


LEICA SL
Instructions

2
3
3a
1
3b
3c
|
4 |
5 |
6 |
7 |
8 |
|
|
|
|
|
|
|
9 |
16 |
|
|
|
|
|
10 |
15 |
14 |
|
13 |
|
12 |
11 |

23
22
21
20 |
|
|
|
|
20a |
24 |
25 |
26 |
|
19 |
||||
|
|
|
||
18 |
|
|
|
|
|
|
|
|
17 |
17 |
|
|
|
|
|
33 |
32 31b 31a 31 |
30 |
29 |
28 |
27 |
 Instruction Manual")
39
40 |
41 |
42 |
43 |
34
44
45
46


 35
35
36
37 38

Leica SL
Instructions

EN
FOREWORD
FOREWORD
Dear customer,
Leica would like to thank you for purchasing the Leica SL and congratulate you on your choice. With this unique digital 35mm system camera, you have made an excellent selection.
We wish you a great deal of pleasure and success using your new Leica SL. In order to make best use of all the opportunities o ered by this high performance camera, we recommend that you first read these instructions.
Your Leica Camera AG
SCOPE OF DELIVERY
Before using your Leica SL for the first time, please check that the supplied parts are complete.
a.Carrying strap professional
b.Camera bayonet cap
c.Lithium-ion battery Leica BP-SCL4
d.Charger Leica BC-SCL4, including power cable (EU, US)
e.USB 3.0 micro-B cable
f.Lens/display cleaning cloth
g.Cover for contact array in baseplate
h.Image processing software (free download after registering the
camera)
Leica SL App (for remote control and transfer of recordings with tablet or smartphone, free download in Apple® AppStore®/ Google® Play Store®)
i.Leica Image Shuttle (Software for remote control with computer, free download)
150 |
Subject to changes in design and production. |
|

Meaning of the di erent categories of information in these instructions
Note:
Additional information
Important:
Non-compliance can lead to damage to the camera, accessories, or recordings
Caution:
Non-compliance can lead to personal injury
Caution:
Always store small parts (e.g. the accessory shoe cover) as follows:
•out of reach of children (swallowing may lead to asphyxiation!)
•in a location where they will not get lost, e.g. in the designated positions in the camera packaging
Note:
As digital cameras have many functions that are controlled electronically, improvements and enhancements to the functions can be installed on the camera at a later date.
To do this, Leica releases what are known as firmware updates at irregular intervals. The cameras always have the latest firmware version when shipped, and you can also download it easily from our home page and install it on your camera.
If you register as an owner on the Leica Camera home page, you will receive a newsletter informing you when a new firmware update is available.
Further information on registration and firmware updates for your camera, as well as any amendments and additions to the details provided in these instructions, can be found in the "Owners' Login" area at: https://owners.leica-camera.com
To check whether your camera and lenses are equipped with the latest firmware version (see also p. 176 - 181, 271):
1.In the menu's SETUP section, select Camera Information, and
2.in the submenu, Firmware Version.
EN
FOREWORD
151

EN
Table of Contents
TABLE OF CONTENTS |
|
FOREWORD......................................................................................... |
150 |
SCOPE OF DELIVERY.......................................................................... |
150 |
WARNING MESSAGES ........................................................................ |
158 |
LEGAL NOTICES.................................................................................. |
159 |
DISPOSAL OF ELECTRICAL AND ELECTRONIC EQUIPMENT............ |
159 |
DESIGNATION OF PARTS.................................................................... |
160 |
QUICK GUIDE...................................................................................... |
162 |
DETAILED INSTRUCTIONS |
|
PREPARATIONS |
|
ATTACHING THE CARRYING STRAP ................................................. |
164 |
CHARGING THE BATTERY ................................................................ |
165 |
CHANGING THE BATTERY................................................................ |
170 |
CHANGING THE MEMORY CARD(S)................................................. |
171 |
ATTACHING / DETACHING A LENS.......................................... |
172/173 |
ADJUSTING THE VIEWFINDER EYEPIECE.......................................... |
173 |
SWITCHING THE CAMERA ON/OFF ............................................... |
174 |
TOP DIAL.......................................................................................... |
174 |
CLICK WHEEL .................................................................................. |
175 |
MENU CONTROL.............................................................................. |
176 |
DIRECT ACCESS TO MENU ITEMS ................................................... |
182 |
THE FAVORITES MENU.................................................................... |
184 |
BASIC CAMERA SETTINGS |
|
MENU LANGUAGE .......................................................................... |
186 |
DATE AND TIME .............................................................................. |
186 |
ENERGY-SAVING SETTINGS............................................................. |
188 |
MONITOR/VIEWFINDER SETTINGS.................................................. |
188 |
ACOUSTIC SIGNALS........................................................................ |
189 |
BUTTON FUNCTION DISPLAYS ........................................................ |
189 |
DISPLAY OPTIONS .......................................................................... |
190 |
Histogram and clipping/zebra ...................................................... |
190 |
Grid ............................................................................................. |
190 |
Horizon ........................................................................................ |
190 |
Focus peaking and manual focus aid ............................................ |
190 |
KEYLOCK ........................................................................................ |
190 |
MEMORY CARD MANAGEMENT ...................................................... |
193 |
BASIC PHOTO SETTINGS |
|
SWITCHING THE SENSOR FORMAT ................................................. |
194 |
ASPECT RATIO ................................................................................ |
194 |
FILE FORMAT .................................................................................. |
195 |
JPEG SETTINGS ............................................................................... |
195 |
JPEG resolution ............................................................................ |
195 |
Contrast, saturation, sharpness.................................................... |
196 |
Working color space..................................................................... |
197 |
WHITE BALANCE............................................................................. |
198 |
ISO SENSITIVITY ............................................................................. |
202 |
IMAGE STABILIZATION..................................................................... |
203 |
152

PHOTO RECORDING MODE |
|
THE SHUTTER RELEASE BUTTON..................................................... |
204 |
Locking the shutter release and video recording buttons............... |
205 |
Serial exposures........................................................................... |
206 |
FOCUSING...................................................................................... |
208 |
Focusing modes........................................................................... |
208 |
Automatic focusing / Autofocus modes..................................... |
208 |
Focusing range limitation........................................................ |
209 |
AF assist lamp........................................................................ |
210 |
Autofocus metering and operating modes ............................... |
210 |
Single field metering [1 Point].............................................. |
211 |
Multi-field metering [Field] ................................................... |
211 |
9 field metering [Zone] ........................................................ |
211 |
Static .................................................................................. |
212 |
Dynamic (Tracking).............................................................. |
212 |
Auto (Face detection) .......................................................... |
213 |
Touch-controlled autofocus.................................................. |
213 |
Manual focusing - MF ................................................................ |
214 |
Manual focusing assistants..................................................... |
214 |
EXPOSURE METERING AND CONTROL ............................................ |
216 |
Exposure metering methods ......................................................... |
216 |
Multi-field metering ................................................................... |
216 |
Center-weighted metering ......................................................... |
216 |
Spot metering ........................................................................... |
216 |
EXPOSURE CONTROL .................................................................. |
217 |
Selecting modes P, A, T, M ........................................................ |
217 |
Wheel operation during recording mode .................................... |
218 |
EXPOSURE SIMULATION/DEPTH OF FIELD CONTROL..................... |
219 |
AUTOMATIC PROGRAM MODE - P ................................................... |
220 |
Program shift ............................................................................... |
220 |
APERTURE PRIORITY MODE - A ....................................................... |
221 |
SHUTTER SPEED PRIORITY MODE - T .............................................. |
221 |
METERING MEMORY LOCK ............................................................. |
222 |
EXPOSURE COMPENSATION ........................................................... |
224 |
MANUAL SETTING - M..................................................................... |
225 |
AUTOMATIC EXPOSURE BRACKETING ............................................. |
226 |
FLASH PHOTOGRAPHY ................................................................... |
227 |
EN
Contents of Table
153

EN
Table of Contents
VIDEO RECORDING |
|
FILE FORMAT .................................................................................. |
230 |
RESOLUTION .................................................................................. |
230 |
ISO SENSITIVITY ............................................................................. |
230 |
DISTANCE SETTING......................................................................... |
230 |
EXPOSURE METERING METHODS ................................................... |
230 |
EXPOSURE MODES......................................................................... |
231 |
COLOR SPACE ................................................................................ |
231 |
CONTRAST, SATURATION, SHARPNESS........................................... |
231 |
STABILIZATION................................................................................ |
231 |
GAMMA L-LOG................................................................................ |
231 |
TIME CODE ..................................................................................... |
232 |
VIDEO ASPECT RATIO ..................................................................... |
233 |
VIDEO SAFETY AREA....................................................................... |
233 |
AUTO ISO VIDEO............................................................................. |
233 |
VIDEO PREVIEW MODE ................................................................... |
234 |
SOUND RECORDING....................................................................... |
234 |
STARTING / ENDING THE RECORDING ........................................... |
236 |
Recording on an external device................................................... |
236 |
Mode Lock...................................................................................... |
237 |
TAKING PICTURES WHILE RECORDING VIDEO................................. |
237 |
ADDITIONAL PHOTO RECORDING FUNCTIONS |
|
INTERVAL PICTURE SERIES ............................................................. |
238 |
TAKING PHOTOGRAPHS WITH THE SELF-TIMER............................... |
240 |
LENS PROFILES .............................................................................. |
241 |
REVIEW MODE |
|
AUTOMATIC REVIEW OF THE LAST RCORDING................................ |
242 |
REVIEW FOR UNLIMITED TIME ........................................................ |
242 |
SELECTING/SCROLLING THROUGH RECORDINGS ......................... |
243 |
ENLARGING PHOTOS ...................................................................... |
244 |
MOVING AN ENLARGED SECTION................................................... |
245 |
SIMULTANEOUS DISPLAY OF 12/30 RECORDINGS......................... |
245 |
MARKING RECORDINGS ................................................................. |
247 |
DELETING RECORDINGS................................................................. |
248 |
VIDEO REVIEW ................................................................................ |
251 |
REVIEW WITH HDMI DEVICES.......................................................... |
254 |
ADDITIONAL FUNCTIONS |
|
USER PROFILES .............................................................................. |
256 |
RESETTING ALL MENU SETTINGS.................................................... |
258 |
COPYRIGHT PROTECTION ............................................................... |
259 |
GPS AND GEOTAGGING .................................................................. |
260 |
FORMATTING MEMORY CARDS....................................................... |
262 |
RESETTING RECORDING NUMBERS ................................................ |
263 |
154
MISCELLANEOUS |
|
APPENDIX |
|
TRANSFERRING DATA TO A COMPUTER ........................................ |
264 |
DISPLAYS ......................................................................................... |
284 |
WIRELESS DATA TRANSMISSION AND |
|
GESTURE CONTROL ........................................................................ |
291 |
REMOTE CONTROL OF THE CAMERA ............................................. |
266 |
MENULIST |
292 |
|
|
||
USING RAW DATA (DNG) ................................................................. |
270 |
TECHNICAL DATA |
294 |
|
|
||
INSTALLING THE IMAGE PROCESSING SOFTWARE....................... |
270 |
LEICA SERVICE ADDRESSES |
296 |
|
|
||
INSTALLING FIRMWARE UPDATES ................................................. |
271 |
|
|
ACCESSORIES..................................................................................... |
272 |
|
|
REPLACEMENTS ................................................................................. |
273 |
|
|
SAFETY AND CARE INSTRUCTIONS .................................................. |
274 |
|
|
INDEX.................................................................................................. |
282 |
|
|
EN
Contents of Table
155
EN To find specific approvals for this product (see also p. 271):
1.In the menu's SETUP section, select Camera Information, and
2.in the submenu, Regulatory Information
The production date of your camera can be found on the stickers in the Warranty Card and/or on the packaging. The date convention is: year/month/day.
FOR U.S. ONLY
Contains FCC ID: VPYLBXN604
This device's transmitter must not be co-located or operated in conjunction with any other antenna or transmitter. This device complies with FCC radiation exposure limits set forth for an uncontrolled environment and meets the FCC radio frequency (RF) Exposure Guidelines. This equipment has very low levels of RF energy that are deemed to comply without testing of specific absorption ratio (SAR).
FCC Note:
This device has been tested and found to comply with the limits for a Class B digital device, pursuant to Part 15 of the FCC Rules. These limits are designed to provide reasonable protection against harmful interference in a residential installation. This device generates, uses, and can radiate radio frequency energy and, if not installed and used in accordance with the instructions, may cause harmful interference to radio communications. However, there is no guarantee that interference will not occur in a particular installation.
If this device does cause harmful interference to radio or television reception, which can be determined by turning the equipment o and on, the user is encouraged to try to correct the interference by one or more of the following measures:
•Reorient or relocate the receiving antenna.
•Increase the distance between the equipment and receiver.
•Connect the equipment into an outlet on a circuit di erent from that to which the receiver is connected.
•Consult the dealer or an experienced radio/TV technician for help.
156

FCC Caution:
To assure continued compliance, follow the attached installation instructions and use only shielded interface cables with ferrite core when connecting to computer or peripheral devices.
Any changes or modifications not expressly approved by the party responsible for compliance could void the user’s authority to operate this equipment.
Trade Name: |
LEICA |
Model No.: |
LEICA SL (Typ 601) |
Responsible party/ |
Leica Camera Inc. |
support contact: |
1 Pearl Count, Unit A |
|
Allendale, New Jersey 07401 |
|
Tel.: +1 201 995 0051 |
|
Fax: +1 201 995 1684 |
|
technicalinfo@leicacamerausa.com |
This device complies with Part 15 of the FCC Rules. Operation is subject to the following two conditions:
(1)This device may not cause harmful interference.
(2)This device must accept any interference received, including interference that may cause undesired operation.
Leica SL (Typ 601)
Tested To Comply
With FCC Standards
FOR HOME OR OFFICE USE
FOR CANADA ONLY: |
EN |
CAN ICES-3 (B)/NMB-3(B)
This device complies with RSS-210 of the IC Rules.
Operation is subject to the following two conditions:
(1)This device may not cause harmful interference,
(2)This device must accept any interference received, including interference that may cause undesired operation of the device.
This equipment complies with IC radiation exposure limits set forth for an uncontrolled environment and meets RSS-102 of the IC radio frequency (RF) Exposure rules. This equipment complies with IC radiation exposure limits set forth for an uncontrolled environment and meets RSS-102 of the IC radio frequency (RF) Exposure rules.
157

EN
Warning messages
CE NOTE
The CE identification of our products documents compliance to the fundamental requirements of the valid EU guidelines.
WARNING NOTES
•Modern electronic components react sensitively to electrostatic discharge. As people can easily pick up charges of tens of thousands of volts, by walking on synthetic carpets for example, a discharge can occur when you touch your camera, particularly if it is placed on a conductive surface. If only the camera housing is a ected, this discharge is harmless to the electronics. However, despite built-in safety circuits, the outer contacts, such as those on the base of the camera, should not be touched if at all possible for safety reasons.
•For any cleaning of the contacts, do not use an optical micro-fiber cloth (synthetic); use a cotton or linen cloth instead. Before touching the contacts, you can make sure you discharge any electrostatic charge by deliberately touching a heating or water pipe (conductive, earthed material).
You can also avoid soiling and oxidization of the contacts by storing your camera in a dry place with the lens or bayonet caps attached.
•You should only use the recommended accessories to prevent faults, short circuits or electric shock.
•Do not attempt to remove parts of the body (covers); specialist repairs can only be carried out at authorized service centers.
158

LEGAL NOTICES
•Please ensure that you observe copyright laws. The recording and publication of pre-recorded media such as tapes, CDs, or other published or broadcast material may contravene copyright laws. This also applies to all of the software supplied.
•This product incorporates open source software which is distributed in the hope that it will be useful, but without any warranty whatsoever, i.e. without even the implied warranty of merchantibility or the software’s applicability for a particular purpose. Please refer to the detailed terms and conditions thereof displayed by selecting [MENU/SET] > [Setup] > [Version Disp.] > [Software info].
•This product is licensed under the AVC patent portfolio license for the personal and noncommercial use of a consumer to (i) encode video in compliance with the AVC Standard (“AVC Video”) and/or (ii) decode AVC Video that was encoded by a consumer engaged in a personal and non-commercial activity and/or was obtained from a video provider licensed to provide AVC Video. No license is granted or shall be implied for any other use. Additional information may be obtained from MPEG LA, LLC. See http://www.mpegla.com.
•SD, SDHC, and SDXC are trademarks of SD-3C, LLC.
•USB is a trademark of the USB Implementers Forum, Inc..
•HDMI (High-Definition Multimedia Interface) is a trademark or a registered trademark of HDMI Licensing LLC in the United States and other countries.
•Adobe is a trademark or a registered trademark of Adobe Systems Incorporated in the United States and/or other countries.
•Mac, iPad, iPhone and are trademarks of Apple Inc., registered in the U.S. and other countries.
•App Store is a service mark of Apple Inc.
•Windows is either a registered trademark or a trademark of Microsoft Corporation in the United States and/or other countries.
•Android and Google Play are trademarks or registered trademarks of Google Inc.
•QR Code is a registered trademark of DENSO WAVE INCORPORATED.
•Other names of systems and products mentioned in these instructions are usually the registered trademarks or trademarks of the manufacturers who developed the system or product concerned.
DISPOSAL OF ELECTRICAL AND ELECTRONIC EQUIPMENT
(Applies within the EC, and for other European countries with segregated waste collection systems)
This device contains electrical and/or electronic components and therefore should not be disposed of in general household waste! Instead it should be disposed of at a recycling collection point provided by the local authority. This costs you nothing.
If the device itself contains replaceable (rechargeable) batteries, these must be removed first and, if necessary, also be disposed of in line with the relevant regulations. Your local authority or waste disposal authority, or the store where you bought this device, can provide you with further information on this issue.
EN
equipment electronic and electrical of Disposal
159

EN
Designation of Parts
|
DESIGNATION OF PARTS |
Top view |
|||||||||
|
Front view |
17 |
|
Carrying strap clip |
|||||||
|
|
|
|
Microphones |
|||||||
|
18 |
||||||||||
|
1 |
|
|
Stop down/FN button |
|
|
|
Fixed ring |
|||
|
|
|
19 |
||||||||
|
2 |
|
|
Self timer LED / Sensor for white balance |
|
|
|
Zoom ring with |
|||
|
|
|
20 |
||||||||
|
3 |
|
|
Bayonet for lens mounting with |
|
|
|
|
|
Index mark |
|
|
|
|
|
|
|
a |
|||||
|
|
|
|
a |
Contact strip |
21 |
|
|
Distance setting ring |
||
|
|
|
|
b |
Locking pin/Index point |
|
|
|
Bayonet for lens hood |
||
|
|
|
|
22 |
|
||||||
|
|
|
|
c |
Unlocking button |
|
|
|
Filter thread |
||
|
|
|
|
23 |
|
||||||
|
|
|
|
|
|||||||
|
|
|
|
|
|
|
|
Red alignment button for changing lens |
|||
Rear view |
24 |
|
|||||||||
|
|
|
Shutter release button |
||||||||
25 |
|
||||||||||
|
4 |
|
|
Main switch |
|
|
|
Top dial |
|||
|
|
|
26 |
|
|||||||
|
5 |
|
|
Viewfinder |
|
|
|
Video release button |
|||
|
|
|
27 |
|
|||||||
|
6 |
|
|
Function button |
|
|
|
LV button |
|||
|
|
|
28 |
|
|||||||
|
7 |
|
|
Joystick |
|
|
|
Top panel display |
|||
|
|
|
29 |
|
|||||||
|
8 |
|
|
LED for indicating picture mode / recording data on to the |
|
|
|
Accessory shoe |
|||
|
|
|
30 |
|
|||||||
|
|
|
|
card / Brightness sensor |
|
|
|
Eyecup with |
|||
|
|
|
|
31 |
|
||||||
|
9 |
|
|
Click wheel |
|
|
|
|
|
Index mark |
|
|
|
|
|
|
|
a |
|||||
|
10 |
|
Door over memory card slots |
|
|
|
|
Diopter setting scale |
|||
|
|
|
|
|
b |
||||||
|
11 |
|
Menu control/function button (TR) |
|
|
|
Loudspeaker |
||||
|
|
32 |
|
||||||||
|
12 |
|
Menu control/function button (BR) |
|
|
|
GPS Antenna |
||||
|
|
33 |
|
||||||||
|
13 |
|
Monitor |
|
|
|
|
|
|
||
|
|
|
Menu control/function button (BL) |
|
|
|
|
|
|
||
14 |
|
|
|
|
|
|
|
||||
|
|
|
Menu control/function button (TL) |
|
|
|
|
|
|
||
15 |
|
|
|
|
|
|
|
||||
|
|
|
Cover over sockets |
|
|
|
|
|
|
||
16 |
|
|
|
|
|
|
|
||||
160

View from right (illustration without door) 34 Memory card slots
View from left (illustration without cover)
35Threaded flash sync socket
36Remote control / Headphone / external microphone socket
37HDMI socket
38USB socket
Bottom views
39Battery
40Battery release lever
41Cover over handgrip contacts
42Hole for multi-function hand gripguide pin
43Tripod plate with 1⁄4" thread
44Hole for rotation prevention pin
45Contacts in battery compartment (battery removed)
46Contacts for handgrip (cover removed)
EN
Parts of Designation
161

EN
QUICK GUIDE
QUICK GUIDE
Required parts:
–Camera
–Lens (not supplied)
–Battery
–Charger with appropriate AC-cable
–Memory card (not supplied)
Note:
The settings recommended here allow you to take good photographs easily, quickly and reliably when you first start to try out the Leica SL. For details of the various modes/functions, refer to the corresponding sections on the specified pages.
Preparations:
1.Attach a lens (see p. 172).
2.Charge a battery (see p. 168).
3.Set the main switch to OFF (see p. 174).
4.Insert the charged battery in the camera (see p. 170).
5.Insert a memory card (see p. 171).
6.Set the main switch to ON (see p. 174).
7.Set the menu language (see p. 186).
8.Set the date and time (see p. 186).
162

Taking photographs
1.Press the shutter button to the first pressure point to activate distance setting and exposure metering and to save the values.
2.Push the shutter button all the way down to take the photo.
Viewing photographs:
Press the upper right button next to the monitor.
Depending on the camera's previous status, you may have to press more than once to call up the button function icon ( ) first.
To view di erent pictures:
Turn the click wheel or press the joystick right or left, or use gesture control (see. p. 243/291).
Enlarging pictures:
Turn the top dial right or left, or use gesture control (see. p. 244/291).
Deleting pictures:
Press the lower left button next to the monitor.
EN
GUIDE QUICK
163
EN
Camera operation
164
DETAILED INSTRUCTIONS
PREPARATIONS
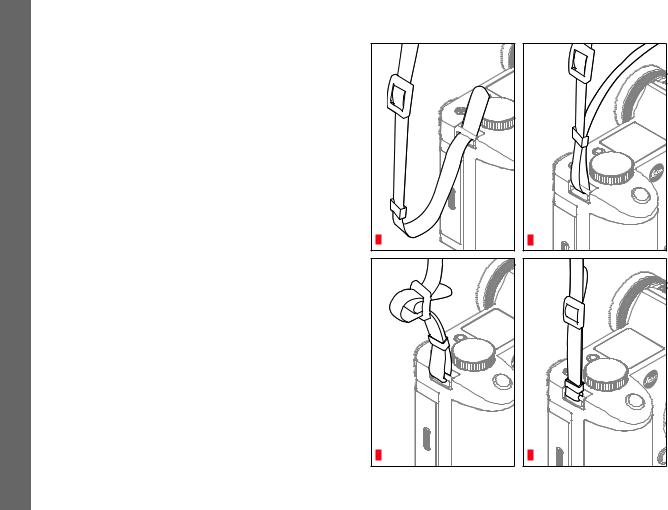
ATTACHING THE CARRYING STRAP
1 |
3 |
2 |
4 |
CHARGING THE BATTERY
The Leica SL is powered by a Lithium ion battery.
Caution:
•Only the battery type specified and described in these instructions, and/or battery types specified and described by Leica Camera AG, may be used in this camera.
•This battery may only be used in the units for which it is designed and may only be charged exactly as described below.
•Using this battery contrary to the instructions and using non-specified battery types may result in an explosion under certain circumstances
•The battery may not be exposed to sunlight, heat, humidity or moisture for long periods. Likewise, it may not be placed in a microwave oven or a high pressure container to prevent a risk of fire or explosion.
•Moist or wet batteries may not be charged or used in the camera under any circumstances.
•Always ensure that the battery contacts are clean and freely accessible. While lithium ion batteries are protected against short circuits, they should still be protected against contact with metal objects such as paper clips or jewelry. A short-circuited battery can get very hot and cause severe burns.
•If a battery is dropped, check the casing and the contacts immediately for any damage. Using a damaged battery can damage the camera.
•In case of smell, discoloration, deformation, overheating or leaking fluid, the battery must be removed from the camera or charger immediately and replaced. Continued use of such a battery carries a risk of overheating, resulting in fire and/or explosion.
•In case of leaking fluid or a smell of burning, keep the battery away from sources of heat. Leaked fluid can catch fire.
•A safety valve in the battery ensures that any excess pressure resulting from improper use is reduced in a controlled way.
•Only the charger specified and described in these instructions, or other chargers specified and described by Leica Camera AG, may be used. The use of other chargers not approved by Leica Camera AG can cause damage to the batteries and, in extreme cases, lead to serious or life-threatening injuries.
•The charger supplied should be used exclusively for charging this battery type. Do not attempt to use it for other purposes.
•Ensure that the mains outlet used is freely accessible.
•The battery and charger may not be opened. Repairs may only be carried out by authorized service stations.
•Ensure that the batteries cannot be accessed by children.
EN
operation Camera
165

EN
Camera operation
First aid:
•If battery fluid comes into contact with the eyes, there is a risk of blinding. Rinse the eyes immediately with clean water. Do not rub the eyes. Seek medical attention immediately.
•If leaked fluid gets onto the skin or clothing, there is a risk of injury. Rinse the a ected areas with clean water. Seek medical attention.
Notes:
•The battery must have a temperature of 0°-35°C /32°-95°F to be charged (otherwise the charger will not turn on, or will turn o again).
•Lithium ion batteries can be charged at any time, regardless of their current charge level. If a battery is only partly discharged when charging starts, it is charged to full capacity faster.
•The batteries and the charger heat up during the charging process. This is normal and not a malfunction.
•If the two LEDs flash rapidly (> 2Hz) after starting charging, this indicates a charging error (e.g. maximum charging time exceeded, voltages or temperatures outside the permitted ranges, or short circuit). In this case, disconnect the charger from the mains and remove the battery. Ensure that the above temperature conditions are met and then restart the charging process. If the problem persists, please contact your dealer, the Leica o ce in your country or Leica Camera AG.
166

•Lithium ion batteries should only be stored in a partially charged condition, i.e. not completely discharged or fully charged (see p. 169). If stored for very long periods, it should be charged up and discharged again around once a year.
•Rechargeable lithium ion batteries generate power through internal chemical reactions. These reactions are also influenced by the external temperature and humidity. To ensure a maximum service life of the battery, it should not be exposed to constant extremes (high or low) of temperature (e. g. in a parked car in the summer or winter).
•Even when used under optimum conditions, every battery has a limited service life! After several hundred charging cycles, this becomes noticeable as the operating times get significantly shorter.
•Hand in damaged batteries at a collection point for proper recycling, in line with the applicable regulations (see p. 159).
•The replaceable battery provides power to a back-up battery inside the camera. This back-up battery retains the set date and time for up to 3 months. If this back-up battery becomes discharged it must be recharged by inserting a charged main battery. Once the replaceable battery has been inserted, the full capacity of the back-up battery is recovered after about 60 hours. This process does not require the camera to be turned on. However, you will have to set the date and time again in this situation.
•Remove the battery if you will not be using the camera for a long period of time. When doing so, turn the camera o using the main switch first (see p. 174). Otherwise, after several weeks the battery could become totally discharged, i.e. the voltage is sharply reduced as the camera still consumes a small amount of current (for saving your settings) even when it is turned o .
EN
operation Camera
167
EN |
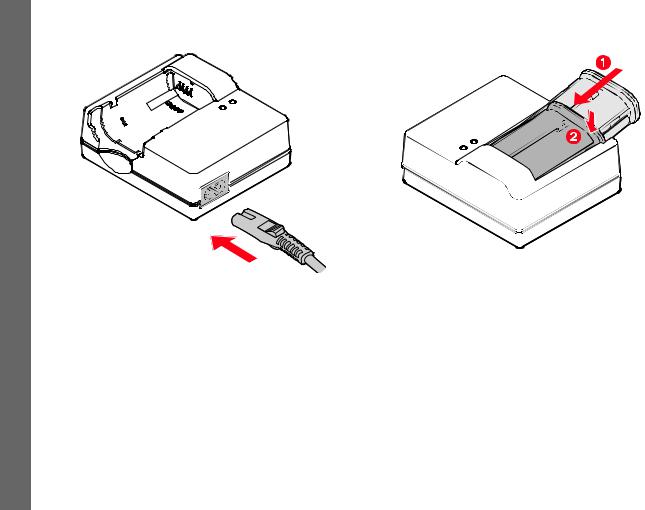
PREPARING THE CHARGER |
INSERTING THE BATTERY IN THE CHARGER |
Camera operation |
|
|
168

CHARGE STATUS DISPLAYS |
EN |
The charging process is indicated by LEDs.
|
Camera |
80%CHARGE |
operation |
CHARGE LED (green): Flashing indicates charging in progress. 80% LED (orange): Lighting up indicates this charge level achieved. Both LEDs light up: Charging has been completed.
Notes:
•The charger automatically switches to the prevailing mains voltage.
•Disconnect the charger from the electrical socket and remove the battery after charging is completed.
169
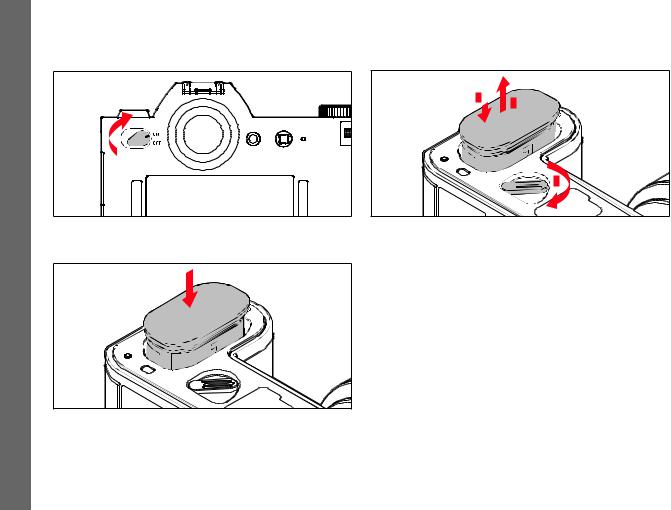
EN CHANGING THE BATTERY
Camera operation |
Turn o the camera. |
|
Insert the battery.
"click" |
Remove the battery.
2 |
3 |
|
|
|
1 |
Note:
When the lever is turned, a spring in the battery compartment pushes the battery out so it can be grasped. The locking mechanism has a catch to prevent the battery from accidentally falling further out, even if the camera is held upright.
170
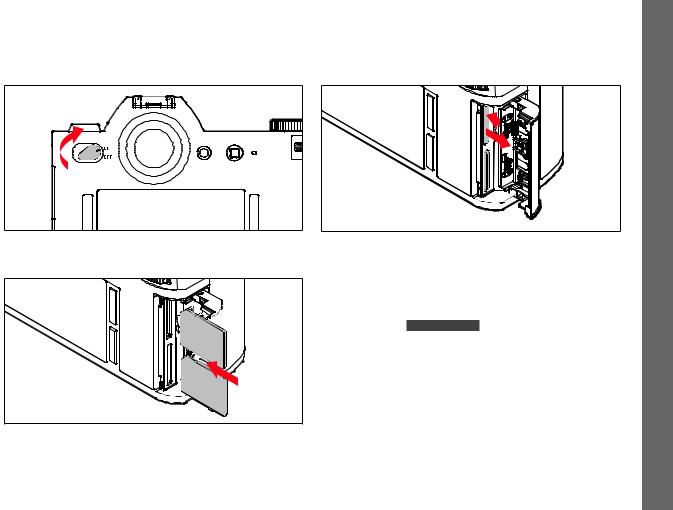
CHANGING THE MEMORY CARD(S)
SD, SDHC or SDXC memory cards can be used in the Leica SL. Turn o the camera.
|
EN |
Remove a memory card. |
Camera |
|
|
1 |
operation |
2 |
Insert a memory card.
"click" |
Notes:
The card slots are numbered: Top = 1, Bottom = 2. Slot 1 operates according to UHS II standards, slot 2 only according to UHS I. This must be taken into account, e.g. when recording 4k video (see p.
230) and using the Storage Backup function (see p. 193).
Important:
Do not open the card door and do not remove a memory card or the battery while the LED is lit to indicate that the camera is accessing the memory. Otherwise, the data on the card/s can be destroyed and the camera may malfunction.
171
EN
Camera operation
•SD, SDHC and SDXC cards have a write protection switch, that can be used to prevent unintentional storage and deletion of pictures. This switch takes the form of a slider on the nonbeveled side of the card; in the lower position, marked LOCK, the data is protected.
•If a memory card cannot be inserted, check that it is aligned correctly.
•If a memory card is inserted, pictures are only saved on the card.
•The range of SD/SDHC/SDXC cards is too large for Leica Camera AG to be able to completely test all available types for compatibility and quality. Although no damage to the camera or the card is generally expected, because some "no name" cards may not fully comply with the SD/SDHC/SDXC standards Leica Camera AG cannot provide any guarantee of function.
•As electromagnetic fields, electrostatic charge, and defects of the camera or the card can lead to damage or loss of the data on the memory card/s, we recommend that you also transfer the data to a computer and save it there.
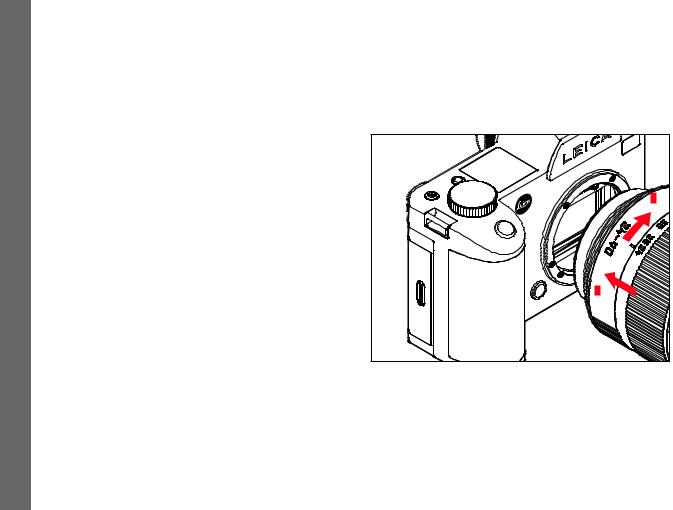
ATTACHING / DETACHING A LENS
Usable lenses
Next to Leica SL lenses, you can also use Leica M and Leica R lenses with the help of adapters (see p. 272).
Attaching |
2 |
1 |
172
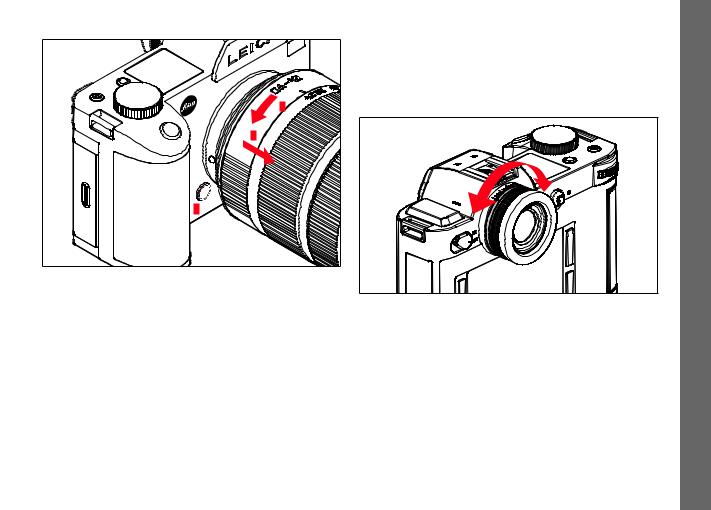
Detaching |
1 |
Notes:
•To protect against dust getting into the interior of the camera, it is important always to have a lens or a cap attached to the camera body.
For the same reason, when changing lenses, work quickly and in an environment that is as dust-free as possible.
•Camera or lens rear caps should not be stored in your pants pockets as they attract dust that can get into the camera when they are attached.
ADJUSTING THE VIEWFINDER EYEPIECE |
EN |
The viewfinder can by adjusted from -3 to +1 diopters, so that it is |
|
exactly set to match your eye. While looking at the viewfinder |
operation Camera |
image, turn the Diopter setting scale until both the image and all |
|
the displays are sharp. |
|
|
173
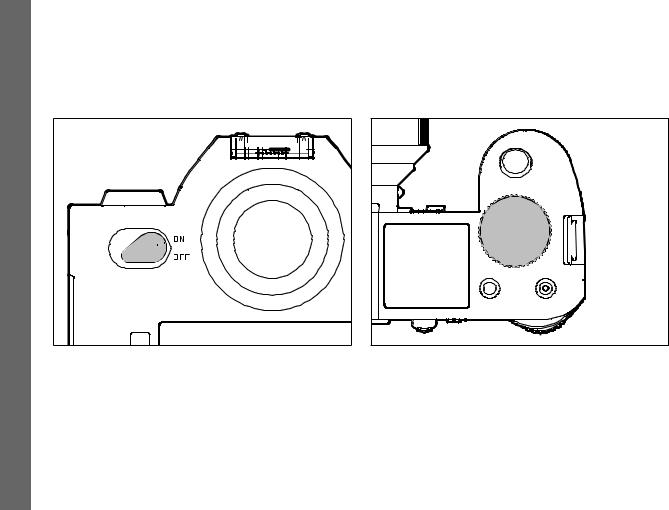
EN |
SWITCHING THE CAMERA ON/OFF |
Camera operation |
The Leica SL is turned on and o using the main switch. |
– OFF = Turned o |
|
– ON = Turned on |
|
|
TOP DIAL
In recording mode, the top dial is used mainly to adjust the exposure by changing the shutter speed (see p. 218).
In review mode, it is used for di erent functions (see p. 244/245).
174
 Loading...