


B40W
B 40 C Bp
B 40 W Bp
Register and win!
www.kaercher.com
59641620 08/13

2
Please read and comply with
these original instructions prior
to the initial operation of your appliance and
store them for later use or subsequent owners.
Contents
Safety instructions . . . . . . . EN . . 1
Function . . . . . . . . . . . . . . . EN . . 1
Proper use . . . . . . . . . . . . . EN . . 1
Environmental protection . . EN . . 1
Warranty . . . . . . . . . . . . . . . EN . . 1
Operating and Functional Ele-
ments . . . . . . . . . . . . . . . . . EN . . 2
Before Startup. . . . . . . . . . . EN . . 3
Operation . . . . . . . . . . . . . . EN . . 4
Shutting Down the Appliance EN . . 5
Grey Intelligent Key . . . . . . EN . . 5
Transport. . . . . . . . . . . . . . . EN . . 6
Storage . . . . . . . . . . . . . . . . EN . . 6
Maintenance and care . . . . EN . . 6
Frost protection. . . . . . . . . . EN . . 8
Faults . . . . . . . . . . . . . . . . . EN . . 9
Accessory B 40. . . . . . . . . . EN . 10
Technical specifications . . . EN . 11
EC Declaration of Conformity EN . 11
Spare parts . . . . . . . . . . . . . EN . 11
Safety instructions
Before using the appliance for the first time,
read and observe these operating instructions and the accompanying brochure:
Safety information for brush cleaning units
and spray-extraction units, No. 5.956-251.
The appliance may only be operated
when the hood and all lids are closed.
Remove the Intelligent Key (emergency
stop) to take all functions out of operation immediately.
The appliance must only be operated on
surfaces that do not exceed the max. permitted incline (see "Technical Specifications").
몇 Warning
Do not use the appliance on inclines.
Safety Devices
Safety devices serve to protect the user
and must not be rendered in operational or
their functions bypassed.
Safety switch (B 40 C Bp)
If the safety switch is released, the brush
drive shuts off.
Drive lever (B 40 W Bp)
If the drive lever is released, the travel drive
and the brush drive shuts off.
Symbols in the operating
instructions
Danger
Immediate danger that can cause severe
injury or even death.
몇 Warning
Possible hazardous situation that could
lead to severe injury or even death.
Caution
Possible hazardous situation that could
lead to mild injury to persons or damage to
property.
Function
The scrubber vacuum is used for wet
cleaning or polishing of level floors.
– You can adjust the machine to suit the
cleaning task by modifying the settings
for water quantity, contact pressure of
the brushes, detergent quantity and
driving speed.
– The appliance is equipped with a fresh
water and a wastewater reservoir (40 litres each). These allow an effective
cleaning with a long usage life.
– Depending on the selected cleaning
head, the working width of the B 40 is
between 430 mm and 550 mm.
– B 40 C Bp
This appliance model is not equipped
with a travel drive. The advance drive is
operated by and is supported by the rotation of the brushes. The brush drive is
powered by two batteries.
– B 40 W Bp
This appliance model is equipped with a
travel drive. The travel speed can be
adjusted with a rotary knob.
– A charger is already integrated in all
models. Batteries can be selected according to the configuration (see Chapter "Recommended batteries“)
Note
The appliance can be equipped with various accessories depending on the cleaning
task.
Please request our catalogue or visit us on
the Internet at:
www.kaercher.com
Proper use
Use this appliance only as directed in these
operating instructions.
– The appliance may only be used for the
cleaning of hard surfaces that are not
sensitive to moisture and polishing operations.
– The appliance is not suited for the
cleaning of frozen grounds (e.g. in cold
stores).
– The appliance may only be equipped
with original accessories and spare
parts.
– The appliance is not suited for the use
in potentially explosive environments.
– The machine should not be used to
suck in inflammable gases, undiluted
acids or solvents.
This includes petrol, thinning agents or
hot oil that can form an explosive mixture when it comes in contact with
sucked air. Do not use acetone, undiluted acids and solvents as they are aggressive towards the materials from
which the appliance is made.
– The machine has been approved for
use on surfaces with max. gradients as
listed under "Technical Specifications".
Environmental protection
The packaging materials are recyclable. Please do not throw
packaging in the domestic waste
but pass it on for recycling.
Old units contain valuable recyclable materials. Batteries, oil
and similar substances may not
be released into the environment. Therefore please dispose
of old units through suitable collection systems.
Notes about the ingredients (REACH)
You will find current information about the
ingredients at:
www.kaercher.com/REACH
Warranty
The warranty terms published by our competent sales company are applicable in
each country. We will repair potential failures of your accessory within the warranty
period free of charge, provided that such
failure is caused by faulty material or defects in fabrication. In the event of a warranty claim please contact your dealer or the
nearest authorized Customer Service center. Please submit the proof of purchase.
- 1
3EN

Operating and Functional Elements
1 Vacuum bar lowering lever
2 Cover dirt water reservoir
3 Holding rail for home base
4 Fluff filter
5 Wastewater reservoir rinsing system
(option)
6 Flexible lock of rinsing system (option)
7 Lock of wastewater reservoir
8 Float
9 Push handle
10 Coarse dirt sieve
11 Dirt water reservoir
12 Fresh water reservoir filler neck
13 Suction hose for detergent (only DOSE
model)
14 Detergent bottle (only DOSE model)
15 Lock of the fresh water reservoir with filter
16 Detergent bottle holder
17 Fresh water tank
18 Locking the tank
Secured with an additional plate and a
screw
19 Cleaning head (illustration is symbolic) *
Illustration of scrubbing vacuum
20 Brush rollers (BR model) Disk brushes
(BD model) *
21 Waste container (only BR)
22 Battery pole fuse
23 Battery *
24 Fresh water level display
25 Pedal for raising/ lowering the cleaning
head
26 Rotary handle to incline the vacuum bar
27 Wing nuts for fastening the vacuum bar
28 Suction hose
29 Vacuum bar *
30 Connecting cable for charger
31 Automatic fill of fresh water reservoir
(option)
32 Water quantity regulator
33 Drive lever (B 40 W Bp)
Safety switch (B 40 C Bp)
34 Operator console
35 Storage surface for cleaning set "Home
base box“
36 Cable hook
37 Drain hose for wastewater with dosing
unit
* not included in the delivery
Colour coding
– The operating elements for the cleaning
process are yellow.
– The controls for the maintenance and
service are light gray.
4 EN
- 2
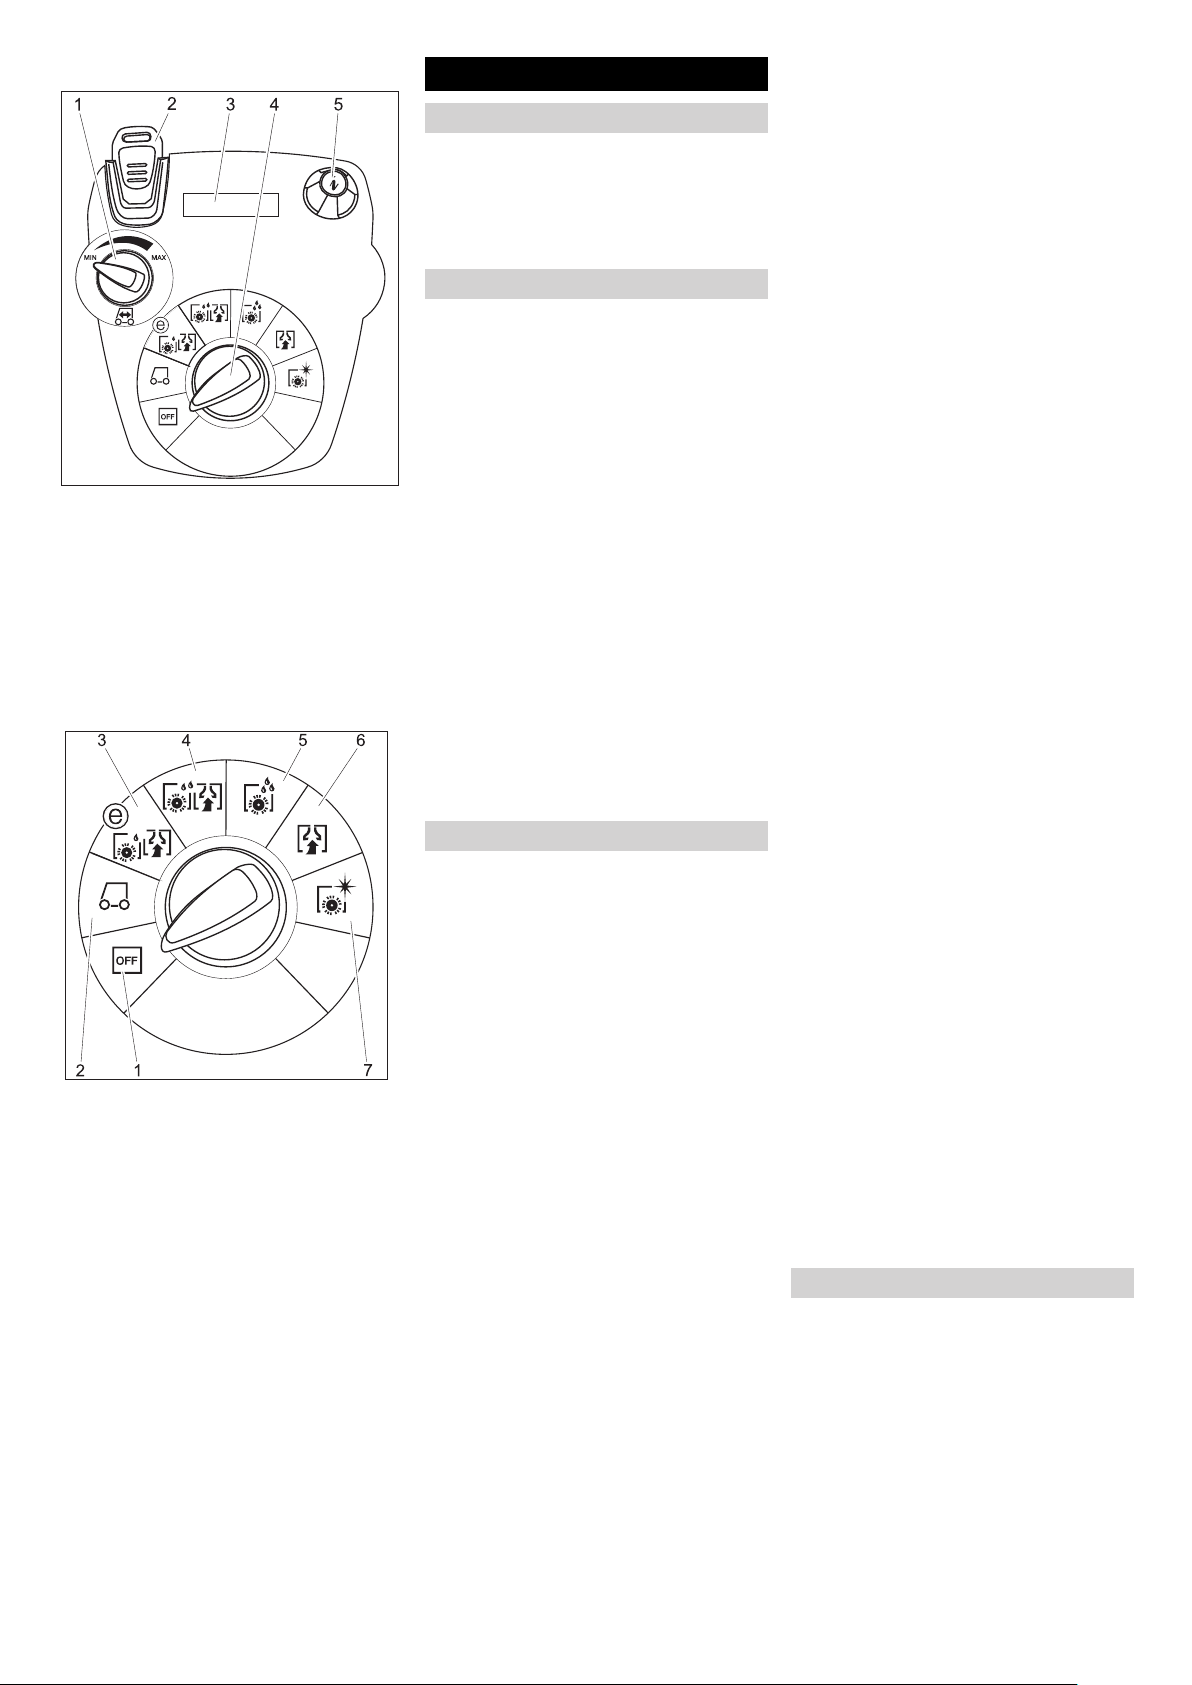
Operator console
1 Rotating button for drive speed
(B 40 W only)
2 Intelligent Key
yellow - operator
grey - supervisor
3 Display
4 Program selection switch
5 Info button
Program selection switch
1 OFF
Device is switched off
2 Transport mode
(B 40 W only)
Driving to the Place of Use.
3 Eco mode
Wet clean the floor (with reduced brush
speed) and vacuum up wastewater
(with reduced suction).
4 Normal mode
Wet clean the floor and vacuum up dirt
water.
5 Intense mode
Wet clean the floor and allow the deter-
gent to react.
6 Vacuum mode
Suck in the dirt fleet.
7 Polishing mode
Polishing the floor without the applica-
tion of liquid.
Before Startup
Installing the Brushes
BD model
The disc brush must be installed before the
initial operation (see "Maintenance work").
BR model
The brushes are mounted.
Install batteries
Install the batteries (see "Care and Maintenance/Install and connect batteries").
Setting the charging marker line
Prior to the initial startup, following a service reset or when switching to another battery type, you must adjust the charging
marker line.
Use the Grey Intelligent Key.
Setting the charging marker line (see
Chapter "Grey Intelligent Key/Setting
the charging marker line“.
Using batteries made by other manufacturers
We recommend using our batteries as described in chapter "Care and Maintenance/
Recommended batteries".
Note
While using other batteries (for e.g. batteries from other manufacturers) the total discharge protection level must be reset by
the Kärcher after sales service according to
the respective battery.
Charging battery
Note
The appliance is equipped with a safety
mechanism to prevent total discharge, i.e.
when the permissible minimum capacity is
reached, the brush motor and the turbine
are switched off.
Drive the machine directly to the charg-
ing station; avoid any steep gradients in
the process.
Danger
Risk of injury on account of electric shock.
The mains voltage must correspond with
the type plate on the appliance.
Use the charger only in dry rooms with sufficient ventilation!
Charging process
Average charging time is approx. 10 -15
hours.
The built-in charger has electronic controls
and is suitable for all recommended batteries; it automatically switches off the charging process.
The built-in battery is shown on the display dur-
ing the charging process. If this is not the case,
the charging marker line must be selected (see
"Setting the charging marker line").
The appliance must not be used during the
charging process.
Initial charge tips
With the initial charge, the control will not
yet be able to detect which battery type has
been installed. Keep charging the batteries
until the display shows a full charge (batter-
ies may still not be completely charged).
The next charging process will have an accurate display and charge power and the
batteries will be fully charged.
Use the appliance until the deep discharge
protection switches off the brush motor and
the turbine after the initial charge of the battery. This procedure is necessary to adjust
the battery indicator. Only then the correct
battery status is displayed.
몇 Danger
Risk of explosion!
Prior to Charging low-maintenance bat-
teries, the tank must be swivelled upwards
(see chapter "Installing and connecting batteries"). This will prevent the generation of
dangerous gases during the charging process under the tank.
While the water tank is folded up, you must
not clean with any water.
When charging maintenance-free batter-
ies, the water tank does not need to be
folded up.
Insert the plug of the connecting cable
into the socket. The charging process
will start.
Note: The selected battery will be displayed during charging.
Charge until the display shows a full
charge.
Low maintenance batteries (wet batteries)
몇 Warning
Danger of causticization!
– Adding water to the battery in its discharged
state can cause the acid to leak.
– Use safety glasses while handling bat-
tery acid and follow the safety instructions to avoid personal injury or damage
to clothes.
– Should the acid spray on to the skin or
clothes, rinse immediately with lots of
water.
Caution
Risk of damage!
– Use only distilled or desalinated water
(EN 50272-T3) for filling the battery.
– Do not add any substances (so-called
performance improving agents), else
warranty claims will not be entertained.
– Replace batteries only with batteries of
the same type. Otherwise, the charging
guideline must be readjusted by customer service.
Installing the Vacuum Bar
Insert the vacuum bar into the vacuum
bar suspension in such a manner that
the profiled sheet is positioned above
the suspension.
Tighten the wing nuts.
- 3
5EN
 Loading...