


 Loading...
KW-M150BT
MONITOR WITH RECEIVER
INSTRUCTION MANUAL
•Updated information (the latest Instruction Manual, etc.) is available from <http://www.jvc.net/cs/car/>.
Model name indication position
See “Removing the trim plate” (P.23)
Trim plate
© 2019 JVC KENWOOD Corporation |
B5A-3199-00 b EN (K) |
Contents |
|
Before use.................................................................................. |
2 |
How to read this manual................................................................................... |
2 |
Precautions................................................................................................................. |
2 |
Getting Started........................................................................ |
3 |
Clock settings............................................................................................................ |
3 |
Basics........................................................................................... |
4 |
Functions of the Buttons on the Front Panel....................................... |
4 |
Common operations............................................................................................ |
4 |
HOME screen descriptions............................................................................... |
5 |
List screen.................................................................................................................... |
5 |
Tuner............................................................................................ |
6 |
Tuner Basic Operation......................................................................................... |
6 |
Presetting stations................................................................................................. |
6 |
Tuner Setup................................................................................................................ |
7 |
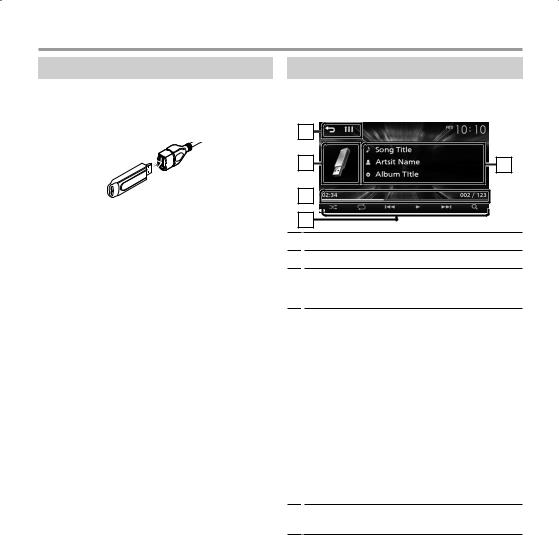
USB............................................................................................... |
8 |
Preparation................................................................................................................. |
8 |
Playback operations............................................................................................. |
8 |
iPod/iPhone............................................................................ |
10 |
Preparation............................................................................................................... |
10 |
Playback operations........................................................................................... |
10 |
Mirroring.................................................................................. |
12 |
Preparation............................................................................................................... |
12 |
Mirroring operations.......................................................................................... |
12 |
External Components......................................................... |
13 |
Using external audio/video players......................................................... |
13 |
Rear view camera................................................................................................. |
13 |
Learning function of steering remote.................................................... |
14 |
Bluetooth................................................................................. |
15 |
Register your smartphone to the unit.................................................... |
15 |
Bluetooth Setup.................................................................................................... |
15 |
Receive a phone call........................................................................................... |
16 |
Make a phone call................................................................................................ |
16 |
Playing Bluetooth Audio Device................................................................ |
17 |
Controlling Audio................................................................. |
18 |
Controlling General Audio............................................................................. |
18 |
Equalizer Control................................................................................................... |
18 |
Speaker / X’Over setup..................................................................................... |
19 |
Listening Position / DTA................................................................................... |
19 |
Sound Effect............................................................................................................ |
19 |
Remote control...................................................................... |
20 |
Functions of the Remote control Buttons........................................... |
20 |
Installation.............................................................................. |
21 |
Before Installation................................................................................................ |
21 |
Installing the unit................................................................................................ |
22 |
About this Unit...................................................................... |
26 |
More information................................................................................................. |
26 |
Troubleshooting.................................................................................................... |
26 |
Copyrights................................................................................................................. |
27 |
Specifications.......................................................................................................... |
28 |
Before use
Precautions
#WARNING
ÑÑTo prevent injury or fire, take the following precautions:
•To prevent a short circuit, never put or leave any metallic objects (such as coins or metal tools) inside the unit.
•Do not watch or fix your eyes on the unit’s display when you are driving for any extended period.
•If you experience problems during installation, consult your JVC dealer.
ÑÑPrecautions on using this unit
•When you purchase optional accessories, check with your JVC dealer to make sure that they work with your model and in your area.
•The Radio Data System or Radio Broadcast Data System feature won’t work where the service is not supported by any broadcasting station.
ÑÑProtecting the monitor
•To protect the monitor from damage, do not operate the monitor using a ballpoint pen or similar tool with the sharp tip.
ÑÑCleaning the Unit
If the front panel of this unit is stained, wipe it with a dry soft cloth such as a silicon cloth. If the front panel is stained badly, wipe the stain off with a cloth moistened with neutral cleaner, then wipe it again with a clean soft dry cloth.
!!CAUTION
•Applaying spray cleaner directly to the unit may affect its mechanical parts. Wiping the front panel with a hard cloth or using a volatile liquid such as thinner or alcohol may scratch the surface or erase screened print.
ÑÑHow to reset your unit
If the unit or the connected unit fails to operate properly, reset the unit.
How to read this manual
Reset button
•The panels shown in this guide are examples used to provide clear explanations of the operations. For this reason, they may be different from the actual panels.
•In operation procedures, bracket shape indicates the key or button you should control.
<>: indicates the name of panel buttons.
[ ]: indicates the name of touch keys
2

Getting Started
1Turn the ignition key of your car to ACC.
The unit is turned on.
2 |
Press the < > button. |
3 |
Touch [Setting]. |
4 Touch the corresponding key and set the value.
[System]
[Beep Tone]
Activates or deactivates the key-touch tone. “ON” (Default), “OFF”
[Language]
Select the language used for the control screen and setting items. Default is “English”.
[Time/Date]
Adjust the clock time. (P.3)
[Clock Mode]
Select the time display format.
[12hr] (Default) / [24hr]
[Steering Remote]
Sets the desired function in the steering remote controller. See Learning function of steering remote (P.14).
[Parking Guidelines]
You can display parking guidelines to enable easier parking when you shift the gear to the reverse (R) position. Default is “ON”.
[Guidelines SETUP]
If you select [ON] for [Parking Guidelines], you can
adjust the parking guidelines. See To adjust the parking guidelines (P.14).
[System Reset]
Touch [System Reset] and then touch [YES] to set all the settings to the initial default settings.
[Bluetooth]
Displays the Bluetooth Settings screen. (P.15)
[Screen]
[Dimmer]
Select the dimmer mode. “High” (Default) / “Mid” / “Low”
[Demo]
Select the demonstration mode. Default is “ON”.
[Information]
Displays the software version of this unit.
5 Touch [6].
Clock settings
ÑÑSynchronizing the clock time with FM
RDS
Activate [RDS Clock Sync]. See Tuner Setup (P.7).
ÑÑAdjusting the clock manually
NOTE
•Deactivate [RDS Clock Sync] before adjusting the clock.
1Press the < > button.
2Touch [Setting].
3Touch [System].
4Touch [Time/Date].
Clock screen appears.
5Touch [R] or [S] to set the clock time.
6 Touch [6].
English | 3
Basics
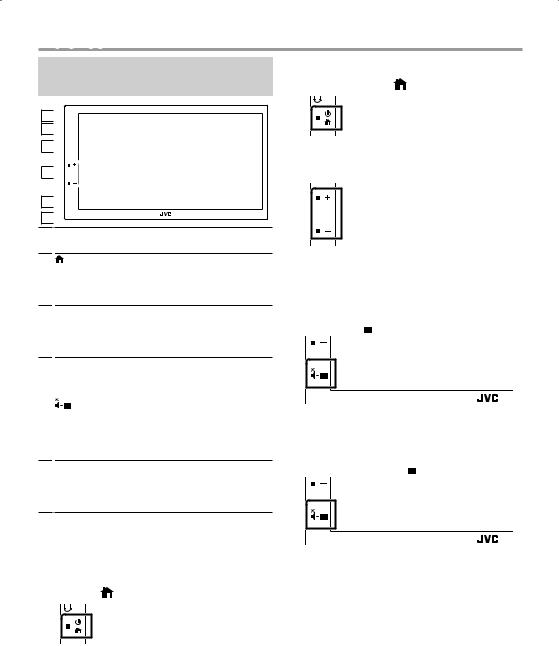
Functions of the Buttons on the Front Panel
1

2

3


4

5


6 

1Remote Sensor
•Receives the remote control signal.
2(HOME)
•Displays the HOME screen. (P.5)
•Pressing for 1 second turns the power off.
•When the power off, turns the power on.
3EQ
•Displays the Audio screen.* (P.18)
*The Audio screen is not displayed during SETUP screen or on the list screen etc,
4+ , – (Volume)
•Adjusts volume. The volume will go up until 20 when you keep pressing [ + ].
5 |
|
(MUTE, Display off) |
•Mutes/restores the sound.
•Pressing for 1 second turns the screen off. When the screen is off, touch the display to turn on the screen.
6Reset
•If the unit or the connected unit fails to operate properly, the unit returns to factory settings when this button is pressed.
ÑÑTurning off the power
1 Press and hold the < > button.
ÑÑAdjusting the volume
1 Press the <+> or <–> button.
NOTE
•The volume will go up until 20 when you keep pressing [ + ].
ÑÑMutes the sound
1 Press the < > button.
To restore the sound, touch the button again, or adjust the volume.
ÑÑTurn off the screen
1 Press and hold the < > button.
Common operations |
To turn on the screen, touch the display. |
|
ÑÑTurning on the power |
||
|
||
1 Press the < > button. |
|
4
Basics
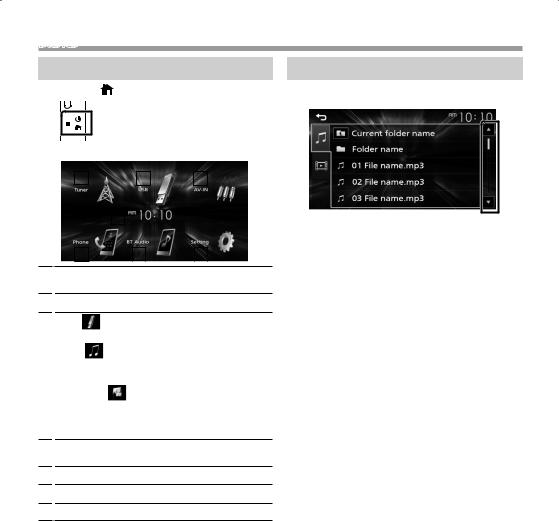
HOME screen descriptions
1 Press the < |
> button. |
|
|
||||||||
HOME screen appears. |
|
|
|||||||||
|
|
|
|
|
|
|
|
|
|
|
|
2 |
|
||||||||||
|
|
3 |
|
||||||||
|
|
|
|
|
|
4 |
|||||
|
|
|
|
|
|
|
|
|
|
|
|
|
|
|
|
1 |
|
|
|
|
|
|
|
|
|
|
|
|
|
|
|
|
|
|
|
|
5 |
|
6 |
|
|
7 |
|||||
1Clock display
Touch to displays the Clock screen.
2Switches to the Tuner broadcast. (P.6)
3[USB]
Plays files on a USB device. (P.8)
[iPod]
Plays an iPod/iPhone. (P.10)
• When iPod/iPhone is connected.
[Mirroring]
Displays the Mirroring screen. (P.12)
•When android device with “Mirroring OB for JVC” application installed is connected.
4Switches to an external component connected to the AV-IN input terminal. (P.13)
5Displays the Hands Free screen. (P.16)
6Plays a Bluetooth audio player. (P.17)
7Displays the SETUP screen. (P.3)
List screen
There are some common function keys in the list screens of most sources.
1You can change the page to display more items by pressing [R]/ [S].
English | 5

 Tuner
Tuner
Tuner Basic Operation
1 |
Press the < > button. |
2 |
Touch [Tuner]. |
ÑÑSource control screen
4 |
1 |
2 |
3 |
1Displays the information of the current station: PS name, Frequency, PTY Genre, Indicator Items
2[FM] : Switches the FM band.
“FM1”, “FM2”, “FM3”
[AM] : Switches the AM band. “AM1”, “AM2”
[E] [F] : Tunes in a station with good reception automatically.
[  ] : Displays the Tuner Setup screen. (P.7)
3Recalls the memorized station.
When touched for 2 seconds, stores the current receiving station in memory.
4[ ] : Returns to previous screen.
[ ] : Displays the Audio screen. (P.18)
Presetting stations
ÑÑAuto memory
You can preset 6 stations for the current band (FM1/ FM2/FM3/AM1/AM2).
1Touch [FM] or [AM] to select the band.
2Touch [  ].
].
3Touch [Auto Store].
ÑÑManual memory
You can store the current receiving station in memory.
1Tune in to a station you want to preset.
2Touch and hold [#] (#:1-6) in which you want to store the station.
ÑÑRecalling the preset station
1 Touch [#] (#:1-6).
6
Tuner
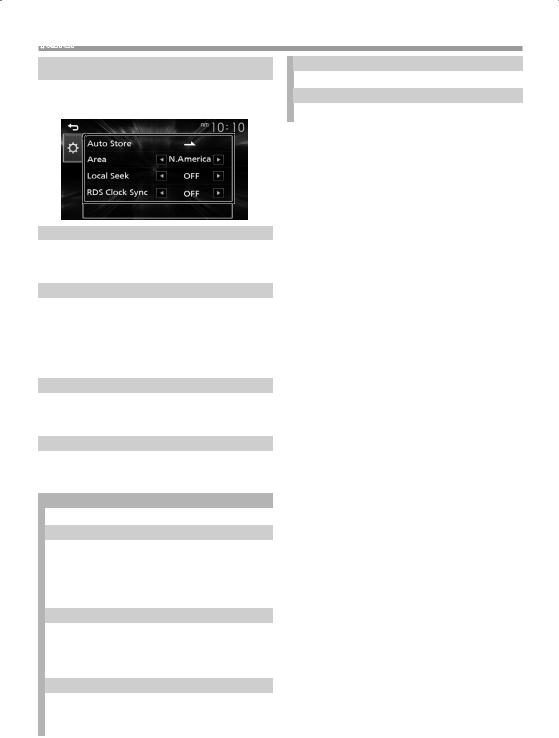
Tuner Setup
1Touch [  ].
].
2Set each item as follows.
[Auto Store]
Automatically searches and stores the 6 stations with the strongest signals for the selected band.
“Auto Store” appears.
[Area]
“N.America” (Default): For North/Central/South America, AM/FM intervals: 10 kHz/200 kHz.
“S.America”: For some South American countries, AM/FM intervals: 10 kHz/50 kHz.
“Europe”: For Europe, AM/FM intervals: 9 kHz/50 kHz.
[Local Seek]
Tunes in only to the stations with sufficient signal strength. (LOC indicator lights up.)
“ON”, “OFF” (Default)
[RDS Clock Sync] *1 *2
Synchronizing the Radio Data System station time data and this unit’s clock.
“ON” (Default), “OFF”
[RDS] *2 *3
Displays the RDS Settings screen.
[AF]
When station reception is poor, automatically switches to the station that is broadcasting the same program over the same Radio Data System network.
“ON” (Default), “OFF”
[TA]
Switches to the traffic information automatically when the traffic bulletin starts. (TI indicator lights up.)
“ON”, “OFF” (Default)
[RDS Clock Sync]
Synchronizing the Radio Data System station time data and this unit’s clock.
“ON” (Default), “OFF”
[PTY]
Select a program type.
[PTY Seek]
Searches for a program by program type.
*1 To use the function, it is necessary to set [Area] to [N.America]/[S.America].
*2 To use the function, it is necessary to set [Area] to [Europe].
*3 FM only
3 Touch [6].
English | 7
USB
Preparation
ÑÑConnecting a USB device
1Remove the cap of the USB terminal.
2Connect the USB device with the USB cable.
The unit reads the device and playback starts.
ÑÑTo disconnect the USB device:
1Press the < > button.
2Touch a source other than [USB].
3Detach the USB device.
ÑÑUsable USB device
This unit can play MPEG1/ MPEG2/ MPEG4/ H.264/ MKV/ MP3/WMA/ AAC/ WAV/ FLAC/ OGG files stored in a USB mass storage class device. (P.26)
•File system: FAT16/ FAT32/ NTFS
•This unit can recognize a total of 9 999 files and 320 folders (a maximum of 9 999 files per folder).
•The maximum number of characters: ––Folder names : 70 characters
––File names : 70 characters ––Tag : 70 characters
NOTE
•When the USB device is connected to this unit, it can be charged through the USB cable.
•Install the USB device in the place where it will not affect safe driving.
•You cannot connect a USB device via a USB hub and Multi Card Reader.
•Take backups of the audio files used with this unit. The files may be erased depending on the operating conditions of the USB device.
We shall have no compensation for any damage arising from any erased data.
•No USB device comes with this unit. You need to purchase a commercially available USB device.
•Cap the USB terminal whenever not using.
Playback operations
ÑÑControl the music you are listening to on the source control screen.
5 |
1 |
2 |
3 
4 |
1The jacket of the currently playing file is displayed.
2Displays the information of the current file.
3Playing time/File number
Play time bar : For confirmation of current playing position.
4[ ] : Selects Random playback mode.
 : Randomly plays all files in the current folder.
 (Default): Normal playback.
[ ] : Selects Repeat playback mode.
 (Default): Repeats all files in the USB device.
 : Repeats the current file.
 : Repeats all files in the current folder. [U], [H] : Plays or pauses.
[E], [F] : Searches the previous/next content.
Touch and hold to fast forward or fast backward.
[1] : Searches file. (P.9)
5[ ] : Returns to previous screen.
[ ] : Displays the Audio screen. (P.18)
8
USB
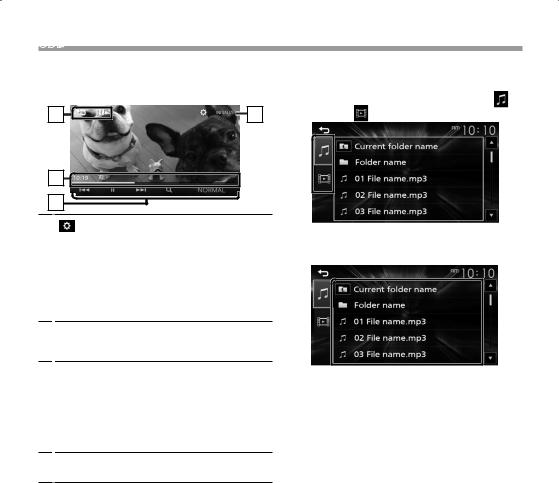
ÑÑFor Video playback
1When the operation buttons are not displayed on the screen, touch the display.
4 |
1 |
2 |
3 |
1 [ |
] : You can adjust image quality in video |
screen.
[Brightness] : Adjusts the brightness. (00
to 10)
[Contrast] : Adjusts the contrast. (00 to 10) [Color] : Adjusts the color. (00 to 10) [Tint] : Adjusts the tint. (00 to 10)
[INITIALIZE] : To clear the adjustment.
2Playing time
Play time bar : For confirmation of current playing position.
3[U], [H] : Plays or pauses.
[E], [F] : Searches the previous/next content.
Touch and hold to fast forward or fast
backward.
[1] : Searches file. (P.9)
[NORMAL]/[16:9]/[4:3] : Select a screen mode.
4[ ] : Returns to previous screen.
[ ] : Displays the Audio screen. (P.18)
ÑÑSelecting a track in a list (Searches file)
1 |
Touch [1]. |
|
|
2 |
Select whether you search by audio files [ |
], |
|
|
video files [ |
]. |
|
3Touch [ ] to moves to the upper hierarchy.
4Touch the desired folder.
When you touch a folder its contents are displayed.
• Touch [6] to moves to the upper hierarchy.
5Touch desired item from the content list.
Playback starts.
NOTE
•The source control screen appears when you touch [6] at the top hierarchy.
English | 9
iPod/iPhone
Preparation
ÑÑConnecting iPod/iPhone
•For Lightning connector models: Use USB Audio cable for iPod/iPhone—KS-U62 (optional accessory).
•For details about connecting iPod/iPhone, see page 25 .
1Remove the cap of the USB terminal.
2Connect the iPod/iPhone.
1 Press the < > button.
2Touch a source other than [iPod].
3Detach the iPod/iPhone.
ÑÑConnectable iPod/iPhone
The following models can be connected to this unit.
Made for
•iPhone XS Max
•iPhone XS
•iPhone XR
•iPhone X
•iPhone 8 Plus
•iPhone 8
•iPhone 7 Plus
•iPhone 7
•iPhone SE
•iPhone 6s Plus
•iPhone 6s
•iPhone 6 Plus
•iPhone 6
•iPhone 5s
NOTE
•If you start playback after connecting the iPod, the music that has been played by the iPod is played first.
•Cap the USB terminal whenever not using.
Playback operations
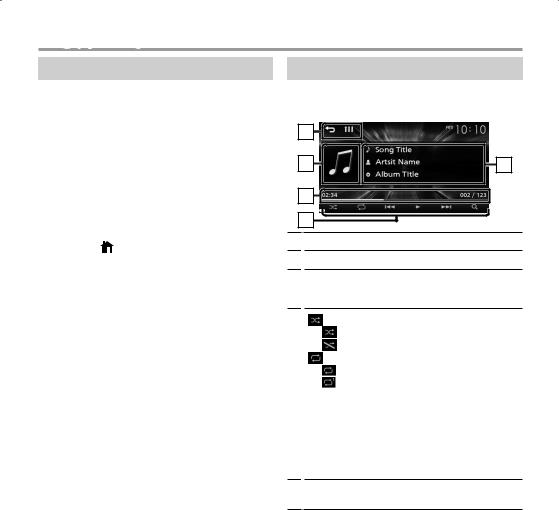
ÑÑControl the music you are listening to on the source control screen.
5 |
1 |
2 |
3 |
4 |
1Artwork (Shown if the track contains artwork)
2Displays the information of the current file.
3Playing time/File number
Play time bar : For confirmation of current playing position.
4 [ ] : Selects Random playback mode.
:Functions the same as Shuffle Songs.
:Random off
[ |
] : Selects Repeat playback mode. |
|
: Functions the same as Repeat All. |
|
: Functions the same as Repeat One. |
 : Repeat off
[U], [H] : Plays or pauses.
[E], [F] : Searches the previous/next content.
Touch and hold to fast forward or fast
backward.
[1] : Searches content. (P.11)
5[ ] : Returns to previous screen.
[ ] : Displays the Audio screen. (P.18)
10
iPod/iPhone
ÑÑSelecting a content in a list
1Touch [1].
2Touch desired item.
When you touch a category its contents are displayed.
3Touch desired item from the content list.
Playback starts.
• Touch [6] to moves to the upper hierarchy.
NOTE
•The source control screen appears when you touch [6] at the top hierarchy.
English | 11

Mirroring operations
ÑÑMirroring Operation
1 Touch [Mirroring].
•Pair your smartphone with the unit via Bluetooth. See Register your smartphone to the unit (P.15) and Connect the Bluetooth device.
•Android version 7.0 or later
•Bluetooth support
• You can display the same screen of the Android device on the monitor of the unit.
ÑÑTo turn off the Mirroring
1 Press the < > button.
• HOME screen appears.
3 Connect the Android smartphone. (P.25)
4 Launch Mirroring App on your Android Smartphone.
1) Touch to check mark.
2)Touch “OK” to start Mirroring App.
3)Touch to check mark.
4)Touch “START NOW” to start capturing your Android screen.
1 Press the < > button.
2Touch a source other than [Mirroring].
3Detach the Android smartphone.
12
ExternalComponentsComponents
Using external audio/video players
ÑÑStarting playback
1Connect an external component to the AV-IN input terminal. (P.24)
2 Press the < > button.
3Touch [AV-IN].
4Turn on the connected component and start playing the source.
ÑÑFor Video playback
1When the operation buttons are not displayed on the screen, touch the display.
1 |
NOTE
•When the picture from the rear view camera is displayed on the AV-IN screen, the picture output from the Visual Output terminal disappears.
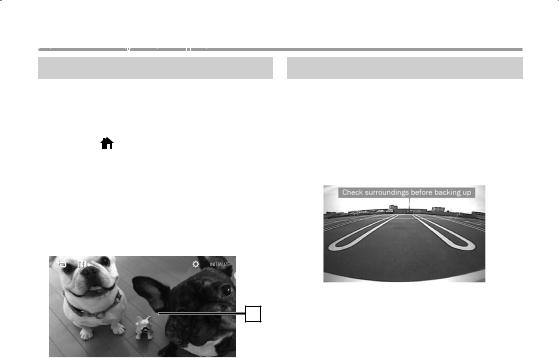
Rear view camera
To use a rear view camera, the REVERSE lead connection is required. For connecting a rear view camera. (P.24)
ÑÑDisplaying the picture from the rear view camera
The rear view screen is displayed when you shift the gear to the reverse (R) position.
• To erase the caution message, touch the screen.
English | 13

External
 Components
ÑÑTo adjust the parking guidelines
NOTE
•Install the rear view camera in the appropriate position according to the instruction manual supplied with the rear view camera.
•When adjusting the parking guidelines, make sure to apply the parking brake to prevent the car from moving.
1 Press the < > button.
2Touch [Setting].
3Touch [System].
4Touch [T] or [U] of [Parking Guidelines] and set to [ON].
5Touch [Guidelines SETUP].
6Adjust the parking guidelines by selecting the [  ] mark.
7Adjusting the position of the selected mark.
A
C D
B
Make sure that lines A and B are horizontally parallel, and that lines C and D are of the same length.
NOTE
•Touch [Initialize] and then touch [Yes] to set all the marks to their initial default position.
Learning function of steering remote
This function is available only when your vehicle is equipped with the electrical steering remote controller.
1 Press the < > button.
2Touch [Setting].
3Touch [System].
4Touch [Steering Remote].
5Touch the function you want to set.
6Press and hold the steering remote controller button.
NOTE
•You can have the unit learned all buttons at a time.
In that case, press the all buttons one at a time and after pressing all of them, touch [6] in Steering Remote Controller Setting screen.
7Repeat steps 5 and 6 as necessary.
8Touch [6].
NOTE
•Touch [Initialize] and then touch [Yes] to set all the settings to the initial default settings.
14
Bluetooth
ÑÑAbout the Bluetooth smartphone and
Bluetooth audio player
This unit conforms to the following Bluetooth specifications:
Version
Bluetooth Ver.4.2
Profile
Smartphone/ Cell-phone:
HFP (V1.6) (Hands Free Profile) PBAP (Phonebook Access Profile)
Audio player:
A2DP (Advanced Audio Distribution Profile) AVRCP (V1.5) (Audio/Video Remote Control Profile)
Sound codec
SBC
ÑÑAbout mobile phones compatible with
Phone book Access Profile (PBAP)
If your mobile phone supports PBAP, you can display the following items on the touch panel screen when the mobile phone is connected.
•Phone book (up to 1000 entries)
•Dialed calls, received calls, and missed calls (up to 50 entries in total)
Register your smartphone to the unit
You can use your Bluetooth smartphone when paired to this unit.
You can register up to 8 Bluetooth devices.
•You can pair the device and the unit using SSP (Secure Simple Pairing) which only requires confirmation.
•One device can be connected at a time.
•When you register a new Bluetooth device, disconnect the Bluetooth device currently connected and then register the new device.
•A new device cannot be registered if there are 8
registered Bluetooth units. Delete unnecessary registration. (P.15)
1Turn on the Bluetooth function on your smartphone/cell-phone.
2Search the unit (“KW-M150BT”) from your smartphone/cell-phone.
If a PIN code is required, enter the PIN code (“0000”).
• appears when the Bluetooth smartphone is connected.
ÑÑDisconnecting the device
•Turn off the Bluetooth function from your smartphone/cell-phone.
•Turn off the ignition switch.
Bluetooth Setup
1 Press the < > button.
2Touch [Setting].
3Touch [Bluetooth].
4Touch the corresponding key and set the value.
[Select Device]
Connect the Bluetooth device.
[Phone Auto Answer]
Set the automatic response time to pick-up an incoming call.
“OFF” (Default) / “ON”
[Device Name]
The Bluetooth device name of this unit is displayed.
[Pin Code]
Displays the PIN code.
[Device address]
Displays the device address.
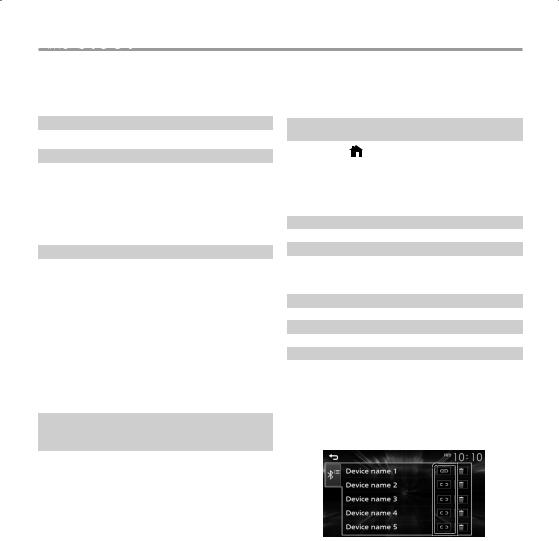
ÑÑConnect the Bluetooth device
1Touch [Select Device] on the Bluetooth Setup screen.
2Touch [  ] of the device you want to connect.
To delete the registered Bluetooth device
1 Touch [  ] on the Select Device screen.
English | 15

Bluetooth
Receive a phone call
1 Touch [Û].
• [Ý] : Reject an incoming call.
ÑÑOperations during a call
[Ý] Ending a call
You can send tones by touching desired keys on the screen.
• Touch [6] to close the window.
Switches the speaking voice output between smartphone/cell-phone and speaker.
Adjust the receiver volume
Press the <+> or <–> button.
Make a phone call
1 Press the < > button.
2Touch [Phone].
3See the table below for each operation method.
Call by entering a phone number
1)Enter a phone number with number keys.
2)Touch [Û]. Make a call
•Touch [  ] to delete the last entry.
Call using call records
1)Touch [  ].
].
2)Touch [  ] (Incoming Calls), [
  ] (Outgoing Calls), [
  ] (Missed Calls).
3)Select the phone number from the list.
Make a call
Call using the phonebook
1)Touch [  ].
].
2)Select the name from the list.
Make a call
• [ ] : Updates the phonebook. Touch this button after you have made a change to the phonebook of your smartphone/ cell-phone.
16
Loading...