


Programat® P310
Short Instructions | Kurzanleitung | Mode d’emploi : l’essentiel Istruzioni d’uso – versione ridotta | Guía rápida | Guia Rápido

Programat® P310
Short Instructions
Dear Customer
Thank you for having purchased the Programat P310. In order to render the setting-up and the initial use of the furnace as easy as possible, we have prepared these short instructions.
These short instructions replace by no means the detailed Operating Instructions. We therefore kindly ask you to thoroughly read the Operating Instructions and follow the notes contained therein.
Enjoy working with the Programat P310.
english

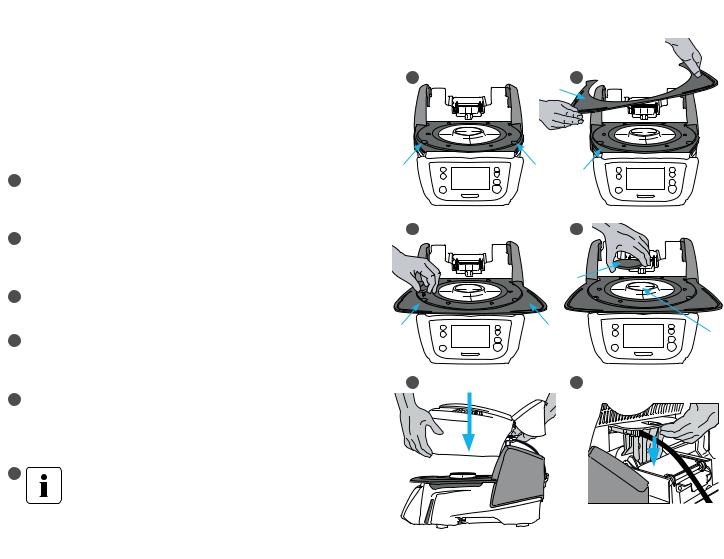
1. Installation
Remove the furnace components from their packaging and place the unit on a suitable table. Please observe the instructions on the outer packaging. Make sure the voltage indicated on the rating plate complies with the local power supply. If this is not the case, the furnace must not be connected.
AMounting the cooling tray
Remove both screws for the cooling tray (1).
BPlace the cooling tray (2) on the frame plate (3).
Make sure that the cooling tray is correctly positioned on the frame plate.
CSecure the cooling tray with the two screws (1).
DPlacing the firing plate
The firing plate (4) can now be placed on the firing plate holder (5).
EMounting the furnace head
The furnace head is best mounted with the back of the furnace pointing towards the user. Lift the furnace head with both hands as shown in the picture and place it on the furnace head mounting.
FMount the furnace head as shown in the picture until you feel it click into place. Make sure that neither the firing plate nor the insulation is damaged during the mounting of the furnace head.
A |
|
B |
|
|
2 |
1 |
1 |
3 |
|
|
|
C |
|
D |
4
1 |
2 |
5 |
|
|
|
E |
|
F |

GEstablishing the connections
Connect the cables of the furnace head with the furnace base. Proceed as follows:
-Connect vacuum hose (6).
-Insert the thermocouple plug (7). (Make sure that the polarity of the plug is correct.)
-Insert the heater plug (8).
HInsert the heater plug into the specified connector. Secure the heater plug by rotating it by 45°.
IClosing the protective cover
When all cables are correctly connected to the base, close the cover (9) to protect the connections until you feel it click into place.
JMounting the connection cover
The connection cover (10) can now be mounted and secured with the screws.
The furnace may only be used with the protective cover closed and the connection cover mounted!
KEstablishing additional connections Power connection
Make sure that the voltage indicated on the rating plate complies with the local power supply. Subsequently, connect the power cord (11) with the power socket of the Programat (12).
Connecting the vacuum pump
Connect the vacuum pump plug (13) with the vacuum pump socket (14). We recommend using only the VP4 vacuum pump from Ivoclar Vivadent, since this pump is especially coordinated with the furnace. If other pumps are used,
please observe and do not exceed the indicated maximum power consumption.
G |
|
H |
|
8 |
2 |
|
1 |
7 6
I |
J |
9 |
|
|
10
K
12
11
14
13
english

2. User interface
The Programat P310 has a wide-screen colour display. The keypad and the touch screen allow user-friendly handling. By tapping slightly with your fingertips on the touch screen, the buttons are activated and the furnace performs the requested function.
Keypad:
Home
Returning to «Home» screen (main menu)
Power-saving key
This key activates the power-saving function.
Open furnace head
START (Start LED)
Starts the selected program. The green LED indicates that a program is running. If the program is paused (1 x STOP), the Start LED flashes until renewed pressing of START results in the program being resumed.
Program key
Pressing once: The currently selected program is displayed.
Pressing twice:
The program selection via number entry is accessed.
Close furnace head
STOP
A running program can be paused by pressing the
STOP key and terminated by pressing the key twice. Movement of the furnace head can be stopped at any time by pressing STOP. Acoustic signals can be turned off by pressing the STOP key.
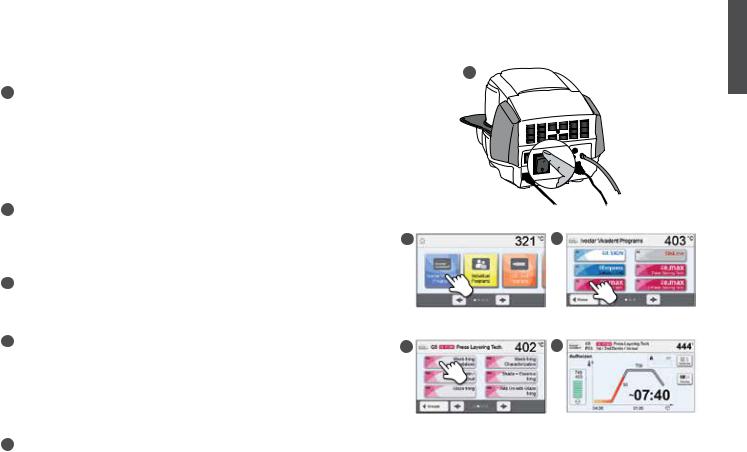
3. Operation
A
ATurning the furnace on
Connect the power cord with the wall socket.
Switch the On/Off button to position «I».
After the self-test, the display shows the home screen. All functions of the Programat can be selected from this screen. Click the Home key in order to return to the home screen.
BSelecting program sections
The furnace comprises multiple program sections
a. Programs for Ivoclar Vivadent materials |
B |
C |
b. 300 individually programmable programs |
|
|
CSelecting the program group
The program sections are divided into program groups. Each program group comprises 20 programs.
D Selecting the program |
D |
E |
|
Select the required program. |
|||
|
|
Loading the furnace
Open the furnace head by pressing the button Open furnace head and place the object to be fired with the firing tray in the furnace.
EStarting the program
Press the Start key to start the program. The LED lights up green. You can see the progress in the firing curve.
At the end of the program, the furnace head opens automatically. As soon as the OSD lights up green, the furnace is available for the next program start.
english

4. Editing the firing parameters
Parameters are set or edited in two steps.
Example: Setting the holding temperature
APress the [T] button.
BEnter the desired holding temperature and confirm by pressing the green button.
The holding temperature has been changed successfully. All parameters shown in the firing curve can be changed / edited the same way.
Changing program options
By pressing the [Options] button, the menu for additional program options opens.
Example: Open the write-protection program
APress the [Options] button.
BEdit the desired option and return to the program view by pressing the [Close] button.
By pressing the [Arrow] buttons, you can change between the individual option pages.
Please refer to the Operating Instructions for more detailed information.
A B
A B

Programat® P310
Kurzanleitung
deutsch
Sehr geehrter Kunde
Es freut uns, dass Sie sich für den Kauf des Programat P310 entschieden haben. Um Ihnen die Inbetriebnahme und die erste Anwendung des Gerätes so einfach wie möglich zu gestalten, haben wir diese Kurzanleitung verfasst.
Diese Kurzanleitung ersetzt keinesfalls die umfassende Bedienungsanleitung.
Wir bitten Sie daher, auch die Bedienungsanleitung genau durchzulesen und die Hinweise zu beachten.
Wir wünschen Ihnen viel Freude und Erfolg mit dem Gerät.
1. Installation
A
Gerätekomponenten aus der Verpackung nehmen und das Gerät auf einen geeigneten Tisch stellen. Bitte beachten Sie die Anleitung auf der Aussenver-
packung. Prüfen Sie, ob die angegebene Spannung des Typenschilds mit der vorhandenen Netzspannung übereinstimmt. Ist dies nicht der Fall, darf das
Gerät nicht angeschlossen werden! 1
AMontage der Brenngut-Ablageplatte
Entfernen Sie die zwei Befestigungsschrauben für die Brenngutablageplatte (1).
C
BLegen Sie nun die Brenngut-Ablageplatte (2) auf die Rahmenplatte (3). Achten Sie dabei, dass die Brenngut-Ablageplatte korrekt auf der
Rahmenplatte aufliegt.
C Sichern Sie nun die Brenngut-Ablageplatte mit den zwei Befestigungsschrauben (1).
1
D Brenntisch auflegen
Der Brenntisch (4) kann nun auf die Brenntisch-Aufnahme (5) aufgelegt
werden.
E
EOfenkopf montieren
Der Ofenkopf kann am einfachsten montiert werden, wenn das Ofen-Hinter- teil zum Anwender zeigt. Heben Sie den Ofenkopf mit beiden Händen wie
auf dem Bild ersichtlich und setzen Sie ihn auf die Ofenkopfhalterung.
F |
Die Ofenkopfhalterung wie auf dem Bild ersichtlich aufsetzen bis der |
|
Ofenkopf spürbar einrastet. Achten Sie darauf, dass der Brenntisch |
|
bzw. die Isolation durch die Ofenkopfmontage nicht beschädigt wird. |
B
2
1 |
|
3 |
|
|
|
|
|
D |
|
|
4 |
|
2 |
5 |
|
|
|
|
|
F |
GAnschlüsse herstellen
Verbinden Sie nun die Kabel des Ofenkopfes mit dem Unterteil. Gehen Sie dabei wie folgt vor:
-Vakuumschlauch anschliessen (6)
-Stecker Thermoelement (7) einstecken (auf richtige Polung achten)
-Stecker Heizung einstecken (8)
HStecken Sie den Heizungsstecker in den vorgesehenen Anschluss. Fixieren Sie den Heizungsstecker durch eine 45° Drehung.
IAbdeckhaube anklappen
Wenn alle Kabel korrekt mit dem Unterteil verbunden sind, klappen Sie die
Abdeckhaube (9) über die Anschlüsse bis jene einrastet.
JAnschlussabdeckung montieren
Nun kann die Anschlussabdeckung (10) aufgesetzt und mit der Befestigungsschraube fixiert und gesichert werden.
Das Gerät darf nur mit angeklappter Abdeckhaube und montierter Anschlussabdeckung in Betrieb genommen werden!
KWeitere Anschlüsse herstellen Netzanschluss herstellen
Bitte überprüfen Sie vor dem Anschliessen, ob die Netzspannung mit Ihrer örtlichen Netzspannung übereinstimmt. Anschliessend können Sie das Netzkabel (11) mit der Gerätesteckdose (12) verbinden.
Vakuumpumpe anschliessen
Stecken Sie den Vakuumpumpen-Netzstecker (13) in die VakuumpumpeGerätesteckdose (14). Wir empfehlen Ihnen, die Vakuumpumpe VP4 von Ivoclar Vivadent zu verwenden, da diese Pumpe speziell auf den Brennofen abgestimmt ist. Falls eine andere Vakuumpumpe angeschlossen wird, beachten Sie dabei bitte die maximal zulässige Leistungsaufnahme auf dem Schild.
G |
|
H |
|
8 |
2 |
|
1 |
7 6
I |
J |
9 |
|
|
10
K
12
11
14
13
deutsch

2. Bedienelemente
Der Programat P310 verfügt über ein Breitbild-Farbdisplay. Die intuitive Bedienung erfolgt über die Folientastatur und den Touch-Screen. Durch leichtes Antippen der Anzeige mit der Fingerkuppe können Touch-Buttons betätigt werden und das Gerät führt die gewünschte Funktion aus.
Folientasten:
Home
Wechsel zum „Home-Screen“ (Hauptmenü)
Stromspar-Taste
Mit dieser Taste wird die Stromspar-Funktion aktiviert.
Ofenkopf öffnen
START (Start-LED)
Startet das gewählte Programm. Ein aktives Programm wird durch die grün leuchtende LED signalisiert. Wird das Programm pausiert (1 x STOP), blinkt die Start-LED bis zur Fortsetzung durch erneutes START.
Programm-Taste
Einmaliges Drücken: Anzeige des aktuell gewählten Programms.
Zweimaliges Drücken:
Wechsel in die Programmauswahl via Nummern-Eingabe
Ofenkopf schliessen
STOP
Ein aktives Programm kann durch Drücken der STOP-
Taste pausiert und durch zweimaliges Drücken beendet werden. Eine Kopf-Bewegung kann mit der STOP-Taste jederzeit angehalten werden. Signaltöne können mit der STOP-Taste quittiert werden.
 Loading...