


 Loading...
 Bluephase®
Licence to cure
LED for every use
EN Instructions for Use |
IT |
Istruzioni d’uso |
Appendix |
Page 2 |
|
Pagina 44 |
Page / Seite 86 |
DE Gebrauchsinformation |
ES |
Instrucciones de uso |
|
Seite 16 |
|
Pagina 58 |
|
FR Mode d’emploi |
PT |
Instruções de Uso |
|
Page 30 |
|
Página 72 |
|
For dental use only!
Caution: U.S. Federal law restricts this device to sale by or on the order of a licensed dentist
Made in Austria
Ivoclar Vivadent AG, FL-9494 Schaan / Liechtenstein
Dear Customer,
Optimum polymerization is an important requirement for all light cured materials in order to consistently produce high quality restorations.
The polymerization light selected also plays a decisive role in this respect. Therefore, we would like to thank you for having purchased Bluephase. Bluephase is a high-quality medical device which has been designed according to the latest standard of science and technology in compliance with the relevant industry standards.
These Instructions for Use will help you safely start-up the device, make full use of its capabilities, and ensure a long service life.
Should you have any further questions, please do not hesitate to contact us (see addresses on the reverse page).
Your Ivoclar Vivadent Team
2

Table of Contents
Product overview
–List of parts
–Indicators on the charging base
–Indicators on the handpiece
Safety
–Intended use
–Indication
–Signs and symbols
–Safety notes
Start-up
–Charging base
–Handpiece
–Battery
–Click & Cure corded operation
Operation
–Selecting the curing program and the curing time
–Cure Memory function
–Start
–Acoustic signals
–Light intensity
–Measuring the light intensity
Maintenance and cleaning
–Housing
–Light probes
–Battery contacts
–Disposal
What if …
Warranty / Procedure in case of repair Product specifications
–Delivery form
–Accessories
–Technical data
–Operating conditions
–Transportation and storage conditions
4
4
5
5
6
6
6
6
6
8
8
8
9
10
11
11
12
12
12
12
12
13
13
13
13
13
14
15
15
15
15
15
15
15
English
3
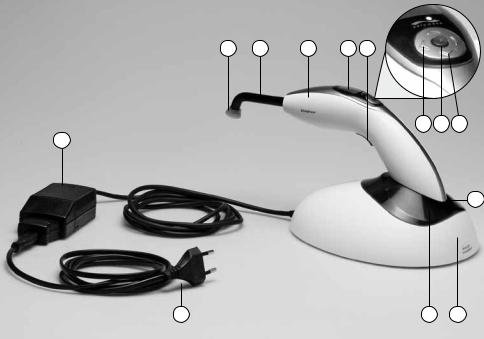
List of parts
13 |
12 |
1 |
3 |
2 |
5 6 4
10
11
9 |
7 |
8 |
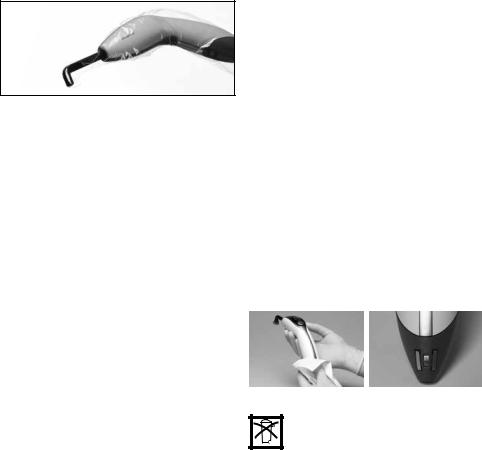
1Handpiece
2Start button
3Display
4Program selection button
5Time selection button
6Volume button
7Power indicator
8Charging base
9Power cord
10Power pack
11Battery
12Light probe 10 mm
13Anti-glare cone
4
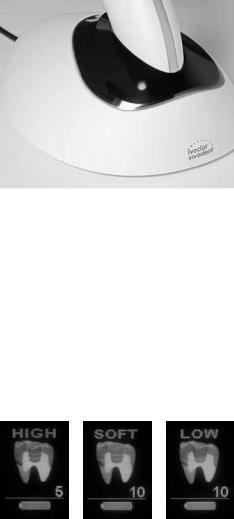
Indicators on the charging base
Indicator lights up in blue - the charging base is connected to the power supply
Indicators on the handpiece
Curing program and operating state
Selected indications and curing time
Charging status of the battery
5

Safety
Intended use
Bluephase is an LED polymerization light that produces energy-rich blue light. It is used for the polymerization of light-curing dental materials immediately at the dental unit. The intended use also includes the observation of the notes and regulations in these Instructions for Use.
Indication
With its “Polywave®” broadband spectrum, Bluephase is suitable for the polymerization of all light-curing dental materials curing in the wavelength range of 385–515 nm. These materials include restoratives, bonding agents/ adhesives, bases, liners, fissure sealants, temporaries, as well as luting materials for brackets and dental-lab materials such as ceramic inlays.
Safety notes
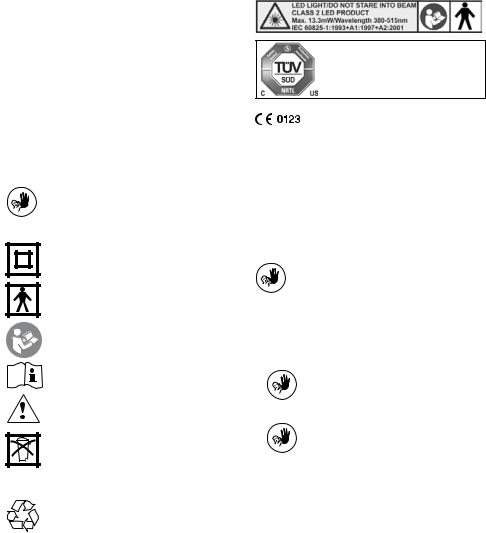
The Bluephase is is an electronic device and a medical product which is subject to IEC 60601-1 (EN 60601-1) and EMC directives, as well as the 93/42/EEC Medical Device Directive. The appliance complies with the relevant EU regulations and is classified as an LED Class 2 product.
NRTL (Nationally Recognized
Testing Laboratory)
Signs and symbols
Non permissible use
Symbols on the curing light
Double insulation
(device complies with safety class II)
Protection against electrical shock (BF type apparatus)
Observe Instructions for Use
Observe Instructions for Use
Caution
The curing light must not be disposed of in the normal domestic waste. Information regarding disposal of the light can be found on the respective national Ivoclar Vivadent homepage.
Recyclable
The apparatus has been shipped from the manufacturer in a safe and technically sound condition. In order to maintain this condition and to ensure risk-free operation, the notes and regulations in these Instructions for Use have to be observed. To prevent damage to equipment and risks for patients, users, and third parties, the following safety instructions have to be observed.
Materials, the polymerization of which is activated outside the wavelength range of 385–515 nm (no materials known to date.) If you are not sure about certain products, please ask the manufacturer of the corresponding material.
Do not charge or use the appliance near flammable or combustible substances.
Portable and mobile high-frequency communication devices may interfere with medical equipment. The use of mobile phones during operation is not allowed.
6

Usage and liability
–Bluephase must only be employed for the intended use. Any other uses are contraindicated. Liability cannot be accepted for damage resulting from misuse or failure to observe the Operating Instructions.
–The user is responsible for testing Bluephase for its use and suitability for the intended purposes. This is particularly important if other equipment is used in the immediate vicinity of Bluephase at the same time.
–Use only original spare parts and accessories from Ivoclar Vivadent (see Accessories). The manufacturer does not accept any liability for damage resulting from the use of other spare parts or accessories.
–The light probe is an applied part and may warm up to a maximum of 45 °C (113 °F) at the interface to the handpiece during operation.
Operating voltage
Before switching on, make sure that
a)the voltage indicated on the rating plate complies with the local power supply.
b)the unit has acquired the ambient temperature.
If the battery or power pack are used separately, e.g. during start-up or Click & Cure corded operation, contact with patients or third parties must be prevented. Do not touch the exposed contacts of the battery or connection plug (power pack).
Assumption of impaired safety
If it has to be assumed that safe operation is no longer possible, the power must be disconnected and the battery removed to avoid accidental operation. This may be the case, for example, if the apparatus is visibly damaged or no longer works correctly. A complete disconnection from the power supply is only ensured when the power cord is disconnected from the power source.
Eye protection
Direct or indirect exposure of the eyes must be prevented. Prolonged exposure to the light is unpleasant for the eyes and may result in injury. Therefore, using the supplied anti-glare cones is recommended. Individuals who are generally sensitive to light, who take photosensitizing drugs, have undergone eye surgery, or people who work with the apparatus or in its vicinity for long periods of time should not be exposed to the light of this device and wear protective goggles (orange) that absorb light below 515 nm.
Battery
Caution: Use only original spare parts, particularly Ivoclar Vivadent batteries and charging bases.
Do not short circuit battery. Do not store at temperatures above 40 °C / 104 °F (or 60 °C / 140 °F for a short period). Always store batteries charged. The storage period must not exceed 6 months. May explode if disposed of in fire.
Please note that the lithium polymer battery may react with explosion, fire, and smoke development in case of inappropriate handling and mechanical damage.
Damaged lithium polymer batteries must no longer be used.
The electrolytes and electrolyte fumes released during exlosion, fire, and smoke development are toxic and corrosive . In case of contact with the eyes and skin, immediately rinse with copious amounts of water. Avoid the inhalation of the fumes. See a physician immediately in case of indisposition.
Heat development
As it is the case with all high-performance lights, the high light intensity results in a certain heat development. Prolonged exposure of areas near the pulp and soft tissues may result in irreversible or reversible damage. Therefore, the recommended curing times have to be observed. Uninterrupted curing times of more than
20 seconds on the same tooth surface, as well as direct contact with the gingiva, oral mucous membrane, or skin, have to be prevented. If required, polymerize indirect restorations at intermitting intervals of
20 seconds each or use external cooling with an air stream.
7
Start-up
Check the delivery for completeness and any possible transportation damage (see delivery form). If components are missing or damaged, immediately contact your dealer or your Service Center.
Charging base
Before you switch on the device, make sure that the voltage mentioned on the rating plate complies with your local power supply. The rating plate is attached to the underside of the charging base.
Place the charging base on a suitable, flat table top.
Remove the protective foil from the connection plug of the power pack. Slide the connection plug of the power pack into the socket on the underside of the charging base. Tilt it slightly and apply slight pressure until you hear and feel it snap into place.
Connect the power cord with the power supply and the power pack. The Power ON indicator on the left side of the housing lights up in blue (see Indicators on the charging base).
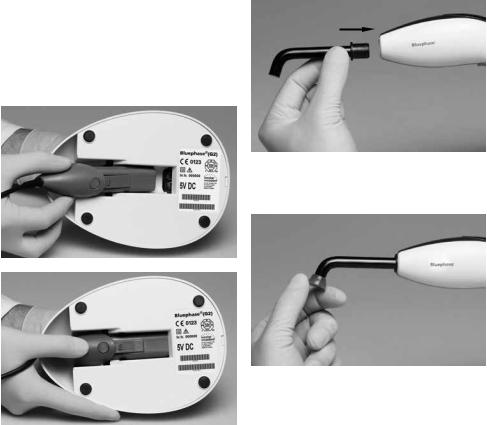
Handpiece
Before you insert the light probe, remove the protective foil on the corresponding opening of the handpiece.
Slightly turn the light probe while attaching it to the handpiece.
After that, mount anti-glare protection on the light probe.
8

Battery
We recommend fully charging the battery before the first use.
If the battery is fully charged, it features a curing capacity of approximately 60 minutes.
Charging status of the battery
With the handpiece switched on, the current charging status is shown on the display as follows:
Battery fully charged (curing capacity of approximately 60 minutes)
Battery half full
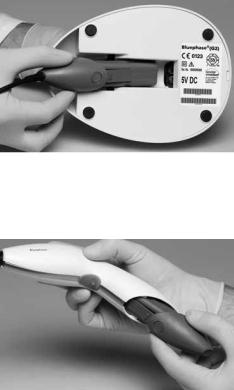
Slide the battery straight into the handpiece until you hear and feel it click into place.
Gently place the handpiece in the corresponding rest in the charging base. If a sleeve is used, please remove it before you charge the battery.
If possible, use the light always with a fully charged battery. This will prolong the service life. It is therefore recommended to place the handpiece into the charging base after each patient. The charging time for empty batteries is 2 hours.
Reserve (The last bar in the battery indicator is red in the reserve mode. The battery has to be charged as soon as possible.)
When the battery is being charged, „Charging Battery“ briefly appears in the display before the display returns to the stand-by mode.
If the battery is completely empty, the handpiece automatically switches to the stand-by mode. The light can no longer be called up and the curing program and
curing time can no longer be set. However, the handpiece can be used in the Click & Cure corded operation.
Since the battery is a consumable, it has to be replaced after its typical life cycle has expired after 2½ years. See battery label for the age of the battery.
9
Click & Cure corded operation
Bluephase can be used in corded operation at any time, but particularly when the battery is completely empty.
For this purpose, remove the battery from the handpiece. Then remove the power pack from the underside of the charging base. Do not pull on the power cord.
Insert the connection plug straight into the handpiece until you hear and feel it click into place.
During corded operation, the charging base cannot charge the battery.
The apparatus is only completely disconnected from the power supply if the power cord has been pulled out of the plug-in socket.
Operation
Disinfect or autoclave contaminated surfaces of the curing light, as well as light probes, and anti-glare cones before each use. Furthermore, make sure that the stipulated light intensity permits adequate polymerization. For that purpose, check the light probe for contamination and damage, as well as the light intensity at regular intervals (e.g. with the Ivoclar Vivadent radiometer “Bluephase Meter”).
Selecting the curing program and time
The curing program and the curing time can be individually set. Bluephase is equipped with the following
3 curing programs for the different indications. The desired curing program is selected with the program selection buttons. The display changes accordingly (see Indicators on the handpiece).
Upon the first start-up, the following settings have been preset:
–HIGH (High Power): 10 seconds
–LOW (Low Power): 10 seconds
–SOFT (Soft start): 15 seconds
The intended curing time is selected using the time selection buttons. Users may choose between 5, 10, 15, 20 and 30 seconds.
Observe the Instructions for Use of the material applied when selecting the curing time.
The curing recommendations for composite materials apply to all shades and, if not mentioned otherwise in the Instructions for Use of the relevant material, to a maximum layer thickness of 2 mm. Generally, these recommendations apply to situations where the emission window of the light probe is placed directly over the material to be polymerized. Increasing the distance between the light source and the material will require the curing time to be extended accordingly. For instance, if the distance to the material is 9 mm, the effective light output is reduced by approx. 50%. In this case, the recommended curing time has to be doubled.
10
Curing programs
HIGH POWER Program
Consistently high light intensity for the polymerization of restorative and cementation materials for direct and indirect restorations.
 1.200 mW/cm2
0 |
t [s] |
Light intensity |
1,200 mW/cm2 |
Exposure time for composites |
15 s |
Exposure time for Tetric EvoCeram / IPS Empress Direct |
10 s |
Filling materials |
Curing time |
Composite |
|
• 2 mm 1) |
|
IPS Empress Direct / IPS Empress Direct Flow / |
|
Tetric EvoCeram / Tetric EvoFlow / Tetric / |
10 s |
Tetric Basic White / Tetric N-Ceram / Tetric N-Flow |
|
Heliomolar / Heliomolar HB / Heliomolar Flow |
|
All conventional composites |
15 s |
• 4 mm 2) |
|
Tetric EvoCeram Bulk Fill / Tetric Basic White |
10 s |
Compomer 3) |
|
Compoglass F / Compoglass Flow |
20 s |
Indirect restorations / Luting materials |
|
Variolink II Base 4) / Variolink Veneer / Variolink N Base 4) |
per mm ceramic: |
/ Variolink N Clear Veneer / Variolink Ultra 5) / |
10 s per segment |
Dual Cement 5) / Variolink II 5) |
|
Miscellaneous |
|
Helioseal / Helioseal F / Helioseal Clear |
10 s |
Monopaque |
20 s |
MultiCore Flow / Multicore HB |
20 s |
Heliosit Orthodontic |
10 s |
Telio Add-On Flow |
15 s |
Telio Stains |
10 s |
IPS Empress Direct Color |
10 s |
IPS Empress Direct Opaque |
20 s |
650 mW/cm2
0 |
t [s] |
LOW POWER Program
Reduced light intensity with reduced heat development for the polymerization of adhesives, liners, and restorative materials in areas near the pulp when restoring Class V cavities.
Adhesive |
Curing time |
AdheSE / AdheSE One F |
|
ExciTE / ExciTE DSC |
10 s |
Tetric N-Bond / Tetric N-Bond Self-Etch |
|
Heliobond (Syntac) |
|
Temporary materials |
|
Telio CS Inlay/Onlay |
10 s |
Systemp.inlay/onlay |
10 s |
Fermit / Fermit N |
10 s |
Telio CS Link / Systemp.link |
20 s per segment |
Miscellaneous |
|
Heliosit Orthodontic |
20 s |
Vivaglass Liner |
20 s |
SOFT START Program
Step-by-step increase of the light intensity with reduced shrinkage stress and reduced heat development for the polymerization of restorative materials.
1.200 mW/cm2
650 mW/cm2
0 5 |
t [s] |
Filling materials |
Curing time |
Composite |
|
• 2 mm 1) |
|
IPS Empress Direct / IPS Empress Direct Flow / |
|
Tetric EvoCeram / Tetric EvoFlow / Tetric / |
15 s |
Tetric Basic White / Tetric N-Ceram / Tetric N-Flow |
|
Heliomolar / Heliomolar HB / Heliomolar Flow |
|
All conventional composites |
20 s |
• 4 mm 2) |
|
Tetric EvoCeram Bulk Fill / Tetric Basic White |
15 s |
Compomer 3) |
|
Compoglass F / Compoglass Flow |
20 s |
1) Applies to a maximum layer thickness of 2 mm and provided that the Instructions for Use of the respective material do not state any other recommendation (might be the case, e.g. with dentin shades) 2) Applies to a maximum layer thickness of 4 mm and provided that the Instructions for Use of the respective material do not state any other recommendation (might be the case, e.g. with dentin shades) 3) Applies to a maximum layer thickness of 3 mm 4) Applies to light-curing (use of the base past only) 5) Applies to dual-curing
11
Cure Memory function
The last settings used, together with the combination of curing program and curing time, are automatically saved.
Start
The light is switched on by means of the start button. Once the selected curing time has elapsed, the curing program is automatically terminated. If desired, the light can be switched off before the set curing time has elapsed by pressing the start button again. The fan is activated simultaneously to the light. Once the curing time has elapsed, the fan continues to run for a certain time to cool the apparatus. The battery must not be removed as long as the fan is still running.
Acoustic signals
Acoustic signals can be heard for the following functions:
–Start (Stop)
–Every 10 seconds
–Program change
–Curing time change
–Connecting the battery to the charging base
–Inserting battery
–Error message
If desired, the volume of the acoustic signals can be adjusted. For that purpose, press the blue volume button while the light is off and reduce the volume or turn the acoustic signals off with the left program selection button. If you want to turn the acoustic signals back on or increase the volume, press the blue volume button and then the right program selection button.
Light intensity
The light intensity is maintained at a consistent level during operation. If the supplied 10 mm light probe is used, the light intensity has been calibrated to
1200 mW/cm2 ± 10%.
The use of a light probe other than the one provided has a direct influence on the light intensity emitted.
In parallel-walled light probes (10 mm), the diameter is equal at both ends. In focussing light probes (10>8 mm light probe, Pin-Point light probe 6>2 mm), the diameter of the rear end is larger than that of the light emission window. The incident blue light is thus bundled to a smaller surface, which increases the light intensity emitted.
Pin-Point light probes are suitable for the polymerization of confined areas, such as the attachment of veneers prior to excess removal. For thorough curing, it is necessary to change the light probe.
Measuring the light intensity
The light intensity of the Bluephase and the enclosed 10 mm light probe can be checked by means of the Bluephase Meter.
If the measured value does not correspond with the expected light intensity, proceed as follows:
–Check the selected curing program.
–Clean possibly dirty light sensor (radiometer).
–Remove the light probe and clean the light emission window of the handpiece with a cotton swab dipped in alcohol.
–Clean possibly dirty light probe (see Maintenance and cleaning).
–Replace a damaged light probe with a new one.
If these measures do not improve the results, please contact your dealer or your local Service Center.
12
Maintenance and cleaning
For reasons of hygiene, we recommend using a disposable protective sleeve for each pa-tient. Make sure to fit the protective sleeve closely to the light probe. Disinfect contaminated surfaces of the device and anti-glare cones (FD 366/Dürr Dental, Incidin Liquid/Ecolab) and sterilize the light probe before each use if disposable protective sleeves are not used. Make sure that no liquids or other foreign substances enter the handpiece, charging base and particularly the power pack during cleaning (risk of electrical shock). Disconnect the charging base from the power source when cleaning it.
Housing
Wipe the handpiece and handpiece holder with a customary aldehyde-free disinfecting solution. Do not clean with highly aggressive disinfecting solutions (e.g. solutions based on orange oil or with an ethanol content of more than 40%), solvents (e.g. acetone), or pointed instruments, which may damage or scratch the plastic. Clean dirty plastic parts with a soapy solution.
Light probe
Before cleaning and/or disinfecting the light probe, pretreat it. This applies to both automated and manual cleaning and disinfection.
Pretreatment
–Remove gross contamination immediately after use or within 2 hours. For this purpose, thoroughly rinse the light probe under running water (for at least
10 seconds). Alternatively, use a suitable aldehyde-free disinfecting solution to prevent the fixation of blood.
–To remove contamination manually, use a soft brush or soft cloth. Partially polymerized composite can be removed with alcohol and a plastic spatula, if necessary. Do not use sharp or pointed objects, as they may scratch the surface.
Cleaning and disinfection
For cleaning, immerse the light probe in a cleaning solution and ensure that it is sufficiently covered with liquid (ultrasound or careful brushing with a soft brush may support the effect). A neutral-enzymatic cleaning agent is
recommended. When cleaning and disinfecting, please make sure that the agents used are free of:
–organic, mineral and oxidizing acids (the minimum admissible pH value is 5.5)
–alkaline solution (the maximum admissible pH value is 8.5)
–oxidizing agent (e.g. hydrogen peroxide)
Afterwards, remove the light probe from the solution and thoroughly rinse it under running water (for at least
10 seconds). Cleaning in a thermal disinfector is an effective alternative.
Sterilization
Thorough cleaning and disinfecting is imperative to ensure that the subsequent sterilization is effective. Use only autoclave sterilization for this purpose. The sterilization time (exposure time at sterilization temperature) is 4 minutes at 134 °C (273 °F); pressure should be 2 bar (29 psi). Dry the sterilized light probe using either the special drying program of your steam autoclave or hot air. The light probe has been tested for up to 200 sterilization cycles.
After that, check the light probe for damage. Hold it against light. If individual segments appear black, glass fibres are broken. If this is the case, replace the light probe with a new one.
Battery contacts
To ensure reliable conductivity at all times, keep the battery contacts free from possible contamination (e.g. composite residue). For this purpose, clean the affected contacts regularly in the course of the usual wipe disinfection (after each patient).
Disposal
The curing light must not be disposed of as urban waste. Dispose unserviceable batteries and polymerization lights according to the corresponding legal requirements in your country. Batteries must not be incinerated.
13

What if....?
Symbol |
Causes |
Error Rectification |
|
|
|
Electronic defect in the handpiece |
Remove and reinsert the battery. If the error remains, |
|
|
||
|
|
or battery |
replace the battery with the power pack (Click & Cure). |
|
|
|
If the error remains, please contact your dealer or your |
|
|
|
local Service Center. |
|
|
|
|
|
|
|
|
|
|
Apparatus is overheated or undercooled |
Allow the apparatus to cool down (or assume room |
|
|
||
|
|
|
temperature if it is undercooled) and try again after a |
|
|
|
certain time. If the error remains, please contact your |
|
|
|
dealer or your local Service Center. |
|
|
|
|
|
|
|
|
|
|
Electronic defect in the battery |
Remove and reinsert the battery. If the error remains, |
|
|
||
|
|
|
place the apparatus into the charging base. |
|
|
|
If the error remains nonetheless, replace the battery |
|
|
|
with the power pack (Click & Cure). |
|
|
|
Please contact your dealer or your local Service Center. |
|
|
|
|
|
|
|
|
|
|
Battery empty |
Position the handpiece in the charging base. „Charg- |
|
|
||
|
|
|
ing Battery“ briefly appears in the display before the |
|
|
|
display returns to the stand-by mode. If the battery is |
|
|
|
not charged, the contacts have to be cleaned. If the |
|
|
|
error remains, please contact your dealer or your local |
|
|
|
Service Center. |
|
|
|
|
|
|
|
|
No display |
Charging contacts contaminated |
Check if the handpiece has been correctly placed into |
|
during |
|
the charging base. Clean battery contacts. Information: |
|
charging |
|
“Charging Battery“ briefly appears in the display |
|
|
|
Battery in safety mode |
before the display returns to the stand-by mode. |
|
|
(integrated protective circuit) |
|
|
|
|
If cleaning the battery contacts does not improve the |
|
|
|
results, remove the battery from the apparatus. Charge |
|
|
|
the battery separately from the handpiece in the |
|
|
|
charging base for approx. 10 minutes. |
|
|
|
If the error remains, please contact your dealer or your |
|
|
|
local Service Center. |
|
|
|
|
LED of the |
Power pack not connected or defective |
Check if the power pack is correctly positioned in the |
|
charging |
|
charging base (also check the charging contacts) or if |
|
base is not |
|
the power pack is connected to the power supply by |
|
illuminated |
|
means of the power cord (display on the power pack |
|
|
|
|
lights up in green if it works correctly). |
|
|
|
If the error remains, please contact your dealer or your |
|
|
|
local Service Center. |
|
|
|
|
14
Warranty /
Procedure in case of repair
The warranty period for Bluephase is 3 years from the date of purchase (battery 1 year).
Malfunctions resulting from faulty material or manufacturing errors are repaired free of charge during the warranty period. The warranty does not provide the right to recover any material or non-material damage other than the ones mentioned. The apparatus must only be used for the intended purposes. Any other uses are contraindicated. The manufacturer does not accept any liability resulting from misuse and warranty claims cannot be accepted in such cases. This is particularly valid for:
–damage resulting from improper handling, especially incorrectly stored batteries (see Technical data: Transportation and storage conditions).
–damage to components resulting from wear under standard operating conditions (e.g. battery).
–damage resulting from external influences, e.g. blows, drop to the floor.
–damage resulting from incorrect set-up or installation.
–damage resulting from connecting the unit to a power supply, the voltage and frequency of which do not comply with the ones stated on the rating plate.
–damage resulting from improper repairs or modifications that have not been carried out by certified Service Centers.
In case of a claim under warranty, the complete apparatus (handpiece, charging base, power cord, and power pack) must be returned, carriage paid, to the dealer or directly to Ivoclar Vivadent, together with the purchase document. Use the original packaging with the corresponding cardboard inserts for transportation.
Repair work may only be carried out by a certified Ivoclar Vivadent Service Center. In case of a defect that cannot be rectified, please contact your dealer or your local Service Center (see addresses on the reverse side). A clear description of the defect or the conditions under which the defect occurred will facilitate locating the problem. Please enclose this description when returning the apparatus.
Product specifications
Delivery form
1 Charging base, 1 Power cord, 1 Power pack, 1 Handpiece, 1 Battery (Li-Po), 1 10 mm light probe, 3 Anti-glare cones, Sleeves, 1 Set of Instructions for Use
Accessories
The following accessories are available for Bluephase:
REF Description
608537 Light probe 10 mm, black (G2)
608538 Pin-point light probe 6>2 mm, black
551756 Anti-glare cones
592496 Anti-glare shield
608534 Bluephase charging base (G2)
608535 Bluephase battery (G2)
608532 Bluephase handpiece (G2)
607922 Bluephase Meter
608554 Bluephase sleeves (G2)
Technical data
Operating voltage charging base Operating voltage handpiece
Power pack
Output
TYPE 15.2630
Operating conditions
Temperature Relative humidity Ambient pressure
Dimensions of the charging base Weight of the charging base Charging time
Power supply of the handpiece Max. battery time
Light source
Wavelength range
Light intensity
Operating
Dimensions of the handpiece: Weight of the handpiece
5 VDC
3.7 VDC with battery
5 VDC with power pack
100–240 VAC / 50-60 Hz / max. 0.4 A
Manufacturer: Friwo 5 VDC
+10 °C to +35 °C (+50 to +95 °F)
30% to 75%
700 hPa to 1060 hPa L=205mm W=150mm H=85mm 250 g
approx. 2 h (with the battery empty) Li-Po battery
approx. 60 min. (with a new, fully charged battery)
Polywave® LED 385 – 515 nm
max. 1,200 mW/cm2 ± 10 % 5 min. on / 6 min. off (intermittently)
L=260mm W=42mm H=120 mm (incl. battery) 225 g
Transportation and storage conditions:
Temperature |
-20 °C to +60 °C (-4 to 140 °F) |
Relative humidity |
10% to 75% |
Ambient pressure |
500 hPa to 1060 hPa |
Bluephase has to be stored in closed, roofed rooms. Protect the device from severe jarring.
Battery
–Do not store at temperatures above 40 °C / 104 °F (or 60 °C / 140 °F for a short period).
Recommended storage temperature 15 – 30 °C (59 – 86 °F).
–Always store the battery charged
–and not for longer than 6 months.
15
Liebe Kundin, lieber Kunde,
eine optimale Aushärtung ist die Basis für eine dauerhaft hohe Versorgungsqualität aller lichthärtenden Materialien. Hierzu trägt auch entscheidend das gewählte Polymerisationsgerät bei. Deshalb freut es uns, dass Sie sich für die Bluephase entschieden haben. Hierbei handelt es sich um ein hochwertiges Medizinprodukt, welches auf der Basis der gültigen Normen nach dem heutigen Stand von Wissenschaft und Technik gefertigt wird.
Die Gebrauchsinformation erklärt Ihnen, wie Sie das Gerät sicher in Betrieb nehmen, seinen vollen Leistungsumfang auf einfache Weise nutzen und für eine lange Verwendung pflegen können.
Bei Fragen stehen wir Ihnen gerne zur Verfügung (Adressen siehe hintere Umschlagseite).
Ihr Ivoclar Vivadent Team
16

Inhaltsverzeichnis
Produktübersicht |
18 |
|
– |
Teileverzeichnis |
18 |
– |
Anzeigen der Ladestation |
19 |
– |
Anzeigen des Handstücks |
19 |
Sicherheit |
20 |
|
– |
Bestimmungsgemässer Gebrauch |
20 |
– |
Indikation |
20 |
– |
Zeichenerklärung |
20 |
– |
Sicherheitshinweise |
20 |
Inbetriebnahme |
22 |
|
– |
Ladestation |
22 |
– |
Handstück |
23 |
– |
Akku |
24 |
– |
Kabelbetrieb Click & Cure |
|
Bedienung |
24 |
|
– |
Wahl des Belichtungsprogrammes und der Belichtungszeit |
24 |
– |
Speicherfunktion Cure Memory |
26 |
– |
Start |
26 |
– |
Akustische Signale |
26 |
– |
Lichtintensität |
26 |
– |
Messen der Lichtintensität |
26 |
Wartung und Reinigung |
27 |
|
– |
Gehäuse |
27 |
– |
Lichtleiter |
27 |
– |
Akkukontakte |
27 |
– |
Entsorgung |
27 |
Was ist, wenn …? |
28 |
|
Garantie / Vorgehen bei einem Reparaturfall |
29 |
|
Produktspezifikation |
29 |
|
– |
Lieferumfang |
29 |
– |
Zubehör |
29 |
– |
Technische Daten |
29 |
– |
Betriebsbedingungen |
29 |
– |
Transportund Lagerbedingungen |
29 |
Deutsch

Teileverzeichnis
13 |
12 |
1 |
3 |
2 |
5 6 4
10
11
9 |
7 |
8 |
1Handstück
2Starttaster
3Display
4Programmwahltaster
5Zeitwahltaster
6Lautstärketaster
7Power-Anzeige
8Ladestation
9Netzkabel
10Netzgerät
11Akku
12Lichtleiter 10 mm
13Blendschutzkegel
18

Anzeigen der Ladestation
Anzeige leuchtet blau -
Ladestation ist an die Stromversorgung angeschlossen
Anzeigen des Handstücks
Belichtungsprogramm bzw. Betriebszustand
Angewählte Indikation bzw. Belichtungsdauer
Ladezustand Akku
19
Sicherheit
Bestimmungsgemässer Gebrauch
Die Bluephase ist ein LED-Polymerisationsgerät zur Erzeugung von energiereichem Blaulicht und dient der Poly merisation von lichthärtenden Dentalwerkstoffen unmittelbar an der zahnärztlichen Behandlungseinheit. Zum bestimmungsgemässen Gebrauch gehört auch die Beachtung der Hinweise der vorliegenden Gebrauchs information.
Indikation
Die Bluephase eignet sich mit seinem Breitbandspektrum „polywave“ für die Polymerisation aller lichthärtenden Dentalwerkstoffen im Wellenlängenbereich von 385–515 nm. Hierzu zählen Füllungsmaterialien, Bondings/ Adhäsive, Unterfüllungen, Liner, Fissuren versiegler, Provisorien sowie Befestigungsmaterialien für Brackets und zahntechnische Werkstücke wie z.B. keramische Inlays.
Zeichenerklärung
Nicht zulässige Anwendung
Symbole am Gerät
Doppelt isoliert
(Gerät der Schutzklasse II)
Schutz gegen elektrischen Schlag (Gerätetyp BF)
Gebrauchsinformation beachten
Gebrauchsinformation beachten
Vorsicht
Das Gerät darf nicht über den normalen Hausmüll entsorgt werden. Informationen zur Entsorgung es Gerätes finden Sie auf der jeweiligen nationalen Ivoclar Vivadent Homepage.
Recycelbar
Sicherheitshinweise
Die Bluephase ist ein elektrisches Gerät und ein Medizinprodukt, welches der IEC 60601-1 (EN 60601-1) und der EMV Richtlinie, sowie der Medizinprodukterichtlinie 93/42/EWG unterliegt. Das Gerät erfüllt die geltenden EU-Richtlinien und ist in der LED-Klasse 2 klassifiziert.
NRTL (Nationally Recognized
Testing Laboratory)
Das Gerät hat das Werk in sicherem und technisch einwandfreiem Zustand verlassen. Um diesen Zustand zu erhalten und einen sicheren Betrieb zu ermöglichen, sind die Hinweise dieser Gebrauchsinformation zu beachten. Zur Vermeidung von Schäden sowie Gefahren für Patien ten, Anwender und Dritte gehören hierzu insbesondere folgende Sicherheitshinweise:
Bei Materialien deren Polymerisation ausserhalb des Wellenlängenbereichs von 385–515 nm aktiviert wird (derzeit sind hier jedoch keine Materialien bekannt.) Bei fraglichen Produkten wird empfohlen, sich diesbezüglich beim Materialhersteller zu erkundigen.
Das Gerät nicht in der Nähe leicht entflammbarer oder leicht entzündlicher Stoffe aufladen oder verwenden.
Tragbare und mobile Hochfrequenz-Kom- munikationseinrichtungen können medizinische Geräte beeinflussen. So ist eine gleichzeitige Verwendung von Mobiltelefonen während des Betriebs nicht zulässig.
20
Verwendungsund Haftungsumfang
–Die Bluephase ist ausschliesslich nach dem bestimmungsgemässen Gebrauch zu verwenden. Eine andere oder darüber hinausgehende Benutzung gilt als nicht bestimmungsgemäss. Für Schäden, die sich aus einer nicht bestimmungsgemässen Verwendung oder nicht sachgemässen Handhabung ergeben, übernimmt der Hersteller keine Haftung.
–Der Benutzer ist verpflichtet, die Bluephase eigenverantwortlich vor Gebrauch auf Eignung und Ein- setz-barkeit für die vorgesehenen Zwecke zu prüfen. Dies gilt insbesondere, wenn in unmittelbarer Nähe und gleichzeitig andere Geräte betrieben werden.
–Es dürfen nur Originalersatzteile und -zubehör von Ivoclar Vivadent eingesetzt werden (siehe Zubehör). Bei Schäden, die auf Verwendung anderer Ersatzteile sowie Zubehör zurückzuführen sind, übernimmt der Hersteller keine Haftung.
–Der Lichtleiter ist ein Anwendungsteil und kann sich im Betrieb an der Schnittstelle zum Handstück auf max. 45°C erwärmen.
Betriebsspannung
Vor dem Einschalten ist sicherzustellen, dass
a)die angegebene Spannung des Typenschildes mit der des Versorgungsnetzes übereinstimmt und
b)das Gerät die Umgebungstemperatur angenommen hat.
Bei separater Handhabung von Akku oder Netzteil – z.B. bei Inbetriebnahme oder Kabelbetrieb Click & Cure – ist ein Kontakt mit Patienten oder Dritten zu vermeiden. Die freiliegenden elektrischen Kontakte von Akku und Verbindungsstecker (Netzgerät) sind nicht zu berühren.
Annahme beeinträchtigter Sicherheit
Wenn anzunehmen ist, dass ein gefahrloser Betrieb nicht mehr möglich ist, so ist das Gerät von Akkuund Netz-spannung zu trennen und gegen unabsichtlichen Gebrauch zu sichern. Dies kann z.B. bei sichtbarer Be-schädigung oder eingeschränktem Betrieb der Fall sein. Eine vollständige Trennung vom Versorgungsnetz ist nur bei aus der Steckdose gezogenem Netzkabel gewährleistet.
Augenschutz
Eine direkte oder indirekte Bestrahlung der Augen ist zu vermeiden. Längere Bestrahlungen sind für das Auge unangenehm und können Schäden hervorrufen. Es wird
deshalb empfohlen, den mitgelieferten Blendschutz zu verwenden. Personen, die allgemein lichtempfindlich reagieren, Medikamente wegen Lichtempfindlichkeit oder photosensibilisierende Medikamente einnehmen, eine Augenoperation hinter sich haben oder die sich über längere Zeit mit diesem Gerät oder in seiner Nähe arbeiten, sollten dem Licht des Gerätes nicht ausgesetzt werden und Schutzbrillen (orange) tragen, die Licht unterhalb einer Wellenlänge von 515 nm absorbieren.
Akku
Vorsicht: Nur Originalteile – insbesondere Ivoclar Vivadent Akkus und Ladestationen – verwenden.
Akku nicht kurzschliessen. Nicht bei Temperaturen über 40°C (bzw. kurzzeitig 60°C) und immer geladen lagern. Die Lagerzeit darf 6 Monate nicht übersteigen.
Explosionsgefahr bei Entsorgung in offenem Feuer.
Bitte beachten Sie, dass Lithium-Polymer-Akkus bei un sachgemässer Behandlung oder bei mechanischer Beschädigung mit Explosion, Feuer und Rauchentwicklung reagieren können. Beschädigte Lithium-Polymer- Akkus dürfen nicht weiter verwendet werden.
Die bei Explosion, Feuer und Rauchentwicklung freigesetzten Elektrolyte und Elektrolytdämpfe sind toxisch und ätzend. Bei Augenund Hautkontakt sofort mit viel Wasser spülen. Das Einatmen der Dämpfe vermeiden. Bei Unwohlsein Arzt aufsuchen.
Wärmeentwicklung
Wie bei allen leistungsstarken Lampen ist die hohe Lichtintensität mit einer Wärmeentwicklung verbunden. Bei längerer Bestrahlung im pulpanahen Bereich oder von Weichgewebe können irreversible oder reversible Schäden auftreten. Deshalb sind die vorgeschriebenen Belichtungszeiten zu beachten. Ununterbrochene Belichtungszeiten von mehr als 20 Sekunden an derselben Zahnfläche sowie ein direkter Kontakt mit Gingiva, Mundschleimhaut oder Haut sind dringend zu vermeiden. Bei indirekten Restaurationen ist in intermittierenden Intervallen von je 20 Sekunden oder durch externe Kühlung mittels Luftstrom zu arbeiten.
21

Inbetriebnahme
Prüfen Sie den Lieferumfang auf Vollständigkeit und eventuelle Transportschäden (siehe Lieferumfang). Falls Teile fehlen oder beschädigt sind, wenden Sie sich bitte umgehend an Ihren Händler oder Ihre Service-Stelle.
Ladestation
Vor dem Einschalten ist sicherzustellen, dass die angegebene Spannung des Typenschildes mit der des vorhandenen Versorgungsnetzes übereinstimmt. Das Typenschild befindet sich an der Unterseite der Ladestation.
Die Ladestation auf eine geeignete, ebene Tischfläche stellen. Die Schutzfolie von dem Verbindungsstecker des Netzgerätes entfernen. Den Verbindungsstecker des Netzgerätes an der Unterseite der Ladestation schräg einsetzen und mit leichtem Druck einstecken bis er hörund fühlbar einrastet.
Netzkabel an das Versorgungsnetz anschliessen und mit dem Netzgerät verbinden. Die Power ON Anzeige auf der linken Gehäuseseite leuchtet blau auf (siehe Anzeigen der Ladestation).
Handstück
Vor der Montage des Lichtleiters ist die Schutzfolie an der zugehörigen Öffnung des Handstücks zu entfernen.
Lichtleiter beim Einstecken in das Handstück leicht drehen.
Anschliessend Blendschutz auf Lichtleiter aufstecken.
22

Akku |
Akku - Ladezustand |
Vor dem ersten Gebrauch muss der Akku vollständig |
Der jeweilige Ladezustand wird bei eingeschaltetem |
geladen werden! |
Handstück auf dem Display wie folgt angezeigt: |
In voll geladenem Zustand hat der Akku eine Belich- |
|
tungskapazität von ca. 60 Minuten. |
Voll geladener Akku (Belichtungskapazität |
|
von ca. 60 Minuten) |
Halbvoll geladener Akku
Akku geradlinig in das Handstück einschieben bis er hörund fühlbar einrastet.
Handstück ohne Kaftaufwand in die Öffnung der Ladestation einsetzen. Falls ein Hygieneschutz verwendet wird, muss dieser vor dem Laden des Akkus entfernt werden.
Nach Möglichkeit ist das Gerät stets mit vollgeladenem Akku zu benutzen - dies dient der Verlängerung der Lebensdauer. Es wird daher empfohlen nach jedem Patienten das Handstück in die Ladestation zu stellen. Bei leerem Akku dauert die Aufladezeit 2 h.
Reserve (Im Reservemodus ist der letzte Balken in der Akku-Anzeige rot. Der Akku ist schnellstmöglich zu laden.)
Wird der Akku geladen, erscheint kurzfristig auf dem Display „Charging Battery“ bevor das Display in den Stand-by Modus geht.
Bei vollständig entladenem Akku geht das Handstück automatisch in den Stand-by Modus. Das Licht lässt sich nicht mehr starten und Belichtungsprogramm sowie -zeit können nicht mehr eingestellt werden. Das Handstück kann jedoch im Kabelbetrieb Click & Cure betrieben werden.
Der Akku ist ein Verschleissteil, das typischerweise nach ca. 2½ Jahren erneuert werden muss. Das Alter des Akkus kann dem Akkuaufkleber entnommen werden.
23

Kabelbetrieb Click & Cure
Die Bluephase kann jederzeit und insbesondere bei vollständig entleertem Akku im Kabelbetrieb betrieben werden.
Hierzu den Akku aus dem Handstück entnehmen. Anschliessend Netzgerät am Verbindungsstecker von der Unterseite der Ladestation lösen. Dabei nicht am Netzkabel ziehen.
Verbindungsstecker geradlinig in das Handstück einschieben bis er hörund fühlbar einrastet.
Mangels Stromversorgung kann die Ladestation während des Kabelbetriebes den Akku nicht laden.
Eine vollständige Trennung vom Versorgungsnetz ist nur bei aus der Steckdose gezogenem Netzkabel gewährleistet.
Bedienung
Vor jedem Gebrauch sind kontaminierte Oberflächen des Gerätes sowie Lichtleiter und Blendschutz zu desinfizieren bzw. zu autoklavieren. Darüber hinaus ist sicherzustellen, dass die abgegebene Lichtintensität eine ausreichende Aushärtung ermöglicht. Dazu den Licht leiter auf Verschmutzungen und Beschädigungen prüfen sowie die Lichtintensität regelmässig kontrollieren (z.B. mit dem Ivoclar Vivadent Radiometer „Bluephase Meter“).
Wahl des Belichtungsprogrammes und der Belichtungszeit
Belichtungsprogramm und Belichtungszeit können individuell eingestellt werden. Für unterschiedliche Anwendungen verfügt die Bluephase über 3 Belichtungsprogramme. Mit den Programmwahltastern wird das beabsichtigte Belichtungsprogramm angewählt. Das Display verändert sich entsprechend (siehe auch Anzeigen des Handstücks). Das Gerät wird bei der ersten Inbetriebnahme mit folgender Voreinstellung ausgeliefert:
–HIGH (High Power): 10 Sekunden
–LOW (Low Power): 10 Sekunden
–SOFT (Soft start): 15 Sekunden
Die beabsichtigte Belichtungszeit wird mit den Zeitwahltastern angewählt. Zur Auswahl stehen 5, 10, 15, 20 und 30 Sekunden.
Bei der Wahl der Belichtungszeit ist die Gebrauchsinformation des verwendeten Materials zu beachten.
Bei Compositen beziehen sich die genannten Belichtungsempfehlungen auf sämtliche Farben und – sofern die Gebrauchsinformation des betroffenen Materials keine abweichende Empfehlung aufweist – auf Schicht stärken von maximal 2 mm. Diese Empfehlungen gelten allgemein für Belichtungen, bei denen das Lichtaustrittsfenster des Lichtleiters direkt auf dem zu bestrahlenden Material aufsitzt. Mit zunehmendem Abstand sind die Belichtungszeiten entsprechend zu verlängern. Bei einem Abstand von 9 mm reduziert sich die effektive Lichtintensität auf ca. 50 %, so dass die empfohlene Belichtungszeit zu verdoppeln ist.
24

Belichtungsprogramme
HIGH POWER Programm
Konstant hohe Lichtintensität zur Polymerisation von Füllungsund Befestigungsmaterialien bei direkten und indirekten Restaurationen.
 1.200 mW/cm2
Lichtintensität |
1'200 mW/cm2 |
Aushärtungszeit für Composites |
15 s |
Aushärtungszeit für Tetric EvoCeram / IPS Empress Direct |
10 s |
Füllungsmaterialien |
Belichtungszeit |
Composite |
|
• 2 mm 1) |
|
IPS Empress Direct / IPS Empress Direct Flow / |
|
Tetric EvoCeram / Tetric EvoFlow / Tetric / |
10 s |
Tetric Basic White / Tetric N-Ceram / Tetric N-Flow |
|
Heliomolar / Heliomolar HB / Heliomolar Flow |
|
Alle klassischen Composites |
15 s |
• 4 mm 2) |
|
Tetric EvoCeram Bulk Fill / Tetric Basic White |
10 s |
Compomer 3) |
|
Compoglass F / Compoglass Flow |
20 s |
Indirekte Restaurationen /
Befestigungsmaterialien
0 |
t [s] |
Variolink II Base 4) / Variolink Veneer / Variolink N Base 4) |
pro mm Keramik: |
||
/ Variolink N Clear Veneer / Variolink Ultra 5) |
/ |
10 s pro Fläche |
|||
|
|
||||
|
|
Dual Cement 5) / Variolink II 5) |
|
|
|
|
|
Verschiedenes |
|
|
|
|
|
Helioseal / Helioseal F / Helioseal Clear |
|
10 s |
|
|
|
Monopaque |
|
20 s |
|
|
|
MultiCore Flow / Multicore HB |
|
20 s |
|
|
|
Heliosit Orthodontic |
|
10 s |
|
|
|
Telio Add-On Flow |
|
15 s |
|
|
|
Telio Stains |
|
10 s |
|
|
|
IPS Empress Direct Color |
|
10 s |
|
|
|
IPS Empress Direct Opaque |
|
20 s |
|
650 mW/cm2
0 |
t [s] |
LOW POWER Programm
Reduzierte Lichtintensität mit verringerter Temperaturentwicklung für die Polymerisation im pulpanahen Bereich von Adhäsiven, Linern und Füllungsmaterialien bei Versorgung von Kavitäten der Klasse V.
Adhäsive |
Belichtungszeit |
AdheSE / AdheSE One F |
|
ExciTE / ExciTE DSC |
10 s |
Tetric N-Bond / Tetric N-Bond Self-Etch |
|
Heliobond (Syntac) |
|
Provisorische Materialien |
|
Telio CS Inlay/Onlay |
10 s |
Systemp.inlay/onlay |
10 s |
Fermit / Fermit N |
10 s |
Telio CS Link / Systemp.link |
20 s pro Fläche |
Verschiedenes |
|
Heliosit Orthodontic |
20 s |
Vivaglass Liner |
20 s |
SOFT START Programm
Stufenweise Steigerung der Licht intensität mit reduziertem Schrumpfungsstress und verringerter Temperaturenwicklung für die Polymerisation von Füllungsmaterialien
1.200 mW/cm2
650 mW/cm2
0 5 |
t [s] |
Füllungsmaterialien |
Belichtungszeit |
Composite |
|
• 2 mm 1) |
|
IPS Empress Direct / IPS Empress Direct Flow / |
|
Tetric EvoCeram / Tetric EvoFlow / Tetric / |
15 s |
Tetric Basic White / Tetric N-Ceram / Tetric N-Flow |
|
Heliomolar / Heliomolar HB / Heliomolar Flow |
|
Alle klassischen Composites |
20 s |
• 4 mm 2) |
|
Tetric EvoCeram Bulk Fill / Tetric Basic White |
15 s |
Compomer 3) |
|
Compoglass F / Compoglass Flow |
20 s |
1) Gilt für Schichtstärken von maximal 2 mm und soweit die Bedienungsanleitung |
des betroffenen |
Materials keine abweichende Empfehlung aufweist (möglich z.B. bei Dentinfarben) |
||
2) Gilt für Schichtstärken von maximal 4 mm und soweit die Bedienungsanleitung |
des betroffenen |
Materials keine abweichende Empfehlung aufweist (möglich z.B. bei Dentinfarben) |
||
3) Gilt für Schichtstärken von maximal 3 mm |
4) Gilt bei Lichthärtung (ausschliessliche Verwendung der Basepaste) |
5) Gilt bei Dualhärtung |
||
25

Speicherfunktion Cure Memory
Die zuletzt angewendete Einstellung wird in der Kombination Belichtungsprogramm und -zeit automatisch gespeichert.
Start
Mit dem Starttaster wird das Licht eingeschaltet. Nach Ablauf der gewählten Belichtungszeit wird das Belichtungsprogramm automatisch beendet. Falls gewünscht, kann das Licht vorzeitig durch nochmaliges Betätigen des Starttasters ausgeschaltet werden. Gleichzeitig zur Lichtaktivierung schaltet sich auch der Ventilator ein. Nach dem Beenden der Belichtungszeit läuft dieser zur Kühlung des Gerätes nach. Solange der Ventilator läuft, darf der Akku nicht entnommen werden.
Akustische Signale
Bei folgenden Funktionen ertönen akustische Signale:
–Start (Stop)
–Alle 10 Sekunden
–Programmwechsel
–Belichtungszeitwechsel
–Akku mit Ladestation verbinden
–Akku einsetzen
–Error-Meldung
Falls gewünscht, können die akustischen Signale in der Lautstärke geregelt werden. Dazu bei ausgeschaltetem Licht den blauen Lautstärketaster (siehe Produktübersicht) drücken und mit dem linken Zeitwahltaster die Lautstärke verringern bzw. den Ton ganz ausschalten. Sollen die akustischen Signale wieder eingeschaltet bzw. die Lautstärke erhöht werden, muss der blaue Lautstärketaster und danach der rechte Zeitwahltaster gedrückt werden.
Lichtintensität
Die Lichtintensität wird bei Betrieb des Gerätes konstant gehalten. Bei Verwendung des mitgelieferten 10mm Lichtleiters wurde die Lichtintensität kalibriert auf
1200 mW/cm2 +/- 10%.
Wird ein anderer als der mitgelieferte Lichtleiter verwendet, hat dies einen direkten Einfluss auf die abgegebene Lichtintensität.
Bei parallelwandigen Lichtleitern (10 mm) ist der Durchmesser beim Lichteintritt und der am Lichtaustrittsfenster gleich. Bei der Verwendung von fokussierenden Lichtleitern (10>8 mm Lichtleiter, Pin-Point Lichtleiter 6>2 mm) ist der Durchmesser beim Lichteintritt grösser als der am Lichtaustrittsfenster. Das einfallende Blaulicht wird so auf eine kleinere Fläche gebündelt. Dadurch erhöht sich die abgegebene Lichtintensität.
Pin-Point Lichtleiter eigenen sich für die punktuelle Polymerisation z.B. zum Fixieren von Veneers vor der Überschussentfernung. Für die komplette Aushärtung muss der Lichtleiter gewechselt werden.
Messen der Lichtintensität
Die Lichtintensität der Bluephase und des mitgelieferten 10mm Lichtleiters kann z.B. mit dem Bluephase Meter überprüft werden.
Falls der ermittelte Messwert nicht der erwarteten Licht intensität entspricht:
–Gewähltes Belichtungsprogramm prüfen
–Eventuell verschmutzten Lichtsensor des Radiometers reinigen
–Lichtleiter entfernen und die Lichtaustrittsöffnung beim Handstück mit einem von Alkohol benetzten Wattestäbchen reinigen
–Eventuell verschmutzten Lichtleiter reinigen (siehe Wartung und Reinigung)
–Eventuell beschädigten Lichtleiter gegen einen neuen austauschen
Falls diese Massnahmen keinen Erfolg bringen, wenden Sie sich bitte an Ihren Händler oder Ihre Service-Stelle.
26

Wartung und Reinigung
Aus hygienischen Gründen wird empfohlen, bei jedem Patienten Einmalschutzhüllen zu verwenden. Die Schutzhülle muss dabei bündig über den Lichtleiter gezogen werden. Kontaminierte Oberflächen des Gerätes und Blendschutz sind vor jedem Gebrauch zu desinfizieren (FD 366/Dürr Dental, Incidin Liquid/Ecolab) und der Lichtleiter zu sterilisieren sofern keine Einmalschutzhüllen verwendet werden. Bei Reinigungsarbeiten dürfen keine Flüssigkeiten oder andere Fremdmaterialien in das Handstück, die Ladestation und insbesondere nicht in das Netzgerät gelangen (Stromschlaggefahr). Bei Reinigung der Ladestation ist diese von der Netzspannung zu trennen.
Gehäuse
Handstück und Handstückhalter mit einer handels üblichen und aldehydfreien Desinfektionslösung abwis- chen. Keine hochaggressiven Desinfektionslösungen (z.B. Lösungen auf Basis von Orangenöl oder Lösungen mit einem Ethanolanteil von über 40%), Lösungsmittel (z.B. Aceton) oder spitze Gegenstände verwenden, die den Kunststoff angreifen oder verkratzen können. Verschmutzte Kunststoffteile mit Seifenlösung reinigen.
Lichtleiter
Bevor Sie den Lichtleiter reinigen und/oder desinfizieren, sollten Sie ihn vorbehandeln. Das gilt sowohl bei der maschinellen als auch bei der manuellen Reinigung und Desinfektion.
Vorbehandlung
–Entfernen Sie grobe Verunreinigungen direkt nach der Anwendung oder bis spätestens 2 Stunden danach. Spülen Sie dazu den Lichtleiter gründlich unter fliessendem Wasser ab (mindestens 10 Sekunden). Sie können auch eine geeignete, aldehydfreie Desinfektionsmittellösung verwenden um eine Fixierung von Blut zu verhindern.
–Um Verunreinigungen manuell zu entfernen, verwenden Sie am besten eine weiche Bürste oder ein weiches Tuch. Anpolymerisiertes Composite lässt sich mit Alkohol entfernen, evtl. auch mit Hilfe eines Kunst stoffspatels. Keine scharfen oder spitzen Gegen ständen benutzen/einsetzen. Diese könnten die Oberfläche verkratzen.
Reinigung und Desinfektion
Zur Reinigung legen Sie den Lichtleiter in eine Reinigungslösung, so dass er ausreichend mit Flüssigkeit bedeckt ist (Ultraschall oder vorsichtiges Bürsten mit einer weichen Bürste können die Wirkung unterstützen). Empfohlen wird ein neutral-enzymatisches Reinigungsmittel. Bitte achten Sie beim Reinigen und Desinfizieren darauf, dass die verwendeten Mittel frei sind von
–organischen, mineralischen und oxidierenden Säuren (minimal zulässiger pH-Wert 5,5),
–Laugen (maximal zulässiger pH-Wert 8,5),
–Oxidationsmitteln (z. B. Wasserstoffperoxide)
Entnehmen Sie danach den Lichtleiter der Lösung und spülen Sie gründlich mit fliessendem Wasser nach (mindestens 10 Sekunden). Eine wirksame Alternative ist die Reinigung in einem Thermodesinfektor.
Sterilisation
Das intensive Reinigen und Desinfizieren ist unabdingbar dafür, dass die nachfolgende Sterilisation effektiv wirkt. Bitte verwenden Sie dafür ausschliesslich die Dampf sterilisation. Die Sterilisationszeit (Expositionszeit bei der Sterilisationstemperatur) beträgt 4 Minuten bei 134°C; der Druck sollte 2 bar betragen. Trocknen Sie den sterili sierten Lichtleiter entweder mit dem speziellen Trocknungsprogramm Ihres Dampfautoklaven-Ofens oder mit heisser Luft. Der Lichtleiter ist für bis zu
200 Sterilisationszyklen getestet.
Überprüfen Sie danach den Lichtleiter auf Beschädigungen. Halten Sie den Lichtleiter gegen das Licht. Erscheinen einzelne Segmente schwarz, dann sind Glasfasern gebrochen. Tauschen Sie in diesem Fall den Lichtleiter gegen einen neuen aus.
Entsorgung
Das Gerät darf nicht über den normalen Hausmüll entsorgt werden. Unbrauchbare Akkus und Polymerisationsgeräte sind den jeweiligen nationalen gesetzlichen Bestimmungen entsprechend zu entsorgen. Akkus nie ins Feuer werfen!
27
Loading...