


SR Nexco Paste
Instructions for Use

2
PRODUCT
INFORMATION
Table of Contents
4 Product information
Material
Usage
Composition
Working times/curing depths
Definitions and description
10 Shade determination – tooth shade, stump shade
Preparation guidelines and minimum thickness
13 Framework-free restorations (inlay/onlay)
Model isolation
Liner application
Inlay/onlay layering
Final polymerization
Finishing/polishing
Preparing for cementation
20 Framework-free restorations (anterior crown)
Model isolation
Liner application
Anterior crown layering
Final polymerization
Finishing/polishing
Preparing for cementation
26 Fixed, metal-supported restorations
Framework design
Framework fabrication
Casting and finishing
Conditioning of the framework
Layering diagram
Optional: Application of SR Nexco Retention Flow
Opaquer application
Cervical, Dentin and Incisal layering
Final polymerization
Finishing/polishing
42 Framework-supported combination dentures
Procedure for combination dentures
Matching the shade of SR Nexco to the shade of SR Phonares
®
II
47 Modification and characterization of denture teeth
Conditioning of the surface
Characterization and customization with Effect and Incisal materials
Final polymerization
Finishing/polishing/outcome
PRACTICAL PROCEDURE

3
PRACTICAL PROCEDURE
GENERAL
INFORMATION
50 Restorations with gingiva portions
Framework design
Starting situation
Framework design criteria
Contouring
Finishing
Conditioning of the framework
Opaquer application
Cervical, Dentin and Incisal layering
Gingiva layering
Final polymerization
Finishing/polishing
56 General information
Cementation
Polymerization parameters
Subsequent adjustments
Materials combination table A–D shades
Frequently Asked Questions
4
Product Information
MATERIAL
SR Nexco Paste is a purely light-curing lab composite with micro-
opal fillers for framework-based and framework-free dental
restorations.
As the desired shades can be reproduced even with varying layer
thicknesses, a true-to-nature appearance can be achieved for
fixed and removable dental restorations, even with artificial
gingiva. The high content of inorganic opal fillers affords optimum
benefits in terms of abrasion, discolouration, processing and surface
gloss.
Physical properties of SR Nexco Paste
Together with the respective matrix the inorganic micro-opal fillers
impart a homogeneous structure to the material. The balanced ratio
between these two components results in outstanding physical
properties achieved with the most popular polymerization units
available on the market.
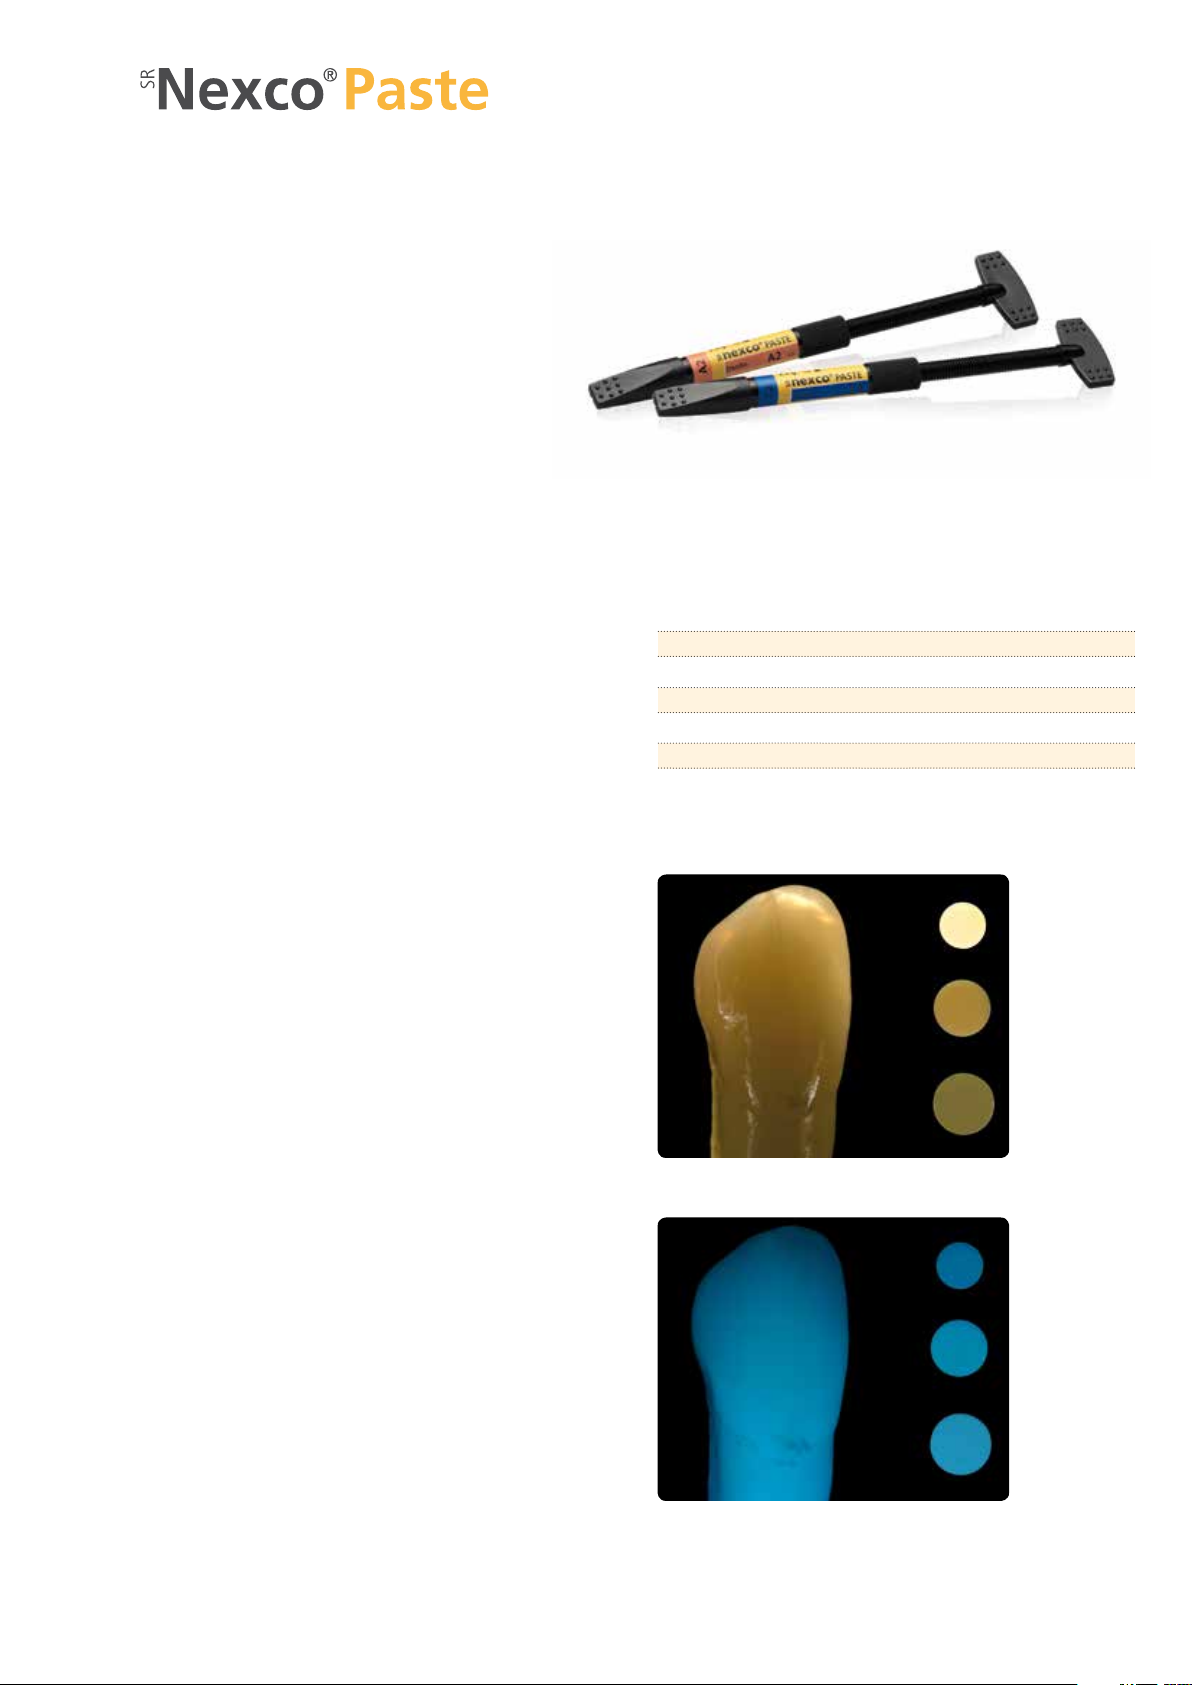
Esthetic properties of SR Nexco Paste
In transmitted light, the full range of light-optical properties of
SR Nexco Paste becomes evident: The opalescence and translucency
of SR Nexco restorations correspond to the dynamic light effects of
natural teeth.
The light behaviour is very similar to that of natural teeth in all
areas: the tooth neck, the dentin areas and the incisal area.
This image taken with incident light shows the fluorescence and
luminosity of SR Nexco restorations. Natural teeth derive a major
part of their brightness effect from their fluorescence. This
fluorescence plays an important role in the true-to-nature light
behaviour of SR Nexco restorations.
SR Nexco Paste
Modulus of elasticity [MPa] 6500 ± 500
Flexural strength [MPa] 90 ± 10
Hardness (Vickers) [MPa] 440 ± 10
Water absorption [µg/mm³] 15 ± 1
Water solubility [µg/mm³] 1 ± 0.5
Margin
Margin
Dentin
Dentin
Incisal
Incisal

5
General note
As is generally known, composites have to meet different demands
due to country-specific uses. Composite veneering materials show
specific characteristics and properties and their performance and
durability can therefore not be compared with that of other C&B
materials. The composite restorations may require clinical repair over
time, depending on the situation and the individual case. The
restorations can be repaired by means of microfilled composites, as
described in the section on "Subsequent Adjustments" on page 58.
USES
Indications
Fixed denture prosthetics
Framework-based
– Veneering of metal-supported restorations
– Veneering of combination dentures (e.g. telescope crown
veneers)
– Veneering of fixed-removable implant superstructures
– Veneering of gingiva portions in fixed-removable implant
superstructures
– Veneering of CAD/ CAM-fabricated metal frameworks
– Masking of model cast frameworks with SR Nexco Opaquer pink
Framework-free
– Inlays/onlays/veneers
– Anterior crowns
Modification/characterization
– Superficial characterization of Ivoclar Vivadent resin teeth with
SR Nexco Stains in conjunction with SR Connect and subsequent
layering with SR Nexco Paste layering materials
– Shape and shade modifications of Ivoclar Vivadent resin teeth
with SR Nexco Paste layering materials in conjunction with
SR Connect
– Modification and characterization of Telio
®
CAD and Telio Lab
with SR Nexco Stains, Dentin, Incisal and Effect Shades in con-
junction with SR Connect
Contraindications
– Posterior crowns without framework support
– Conventional cementation of fixed, metal-free restorations
– Framework-free long-term temporaries worn for longer than
12 m onths
– Patients with occlusal dysfunctions or parafunctions, such as
bruxism, etc.
– Patients with inadequate oral hygiene and substantial drug intake
(e.g. drugs that reduce salivary flow)
– All the clinical applications that are not described as an indication
by the manufacturer
– Veneering of metal frameworks without the use of SR Link and
SR Nexco Opaquer
– The use of non-recommended polymerization devices or bonding
agents
– Repairing of chipped denture teeth

6
COMPOSITION
– SR Nexco Paste layering materials
(Margin, Dentin, Incisal, Effect, Gingiva and Intensive Gingiva
materials)
Dimethacrylates (17–19 wt.%); copolymer and silicon dioxide
(82–83 wt.%). Additional contents are stabilizers,
catalysts and pigments (<1 wt.%).
The total content of inorganic fillers is 64–65 wt.% /
46–47 vol.%. Particle size: 10–100 nm.
– SR Nexco Liner
Dimethacrylates (48 w t.%); barium glass filler, silicon dioxide
(51 wt%). Additional contents are catalysts, stabilizers and
pigments (<1 wt.%).
– SR Nexco Opaquer
Dimethacrylates 65–70 wt.%), inorganic filler (<43 wt.%).
Additional contents are catalysts, stabilizers and pigments
(<2 w t.%) .
– SR Nexco Stains
Dimethacrylates (47–48 wt.%); copolymer and silicon dioxide
(49 –50 wt.%).
Additional contents are catalysts, stabilizers and pigments
(2–3 wt .%) .
– SR Modelling Liquid
Dimethacrylate (approx. 99%). Additionally, initiators and
catalysts are contained.
– SR Nexco Retention Flow
Dimethacrylates (65–70 wt.%), inorganic filler (30–35 wt.%).
Additional contents are catalysts, stabilizers (<2 wt.%).
– SR Link
Dimethacrylate, phosphate ester, solvents and benzol peroxide
– SR Gel
Glycerine, silicon dioxide and aluminium oxide
– SR Retention Adhesive
Copolymer, resin and softening agent (30 wt.%) solved in
acetone (70 wt.%).
– SR Microretentions: 200 –300 µm
– SR Macroretentions: 400–600 µm
Copolymer (99.5 wt.%) and titanium dioxide (0.5 wt.%).
– SR Connect
Methyl methacrylate (60–70%), polymethyl methacrylate (<10%),
dimethacrylate (20–30%) and catalysts (3–5%).
– Universal Polishing Paste
Emulsion of aluminium oxide, ammonium oleate, petroleum
distillate and water.
Warning
SR Nexco is intended for use in dentistry and dental technology.
Contact of unpolymerized material (pastes) with the skin or eyes
must be prevented. Contact with unpolymerized material may
have a slight irritating effect and may lead to a sensitization
against methacrylates. Customary medical gloves do not provide
protection against the sensitizing effect of methacrylates.
SR Connect contains methyl methacrylate (MMA). MMA is highly
flammable. Therefore, keep away from sources of ignition and do
not smoke. MMA is an irritant and is irritating to eyes, respiratory
organs and skin. Do not inhale vapours.
Do not inhale grinding dust. The safety notes on the individual
primary packages and labels have to be observed.
General note
Failure to observe the stipulated contraindications and processing
restrictions might lead to clinical failure in certain cases.
Side effects
Systemic side effects are not known to date. In individual cases
allergic reactions may occur. In case of a suspected or confirmed
allergy to one of the components, SR Nexco Paste or respective
other system components must not be used.
Storage instructions
– Store SR Link in the refrigerator (2–8 °C / 36–46 °F).
– Store SR Nexco Paste layering materials, SR Model Isolation,
SR Connect at 2–28 °C (36 –82 °F).
– Syringes should be closed immediately after use (exposure to
light causes premature polymerization).
– Protect the materials from direct sunlight.
– Do not use the products after the indicated expiration date.
– Keep material out of children’s reach.
Note on the cleaning of SR Nexco Paste restorations
As the ultrasonic cleaning liquids are highly aggressive, the
composite surface may begin dissolve if the liquid is used
inappropriately. Therefore, alkaline cleaning agents with a pH
higher than 8 must not be used.

7
DEFINITIONS AND DESCRIPTION
Compatibility with polymerization units
High-performance polymerization is requisite in the fabrication of
high-quality lab composite restorations. With the excellent light-
curing appliance Lumamat
®
100 from Ivoclar
Vivadent, you can achieve an optimum
polymerization of SR Nexco restorations and
thus benefit from the full potential of this
material's physical properties. In addition,
the sensor-controlled Quick appliance is
available to quickly precure the material. The
Quick can also be used for the intermediate
polymerization of other light-curing veneering
materials.
Apart from Lumamat 100, other poly-
merization appliances may also be used for
complete or intermediate polymerization. An overview of the tested
appliances and the respective polymerization parameters can be
found on page 57.
The range of available alloys may vary from country to country.
WORKING TIMES/CURING DEPTHS
Working times
SR Nexco materials are sensitive to light. The working time depends
on the layer thickness, the shade and the environmental light
conditions. Brighter shades react more quickly than darker ones.
The values indicated below are average values at a light intensity of
3000 Lux, which corresponds to a bright work space lighting. These
maximum values must be taken into consideration when extruding
the respective amount of veneering material.
2–25 min
low viscosity
4–25 min
SR Nexco Margin
SR Nexco Dentin
SR Nexco Incisal
SR Nexco Effect
SR Nexco Gingiva
high viscosity
SR Nexco Liner
SR Nexco Opaquer
SR Nexco Stains
SR Nexco
Time
Curing depths
Due to the light sensitivity, the curing depth (intermediate curing
with the Quick initial curing light) of SR Nexco materials depends on
the shade and above all the layer thickness. Bright and translucent
shades cure better, as light can penetrate through these shades
more easily than through darker and more opaque shades. These
values must be taken into consideration during the layering of the
different materials.
SR Nexco
Curing depths
(20 seco nds with t he Quick)
SR Nexco Opaquer max. 0.05 mm
SR Nexco Stains 0.2 – 0. 8 mm
SR Nexco Paste
Incisal, Dentin, Effect
min. 2.0 mm
SR Nexco Paste
Margin, Gingiva, Intensive Gingiva
min. 1.0 mm
Compatibility with Ivoclar Vivadent alloys
A metal framework is the basis for any veneered metal-based resto-
ration. To this end, Ivoclar Vivadent offers a wide range of different
high-quality alloys which are specifically designed to match their
area of indication. This range includes high-gold, reduced gold and
base metal alloys. In conjunction with the SR Link bonding system,
the alloys establish an ideal metal/composite bond.
When using other alloys, please ask your
alloy manufacturer about the
compatibility with SR Link and its
system components.
Alloys Au Pt Pd Ag
High-gold
Academy Gold 77.2 <1.0 – 12.7
Harmony
®
PF 72.0 3.6 – 13.7
Academy Gold XH 70.7 3.6 – 13.7
Reduced gold
Harmony
®
X-Hard 68.3 2.9 3.6 10.0
XL-X
®
62.8 – 3.9 16.1
Maxigold
®
59.5 – 2.7 26.3
Midigold
®
50 50.0 – 3.5 35.0
Magenta 50.0 – 6.5 21.0
Minigold
®
40.0 – 4.0 47.0
Harmony
®
3 3.5 – 25.9 50.8
Universal alloys
BioUniversal PdF 71.1 9.2 – 11.7
Co Ni Cr Mon
Base metal
d.SIGN
®
30 60.2 – 30.1 <1.0
Colado
®
CC 59.0 – 25.5 5.5
Colado
®
NC – 65.6 20.1 1.3
4all – 61.4 25.7 11.0
8
SR
®
Accessories
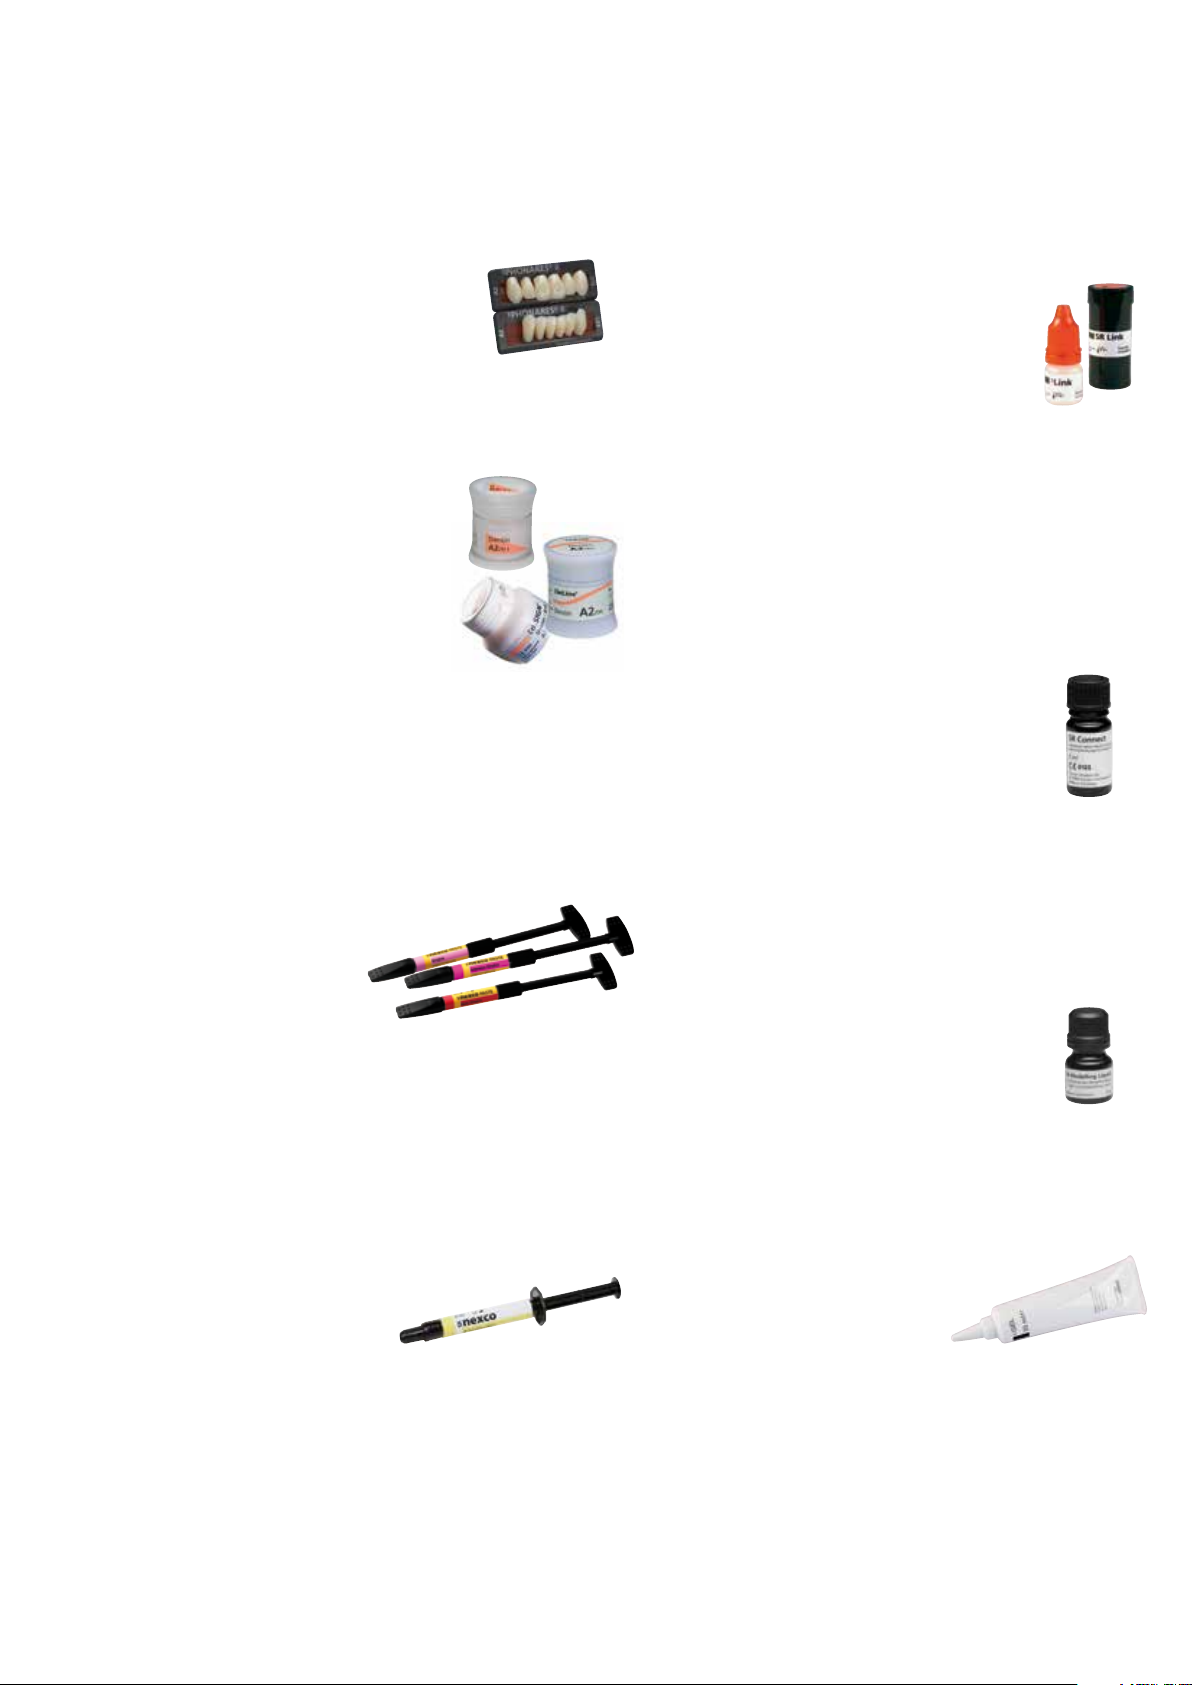
SR Link, 5 ml
SR Link is a metal /composite bonding agent that
provides a covalent bond between metal frameworks
and SR Nexco. SR Link is an easy-to-use and, above
all, tried-and-tested bonding system that can be used
in conjunction with a wide selection of alloys.
The bonding system is suitable for use on frame-
works made of
– alloys that contain less than 90% gold, palladium and platinum
– alloys that contain less than 50% copper and /or silver
– base metal alloys
– titanium and titanium alloys
SR Connect, 5 ml
SR Connect is a light-curing conditioner to bond light-curing
veneering materials to PMMA, heat- or cold-curing poly-
mers and resin denture teeth. These are the areas of
application:
Establishing a bonding layer in the case of
– individual shade and shape modifications of pre-
fabricated teeth and different veneering materials,
such as Telio
®
CAD and Telio Lab.
– individual shade adjustments of denture base resins.
SR Modelling Liquid, 5 ml
SR Modelling Liquid is used to wet the dental technician's
instruments during modelling and as a modelling aid (wetting of
the brush to disperse the material, etc.). SR Modelling Liquid must
not be used as a bonding agent for the purpose of
modifying the consistency or in the case of subsequent
adjustments. Use SR Modelling Liquid only in very low
quantities.
SR Gel, 30 ml
SR Gel is a glycerine-based masking gel that is impervious to
oxygen. The gel is applied to the restoration before polymerization
to minimize the formation of an inhibition layer on the surface of
the veneering composite. Consequently, the gel ensures
complete curing of the restoration surface. Do not
apply too thick a layer of SR Gel.
Compatibility of SR Phonares
®
II
Compatibility between denture teeth and
lab composite is an important criterion
particularly in the fields of partial and
removable denture prosthetics. Therefore,
the shade of SR Nexco has been specifically
coordinated with the shades of SR Phonares II.
Compatibility with IPS d.SIGN
®
and IPS InLine
®
The shade concept of SR Nexco and the
IPS InLine system has been modelled
after the shade system used for
IPS d.SIGN. Thus, an Opaquer, a Dentin
and a suitable Incisal material are allocated
to each tooth shade. The shades of the
Effect, Gingiva and Stains materials are
coordinated with the shade systems of
Ivoclar Vivadent ceramic products, so that
a similar esthetic outcome can be achieved with the shade-
independent additional materials. Users are thus offered an efficient
work procedure.
The benefits include an easy and quick processing in the fabrication
of combination dentures and a simplified shade match with existing
ceramic restorations.
SR Nexco Gingiva concept
The SR Nexco Paste Gingiva shades are coordinated with
the Ivoclar Vivadent Gingiva concept of
the IPS InLine system,
IPS d.SIGN and IPS e.max.
Thus, gingiva with a lifelike
shade effect can be created according to the same diagram with all
veneering systems particularly in implant superstructures.
In addition to the conventional Ivoclar Vivadent Gingiva concept,
SR Nexco Paste offers a new Intensive Gingiva shade (IG5) and a
Basic Gingiva shade (BG34). These materials can be used for
modifications and characterizations of e.g. IvoBase
®
dentures even
more quickly and easily.
SR Nexco Retention Flow
SR Nexco Retention Flow is a low-
viscosity opaquer component,
which can be applied into the
undercuts of the retention beads.
SR Nexco Retention Flow demonstrates a higher curing depth than
the shaded SR Nexco Opaquers and can be quickly and easily
applied due to its flowable consistency. The application of SR Nexco
provides for a reliable bond between the metal framework and the
first opaquer layer.
9
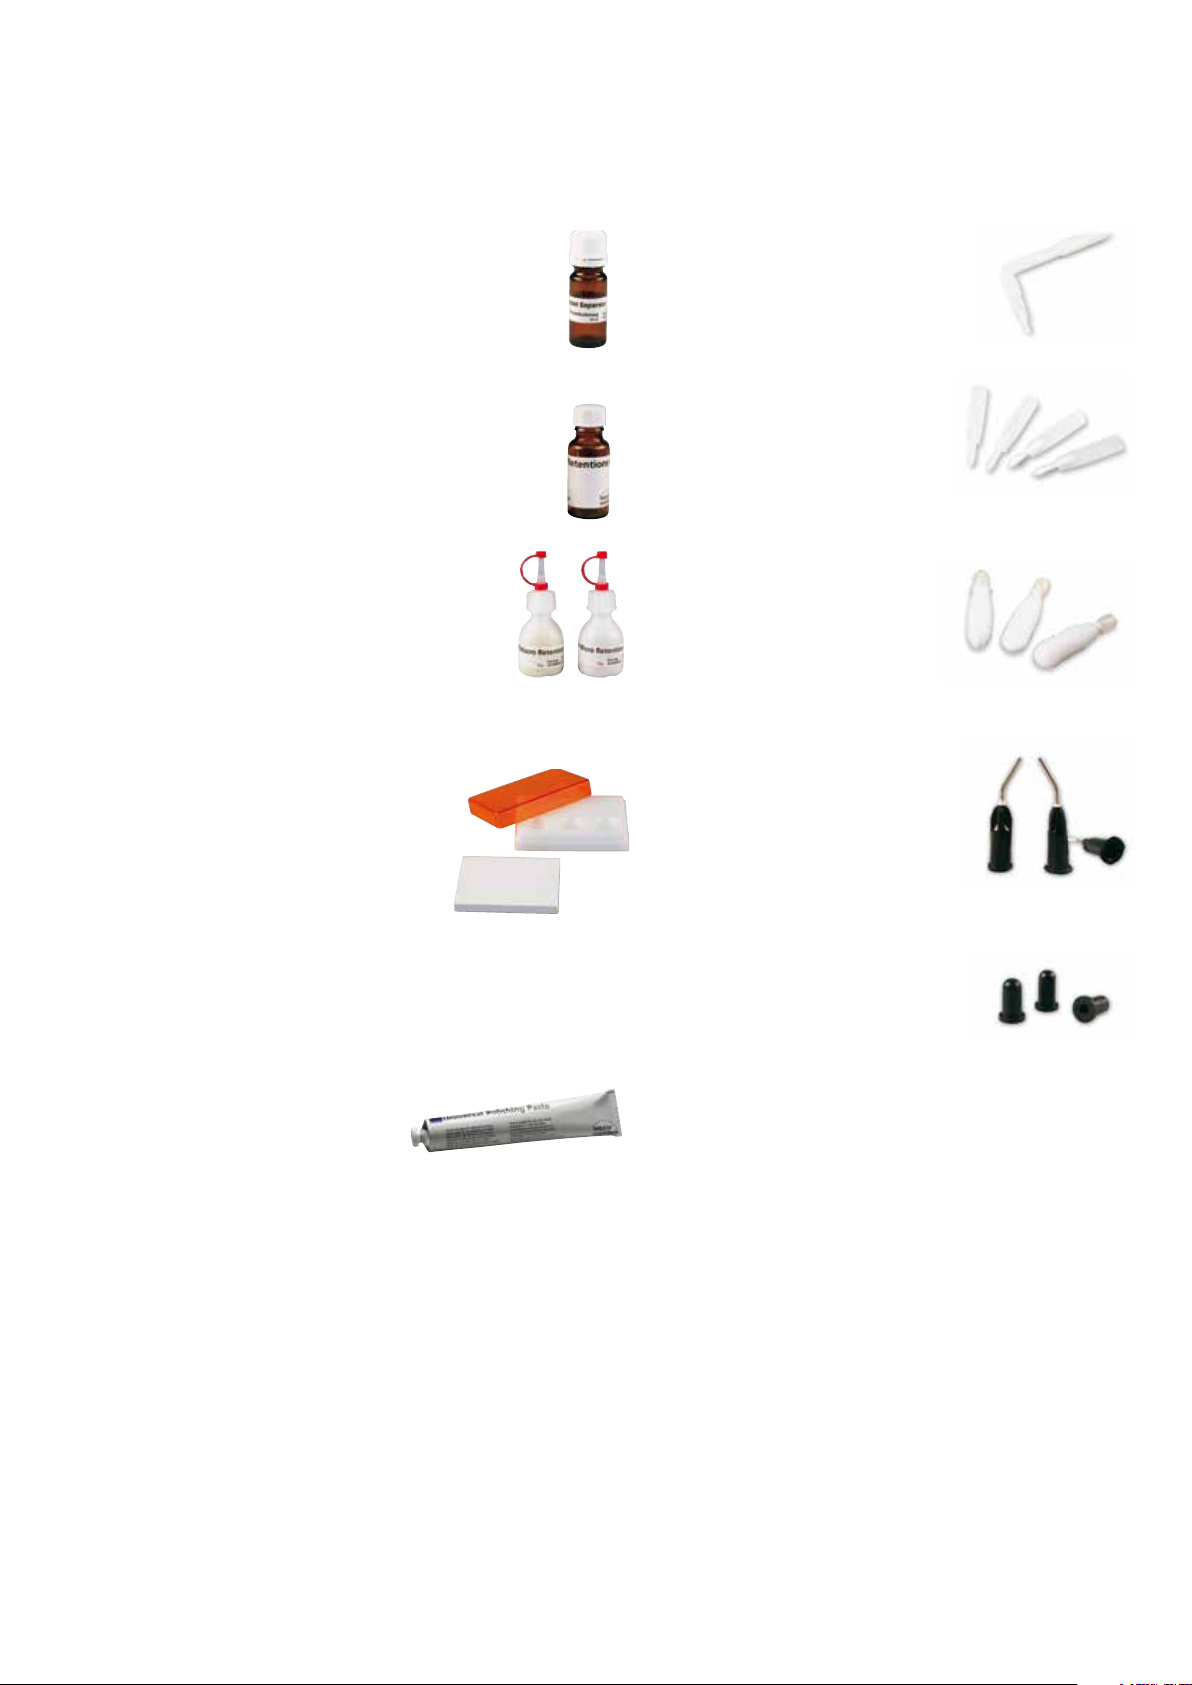
SR Model Seperator, 10 ml
The SR Model Separator is suitable for separating
working dies during the fabrication of metal-free
restorations and adjoining stone surfaces during lab
composite veneering.
SR Retention Adhesive, 20 ml
This adhesive varnish is utilized to affix micro- and
macroretention beads to the restoration surfaces after
contouring.
SR Microretention Beads, 15 ml
SR Macroretention Beads, 15 ml
Two different sizes of retention beads are available,
depending on space conditions.
– Microretention: 200–300 microns
– Macroretention: 400–600 microns
SR Mixing Pad, small
SR Mixing Plate, small
Depending on the material to be
processed, the SR Mixing Pad and
SR Mixing Plate may be used. The pad is
mainly used to process liquid SR Nexco
materials so that time-consuming
cleaning of the plate can be avoided. In
contrast, the plate is used to mix the more viscous composite
components. The light protective cover of the plate extends the
working time of the materials.
Universal Polishing Paste, 100 ml
The SR Universal Polishing Paste
enables quick and efficient polish-
ing of composite and metal
restorations.
The paste is particularly suitable for prepolishing and principal
polishing of SR Nexco veneers.
Universal Holder
Used to handle disposable brushes and
sponges and thereby help facilitate the
working procedures in the dental laboratory.
Disposable Brushes, 50x
The disposable brushes are particularly
suitable for the application of liquid
materials, such as SR Model Separator,
SR Link and SR Nexco Opaquer.
Disposable Sponges, 50x
The disposable sponges have been
modified to fit into the universal holder.
They are used to remove the inhibition
layer after polymerization of the
Opaquer and Liner.
Cannulas, 10x
These application aids can be attached to
Liner, Opaquer and Stains syringes. They
help achieve more accurate dosing and
cleaner application procedures as the
extrusion pressure can be controlled.
Cannula Caps, 20x
The cannula caps prevent the material from
drying out or polymerizing prematurely while
it is in the cannula and provide protection
against contamination.

10
SHADE DETERMINATION – TOOTH SHADE,
STUMP SHADE
Shade determination of the natural tooth
After tooth cleaning, the tooth shade of the non-prepared tooth
and/or the adjacent teeth is determined with the help of a shade
guide. Individual characteristics have to be considered when
determining the tooth shade. If a crown preparation is planned, for
example, the cervical shade should also be determined. In order to
achieve the best possible true-to-nature results, shade determination
should be carried out at daylight. Furthermore, the patient should
not wear clothes of intensive colours and /or lipstick.
Die shade selection
Based on the IPS Natural Die shade guide, a die for a framework-
free restoration is fabriacated. This die is used as control die in
conjunction with the restoration to check the shade.
Practical procedure

11
Application procedure – Shade Determination | Preparation Guidelines and Minimum Thickness
PREPARATION GUIDELINES AND MINIMUM LAYER THICKNESSES
Successful results can only be achieved with SR Nexco veneering material if the guidelines and minimum
layer thicknesses are strictly observed.
As framework-free SR Nexco restorations are placed using an adhesive cementation method, a tooth-
conserving and defect-oriented preparation technique can be used.
Inlays and onlays
Static and dynamic antagonist contacts must be taken into consideration. The preparation margins
must not be located on centric antagonist contacts. A preparation depth of at least 1.5 mm and an
isthmus width of at least 1.5 mm must be observed in the fissure area. Prepare the proximal box with
slightly diverging walls and observe an angle of >90° between the proximal cavity walls and the
prospective proximal inlay surfaces. For inlays with pronounced convex cavity walls without adequate
support by the proximal shoulder, marginal ridge contacts should be avoided. Round out internal edges
and transitions in order to prevent stress concentration within the composite material. Eliminate the
proximal contacts on all sides. Do not prepare slice-cuts or feather edges.
For onlays, provide at least 2 mm of space in the cusp areas. On the vestibular side, prepare a bevel
(10°–30°) to improve the esthetic appearance of the transition between the composite and the tooth.
Onlays are indicated if the preparation margin is less than approximately 0.5 mm away from the cusp
tip, or if the enamel is severely undermined.
Anterior crowns
Evenly reduce the anatomical shape and observe the stipulated
minimum thickness. Prepare a circular shoulder with rounded inner
edges or a pronounced chamfer of at least 0.8 mm. In the anterior
region, reduce the labial and/or palatal /lingual surfaces by at least
1.0 mm. Reduce the incisal crown third by at least 1.5 mm. Design
transitions in such a way that no angles or edges are present.
≥1.5
6°
>90°
60°–80°
≥1.5
≥2.0
≥1.5
6°
10–3 0°
≥1.5
0.8
0.8
≥1.0
1.5
>1.0

12
Veneers
If possible, the preparation should be entirely located in the enamel,
either in the form of a simple incisal reduction without incisal over-
lap or conventional preparation with incisal, chamfer-type incisal
overlap. Make sure that the incisal preparation margin is not located
in the area of the abrasion surfaces. The extent of the incisal reduc-
tion depends on the desired translucency of the incisal area to be
built up. The more transparent the incisal edge of the intended
veneer, the more pronounced the incisal reduction should be. The
incisal edge should be reduced by at least 1.0 mm. By preparing ori-
entation grooves using a depth marker, controlled enamel reduction
can be achieved. The minimum preparation thickness is approx.
0.6–1.0 mm, depending on the preparation technique selected.
Elimination of the proximal contacts is not required. Discoloured
teeth may require more preparation. In the cervical area, prepare a
cham fe r.
≥0.6
≥0.7
1.0
13
Practical Procedure – Framework-free Restorations (Inlay/Onlay)
Framework-free restorations (inlay/onlay)
MODEL ISOLATION
Sealer application
Fabricate a master model or a model with detachable
segments according to the impression in the usual manner.
Expose and mark the preparation margin. Block out under-
cuts with blocking-out wax or blocking-out resin to ensure
that the restoration can be removed after the polymeriza-
tion process without damaging the die. Basically, the appli-
cation of a sealer is recommended to harden the surface
and to protect the stone die. However, the sealer layer
must not result in any changes of the dimensions of the
stone die. It is not mandatory to utilize a spacer, as two
coats of SR Model Separator will be applied. If you use a
spacer, check as to whether it is compatible with SR Model
Se parator.
Sealing the dies and adjoining parts of the model
SR Model Separator is applied in two thin coats. Apply the first coat generously and make sure that all areas of the die are
well covered. Watch out for sharp edges (incisal edges) in particular. Then allow to react for 3 minutes. After the reaction
time, apply a second layer in a thin coat, invert the model and allow to dry for 3 minutes.
Additionally, apply SR Model Separator to adjoining model surfaces that may come into contact with SR Nexco including
counterbite, allow to react for a short time, and then disperse excess material with oil-free compressed air.
Inlay (and onlay)
Fabrication of a die coated with sealer as the working basis.
Apply first coat of SR Model Separator generously, watch out for sharp edges, and allow to react for 3 minutes. Isolate model areas.
14
APPLYING THE LINER
SR Nexco Liner combination table
BL A B C D
Tooth BL3 BL4 A1 A2 A3 A3.5 A4 B1 B2 B3 B4 C1 C2 C3 C4 D2 D3 D4
Liner BL BL 1 2 2 3 4 1 2 3 3 1 5 5 4 5 5 5
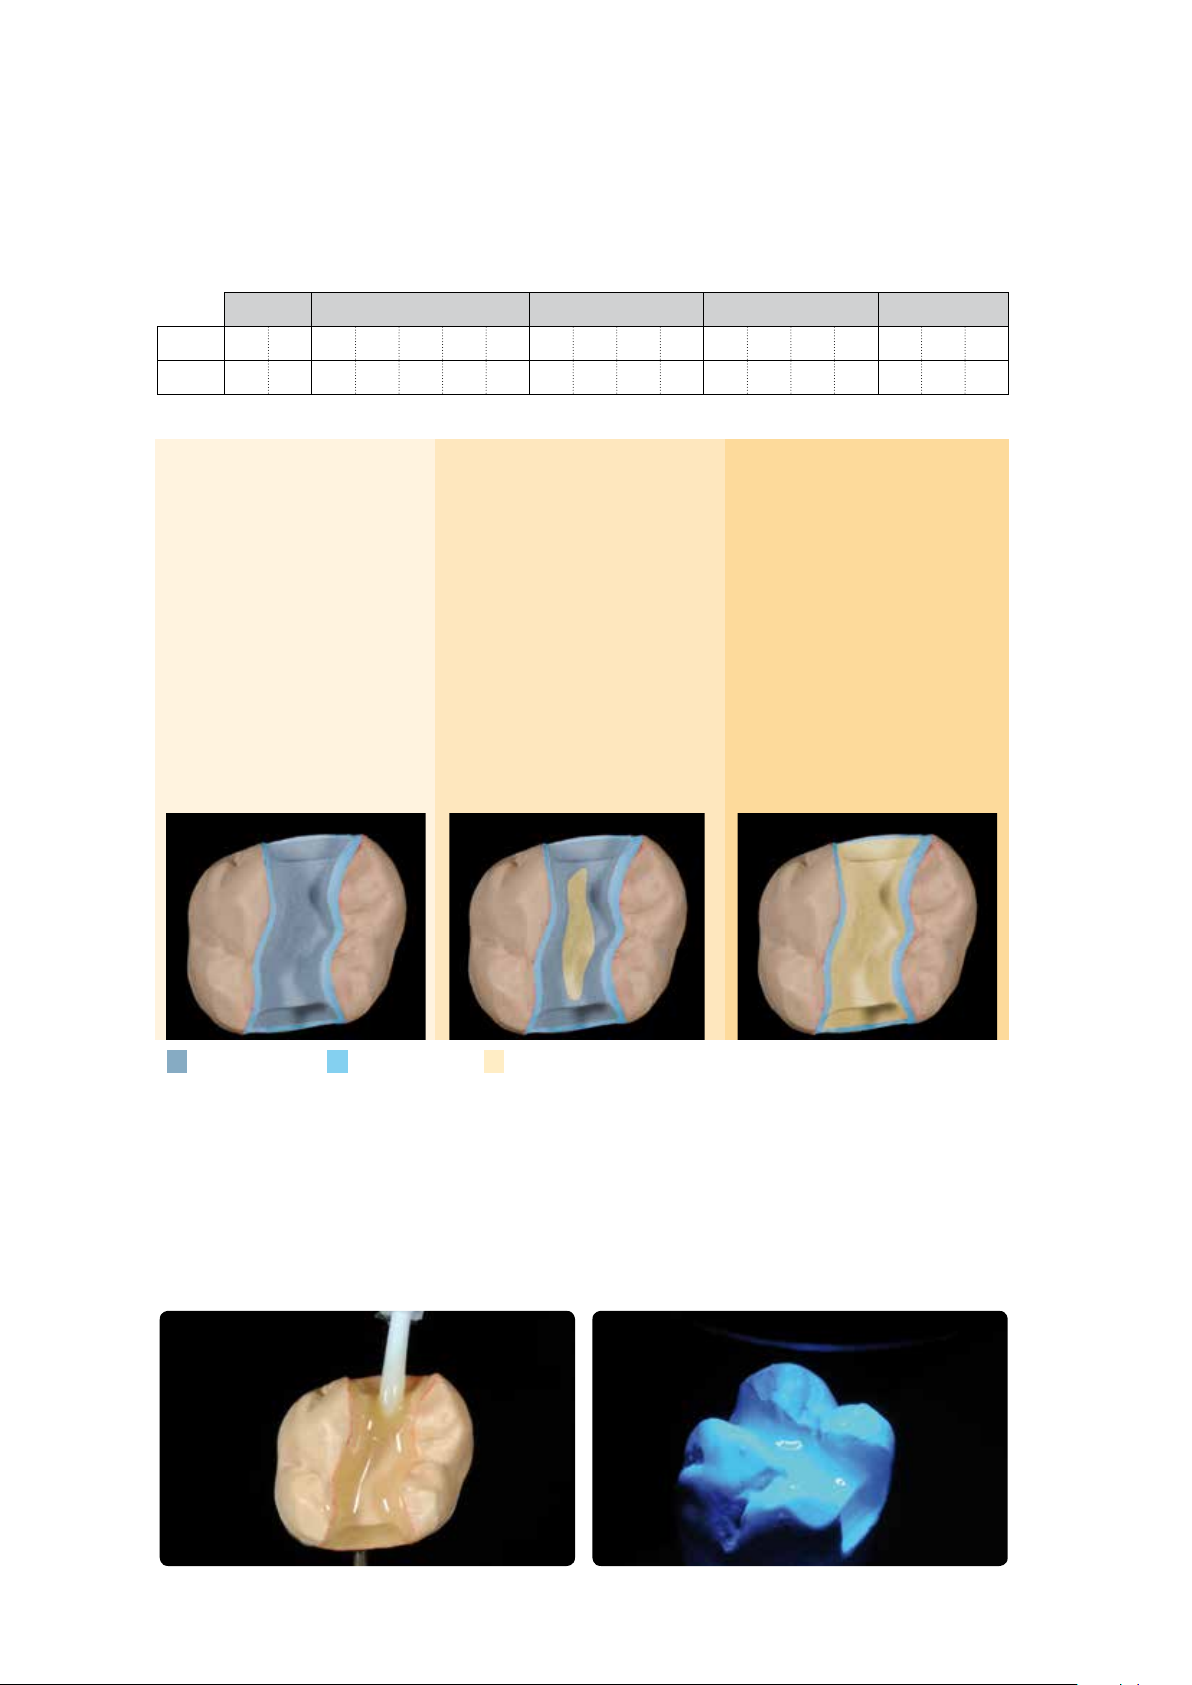
Procedure for
non-discoloured cavities
– Apply Liner clear to the cavity
walls and the cavity floor (dentin
area) for an optimum chameleon
effect.
– Apply Liner incisal in the
marginal areas (course of natural
enamel) to achieve a harmonious
transition between the shade of
the restoration and natural tooth
structure without grey lines.
Procedure for
slightly discoloured cavities
– Mask dark areas using a Liner in
an appropriate shade (1–5).
– Coat the remaining portions of
the cavity, except the marginal
areas, with Liner clear.
– Apply Liner incisal in the marginal
areas (course of natural enamel)
to achieve a harmonious transition
between the shade of the restora-
tion and natural tooth structure
without grey lines.
Procedure for
severely discoloured cavities
– Mask the entire cavity, except
the marginal areas, using a Liner
in a corresponding shade (1–5).
– Apply Liner incisal in the marginal
areas (course of natural enamel)
to achieve a harmonious transi-
tion between the shade of the
restoration and natural tooth
structure without grey lines.
Liner clear
Liner incisal
Liner 1–5
1
st
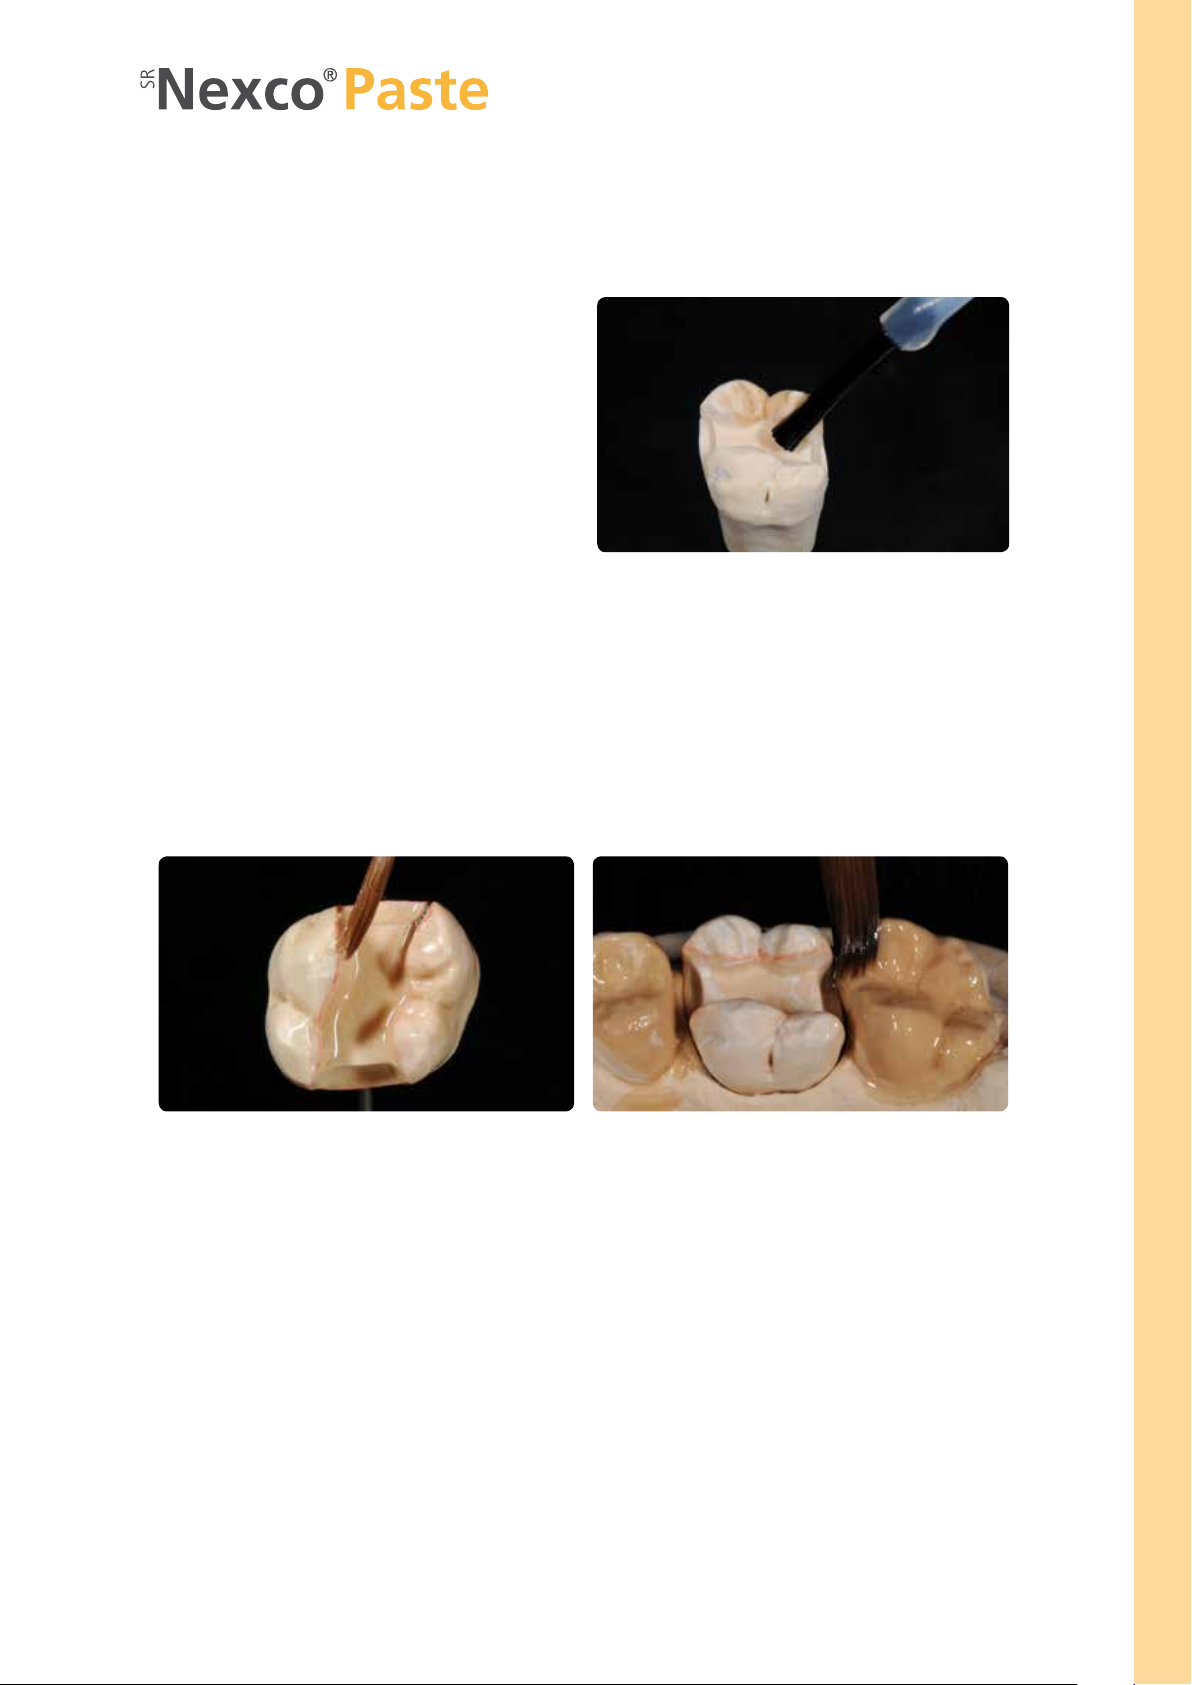
Liner application (Clear, 1–5)
Extrude the desired amount of the ready-to-use Liner paste from the syringe and spread it out slightly on the mixing pad
using a disposable brush. First, apply the Liner to the cavity walls and cavity floor in a thick coat and precure each
segment for 20 seconds using a Quick curing light. Make sure to fully cover all areas, as the Liner provides an essential
bonding surface to the luting composite. Do not cover marginal areas at this stage (course of natural enamel).
Generously cover the cavity walls and floor with the 1
st
liner cover and precure with Quick for 20 seconds for each segment.
15
Practical Procedure – Framework-free Restorations (Inlay/Onlay)
2
nd
Liner incisal application in the marginal area
After the application of the first Liner layer to the cavity walls and floor, apply Liner incisal in the marginal areas so that all
cavity surfaces are coated with Liner. Apply Liner incisal up to the preparation margin in order to ensure a reliable bond
between the preparation margins and the luting composite. This measure helps to reduce premature discolouration
between the restoration margins and tooth structure.
Apply Liner incisal to the marginal areas or the course of the natural enamel and precure each segment for 20 seconds
Thoroughly remove the inhibition layer with clean disposable sponges.
Polymerizing the Liner Appliance Time Program
Precuring time per segment Quick 20 s –
– The entire inner surface of the restoration has to be covered with SR Nexco Liner. The layer
thickness should be at least 150 µm. Thin out the Liner towards the preparation margin.
– Do not separate polymerized SR Nexco Liner from the die.
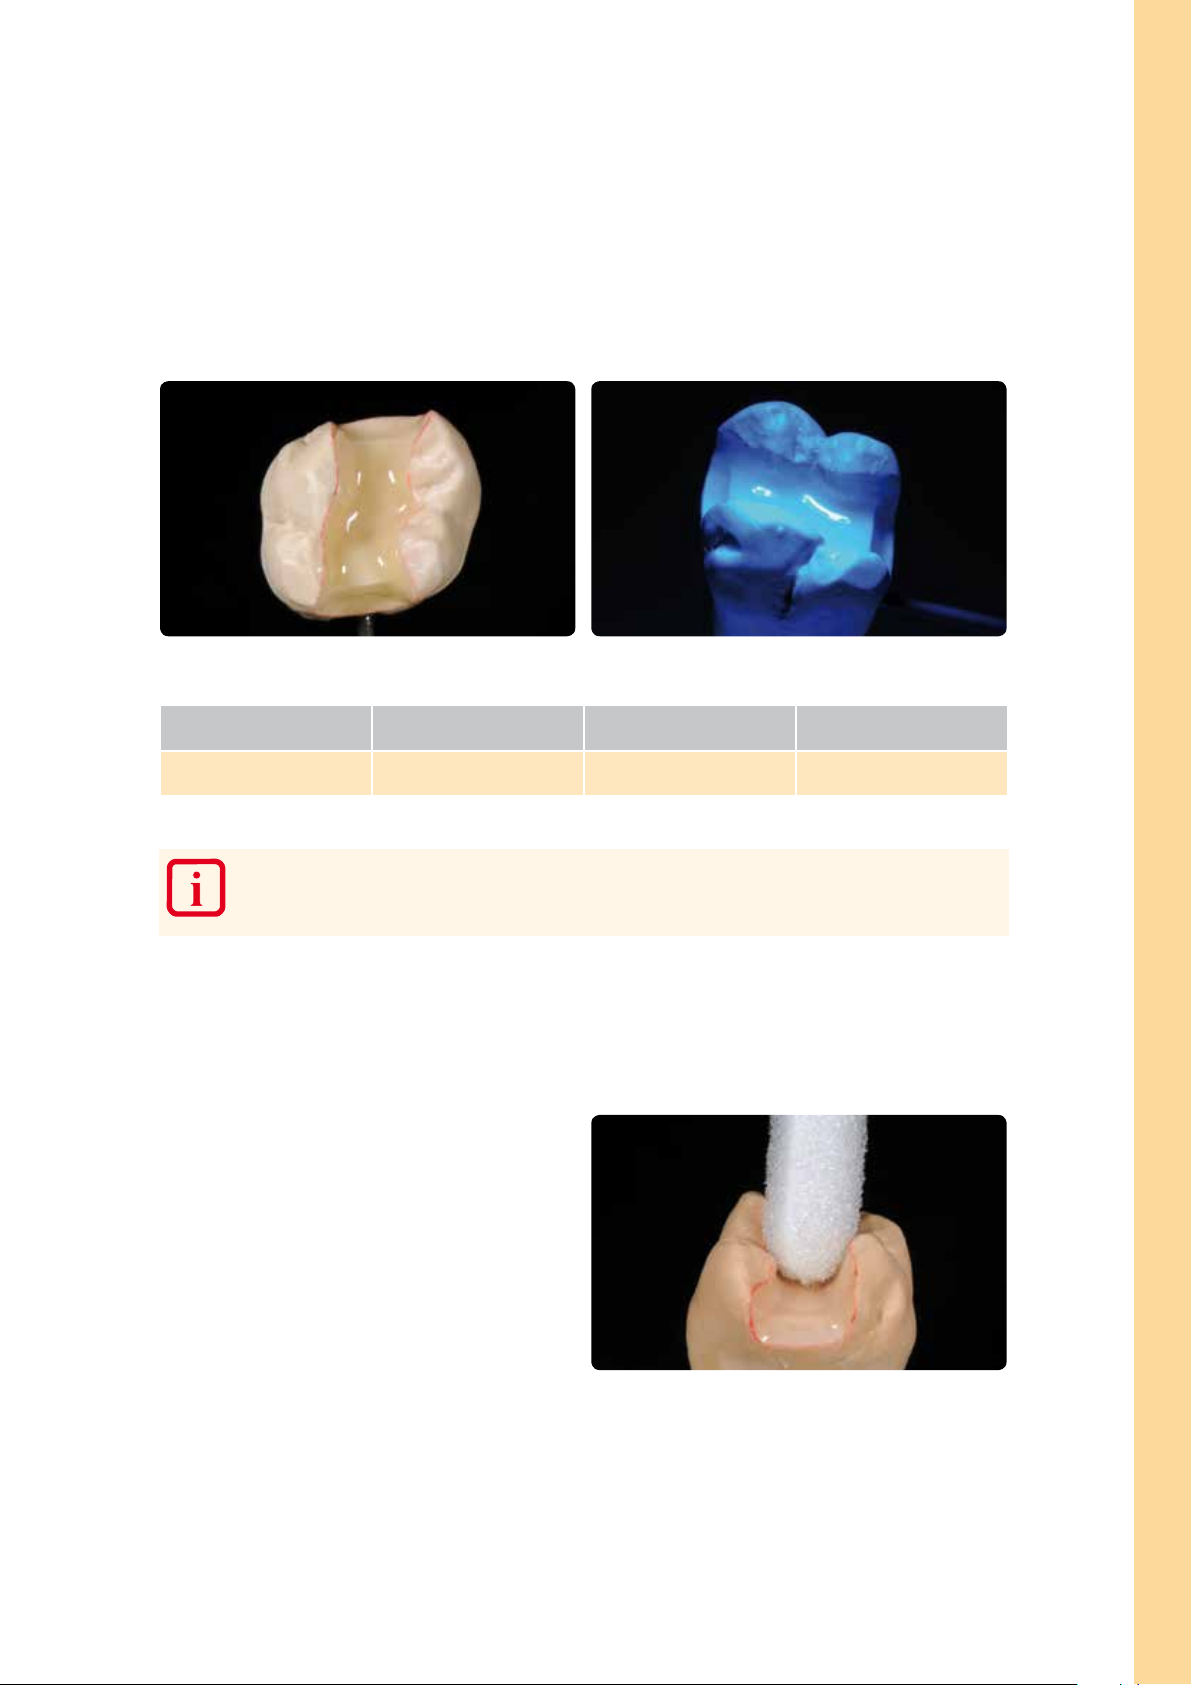
Removing the inhibition layer after polymerization of the Liner
Thoroughly remove the resulting inhibition layer using a
disposable sponge (do not use a solvent); make sure that
the Liner surfaces are free of residue. Make sure that the
Liner shows a mat surface.

16
INLAY/ONLAY LAYERING
Adapt the first layer firmly (press into place) to ensure an effective bond between the Liner and lab composite and pre-
cure each segment for 20 seconds using a Quick curing light. The shade effect in the interdental area and cavity may be
increased by means of Occlusal Dentin orange. Slightly emphasize the marginal ridges and cusps with Dentin.
Subsequently, begin the process of building up the cavity with Dentin materials. Make sure to provide adequate space for
the subsequent application of Incisal and Effect materials. The translucency of the restoration may be increased by means
of coloured Transpa materials, such as Transpa orange-grey and Transpa brown-grey. Layer SR Nexco Paste layering
materials step by step and precure each individual layer. After building up and precuring the dental plateau, apply
characterizations with SR Nexco Stains and precure for 20 seconds. Next, complete the restoration using Incisal and
Transpa materials. The cusp tips and triangular ridges may be supplemented with a fine layer of Opal Effect 3 and 4.
Adapt firmly and create smooth, rounded transitions between the layers using SR modelling instruments and synthetic
brushes.
Increase the shade effect in the interdental and cavity area with Occlusal Dentin. Outline the marginal ridges with Dentin and create a plateau with various Dentin materials.
Precure each intermediate segment for 20 seconds using the Quick curing light.
Apply characterizations with SR Nexco Stains, precure with the Quick and cover with Incisal and Transpa materials.
Design a lifelike occlusal morphology and subsequently precure all areas for 20 seconds using
Quick.
– It is essential to observe the stipulated curing depths and maximum layer thickness of the
individual materials during the layering procedure.
– If the maximum layer thickness is exceeded, break up large portions into several increments
and precure each increment for 20 seconds.
– SR Nexco Stains always have to be coated with layering material (e.g. Incisal, Transpa).
17
Practical Procedure – Framework-free Restorations (Inlay/Onlay)
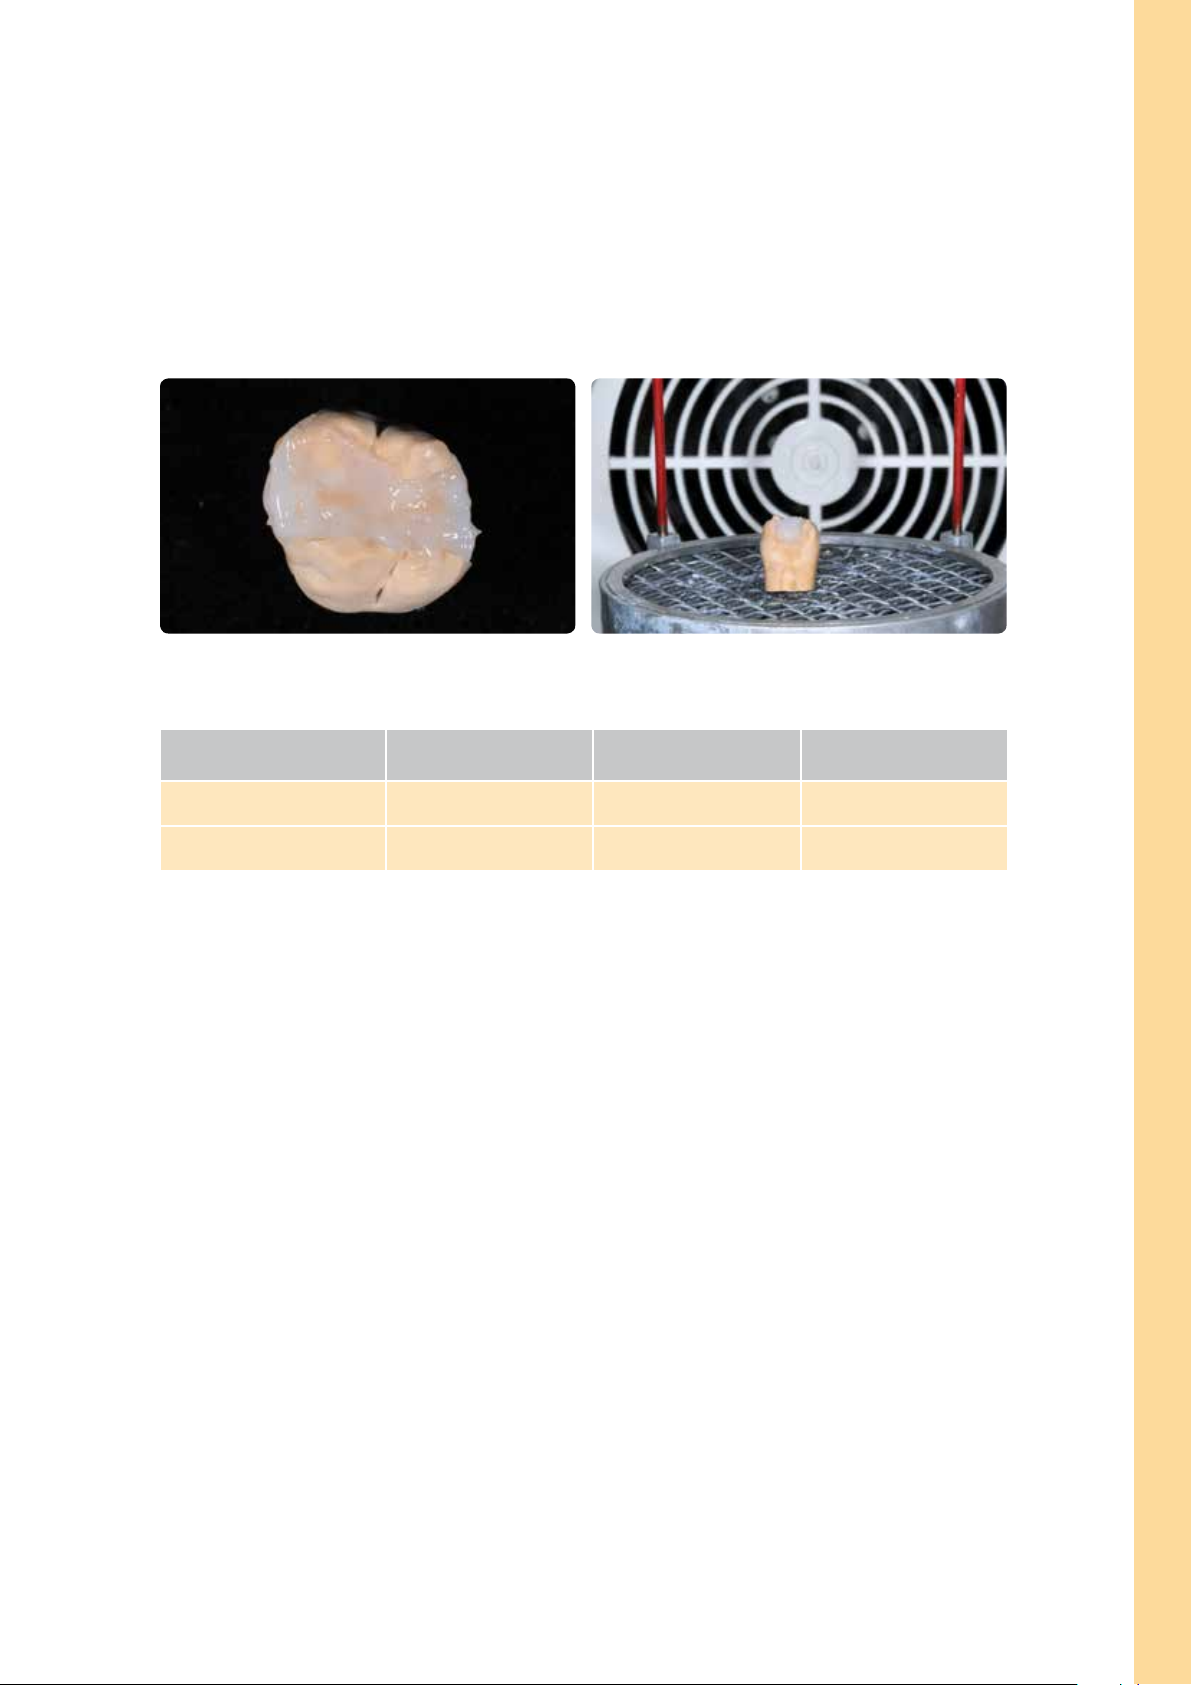
CONDUCT FINAL POLYMERIZATION
After the layering procedure has been completed, all layers must be precured. To make sure that this is the case precure
each segment for 20 seconds using a Quick curing light. Next, apply SR Gel on the entire veneering surface ensuring that
all areas are fully covered and the layer is not too thick.
Apply a covering, but not too thick layer of SR Gel and secure the dies on the object holder in the correct position.
Polymerization
Inlay/onlay
Appliance Time Program
Precuring time per segment Quick 20 s –
Conduct final polymerization Lumamat 100 11 m i n P2
For the parameters of other polymerization devices, please go to page 57.
18
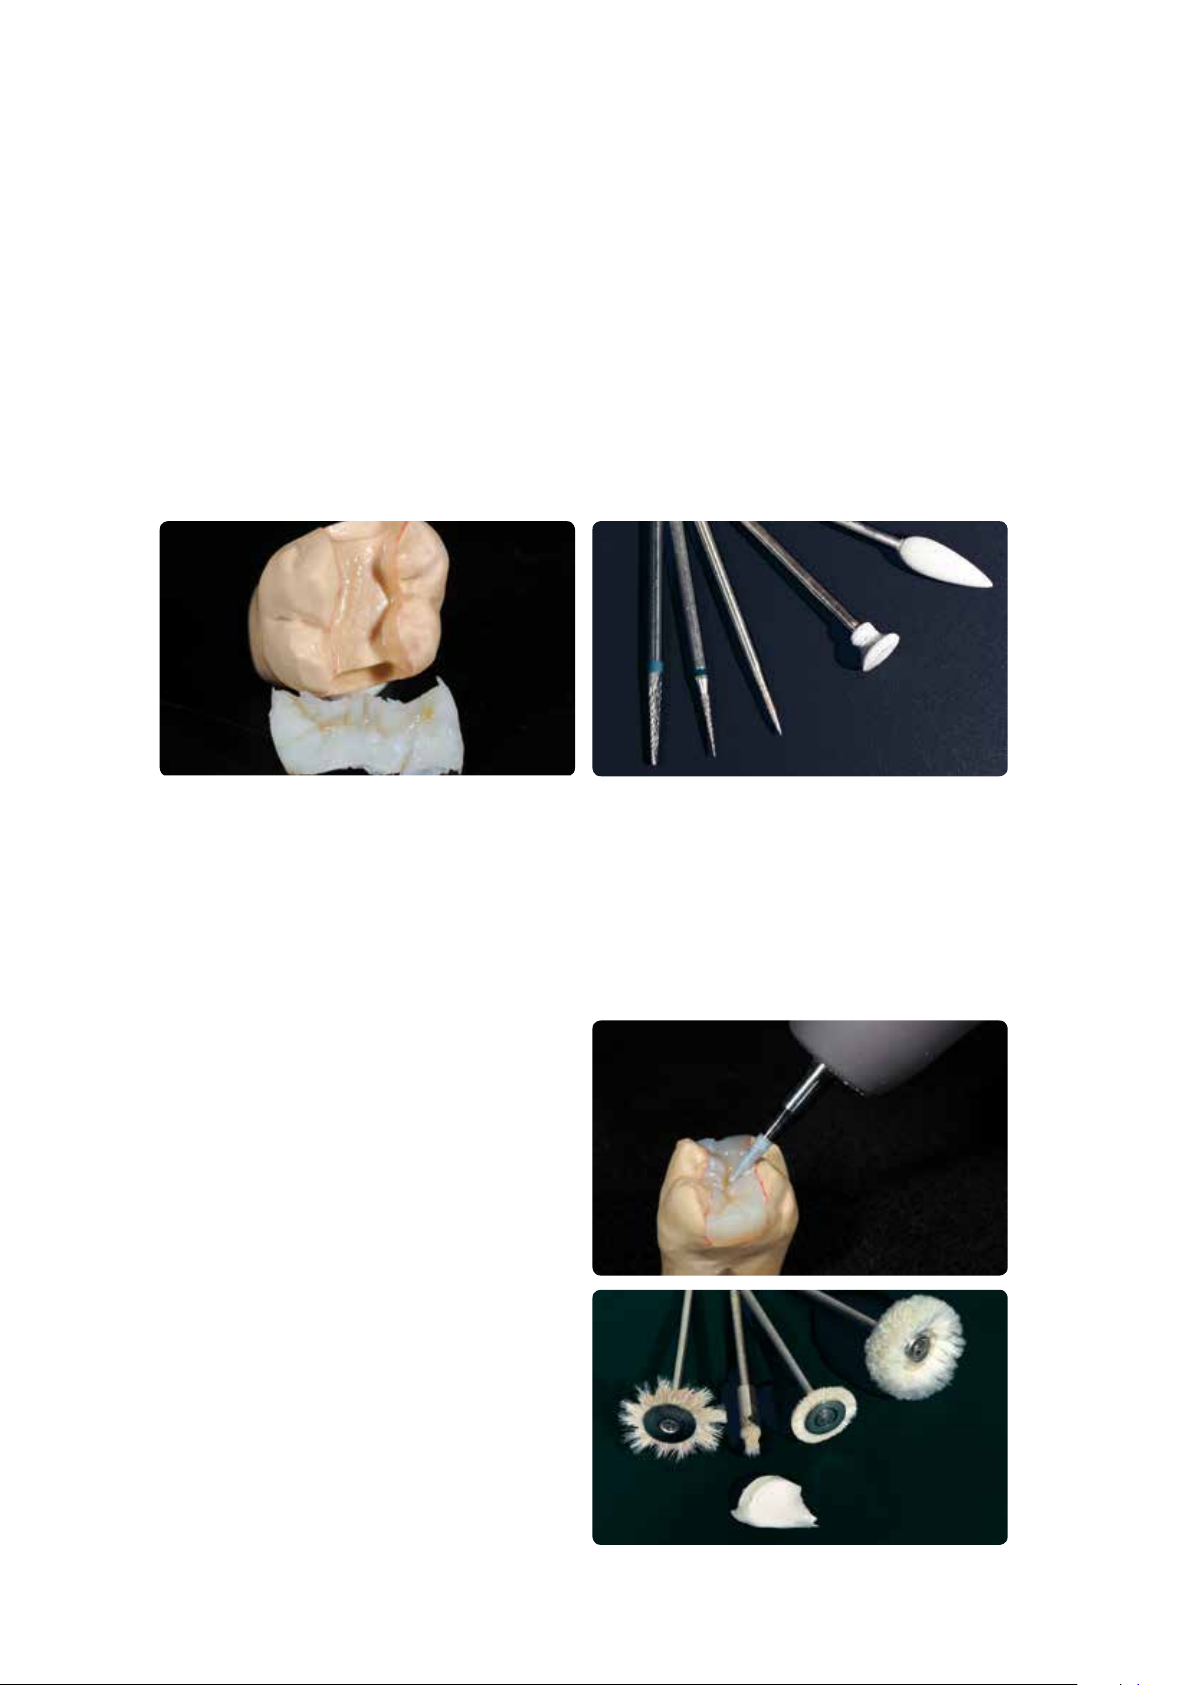
FINISHING / POLISHING
After completion of the polymerization procedure, completely remove SR Gel from the restoration using running water
and/or a steamer. Carefully remove the restoration from the die. If the restoration is removed at a later stage, it is
advisable to warm up the stone die by means of steam/hot water. Finish the restoration with cross-cut tungsten carbide
burs and fine diamonds. It is advisable to use low speed and light pressure. Make sure to rework the entire restoration to
remove the inhibition layer of approximately 30 µm. Carefully taper the margins of the restoration, lightly grind the
margins, and adjust proximal and occlusal contact points. Subsequently, recreate a lifelike tooth shape and surface
structure. The inhibition layer must be removed from the entire SR Nexco surface.
Polishing
Finishing
Carefully smooth out the ridges of the occlusal surface and
proximal surfaces with rubber polishers and silicone
polishing wheels. Pay particular attention to the margins in
order to avoid rendering them too short.
Prepolishing and high-gloss polishing
The restorations are prepolished and polished to a high
gloss using a goat hair brush, cotton or leather buff as
well as Universal Polishing Paste. Use low speed and slight
pressure for prepolishing and high-gloss polishing. Adjust
the pressure at the handpiece, not with the polishing
motor. In order to optimally polish the occlusal surfaces,
we recommend modifying the goat hair brushes to
become star-shaped so that only the desired areas can be
polished due to the smaller size of the brush. Depending
on the type of high gloss desired, leather buffing wheels
can be used to achieve a high shine, while cotton buffs are
used to achieve a lesser degree of lustre.
Remove SR Gel and carefully remove the restoration from the die. Remove the inhibition layer and finish the surface with cross-cut burs.
19
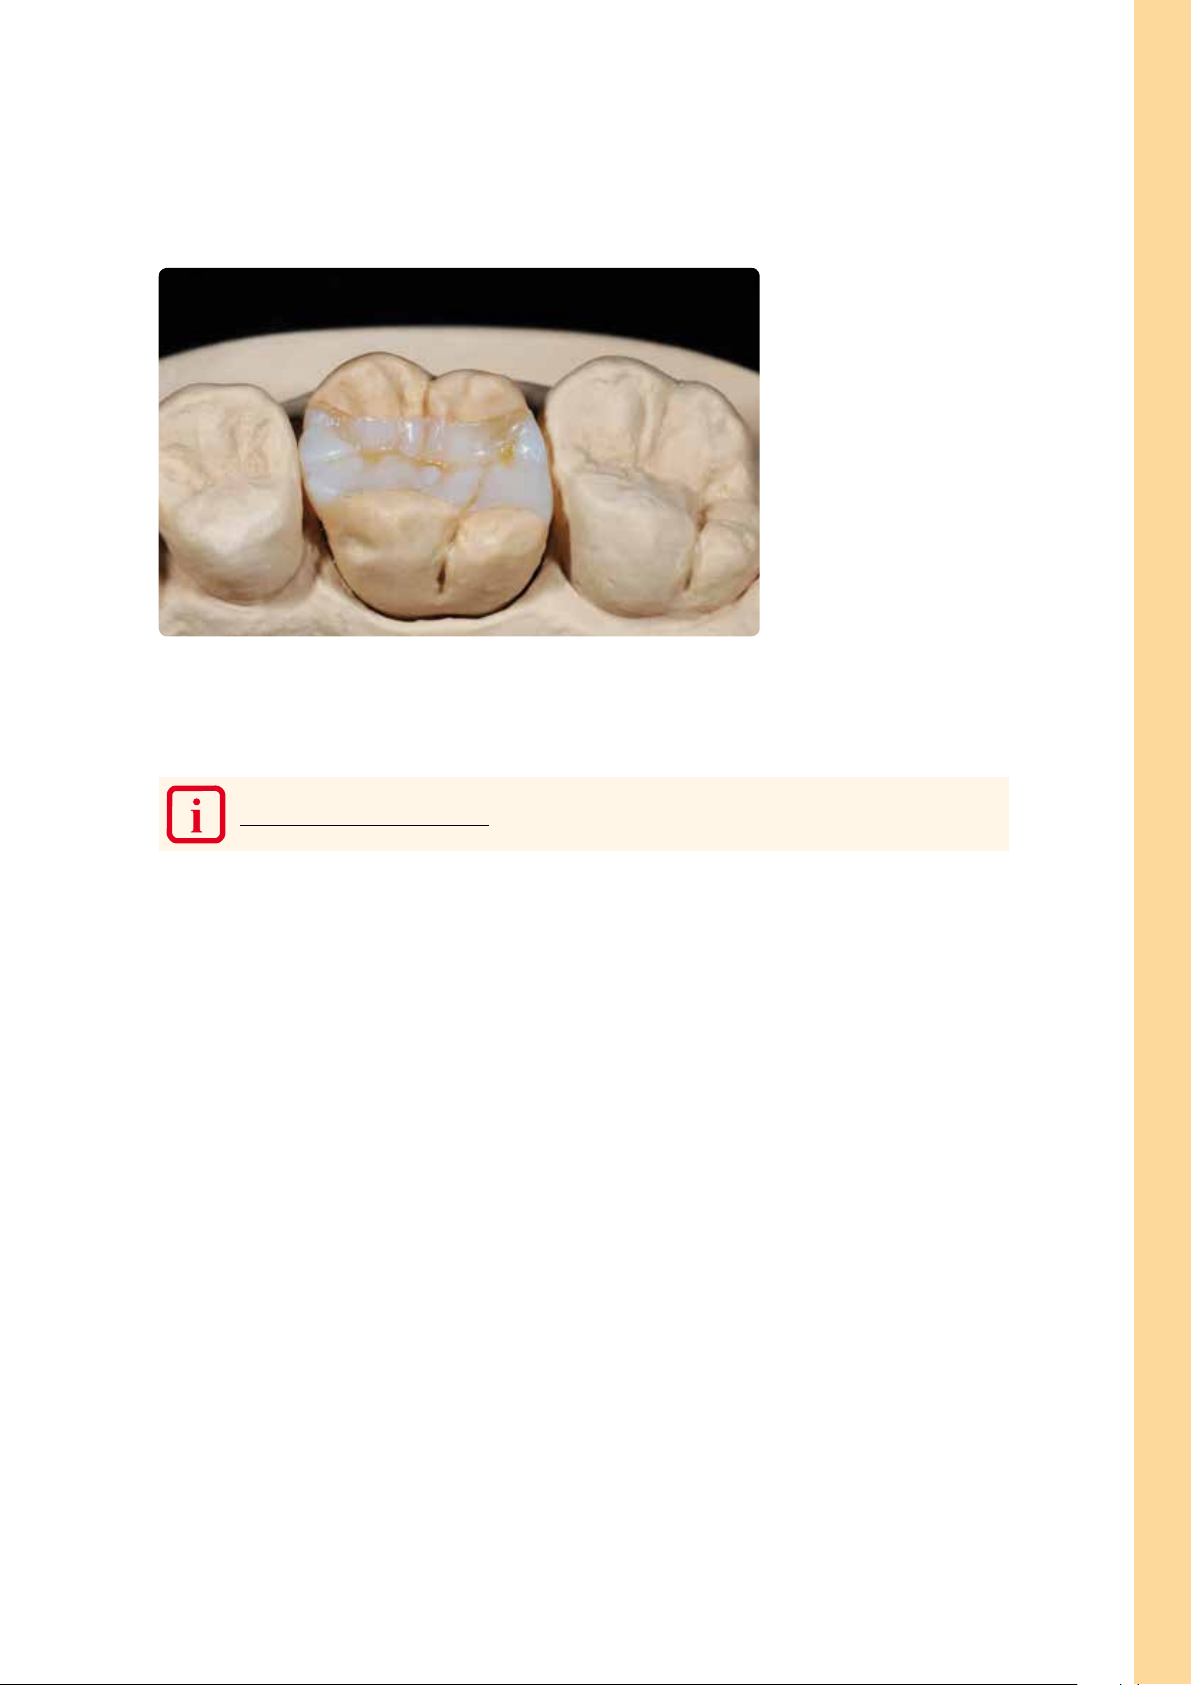
Results
Adhesive cementation is mandatory for framework-free SR Nexco Paste restorations.
In order to achieve an excellent bond with the luting composite, the cavity side of the restoration has to be carefully
blasted with Al
2
O
3
(80 –100 µm) at 1 bar / 15 psi pressure in the laboratory. Following the try-in in the dental practice and
subsequent cleaning, the cavity side is again roughened with a 50–100 µm diamond directly prior to the adhesive
cementation. Finally, the surfaces are silanized (e.g. with Monobond
®
Plus) to enable a chemical bond.
PREPARING FOR CEMENTATION
Practical Procedure – Framework-free Restorations (Inlay/Onlay)
20
MODEL ISOLATION
Applying the sealer
Fabricate a master model or a model with detachable segments according to the impression in the usual manner. Expose
and mark the preparation margins. Block out undercuts with blocking-out wax or blocking-out resin to ensure that the
restoration can be removed after the polymerization process without damaging the die. Basically, the application of a
sealer is recommended to harden the surface and to protect the stone die. However, the sealer layer must not result in
any changes of the dimensions of the stone die. It is not mandatory to utilize a spacer, as two coats of SR Model
Separator will be applied. If you use a spacer, check as to whether it is compatible with SR Model Separator.
Sealing the dies and adjoining parts of the model
SR Model Separator is applied in two thin coats. Apply the first coat generously and make sure that all areas of the die
are well covered. Watch out for sharp edges (incisal edges) in particular. Allow the layer to react for 3 minutes. After the
reaction time, apply a second layer in a thin coat, invert the model and allow to dry for 3 minutes. Additionally, apply
SR Model Separator to adjoining model surfaces that may come into contact with SR Nexco including counterbite, allow
to react for a short time, and then disperse excess material with oil-free compressed air.
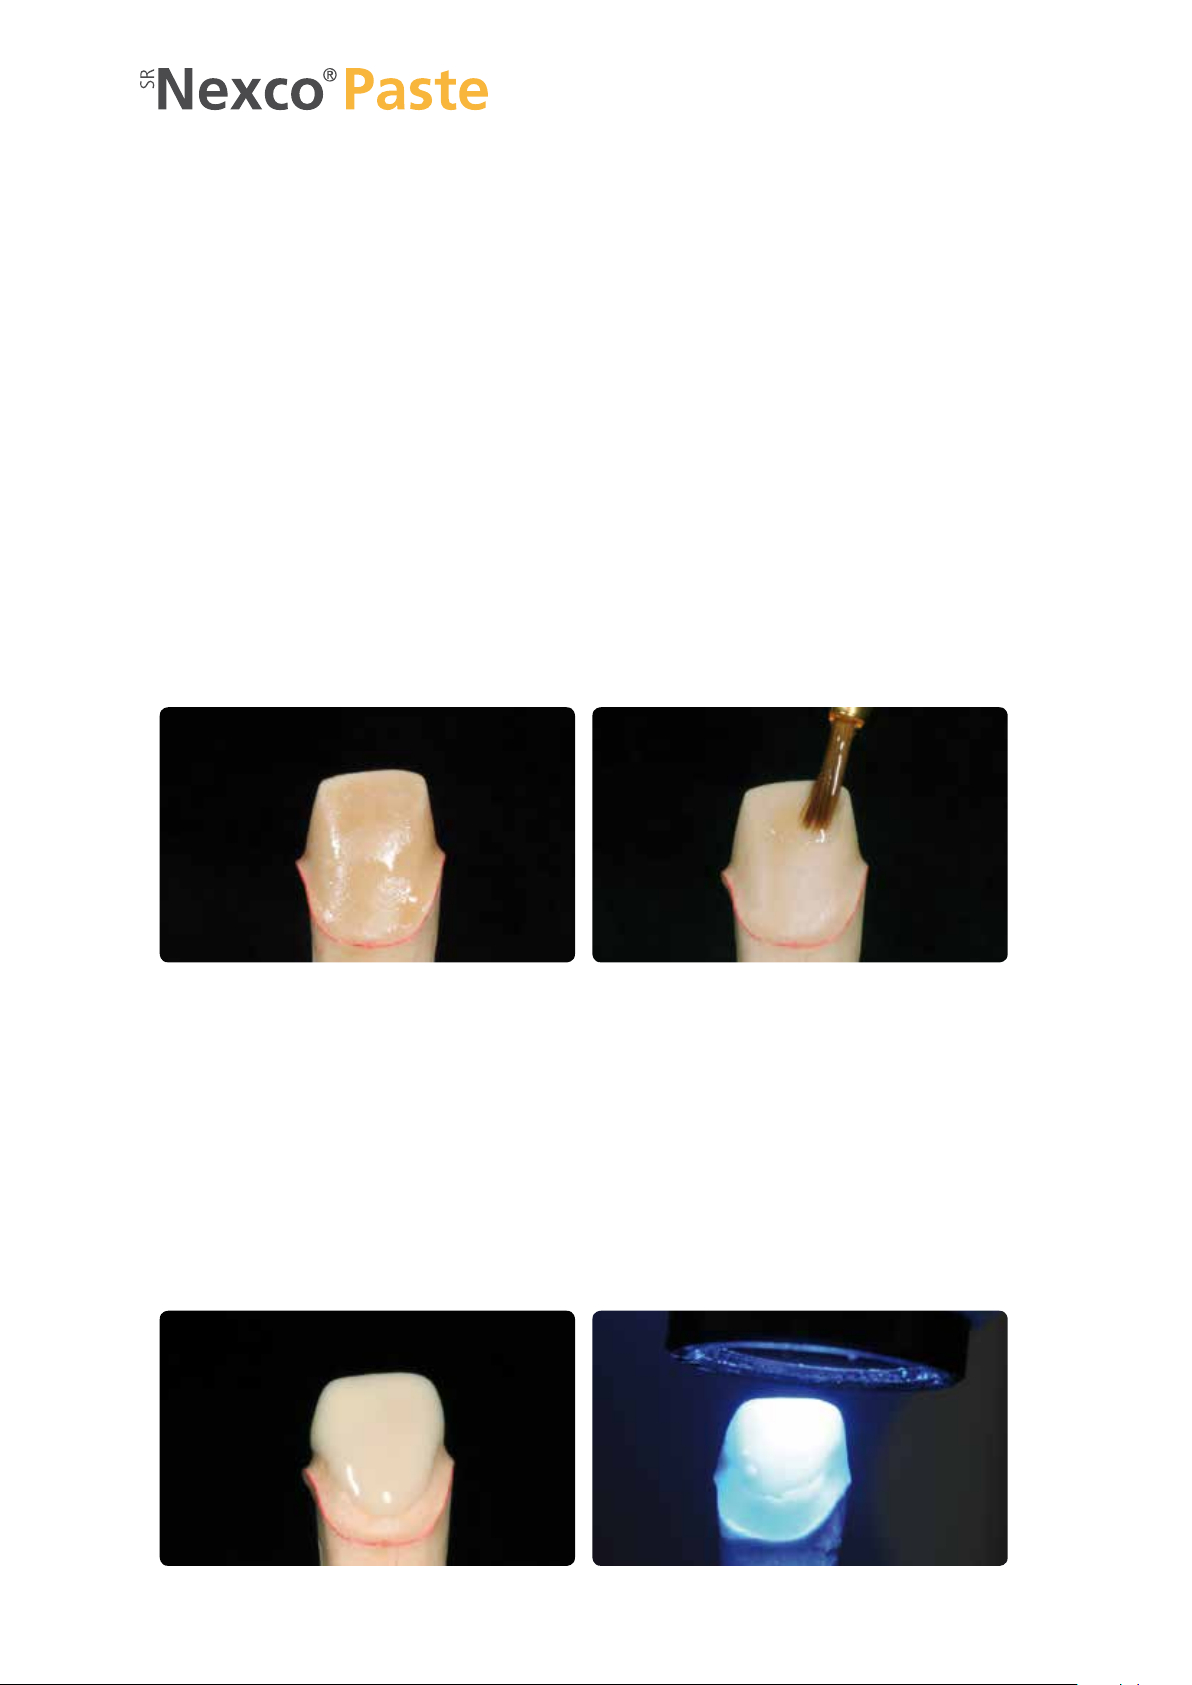
APPLYING THE LINER
Extrude the desired amount of the ready-to-use Liner paste from the syringe and spread it out slightly on the mixing pad
using a disposable brush. First, apply the Liner thinly on the die surfaces. Make sure to fully cover all areas, as the Liner
provides an essential bonding surface to the luting composite. The Liner layer must be at least 150 µm thick and has to be
precured for 20 seconds per segment using the Quick.
Framework-free restorations (anterior crown)
Fabrication of a die coated with sealer as the working basis
Apply the Liner in a minimum layer thickness of 150 µm. Precure each segment for 20 seconds using a Quick curing light.
Applying two layers of SR Model Separator
 Loading...