


Notebook Essentials

For more information about HP products and services, see the HP Web site at http://www.hp.com.
© Copyright 2010 Hewlett-Packard Development Company, L.P.
Windows and Windows Vista are U.S. registered trademarks of Microsoft Corporation.
The information contained herein is subject to change without notice. The only warranties for HP products and services are set forth in the express warranty statements accompanying such products and services. Nothing herein should be construed as constituting an additional warranty. HP shall not be liable for technical or editorial errors or omissions contained herein.
Part number: 582228-001
User Guides
HP is committed to reducing the environmental impact of our products. As part of this effort, we provide user guides and learning centers on your computer hard drive in Help and Support. Additional support and updates to the user guides are available on the Web.
Windows Users
Looking for more user guides? They are on your computer. Click: Start > Help and Support > User Guides
Linux Users
Looking for more user guides? You can find them on the User Guides disc that came with your computer.
Subscription Services for Business Notebook
Keep this product up to date with the latest drivers, patches, and notifications. Sign up now at www.hp.com/go/alerts to receive e-mail alert notifications.

End User License Agreement (EULA)
BY INSTALLING, COPYING, DOWNLOADING, OR OTHERWISE USING ANY SOFTWARE PRODUCT PRE-INSTALLED ON THIS PC, YOU AGREE TO BE BOUND BY THE TERMS OF THE HP EULA. IF YOU DO NOT ACCEPT THESE LICENSE TERMS, YOUR SOLE REMEDY IS TO RETURN THE ENTIRE UNUSED PRODUCT (HARDWARE AND SOFTWARE) WITHIN 14 DAYS FOR A REFUND SUBJECT TO THE REFUND POLICY OF YOUR PLACE OF PURCHASE. For any further information or for requesting a full refund of the PC, please contact your local point of sale (the seller).
Contacting Customer Support
If the information provided in your User Guide or Learning Center does not address your questions, you can contact HP Customer Support at:
www.hp.com/go/contactHP
Here you can:
■Chat online with an HP technician.
When technical support chat is not available in a particular language, it is available in English.
■E-mail HP Customer Support.
■Find HP Customer Support worldwide telephone numbers.
■Locate an HP service center.
Serial Number Label Information
The serial number label, located on the bottom of the computer, provides important information that you may need when contacting technical support.
|
|
|
|
|
|
|
|
|
|
|
|
|
|
|
|
|
|
|
|
|
|
|
|
|
|
|
|
|
|
|
|
|
|
|
|
|
|
|
|
|
|
|
|
|
|
|
|
|
|
|
|
|
|
|
|
|
|
|
|
|
|
|
|
|
|
|
|
|
|
|
|
|
|
|
|
|
|
|
|
|
|
|
|
|
|
|
|
|
|
|
|
|
|
|
|
|
|
|
1 |
Product name |
4 |
Warranty period |
|||||||
|
|
|
|
|
|
|
|
|
|
|
2 |
Serial number |
5 |
Model description (select models) |
|||||||
|
|
|
|
|
|
|
|
|
|
|
3 |
Product number |
|
|
|
|
|
|
|
|
|
|
|
|
|
|
|
|
|
|
|
|

Warranty Information
You may find the expressly provided HP Limited Warranty applicable to your product in the start menu on your PC and/or in the CD/DVD provided in the box. Some countries/regions may provide a printed HP Limited Warranty in the box. In countries/regions where the warranty is not provided in printed format, you may request a printed copy from www.hp.com/go/orderdocuments or write to:
North America:
Hewlett Packard, MS POD, 11311 Chinden Blvd, Boise, ID 83714, USA
Europe, Middle East, Africa:
Hewlett-Packard, POD, Via G. Di Vittorio, 9, 20063, Cernusco s/Naviglio (MI), Italy
Asia Pacific:
Hewlett-Packard, POD, P.O. Box 200, Alexandra Post Office, Singapore 911507
Please include your product number, warranty period (found on your serial number label), name and postal address.
Contents
Chapter 1: Getting started
Creating recovery discs. . . . . . . . . . . . . . . . . . . . . . . . . . . . . . . . . . . . . . . . . . . . . . . . . . . . 1 Connecting to the Internet . . . . . . . . . . . . . . . . . . . . . . . . . . . . . . . . . . . . . . . . . . . . . . . . . 1 Updating your antivirus software . . . . . . . . . . . . . . . . . . . . . . . . . . . . . . . . . . . . . . . . . . . . 1 Getting to know the computer . . . . . . . . . . . . . . . . . . . . . . . . . . . . . . . . . . . . . . . . . . . . . . 2 Finding information . . . . . . . . . . . . . . . . . . . . . . . . . . . . . . . . . . . . . . . . . . . . . . . . . . . . . . 3
Locating the electronic manuals . . . . . . . . . . . . . . . . . . . . . . . . . . . . . . . . . . . . . . . . . 3 Finding more information. . . . . . . . . . . . . . . . . . . . . . . . . . . . . . . . . . . . . . . . . . . . . . 4
Chapter 2: What’s new?
Display rotating . . . . . . . . . . . . . . . . . . . . . . . . . . . . . . . . . . . . . . . . . . . . . . . . . . . . . . . . . 5 Using the rotate button . . . . . . . . . . . . . . . . . . . . . . . . . . . . . . . . . . . . . . . . . . . . . . . . 6 TouchPad . . . . . . . . . . . . . . . . . . . . . . . . . . . . . . . . . . . . . . . . . . . . . . . . . . . . . . . . . . . . . . 7 Identifying TouchPad components . . . . . . . . . . . . . . . . . . . . . . . . . . . . . . . . . . . . . . . 7 Turning the TouchPad on and off. . . . . . . . . . . . . . . . . . . . . . . . . . . . . . . . . . . . . . . . 8 Navigating. . . . . . . . . . . . . . . . . . . . . . . . . . . . . . . . . . . . . . . . . . . . . . . . . . . . . . . . . . 8 Selecting . . . . . . . . . . . . . . . . . . . . . . . . . . . . . . . . . . . . . . . . . . . . . . . . . . . . . . . . . . . 9 Using TouchPad gestures . . . . . . . . . . . . . . . . . . . . . . . . . . . . . . . . . . . . . . . . . . . . . . 9 Touch screen. . . . . . . . . . . . . . . . . . . . . . . . . . . . . . . . . . . . . . . . . . . . . . . . . . . . . . . . . . . 11 Using touch screen gestures . . . . . . . . . . . . . . . . . . . . . . . . . . . . . . . . . . . . . . . . . . . 11 Setting touch screen preferences . . . . . . . . . . . . . . . . . . . . . . . . . . . . . . . . . . . . . . . 14 Digitizer pen . . . . . . . . . . . . . . . . . . . . . . . . . . . . . . . . . . . . . . . . . . . . . . . . . . . . . . . . . . . 15 Identifying the pen components . . . . . . . . . . . . . . . . . . . . . . . . . . . . . . . . . . . . . . . . 15 Holding the pen. . . . . . . . . . . . . . . . . . . . . . . . . . . . . . . . . . . . . . . . . . . . . . . . . . . . . 15 Storing the pen . . . . . . . . . . . . . . . . . . . . . . . . . . . . . . . . . . . . . . . . . . . . . . . . . . . . . 15 Sharing optical drives . . . . . . . . . . . . . . . . . . . . . . . . . . . . . . . . . . . . . . . . . . . . . . . . . . . . 16
Chapter 3: Networking
Choosing the type of Internet access . . . . . . . . . . . . . . . . . . . . . . . . . . . . . . . . . . . . . . . . 17 Using an ISP . . . . . . . . . . . . . . . . . . . . . . . . . . . . . . . . . . . . . . . . . . . . . . . . . . . . . . . . . . . 18 Connecting to an existing wireless network . . . . . . . . . . . . . . . . . . . . . . . . . . . . . . . . . . . 18 Setting up a wireless network . . . . . . . . . . . . . . . . . . . . . . . . . . . . . . . . . . . . . . . . . . . . . . 19 Step 1: Purchase high-speed Internet service . . . . . . . . . . . . . . . . . . . . . . . . . . . . . . 19 Step 2: Purchase and install a wireless router. . . . . . . . . . . . . . . . . . . . . . . . . . . . . . 20 Step 3: Configure the computer to connect to the wireless network . . . . . . . . . . . . 20 Connecting to a wired network. . . . . . . . . . . . . . . . . . . . . . . . . . . . . . . . . . . . . . . . . . . . . 21
Chapter 4: Keeping the computer safe
Protecting the computer from viruses. . . . . . . . . . . . . . . . . . . . . . . . . . . . . . . . . . . . . . . . 23 Protecting your system files . . . . . . . . . . . . . . . . . . . . . . . . . . . . . . . . . . . . . . . . . . . . . . . 23 Protecting your privacy. . . . . . . . . . . . . . . . . . . . . . . . . . . . . . . . . . . . . . . . . . . . . . . . . . . 23 Protecting the computer from power surges. . . . . . . . . . . . . . . . . . . . . . . . . . . . . . . . . . . 23 Turning off the computer . . . . . . . . . . . . . . . . . . . . . . . . . . . . . . . . . . . . . . . . . . . . . . . . . 24 Using the computer safely . . . . . . . . . . . . . . . . . . . . . . . . . . . . . . . . . . . . . . . . . . . . . . . . 24
Notebook Essentials |
iii |

Contents
Chapter 5: Using software
Identifying installed software . . . . . . . . . . . . . . . . . . . . . . . . . . . . . . . . . . . . . . . . . . . . . . 25 Using HP TouchSmart software or HP MediaSmart software . . . . . . . . . . . . . . . . . . . . . 26 Installing software from an optical disc . . . . . . . . . . . . . . . . . . . . . . . . . . . . . . . . . . . . . . 26 Creating or burning a CD or DVD . . . . . . . . . . . . . . . . . . . . . . . . . . . . . . . . . . . . . . . . . . 27 Updating the software installed on the computer . . . . . . . . . . . . . . . . . . . . . . . . . . . . . . . 28
Chapter 6: Backup and recovery
Creating recovery discs. . . . . . . . . . . . . . . . . . . . . . . . . . . . . . . . . . . . . . . . . . . . . . . . . . . 29 Backing up your information . . . . . . . . . . . . . . . . . . . . . . . . . . . . . . . . . . . . . . . . . . . . . . 30 When to back up . . . . . . . . . . . . . . . . . . . . . . . . . . . . . . . . . . . . . . . . . . . . . . . . . . . . 30 Backup suggestions . . . . . . . . . . . . . . . . . . . . . . . . . . . . . . . . . . . . . . . . . . . . . . . . . 30 Using system restore points . . . . . . . . . . . . . . . . . . . . . . . . . . . . . . . . . . . . . . . . . . . 30 Performing a recovery . . . . . . . . . . . . . . . . . . . . . . . . . . . . . . . . . . . . . . . . . . . . . . . . . . . 31 Recovering using the recovery discs . . . . . . . . . . . . . . . . . . . . . . . . . . . . . . . . . . . . 32 Recovering using the partition on the hard drive (select models only) . . . . . . . . . . 32
Chapter 7: Routine care
Cleaning the display . . . . . . . . . . . . . . . . . . . . . . . . . . . . . . . . . . . . . . . . . . . . . . . . . . . . . 33 Cleaning the TouchPad and keyboard . . . . . . . . . . . . . . . . . . . . . . . . . . . . . . . . . . . . . . . 33 Traveling and shipping . . . . . . . . . . . . . . . . . . . . . . . . . . . . . . . . . . . . . . . . . . . . . . . . . . . 34
Appendix A: Troubleshooting
Troubleshooting resources . . . . . . . . . . . . . . . . . . . . . . . . . . . . . . . . . . . . . . . . . . . . . . . . 35 Quick troubleshooting . . . . . . . . . . . . . . . . . . . . . . . . . . . . . . . . . . . . . . . . . . . . . . . . . . . 35 The computer is unable to start up . . . . . . . . . . . . . . . . . . . . . . . . . . . . . . . . . . . . . . 35 The TouchPad is behaving erratically . . . . . . . . . . . . . . . . . . . . . . . . . . . . . . . . . . . 35 The computer screen is blank . . . . . . . . . . . . . . . . . . . . . . . . . . . . . . . . . . . . . . . . . . 36 Software is functioning abnormally . . . . . . . . . . . . . . . . . . . . . . . . . . . . . . . . . . . . . 36 The computer is on but is not responding. . . . . . . . . . . . . . . . . . . . . . . . . . . . . . . . . 36 The computer is unusually warm . . . . . . . . . . . . . . . . . . . . . . . . . . . . . . . . . . . . . . . 36 An external device is not working . . . . . . . . . . . . . . . . . . . . . . . . . . . . . . . . . . . . . . 37 The wireless network connection is not working . . . . . . . . . . . . . . . . . . . . . . . . . . . 37
Appendix B: Specifications
Operating environment . . . . . . . . . . . . . . . . . . . . . . . . . . . . . . . . . . . . . . . . . . . . . . . . . . . 39 Input power. . . . . . . . . . . . . . . . . . . . . . . . . . . . . . . . . . . . . . . . . . . . . . . . . . . . . . . . . . . . 40
Index
iv |
Notebook Essentials |
Chapter 1: Getting started
After you set up and register the computer, it is important to take the next steps in this guide before you begin using the computer. These steps include setting up your wired and wireless networking features. You will also find practical information to help you protect and maintain the computer. First, read this chapter completely, because it explains what to do and where to find additional information. Then, read specific chapters for additional information.
For help in identifying specific components of the computer, refer to the user guide, which is located in Help and Support. Click Start, click Help and Support, and then click User Guides.
Creating recovery discs
After you set up your computer, one of the first and most important steps to take is to create a set of recovery discs of the full factory image. The recovery discs are essential in case of system instability or failure, when they are used to recover the operating system and software to factory settings. For instructions, refer to Chapter 6, “Backup and recovery.”
Connecting to the Internet
After creating the recovery discs, set up your wired or wireless network so that you can send and receive e-mail and connect to the Internet. For more information, refer to Chapter 3, “Networking.”
Updating your antivirus software
After you have connected to the Internet, be sure to update your antivirus software. The software is preinstalled on the computer and includes a limited subscription for free updates. Antivirus software helps protect your computer from damage caused by viruses. For more information, refer to Chapter 4, “Keeping the computer safe.”
Notebook Essentials |
1 |

Chapter 1: Getting started
Getting to know the computer
When you have completed the preceding steps, familiarize yourself with the features of the computer and set up any additional components, such as optional external audio devices.
Be sure to review the user guides located in Help and Support on the computer. They provide detailed information about using the computer. For instructions on accessing the user guides, refer to the “Finding information” section later in this chapter.
The following list highlights the entertainment features of the computer and explains where to get additional information for each feature.
■Multimedia software—The computer comes with preinstalled multimedia software, including HP MediaSmart, which turns the computer into a mobile entertainment center. For details, refer to Chapter 5, “Using software.”
■Audio—The computer includes integrated speakers. For more information on using the integrated speakers and setting up optional external audio devices, refer to the user guide in Help and Support.
■Video—You can connect an optional display device or an HDMI (High Definition Multimedia Interface) device to the computer. You can also use an optional external optical drive to watch a high-definition movie. For more information about the video features, refer to the user guide in Help and Support.
On select models, when watching movies, you must use MediaSmart software.
■Webcam—Adjustable, with low-light image technology and built-in microphones, the webcam is a perfect companion to your instant messaging program. For more information on the webcam, refer to the user guide in Help and Support.
2 |
Notebook Essentials |

Chapter 1: Getting started
Finding information
Locating the electronic manuals
For detailed information about the features and components of the computer, such as power management, drives, memory, security, and other features, click Start, click Help and Support, and then click User Guides. You do not need to connect to the Internet to access the user guides in Help and Support.
Thesection.desktop of your computer may look slightly different from the illustration in this
Help and Support |
User Guides |
Notebook Essentials |
3 |

Chapter 1: Getting started
Finding more information
In addition to the user guides, Help and Support also provides information about the operating system, drivers, troubleshooting tools, and accessing technical support. To access Help and Support, click Start, and then click Help and Support. For countryor regionspecific support, go to http://www.hp.com/support, select your country or region, and follow the on-screen instructions.
ÅWARNING: To reduce the risk of serious injury, read the Safety & Comfort Guide. It describes proper workstation setup and proper posture, health, and work habits for computer users. The Safety & Comfort Guide also provides important electrical and
mechanical safety information. To access this document, click Start, click Help and Support, and then click User Guides. The Safety & Comfort Guide is also available on the Web at http://www.hp.com/ergo.
For more safety and regulatory information, and for battery disposal information, refer to the
Regulatory, Safety and Environmental Notices. To access the notices, click Start, click Help and Support, and then click User Guides.
4 |
Notebook Essentials |
Chapter 2: What’s new?
Display rotating
To rotate the display and use the computer in slate mode:
1.Open the display.
2.Rotate the display 180 degrees either clockwise or counterclockwise.
ÄCAUTION: To reduce the risk of damage to your computer, do not force the display past 180 degrees.
3.Lower the display over the keyboard.
ÄCAUTION: To reduce the risk of damage to your computer, do not transport the computer while it is in slate mode.
Notebook Essentials |
5 |
Chapter 2: What’s new?
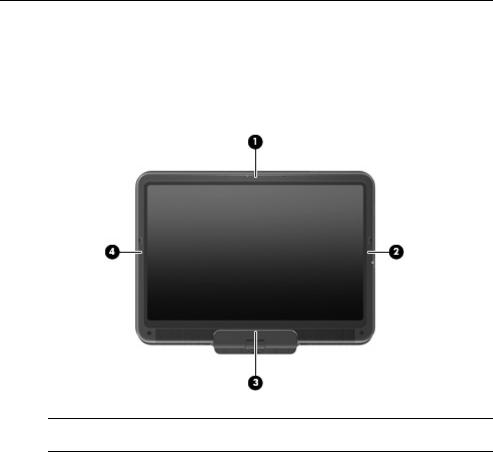
Using the rotate button
When the computer is in slate mode, press the rotate button (on the right side of the computer) to change the screen image to 4 different orientations. When you change the screen orientation, the top of the screen rotates 90 degrees clockwise into the following orientations: landscape secondary 1, portrait primary 2, landscape primary 3, and portrait secondary 4.
Computers with WWAN capabilities only support landscape primary 3 and portrait secondary 4 orientations.
6 |
Notebook Essentials |
Chapter 2: What’s new?
TouchPad
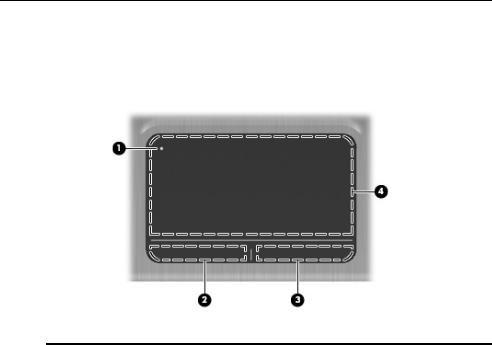
Identifying TouchPad components
Component |
Description |
|
|
|
|
1 |
TouchPad off indicator |
To turn the TouchPad zone on and off, quickly |
|
|
double-tap the TouchPad off indicator. |
|
|
When the TouchPad zone is active, the light |
|
|
is off. |
|
|
|
2 |
Left TouchPad button |
Functions like the left button on an external mouse. |
|
|
|
3 |
Right TouchPad button |
Functions like the right button on an external |
|
|
mouse. |
|
|
|
4 |
TouchPad zone |
Moves the pointer and selects or activates items on |
|
|
the screen. |
|
|
|
Notebook Essentials |
7 |

Chapter 2: What’s new?
Turning the TouchPad on and off
The TouchPad is turned on at the factory. When the TouchPad zone is active, the light is off. To turn the TouchPad on and off, quickly double-tap the TouchPad off indicator.
Navigating
To move the pointer, touch and slide one finger across the TouchPad surface in the direction you want the pointer to go.
8 |
Notebook Essentials |

Chapter 2: What’s new?
Selecting
Use the left and right TouchPad buttons like the corresponding buttons on an external mouse.
Using TouchPad gestures
The TouchPad supports a variety of gestures that make it easy and fun to work with images or pages of text. To activate the TouchPad gestures, place two fingers on the TouchPad at the same time as described in the following sections.
You can scroll and pinch anywhere on the TouchPad surface. The rotate gesture must be done within the TouchPad zone.
Scrolling
Scrolling is useful for moving around a page or image. To scroll, place two fingers slightly apart on the TouchPad, and then drag them across the TouchPad in an up, down, left, or right motion.
Scrolling speed is controlled by finger speed.
|
|
|
|
|
|
|
|
|
|
|
|
|
|
|
|
|
|
|
|
|
|
|
|
|
|
|
|
|
|
|
|
|
|
|
|
|
|
|
|
|
|
|
|
|
|
|
|
|
|
|
|
|
|
|
|
|
|
|
|
|
|
|
|
|
|
|
|
|
|
|
|
|
|
|
|
|
|
|
|
|
|
|
|
Notebook Essentials |
9 |
||||||||||
 Loading...