


 Loading...
Color LaserJet Pro MFP M377
User Guide
M377dw
 www.hp.com/support/colorljM377MFP

HP Color LaserJet Pro MFP M377
User Guide
Copyright and License
© Copyright 2015 HP Development Company,
L.P.
Reproduction, adaptation, or translation without prior written permission is prohibited, except as allowed under the copyright laws.
The information contained herein is subject to change without notice.
The only warranties for HP products and services are set forth in the express warranty statements accompanying such products and services. Nothing herein should be construed as constituting an additional warranty. HP shall not be liable for technical or editorial errors or omissions contained herein.
Edition 2, 3/2019
Trademark Credits
Adobe®, Adobe Photoshop®, Acrobat®, and PostScript® are trademarks of Adobe Systems Incorporated.
Apple and the Apple logo are trademarks of Apple Computer, Inc., registered in the U.S. and other countries. iPod is a trademark of Apple Computer, Inc. iPod is for legal or rightholderauthorized copying only. Don't steal music.
OS X is a trademark of Apple Inc., registered in the U.S. and other countries.
AirPrint is a trademark of Apple Inc., registered in the U.S. and other countries.
iPad is a trademark of Apple Inc., registered in the U.S. and other countries.
iPod is a trademark of Apple Inc., registered in the U.S. and other countries.
iPhone is a trademark of Apple Inc., registered in the U.S. and other countries.
Microsoft®, Windows®, Windows® XP, and Windows Vista® are U.S. registered trademarks of Microsoft Corporation.
UNIX® is a registered trademark of The Open Group.

Table of contents
1 Product overview .......................................................................................................................................... |
1 |
Product views ........................................................................................................................................................ |
2 |
Printer front view ................................................................................................................................ |
2 |
Printer back view ................................................................................................................................. |
3 |
Control-panel view .............................................................................................................................. |
4 |
Home screen layout .......................................................................................................... |
5 |
How to use the touchscreen control panel ...................................................................... |
6 |
Product specifications ........................................................................................................................................... |
7 |
Technical specifications ...................................................................................................................... |
7 |
Supported operating systems ............................................................................................................ |
8 |
Mobile printing solutions .................................................................................................................... |
9 |
Printer dimensions ............................................................................................................................ |
10 |
Power consumption, electrical specifications, and acoustic emissions .......................................... |
11 |
Operating-environment range .......................................................................................................... |
11 |
Printer hardware setup and software installation ............................................................................................. |
12 |
2 Paper trays ................................................................................................................................................. |
13 |
Load paper into Tray 1 (multipurpose tray) ........................................................................................................ |
14 |
Introduction ....................................................................................................................................... |
14 |
Load paper into Tray 1 (multipurpose tray) ..................................................................................... |
14 |
Tray 1 paper orientation ................................................................................................................... |
16 |
Load paper into Tray 2 ......................................................................................................................................... |
17 |
Introduction ....................................................................................................................................... |
17 |
Load paper into Tray 2 ...................................................................................................................... |
17 |
Tray 2 paper orientation ................................................................................................................... |
20 |
Load and print envelopes .................................................................................................................................... |
21 |
Introduction ....................................................................................................................................... |
21 |
Print envelopes ................................................................................................................................. |
21 |
Envelope orientation ......................................................................................................................... |
22 |
ENWW |
iii |
3 Supplies, accessories, and parts ................................................................................................................... |
23 |
Order supplies, accessories, and parts ............................................................................................................... |
24 |
Ordering ............................................................................................................................................. |
24 |
Supplies and accessories .................................................................................................................. |
24 |
Customer self-repair parts ............................................................................................................... |
24 |
Replace the toner cartridges ............................................................................................................................... |
26 |
Introduction ....................................................................................................................................... |
26 |
Remove and replace the toner cartridges ........................................................................................ |
27 |
4 Print ........................................................................................................................................................... |
33 |
Print tasks (Windows) .......................................................................................................................................... |
34 |
How to print (Windows) ..................................................................................................................... |
34 |
Automatically print on both sides (Windows) .................................................................................. |
35 |
Manually print on both sides (Windows) .......................................................................................... |
35 |
Print multiple pages per sheet (Windows) ....................................................................................... |
37 |
Select the paper type (Windows) ...................................................................................................... |
37 |
Additional print tasks ........................................................................................................................ |
37 |
Print tasks (OS X) ................................................................................................................................................. |
39 |
How to print (OS X) ............................................................................................................................ |
39 |
Automatically print on both sides (OS X) .......................................................................................... |
39 |
Manually print on both sides (OS X) .................................................................................................. |
39 |
Print multiple pages per sheet (OS X) ............................................................................................... |
40 |
Select the paper type (OS X) ............................................................................................................. |
40 |
Additional print tasks ........................................................................................................................ |
40 |
Store print jobs on the product to print later or print privately ......................................................................... |
42 |
Introduction ....................................................................................................................................... |
42 |
Before you begin ............................................................................................................................... |
42 |
Set up the printer for job storage ..................................................................................................... |
42 |
Step one: Install the USB storage device ....................................................................... |
42 |
Step two: Update the print driver ................................................................................... |
43 |
Create a stored job (Windows) .......................................................................................................... |
43 |
Print a stored job ............................................................................................................................... |
45 |
Delete a stored job ............................................................................................................................ |
45 |
Mobile printing ..................................................................................................................................................... |
46 |
Introduction ....................................................................................................................................... |
46 |
Wi-Fi Direct (wireless models only) .................................................................................................. |
46 |
Enable or disable Wi-Fi Direct ......................................................................................... |
46 |
Change the printer Wi-Fi Direct name ............................................................................ |
47 |
HP ePrint via email ............................................................................................................................ |
47 |
HP ePrint software ............................................................................................................................ |
48 |
AirPrint ............................................................................................................................................... |
48 |
iv |
ENWW |
Android embedded printing .............................................................................................................. |
49 |
Use walk-up USB printing .................................................................................................................................... |
50 |
Introduction ....................................................................................................................................... |
50 |
Step one: Access USB files on the printer ......................................................................................... |
50 |
Step two: Print USB documents ........................................................................................................ |
50 |
Option one: Print documents .......................................................................................... |
50 |
Option two: Print photos ................................................................................................ |
51 |
5 Copy ........................................................................................................................................................... |
53 |
Make a copy ......................................................................................................................................................... |
54 |
Copy on both sides (duplex) ................................................................................................................................ |
55 |
Copy on both sides manually ............................................................................................................ |
55 |
Additional copy tasks .......................................................................................................................................... |
56 |
6 Scan ........................................................................................................................................................... |
57 |
Scan by using the HP Scan software (Windows) ................................................................................................. |
58 |
Scan by using the HP Scan software (OS X) ........................................................................................................ |
59 |
Scan to a USB flash drive ..................................................................................................................................... |
60 |
Set up the Scan to Network Folder feature ........................................................................................................ |
61 |
Introduction ....................................................................................................................................... |
61 |
Before you begin ............................................................................................................................... |
61 |
Method one: Use the Scan to Network Folder Wizard (Windows) .................................................... |
61 |
Method two: Set up the Scan to Network Folder feature via the HP Embedded Web Server |
|
(Windows) .......................................................................................................................................... |
63 |
Step one: Access the HP Embedded Web Server (EWS) ................................................. |
63 |
Step two: Configure the Scan to Network Folder feature .............................................. |
63 |
Set up the Scan to Network Folder feature on a Mac ....................................................................... |
64 |
Step one: Access the HP Embedded Web Server (EWS) ................................................. |
64 |
Method one: Use a Web browser to open the HP Embedded Web |
|
Server (EWS) ................................................................................................. |
64 |
Method two: Use the HP Utility to open the HP Embedded Web Server |
|
(EWS) ............................................................................................................. |
65 |
Step two: Configure the Scan to Network Folder feature .............................................. |
65 |
Scan to a network folder ..................................................................................................................................... |
67 |
Set up the Scan to E-mail feature ....................................................................................................................... |
68 |
Introduction ....................................................................................................................................... |
68 |
Before you begin ............................................................................................................................... |
68 |
Method one: Use the Scan to Email Wizard (Windows) .................................................................... |
68 |
Method two: Set up the Scan to Email feature via the HP Embedded Web Server (Windows) ....... |
69 |
Step one: Access the HP Embedded Web Server (EWS) ................................................. |
70 |
Step two: Configure the Scan to E-mail feature ............................................................ |
70 |
ENWW |
v |
Step three: Add contacts to the E-mail Address Book ................................................... |
72 |
Step four: Configure the default E-mail Options ........................................................... |
72 |
Set up the Scan to E-mail feature on a Mac ...................................................................................... |
73 |
Step one: Access the HP Embedded Web Server (EWS) ................................................. |
73 |
Method one: Use a Web browser to open the HP Embedded Web |
|
Server (EWS) ................................................................................................. |
73 |
Method two: Use the HP Utility to open the HP Embedded Web Server |
|
(EWS) ............................................................................................................. |
73 |
Step two: Configure the Scan to E-mail feature ............................................................ |
73 |
Step three: Add contacts to the E-mail Address Book ................................................... |
75 |
Step four: Configure the default E-mail Options ........................................................... |
75 |
Scan to email ....................................................................................................................................................... |
77 |
Additional scan tasks ........................................................................................................................................... |
78 |
7 Manage the product ..................................................................................................................................... |
79 |
Use HP Web Services applications ...................................................................................................................... |
80 |
Change the product connection type (Windows) ................................................................................................ |
81 |
Advanced configuration with HP Embedded Web Server (EWS) and HP Device Toolbox (Windows) ................ |
82 |
Advanced configuration with HP Utility for OS X ................................................................................................ |
85 |
Open HP Utility .................................................................................................................................. |
85 |
HP Utility features ............................................................................................................................. |
85 |
Configure IP network settings ............................................................................................................................. |
87 |
Introduction ....................................................................................................................................... |
87 |
Printer sharing disclaimer ................................................................................................................. |
87 |
View or change network settings ..................................................................................................... |
87 |
Rename the printer on a network ..................................................................................................... |
87 |
Manually configure IPv4 TCP/IP parameters from the control panel .............................................. |
88 |
Link speed and duplex settings ........................................................................................................ |
88 |
Product security features .................................................................................................................................... |
90 |
Introduction ....................................................................................................................................... |
90 |
Assign or change the system password using the Embedded Web Server ..................................... |
90 |
Energy-conservation settings ............................................................................................................................. |
91 |
Introduction ....................................................................................................................................... |
91 |
Print with EconoMode ....................................................................................................................... |
91 |
Set the Sleep/Auto Off After setting ................................................................................................. |
91 |
Set the Shut Down After delay and configure the printer to use 1 watt or less of power .............. |
92 |
Set the Delay Shut Down setting ...................................................................................................... |
92 |
HP Web Jetadmin ................................................................................................................................................. |
93 |
Update the firmware ........................................................................................................................................... |
94 |
Method one: Update the firmware using the control panel ............................................................. |
94 |
Method two: Update the firmware using the Firmware Update Utility ............................................ |
94 |
vi |
ENWW |
8 Solve problems ........................................................................................................................................... |
97 |
Customer support ................................................................................................................................................ |
98 |
Control panel help system .................................................................................................................................. |
99 |
Restore the factory-set defaults ...................................................................................................................... |
100 |
A “Cartridge is low” or “Cartridge is very low” message displays on the printer control panel ...................... |
101 |
Change the “Very Low” settings ..................................................................................................... |
101 |
Order supplies ................................................................................................................................. |
101 |
Product does not pick up paper or misfeeds .................................................................................................... |
102 |
Introduction ..................................................................................................................................... |
102 |
The printer does not pick up paper ................................................................................................. |
102 |
The printer picks up multiple sheets of paper ............................................................................... |
104 |
The document feeder jams, skews, or picks up multiple sheets of paper .................................... |
107 |
Clean the pickup rollers and separation pad in the document feeder ........................................... |
108 |
Clear paper jams ................................................................................................................................................ |
110 |
Introduction ..................................................................................................................................... |
110 |
Experiencing frequent or recurring paper jams? ............................................................................ |
110 |
Paper jam locations ........................................................................................................................ |
111 |
Clear paper jams in the document feeder ...................................................................................... |
112 |
Clear paper jams in Tray 1 .............................................................................................................. |
114 |
Clear paper jams in Tray 2 .............................................................................................................. |
117 |
Clear paper jams in the rear door and the fuser area .................................................................... |
118 |
Clear paper jams in the output bin ................................................................................................. |
120 |
Clear paper jams in the duplexer (duplex models only) ................................................................. |
121 |
Improve print quality ......................................................................................................................................... |
122 |
Introduction ..................................................................................................................................... |
122 |
Print from a different software program ....................................................................................... |
122 |
Check the paper-type setting for the print job ............................................................................... |
122 |
Check the paper type setting (Windows) ..................................................................... |
122 |
Check the paper type setting (OS X) ............................................................................. |
123 |
Check toner-cartridge status .......................................................................................................... |
123 |
Clean the product ............................................................................................................................ |
124 |
Print a cleaning page .................................................................................................... |
124 |
Check the scanner glass for dirt and smudges ............................................................ |
124 |
Visually inspect the toner cartridge ............................................................................................... |
124 |
Check paper and the printing environment .................................................................................... |
125 |
Step one: Use paper that meets HP specifications ...................................................... |
125 |
Step two: Check the environment ................................................................................ |
125 |
Step three: Set the individual tray alignment .............................................................. |
125 |
Adjust color settings (Windows) ..................................................................................................... |
126 |
Calibrate the printer to align the colors ......................................................................................... |
127 |
Check the EconoMode settings ....................................................................................................... |
127 |
ENWW |
vii |
Try a different print driver .............................................................................................................. |
128 |
Improve copy and scan image quality .............................................................................................................. |
130 |
Introduction ..................................................................................................................................... |
130 |
Check the scanner glass for dirt and smudges ............................................................................... |
130 |
Eliminate lines or streaks when using the document feeder ........................................................ |
131 |
Check the paper settings ................................................................................................................ |
131 |
Check the image adjustment settings ............................................................................................ |
131 |
Optimize for text or pictures .......................................................................................................... |
132 |
Check the scanner resolution and color settings on the computer ............................................... |
132 |
Resolution and color guidelines ................................................................................... |
132 |
Color .............................................................................................................................. |
133 |
Edge-to-edge copying .................................................................................................................... |
133 |
Clean the pickup rollers and separation pad in the document feeder ........................................... |
133 |
Solve wired network problems ......................................................................................................................... |
135 |
Introduction ..................................................................................................................................... |
135 |
Poor physical connection ................................................................................................................ |
135 |
The computer is using the incorrect IP address for the printer ..................................................... |
135 |
The computer is unable to communicate with the printer ............................................................ |
135 |
The printer is using incorrect link and duplex settings for the network ....................................... |
136 |
New software programs might be causing compatibility problems ............................................. |
136 |
The computer or workstation might be set up incorrectly ............................................................ |
136 |
The printer is disabled, or other network settings are incorrect ................................................... |
136 |
Solve wireless network problems ..................................................................................................................... |
137 |
Introduction ..................................................................................................................................... |
137 |
Wireless connectivity checklist ....................................................................................................... |
137 |
The printer does not print after the wireless configuration completes ........................................ |
138 |
The printer does not print, and the computer has a third-party firewall installed ....................... |
138 |
The wireless connection does not work after moving the wireless router or printer ................... |
138 |
Cannot connect more computers to the wireless printer .............................................................. |
138 |
The wireless printer loses communication when connected to a VPN .......................................... |
139 |
The network does not appear in the wireless networks list .......................................................... |
139 |
The wireless network is not functioning ........................................................................................ |
139 |
Perform a wireless network diagnostic test .................................................................................. |
139 |
Reduce interference on a wireless network ................................................................................... |
139 |
Index ........................................................................................................................................................... |
141 |
viii |
ENWW |
1 Product overview
●Product views
●Product specifications
●Printer hardware setup and software installation
For more information:
The following information is correct at the time of publication. For current information, see www.hp.com/ support/colorljM377MFP.
HP's all-inclusive help for the printer includes the following information:
●Install and configure
●Learn and use
●Solve problems
●Download software and firmware updates
●Join support forums
●Find warranty and regulatory information
ENWW |
1 |
Product views
●Printer front view
●Printer back view
●Control-panel view
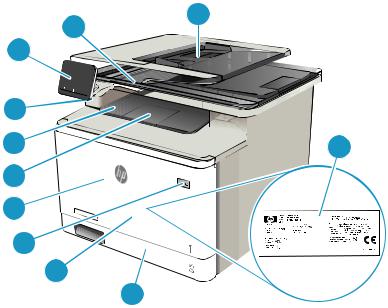
Printer front view
|
1 |
2 |
|
|
11 |
|
|
|
|
|
|
|
|
|
10 |
|
|
|
|
9 |
|
3 |
||
8 |
|
|
|
|
|
|
|
|
|
7 |
|
|
|
|
6 |
|
|
|
|
|
5 |
|
|
|
|
4 |
|
|
|
|
|
|
|
|
1 |
Scanner |
|
|
|
|
|
|
|
|
2 |
Document feeder |
|
|
|
|
|
|||
3 |
Regulatory label (inside the front door) |
|||
|
|
|
|
|
4 |
Tray 2 |
|
|
|
|
|
|
|
|
5 |
Tray 1 |
|
|
|
|
|
|
|
|
6 |
Power on/off button |
|
|
|
|
|
|||
7 |
Front door (provides toner cartridge access) |
|||
|
|
|
|
|
8 |
Output bin extension |
|
|
|
|
|
|
|
|
9 |
Output bin |
|
|
|
|
|
|||
10 |
Walk-up USB port (for printing and scanning without a computer) |
|||
|
|
|||
11 |
Touchscreen control panel (tilts up for easier viewing) |
|||
|
|
|
|
|
2 Chapter 1 Product overview |
ENWW |

Printer back view
1
6
2
5
 3
3  4
4
1Front door release button
2USB port for job storage
3USB port for direct connection to a computer
4Ethernet port
5Duplexer door (provides access to jams)
6Power connection
ENWW |
Product views 3 |
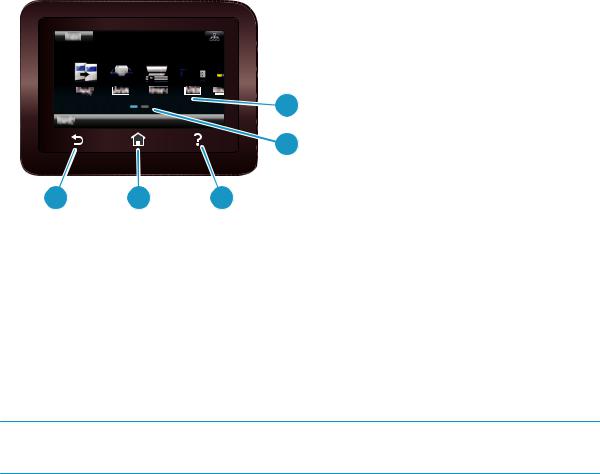
Control-panel view
|
|
|
|
|
|
|
|
|
|
|
1 |
|
|
|
|
|
|
|
|
|
|||
|
|
|
|
|
|
|
2 |
||||
|
5 |
|
4 |
|
3 |
||||||
|
|
|
|
|
|
|
|
|
|
|
|
1 |
Touchscreen |
|
|
|
|
|
|
|
|
Provides access to menus, help animations, and printer |
|
|
|
|
|
|
|
|
|
|
|
|
information. |
|
|
|
|
|
|
|
|||||
2 |
Home page screen indicator |
|
|
|
|
The display indicates which Home screen the control panel is |
|||||
|
|
|
|
|
|
|
|
|
|
|
currently displaying. |
|
|
|
|
|
|
|
|
|
|
|
|
3 |
Help button |
|
|
|
|
|
|
|
|
Provides access to the control-panel help system |
|
|
|
|
|
|
|
|
|
|
|
|
|
4 |
Home button |
|
|
|
|
|
|
|
|
Provides access to the Home screen |
|
|
|
|
|
|
|
|
|
|
|
|
|
5 |
Back button |
|
|
|
|
|
|
|
|
Returns to the previous screen |
|
|
|
|
|
|
|
|
|
|
|
|
|
 NOTE: While the control panel does not have a standard Cancel button, during many printer processes a Cancel button appears on the touchscreen. This permits users to cancel a process before the printer completes it.
4 Chapter 1 Product overview |
ENWW |

Home screen layout
The Home screen provides access to the printer features and indicates the current status of the printer. Return to the Home screen at any time by touching the Home button on the printer control panel.
 NOTE: The features that appear on the Home screen can vary, depending on the printer configuration.
12
10 |
9 |
8 |
7 |
6 |
5 |
4 |
3 |
|
|
1 |
Reset button |
Touch this button to reset any temporary job settings to the default printer settings. |
|
||||||
2 |
Connection Information |
Touch this button to open the Connection Information menu, which provides network information. |
|||||||
|
button |
|
|
The button appears as either a wired network icon |
or a wireless network icon |
, |
|||
|
|
|
|
||||||
|
|
|
|
depending on the type of network to which the printer is connected. |
|
||||
3 |
Setup |
button |
Touch this button to open the Setup menu. |
|
|
||||
4 |
Apps |
button |
Touch this button to open the Apps menu to print directly from select Web applications. |
|
|||||
5 |
Supplies |
button |
Touch this button to view information about supplies status. |
|
|||||
6 |
USB |
button |
Touch this button to open the USB Flash Drive menu. |
|
|
||||
7 |
Scan |
button |
Touch this button to open the scan features: |
|
|
||||
|
|
|
|
● |
Scan to USB Drive |
|
|
|
|
|
|
|
|
● |
Scan to Network Folder |
|
|
|
|
|
|
|
|
● |
Scan to E-mail |
|
|
|
|
8 |
Jobs |
button |
Touch this button to open the stored jobs feature. |
|
|
||||
9 |
Copy |
button |
Touch this button to open the copy feature. |
|
|
||||
10 |
Printer status |
This screen area provides information about the overall printer status. |
|
||||||
ENWW |
Product views 5 |
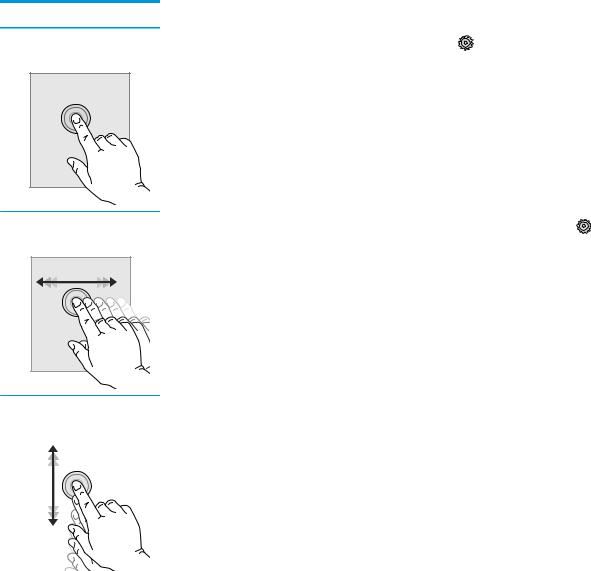
How to use the touchscreen control panel
Use the following actions to use the printer touchscreen control panel.
Action |
Description |
Example |
|
Touch |
Touch an item on the screen to select that item |
Touch the Setup |
button to open the Setup |
|
or open that menu. Also, when scrolling |
menu. |
|
|
through menus, briefly touch the screen to stop |
|
|
|
|
|
|
|
the scrolling. |
|
|
Swipe |
Touch the screen and then move the finger |
Swipe the Home screen to access the Setup |
|
horizontally to move the screen sideways. |
button. |
|
|
Scroll |
Touch the screen, and then, without lifting the |
Scroll through the Setup menu. |
|
finger, move the finger vertically to move the |
|
|
screen. |
|
|
|
|
|
|
|
|
|
6 Chapter 1 Product overview |
ENWW |
||
Product specifications
 IMPORTANT: The following specifications are correct at the time of publication, but they are subject to change. For current information, see www.hp.com/support/colorljM377MFP.
●Technical specifications
●Supported operating systems
●Mobile printing solutions
●Printer dimensions
●Power consumption, electrical specifications, and acoustic emissions
●Operating-environment range
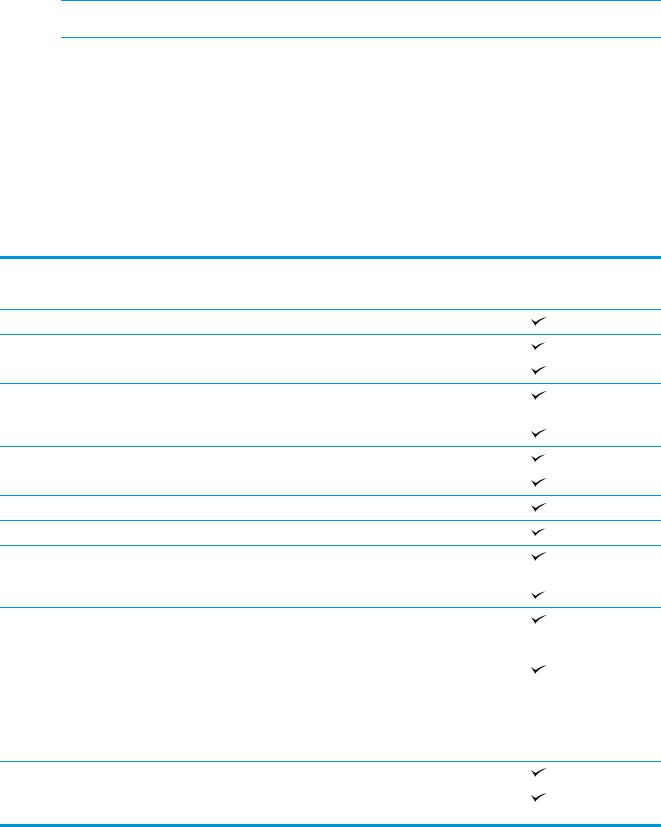
Technical specifications
Model name |
M377dw |
Product number |
M5H23A |
Paper handling |
50-sheet multipurpose tray (Tray 1) |
|
Tray 2 (250-sheet capacity) |
|
Automatic duplex printing |
Connectivity |
10/100/1000 Ethernet LAN connection with IPv4 |
|
and IPv6 |
|
Hi-Speed USB 2.0 |
|
Print server for wireless network connectivity |
|
Walk-up USB port |
|
Wi-Fi Direct for printing from mobile devices |
Control-panel display and input |
Touchscreen control panel |
Prints 24 pages per minute (ppm) on A4 and |
|
|
25 ppm on letter-size paper |
|
USB printing (no computer required) |
|
Job storage/PIN-protected printing |
|
(Requires a 16 GB or greater USB thumb drive.) |
Copy and Scan |
Copies 19 pages per minute (ppm) |
NOTE: Copy and scan speeds are |
Scans 26 ppm |
subject to change. For the most |
|
current information, go to |
|
www.hp.com/support/ |
|
colorljM377MFP. |
|
|
50-page document feeder |
|
Scan to E-mail, Scan to USB, and Scan to Network |
|
Folder options |
ENWW |
Product specifications 7 |

Supported operating systems
The following information applies to the printer-specific Windows PCL 6 and OS X print drivers.
Windows: The HP Software Installer installs the HP PCL.6, HP PCL-6, or HP PCL 6 driver depending on the Windows operating system along with optional software when using the full software installer. See the software installation notes for more information.
OS X: Mac computers are supported with this printer. Download HP Easy Start either from 123.hp.com or from the Print Support page, and then use HP Easy Start to install the HP print driver and utility. HP Easy Start is not included in the in-box CD.
1.Go to 123.hp.com.
2.Follow the steps provided to download the printer software.
Linux: For information and print drivers for Linux, go to hplipopensource.com/hplip-web/index.html.
UNIX: For information and print drivers for UNIX®, go to www.hp.com/go/unixmodelscripts.
Operating system |
Print driver installed |
Notes |
Windows® XP SP3 or later, 32bit
The HP PCL.6 printer-specific print driver is installed for this operating system as part of the basic software installation. The basic installer installs the driver only.
The full software installation is not supported for this operating system.
Microsoft retired mainstream support for Windows XP in April 2009. HP will continue to provide best-effort support for the discontinued XP operating system.
Windows Vista®, 32-bit |
The HP PCL.6 printer-specific print |
|
driver is installed for this operating |
|
system as part of the basic software |
|
installation. The basic installer |
|
installs the driver only. |
The full software installation is not supported for this operating system.
Windows Server 2003 SP2 or later, 32-bit
The HP PCL.6 printer-specific print driver is installed for this operating system as part of the basic software installation. The basic installer installs the driver only.
The full software installation is not supported for this operating system.
Use UPD drivers for 64-bit operating systems.
Microsoft retired mainstream support for Windows Server 2003 in July 2010. HP will continue to provide best-effort support for the discontinued Server 2003 operating system.
Windows 7 SP1 or later, 32-bit and 64-bit
The HP PCL 6 printer-specific print driver is installed for this operating system as part of the full software installation.
Windows 8, 32-bit and 64-bit |
The HP PCL-6 printer-specific print |
|
driver is installed for this operating |
|
system as part of the basic software |
|
installation. |
Windows 8 RT support is provided through Microsoft IN OS Version 4, 32-bit driver.
Windows 8.1, 32-bit and 64-bit |
The HP PCL-6 printer-specific print |
|
driver is installed for this operating |
|
system as part of the basic software |
|
installation. |
Windows 8.1 RT support is provided through Microsoft IN OS Version 4, 32-bit driver.
Windows 10, 32-bit and 64-bit |
The HP PCL-6 printer-specific print |
|
driver is installed for this operating |
|
system as part of the basic software |
|
installation. |
|
|
8 Chapter 1 Product overview |
ENWW |

Operating system |
Print driver installed |
Notes |
Windows Server 2008 SP2, 32bit
The HP PCL.6 printer-specific print driver is installed for this operating system as part of the basic software installation.
Windows Server 2008 SP2, 64bit
The HP PCL 6 printer-specific print driver is installed for this operating system as part of the basic software installation.
Windows Server 2008 R2, SP 1, 64-bit
The HP PCL 6 printer-specific print driver is installed for this operating system as part of the basic software installation.
Windows Server 2012, 64-bit |
The software installer does not |
Download the HP PCL 6 or PCL-6 driver from the HP Web |
|
support Windows Server 2012 but |
site www.hp.com/support/colorljM377MFP, and use the |
|
the HP PCL 6 and HP PCL-6 printer- |
Windows Add Printer tool to install it. |
|
specific print drivers do support it. |
|
|
|
|
Windows Server 2012 R2, 64 bit |
The software installer does not |
Download the HP PCL 6 or PCL-6 driver from the HP Web |
|
support Windows Server 2012 but |
site www.hp.com/support/colorljM377MFP, and use the |
|
the HP PCL 6 and HP PCL-6 printer- |
Windows Add Printer tool to install it. |
|
specific print drivers do support it. |
|
OS X 10.9 Mavericks, OS X 10.10 |
The OS X print driver and print utility |
Yosemite, and OS X 10.11 El |
are available for download from |
Capitan |
123.hp.com. The HP installer |
|
software for OS X is not included in |
|
the in-box CD. |
Download HP Easy Start either from 123.hp.com or from the Print Support page, and then use HP Easy Start to install the HP print driver and utility.
1.Go to 123.hp.com.
2.Follow the steps provided to download the printer software.
 NOTE: For a current list of supported operating systems, go to www.hp.com/support/colorljM377MFP for HP's all-inclusive help for the printer.


 NOTE: For details on client and server operating systems and for HP UPD PCL6, UPD PCL 5, and UPD PS driver support for this printer, go to www.hp.com/go/upd and click the Specifications tab.
Mobile printing solutions
The printer supports the following software for mobile printing:
●HP ePrint software
 NOTE: The HP ePrint Software supports the following operating systems: Windows 7 SP 1 (32-bit and 64-bit); Windows 8 (32-bit and 64-bit); Windows 8.1 (32-bit and 64-bit); Windows 10 (32-bit and 64-bit); and OS X versions 10.8 Mountain Lion, 10.9 Mavericks, and 10.10 Yosemite.
●HP ePrint via email (Requires HP Web Services to be enabled and the printer to be registered with HP Connected)
●HP ePrint app (Available for Android, iOS, and Blackberry)
●ePrint Enterprise app (Supported on all printers with ePrint Enterprise Server Software)
●HP All-in-One Remote app for iOS and Android devices
ENWW |
Product specifications 9 |

●Google Cloud Print
●AirPrint
●Android Printing
Printer dimensions
Figure 1-1 Dimensions for the base model
3
3
1
|
|
1 |
|
|
|
2 |
|
|
|
2 |
|
|
|
|
|||
|
|
||||
|
|||||
|
Printer fully closed |
Printer fully open |
|
|
|
1. Height |
399.8 mm (15.74 in) |
656 mm (25.83 in) |
|
|
|
2. Depth |
472.3 mm (18.59 in) |
1124.4 mm (44.27 in) |
|
|
|
3. Width |
415.4 mm (16.35 in) |
415.4 mm (16.35 in) |
|
|
|
Weight (with cartridges) |
23.2 kg (51.15 lb) |
|
|
|
|
10 Chapter 1 Product overview |
ENWW |

Figure 1-2 Dimensions for printer with optional Tray 3
3
3

 1 1
1 1 


2
2
|
Printer fully closed |
Printer fully open |
|
|
|
1. Height |
531.8 mm (20.93 in) |
788 mm (31.02 in) |
|
|
|
2. Depth |
472.3 mm (18.59 in) |
1124.4 mm (44.27 in) |
|
|
|
3. Width |
415.4 mm (16.35 in) |
415.4 mm (16.35 in) |
|
|
|
Weight (with cartridges) |
28.4 kg (62.61 lb) |
|
|
|
|
Power consumption, electrical specifications, and acoustic emissions
See www.hp.com/support/colorljM377MFP for current information.
 CAUTION: Power requirements are based on the country/region where the printer is sold. Do not convert operating voltages. This will damage the printer and void the printer warranty.
Operating-environment range
Environment |
Recommended |
Allowed |
|
|
|
Temperature |
15° to 27°C (59° to 80.6°F) |
15° to 30°C (59° to 86°F) |
|
|
|
Relative humidity |
20% to 70% relative humidity (RH), non- |
10% to 80% RH, non-condensing |
|
condensing |
|
|
|
|
ENWW |
Product specifications 11 |
Printer hardware setup and software installation
For basic setup instructions, see the Setup Poster and Getting Started Guide that came with the printer. For additional instructions, go to HP support on the Web.
Go to www.hp.com/support/colorljM377MFP for HP's all-inclusive help for the printer. Find the following support:
●Install and configure
●Learn and use
●Solve problems
●Download software and firmware updates
●Join support forums
●Find warranty and regulatory information
12 Chapter 1 Product overview |
ENWW |

2 Paper trays
●Load paper into Tray 1 (multipurpose tray)
●Load paper into Tray 2
●Load and print envelopes
For more information:
The following information is correct at the time of publication. For current information, see www.hp.com/ support/colorljM377MFP.
HP's all-inclusive help for the printer includes the following information:
●Install and configure
●Learn and use
●Solve problems
●Download software and firmware updates
●Join support forums
●Find warranty and regulatory information
ENWW |
13 |
Load paper into Tray 1 (multipurpose tray)
Introduction
Use Tray 1 to print single-page documents, documents that require multiple paper types, or envelopes.
●Load paper into Tray 1 (multipurpose tray)
●Tray 1 paper orientation
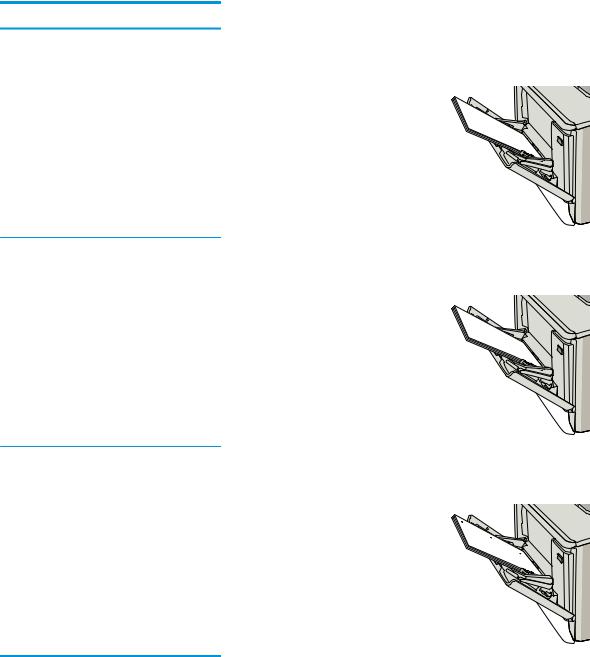
Load paper into Tray 1 (multipurpose tray)
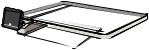
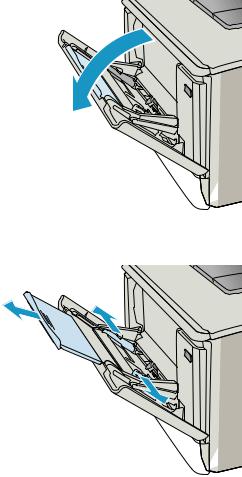
1. Open Tray 1.
2. Press the tab on the right paper guide to move the paper width guides outward, and then slide out the tray extension.
14 Chapter 2 Paper trays |
ENWW |

3.Place the paper stack in the tray, and then adjust the side guides so that they lightly touch the stack, but do not bend it. For information about how to orient the paper, see Tray 1 paper orientation on page 16.
4.At the computer, begin the printing process from the software application. Make sure that the driver is set to the correct paper type and size for the paper being printed from Tray 1.
ENWW |
Load paper into Tray 1 (multipurpose tray) 15 |
Tray 1 paper orientation
When using paper that requires a specific orientation, load it according to the information in the following table.
Paper type |
Output |
How to load paper |
Letterhead or preprinted |
1-sided printing |
Face-up |
|
|
Top edge leading into the printer |
123
Letterhead or preprinted |
2-sided printing |
Face-down |
|
|
Top edge away from the printer |
123
Prepunched |
1-sided printing or 2-sided printing |
Face-up |
|
|
Holes toward the left side of the printer |
16 Chapter 2 Paper trays |
ENWW |
Load paper into Tray 2
Introduction
The following information describes how to load paper in Tray 2.
●Load paper into Tray 2
●Tray 2 paper orientation
Load paper into Tray 2
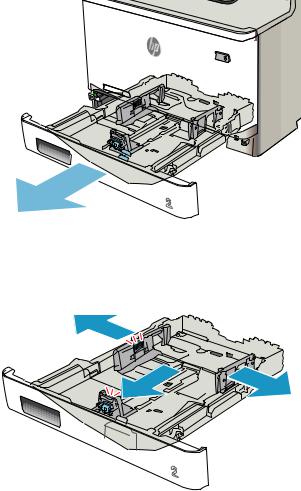
1.Open the tray.
2.Adjust the paper-width guides by squeezing the adjustment latches on the guides and then sliding the guides to the size of the paper being used.
ENWW |
Load paper into Tray 2 17 |
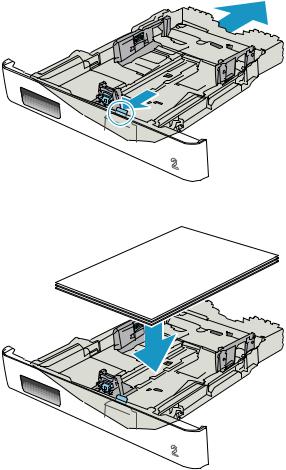
3.To load legal-size paper, extend the tray front by squeezing the front latch and pulling the front of the tray.
NOTE: When loaded with legal-size paper, Tray 2 extends from the front of the printer approximately 51 mm (2 in).
4.Load paper into the tray.
18 Chapter 2 Paper trays |
ENWW |

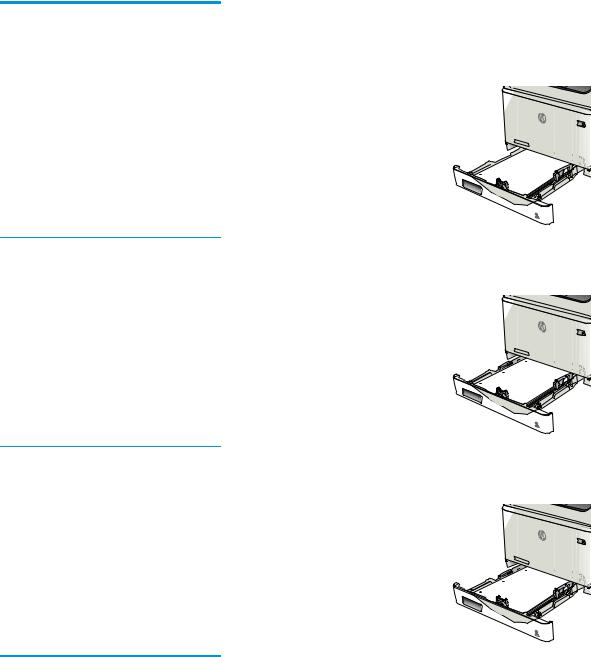
5.Make sure that the paper stack is flat at all four corners. Slide the paper length and width guides so that they are against the stack of paper.
NOTE: To prevent jams, do not overfill the tray. Be sure that the top of the stack is below the tray full indicator.
6.After making sure that the paper stack is below the tray full indicator, close the tray.
|
|
|
|
|
|
|
|
|
|
|
|
|
|
|
|
|
|
|
|
|
|
|
|
|
|
|
|
|
|
ENWW |
Load paper into Tray 2 19 |
||||
Tray 2 paper orientation
When using paper that requires a specific orientation, load it according to the information in the following table.
Paper type |
Output |
How to load paper |
|
|
|
Letterhead or preprinted |
1-sided printing |
Face-up |
|
|
Top edge toward the printer |


 123
123 

Letterhead or preprinted |
2-sided printing |
Face-down |
|
|
Top edge away from the printer |
|
|
123 |
Prepunched |
1-sided printing or 2-sided printing |
Face-up |
|
|
Holes toward the left side of the printer |
20 Chapter 2 Paper trays |
ENWW |
Loading...