


|
|
|
|
|
|
Programmable |
RTH6350/RTH6450 |
||||
RET93E/RET95E |
|||||
Thermostat |
|||||
Owner’s Manual |
Series |
||||
|
|
|
|
||
Read and save these instructions.
For help please visit yourhome.honeywell.com
Installation is Easy
1.Label wires and remove your old thermostat
2.Install and wire your new thermostat
3.Set your new thermostat to match your heating/cooling system
•It is preset for the most common system
Do you need assistance? We are here to help.
Call 1-800-468-1502 for wiring assistance before returning the thermostat to the store.

Hg
NO MERCURY
NO BOTE
MERCURIO
ATTENTION: MERCURY RECYCLING NOTICE
This product does not contain mercury. However, this product may replace a product that contains mercury. Mercury and products containing mercury should not be discarded in household trash.
For more information on how and where to properly recycle a thermostat containing mercury in the United States, please refer to the Thermostat Recycling Corporation at www.thermostat-recycle.org.
For mercury thermostat recycling in Canada, please refer to Switch the Stat at www.switchthestat.ca
NOTICE: To avoid possible compressor damage, do not run air conditioner if the outside temperature drops below 50°F (10°C).
Customer assistance
For assistance with this product, please visit http://yourhome.honeywell.com.
Or call Honeywell Customer Care toll-free at 1-800-468-1502.
To save time, please note your model number and date code before calling.
Remove battery holder; model number is on the battery holder.
M28400
® U.S. Registered Trademark. Patents pending.
US Patent No. D542,677 and other patents pending.
2
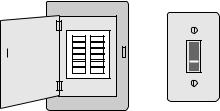
Table of contents |
|
Installation |
|
Installation............................................. |
3 |
Advanced Installation............................ |
9 |
About your new thermostat |
|
Controls and Home screen |
|
quick reference................................... |
11 |
Preset energy-saving schedules........ |
13 |
Programming and operation |
|
Setting the clock................................. |
13 |
Adjusting program schedules............. |
14 |
Overriding schedules temporarily....... |
15 |
Overriding schedules permanently..... |
15 |
Compressor protection....................... |
17 |
Replace batteries................................ |
18 |
Appendices |
|
Troubleshooting.................................. |
18 |
Limited warranty................................. |
20 |
1 Turn Off Power to Heating/Cooling System
or
Circuit breaker |
Heating/cooling system |
box |
power switch |
3
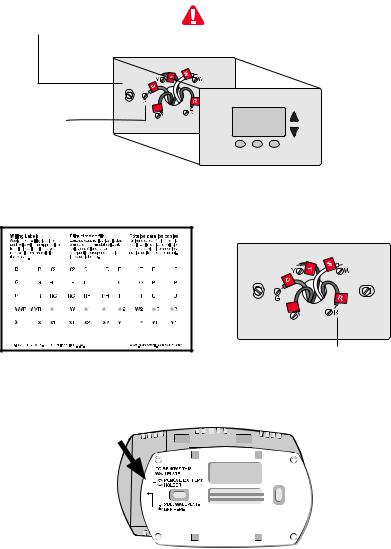
2 Remove Old Thermostat
Remove old thermostat but leave wallplate with wires attached.
If you have an older thermostat with a
Do not remove wallplate yet sealed mercury tube, turn to page 2 for proper disposal instructions.
Terminal designation
C
3 Label Wires with Tags
Label the wires using the supplied wire labels as you disconnect them. Wire Labels
|
C |
|
C |
M28100 |
Terminal designation |
4 Separate Wallplate from New Thermostat
Remove wallplate from the new thermostat and mount onto wall.
M28343
Wallplate
4
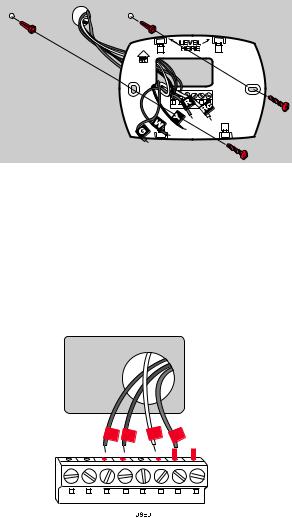
5 Mount Wallplate
Mount the new wallplate using the included screws and anchors.
M28345
Drill 3/16-in. holes for drywall
Drill 3/32-in. holes for plaster
6 Connect Wires
Simply match wire labels.
If labels do not match letters on the thermostat, check Alternate Wiring on page 6 and connect to terminal as shown (see notes, below).
G
Y2 W2 G
W |
Y |
R |
|

 Remove metal
jumper if you
have both R and
Rc wires.
W 
 Y R Rc
MCR31270A
We are here to help. Call 1-800-468-1502 for wiring assistance.
5

Alternate Wiring (Conventional Systems)
If labels do not match terminals, connect wires as shown here (see notes, below).
C |
Y2 W2 G |
W |
Y |
R |
Rc |
X |
F |
W1 |
Y1 |
RH |
R |
B |
|
H |
M |
4 |
|
|
|
|
|
V |
|
|
|
|
|
|
|
|
|
|
|
|
|
|
|
|
|
|
|
|
|
|
|
|
|
|
|
|
|
|
|
|
|
|
|
|
|
Y2 W2 G W |
Y R Rc |
||||||||||
|
|
|
|
|
|
|
|
|
|
MCR31274B |
|
If wires will be connected to both R and Rc terminals, remove metal jumper.
 Do not use C, X or B. Wrap bare end of wire with electrical tape.
Wiring—Heat Pump
If E and Aux do not each have a wire connected, use a small piece of wire to connect them to each other.
Aux
G |
O |
Y
R
L |
Aux |
G O/B |
Y R Rc |
|
E |
|
MCR31276A |
|
|
|
6
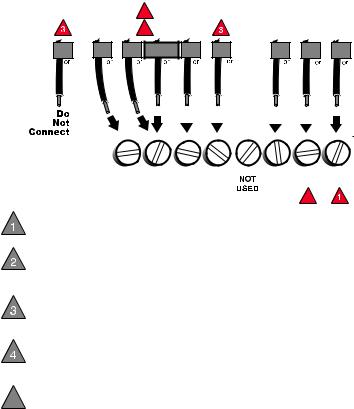
Alternate Wiring (Heat Pump Only)
If labels do not match letters on the thermostat, check the chart below and connect to terminal as shown here (see notes, below).
|
|
4 |
|
|
|
5 |
|
C |
L |
E AUX |
G |
X |
F |
X |
W |
F |
B |
|
X2 |
W1 |
|
|
|
|
W2 |
|
O |
Y |
R |
Rc |
H |
Y1 |
V |
R |
B |
M |
VR |
|
|
|
|
|
|
|
|
|
|
|
|
|
|
|
|
|
|
|
|
|
|
|
|
|
|
|
|
|
|
|
|
|
|
L |
Aux |
G O/B |
Y |
R Rc |
||||||
E |
||||||||||
|
|
|
|
|
|
|
2 |
|||
|
|
|
|
|
|
|
|
|||
|
|
|
|
|
|
|
|
MCR31275B |
||
Leave metal jumper in place, connecting R and Rc terminals.
If your old thermostat had both V and VR wires, stop now and contact a qualified contractor for help.
If your old thermostat had separate O and B wires, wrap the B wire in electrical tape and do not connect.
If your old thermostat had Y1, W1 and W2 wires, stop now and contact a qualified contractor for help.
5If there were seperate wires on E and Aux, place both wires in the Aux/E terminal.
7
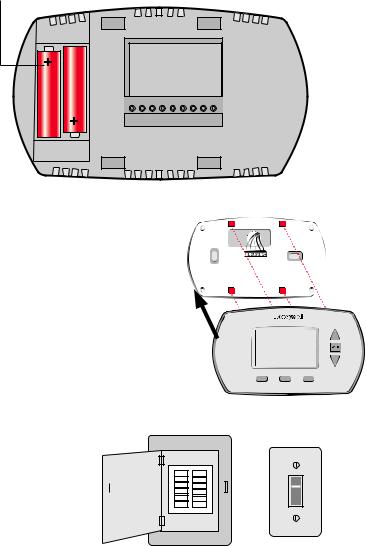
7 Install Batteries
Install two AA alkaline batteries.
Back of thermostat
8 Install Thermostat onto Wallplate
Install thermostat onto the wallplate on the wall.
M28346
M28347
9 Turn Power Back On
Turn the power back on to the heating/cooling system.
or
Circuit breaker box Heating/cooling system power switch
8
10 If your system type is...
If your system type is:
θ Single Stage Heat and Cool
Congratulations, you’re done!
If your system type is:
θMultistage Heat and Cool
θHeat Pump* without Backup Heat
θHeat Pump* with Backup Heat
θHeat Only
θCool Only
Continue with Advanced Installation to match your thermostat to your system type.
*Heat Pump—an air conditioner that provides cooling in the summer, and also runs in reverse in the winter to provide heating.
If you are not sure of your system type or if you have other questions, call us toll-free at 1-800-468-1502.
This thermostat works on 24 volt or 750 mV systems. It will NOT work on 120/240 Volt systems.
Advanced Installation
Enter System Setup
To enter system setup, press and hold both the σ and FAN buttons until the display
changes (approximately 5 seconds). |
|
M28348 |
|
Function |
Setting |
||
|
Changing Settings
1.Press the σ or τ button to change the setting.
2.Press NEXT to advance to the next function.
3.Press DONE to exit and save settings.
1  0
0
Done |
Next |
M28349
9

Function |
Description |
Setting |
|
Press the σ or τ button to |
|||
1 |
select the type of system |
0 Heating & cooling: Gas, oil or electric heating with central |
|
|
you have in your home |
|
air conditioning. |
|
|
1 |
Heat pump: Outside compressor provides both heating and |
|
|
|
cooling without backup or auxiliary heat. |
|
|
2 |
Heating only: Gas, oil or electric heating without central air |
|
|
|
conditioning. |
|
|
3 |
Heating only with fan: Gas, oil or electric heating without |
|
|
|
central air conditioning. (Use this setting if you could turn the |
|
|
|
fan on and off with a fan switch on your old thermostat.) |
|
|
4 |
Cool only: Central air conditioning only. |
|
|
5 |
Heat pump: Outside compressor provides both heating and |
|
|
|
cooling with backup or auxiliary heating. |
|
|
6 |
Heat/Cool Multiple Stages: Two heat stages (wires on W |
|
|
|
and W2), two cooling stages (wires on Y and Y2). |
|
|
7 |
Heat/Cool Multiple Stages: Two heat stages (wires on W |
|
|
|
and W2), one cooling stage (wire on Y). |
|
|
8 |
Heat/Cool Multiple Stages: One heat stage (wire on W), |
|
|
|
two cooling stages (wires on Y and Y2). |
2 |
select whether your |
0 Cooling changeover valve: Use this setting if you |
|
|
changeover valve is used |
|
connected a wire labeled “O” to the O/B W wire terminal. |
|
in heating or cooling |
1 Heating changeover valve: Use this setting if you |
|
|
|
|
connected a wire labeled “B” to the O/B W wire terminal. |
3 |
select your heating |
0 Gas or oil heat: Use this setting if you have a gas or oil |
|
|
system and fan operation |
|
heating system (system controls fan operation). |
|
|
1 |
Electric heat: Use this setting if you have an electric |
|
|
|
heating system (thermostat controls fan operation). |
5 |
select your Stage 1 |
5 Gas or oil furnace: Use this setting if you have a standard |
|
|
heating system and |
|
gas or oil furnace that is less than 90% efficient. |
|
optimize its operation |
9 Electric furnace: Use this setting if you have any type of |
|
|
|
|
electric heating system. |
|
|
3 |
Heat pump, hot water or high-efficiency furnace: Use |
|
|
|
this setting if you have a hot water system or a gas furnace |
|
|
|
of greater than 90% efficiency. |
|
|
1 |
Gas/oil steam or gravity system: Use this setting if you |
|
|
|
have a steam or gravity heat system. |
6 |
select your Stage 2 |
5 Gas or oil furnace: Use this setting if you have a standard |
|
|
heating system and |
|
gas or oil furnace that is less than 90% efficient. |
|
optimize its operation |
9 Electric furnace: Use this setting if you have any type of |
|
|
|
|
electric heating system. |
|
|
3 |
Heat pump, hot water or high-efficiency furnace: Use |
|
|
|
this setting if you have a hot water system or a gas furnace |
|
|
|
of greater than 90% efficiency. |
|
|
1 |
Gas/oil steam or gravity system: Use this setting if you |
|
|
|
have a steam or gravity heat system. |
8Emergency Heat Cycle 9 Electric furnace: Electric heating systems. Rate (heat pumps only)
12 |
select Manual or Auto |
0 |
Manual Changeover: (Heat/Off/Cool) |
|
Changeover |
1 |
Automatic Changeover: (Heat/Off/Cool/Auto) Automatically |
|
|
|
turns on heat or cool based on room temperature. |
13 |
select Smart Response® |
1 |
Smart Response Technology ON |
|
Technology |
0 |
Smart Response Technology OFF |
14select Fahrenheit or 0 Fahrenheit temperature display (°F) Celsius temperature 1 Celsius temperature display (°C) display
10
About your new thermostat
Your new Honeywell thermostat has been designed to give you many years of reliable service and easy-to-use, push-button climate control.
•Easy-to-follow menu programming.
•One-touch temp control overrides program schedule at any time.
•Large, clear, backlit display is easy to read — even in the dark.
•Displays both room temperature and temperature setting.
•Removable battery holder for fast, easy replacement.
•Built-in compressor protection.
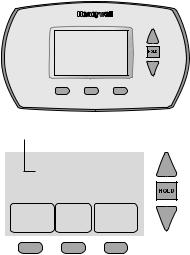
Thermostat controls
Digital display |
|
Battery holder |
|
||
|
|
|
Temperature buttons
Press to adjust temperature settings.
|
Hold button |
|
Press to override programmed |
M28401 |
temperature control. |
|
Function buttons
Press to select the function displayed just above each button. (Functions change depending on the task.)
11

Display screen
Current inside temperature |
|
|
Low battery warning |
|
Current time/day |
||||||||||||||||||
Smart Response® |
|
|
|
|
|
|
|
|
|
|
|
|
|
|
|
|
|
|
|||||
|
|
|
|
|
|
|
|
|
|
|
|
|
|
|
|
|
|
||||||
|
|
|
|
|
|
|
|
|
|
|
|
|
|
|
|
|
|
|
|
|
|
Temperature |
|
|
|
|
|
|
|
|
|
Replace Battery |
|
|
Heat |
|
|
|
|
|
|||||||
technology in effect |
|
|
|
Inside |
|
|
|
|
|
|
|
|
|||||||||||
|
|
|
|
|
|
|
|
|
|
|
setting |
||||||||||||
|
|
|
|
|
|
|
|
|
|
|
|
|
|
|
|
|
Setting |
|
|
|
|
|
|
|
|
|
|
|
|
|
|
|
In Recovery |
|
|
|
|
|
|
|
|
|
|
|
|||
Current program period |
|
75 |
|
|
|
|
|
|
|
|
|
|
|
||||||||||
Wake/Leave/Return/Sleep |
|
|
6 |
: |
30 |
AM |
75 |
|
|
|
|
|
System status |
||||||||||
|
|
|
|
|
|
|
|
|
|||||||||||||||
|
|
|
|
|
|
|
|
|
|
Heat On |
|
|
|
|
|
On when “calling” for |
|||||||
|
|
|
|
|
Wake |
|
|
|
Wed |
|
|
|
|
|
|
|
|
|
|
heating or cooling; |
|||
|
|
|
|
|
|
|
|
|
|
Fan |
|
|
System |
|
|
|
|
|
|||||
Set clock/day/schedule |
|
Set Clock/Day/ |
|
|
|
|
|
|
|
flashes when waiting |
|||||||||||||
Press to set time, day |
Auto |
|
|
Heat |
|
|
|
|
|
|
for compressor restart |
||||||||||||
or program schedules |
|
Schedule |
|
|
|
|
|
|
|
|
|
|
|
|
|
|
|||||||
|
|
|
|
|
|
|
|
|
|
|
|
|
|
|
|
|
|
|
|||||
|
|
|
|
|
|
|
|
|
|
|
|
|
|
|
|
|
|
|
|
|
|
|
|
Fan setting
Press the FAN button to select Auto or On.
In “Auto” mode (the most commonly used setting), the fan runs only when the heating or cooling system is on. If set to “On,” the fan runs continuously.
M28402
System setting
Press the SYSTEM button to select Heat, Cool or Off.
•Heat: Thermostat controls only the heating system.
•Cool: Thermostat controls only the cooling system.
•Off: Heating and cooling systems are off.
•Auto: Thermostat automatically selects heating or cooling depending on the indoor temperature.
Note: The Auto setting may not appear, depending on how your themostat was installed.
12
 Loading...