


Operating Manual
Wireless Remote Control
For use with RedLINK™ devices
Para ser utilizado con dispositivos RedLINK™ À utiliser avec les appareils RedLINK™
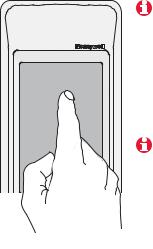
Always press touchscreen buttons with your fingertip. Never use sharp instruments, such as a pencil or pen.
Presione siempre los botones de la pantalla táctil con la punta del dedo. Nunca utilice objetos con punta, como lápices o bolígrafos.
Toujours appuyer sur l’écran tactile du bout du doigt. Ne jamais utiliser d’objets pointus, comme la pointe d’un crayon ou d’un stylo.
To clean the screen, lock the display and use a damp cloth.
Never use abrasive cleansers.
Para limpiar la pantalla, bloquéela y utilice un paño húmedo.
Nunca utilice limpiadores abrasivos.
Pour nettoyer l’écran, verrouiller l’affichage et utiliser un linge humide. Ne jamais employer de nettoyants abrasifs.
Read and save these instructions
Lea y conserve estas instrucciones
Veuillez lire et conserver ces instructions
® U.S. Registered Trademark.
Copyright © 2008 Honeywell International Inc. All rights reserved.

Contents
Wireless Remote Control
Español: vea la página 15 • Français : voir la page 29
How it works .............................................................................. |
2 |
Quick reference .......................................................................... |
4 |
System settings .......................................................................... |
5 |
Temperature control options (one thermostat).......................... |
6 |
Temperature control options (multiple thermostats) ................ |
7 |
Temperature “hold” .................................................................... |
8 |
Screen lock/unlock .................................................................... |
9 |
Customizing features (setup menu) ........................................ |
10 |
Battery replacement ................................................................ |
12 |
In case of difficulty.................................................................... |
13 |
Limited warranty ...................................................................... |
14 |
Regulatory information ............................................................ |
43 |
1
Operating Manual
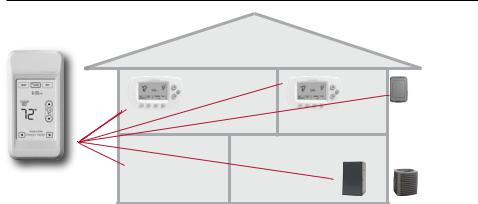
How it works
Thermostat
Thermostat |
Optional outdoor |
|
air sensor |
||
|
Wireless  remote Thermostat
control
If you have one thermostat, you can move the remote control around your home (like a mobile thermostat) to make sure the temperature is comfortable in the room you’re using.
Heating/cooling equipment
If you have multiple thermostats, you can use the remote control to display and adjust temperatures in each room independently.
(See next page.)
2

Wireless Remote Control
How it works
|
SET TO |
|
SET TO |
78° |
78 ° |
77 ° |
78 ° |
READ TEMP FROM... |
|
|
|
THERMOSTAT |
•THIS DEVICE |
|
|
TOGGLE ZONE
BEDROOM
If you have only one thermostat
Temperature is measured at thermostat or remote control, as you choose. You can move the remote control as needed, so the room you are using maintains a comfortable temperature (see page 6).
If you have multiple thermostats
Temperature is measured at each thermostat. Press TOGGLE ZONE buttons to choose which room to display and adjust (see page 7).
3

Operating Manual
Quick reference to display screen
System setting |
|
|
|
Current time (set at thermostat) |
•HEAT |
COOL |
OFF |
Outside temperature |
|
8:03 |
AM |
(appears only if outdoor |
|
|
|
sensor is installed) |
|
|
|
Outside humidity (Press to display for 5 seconds)
Inside temperature
If “No Signal” appears here, check to make sure there are fresh batteries in the thermostat, and HVAC power is on.
OUTDOOR
58 SCREEN ° UNLOCKED
SET TO 78°REPLACE 78 °
BATTERY
READ TEMP FROM... |
|
THERMOSTAT |
•THIS DEVICE |
|
TOGGLE ZONE |
|
Note: First press of screen |
LIVINGROOM |
|
only turns on backlight. |
||
|
Screen lock/unlock
Temperature setting
Replace battery warning
Temperature sensor source (appears if you have only one thermostat)
Zone control (appears only if you have more than one thermostat)
4

Wireless Remote Control
System settings
Press to select |
|
Press a SYSTEM button to select: |
|
•HEAT |
|
|
• Heat: Thermostat controls only the |
COOL |
OFF |
heating system. |
|
|
8:03 |
|
• Cool: Thermostat controls only the |
|
AM |
cooling system. |
|
|
|
• Off: Heating and cooling systems |
|
|
|
|
|
CHANGEOVER are off.
•HEAT |
AUTO |
|
COOL |
OFF |
8:03 AM
Note: The Auto Changeover option is available only if programmed by the system installer.
Note: Emergency Heat can only be set at the thermostat.
Press and hold HEAT or COOL for 3 seconds to select Auto Changeover (thermostat automatically selects heating or cooling depending on the indoor temperature).
In Auto Changeover mode, you can press HEAT or COOL to display or adjust the settings for each system.
To exit Auto Changeover mode, press and hold HEAT or COOL for 3 seconds.
5

Operating Manual
Temperature control options (one thermostat)
Display shows temperature at selected device
OUTDOOR |
|
58° |
|
|
SET TO |
78° |
78 ° |
READ TEMP FROM... |
|
THERMOSTAT |
•THIS DEVICE |
Press to choose temperature measurement device
Both the thermostat and the remote control have built-in temperature sensors. Press a button to choose whether the system responds to temperatures at the thermostat, or at the location of the remote control.
If you use the remote control to measure temperature, keep it in an upright position in an area with good air circulation. Do not place it near sources of heat or cold air. Keep away from air ducts, direct sunlight, appliances and electronic devices.
Note: This option will not appear if you have a zone system (more than one thermostat). In zone systems, temperature is always measured at the thermostats.
6
Wireless Remote Control
Temperature control options (multiple thermostats)
Display shows temperature in selected zone
OUTDOOR |
|
58° |
|
|
SET TO |
78° |
78 ° |
TOGGLE ZONE
LIVINGROOM
Press to select a thermostat zone
If you have a zone system (more than one thermostat), you can display and adjust the temperature in each zone from the remote control.
Press the arrow buttons until the thermostat zone you want is displayed. After a short delay, the remote will retrieve information, then display the current temperature in that zone.
At the remote control you can change the following settings for each zone independently:
•Temperature
•System setting (heat/cool)
•Temporary hold
•Permanent hold
(Fan operation and program schedules can be changed only at the thermostat.)
7

Operating Manual
Temperature “hold” (programmable thermostats only)
1 Press to adjust temperature |
Press ▲ or ▼ to adjust the temperature. |
|||||
OUTDOOR |
|
|
|
|
Temporary hold: |
|
|
|
|
|
|||
58° |
|
|
|
|
Press ▲ or ▼ to set the “Hold Until” |
|
|
|
|
SET TO |
time. When the timer expires (or when |
||
72 |
° |
78 ° |
|
you press CANCEL), the temperature will |
||
|
|
|
|
revert to the setting you’ve |
||
|
|
|
|
|||
|
|
|
|
programmed at the thermostat. |
||
|
|
|
|
|
Permanent hold: |
|
|
|
|
|
|
||
2 Set temporary hold time period |
Press PERM. HOLD to maintain the new tem- |
|||||
perature permanently. The temperature |
||||||
OR press PERM. HOLD |
|
|
|
|||
|
|
|
will remain as you set it until you press |
|||
|
|
|
|
|
||
•HEAT |
|
|
|
|
CANCEL to revert to the setting you’ve |
|
|
|
|
|
programmed at the thermostat. |
||
|
|
|
|
|
||
HOLD UNTIL
DONE 10:15AM
CANCEL PERM. HOLD
Note: If you have a zone system (more than one thermostat), Hold will only apply to the zone displayed at the bottom of the screen. Scroll to another zone to change the temperature in that zone (see page 7).
8
Wireless Remote Control
Screen lock/unlock
Press and hold until label appears
•HEAT |
COOL |
OFF |
|
8:03 AM |
|
||
OUTDOOR |
LOCKED |
|
|
58° |
|
|
|
|
SCREEN |
|
|
|
|
SET TO |
|
78 |
° |
78 |
° |
Press and hold the SCREEN LOCK button for 3 seconds to lock or unlock the screen.
If the remote control is set to use Auto Lock, the screen is re-locked 30 seconds after each use. If set to use Manual Lock, press and hold the SCREEN LOCK button to re-lock the screen after use.
You can lock the screen to prevent changes to settings while cleaning. Clean the screen with a soft cloth moistened with warm water or household window cleaner.
Note: The screen lock button will not appear if the remote control has not been set to use manual or auto lock options (see pages 10-11 to activate this feature).
LOCKED
9
Operating Manual
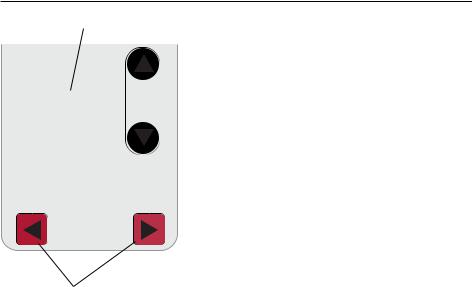
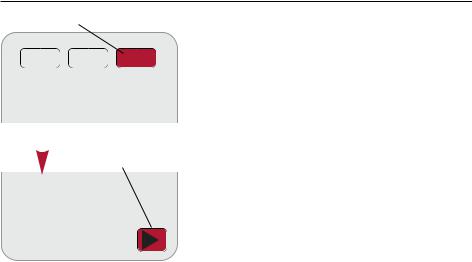
Customizing features
Press and hold until screen changes |
The remote control has four features that |
||
|
|
|
can be turned on or off as desired (see |
|
|
|
next page). |
|
|
|
Press and hold the OFF button until the |
|
|
|
screen changes (about 3 seconds), then |
|
|
|
press the right arrow button to enter the |
|
|
|
setup menu. |
|
|
Press to continue |
|
|
|
|
|
SETUP MENU
10

Wireless Remote Control
Customizing features
Press arrow buttons to select feature, then YES or NO to enable or disable
YES |
• |
NO |
|
MENU
MANUAL LOCK
AUTOMATIC LOCK
BUTTON CLICK
TEMP OFFSET
Press arrow buttons to select a feature, then YES or NO to turn it on or off. When finished customizing features, press DONE to exit the menu and restore the home screen.
•Manual Lock: Allows you to lock the screen by pressing and holding the LOCK button.
•Automatic Lock: Always locks the
screen 30 seconds after each use.
•Button Click: Audible tone sounds to confirm each keypress.
•Temp Offset: The remote control displays actual indoor temperature. If you prefer, you can offset the displayed temperature by up to ± 3 degrees (not displayed when used with more than one thermostat).
11
Operating Manual
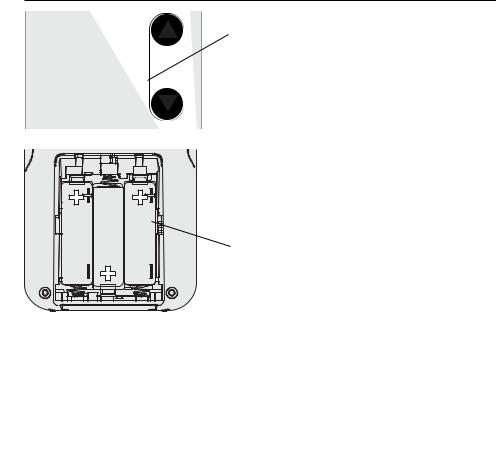
Battery replacement
SET TO
78°REPLACE 78 °
BATTERY
Install fresh batteries when the REPLACE BAT- TERY warning flashes on the screen. This warning will flash for approximately two months before the batteries fail.
Remove the cover and install 3 fresh AA batteries. Make sure the batteries are inserted properly (see polarity marks on illustration at left).
After batteries are installed, the remote control will automatically restore communication with the wireless network within a few minutes.
Always use 3 fresh
AA batteries
12

Wireless Remote Control
In case of difficulty
Slow response The thermostat may take up to 15 seconds to respond to commands entered at the remote control.
Heating or |
• Check circuit breaker and reset if necessary. |
|
cooling system |
• Make sure power switch at heating & cooling system is on. |
|
does not respond |
||
|
• |
Make sure furnace door is closed securely. |
|
• |
Wait 5 minutes for the system to respond. |
Screen displays Remote control has lost radio contact with the wireless network (usually “No Signal” because of a power outage). To restore power:
•Check circuit breaker and reset if necessary.
•Make sure power switch at heating & cooling system is on.
•Make sure furnace door is closed securely.
After power is restored, the remote control will automatically restore wireless communication within a few minutes.
13
 Loading...