


EN
DE
FR ES
NL
IT
FI
SV
DA
NO
Vent Filter
for 16 and 19 mm ID vent hose
Instruction manual . . . . . . . . . . . . . . . . 2. . . . . . .
Entlüftungsfilter
Für Entlüftungsschläuche, Innendurchmesser 16 und 19 mm
Einbauanleitung . . . . . . . . . . . . . . . . . .6 . . .  . . . .
DVF1619
Vent Filter
Filtre de purge d'air |
|
Pour tuyaux d'évacuation de 16 et 19 mm |
|
Mode d'emploi . . . . . . . . . . . . . . . . . |
.8 . . . . . . . |
Filtro de ventilación
Para mangueras de ventilación ID de 16 y 19 mm
Manual de instrucciones . . . . . . . . . . . . 11. . . . .
Luchtfilter
Voor luchtslangen met een binnendiameter van 16 en 19 mm
Gebruiksaanwijzing . . . . . . . . . . . . . . .14. . . . . .
Filtro di sfiato
Per tubo di sfiato ID da 16 e 19 mm
Manuale di istruzioni . . . . . . . . . . . . . . 16. . . . . .
Tuuletussuodatin
Tuuletusletkuihin, joiden sisähalkaisija on 16 ja 19 mm
Ohjekirja . . . . . . . . . . . . . . . . . . . . . 18. . . . . . . . .
Ventilationsfilter |
|
För 16 och 19 mm ID ventilationsslangar |
|
Bruksanvisning . . . . . . . . . . . . . . . . . |
20. . . . . . . |
Udluftningsfilter
Til 16 og 19 mm ID udluftningsslange
Instruktionsvejledning . . . . . . . . . . . . . 22. . . . . .
Ventilasjonsfilter
For 16 og 19 mm ID ventilajsonsslange
Brukerhåndbok . . . . . . . . . . . . . . . . .24. . . . . . .

Notes on using the manual |
Dometic Vent Filter |
|
|
1 |
|
|
|
|
2 |
|
1 |
|
|
|
|
|
|
|
|
|
|
|
|
|
|
|
2 |
3 |
|
|
4 |
|
|
|
|
1 |
2 |
3 |
5 |
6 |
5 |
3 |
2 |
EN
Table of contents
1 |
Notes on using the manual . |
. . . . . . . . . . . . . . . . . . . . . . . . . . . . |
. |
. |
. |
.2 . . . . . |
2 |
General safety instructions . |
. . . . . . . . . . . . . . . . . . . . . . . . . . . . |
. |
. |
. |
.3 . . . . . |
3 |
Intended use . . . . . . . . . |
. . . . . . . . . . . . . . . . . . . . . . . . . . . |
. |
. |
. |
. 3. . . . . . |
4 |
Installation . . . . . . . . . . |
. . . . . . . . . . . . . . . . . . . . . . . . . . . |
. |
. |
. |
. 3. . . . . . |
5 |
Warranty and Product Liability |
. . . . . . . . . . . . . . . . . . . . . . . . . . . |
. |
.4.- .5 . . . . . |
||
1 Notes on using the manual
Caution!
Safety Instruction: Failure to observe this instruction can cause material damage and impair the function of the device..
Note
Supplementary information for operating the device..
fig. 2 1, page 2 : This refers to an element in an illustration.. In this example, item 1 in figure 2 on page 2..
2

Dometic Vent Filter |
General safety instructions |
|
|
2 General safety instructions
The manufacturer will not be held liable for claims for damage resulting from the following:
•Faulty assembly or connection
•Damage to the unit from mechanical influences
•Alterations to the unit without express written permission from the manufacturer
•Use for purposes other than those described in the operating manual
3 Intended use
When a toilet is flushed on a boat with a holding tank, air is pushed out of the holding tank, through a vent hose, and out of the boat through a vent fitting.. To stop foul-smelling air from coming out of the vent fitting, install a Dometic Vent Filter..
4 Installation
Remove old filter
(if replacing existing vent filter)
1. Remove vent hose from both ends of old vent filter..
2..Remove old filter from bracket and seal ends with caps that are provided with new filter..
3.Discard old filter in appropriate container..
Install new filter
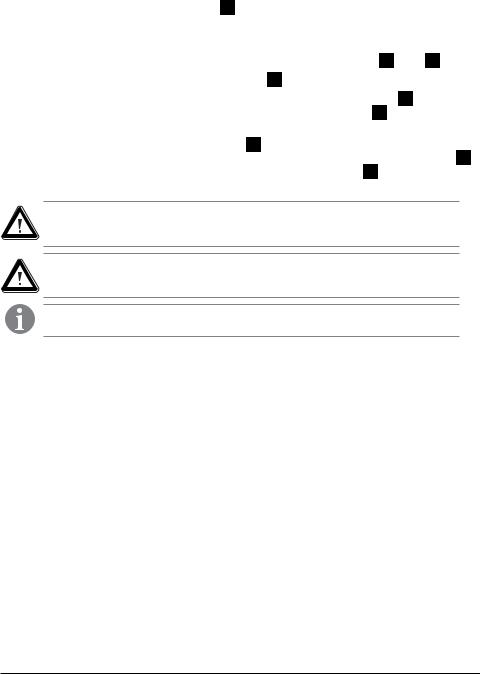
1.Select location for vent filter.. Avoid areas near excessive heat sources (engine manifolds, lights, etc..).. Do not install filter below top of holding tank (fig.. 1 page 2)..
2.Vent filter can be mounted at any angle.. Installations near thru-hull vent reduce chance of filter damage from potential overfilling of tank..
3.Install mounting bracket (fig.. 2 1, page 2) with fasteners (fig.. 2 2, page 2)..
4.Press vent filter (fig.. 3 6, page 2) into mounting bracket..
5.Install 5/8-inch or 3/4-inch (16 mm or 19 mm) hose adapters (fig.. 3 4, page 2) on both ends of filter, making sure rubber gaskets (fig.. 3 5, page 2) are in place.. Tighten 1/4 to 1/2 turn beyond hand tight..
6.Using hose clamps (fig.. 3 3, page 2) (not included with vent filter), install 16 mm or 19 mm (5/8-inch or 3/4-inch) I..D.. vent hoses (fig.. 3 2, page 2) from holding tank and thru-hull fitting (fig.. 3 1, page 2) to hose adapters on filter..
Caution!
Do not use Dometic® Vent Filter for holding tanks with waste that is treated through onboard sewage treatment systems that use chlorine or other strong oxidizing agents..
Caution!
Replace vent filter immediately if accidental overflow of holding tank occurs.
Note
Replace vent filter at the beginning of each boating season for best odor control..
3

Warranty and Product Liability |
Dometic Vent Filter |
|
|
5 Warranty and Product Liability
Europe:
Warranty and Customer Service
Warranty arrangements are in accordance with EC Directive 44/1999/CE and the normal conditions applicable for the country concerned.. For warranty or other service, please contact our Dometic/Waeco Service department listed elsewhere in this manual.. Any damage due to improper use is not covered by the warranty..
The warranty does not cover any modifications to the product or the use of non-original Dometic parts; the warranty does not apply if the installation and operating instructions are not adhered to and no liability shall be entertained..
Product Liability
Product liability of Dometic Group and its subsidiary companies does not include damages which may arise from: faulty operation; improper alterations or intervention in the equipment; adverse effects from the environment which may impact the equipment itself or the direct vicinity of the equipment or persons in the area..
To obtain warranty service, first contact your local dealer from whom you purchased this product or go to http://www..dometic..com/enuk/Europe/United-Kingdom/Customer-Center/ for a dealer near you..
North America and Rest of the World:
Manufacturer’s One-Year and Five-Year Limited Warranty
Dometic Corporation, Sanitation Division warrants to the original purchaser only that this product (certain Dometic products, listed below, have a longer warranty period), if used for personal, family or household purposes, is free from defects in material and workmanship for a period of one year from the date of purchase..
Dometic Corporation, Sanitation Division also warrants to the original purchaser only that the following products will not leak liquid sewage or malodorous gases for a period of five (5) years if used for personal, family or household purposes:
•OdorSafe branded sanitation hose
•Thermoplastic pump bellows installed in the Dometic T-series discharge pump
•Dometic L-series holding tanks
If this Dometic product is placed in commercial or business use, it will be warranted to the original purchaser only to be free of defects in material and workmanship for a period of ninety (90) days from the date of purchase..
Dometic reserves the right to replace or repair any part of this product that proves, upon inspection by Dometic, to be defective in material or workmanship.. All labor and transportation costs or charges incidental to warranty service are to be borne by the purchaser-user..
EXCLUSIONS
IN NO EVENT SHALL DOMETIC BE LIABLE FOR INCIDENTAL OR CONSEQUENTIAL DAMAGES, FOR DAMAGES RESULTING FROM IMPROPER INSTALLATION, OR FOR DAMAGES CAUSED BY NEGLECT, ABUSE, ALTERATION OR USE OF UNAUTHORIZED COMPONENTS.. ALL IMPLIED WARRANTIES, INCLUDING ANY IMPLIED WARRANTY OF MERCHANTABILITY OR FITNESS FOR ANY PARTICULAR PURPOSE, ARE LIMITED TO A PERIOD OF ONE YEAR FROM DATE OF PURCHASE..
4

Warranty and Product Liability |
Dometic Vent Filter |
|
|
IMPLIED WARRANTIES
No person is authorized to change, add to, or create any warranty or obligation other than that set forth herein.. Implied warranties, including those of merchantability and fitness for a particular purpose, are limited to one (1) year from the date of purchase for products used for personal, family or household purposes, and ninety (90) days from the date of purchase for products placed in commercial or business use..
OTHER RIGHTS
Some states do not allow limitations on the duration of an implied warranty and some states do not allow exclusions or limitations regarding incidental or consequential damages; so, the above limitations may not apply to you.. This warranty gives you specific legal rights, and you may have other rights which vary from state to state..
To obtain warranty service, first contact your local dealer from whom you purchased this product or go to http://www..dometic..com/enus/Americas/USA/Customer-Support/ for a dealer near you..
® Registered; ™ Trademark of Dometic Corporation |
13128 SR 226 | PO BOX 38 |
|
© Dometic Corporation |
||
BIG PRAIRIE, OHIO 44611 USA |
||
600346025 10/08 |
||
www.dometic.com |
5
Hinweise zur Benutzung der Einbauanleitung |
Dometic Entlüftungsfilter |
|
|
DE
Inhalt
1 Hinweise zur Benutzung der Einbauanleitung . . . . . . . . . . . . . . . . . . . . . . . 6. . . . . .
2 Grundlegende Sicherheitshinweise . . . . . . . . . . . . . . . . . . . . . . . . . . . . .6 . . . . .
3 |
Bestimmungsgemäßer Gebrauch . . . . . . . . . . . . . . . . . . . . . . . . . . . . |
. |
6. . . . . . |
|||||||||||||||||||
4 |
Installation . . . . . . . . . |
. . . . |
. |
. . . . . |
. . . . . |
. |
. . |
. |
. |
. |
. |
. |
. |
. |
. |
. |
. |
. |
. |
6. -. |
7. . . . . . |
|
5 |
Garantie und Produkthaftung |
. . . |
. |
. . . . . |
. . . . . |
. |
. . |
. |
. |
. |
. |
. |
. |
. |
. |
. |
. |
. |
. |
. |
. |
7. . . . . . |
1 Hinweise zur Benutzung der Einbauanleitung
Achtung!
Sicherheitshinweis: Nichtbeachtung kann zu Materialschäden führen und die Funktion des Gerätes beeinträchtigen..
Hinweis
Ergänzende Informationen zur Bedienung des Gerätes..
Abb. 2 1, Seite 2 : Bezeichnet ein Element in einer Illustration.. In diesem Beispiel Element 1 in Abbildung 2 auf Seite 2..
2 Grundlegende Sicherheitshinweise
Der Hersteller übernimmt keine Haftung für Schäden aufgrund von
•Montageoder Anschlussfehlern
•Schäden am Gerät durch mechanische Einwirkung
•Modifikationen am Gerät ohne ausdrückliche Genehmigung des Herstellers
•Verwendung für andere als die in der Anleitung beschriebenen Zwecke.
3 Bestimmungsgemäßer Gebrauch
Wird auf einem Boot mit einem Schmutzwassertank eine Toilettenspülung betätigt, entweicht Luft aus dem Schmutzwassertank durch einen Entlüftungsschlauch und über einen Entlüftungsstutzen aus dem Boot.. Installieren Sie einen Entlüftungsfilter von Dometic, um zu verhindern, dass Fäulnisgeruch aus dem Entlüftungsstutzen dringt..
4 Installation
Alten Filter entfernen
(falls Sie einen vorhandenen Entlüftungsfilter ersetzen möchten)
1. Nehmen Sie den Entlüftungsschlauch von beiden Enden des alten Entlüftungsfilters ab..
2..Nehmen Sie den alten Filter aus der Halterung und verschließen Sie die Enden mit den dem neuen Filter beiliegenden Kappen..
3. Entsorgen Sie den alten Filter in einem dafür vorgesehenen Behälter..
6
Dometic Entlüftungsfilter |
Installation |
|
|
Neuen Filter installieren
1.Wählen Sie den Einbauort für den Entlüftungsfilter.. Vermeiden Sie dabei Bereiche in der Nähe starker Wärmequellen (Abgaskrümmer, Leuchten usw..).. Installieren Sie den Filter nicht unterhalb der Oberseite eines Schmutzwassertanks (Abb.. 1 Seite 2)..
2.Der Entlüftungsfilter kann in einem beliebigen Winkel eingebaut werden.. Der Einbau in der Nähe der Rumpföffnung verringert das Risiko von Schäden am Filter durch Überfüllung des Tanks..
3. Bringen Sie den Halter mit den dafür vorgesehenen Befestigungsmitteln an (Abb.. 2 1 und 2 2, Seite 2)..
4.Setzen Sie den Entlüftungsfilter in den Halter ein (Abb.. 3 6, Seite 2)..
5.Bringen Sie an beiden Enden des Filters 16 oder 19 mm Schlauchadapter an (Abb.. 3 4, Seite 2).. Vergewissern sie sich dabei, dass die Gummidichtungen eingesetzt sind (Abb.. 3 5, Seite 2).. Ziehen Sie die Schrauben 1/4 bis 1/2 Umdrehung weiter als handfest an..
6.Installieren Sie mithilfe von Schlauchschellen (Abb.. 3 3, Seite 2; nicht im Lieferumfang des Entlüftungsfilters enthalten) jeweils einen Entlüftungsschlauch (Innendurchmesser 16 oder 19 mm, Abb.. 3 2, Seite 2) zwischen dem Schmutzwassertank und dem Rumpfanschluss (Abb.. 3 1, Seite 2) und den Schlauchadaptern am Filter..
Achtung!
Verwenden Sie Dometic®-Entlüftungsfilter nicht für Tanks mit Abwässern, die über eine Bordschmutzwasseranlage mit Chlor oder anderen starken Oxidationsmitteln aufbereitet werden..
Achtung!
Ersetzen Sie bei einem versehentlichen Überlaufen des Schmutzwassertanks sofort den Entlüftungsfilter..
Hinweis
Ersetzen Sie für einen optimalen Geruchsschutz den Entlüftungsfilter zu Beginn jeder Saison..
5 Garantie und Produkthaftung
Europa:
Garantie und Kundendienst
Die Garantievereinbarungen entsprechen der EG-Direktive 44/1999/EG und die normalen Bedingungen gelten für das betreffende Land.. Wenden Sie sich an die Dometic/Waeco Service-Abteilung, deren Adresse Sie an anderer Stelle in diesem Handbuch finden, wenn Sie einen Garantiefall oder eine andere Serviceleistung vereinbaren möchten.. Alle Schäden aufgrund falscher oder missbräuchlicher Bedienung werden von der Garantie nicht abgedeckt..
Von der Garantie werden keine Änderungen am Produkt oder die Verwendung von anderen Bauteilen als den Dometic Originalteilen abgedeckt; die Garantie gilt nicht, wenn die Installationsoder Betriebsanweisungen nicht beachtet werden.. In solchen Fällen wird jedwede Haftung durch den Hersteller abgelehnt..
Product Liability
Die Produkthaftung der Dometic Group und ihrer Niederlassungen umfasst keine Schäden, die durch das Folgende entstehen: fehlerhafter Betrieb; ungeeignete Änderungen oder Eingriffe in die Anlage; negative Umgebungsauswirkungen, die die Anlage selbst beeinträchtigen oder die direkte Umgebung der Anlage oder Personen in diesem Bereich..
Wenn Sie eine Garantieleistung in Anspruch nehmen möchten, wenden Sie sich zuerst an Ihren Fachhändler vor Ort, bei dem Sie das Produkt erworben haben oder informieren Sie sich im Internet unter http://www.. dometic..com/de/Europe/Germany/Service-Center/ über Händler in Ihrer Nähe..
® Eingetragenes ™ Warenzeichen der Dometic Corporation
7

Remarques concernant ce mode d’emploi |
Dometic Filtre de purge d’air |
|
|
FR
Table des matières
1 |
Remarques concernant ce mode d'emploi . . . . . . . . . . . . . . . . . . . . . . |
. . .8 . . . . . |
||||||
2 |
Consignes générales de sécurité . . . . |
. . . . . . . . . . . . . . . . . . . . . |
. |
|
. |
. |
. |
8. . . . . . |
3 |
Usage conforme . . . . . . . . . . . . . |
. . . . . . . . . . . . . . . . . . . . . |
. |
|
. |
. |
. 8. . . . . . |
|
4 |
Installation . . . . . . . . . . . . . . . . |
. . . . . . . . . . . . . . . . . . . . . |
. |
|
. |
8. |
-. |
9. . . . . . |
5 |
Garantie et Responsabilité pour le produit |
. . . . . . . . . . . . . . . . . . . . . |
|
. |
9. -. 10. . . . . . |
|||
1 Remarques concernant ce mode d'emploi
Attention!
Consigne de sécurité: Le non-respect de cette consigne peut entraîner des dégâts matériels et entraver le fonctionnement de l'appareil..
Remarque
Informations supplémentaires relatives à l'utilisation de l'appareil..
fig. 2 1, page 2 : Ceci désigne un élement d'un schéma.. Dans cet exemple, l'item 1 du schéma 2 sur la page 2..
2 Consignes générales de sécurité
Le fabricant ne saurait être tenu responsable dans les cas suivants:
•Assemblage ou connections incorrects
•Appareil endommagé par des influences mécaniques
•Modification de l'appareil sans l'autorisation écrite expresse du fabricant
•Utilisations autres que celles décrites dans le mode d'emploi
3 Usage conforme
Lorsque vous tirez la chasse sur un bateau équipé d'un réservoir d'eau noires, de l'air sort du réservoir à travers un tuyau d'évacuation et du bateau à travers un évent.. Afin d'empêcher de l'air nauséabond de sortir de l'évent, installez un filtre de purge d'air Dometic..
4 Installation
Enlevez le filtre usagé
(si vous remplacez un filtre de purge d'air existant)
1. Retirez le tuyau d'évacuation des deux côtés du filtre usagé..
2..Retirez le filtre usagé du support et fermez-en les extrêmités hermétiquement avec les bouchons fournis avec le nouveau filtre..
3. Jettez le filtre usagé dans un réceptacle approprié..
8

Installation |
Dometic Filtre de purge d’air |
|
|
Installation du nouveau filtre
1.Choisissez un endroit pour installer le filtre.. Evitez les zones à proximité de sources de chaleur excessives (collecteurs, lumières, etc..).. Ne pas installer le filtre en dessous du couvercle du réservoir à eau noires (fig.. 1 page 2)..
2.Le filtre peut être monté à n’importe quel angle.. En installant le filtre près de l'évent de coque, vous réduisez les risques de dégâts au filtre dus à un éventuel surremplissage du réservoir d'eaux noires..
3.Installez le support de montage (fig.. 2 1, page 2) avec des fermoirs (fig.. 2 2, page 2)..
4.Inserez le filtre de purge d'air dans le support de montage en appuyant (fig.. 3 6, page 2)..
5.Installez des adaptateurs de tuyau 5/8 de pouce ou 3/4 de pouce (16 mm ou 19 mm) (fig.. 3 4, page
2)des deux côtés du filtre, et assurez-vous que les joints en caoutchou (fig.. 3 5, page 2) sont en place.. Serrez 1/4 de tour ou 1/2 de tour au-delà de ce qui est nécessaire pour ouvrir manuellement..
6.En utilisant des colliers de serrage (fig.. 3 3, page 2) (non fournis avec le filtre de purge d'air), connectez les tuyaux d'évacuation 16 mm ou 19 mm (5/8 de pouce or 3/4 de pouce) (fig.. 3 2, page
2)du réservoir d'eaux noires et de l'évent de coque (fig.. 3 1, page 2) aux adaptateurs sur le filtre..
Attention !
Ne pas utiliser le filtre de purge d'air ®Dometic sur les réservoirs d'eaux noires dont les boues sont traitées par un système d'évacuation utilisant du chlore ou d'autres agents oxydants puissants..
Attention !
Si un débordement accidentel se produit, remplacez le filtre de purge d'air immédiatement..
Remarque
Remplacez le filtre de purge d'air au début de chaque saison de plaisance afin de limiter les odeurs..
5 Garantie et Responsabilité pour le produit
Europe:
Garantie et service après-vente
Les conditions de la garantie correspondent à la directive 44/1999/CE et aux conditions normales applicables dans le pays concerné.. Pour la garantie ou un autre service, veuillez contacter notre service après-vente Dometic/Waeco dont la liste figure dans le manuel.. Tout dommage dû à une utilisation non conforme n’est pas couvert par la garantie..
La garantie ne couvre pas les modifications apportées au produit ou l'utilisation d'autres pièces que les pièces Dometic d'origine; la garantie ne s'applique pas si les instructions d'installation et d'utilisation ne sont pas respectées et aucune responsabilité ne peut être admise..
Responsabilité pour le produit
La responsabilité du groupe Dometic et de ses filiales pour le produit n'inclut pas les dommages éventuellement provoqués par: une utilisation impropre; des modifications impropres ou des interventions sur le matériel; des effets nocifs de l'environnement pouvant avoir un impact sur le matériel lui-même ou le matériel et les personnes à proximité directe dans cette zone..
Pour obtenir le service de garantie, veuillez contacter dans un premier temps le revendeur chez lequel vous avez acheté ce produit ou consulter le site http://www..dometic..com/fr/Europe/France/CustomerCenter/ afin de trouver un revendeur près de chez vous..
9
 Loading...