


COOLING BOXES COOLFREEZE
EN
DE
FR
ES
PT
IT
NL
DA
SV
NO
CF 11, CF 16, CF 26
Compressor Cooler |
|
FI |
|
Operating manual . . . . . . . . . . . . . . . . . . . . |
5. |
||
|
|||
Kompressor-Kühlbox |
|
|
|
|
RU |
||
Bedienungsanleitung . . . . . . . . . . . . . . . . . |
21 |
||
|
|||
Glacière à compression |
|
|
|
|
PL |
||
Notice d’utilisation . . . . . . . . . . . . . . . . . . . |
38 |
||
|
|||
Nevera por compresor |
|
|
|
Instrucciones de uso |
55 |
|
|
SK |
|||
|
|
||
Geleira com compressor |
|
|
|
Manual de instruções |
72 |
|
|
CS |
|||
|
|
||
Frigorifero a compressore |
|
|
|
Istruzioni per l’uso . . . . . . . . . . . . . . . . . . . . |
89 |
HU |
|
|
|
Compressorkoelbox
Gebruiksaanwijzing. . . . . . . . . . . . . . . . . . 107
Kompressor-køleboks
Betjeningsvejledning . . . . . . . . . . . . . . . . 123
Kompressori-kylmälaatikko
Käyttöohje . . . . . . . . . . . . . . . . . . . . . . . . . 171
Компрессорный холодильник
Инструкция по эксплуатации . . . . . . . . . 187
Przenośna lodówka kompresorowa
Instrukcja obsługi . . . . . . . . . . . . . . . . . . . 205
Chladiaci box s kompresorom
Návod na obsluhu . . . . . . . . . . . . . . . . . . . 222
Kompresorový chladicí box
Návod k obsluze . . . . . . . . . . . . . . . . . . . . 239
Kompresszor hűtőláda
Használati utasítás. . . . . . . . . . . . . . . . . . . 255
Kylbox med kompressor
Bruksanvisning . . . . . . . . . . . . . . . . . . . . . . 139
Kjøleboks med kompressor
Bruksanvisning . . . . . . . . . . . . . . . . . . . . . . 155
CoolFreeze |
|
|
|
|
|
|
|
|
1 |
|
|
|
|
|
|
|
|
|
|
POWER |
|
|
|
|
|
|
|
|
ERROR |
|
FRIDGE FREEZER |
|
|
|
|
1 |
2 |
3 |
4 |
|
5 |
6 |
7 |
|
CF 11 |
|
|
|
|
|
|
|
|
2 |
|
|
|
|
|
|
|
|
1 |
2 |
3 |
|
4 |
5 |
|
6 |
7 |
|
POWER |
|
|
° |
|
|
|
|
|
|
|
|
|
|
|
|
|
|
ERROR |
|
|
|
|
|
|
|
CF 16, CF 26
3
CF 11, CF 16, CF 26
1 |
2 |
3 |
100-240V~AC
12/24V DC
DC
FUSE
3

|
|
|
|
CoolFreeze |
4 |
CF 11 |
5 |
CF 16, CF 26 |
1 |
|
1 |
|||
|
|
|
|
6
1 |
2 |
3 |
7 |
1 |
2 |
3 |
|
|||
|
|
|
4 |
|
|
|
5 |
|
|
6 |
|
4 |
|
|
|
8 |
1 |
2 |
|

CoolFreeze |
Explanation of symbols |
Please read this manual carefully before starting the device. Keep it in a safe place for future reference. If the device is passed on to another person, this manual must be handed over to the user along with it.
The manufacturer cannot be held liable for damage resulting from improper usage or incorrect operation.
Table of contents |
|
|
1 |
Explanation of symbols . . . . . . . . . . . . . . . . . . . . . . . . . . . . . . . . . . . . . . . . . . |
.5 |
2 |
Safety instructions . . . . . . . . . . . . . . . . . . . . . . . . . . . . . . . . . . . . . . . . . . . . . . |
.6 |
3 |
Scope of delivery . . . . . . . . . . . . . . . . . . . . . . . . . . . . . . . . . . . . . . . . . . . . . . |
.8 |
4 |
Intended use . . . . . . . . . . . . . . . . . . . . . . . . . . . . . . . . . . . . . . . . . . . . . . . . . . |
.8 |
5 |
Technical description . . . . . . . . . . . . . . . . . . . . . . . . . . . . . . . . . . . . . . . . . . . |
.9 |
6 |
Operation . . . . . . . . . . . . . . . . . . . . . . . . . . . . . . . . . . . . . . . . . . . . . . . . . . . . |
10 |
7 |
Cleaning and maintenance. . . . . . . . . . . . . . . . . . . . . . . . . . . . . . . . . . . . . . . |
17 |
8 |
Troubleshooting . . . . . . . . . . . . . . . . . . . . . . . . . . . . . . . . . . . . . . . . . . . . . . . |
17 |
9 |
Warranty . . . . . . . . . . . . . . . . . . . . . . . . . . . . . . . . . . . . . . . . . . . . . . . . . . . . . |
18 |
10 |
Disposal . . . . . . . . . . . . . . . . . . . . . . . . . . . . . . . . . . . . . . . . . . . . . . . . . . . . . . |
19 |
11 |
Technical data . . . . . . . . . . . . . . . . . . . . . . . . . . . . . . . . . . . . . . . . . . . . . . . . . |
19 |
1Explanation of symbols
DDANGER!
Safety instruction: Failure to observe this instruction will cause death or serious injury.
!WARNING!
Safety instruction: Failure to observe this instruction can cause death or serious injury.
!CAUTION!
Safety instruction: Failure to observe this instruction can lead to injury.
EN |
5 |
|
|
|
|

Safety instructions |
CoolFreeze |
ANOTICE!
Failure to observe this instruction can cause material damage and impair the function of the product.
INOTE
Supplementary information for operating the product.
2Safety instructions
2.1General safety
!WARNING!
•Do not operate the cooling device if it is visibly damaged.
•If this cooling device's power cable is damaged, it must be replaced by the manufacturer, customer service or a similarly qualified person in order to prevent safety hazards.
•This cooling device may only be repaired by qualified personnel. Improper repairs can lead to considerable hazards.
•This cooling device can be used by children aged 8 years or over, as well as by persons with diminished physical, sensory or mental capacities or a lack of experience and/or knowledge, providing they are supervised or have been taught how to use the cooling device safely and are aware of the resulting risks.
•Cleaning and user maintenance must not be carried out by children without supervision.
•Children must not play with the cooling device.
•Children must be supervised to ensure that they do not play with the cooling device.
•Always keep and use the cooling device out of the reach of children under the age of 8 years.
•Do not store any explosive substances such as spray cans with a flammable propellant in the cooling device.
!CAUTION!
•Disconnect the cooling device from the power supply
–before each cleaning and maintenance
–after every use
6 |
EN |
|
CoolFreeze |
Safety instructions |
•Food may only be stored in its original packaging or in suitable containers.
ANOTICE!
•Check that the voltage specification on the type plate corresponds to that of the energy supply.
•Only connect the cooling device to a DC power supply in the vehicle with the DC cable.
•Only connect the cooling device as follows:
–With the DC connection cable to a DC power supply in the vehicle
–Or with the AC connection cable to an AC power supply
•Connect the cooling device with an AC connection cable to the AC power supply.
•Never pull the plug out of the socket by the cable.
•If the cooling device is connected to a DC outlet: Disconnect the cooling device and other power consuming devices from the battery before connecting a quick charging device.
•If the cooling device is connected to a DC outlet: Disconnect the cooling device or switch it off when you turn off the engine. Otherwise you may discharge the battery.
•The cooling device is not suitable for transporting caustic materials or materials containing solvents.
•The insulation of the cooling device contains flammable cyclopentane and requires special disposal procedures. Deliver the cooling device at the end of its life-cycle to an appropriate recycling center.
2.2Operating the cooling device safely
!CAUTION!
•Before starting the cooling device, ensure that the power supply line and the plug are dry.
ANOTICE!
•Do not use electrical devices inside the cooling device unless they are recommended by the manufacturer for the purpose.
•Do not place the cooling device near naked flames or other heat sources (heaters, direct sunlight, gas ovens etc.).
EN |
7 |
|
|
|
|

Scope of delivery |
CoolFreeze |
•Danger of overheating!
Ensure at all times that there is a minimum of 50 mm ventilation on all four sides of the cooling device. Keep the ventilation area free of any objects that could restrict the air flow to the cooling components.
Do not place the cooling device in closed compartments or areas with none or minimal air flow.
•Ensure that the ventilation openings are not covered.
•Do not fill the inner container with ice or fluids.
•Never immerse the cooling device in water.
•Protect the cooling device and the cable against heat and moisture.
3Scope of delivery
•Compressor cooler
•Connection cable for DC connection
•Connection cable for AC connection
•Operating manual
•Shoulder strap (CF11)
4Intended use
The compressor cooler is suitable for refrigerating and freezing foodstuffs.
The compressor cooler has been designed for operation using the following power supply alternatives:
•The DC network of a car, boot or caravan
•A DC supply battery
•An AC power supply
The compressor cooler can also be used for camping. The compressor cooler may not be exposed to rain.
!CAUTION! Health hazard!
Please check if the cooling capacity of the compressor cooler is suitable for storing the food or medicine you wish to cool.
8 |
EN |
|

CoolFreeze |
Technical description |
5Technical description
The cooler can chill products, keep them cool as well as freeze them. A low maintenance refrigerant circuit with compressor provides the cooling.
The cooler is portable.
For use in vehicles, the cooling device can be secured with a safety belt (CF11).
The cooler can withstand a short-term inclination of 30°, for example on boats.
An integrated battery monitor can be switched on to protect your vehicle battery from discharging to dangerously low levels (see chapter “Using the battery monitor” on page 14).
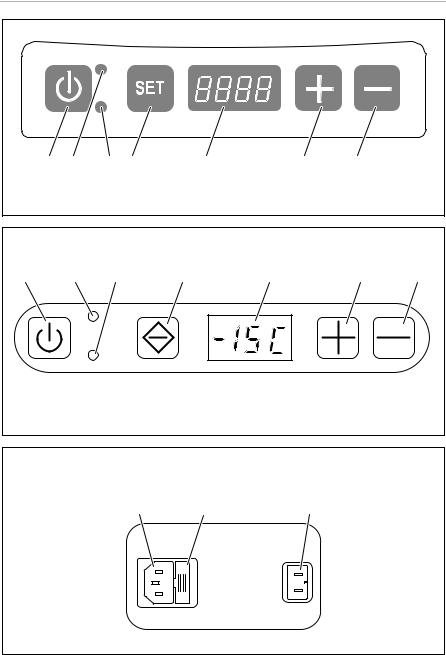
5.1Operating and display elements
Control panel (fig. 1, page 3 and fig. 2, page 3)
Item |
Description |
Explanation |
|
|
|
|
|
1 |
ON/OFF button |
Switches the cooling device on or off when the button is |
|
|
|
pressed for between one and two seconds |
|
|
|
|
|
2 |
POWER |
Operating display |
|
|
|
|
|
|
|
LED lights up green |
Compressor is on; set |
|
|
|
temperature not yet reached |
|
|
|
|
|
|
LED lights up orange |
Set temperature has been |
|
|
|
reached |
|
|
|
|
|
|
LED flashes orange |
Voltage is too low |
|
|
|
|
3 |
ERROR |
LED flashes red: |
Device is switched on but |
|
|
|
not ready for operation |
|
|
|
|
4 |
SET |
Selects the input mode |
|
•Setting the temperature
•Set temperature unit (°Celsius or °Fahrenheit)
•Set the battery monitor
5 |
Display |
Displays the temperature in the refrigerator compartment |
The first three digits of the four-digit display show the temperature, the fourth digit indicates the temperature unit (°C or °F).
When an error occurs, the display shows “Err1” or “Err2”.
EN |
9 |
|
|
|
|

Operation |
CoolFreeze |
|
|
|
|
Item |
Description |
Explanation |
|
|
|
6 |
+ |
Press once to increase the selected value |
|
|
|
7 |
– |
Press once to decrease the selected value |
|
|
|
Connection sockets (fig. 3, page 3)
Item Description
1 AC voltage supply inlet
2AC Fuse holder
3DC voltage supply inlet
6Operation
The cooling device is equipped with an LED interior light that remains on when the voltage is applied. The energy consumption of the LED interior light is extremely low and is negligible compared to the total energy consumption of the device.
6.1 Before initial use
I NOTE
Before starting your new cooler for the first time, you should clean it inside and outside with a damp cloth for hygienic reasons (see also chapter “Cleaning and maintenance” on page 17).
6.2 Energy saving tips
•Choose a well ventilated location which is protected from direct sunlight.
•Allow warm food to cool down first before placing it in the device to keep cool.
•Do not open the cooling device more often than necessary.
•Do not leave the lid open for longer than necessary.
•Defrost the cooling device as soon as a layer of ice forms.
•Avoid unnecessarily low temperature settings.
10 |
EN |
|
CoolFreeze Operation
6.3 Locking the cooling device
Close the lid.
Press the latch (fig. 4 or fig. 5 1, page 4) down, until it latches in place audibly.
6.4 Connecting the cooling device
The cooler can be operated with 12 Vg or 24 Vg or 100 – 240 Vw.
ANOTICE! Danger of Damage!
•Disconnect the cooler and other consumer units from the battery before you connect the battery to a quick charging device.
•Overvoltage can damage the electronics of the device.
Place the cooler on a firm base.
Make sure that the ventilation slots are not covered and that the heated air can be dissipated.
Connecting to a battery (vehicle or boat)
ANOTICE!
For protection of the device the DC cable supplied includes a fuse inside the plug. Do not remove the fused DC plug. Only use the DC cable supplied.
INOTE
If you connect the cooler to the DC socket, remember that the ignition must be turned on to supply it with power.
Plug the DC connection cable (fig. 6 2, page 4) into the DC voltage inlet of the cooler (fig. 3 3, page 3).
Connect the connection cable to the DC power outlet.
EN |
11 |
|
|
|
|

Operation |
CoolFreeze |
Connecting to an AC power supply (e.g. at home or in the office)
DDANGER! Danger of electrocution
•Never handle plugs and switches with wet hands or if you are standing on a wet surface.
•If you are operating your cooler on board a boat with an AC power supply, you must install a residual current circuit breaker between the power supply and the cooler.
Seek advice from a trained technician.
The coolers have an integrated multi-voltage power supply with priority circuit for connecting to an AC voltage source. The priority circuit automatically switches the cooler to AC operation, if the device is connected to an AC power supply, even if the DC connection cable is still attached.
Plug the AC connection cable (fig. 6 3, page 4) into the AC voltage socket of the cooler (fig. 3 1, page 3).
Connect the connection cable to the AC power outlet.
6.5Secure the cooling device in the vehicle (CF11)
Open the lid of the cooling device.
Place the safety strap into the guide (fig. 6 1, page 4) of the cooling device.
Close the lid.
Engage the safety strap and tighten it.
6.6Switching on the cooling device
ANOTICE! Risk of damage!
•Always ensure sufficient ventilation so that the heat generated during operation can dissipate. Ensure that the ventilation slots are not covered. Make sure that the device is sufficiently far away from walls and other objects so that the air can circulate.
•Ensure that the items placed in the cooler are suitable for cooling to the selected temperature.
•Disconnect the cooler and other electric consumers from the battery before you connect the battery to a quick charging device. Overvoltage can damage the electronics of the device.
12 |
EN |
|
CoolFreeze |
Operation |
For safety reasons, the cooler is equipped with an electronic system to prevent the polarity being reversed.This protects the cooler against reversed polarity when connecting to a battery and against short circuiting.
fig. 1, page 3, fig. 2, page 3
Press the ON/OFF button (1) for three seconds.
The “POWER” LED (2) is lit green.
Once the cooling device has reached the saved temperature, the LED lights up orange.
The display (5) switches on and shows the current interior temperature.
The cooler starts cooling the interior.
6.7Setting the temperature
fig. 1, page 3, fig. 2, page 3
Press the “SET” (4) button once.
Use the “+” (6) and “–” (7) buttons to set the cooling temperature.
The set cooling temperature then appears in the display for a few seconds. The display flashes several times before it returns to the current temperature.
6.8Selecting the temperature unit
fig. 1, page 3, fig. 2, page 3
You can switch the temperature display between Celsius and Fahrenheit. To do this, proceed as follows:
Switch on the cooler.
Press the “SET” button (4) twice.
Use the “+” (6) or “–” (7) buttons to set the temperature unit °Celsius or °Fahrenheit.
The selected temperature unit then appears in the display for a few seconds. The display flashes several times before it returns to the current temperature.
EN |
13 |
|
|
|
|

Operation |
CoolFreeze |
6.9Using the battery monitor
ANOTICE! Beware of damage
When switched off by the battery monitor, the battery will no longer be fully charged. Avoid starting repeatedly or operating electric consumers without longer charging phases. Make sure that the battery is recharged.
The cooling device is equipped with a multi-level battery monitor that protects your vehicle battery against excessive discharging when the device is connected to the 12 V vehicle electrics.
If the cooler is operated when the vehicle ignition is switched off, the cooler switches off automatically as soon as the supply voltage falls below a set level. The cooler will switch back on once the battery has been recharged to the restart voltage level.
INOTE
When the cooling device is switched off by the battery monitor due to low voltage, the display (fig. 1 5, page 3, fig. 2 5, page 3) switches off and the “Power” LED (fig. 1 2, page 3, fig. 2 2, page 3) flashes orange.
In HIGH mode, the battery monitor responds faster than at the levels “LOW” and “MED” (see the following table).
Battery monitor mode |
LOW |
MED |
HIGH |
|
|
|
|
Cut-off voltage at 12 V |
10.1 V |
11.4 V |
11.8 V |
|
|
|
|
Cut-in voltage at 12 V |
11.1 V |
12.2 V |
12.6 V |
|
|
|
|
Cut-off voltage at 24 V |
21.5 V |
24.1 V |
24.6 V |
|
|
|
|
Cut-in voltage at 24 V |
23.0 V |
25.3 V |
26.2 V |
|
|
|
|
This is how to select the battery monitor mode (fig. 1, page 3 and fig. 2, page 3):
Switch on the cooler.
Press the “SET” button (4) three times.
Use the “+” (6) and “–” (7) buttons to select the battery monitor mode.
The selected mode then appears in the display for a few seconds. The display flashes several times before it returns to the current temperature.
14 |
EN |
|

CoolFreeze |
Operation |
INOTE
When the cooler is supplied by the starter battery, select the battery monitor mode HIGH. When the cooler is connected to a supply battery, the battery monitor mode LOW will suffice.
If you wish to operate the cooling device from the AC mains, set the battery monitor to LOW.
6.10Switching off the cooling device
fig. 1, page 3, fig. 2, page 3
Empty the cooling device.
Switch the cooling device off: Press the ON/OFF button (1) for three seconds.
Disconnect the plug.
If you do not want to use the cooling device for a longer period of time:
Leave the lid slightly open. This prevents odours from building up.
6.11Defrosting the cooling device
Humidity can form frost in the interior of the cooling device or on the evaporator. This reduces the cooling capacity.
Defrost the device in good time to avoid this.
ANOTICE! Risk of damage to the device!
Never use hard or sharp tools to remove ice or to free objects frozen onto the device.
To defrost the cooling device, proceed as follows:
Empty the contents.
If necessary, put them in another cooling device to keep them chilled.
Switch off the device.
Leave the lid open.
Wipe off the condensate.
EN |
15 |
|
|
|
|

Operation |
CoolFreeze |
6.12Replacing the AC fuse
DDANGER! Danger of electrocution!
Disconnect the connection cable before you replace the device fuse.
Remove the connection cable.
Pry out the fuse insert (fig. 3 2, page 3) with a screwdriver.
Replace the defective fuse with a new one that has the same rating (T4AL 250 V).
Press back the fuse insert into the housing.
6.13Replacing the plug fuse (12/24 V)
fig. 7, page 4
Pull the adapter sleeve (4) off of the plug.
Unscrew the screw (5) out of the upper half of the housing (6).
Carefully lift the upper half of the housing off the lower half (1).
Take out the contact pin (3).
Replace the defective fuse (2) with a new one that has the same rating (T8 A 32 V).
Re-assemble the plug in the reverse order.
INOTE – Internal DC fuse
There is an additional DC fuse inside the device (Automotive standard blade fuse, 10 A). This fuse can only be replaced by an authorised repair centre.
6.14Replacing the bulb (CF16, CF26)
Press the switch pin (fig. 8 2, page 4) downwards so that the transparent part (fig. 8 1, page 4) of the lamp can be removed at the front.
Replace the light bulb.
Press the transparent part of the lamp back into the housing.
16 |
EN |
|

CoolFreeze |
Cleaning and maintenance |
7Cleaning and maintenance
!WARNING!
Always disconnect the device from the power supply before you clean and service it.
ANOTICE! Risk of damage
•Never clean the cooler under running water or in dish water.
•Do not use abrasive cleaning agents or hard objects during cleaning as these can damage the cooler.
Occasionally clean the device interior and exterior with a damp cloth.
Make sure that the air inlet and outlet vents on the device are free of any dust and dirt, so that heat can be released and the device is not damaged.
8Troubleshooting
Problem |
Possible cause |
Suggested remedy |
|
|
|
Device does not function, “POWER” LED does not light up.
No voltage is flowing from the DC power socket in your vehicle.
The ignition must be switched on in most vehicles to supply current to the on-board power socket.
|
No voltage present in |
Try using another plug socket. |
|
the AC voltage |
|
|
socket. |
|
|
|
|
|
The device fuse is |
Replace the device fuse, see chapter |
|
defective. |
“Replacing the AC fuse” on page 16. |
|
|
|
|
The integrated mains |
This can only be repaired by an |
|
adapter is defective. |
authorised repair centre. |
|
|
|
CF11, CF26: The device |
Defective |
This can only be repaired by an |
does not cool (plug is |
compressor. |
authorised repair centre. |
inserted, “POWER” LED is |
|
|
lit). |
|
|
|
|
|
CF11, CF16: The device does not cool (plug is inserted, “POWER” LED flashes, display is empty).
The voltage is too low at the 12/24 V socket.
Check the battery and charge if necessary.
Check the cables and connections.
EN |
17 |
|
|
|
|

Warranty |
CoolFreeze |
Problem
When operating from the DC outlet:
The ignition is on and the device is not working and the “POWER” LED is not lit.
Possible cause |
Suggested remedy |
The DC outlet is dirty. |
If the plug of your cooler becomes |
This results in a poor |
very warm in the DC outlet, either |
electrical contact. |
the DC outlet must be cleaned or the |
|
plug has not been assembled |
|
correctly. |
|
|
The fuse of the DC |
Replace the fuse in the DC plug, see |
plug has blown. |
chapter “Replacing the plug fuse |
|
(12/24 V)” on page 16. |
|
|
|
The DC fuse inside |
This can only be repaired by an |
|
the device has blown. |
authorised repair centre. |
|
|
|
|
The vehicle fuse has |
Replace the vehicle’s DC outlet fuse. |
|
blown. |
Please refer to your vehicle’s operat- |
|
|
ing manual. |
|
|
|
CF11: The “ERROR” LED flashes and the display shows “ERR1” or “ERR2”.
CF16: The display shows an error message (e.g. “Err1”) and the device does not cool.
CF26: “ERROR” LED flashes for longer than 2 minutes, as follows: 3 flashes, pause,
3 flashes, pause, ..
The appliance has switched off due to an internal fault.
This can only be repaired by an authorised repair centre.
9Warranty
The statutory warranty period applies. If the product is defective, please contact the manufacturer's branch in your country (see the back of the instruction manual for the addresses) or your retailer.
For repair and warranty processing, please include the following documents when you send in the device:
•A copy of the receipt with purchasing date
•A reason for the claim or description of the fault
18 |
EN |
|

CoolFreeze Disposal
10 Disposal
Place the packaging material in the appropriate recycling waste bins wherever possible.
|
If you wish to finally dispose of the product, ask your local recycling centre |
|||
M or specialist dealer for details about how to do this in accordance with the |
||||
|
applicable disposal regulations. |
|
|
|
11 |
Technical data |
|
|
|
|
|
|
|
|
|
|
CF11 |
CF16 |
CF26 |
|
|
|
|
|
Ref. no.: |
|
9600005337 |
9600005339 |
9600005341 |
|
|
9600005338 |
9600005340 |
9600005343 |
|
|
|
|
|
Voltage: |
|
12/24 Vg and 100 – 240 Vw |
||
|
|
|
|
|
Power consumption: |
30 W |
35 W |
35 W |
|
|
|
|
|
|
Rated current: |
|
|
|
|
100 Vw: |
|
0,5 A |
0,5 A |
0,5 A |
240 Vw: |
|
0,2 A |
0,2 A |
0,2 A |
12 Vg : |
|
2,2 A |
2,9 A |
2,9 A |
24 Vg : |
|
1,3 A |
1,7 A |
1,7 A |
|
|
|
|
|
Cooling range: |
|
+10 °C to –18 °C |
|
|
|
|
|
|
|
Energy efficiency class: |
|
A++ |
|
|
|
|
|
|
|
Category: |
|
|
Category 1 |
|
|
|
(refrigerator with one or more fresh-food storage |
||
|
|
|
compartments) |
|
|
|
|
|
|
Climate class: |
|
N or T |
|
|
|
|
|
|
|
Ambient temperature: |
|
+16 °C to +43 °C |
|
|
|
|
|
|
|
Noise emission: |
46 dB (A) |
48 dB (A) |
48 dB (A) |
|
|
|
|
|
|
Gross capacity: |
11 l |
16 l |
23 l |
|
|
|
|
|
|
Capacity: |
|
10,5 l |
15 l |
21 l |
|
|
|
|
|
Refrigerant quantity: |
28 g |
30 g |
28 g |
|
|
|
|
|
|
CO2 equivalent: |
0,040 t |
0,043 t |
0,040 t |
|
|
|
|
|
|
EN |
19 |
|
|
|
|

Technical data |
|
|
CoolFreeze |
|
|
|
|
|
CF11 |
CF16 |
CF26 |
|
|
|
|
Global warming potential |
|
|
|
(GWP): |
|
1430 |
|
|
|
|
|
Dimensions (W x H x D): |
235 x 358 x |
549,5 x 366 x |
550 x 425 x |
|
540 mm |
260 mm |
260 mm |
|
|
|
|
Weight: |
8,5 kg |
9,5 kg |
10,5 kg |
|
|
|
|
Inspection/certification: |
|
|
|
|
|
4 |
|
|
|
|
|
INOTE
If the ambient temperature is above +32 °C, the minimum temperature cannot be attained.
The refrigerant circuit contains R134a.
Contains fluorinated greenhouse gases
Hermetically sealed equipment
20 |
EN |
|
CoolFreeze |
Erklärung der Symbole |
Bitte lesen Sie diese Anleitung vor der Inbetriebnahme sorgfältig durch und bewahren Sie sie auf. Geben Sie sie im Falle einer Weitergabe des Kühlgerätes an den Nutzer weiter.
Der Hersteller haftet nicht für Schäden, die durch nicht bestimmungsgemäßen Gebrauch oder falsche Bedienung verursacht werden.
Inhaltsverzeichnis
1 Erklärung der Symbole . . . . . . . . . . . . . . . . . . . . . . . . . . . . . . . . . . . . . . . . . .21 2 Sicherheitshinweise . . . . . . . . . . . . . . . . . . . . . . . . . . . . . . . . . . . . . . . . . . . 22 3 Lieferumfang . . . . . . . . . . . . . . . . . . . . . . . . . . . . . . . . . . . . . . . . . . . . . . . . . 24 4 Bestimmungsgemäßer Gebrauch . . . . . . . . . . . . . . . . . . . . . . . . . . . . . . . . 24 5 Technische Beschreibung . . . . . . . . . . . . . . . . . . . . . . . . . . . . . . . . . . . . . . 25 6 Bedienung. . . . . . . . . . . . . . . . . . . . . . . . . . . . . . . . . . . . . . . . . . . . . . . . . . . 26 7 Reinigung und Pflege . . . . . . . . . . . . . . . . . . . . . . . . . . . . . . . . . . . . . . . . . . 33 8 Störungsbeseitigung . . . . . . . . . . . . . . . . . . . . . . . . . . . . . . . . . . . . . . . . . . 34 9 Garantie . . . . . . . . . . . . . . . . . . . . . . . . . . . . . . . . . . . . . . . . . . . . . . . . . . . . . 36 10 Entsorgung . . . . . . . . . . . . . . . . . . . . . . . . . . . . . . . . . . . . . . . . . . . . . . . . . . 36 11 Technische Daten . . . . . . . . . . . . . . . . . . . . . . . . . . . . . . . . . . . . . . . . . . . . . 36
1Erklärung der Symbole
DGEFAHR!
Sicherheitshinweis: Nichtbeachtung führt zu Tod oder schwerer Verletzung.
!WARNUNG!
Sicherheitshinweis: Nichtbeachtung kann zu Tod oder schwerer Verletzung führen.
!VORSICHT!
Sicherheitshinweis: Nichtbeachtung kann zu Verletzungen führen.
DE |
21 |
|
|
|
|

Sicherheitshinweise |
CoolFreeze |
AACHTUNG!
Nichtbeachtung kann zu Materialschäden führen und die Funktion des Produktes beeinträchtigen.
IHINWEIS
Ergänzende Informationen zur Bedienung des Produktes.
2Sicherheitshinweise
2.1Allgemeine Sicherheit
!WARNUNG!
•Wenn das Kühlgerät sichtbare Beschädigungen aufweist, dürfen Sie es nicht in Betrieb nehmen.
•Wenn das Anschlusskabel dieses Kühlgerätes beschädigt wird, muss es durch den Hersteller, seinen Kundendienst oder eine ähnlich qualifizierte Person ersetzt werden, um Gefährdungen zu vermeiden.
•Reparaturen an diesem Kühlgerät dürfen nur von Fachkräften durchgeführt werden. Durch unsachgemäße Reparaturen können erhebliche Gefahren entstehen.
•Dieses Kühlgerät kann von Kindern ab 8 Jahren und darüber sowie von Personen mit verringerten physischen, sensorischen oder mentalen Fähigkeiten oder Mangel an Erfahrung und Wissen benutzt werden, wenn sie beaufsichtigt oder bezüglich des sicheren Gebrauchs des Kühlgerätes unterwiesen wurden und die daraus resultierenden Gefahren verstehen.
•Reinigung und Benutzer-Wartung dürfen nicht von Kindern ohne Beaufsichtigung durchgeführt werden.
•Kinder dürfen nicht mit dem Kühlgerät spielen.
•Kinder sollten beaufsichtigt werden, um sicherzustellen, dass sie nicht mit dem Kühlgerät spielen.
•Verwahren und benutzen Sie das Kühlgerät außerhalb der Reichweite von Kindern unter 8 Jahren.
•Lagern Sie keine explosionsfähigen Stoffe wie z. B. Sprühdosen mit brennbarem Treibgas im Kühlgerät.
22 |
DE |
|
CoolFreeze |
Sicherheitshinweise |
!VORSICHT!
•Trennen Sie das Kühlgerät von der Stromversorgung
–vor jeder Reinigung und Pflege
–nach jedem Gebrauch
•Lebensmittel dürfen nur in Originalverpackungen oder geeigneten Behältern eingelagert werden.
AACHTUNG!
•Vergleichen Sie die Spannungsangabe auf dem Typenschild mit der vorhandenen Energieversorgung.
•Schließen Sie das Kühlgerät nur mit dem Gleichstrom-Anschlusskabel an das Gleichstromnetz im Fahrzeug an.
•Schließen Sie das Kühlgerät nur wie folgt an:
–mit dem Gleichstrom-Anschlusskabel an das Gleichstromnetz im Fahrzeug
–oder mit dem Wechselstrom-Anschlusskabel an das Wechselstromnetz
•Schließen Sie das Kühlgerät mit dem Wechselstrom-Anschlusskabel an das Wechselstromnetz an.
•Ziehen Sie den Stecker nie am Anschlusskabel aus der Steckdose.
•Wenn das Kühlgerät an der Gleichstrom-Steckdose angeschlossen ist: Klemmen Sie Ihr Kühlgerät und andere Verbraucher von der Fahrzeugbatterie ab, bevor Sie ein Schnellladegerät anschließen.
•Wenn das Kühlgerät an der Gleichstrom-Steckdose angeschlossen ist: Trennen Sie die Verbindung oder schalten Sie das Kühlgerät aus, wenn Sie den Motor ausschalten. Sonst kann die Fahrzeugbatterie entladen werden.
•Das Kühlgerät ist nicht geeignet für den Transport ätzender oder lösungsmittelhaltiger Stoffe.
•Die Isolierung des Kühlgeräts enthält brennbares Zyklopentan und erfordert ein besonderes Entsorgungsverfahren. Führen Sie das Kühlgerät am Ende seiner Lebensdauer einer ordnungsgemäßen Entsorgung zu.
2.2Sicherheit beim Betrieb des Kühlgerätes
!VORSICHT!
•Achten Sie vor der Inbetriebnahme darauf, dass Zuleitung und Stecker trocken sind.
DE |
23 |
|
|
|
|

Lieferumfang |
CoolFreeze |
AACHTUNG!
•Benutzen Sie keine Elektrogeräte innerhalb des Kühlgerätes, außer wenn diese Elektrogeräte vom Hersteller dafür empfohlen werden.
•Stellen Sie das Kühlgerät nicht in der Nähe von offenen Flammen oder anderen Wärmequellen (Heizung, starke Sonneneinstrahlung, Gasöfen usw.) ab.
•Überhitzungsgefahr!
Achten Sie stets darauf, dass die Belüftung auf allen vier Seiten des Kühlgeräts mindestens 50 mm beträgt. Halten Sie den Lüftungsbereich frei von jeglichen Gegenständen, die den Luftdurchfluss zu den Kühlkomponenten behindern können.
Platzieren Sie das Kühlgerät nicht in geschlossenen Räumen oder Bereichen, die keinen oder nur einen mininimalen Luftdurchfluss aufweisen.
•Achten Sie darauf, dass die Lüftungsöffnungen nicht abgedeckt werden.
•Füllen Sie keine Flüssigkeiten oder Eis in den Innenbehälter.
•Tauchen Sie das Kühlgerät nie in Wasser.
•Schützen Sie das Kühlgerät und die Kabel vor Hitze und Nässe.
3Lieferumfang
•Kompressor-Kühlbox
•Anschlusskabel für Gleichstrom-Anschluss
•Anschlusskabel für Wechselstrom-Anschluss
•Bedienungsanleitung
•Schultergurt (CF11)
4Bestimmungsgemäßer Gebrauch
Die Kompressor-Kühlbox eignet sich zum Kühlen und Tiefkühlen von Lebensmitteln.
Die Kühlbox ist ausgelegt für den Betrieb an:
•einem Gleichstromnetz eines Fahrzeugs, Boots oder Wohnmobils
•einer Gleichstrom-Versorgungsbatterie
•einem Wechselstromnetz ausgelegt
24 |
DE |
|

CoolFreeze |
Technische Beschreibung |
Die Kompressor-Kühlbox ist auch für Camping-Zwecke geeignet. Die KompressorKühlbox darf keinem Regen ausgesetzt werden.
!VORSICHT! Gesundheitsgefahr!
Prüfen Sie bitte, ob die Kühlleistung des Gerätes den Anforderungen der Lebensmittel oder Medikamente entspricht, die Sie kühlen wollen.
5Technische Beschreibung
Die Kühlbox kann Waren abkühlen und kühl halten sowie tiefkühlen. Die Kühlung erfolgt durch einen wartungsfreien Kühlkreislauf mit Kompressor.
Die Kühlbox ist für den mobilen Einsatz geeignet.
Bei der Verwendung in Fahrzeugen kann das Kühlgerät mit dem Sicherheitsgurt gesichert werden (CF11).
Die Kühlbox kann einer kurzzeitigen Krängung von 30° ausgesetzt werden, z. B. beim Einsatz auf Booten.
Ein im Gerät integrierter zuschaltbarer Batteriewächter schützt Ihre Fahrzeugbatterie vor zu tiefer Entladung (siehe Kapitel „Batteriewächter verwenden“ auf Seite 30).
5.1Bedienund Anzeigeelemente
Bedienfeld (Abb. 1, Seite 3 und Abb. 2, Seite 3)
Pos. |
Bezeichnung |
Erklärung |
|
|
|
|
|
1 |
Ein-/Austaster |
Schaltet das Kühlgerät ein oder aus, wenn die Taste ein bis |
|
|
|
zwei Sekunden gedrückt wird |
|
|
|
|
|
2 |
POWER |
Betriebsanzeige |
|
|
|
|
|
|
|
LED leuchtet grün |
Kompressor ist an; einge- |
|
|
|
stellte Temperatur ist noch |
|
|
|
nicht erreicht |
|
|
|
|
|
|
LED leuchtet orange |
Eingestellte Temperatur ist |
|
|
|
erreicht |
|
|
|
|
|
|
LED blinkt orange |
Spannung zu niedrig |
|
|
|
|
3 |
ERROR |
LED blinkt rot: |
eingeschaltetes Gerät ist |
|
|
|
nicht betriebsbereit |
|
|
|
|
DE |
25 |
|
|
|
|

Bedienung |
|
CoolFreeze |
|
|
|
|
|
Pos. |
Bezeichnung |
Erklärung |
|
|
|
|
|
4 |
SET |
Wählt den Eingabemodus |
|
|
|
• |
Temperatur einstellen |
|
|
• Temperatureinheit (°Celsius oder °Fahrenheit) einstellen |
|
|
|
• |
Batteriewächter einstellen |
5 |
Display |
Zeigt die Temperatur im Kühlfach an |
|
|
|
Die ersten drei Stellen des vierstelligen Displays zeigen die |
|
|
|
Temperatur, die vierte Stelle die Temperatureinheit (°C oder |
|
|
|
°F) an. |
|
|
|
Im Fehlerfall zeigt das Display die Fehlermeldung „Err1“ |
|
|
|
oder „Err2“ an. |
|
|
|
|
|
6 |
+ |
Einmal Antippen erhöht den gewählten Eingabewert |
|
|
|
|
|
7 |
– |
Einmal Antippen verringert den gewählten Eingabewert |
|
|
|
|
|
Anschlussbuchsen (Abb. 3, Seite 3)
Pos. Bezeichnung
1 Anschlussbuchse Wechselspannungsversorgung
2Sicherungshalter (Wechselspannung)
3Anschlussbuchse Gleichspannungsversorgung
6Bedienung
Das Kühlgerät ist mit einer LED-Innenbeleuchtung ausgestattet, die eingeschaltet bleibt, wenn Spannung anliegt. Der Energieverbrauch dieser LED-Innen- beleuchtung ist äußerst gering und vernachlässigbar im Vergleich zum Gesamtenergieverbrauch des Gerätes.
6.1Vor dem ersten Gebrauch
IHINWEIS
Bevor Sie das neue Kühlgerät in Betrieb nehmen, sollten Sie es aus hygienischen Gründen innen und außen mit einem feuchten Tuch reinigen (siehe auch Kapitel „Reinigung und Pflege“ auf Seite 33).
26 |
DE |
|

CoolFreeze |
Bedienung |
6.2Tipps zum Energiesparen
•Wählen Sie einen gut belüfteten und vor Sonnenstrahlen geschützten Einsatzort.
•Lassen Sie warme Speisen erst abkühlen, bevor Sie sie im Gerät kühl halten.
•Öffnen Sie das Kühlgerät nicht häufiger als nötig.
•Lassen Sie den Deckel nicht länger offen stehen als nötig.
•Tauen Sie das Kühlgerät ab, sobald sich eine Eisschicht gebildet hat.
•Vermeiden Sie eine unnötig tiefe Innentemperatur.
6.3 Kühlgerät verriegeln
Schließen Sie den Deckel.
Drücken Sie die Verriegelung (Abb. 4 oder Abb. 5 1, Seite 4) nach unten, bis sie hörbar einrastet.
6.4 Kühlgerät anschließen
Die Kühlbox kann mit 12 Vg oder 24 Vg oder 100 – 240 Vw betrieben werden.
AACHTUNG! Beschädigungsgefahr!
•Klemmen Sie die Kühlbox und andere Verbrauche von der Batterie ab, bevor Sie die Batterie mit einem Schnellladegerät aufladen.
•Überspannungen können die Elektronik der Geräte beschädigen.
Stellen Sie das Kühlgerät auf eine feste Unterlage.
Achten Sie darauf, dass die Lüftungsschlitze nicht abgedeckt sind und die erwärmte Luft gut abziehen kann.
An eine Batterie anschließen (Fahrzeug oder Boot)
AACHTUNG!
Zum Schutz des Gerätes ist der Stecker des mitgelieferten GleichstromAnschlusskabels mit einer Sicherung ausgestattet. Entfernen Sie nicht den abgesicherten Gleichstrom-Stecker. Benutzen Sie ausschließlich das mitgelieferte Gleichstrom-Anschlusskabel.
IHINWEIS
Wenn Sie das Kühlgerät an die Gleichstromsteckdose Ihres Fahrzeugs anschließen, beachten Sie, dass Sie ggf. die Zündung einschalten müssen, damit das Gerät mit Strom versorgt wird.
DE |
27 |
|
|
|
|

Bedienung |
CoolFreeze |
Stecken Sie das Gleichstrom-Anschlusskabel (Abb. 6 2, Seite 4) in die Buchse für die Gleichstromversorgung der Kühlbox (Abb. 3 3, Seite 3).
Schließen Sie das Anschlusskabel an eine Gleichstromsteckdose an.
An ein Wechselstromnetz anschließen (z. B. zu Hause oder im Büro)
DGEFAHR! Lebensgefahr durch Stromschlag!
•Hantieren Sie nie mit Steckern und Schaltern, wenn Sie nasse Hände haben oder mit den Füßen in der Nässe stehen.
•Wenn Sie Ihre Kühlbox an Bord eines Bootes per Landanschluss mit Wechselstrom betrieben, müssen Sie einen FI-Schutzschalter zwischen Wechselstromnetz und Kühlbox schalten.
Lassen Sie sich von einem Fachmann beraten.
Die Kühlboxen haben ein integriertes Multispannungsnetzteil mit Vorrangschaltung zum Anschluss an Wechselstrom. Durch die Vorrangschaltung wird automatisch auf Wechselstrombetrieb umgeschaltet, wenn das Gerät an ein Wechselstromnetz angeschlossen ist, auch wenn das Gleichstrom-Anschlusskabel noch angeschlossen ist.
Stecken Sie das Wechselstrom-Anschlusskabel (Abb. 6 3, Seite 4) in die Buchse für die Wechselstromversorgung der Kühlbox (Abb. 3 1, Seite 3).
Schließen Sie das Anschlusskabel an eine Wechselstromsteckdose an.
6.5Kühlgerät im Fahrzeug sichern (CF11)
Öffnen Sie den Deckel des Kühlgeräts.
Legen Sie den Sicherheitsgurt in die Führung (Abb. 6 1, Seite 4) des Kühlgeräts ein.
Schließen Sie den Deckel.
Rasten Sie den Sicherheitsgurt ein und straffen Sie ihn.
28 |
DE |
|

CoolFreeze |
Bedienung |
6.6Kühlgerät einschalten
AACHTUNG! Beschädigungssgefahr!
•Achten Sie stets darauf, dass beim Betrieb entstehende Wärme ausreichend abgeführt werden kann. Achten Sie darauf, dass die Lüftungsschlitze nicht abgedeckt werden. Sorgen Sie dafür, dass das Gerät in ausreichendem Abstand zu Wänden oder Gegenständen steht, sodass die Luft zirkulieren kann.
•Achten Sie darauf, dass sich nur Gegenstände bzw. Waren im Kühlgerät befinden, die auf die gewählte Temperatur gekühlt werden dürfen.
•Klemmen Sie das Kühlgerät und andere Verbraucher von der Batterie ab, bevor Sie die Batterie mit einem Schnellladegerät aufladen. Überspannungen können die Elektronik der Geräte beschädigen.
Zur Sicherheit ist das Kühlgerät mit einem elektronischen Verpolungsschutz ausgestattet, der das Kühlgerät gegen Verpolung beim Batterieanschluss und gegen Kurzschluss schützt.
Abb. 1, Seite 3, Abb. 2, Seite 3
Drücken Sie den EIN/AUS-Taster (1) für drei Sekunden.
Die LED „POWER“ (2) leuchtet grün.
Wenn das Kühlgerät die gespeicherte Temperatur erreicht hat, leuchtet die LED orange.
Das Display (5) schaltet sich ein und zeigt die aktuelle Innenraumtemperatur an.
Das Kühlgerät startet mit dem Kühlen des Innenraums.
6.7Temperatur einstellen
Abb. 1, Seite 3 und Abb. 2, Seite 3
Drücken Sie den Taster „SET“ (4) einmal.
Stellen Sie mit den Tastern „+“ (6) bzw. „–“ (7) die Kühltemperatur ein.
Das Display zeigt für einige Sekunden die eingestellte gewünschte Kühltemperatur an. Das Display blinkt einige Male, bevor es zur Darstellung der aktuellen Temperatur zurückkehrt.
DE |
29 |
|
|
|
|

Bedienung |
CoolFreeze |
6.8Temperatureinheit wählen
Abb. 1, Seite 3 und Abb. 2, Seite 3
Sie können zur Temperaturanzeige zwischen den Werten für °Celsius und °Fahrenheit wählen. Gehen Sie hierzu wie folgt vor:
Schalten Sie das Kühlgerät ein.
Drücken Sie den Taster „SET“ (4) zweimal.
Stellen Sie mit den Tastern „+“ (6) bzw. „–“ (7) die Temperatureinheit °Celsius oder °Fahrenheit ein.
Das Display zeigt für einige Sekunden die eingestellte Temperatureinheit an. Das Display blinkt einige Male, bevor es zur Darstellung der aktuellen Temperatur zurückkehrt.
6.9Batteriewächter verwenden
AACHTUNG! Beschädigungsgefahr!
Die Batterie besitzt beim Abschalten durch den Batteriewächter nicht mehr ihre volle Ladekapazität, vermeiden Sie mehrmaliges Starten oder den Betrieb von Stromverbrauchern ohne längere Aufladephasen. Sorgen Sie dafür, dass die Batterie wieder aufgeladen wird.
Das Kühlgerät ist mit einem mehrstufigen Batteriewächter ausgestattet, der Ihre Fahrzeugbatterie beim Anschluss an das 12/24-V-Bordnetz vor zu tiefer Entladung schützt.
Wird das Kühlgerät bei ausgeschalteter Zündung im Fahrzeug betrieben, schaltet sich das Kühlgerät selbstständig ab, sobald die Versorgungsspannung unter einen einstellbaren Wert abfällt. Das Kühlgerät schaltet sich wieder ein, sobald durch Aufladung der Batterie die Wiedereinschaltspannung erreicht wird.
IHINWEIS
Wenn das Kühlgerät wegen zu niedriger Spannung vom Batteriewächter abgeschaltet wird, schaltet sich das Display (Abb. 1 5, Seite 3, Abb. 2 5, Seite 3) ab und die LED „Power“ (Abb. 1 2, Seite 3, Abb. 2 2, Seite 3) blinkt orange.
Im Modus „HIGH“ spricht der Batteriewächter schneller an als in den Stufen „LOW“ und „MED“ (siehe folgende Tabelle).
30 |
DE |
|
 Loading...