


REFRIGERATION
COOLMATIC
CRX50, CRX65, CRX80, CRX110, CRX140
EN Compressor refrigerator
Installation and Operating Manual . . . . . . . 13
DE Kompressor-Kühlschrank |
|
|
|
Montageund Bedienungsanleitung . . . . .35 |
|
|
Réfrigérateur à compression |
|
FR |
|
|
|
Instructions de montage |
|
|
et de service . . . . . . . . . . . . . . . . . . . . . . . . |
.58 |
|
Nevera con compresor |
|
ES |
|
|
|
Instrucciones de montaje y de uso . . . . . . .83 |
|
|
Frigorífico com compressor |
|
PT |
|
|
|
Instruções de montagem e manual de |
|
|
instruções . . . . . . . . . . . . . . . . . . . . . . . . . . |
107 |
|
Frigorifero con compressore |
|
IT |
|
|
NL |
Compressorkoelkast |
|
|
Montagehandleiding en |
|
|
gebruiksaanwijzing. . . . . . . . . . . . . . . . . . |
156 |
DA |
Kompressor-Køleskab |
|
|
Monteringsog betjeningsvejledning. . . 179 |
|
SV |
Kylskåp med kompressor |
|
|
Monteringsoch bruksanvisning . . . . . . . 201 |
|
NO |
Kompressorkjøleskap |
|
|
Monteringsog bruksanvisning . . . . . . . . 223 |
|
|
Kompressori jääkaappi |
|
FI |
|
|
|
Asennusja käyttöohje . . . . . . . . . . . . . . . |
245 |
RU |
Компрессорный холодильник |
|
|
Инструкция по монтажу и |
|
|
эксплуатации . . . . . . . . . . . . . . . . . . . . . . |
268 |
|
Lodówka kompresorowa |
|
PL |
|
|
|
Instrukcja montażu i obsługi. . . . . . . . . . . |
293 |
SK |
Kompresorová chladnička |
|
|
Návod na montáž a uvedenie |
|
|
do prevádzky. . . . . . . . . . . . . . . . . . . . . . . |
316 |
CS |
Kompresorová chladnička |
|
|
Návod k montáži a obsluze . . . . . . . . . . . |
339 |
HU |
Kompresszoros hűtőszekrény |
|
|
Szerelési és használati útmutató . . . . . . . 361 |
|
Istruzioni di montaggio e d’uso . . . . . . . . 132
|
|
CRX |
1 |
|
CRX 50 |
|
1 |
|
|
2 |
7 |
|
|
|
|
3 |
|
|
4 |
|
|
5 |
|
|
|
6 |
2 |
|
CRX 65 |
|
1 |
|
|
2 |
7 |
|
3 |
|
|
|
|
|
4 |
|
|
5 |
|
|
|
6 |
2 |
|
|

CRX |
|
3 |
CRX 80 |
|
1 |
|
2 |
|
7 |
|
3 |
|
4 |
|
5 |
|
6 |
4 |
CRX 110 |
|
1 |
|
2 |
|
7 |
|
3 |
|
4 |
|
5 |
|
6 |
|
3 |
|
|
CRX |
5 |
|
CRX 140 |
1 |
|
|
2 |
|
7 |
|
|
|
3 |
|
|
4 |
|
|
5 |
|
|
|
6 |
|
6 |
|
CRX50, CRX65, CRX80 |
1 |
|
8 |
2 |
|
7 |
3 |
3s |
6 |
|
|
|
4 |
|
|
|
|
5 |
4 |
|
|
CRX
7 |
CRX110DC |
1 |
8 |
2 |
|
3 |
6 |
4 |
|
5 |
CRX110ACDC, CRX140ACDC
1 |
8 |
2 |
7 |
3 |
3s |
4 |
6 |
|
5 |
5
|
|
CRX |
8 |
|
|
CRX 50-140 |
|
CRX 50-140 |
A |
B |
|
ca. 50 mm |
|
|
|
|
ca. 50 mm |
2 |
2 |
4 |
|
||
3 |
3 |
|
1 |
|
1 |
CRX 140 |
|
|
ca. 20 mm |
|
|
6 |
|
|
CRX |
9 |
1 |
2 |
0 |
1 
2
7
|
CRX |
a |
|
b |
c |
8
CRX |
|
|
|
|
|
|
|
|
|
|
|
|
|
|
d |
|
|
|
|
|
|
|
|
|
|
|
|
|
|
Ø/mm² |
|
|
|
|
|
|
12 V |
|
|
|
|
|
24 V |
|
|
|
|
|
|
|
|
|
|
|
|
|
|||
14 |
|
|
|
|
|
|
|
|
|
|
|
|
|
|
10 |
|
|
|
|
|
|
|
|
|
|
|
|
|
|
6 |
|
|
|
|
|
|
|
|
|
|
|
|
|
|
2 |
|
|
|
|
|
|
|
|
|
|
|
|
|
|
0 |
2 |
4 |
6 |
8 |
10 |
12 |
14 |
16 |
18 |
20 |
22 |
24 |
26 |
l/m |
0 |
28 |
|||||||||||||
e |
|
|
|
|
|
|
|
|
|
bk |
|
|
|
|
|
|
|
|
|
|
|
|
|
rd |
|
|
|
|
|
|
|
|
|
|
|
|
|
|
|
|
|
1 |
|
|
9
|
|
CRX |
f |
|
|
|
|
1 |
|
|
2 |
g 1 |
rd |
+ |
|
||
100 – 240 V~ |
bk |
– |
bk |
rd/bk |
2 |
|
10 A |
|
– |
|
|
|
|
|
|
|
+ |
|
|
|
|
|
|
|
||
|
|
|
|
|
|
|
|
|
|
12 V/24 V |
|
|
|
|
|||
|
|
|
|
|
|
|||
|
|
|
|
|
|
|||
|
|
|
|
|
||||
|
|
|
|
|
|
|
|
|
|
|
|
|
|
|
|
|
|
|
|
|
|
|
|
|
|
|
h |
|
1 |
|
Vent |
Lock |
|
|
10
CRX
i |
380 |
500 |
|
CRX 50
534
j |
|
|
|
|
|
|
|
|
|
|
448 |
545 |
|
||||||||
|
|
|
|
|
|
|
|
|
|
|
CRX 65
525
k |
|
|
|
|
|
|
|
|
|
|
475 |
528 |
|
||||||||
|
|
|
|
|
|
|
|
|
|
|
|
|
|
|
|
|
|
|
|
|
|
CRX 80
640
11

CRX
l |
520 |
558 |
|
|
|
|
|
CRX 110
745
m |
525 |
620 |
|
CRX 140
812
12

CRX |
Explanation of symbols |
Please read this instruction manual carefully before installation and first use, and store it in a safe place. If you pass on the product to another person, hand over this instruction manual along with it.
Table of contents
1 Explanation of symbols . . . . . . . . . . . . . . . . . . . . . . . . . . . . . . . . . . . . . . . . . .13 2 Safety instructions . . . . . . . . . . . . . . . . . . . . . . . . . . . . . . . . . . . . . . . . . . . . . .14 3 Scope of delivery . . . . . . . . . . . . . . . . . . . . . . . . . . . . . . . . . . . . . . . . . . . . . .17 4 Accessories . . . . . . . . . . . . . . . . . . . . . . . . . . . . . . . . . . . . . . . . . . . . . . . . . . .17 5 Intended use . . . . . . . . . . . . . . . . . . . . . . . . . . . . . . . . . . . . . . . . . . . . . . . . . .17 6 Technical description . . . . . . . . . . . . . . . . . . . . . . . . . . . . . . . . . . . . . . . . . . .18 7 Installing and connecting the refrigerator . . . . . . . . . . . . . . . . . . . . . . . . . . .19 8 Using the refrigerator . . . . . . . . . . . . . . . . . . . . . . . . . . . . . . . . . . . . . . . . . . 24 9 Cleaning and maintenance. . . . . . . . . . . . . . . . . . . . . . . . . . . . . . . . . . . . . . 28 10 Warranty . . . . . . . . . . . . . . . . . . . . . . . . . . . . . . . . . . . . . . . . . . . . . . . . . . . . 28 11 Disposal . . . . . . . . . . . . . . . . . . . . . . . . . . . . . . . . . . . . . . . . . . . . . . . . . . . . . 29 12 Troubleshooting . . . . . . . . . . . . . . . . . . . . . . . . . . . . . . . . . . . . . . . . . . . . . . 29 13 Technical data . . . . . . . . . . . . . . . . . . . . . . . . . . . . . . . . . . . . . . . . . . . . . . . . 32
1Explanation of symbols
DDANGER!
Safety instruction: Failure to observe this instruction will cause death or serious injury.
!WARNING!
Safety instruction: Failure to observe this instruction can cause death or serious injury.
EN |
13 |
|
|
|
|

Safety instructions |
CRX |
!CAUTION!
Safety instruction: Failure to observe this instruction can lead to injury.
ANOTICE!
Failure to observe this instruction can cause material damage and impair the function of the product.
INOTE
Supplementary information for operating the product.
2Safety instructions
The manufacturer accepts no liability for damage in the following cases:
Faulty assembly or connection
Damage to the product resulting from mechanical influences and incorrect connection voltage
Alterations to the product without express permission from the manufacturer
Use for purposes other than those described in the operating manual
2.1General safety
DDANGER!
On boats: If the device is powered by the mains, ensure that the power supply has a residual current circuit breaker.
!WARNING!
Installations in washrooms and areas exposed to water, must be performed by a qualified technician.
Do not operate the device if it is visibly damaged.
If this device's power cable is damaged, it must be replaced by the manufacturer, customer service or a similarly qualified person in order to prevent safety hazards.
This device may only be repaired by qualified personnel. Inadequate repairs may cause serious hazards.
14 |
EN |
|
CRX |
Safety instructions |
This device can be used by children aged 8 years or over, as well as by persons with diminished physical, sensory or mental capacities or a lack of experience and knowledge, providing they are supervised, or have been taught how to use the device safely and are aware of the resulting risks.
Cleaning and user maintenance must not be carried out by children without supervision.
Children must be supervised to ensure that they do not play with the device.
Always keep and use the device out of the reach of children under 8 years of age.
Do not store any explosive substances, such as spray cans with propellants, in the device.
!CAUTION!
Danger of crushing! Do not put your fingers into the hinge.
Foodstuff may only be stored in its original packaging or in suitable containers.
ANOTICE!
Check that the voltage specification on the type plate is the same as that of the power supply.
Never pull the plug out of the socket by the connection cable.
If the refrigerator is connected to the DC socket: Disconnect the refrigerator and other electric consumers from the battery before connecting the quick charging device.
If the refrigerator is connected to the DC socket: Disconnect the refrigerator or switch it off when you turn off the engine. Otherwise you may discharge the battery.
The refrigerator is not suitable for storing substances which are caustic or contain solvents.
Keep the drainage outlet clean at all times.
Do not open the refrigerant circuit under any circumstances.
Never transport the device in a horizontal position, so that no oil can leak out of the compressor.
EN |
15 |
|
|
|
|

Safety instructions |
CRX |
Make sure that the refrigerator circuit is not damaged during transportation. The refrigerant in the refrigerator circuit is highly flammable.
In the event of any damage to the refrigerator circuit:
–Avoid naked flames and sparks.
–Air the room well.
Set up the device in a dry location where it is protected against splashing water.
2.2Operating the device safely
DDANGER!
Do not touch exposed cables with your bare hands. This applies especially when operating the device from the AC mains.
!CAUTION!
Before starting the device, ensure that the power supply line and the plug are dry.
If you connect the device to a battery, make sure that no food comes into contact with the battery acid.
ANOTICE!
Do not use electrical devices inside the cooling device unless they are recommended by the manufacturer for that purpose.
Do not place it near naked flames or other heat sources (heaters, direct sunlight, gas ovens etc.)
Danger of overheating!
Always ensure sufficient ventilation so that the heat generated during operation can dissipate. Make sure that the device is sufficiently far away from walls and other objects so that the air can circulate.
Ensure that the ventilation vents are not covered.
Do not fill the inner container with ice or fluid.
Never immerse the appliance in water.
Protect the appliance and the cable against heat and moisture.
Make sure that foodstuffs do not touch the walls of the cooling area.
16 |
EN |
|

CRX |
Scope of delivery |
3Scope of delivery
Quantity Description
1Refrigerator with shelves
1Water drain outlet
1Installation and operating manual
4Accessories
Available as accessories (not included in the scope of delivery):
Description |
Explanation |
Ref. no. |
|
|
|
Rectifier |
Suitable for CRX50DC, CRX65DC, CRX80DC, |
9600000445 |
|
CRX110DC. |
|
|
Transforms an input voltage of 100 – 240 Vw to 12 Vg |
|
|
or 24 Vg, so that the refrigerator can be connected to |
|
|
an AC power supply. |
|
|
|
|
Mounting |
Flush-mount and standard mounting frames are available |
Various |
Frames |
for all CRX models. |
|
|
|
|
If you have any questions, please contact the dealer or your service partner directly.
5Intended use
The refrigerator is designed for installation in caravans and motorhomes and on boats. It is recommended the unit is installed into a fixed position. Once it is installed, only the front of the appliance may be accessible
The refrigerator is only suitable for cooling, freezing and storing foodstuffs. The refrigerator is not intended for the proper storage of medicine.
!CAUTION! Health hazard!
Please check if the cooling capacity of the refrigerator is suitable for storing the food you wish to cool.
EN |
17 |
|
|
|
|

Technical description |
CRX |
6Technical description
The CoolMatic CRX series cooling appliances can cool products and keep them cool. Products can be deep-frozen in the freezer compartment. If the refrigerator is operated without a freezer compartment, frozen products can be stored in the short term using the fast-cooling function.
All materials used in the refrigerator are compatible for use with foodstuffs. The refrigerant circuit is maintenance-free.
The temperature is set using the control panel on the inside left of the refrigerator.
CRX50, CRX65, CRX80:
Four temperature ranges from +3 °C to +12 °C, and a fast-cooling function, are available for selection.
CRX110, CRX140:
Four temperature ranges from +3 °C to +12 °C are available for selection.
CRX110ACDC, CRX140ACDC:
Four temperature ranges from +3 °C to +12 °C, and a winter mode, are available for selection.
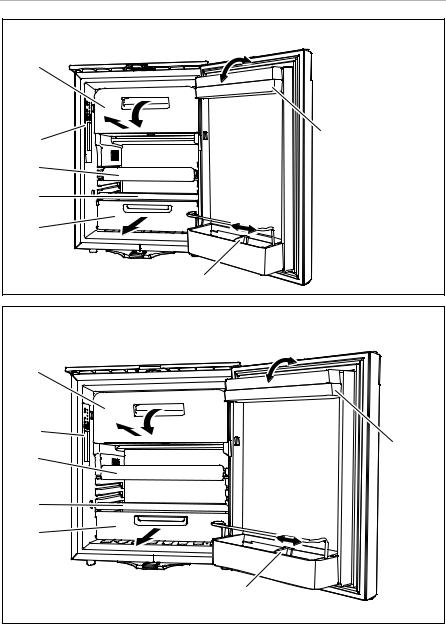
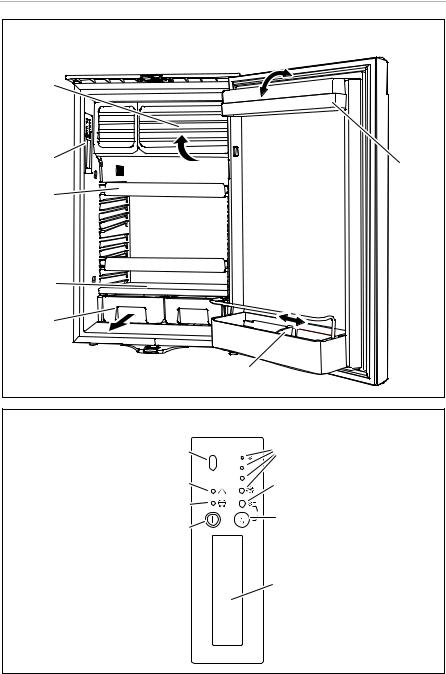
6.1Control elements inside the refrigerator
The various types of refrigerators are shown in the following illustrations:
CRX50: fig. 1, page 3
CRX65: fig. 2, page 3
CRX80: fig. 3, page 4
CRX110: fig. 4, page 4
CRX140: fig. 5, page 5
No. Explanation
1Freezer compartment (detachable: CRX50, CRX65, CRX80 only)
2 |
Control panel |
3 |
Wire shelf (folding, so that bottles can be put in the refrigerator) |
|
|
4 |
Shelf |
|
|
5 |
Fruit compartment |
|
|
18 |
EN |
|
CRX |
Installing and connecting the refrigerator |
No. Explanation
6Bottle restraint
(to hold bottles in the door)
7Compartment with lid (hinged)
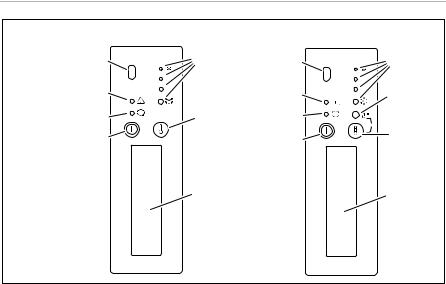
6.2Control elements
No. in
fig. 6, page 5, Explanation fig. 7, page 6
1IR sensor for switching the interior light
2LED Service display
3LED Blue: Compressor is running LED Orange: Compressor is off
4On/off button
5Inner lighting
6Temperature selection button
7LED: Fast cooling function on (CRX50, CRX65, CRX80) LED: Winter mode on (CRX110ACDC, CRX140ACDC)
8LEDs: Temperature levels
7Installing and connecting the refrigerator
7.1Safety instructions for installation on boats
Please note the following instructions for installation on boats:
DDANGER!
If the appliance is powered by the mains, ensure that the voltage supply has a residual current circuit breaker.
EN |
19 |
|
|
|
|

Installing and connecting the refrigerator |
CRX |
ANOTICE!
The cooling device can withstand a short term inclination of 30°, for example on boats. When setting up the refrigerator, note that it must be fastened to take account of this. If you have any questions regarding installation, consult your specialist dealer.
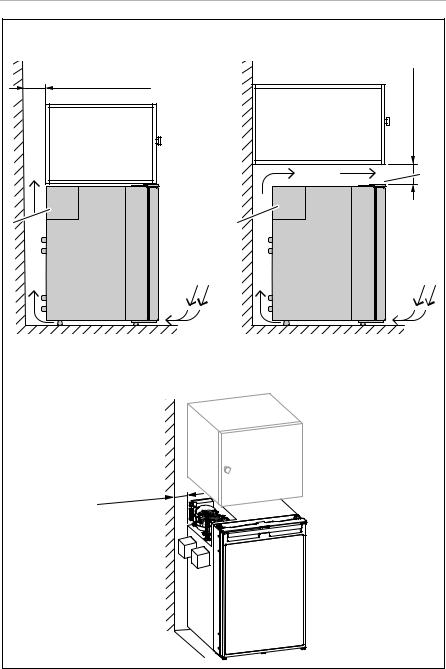
Install the refrigerator so that the warm air produced can easily flow away (either upwards or to the sides, fig. 8, page 7).
The appliance is designed for ambient temperatures between +16 °C (61 °F) and +43 °C (109 °F).
CRX110ACDC, CRX140ACDC: In winter mode the appliance can be operated at ambient temperatures between +10 °C (50 °F) and +16 °C (61 °F).
7.2Notes on installing the refrigerator
Observe the following when installing the refrigerator:
Install the refrigerator so that the warm air produced can easily flow away (either upwards or to the sides, fig. 8, page 7).
Key for fig. 8, page 7
No. Explanation
1Cold intake air
2 |
Hot waste air |
3Condenser
4Spacing above the refrigerator if there is not sufficient air to circulate above or at the side.
Observe the following installation dimensions:
Model |
Dimensions W x H x D (mm) |
|
|
CRX50 |
390 x 544 x 550 |
|
|
CRX65 |
458 x 535 x 595 |
|
|
CRX80 |
485 x 650 x 578 |
|
|
CRX110 |
530 x 755 x 608 |
|
|
CRX140 |
550 x 825 x 670 |
|
|
Keep objects clear of openings in the housing or installation structure (such as ventilation slots, etc.).
20 |
EN |
|
CRX |
Installing and connecting the refrigerator |
Condensate is produced when the refrigerator is operating normally. You can either wipe up the condensate on the floor of the refrigerator in regular intervals, or drain it through an outlet in the floor of the refrigerator (see chapter “Mounting the water drain outlet (optional)” on page 21).
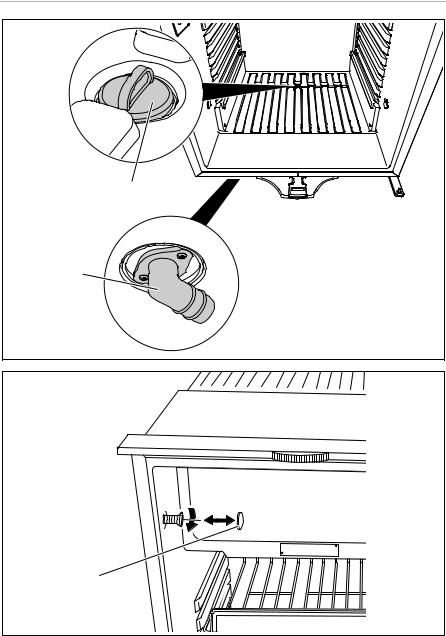
7.3Mounting the water drain outlet (optional)
Connect a hose with an inside diameter of 10 mm (not included) to the water drain outlet.
Lay the refrigerator on its side in order to access the bottom side.
Mount the water drain outlet (fig. 9 2, page 8) aligned to the front or to the back according to the desired outlet direction.
Remove the water drain plug (fig. 9 1, page 8) inside the refrigerator.
7.4Installing the refrigerator
Proceed as follows to install the refrigerator:
If you wish to drain the condensate through a hose:
Mount the water outlet port (see chapter “Mounting the water drain outlet (optional)” on page 21)
Undo the transport lock (chapter “Releasing the lock” on page 27).
Open the refrigerator door.
Remove the blanking plugs (fig. 0 2, page 8).
Push the refrigerator into the recess.
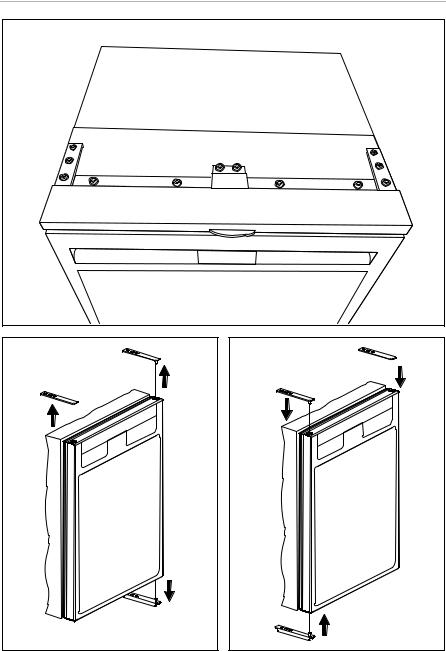
Fix the refrigerator in place using suitable screws (fig. 0 1, page 8).
Press the blanking plugs (fig. 0 2, page 8) into the openings.
7.5Changing the door hinge
You can also change the hinge of the door, so that it opens to the left rather than the right.
Proceed as shown in fig. a, page 9 to fig. c, page 9, to change the hinges.
EN |
21 |
|
|
|
|

Installing and connecting the refrigerator |
CRX |
7.6Connecting the refrigerator to DC voltage
ANOTICE!
To avoid voltage drops and loss of performance, keep the connection cable as short as possible and not be interrupted. Therefore avoid additional switches, plugs or power strips.
Disconnect the cooling device and other electric consumers from the battery before you connect the battery to a quick charging device. Overvoltage can damage the electronics of the device.
The refrigerator can be operated with a 12 V or a 24 V DC voltage supply.
For safety reasons, the refrigerator is equipped with an electronic system to prevent the polarity being reversed. This protects the refrigerator against reversed polarity when connecting to a battery and against short circuiting.
To protect the battery, the refrigerator switches off automatically if the voltage is insufficient (see table below).
|
12 V |
24 V |
|
|
|
Cut-off voltage |
10.4 V |
22.8 V |
|
|
|
Cut-in voltage |
11.7 V |
24.2 V |
|
|
|
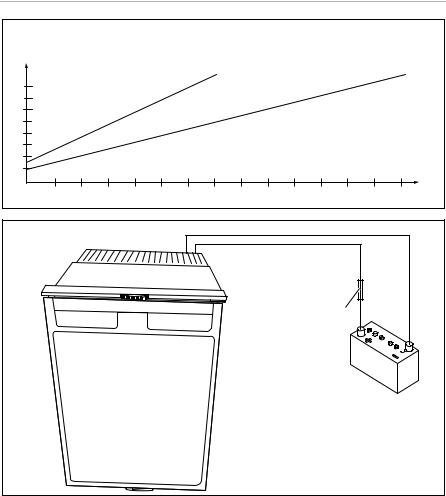
Determine the required cross section of the cable in relation to the cable length according to fig. d, page 10.
Key to fig. d, page 10:
Coordinate axis |
Meaning |
Unit |
|
|
|
l |
Cable length |
m |
|
|
|
|
Cable cross section |
mm² |
|
|
|
ANOTICE!
Make sure the polarity is correct.
Before starting up the device for the first time, check whether the operating voltage and the battery voltage match (see type plate).
Connect your refrigerator to a plug socket which is fuse-protected at 15 A (at 12 V) or 7.5 A (at 24 V) (fig. e 1, page 10).
22 |
EN |
|

CRX |
Installing and connecting the refrigerator |
Connect the red cable (fig. e rd, page 10) to the positive terminal of the battery.
Connect the black cable (fig. e bk, page 10) to the negative terminal of the battery.
7.7Connecting the refrigerator to AC voltage
DDANGER! mortal danger!
Never handle plugs and switches with wet hands or if you are standing on a wet surface.
If you are operating your refrigerator on board a boat with an
AC mains connection using a shore connection, you must install a residual current circuit breaker between the AC mains supply and the refrigerator.
Seek advice from a trained technician.
CRX50ACDC, CRX65ACDC, CRX80ACDC, CRX110ACDC, CRX140ACDC
Proceed as follows when you connect the refrigerator to the AC supply:
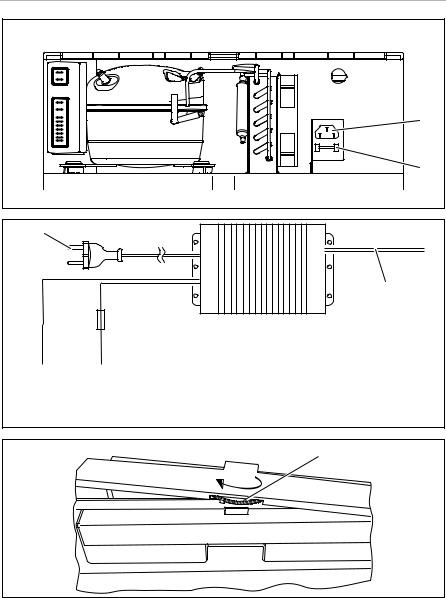
Plug the connector into the AC socket (fig. f 1, page 11).
CRX50DC, CRX65DC, CRX80DC, CRX110DC
You can connect the refrigerator to 100 – 240 Vw AC power if you use the MPS35 rectifier (accessory).
The MPS35 rectifier features a priority circuit which conserves the battery connected. When a 100 – 240 Vw mains connection is used, the rectifier automatically switches from battery to mains operation.
When disconnected from the 100 – 240 Vw mains supply, the rectifier automatically switches back to battery operation. Mains operation via the rectifier always takes priority over battery operation.
Proceed as follows when you connect the refrigerator to the AC supply:
Attach the rectifier on the back of the refrigerator.
Connect the rectifier as shown in fig. g, page 11.
Connect the refrigerator to the rectifier (fig. g 2, page 11):
–Red cable: positive battery terminal
–Black cable: negative battery terminal
Plug the connector into the AC socket (fig. g 1, page 11).
EN |
23 |
|
|
|
|

Using the refrigerator |
CRX |
8Using the refrigerator
The refrigerator conserves fresh foodstuffs. The freezer compartment conserves frozen foodstuffs and freezes fresh foodstuffs.
ANOTICE!
Do not place any electrical devices inside the cooler. The only exceptions are devices approved for the purpose by the manufacturer.
Ensure that food or liquids in glass containers are not excessively refrigerated. Liquids expand when they freeze and can therefore destroy glass containers.
Food may only be stored in its original packaging or in suitable containers.
Make sure that you only put items in the cooler which may be kept at the selected temperature.
INOTE
Before starting your new refrigerator for the first time, you should clean it inside and outside with a damp cloth for hygienic reasons (please also refer to the chapter “Cleaning and maintenance” on page 28).
Do not use force to press the flap of the freezer.
Do not pull out the dividing wall if there is ice in the freezer.
Do not remove the control panel membrane when operating the refrigerator.
8.1Energy saving tips
Choose a well ventilated location which is protected from direct sunlight.
Allow hot food to cool down first before you put it in the refrigerator.
Do not open the refrigerator more often than necessary. If the door is left open for more than 5 minutes, the light starts to flash.
Do not leave the door open for longer than necessary.
Defrost your refrigerator as soon as a layer of ice forms.
Avoid unnecessarily low temperature settings.
Clean dust and dirt from the condenser at regular intervals.
24 |
EN |
|

CRX |
Using the refrigerator |
8.2Switching on the refrigerator
Switch the refrigerator on by pressing the button.
I 8 NOTE
After switching on, the refrigerator needs some time before the compressor starts up.
8.3Setting the temperature
Press the  button repeatedly until the desired temperature level is set. The lower/largest LED is the coldest setting. The upper/smallest LED is the warmest setting.To switch from the coldest level to the warmest level press the
  button again.
INOTE
The cooling performance can be affected by:
The ambient temperature
The amount of food to be conserved
The frequency with which the door is opened.
If the ambient temperature is at 16 °C to 20 °C, set the refrigerator to at least level 2.
8.4Setting the fast cooling function (CRX50, CRX65, CRX80 only)
ANOTICE!
Only use the fast-cooling function when the removable freezer compartment is not installed. Otherwise there is a risk that the freezer compartment becomes too cold and condensate cannot be prevented from forming on the outside of the refrigerator. The energy consumption will also increase dramatically.
Note that bottles and other containers can burst when frozen.
Note that it is difficult to open the refrigerator directly after closing it.
The option of operating the refrigerator using a fast-cooling function allows temperatures suitable for freezing foods to be reached.
Press the  button for longer than 3 seconds.
The LED above the  button lights up.
Press the  button again for longer than 3 seconds to operate the refrigerator in normal mode.
EN |
25 |
|
|
|
|

Using the refrigerator |
CRX |
8.5Setting the winter mode (CRX110ACDC, CRX140ACDC only)
The winter mode ensures optimum operation at ambient temperature of below 16 °C:
Press the  button for longer than 3 seconds.
The refrigerator switches to winter mode and the LED lights up above the
 button.
Press the  button again for longer than 3 seconds to operate the refrigerator in normal mode.
8.6Conserving foodstuffs
ANOTICE!
Do not conserve warm foodstuffs in the refrigerator.
Do not place glass containers containing liquid in the freezer compartment.
INOTE
Food which can easily absorb tastes and odours, as well as liquids and products with a high alcohol content, should be conserved in air-tight containers.
You can conserve foodstuffs in the refrigerator. The time for which the food can be conserved in this way is usually stated on the package.
The refrigerator is divided in different zones with different temperatures:
The colder zones are immediately above the drawers for fruit and vegetables, near the back wall.
Observe the temperature information and best before date on the food packaging.
Observe the following when using the refrigerator:
–Never re-freeze products which have started defrosting or have been defrosted; consume them as soon as possible.
–Wrap food in aluminium foil or cling film and shut in a suitable box with a lid. This ensures that aromas, the shape and the freshness will be better conserved.
26 |
EN |
|

CRX |
Using the refrigerator |
8.7Defrosting the freezer
ANOTICE!
Never use mechanical tools to remove ice or to loosen objects stuck to the device. The only exceptions are devices approved for the purpose by the manufacturer.
This is how to defrost the refrigerator:
Empty the contents.
If necessary, put them in another cooling device to keep them chilled.
Press the  button until the refrigerator switches off.
Close the door properly.
8.8Releasing the lock
ANOTICE!
Only adjust the locking mechanism when the door is open. If you use it with the door closed, you will damage the device.
The refrigerator has a locking mechanism (fig. h 1, page 11) which is also used to protect it during transport. The following settings are possible:
Lock (turn wheel to the Right end stop): the door is locked and secured.To open the door, lift the handle up and open it.
Vent (turn wheel to the Left end stop): The door is slightly open, but fixed in position. Use this position if you are not going to use the unit for a long time.
8.9Switching off and storing the refrigerator
If you do not intend to use the refrigerator for a long time, proceed as follows:
Press the  button until the refrigerator switches off.
Disconnect the connection cable from the battery or disconnect the plug on the AC cable plug from the rectifier.
Clean the refrigerator (see chapter “Cleaning and maintenance” on page 28).
Turn the locking wheel (fig. h 1, page 11) to the Right end stop (“Vent”).
Close the door until it latches in.
The door stays open thus preventing smells from arising.
EN |
27 |
|
|
|
|

Cleaning and maintenance |
CRX |
8.10Change the fuse (CRX50ACDC, CRX65ACDC, CRX80ACDC, CRX110ACDC, CRX140ACDC only)
If the fuse in the AC socket is faulty, it can be replaced.
Lever the fuse compartment (fig. f 2, page 11) open with a screwdriver.
Replace the fuse (250 V/4 A).
Close the fuse compartment again.
9Cleaning and maintenance
ANOTICE!
Do not use abrasive cleaning agents or hard objects during cleaning as these can damage the refrigerator.
Do not use hard or pointed tools to speed up the defrosting process.
Always disconnect the device from the power supply before you clean and service it.
Clean the refrigerator regularly and as soon as it becomes dirty with a damp cloth.
Make sure that no water drips into the seals. This can damage the electronics.
Wipe the refrigerator dry with a cloth after cleaning.
Clean dust and dirt from the condenser at regular intervals.
10 Warranty
The statutory warranty period applies. If the product is defective, please contact the manufacturer's branch in your country (see the back of the instruction manual for the addresses) or your retailer.
For repair and warranty processing, please include the following documents when you send in the device:
A copy of the receipt with purchasing date
A reason for the claim or description of the fault
28 |
EN |
|

CRX |
Disposal |
11 Disposal
!WARNING! Children beware!
Before disposing of your old refrigerator:
Take off the doors.
Leave storage surfaces in the refrigerator so that children cannot climb inside.
Place the packaging material in the appropriate recycling waste bins wherever possible.
MIf you wish to finally dispose of the product, ask your local recycling centre or specialist dealer for details about how to do this in accordance with the applicable disposal regulations.
12 Troubleshooting
The significance of the red LED (fig. 6 2, page 5, fig. 7 2, page 6)
For operational faults it illuminates several times. The number of pulses depends on the type of fault.
Each flash lasts for one quarter of a second. After the series of impulses a pause follows. The sequence for the fault is repeated every four seconds.
CRX50, CRX65, CRX80
Number of |
Fault |
Possible cause |
|
flashes |
|||
|
|
||
|
|
|
|
1 |
Low Voltage |
The supply voltage is outside of the set range. |
|
|
|
|
|
2 |
Excessive fan current |
The fan load on the electronics unit is more |
|
|
|
than 1 A. |
|
|
|
|
|
|
Too many start attempts |
The compressor or fan has been started too |
|
|
|
often within a short period of time. |
|
|
|
|
|
3 |
The motor doesn't start |
The rotor is jammed. |
|
|
|
The pressure difference in the cooling system |
|
|
|
is too high (> 5 bar). |
|
|
|
|
|
4 |
Speed too low |
If the cooling system is overloaded, the |
|
|
|
minimum speed of the motor of 1,850 rpm |
|
|
|
cannot be maintained. |
|
|
|
|
EN |
29 |
|
|
|
|

Troubleshooting |
|
|
|
CRX |
|
|
|
|
|
Number of |
Fault |
Possible cause |
|
|
flashes |
|
|||
|
|
|
|
|
|
|
|
|
|
5 |
Overheating of the |
If the cooling system is loaded too heavily or |
||
|
electronics unit |
the temperature is set too high, the |
||
|
|
|
electronics can overheat. |
|
|
|
|
|
|
Constantly |
Temperature sensor |
Temperature sensor is defective. |
||
|
errors |
|
|
|
|
|
|
|
|
CRX110, CRX140 |
|
|
||
|
|
|
|
|
Number of |
Fault |
Possible cause |
|
|
flashes |
|
|||
|
|
|
|
|
|
|
|
|
|
1 |
Low Voltage |
The supply voltage is outside of the set range. |
||
|
|
|
|
|
2 |
Excessive fan current |
The fan load on the electronics unit is more |
||
|
|
|
than 1 A. |
|
|
|
|
|
|
3 |
The motor doesn't start |
The rotor is jammed. |
||
|
|
|
The pressure difference in the cooling system |
|
|
|
|
is too high (> 5 bar). |
|
|
|
|
|
|
4 |
Speed too low |
If the cooling system is overloaded, the |
||
|
|
|
minimum speed of the motor of 1,850 rpm |
|
|
|
|
cannot be maintained. |
|
|
|
|
|
|
5 |
Overheating of the |
If the cooling system is loaded too heavily or |
||
|
electronics unit |
the temperature is set too high, the |
||
|
|
|
electronics can overheat. |
|
|
|
|
|
|
Constantly |
Temperature sensor |
Temperature sensor is defective. |
||
|
errors |
|
|
|
|
|
|
|
|
Compressor does not run (battery connection) |
|
|||
|
|
|
|
|
Problem |
|
Possible cause |
|
Remedy |
|
|
|
|
|
UTerm = 0 V |
|
There is an interruption in the |
Establish a connection |
|
|
|
battery – electronics connection |
|
|
|
|
|
|
|
|
|
Main switch faulty (if installed) |
Replace the main switch |
|
|
|
|
|
|
|
|
Additional supply line fuse has blown |
Replace the supply line |
|
|
|
(if installed) |
|
fuse |
|
|
|
|
|
UTerm ≤ UON |
|
Battery voltage is too low |
Charge the battery |
|
30 |
EN |
|
 Loading...