


Dometic COOLAIR RTX1000, COOLAIR RTX2000, COOLAIR SPX1200TC, COOLAIR SPX1200IC, RTX1000 Operating manual
...CLIMATE CONTROL
COOLAIR
EN
DE
FR
ES
PT
IT
NL
DA
SV
RTX1000, RTX2000, SPX1200TC, SPX1200IC
Parking cooler
Operating manual . . . . . . . . . . . . . . . . . . . . . 6
Standklimaanlage
Bedienungsanleitung . . . . . . . . . . . . . . . . .26
Climatiseur auxiliaire
Notice d’utilisation . . . . . . . . . . . . . . . . . . . 47
Equipo de aire acondicionado a motor parado
Instrucciones de uso . . . . . . . . . . . . . . . . . .69
Unidade fixa de ar condicionado
Manual de instruções . . . . . . . . . . . . . . . . . 91
Climatizzatore a motore spento
Istruzioni per l’uso . . . . . . . . . . . . . . . . . . . 113
Standairco
Gebruiksaanwijzing. . . . . . . . . . . . . . . . . . 135
Standklimaanlæg
Betjeningsvejledning . . . . . . . . . . . . . . . . 156
NO
FI
RU
PL
SK
CS
HU
Klimaanlegg |
|
Bruksanvisning . . . . . . . . . . . . . . . . . . . . . |
197 |
Ilmastointilaite
Käyttöohje . . . . . . . . . . . . . . . . . . . . . . . . . 217
Стояночный кондиционер
Инструкция по эксплуатации . . . . . . . . . 237
Klimatyzator postojowy
Instrukcja obsługi . . . . . . . . . . . . . . . . . . . 259
Prídavné klimatizačné zariadenie
Návod na obsluhu . . . . . . . . . . . . . . . . . . . 281
Nezávislá klimatizace
Návod k obsluze . . . . . . . . . . . . . . . . . . . . 303
Állóklíma-berendezés
Használati utasítás. . . . . . . . . . . . . . . . . . . 323
Motoroberoende klimatanläggning
Bruksanvisning . . . . . . . . . . . . . . . . . . . . . . 176

RTX1000/2000, SPX1200 |
|
1 RTX1000/2000, SPX1200TC |
1 |
|
|
|
3 |
|
2 |
SPX1200IC |
1 |
|
|
|
3 |
2 |
2 |
|
3 |
RTX1000/2000, SPX1200
2
7 |
6 |
1 |
2 |
5 |
4 |
3 |
3 |
1 |
2 |
|
3 |
4 |
|
5 |
6 |
7 |
8 |
9 |
4
RTX1000/2000, SPX1200 |
|
|
|
|
4 |
3 |
4 |
5 |
6 |
2 |
||||
1 |
|
|
|
7 |
|
|
|
|
|
|
|
|
|
8 |
|
|
|
|
9 |
|
|
|
|
10 |
5

RTX1000/2000, SPX1200
Original instructions
Please read this instruction manual carefully before first use, and store it in a safe place. If you pass on the product to another person, hand over this instruction manual along with it.
Table of contents
1 Explanation of symbols . . . . . . . . . . . . . . . . . . . . . . . . . . . . . . . . . . . . . . . . . . .7 2 Safety . . . . . . . . . . . . . . . . . . . . . . . . . . . . . . . . . . . . . . . . . . . . . . . . . . . . . . . . .7 3 Target group . . . . . . . . . . . . . . . . . . . . . . . . . . . . . . . . . . . . . . . . . . . . . . . . . . .9 4 Intended use . . . . . . . . . . . . . . . . . . . . . . . . . . . . . . . . . . . . . . . . . . . . . . . . . . .9 5 Technical description . . . . . . . . . . . . . . . . . . . . . . . . . . . . . . . . . . . . . . . . . . . .9 6 Operation . . . . . . . . . . . . . . . . . . . . . . . . . . . . . . . . . . . . . . . . . . . . . . . . . . . .10 7 Using the parking cooler . . . . . . . . . . . . . . . . . . . . . . . . . . . . . . . . . . . . . . . .14 8 Display messages . . . . . . . . . . . . . . . . . . . . . . . . . . . . . . . . . . . . . . . . . . . . . 20 9 Cleaning and care . . . . . . . . . . . . . . . . . . . . . . . . . . . . . . . . . . . . . . . . . . . . . 24 10 Warranty . . . . . . . . . . . . . . . . . . . . . . . . . . . . . . . . . . . . . . . . . . . . . . . . . . . . 24 11 Disposal . . . . . . . . . . . . . . . . . . . . . . . . . . . . . . . . . . . . . . . . . . . . . . . . . . . . . 25 12 Technical data . . . . . . . . . . . . . . . . . . . . . . . . . . . . . . . . . . . . . . . . . . . . . . . . 25
6 |
EN |
|

RTX1000/2000, SPX1200 |
Explanation of symbols |
1Explanation of symbols
!WARNING!
Safety instruction: Indicates a hazardous situation that, if not avoided, could result in death or serious injury.
!CAUTION!
Safety instruction: Indicates a hazardous situation that, if not avoided, could result in minor or moderate injury.
ANOTICE!
Indicates a situation that, if not avoided, can result in property damage.
INOTE
Supplementary information for operating the product.
2Safety
The manufacturer accepts no liability for damage in the following cases:
•Damage to the product resulting from mechanical influences and incorrect connection voltage
•Alterations to the product without express permission from the manufacturer
•Use for purposes other than those described in the operating manual
2.1Handling the product
!WARNING!
•Only use the parking cooler for the purpose specified by the manufacturer and do not make any alterations or structural changes to the device.
•If the supply cord is damaged, it must be replaced by the manufacturer, its service agentor similarly qualified persons in order to avoid a hazard.
•Do not use the parking cooler if it is visibly damaged.
EN |
7 |
|
|
|
|

Safety |
RTX1000/2000, SPX1200 |
•Installation and repairs to the parking cooler may only be carried out by qualified personnel who are familiar with the risks involved and the relevant regulations. Inadequate repairs may cause serious hazards.
For repair service, please contact the service centre in your country (addresses on the back page).
•People (including children) whose physical, sensory or mental capacities or whose lack of experience or knowledge prevent them from using this product safely should not use it without the supervision or instruction of a responsible person.
•Electrical devices are not toys.
Always keep and use the product out of the reach of children.
•Children must be supervised to ensure that they do not play with the product.
•Make sure no combustible objects are stored or installed near the air outlet. A distance of at least 50 cm must be maintained.
•Do not undo the upper cover of the parking cooler in the event of a fire. Use approved extinguishing agents instead. Do not use water to extinguish fires.
•Do not reach into air grilles or ventilation nozzles or insert any foreign objects in the system.
!CAUTION!
•Disconnect all power supply lines when working on the parking cooler (cleaning, maintenance etc).
ANOTICE!
•The parking cooler is not suitable for use in agricultural or construction vehicles.
•Vehicles with attached parking coolers may only be cleaned in automatic car washes where the top brush can be manually deactivated.
•Switch the parking cooler off before tilting the cab for maintenance.
•Switch off the parking cooler before using automatic washing equipment (automatic car washes etc.) to clean the vehicle.
•Do not operate the parking cooler if the ambient temperature is below 0 °C or above 52 °C.
•Please inform your vehicle manufacturer if the height entered in your vehicle documents needs to be altered due to the installation of the parking cooler.
8 |
EN |
|

RTX1000/2000, SPX1200 |
Target group |
2.2Operating the product safely
ANOTICE!
• Do not insert foreign objects into the system.
3Target group
The information contained is aimed at the user of the parking cooler.
4Intended use
The parking cooler is used to supply the interior of the driver's cab with cool and dehumidified air.
The system is designed for stationary use. It can be used while driving.
The parking cooler is not suitable for use in agricultural or construction vehicles. The parking cooler is suitable for ambient temperatures of 5 °C to 52 °C.
INOTE
Only install the parking cooler using the manufacturer's assembly kit.
5Technical description
The parking cooler can be used for conditioning inside the vehicle. The air in the interior is guided into the system through the intake grille, cooled, dried and conveyed back into the interior through the blower nozzles.
In BOOST mode, the parking cooler cools the vehicle interior for not more than 20 minutes at maximum power and then switches to AUTO mode. When the set temperature is reached, the parking cooler switches to AUTO mode before the 20 minutes is reached.
In AUTO mode, the fan and compressor speed are controlled automatically.
In ECO mode the fan and compressor speed are controlled automatically. The compressor power is limited in ECO mode electronically.
The system is controlled using the control panel or the remote control.
EN |
9 |
|
|
|
|

Operation |
RTX1000/2000, SPX1200 |
INOTE
The parking cooler can lower the temperature within the vehicle to a certain level. The temperature depends on the type of vehicle, the ambient temperature and the cooling capacity of your parking cooler. For the cooling capacity of your parking cooler, chapter “Technical data” on page 25.
The system is fitted with a battery monitor. If the system is operated when the vehicle ignition is switched off, the system switches off automatically as soon as the supply voltage falls below a set level.
INOTE
This set level can be changed. For this, please contact the specialised company that installed the system.
6Operation
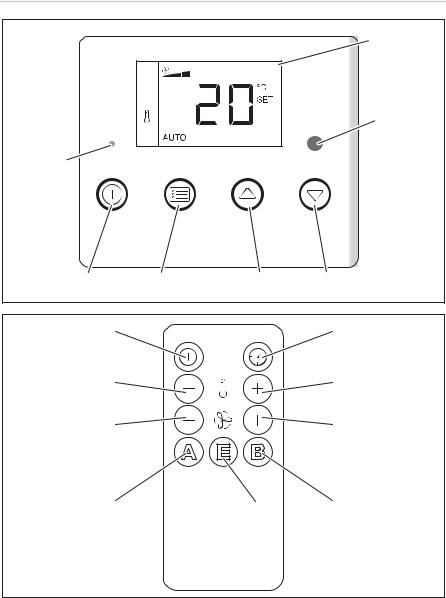
6.1Device elements
The parking cooler has the following device elements:
No. in
Explanation
fig. 1, page 3
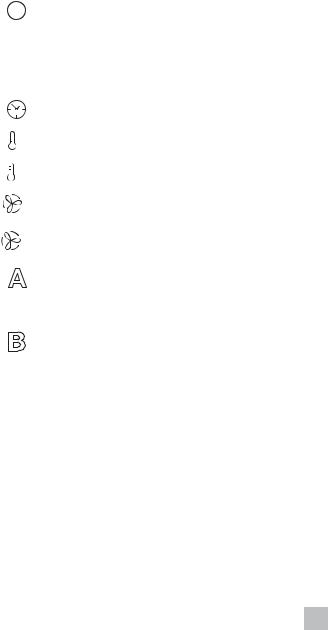
1Blower nozzles
2Intake grille
3Control panel
10 |
EN |
|
RTX1000/2000, SPX1200 |
Operation |
6.2Control panel
The system's control panel contains the following operating and display elements:
No. in |
Symbol |
Description |
|||
fig. 2, page 4 |
|||||
|
|
|
|
||
|
|
|
|
|
|
1 |
|
|
|
Display (see chapter “Display” on page 13) |
|
|
|
|
|
|
|
2 |
|
|
|
Infrared receiver (for the remote control) |
|
|
|
|
|
|
|
3 |
|
|
|
Opens the sub-menus for setting or decreases the value |
|
|
|
|
|
of the selected parameter once a menu has been |
|
|
|
|
|
opened. |
|
|
|
|
|
|
|
4 |
|
|
|
Opens the sub-menus for setting or increases the value of |
|
|
|
|
|
the selected parameter once a menu has been opened. |
|
|
|
|
|
|
|
5 |
|
|
|
Scrolls through the menu items. |
|
|
|
|
|||
|
|
|
|
|
|
|
|
|
|
|
|
6 |
|
|
|
Switches the parking cooler |
|
•on
•off (press button briefly)
•to standby mode (press button longer than 3 s)
7 |
LED Power (blue): |
|
Only lights up when the system is switched on or in |
|
standby. |
|
|
EN |
11 |
|
|
|
|
Operation |
RTX1000/2000, SPX1200 |
6.3Remote control
The remote control contains the following operating elements:
No. in |
Symbol |
Description |
||||||||
fig. 3, page 4 |
||||||||||
|
|
|
|
|
|
|
|
|
||
|
|
|
|
|
|
|
|
|
|
|
1 |
|
|
|
|
|
|
|
|
Press button briefly: Switches the parking cooler to |
|
|
|
|
|
|
|
|
|
|||
|
|
|
|
|
|
|
|
|
standby mode or on again, if it is in standby mode |
|
|
|
|
|
|
|
|
|
|
Press button longer than 3 s: Switches the parking |
|
|
|
|
|
|
|
|
|
|
cooler off |
|
|
|
|
|
|
|
|
|
|
The parking cooler only can be switched on at the control |
|
|
|
|
|
|
|
|
|
|
panel. |
|
|
|
|
|
|
|
|
|
|
|
|
2 |
|
|
|
|
|
|
|
|
Increases the timer running time by 10 minutes. |
|
|
|
|
|
|
|
|
|
|
|
|
3 |
|
|
|
|
|
|
|
– |
Reduces the set point by 1 °C/2 °F. |
|
|
|
|
|
|
|
|
|
|
||
|
|
|
|
|
|
|
|
|
|
|
4 |
+ |
Increases the set point by 1 °C/2 °F. |
||||||||
|
|
|||||||||
|
|
|
|
|
|
|
|
|
|
|
5 |
|
|
|
|
|
|
|
– |
Switches the parking cooler to MANUAL mode and |
|
|
|
|
|
|
|
|
|
reduces the speed of the fan. |
||
|
|
|
|
|
|
|
|
|
||
|
|
|
|
|
|
|
|
|
|
|
6 |
+ |
Switches the parking cooler to MANUAL mode and |
||||||||
|
increases the speed of the fan. |
|||||||||
|
|
|
|
|
|
|
|
|
||
|
|
|
|
|
|
|
|
|
|
|
7 |
|
|
|
|
|
|
|
|
Switches the parking cooler to AUTO mode. |
|
|
|
|
|
|
|
|
|
|
|
|
8 |
|
|
|
|
|
|
|
|
Switches the parking cooler to ECO mode. |
|
|
|
|
|
|
|
|
|
|
|
|
9 |
|
|
|
|
|
|
|
|
Switches the parking cooler to BOOST mode. |
|
|
|
|
|
|
|
|
|
|
|
|
12 |
EN |
|

RTX1000/2000, SPX1200 |
Operation |
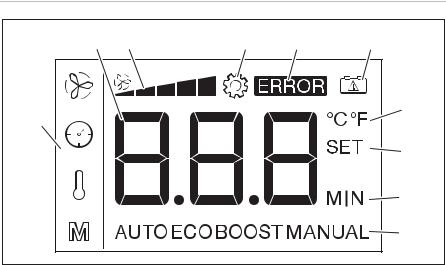
6.4Display
The display has the following indicators:
No. in
Description
fig. 4, page 5
1The symbol shows the current menu selected (see chapter “Using menus” on page 16).
2 |
Depending on the current menu, shows: |
|
• the required temperature |
|
• the current fan speed |
|
• the remaining running time of the timer |
|
|
3 |
Shows the current fan speed. |
|
|
4 |
Setting: Lights up when the setting menu has been activated. |
5ERROR: Lights up when the supply voltage falls below a set value. Additionally the display flashes.
6 |
Battery: Displays problems with the supply voltage. |
|
|
7 |
°C: Lights up when the temperature is shown in °C. |
|
°F: Lights up when the temperature is shown in °F. |
|
|
8 |
SET: Indicates that the set temperature is being shown. |
|
|
9 |
MIN: Lights up when the timer has been set. |
|
|
10 |
Shows the current mode (see chapter “Menu mode” on page 17) |
|
|
INOTE
You can find full details of the display messages in the chapter “Display messages” on page 20.
EN |
13 |
|
|
|
|

Using the parking cooler |
RTX1000/2000, SPX1200 |
7Using the parking cooler
ANOTICE!
•The manufacturer assumes no liability for non-observance of this operating manual, in particular for any consequential damage, especially consequential damage caused by failure of the parking cooler.
•Do not insert foreign objects into the system.
INOTE
In EX/III and FL vehicles, the parking cooler can be shut off via a battery master switch in case of emergency.
7.1Tip for improved use
INOTE
The CoolAir parking coolers are designed as air conditioners for relaxing rest periods. They can be used while driving, however they do not replace the engine-powered vehicle air conditioning system.
Observe the following instructions to ensure your CoolAir parking cooler is used efficiently.
It is recommended that you
•Park your vehicle in the shade when possible.
•Shade your vehicle when possible.
•If you do not have a vehicle air conditioning system, air out your vehicle well before using the parking cooler. You should always cool down the vehicle interior before a rest period using the vehicle air conditioning system.
•Keep doors and windows closed.
•Avoid any heat sources in the vehicle.
•Reduce the power consumed by other products to ensure the maximum possible operating time of the parking cooler.
•Select a suitable temperature and operating mode.
•Make sure the blower nozzles (fig. 1 1, page 3) and intake grille (fig. 1 2, page 3) are not covered by cloths, paper or other objects.
•The best cooling capacity is achieved when the blower nozzles (fig. 1 1, page 3) are not directed towards the intake grille (fig. 1 2, page 3).
14 |
EN |
|

RTX1000/2000, SPX1200 |
Using the parking cooler |
Always observe the following
•If you would like the parking cooler to match the colour of your vehicle, only paint the upper shell casing of the parking cooler.
Only paint this when it has been removed. Use light colours when possible.
•Wash your vehicle regularly, as dirty driver's cabs heat up more quickly.
•Make sure that the performance of the parking cooler is not affected by other sources of heat (e.g. waste heat from cold machines).
7.2Switching on the parking cooler
ANOTICE!
Never close all of the air nozzles of the parking cooler simultaneously. The system would ice up inside.
INOTE
The first time the parking cooler is used, there may be a slight smell. This odour is caused by a design feature and ends after the system has been running for a short time.
With the system switched off, press the  button.
The fan starts.
The Power LED (fig. 2 7, page 4) lights up.
The digital display (fig. 2 1, page 4) shows the current status of the parking cooler (see chapter “Display” on page 13).
INOTE
Depending on the system status, the system compressor is switched on with a delay of up to 180 seconds.
7.3Switching the parking cooler to standby mode
Press the  button briefly to switch the parking cooler to standby mode.
The parking cooler saves the current settings.
The Power LED (fig. 2 7, page 4) continues to light up.
EN |
15 |
|
|
|
|

Using the parking cooler |
RTX1000/2000, SPX1200 |
INOTE
•When the parking cooler is in BOOST mode and switched to standby mode, it will start the next time in AUTO mode.
•A running timer is set to 0 by switching the parking cooler in standby mode.
•The parking cooler switches off completely after 12 hours in standby mode to save power.
7.4Switching off the parking cooler
Press the  button for at least 3 seconds to switch off parking cooler.
The parking cooler saves the current settings.
The Power LED (fig. 2 7, page 4) goes out.
INOTE
•When the parking cooler is in BOOST mode and switched off, it will start the next time in AUTO mode.
•A running timer is set to 0 by switching off the parking cooler.
•If the parking cooler is switched off while the compressor is still operating, the fan will continue to run for 20 seconds to dry the evaporator, among other things.
7.5Using menus
You can set the parking cooler to suit your requirements using the menus:
Press the  button to browse through the menus.
Press the  or
or  button to navigate to the appropriate sub-menu or to change the selected value.
Press the  button to reduce the selected value.
Press the  button to increase the selected value.
INOTE
If you don‘t press any button for more than 5 seconds, the display switches back to the menu mode.
16 |
EN |
|

RTX1000/2000, SPX1200 |
Using the parking cooler |
|
You can select the following menus: |
|
|
|
|
|
Menu Description |
|
Change in |
|
value |
|
|
|
|
|
|
|
Setting the temperature (17 °C to 30 °C/62 °F to 86 °F) |
1 °C/2 °F |
|
|
|
|
Setting the mode (see chapter “Menu mode” on page 17) |
– |
|
|
|
|
MANUAL mode: |
|
1 |
Set the fan speed manually (level 1 – 5) |
|
|
|
|
|
Set the running time of the timer (10 – 120 min) |
|
10 min |
|
|
|
Menu mode
In menu mode, you can select the following sub-menus:
Sub-menu |
Purpose |
|
|
AUTO |
AUTO mode: |
|
The fan and the compressor are controlled automatically. |
|
|
ECO |
Energy-saving mode: |
|
The fan and the compressor are controlled automatically. The speed of the |
|
compressor is limited electronically. |
|
|
BOOST |
BOOST mode: |
|
The system runs at once at full-power. The system switches to automatic |
|
mode after 20 minutes or once the set temperature has been reached. |
|
|
MANUAL |
MANUAL mode: |
|
You can set the fan speed manually. |
|
The compressor is controlled automatically. |
|
|
7.6Using the air conditioner
Set the required temperature (chapter “Setting the temperature” on page 18).
Set the required mode (chapter “Setting the mode” on page 18).
INOTE
If the required temperature is not reached in the energy-saving mode or at a low fan speed, increase the fan speed or switch to BOOST mode or to AUTO mode.
EN |
17 |
|
|
|
|

Using the parking cooler |
RTX1000/2000, SPX1200 |
Set the timer (chapter “Setting the timer” on page 19), if you want the parking cooler to switch off automatically after the required time.
7.7Setting the temperature
INOTE
Depending on the set unit for the temperature, the temperature is changed in steps of either 1 °C or 2 °F.
Control panel
Press the  button until the
  symbol is displayed.
Press the  or
or  button to set the desired temperature.
Press the  button to save the value.
Remote control
Press the  + button to increase the temperature.
Press the  – button to decrease the temperature.
To save the value don‘t press any button for more than 5 seconds.
7.8Setting the mode
Control panel
Press the  button until the
  symbol is displayed.
Press the  or
or  button to set the AUTO, ECO or BOOST mode. To set the MANUAL mode see below.
Press the  button to start the selected mode.
If you like to set the fan speed manually (MANUAL mode):
Press the  button until the
  symbol is displayed.
Press the  or
or  button to set the desired fan speed. At the same time the MANUAL mode is started.
Press the  button to save the value.
18 |
EN |
|

RTX1000/2000, SPX1200 |
Using the parking cooler |
If you want to leave the MANUAL mode:
Press the  button until the
  symbol is displayed.
Press the  button to leave the MANUAL mode.
The BOOST mode is started.
Press the  button
–one more time to set the ECO mode
–two more times to set the AUTO mode
Remote control
Press the  button to set the AUTO mode.
Press the 
 button to set the ECO mode.
Press the  button to set the BOOST mode.
Press the  + button to increase the fan speed manually and to start the MANUAL mode.
Press the  – button to decrease the fan speed manually and to start the MANUAL mode.
To to start the selected mode don‘t press any button for more than 5 seconds.
7.9Setting the timer
The parking cooler is fitted with a timer. Once the set time has elapsed in the timer, the parking cooler automatically switches off.
If the timer is activated, the display alternates between the set temperature and the duration.
Control panel
Press the  button until the
  symbol appears.
Press the  or
or  button to set the required running time of the timer in 10 minute intervals.
Press the  button to save the value.
EN |
19 |
|
|
|
|

Display messages |
RTX1000/2000, SPX1200 |
Remote control
Press the  button to increase the required running time of the timer in 10 minute intervals.
The maximum running time is 120 minutes.
To save the value don‘t press any button for more than 5 seconds.
To reset the timer to 0 minutes, proceed as follows:
Press the  button until the timer shows 120 min.
Press the  button again.
To save the value don‘t press any button for more than 5 seconds.
8Display messages
INOTE
When you start the vehicle or switch on several consumers at once, the display text “LO” may briefly appear.
8.1Control panel warnings
The system control unit has various functions for protecting the device and the battery. If one of these protective functions has been triggered, this is shown by the following codes on the display.
Display |
Description |
Cause |
Remedy |
||
indication |
|||||
|
|
|
|||
|
|
|
|
|
|
LO |
|
The battery monitor has |
Connection voltage is too |
Charge your vehicle |
|
|
|
detected low voltage. |
low. The battery capacity is |
battery. |
|
|
|
|
not sufficient to operate the |
If the fault occurs again, |
|
|
|
|
system. |
contact an authorised |
|
|
|
|
|
workshop. |
|
|
|
|
|
|
|
LO |
°C |
The system has detected |
The ambient temperature is |
Wait until the ambient |
|
|
|
that the ambient |
below 5 °C. |
temperature has risen |
|
|
|
temperature is too low |
|
above 5 °C before |
|
|
|
for operation. |
|
switching on the system. |
|
|
|
|
|
|
|
20 |
EN |
|
RTX1000/2000, SPX1200 |
|
Display messages |
|||
|
|
|
|
|
|
Display |
Description |
Cause |
Remedy |
||
indication |
|||||
|
|
|
|||
|
|
|
|
||
HI |
|
The system has detected |
A brief over-voltage may |
Brief over-voltage: No |
|
|
|
a brief or constant over- |
occur when large electrical |
action required. |
|
|
|
voltage. |
consumers are switched off. |
If the display message |
|
|
|
|
Constant over-voltage is the |
“HI” remains visible for a |
|
|
|
|
result of an incorrect con- |
longer period: Have the |
|
|
|
|
nection voltage. |
vehicle electronics |
|
|
|
|
|
checked. Make sure the |
|
|
|
|
|
connection voltage is less |
|
|
|
|
|
than 30 V. |
|
|
|
|
|
|
|
|
|
The system has detected |
The compressor (driver's |
Once the compressor has |
|
|
|
a too big inclination. |
cab) is tilted too far. |
been returned to its |
|
|
|
The compressor is |
|
normal position, the |
|
|
|
switched off. 10 minutes |
|
system can be switched |
|
|
|
later, the entire system |
|
on again. |
|
|
|
will be switched off. |
|
|
|
|
|
|
|
|
|
|
|
When operating for the |
The system cannot measure |
Consult an authorised |
|
|
|
first time, the symbol |
the battery voltage. |
workshop and have the |
|
|
|
flashes twice briefly |
|
battery connection |
|
|
|
every 5 seconds: |
|
checked. |
|
|
|
The system reports an |
|
|
|
|
|
incorrect connection of |
|
|
|
|
|
the battery sensor cable. |
|
|
|
|
|
|
|
|
|
|
|
The symbol flashes |
The battery voltage is only a |
Recharge your vehicle |
|
|
|
while operating: |
little higher than the set |
battery. |
|
|
|
The system reports that |
shut-down value. |
|
|
|
|
the battery voltage will |
|
|
|
|
|
soon no longer be |
|
|
|
|
|
sufficient to operate the |
|
|
|
|
|
system. |
|
|
|
|
|
|
|
|
|
EN |
21 |
|
|
|
|

Display messages |
RTX1000/2000, SPX1200 |
8.2Control panel fault messages
The “ERROR” symbol (fig. 4 5, page 5) lights up if there is a fault with the parking cooler. The type of error is shown on the display by the following error codes:
Display |
Description |
Cause |
Remedy |
|
text |
||||
|
|
|
||
|
|
|
|
|
F01 |
The compressor does not |
Error in compressor sensor |
Switch off the system. |
|
|
work. |
electrical supply (open |
Switch it on again after |
|
|
|
circuit). |
30 minutes. |
|
|
|
|
If the fault occurs again, |
|
F02 |
|
Error in compressor sensor |
||
|
|
electrical supply (short |
contact an authorised |
|
|
|
workshop. |
||
|
|
circuit). |
||
|
|
|
||
|
|
|
|
|
F03 |
|
Compressor overload |
|
|
|
|
|
|
|
F04 |
The condensor fan 1 does |
No response from the fan. |
|
|
|
not work. |
|
|
|
|
|
|
|
|
F05 |
The condensor fan 1 is |
Faulty fan speed |
|
|
|
overloaded. |
|
|
|
|
|
|
|
|
F06 |
The condensor fan 2 does |
No response from the fan. |
|
|
|
not work. |
|
|
|
|
|
|
|
|
F07 |
The condensor fan 2 is |
Faulty fan speed |
|
|
|
overloaded. |
|
|
|
|
|
|
|
|
F08 |
The evaporator fan does |
No response from the fan. |
|
|
|
not work. |
|
|
|
|
|
|
|
|
F09 |
The evaporator fan is |
Faulty fan speed |
|
|
|
overloaded. |
|
|
|
|
|
|
|
|
F10 |
The condensation water |
The condensation water |
|
|
|
that has formed is not |
that has formed is not being |
|
|
|
being discharged. |
discharged. |
|
|
|
|
|
|
|
F11 |
The system cannot |
Error in temperature sensor |
|
|
|
determine the internal |
electrical supply (open |
|
|
|
temperature. |
circuit). |
|
|
|
|
|
|
|
F12 |
|
Error in temperature sensor |
|
|
|
|
electrical supply (short |
|
|
|
|
circuit). |
|
|
|
|
|
|
22 |
EN |
|
RTX1000/2000, SPX1200 |
|
Display messages |
||
|
|
|
|
|
Display |
Description |
Cause |
Remedy |
|
text |
||||
|
|
|
||
|
|
|
|
|
F13 |
The system cannot |
Error in temperature sensor |
Switch off the system. |
|
|
determine the external |
electrical supply (open |
Switch it on again after |
|
|
temperature. |
circuit). |
30 minutes. |
|
|
|
|
If the fault occurs again, |
|
F14 |
|
Error in temperature sensor |
||
|
|
electrical supply (short |
contact an authorised |
|
|
|
workshop. |
||
|
|
circuit). |
||
|
|
|
||
|
|
|
|
|
F15 |
The system cannot |
Error in temperature sensor |
|
|
|
determine the compressor |
electrical supply (open |
|
|
|
temperature. |
circuit). |
|
|
|
|
|
|
|
F16 |
|
Error in temperature sensor |
|
|
|
|
electrical supply (short |
|
|
|
|
circuit). |
|
|
|
|
|
|
|
F17 |
The compressor |
Compressor thermal |
|
|
|
temperature is too high. |
overload |
|
|
|
|
|
|
|
F18 |
– |
– |
|
|
|
|
|
|
|
F19 |
– |
– |
|
|
|
|
|
|
|
F20 |
The system reports a |
The system‘s current power |
|
|
|
(temporary) electrical |
requirement is too high. |
|
|
|
overload. |
|
|
|
|
|
|
|
|
F21 |
The control PCB is not |
Control PCB |
|
|
|
working. |
communication error |
|
|
|
|
|
|
|
F22 |
The display board is not |
Display board |
|
|
|
working. |
communication error (fault |
|
|
|
|
in the connecting cable |
|
|
|
|
between the display and |
|
|
|
|
control board) |
|
|
|
|
|
|
|
EN |
23 |
|
|
|
|

Cleaning and care |
RTX1000/2000, SPX1200 |
9Cleaning and care
Please observe the following tips for the cleaning and care of your parking cooler.
ANOTICE!
Do not use abrasive cleaning agents or hard objects or inflammable agents during cleaning as these can damage the appliance.
INOTE
The parking cooler may be cleaned with a high-pressure cleaner.
Clean the housing of the parking cooler and the outlet panel occasionally with a damp cloth.
Remove leaves and other dirt from the ventilation grilles of the parking cooler occasionally. Make sure you do not damage the system in the process.
Check regularly that all the elements for the air conditioning unit are fastened.
Check regularly that the connection lines are undamaged and secure.
10 Warranty
The statutory warranty period applies. If the product is defective, please contact the manufacturer's branch in your country (see the back of the instruction manual for the addresses) or your retailer.
For repair and warranty processing, please include the following documents when you send in the device:
•A copy of the receipt with purchasing date
•A reason for the claim or description of the fault
24 |
EN |
|
RTX1000/2000, SPX1200 |
Disposal |
11 Disposal
Place the packaging material in the appropriate recycling waste bins wherever possible.
MIf you wish to finally dispose of the product, ask your local recycling centre or specialist dealer for details about how to do this in accordance with the applicable disposal regulations.
11.1Disposing of remote control batteries
BProtect the environment!
Do not dispose of any batteries with general household waste.
Return defective or used batteries to your retailer or dispose of them at collection points.
12 Technical data
Contains fluorinated greenhouse gases
Hermetically sealed equipment
|
RTX1000 24 V |
|
RTX2000 24 V |
|
|
|
|
Cooling capacity: |
1200 W |
|
2000 W |
|
|
|
|
Voltage: |
24 Vg (20 Vg – 30 Vg) |
||
|
|
|
|
Current consumption: |
5 – 25 A |
|
5 – 29 A |
|
|
|
|
Operating temperature range: |
+5 to +52 °C |
||
|
|
|
|
Refrigerant: |
|
R-134a |
|
|
|
|
|
Refrigerant quantity: |
350 g |
|
850 g |
|
|
|
|
CO2 equivalent: |
0.5005 t |
|
1.21 t |
|
|
|
|
Global warming potential (GWP): |
|
1430 |
|
|
|
|
|
Noise emission: |
|
< 70 dB(A) |
|
|
|
||
Dimensions (L x W x H): |
645 x 860 x 308 mm |
||
|
|
|
|
Weight: |
Approx. 23 kg |
|
Approx. 32 kg |
|
|
|
|
EN |
25 |
|
|
|
|

Technical data |
|
RTX1000/2000, SPX1200 |
|
|
|
|
|
|
RTX1000 12 V |
|
RTX2000 12 V |
|
|
|
|
Cooling capacity: |
1200 W |
|
2000 W |
|
|
|
|
Voltage: |
12 Vg (10 Vg – 15 Vg) |
||
|
|
|
|
Current consumption: |
10 – 50 A |
|
10 – 58 A |
|
|
|
|
Operating temperature range: |
+5 to +52 °C |
||
|
|
||
Refrigerant: |
R-134a |
||
|
|
|
|
Refrigerant quantity: |
350 g |
|
850 g |
|
|
|
|
CO2 equivalent: |
0.5005 t |
|
1.21 t |
|
|
|
|
Global warming potential (GWP): |
|
1430 |
|
|
|
||
Noise emission: |
< 70 dB(A) |
||
|
|
||
Dimensions (L x W x H): |
645 x 860 x 308 mm |
||
|
|
|
|
Weight: |
Approx. 23 kg |
|
Approx. 32 kg |
|
|
|
|
|
|
|
|
|
SPX1200TC |
|
SPX1200IC |
|
|
|
|
Cooling capacity: |
1200 W |
||
|
|
||
Voltage: |
24 Vg (20 Vg – 30 Vg) |
||
|
|
||
Current consumption: |
5 – 25 A |
||
|
|
||
Operating temperature range: |
+5 to +52 °C |
||
|
|
||
Refrigerant: |
R-134a |
||
|
|
|
|
Refrigerant quantity: |
350 g |
|
350 g |
|
|
|
|
CO2 equivalent: |
0.5005 t |
|
0.5005 t |
|
|
|
|
Global warming potential (GWP): |
|
1430 |
|
|
|
||
Noise emission: |
< 70 dB(A) |
||
|
|
|
|
Dimensions (L x W x H): |
778 x 577 x 182 mm |
|
648 x 144 x 278 mm |
|
|
|
|
Weight: |
Approx. 25.5 kg |
|
Approx. 18 kg |
|
|
|
|
26 |
EN |
|

RTX1000/2000, SPX1200
Original-Betriebsanleitung
Bitte lesen Sie diese Anleitung vor der Inbetriebnahme sorgfältig durch und bewahren Sie sie auf. Geben Sie sie im Falle einer Weitergabe des Produktes an den Nutzer weiter.
Inhaltsverzeichnis
1 Erklärung der Symbole . . . . . . . . . . . . . . . . . . . . . . . . . . . . . . . . . . . . . . . . . 28 2 Sicherheit. . . . . . . . . . . . . . . . . . . . . . . . . . . . . . . . . . . . . . . . . . . . . . . . . . . . 28 3 Zielgruppe. . . . . . . . . . . . . . . . . . . . . . . . . . . . . . . . . . . . . . . . . . . . . . . . . . . 30 4 Bestimmungsgemäßer Gebrauch . . . . . . . . . . . . . . . . . . . . . . . . . . . . . . . . 30 5 Technische Beschreibung . . . . . . . . . . . . . . . . . . . . . . . . . . . . . . . . . . . . . . .31 6 Bedienung. . . . . . . . . . . . . . . . . . . . . . . . . . . . . . . . . . . . . . . . . . . . . . . . . . . 32 7 Standklimaanlage benutzen . . . . . . . . . . . . . . . . . . . . . . . . . . . . . . . . . . . . . 35 8 Displaymeldungen . . . . . . . . . . . . . . . . . . . . . . . . . . . . . . . . . . . . . . . . . . . . .41 9 Reinigung und Pflege . . . . . . . . . . . . . . . . . . . . . . . . . . . . . . . . . . . . . . . . . . 45 10 Gewährleistung. . . . . . . . . . . . . . . . . . . . . . . . . . . . . . . . . . . . . . . . . . . . . . . 45 11 Entsorgung . . . . . . . . . . . . . . . . . . . . . . . . . . . . . . . . . . . . . . . . . . . . . . . . . . 46 12 Technische Daten . . . . . . . . . . . . . . . . . . . . . . . . . . . . . . . . . . . . . . . . . . . . . 46
DE |
27 |
|
|
|
|

Erklärung der Symbole |
RTX1000/2000, SPX1200 |
1Erklärung der Symbole
!WARNUNG!
Sicherheitshinweis: Nichtbeachtung kann zu Tod oder schwerer Verletzung führen.
!VORSICHT!
Sicherheitshinweis: Nichtbeachtung kann zu Verletzungen führen.
AACHTUNG!
Nichtbeachtung kann zu Materialschäden führen und die Funktion des Produktes beeinträchtigen.
IHINWEIS
Ergänzende Informationen zur Bedienung des Produktes.
2Sicherheit
Der Hersteller übernimmt in folgenden Fällen keine Haftung für Schäden:
•Beschädigungen am Produkt durch mechanische Einflüsse und falsche Anschlussspannung
•Veränderungen am Produkt ohne ausdrückliche Genehmigung vom Hersteller
•Verwendung für andere als die in der Anleitung beschriebenen Zwecke
2.1Umgang mit dem Produkt
!WARNUNG!
•Benutzen Sie die Standklimaanlage nur für den vom Hersteller angegebenen Verwendungszweck und führen Sie keine Änderungen oder Umbauten am Produkt durch!
•Wenn das Netzkabel beschädigt ist, lassen Sie es durch den Hersteller, seinen Dienstleister oder einer ähnlich qualifizierten Person ersetzen, um Gefahren zu vermeiden.
•Wenn die Standklimaanlage sichtbare Beschädigungen aufweist, darf Sie nicht in Betrieb genommen werden.
28 |
DE |
|
RTX1000/2000, SPX1200 |
Sicherheit |
•Wartung und Reparaturen an der Standklimaanlage dürfen nur von Fachkräften durchgeführt werden, die mit den verbundenen Gefahren bzw. den einschlägigen Vorschriften vertraut sind. Durch unsachgemäße Reparaturen können erhebliche Gefahren entstehen. Wenden Sie sich im Reparaturfall an den Service-Stützpunkt in Ihrem Land (Adressen auf der Rückseite).
•Personen (einschließlich Kinder), die aufgrund ihrer physischen, sensorischen oder geistigen Fähigkeiten oder ihrer Unerfahrenheit oder Unkenntnis nicht in der Lage sind, das Produkt sicher zu benutzen, sollten dieses Produkt nicht ohne Aufsicht oder Anweisung durch eine verantwortliche Person nutzen.
•Elektrogeräte sind kein Kinderspielzeug!
Verwahren und benutzen Sie das Produkt außerhalb der Reichweite von Kindern.
•Kinder sollten beaufsichtigt werden, um sicherzustellen, dass sie nicht mit dem Produkt spielen.
•Achten Sie darauf, dass brennbare Gegenstände nicht im Bereich des Luftaustritts gelagert bzw. montiert sind. Der Abstand muss mindestens 50 cm betragen.
•Im Falle von Feuer lösen Sie nicht die Oberschale der Standklimaanlage, sondern verwenden Sie zugelassene Löschmittel. Verwenden Sie kein Wasser zum Löschen.
•Greifen Sie nicht in Lüftungsgitter oder Lüftungsdüsen, und stecken Sie keine Fremdgegenstände in die Anlage.
!VORSICHT!
•Lösen Sie bei Arbeiten (Reinigung, Wartung usw.) an der Standklimaanlage alle Verbindungen zur Stromversorgung.
AACHTUNG!
•Die Standklimaanlage ist nicht für den Betrieb in Landund Baumaschinen geeignet.
•Fahrzeuge mit Standklimaanlagen dürfen nur in Waschanlagen gereinigt werden, in denen man die obere Bürste manuell abschalten kann.
•Schalten Sie die Standklimaanlage aus, bevor Sie das Fahrerhaus zu Wartungszwecken kippen.
•Schalten Sie die Standklimaanlage aus, bevor Sie automatische Waschvorrichtungen (Waschanlagen etc.) zur Reinigung des Fahrzeugs nutzen.
DE |
29 |
|
|
|
|

Zielgruppe |
RTX1000/2000, SPX1200 |
•Betreiben Sie die Standklimaanlage nicht bei Außentemperaturen unter 0 °C oder über 52 °C.
•Bitte informieren Sie sich bei Ihrem Fahrzeughersteller, ob aufgrund des Aufbaues der Standklimaanlage eine Änderung des Eintrags der Fahrzeughöhe in ihren Fahrzeugpapieren notwendig ist.
2.2Sicherheit beim Betrieb des Produkts
AACHTUNG!
• Stecken Sie keine Fremdgegenstände in die Anlage.
3Zielgruppe
Die hier gegebenen Informationen zur Anlage richten sich an den Benutzer der Standklimaanlage.
4Bestimmungsgemäßer Gebrauch
Die Standklimaanlage dient dazu, den Innenraum eines LKW-Fahrerhauses mit gekühlter und entfeuchteter Luft zu klimatisieren.
Die Anlage ist für den Standbetrieb ausgelegt. Der Einsatz während der Fahrt ist möglich.
Die Standklimaanlage ist nicht für den Betrieb in Landund Baumaschinen geeignet.
Die Standklimaanlage ist geeignet für Umgebungstemperaturen von 5 °C bis 52 °C.
IHINWEIS
Die Standklimaanlage darf nur unter Verwendung von Montagesätzen des Herstellers installiert werden.
30 |
DE |
|
 Loading...