


DN-500BD
User Guide
Guía del usuario
Guide d’utilisation
Guida per l’uso
English ( 3 – 28 )
Español ( 29 – 54 )
Français ( 55 – 80 )
Italiano ( 81 – 106 )
Benutzerhandbuch
Appendix
Deutsch ( 107 – 132 )
English ( 133 –135 )

2
A
A
User Guide (English)
Introduction
Box Contents
Support
DN-500BD
Power Cable
Remote Control
Rack Ears & Screws
User Guide
Safety & Warranty Manual
For the latest information about this product (system
requirements, compatibility information, etc.) and
product registration, visit denonpro.com.
Safety Instructions
Please also see the included Safety & Warranty Manual for more information.
Before turning the
power on:
Proper ventilation:
bout condensation:
Make sure all connections are secure and correct and that there are no
problems with the connection cables.
Power is supplied to some of the circuitry even when the unit is powered off.
When the unit will not be used for long periods of time, disconnect the power
cable from the power outlet.
If the unit is left in a room which is not properly ventilated or is full of smoke
from cigarettes, dust, etc. for long periods of time, the surface of the optical
pickup may get dirty, causing incorrect operation.
If there is a major difference in temperature between the inside of the unit and the
surroundings, condensation may form inside the unit, causing the unit not to
operate properly. If this happens, let the unit sit for an hour or two while powered
off, and wait until there is little difference in temperature before using the unit.
Cautions on using
mobile phones:
Moving the unit:
bout care:
Rackmount warnings:
(required rack specifications
for mounting the unit in a
rack)
Rack installation:
Using a mobile phone near this unit may cause noise. If this occurs, move the
mobile phone away from this unit when it is in use.
Before moving the unit, turn off its power and disconnect the power cable from
the power outlet. Next, disconnect its connection cables from other devices
before moving it.
Wipe the cabinet and control panel clean with a soft cloth.
Follow the instructions when using a chemical cleaner.
Do not use benzene, paint thinner, insecticide, or other organic solvents to
clean the unit. These materials can cause material changes and discoloration.
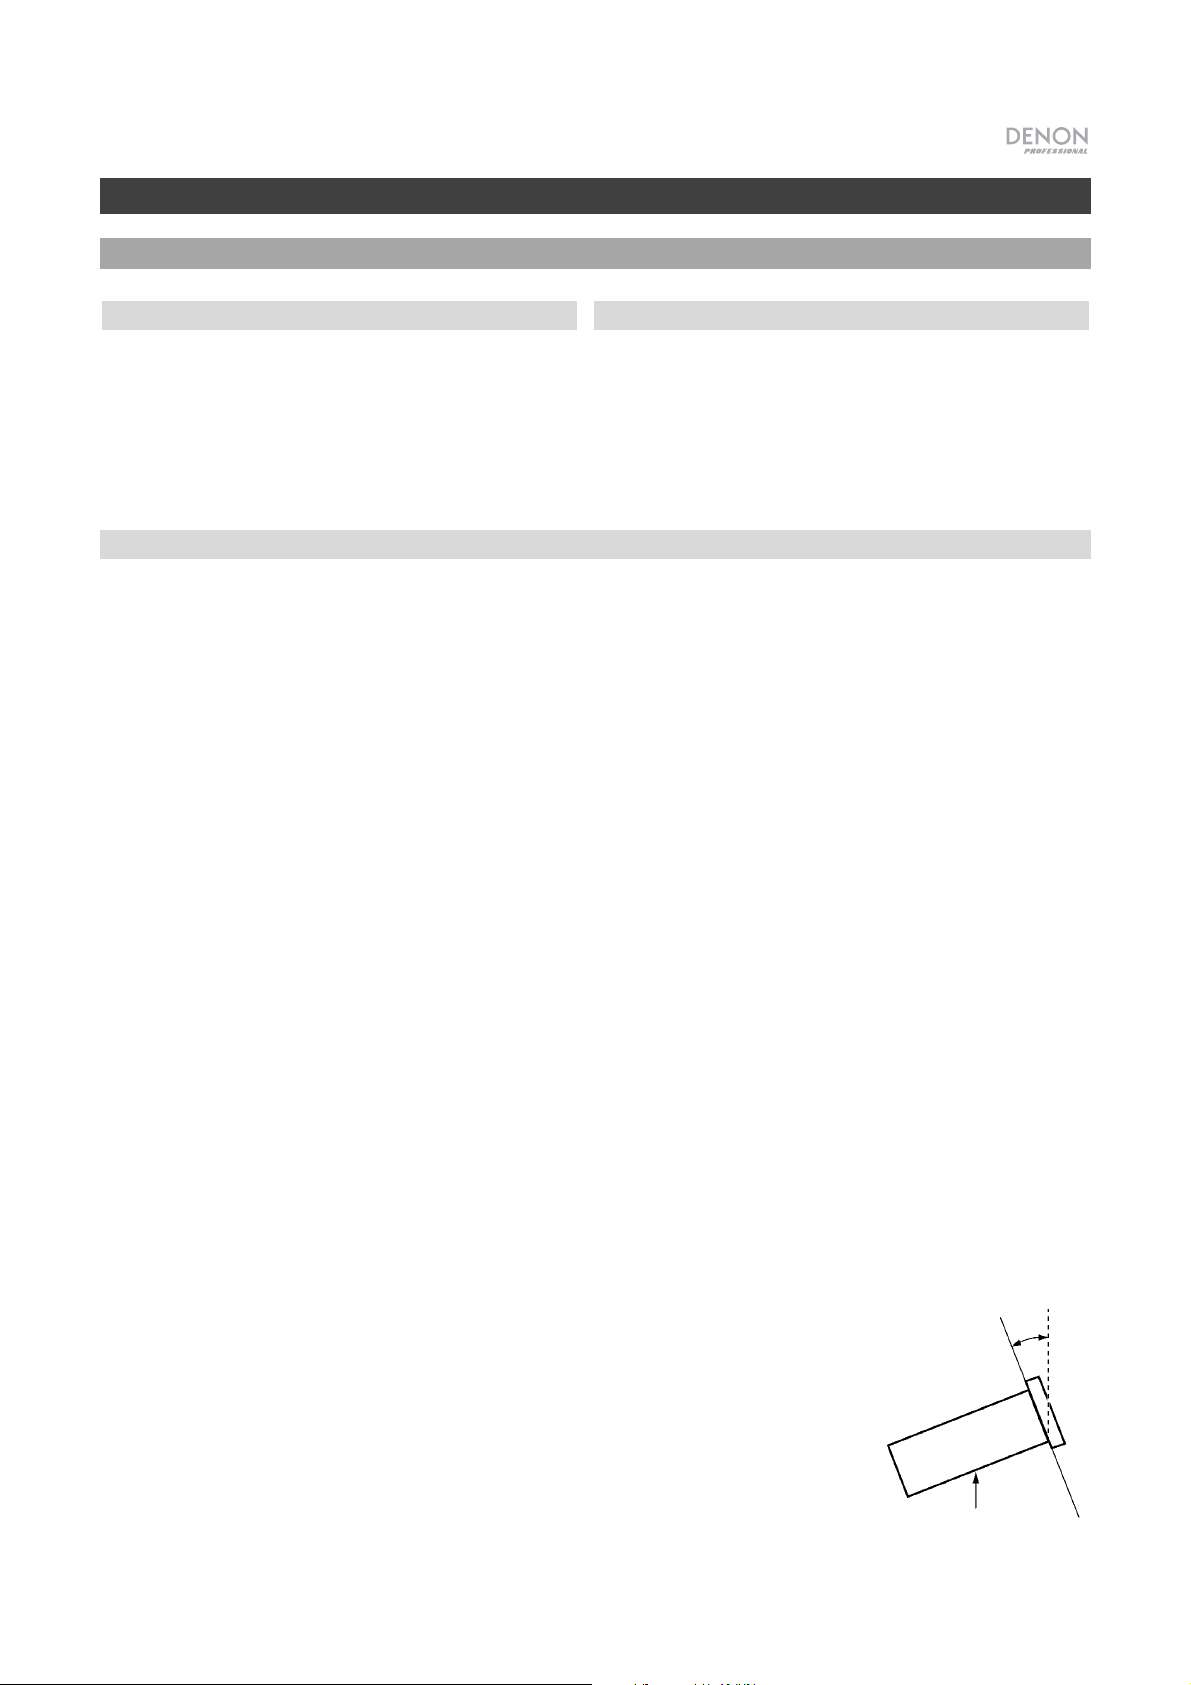
EIA standard 19-inch (483 mm) rack
1U-size installation compatible rack
Maximum 10°
Rack that has a guide rail or shelf board that can
support this device
This product will work normally when the player unit is
mounted within 10° off the vertical plane at the front
panel. If the unit is tilted excessively, the disc may not
load or unload properly. (See image.)
Unit
3
Features
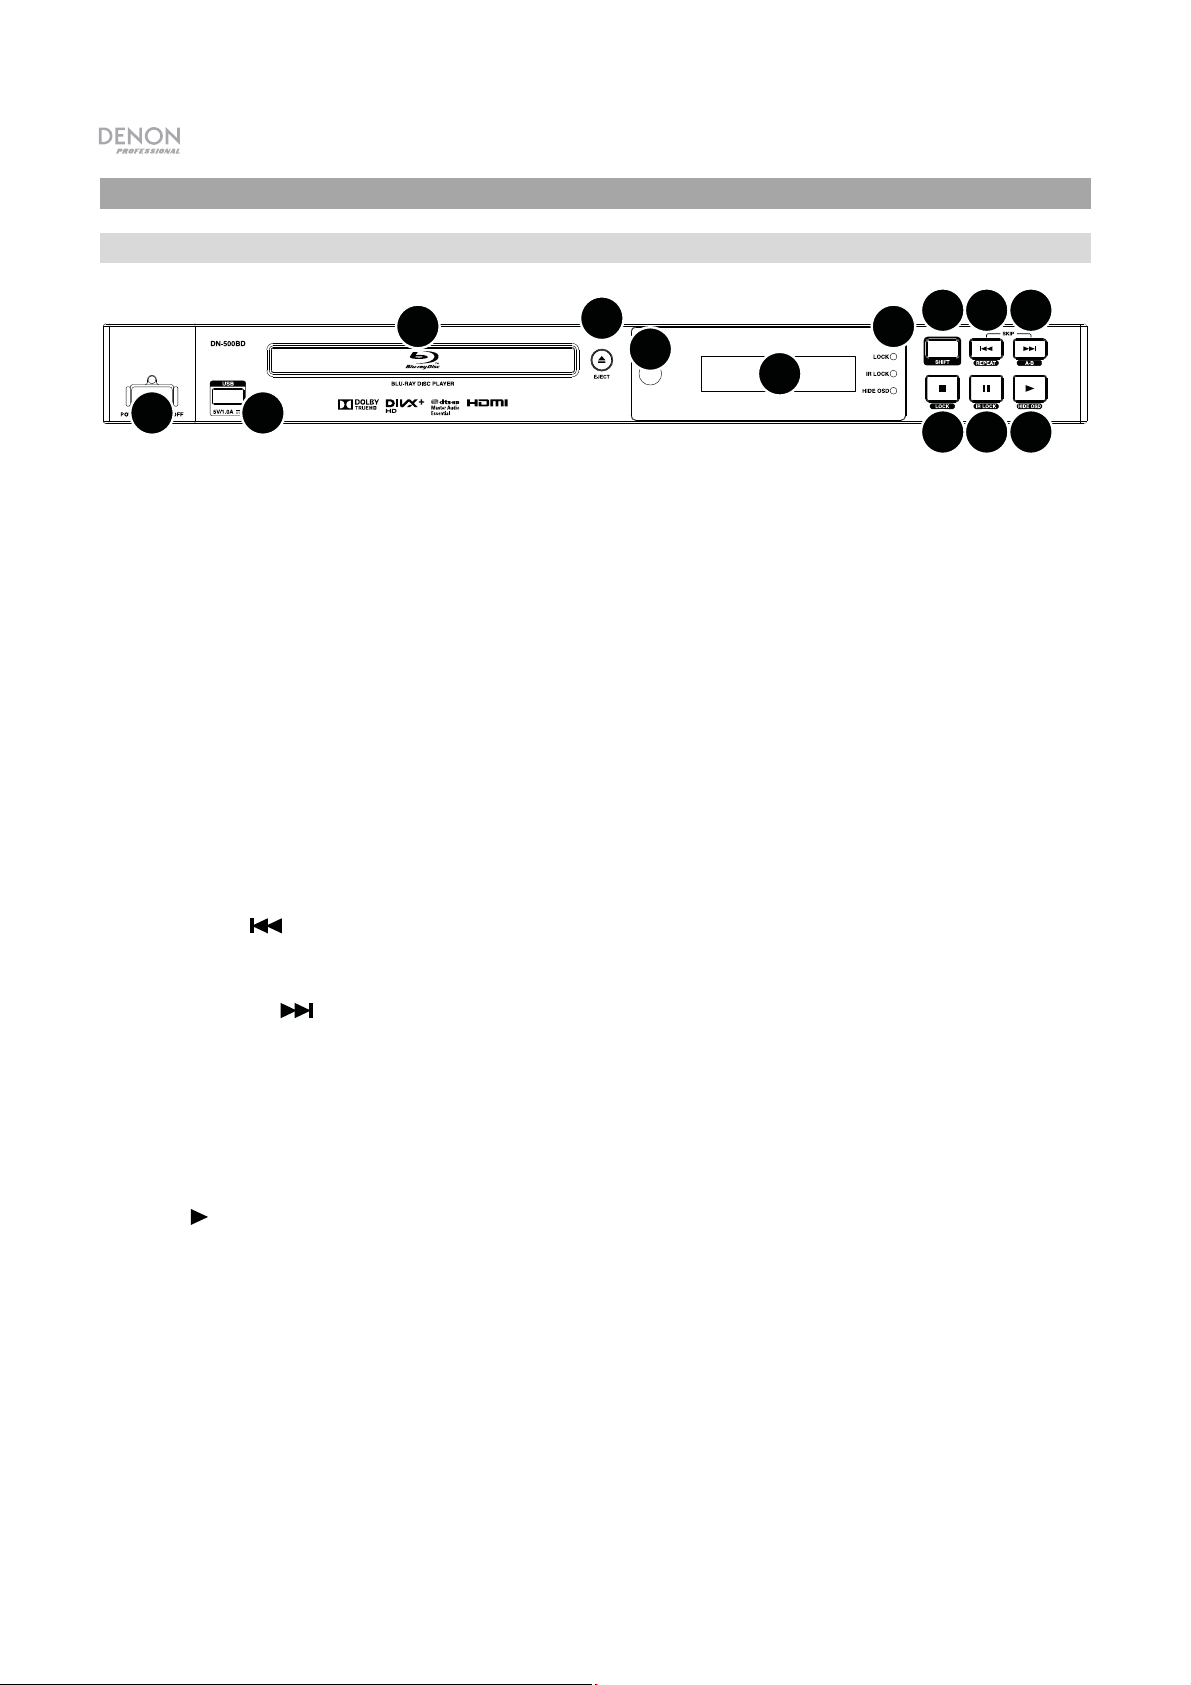
Front Panel
3
4
5
6
7
8
9
10
1
2
11 12 13
1. Power: Press this button to turn DN-500BD on/off. The light above the button will be red when it is off
or green when it is on. Make sure the AC In is properly connected to a power outlet. Do not turn the
unit off during media playback—doing so could damage your media.
2. USB Port: Connect a mass-storage-class USB device to this port. See Operation > Playing Files
(Video, Audio, or Picture) for more information.
3. Disc Tray: Insert a compatible disc into this tray when it is open.
4. Eject: Press this to eject or close the disc tray.
5. Remote Sensor: Point the remote control at this sensor when operating it. See Remote Control for
more information.
6. Display: This screen indicates the unit’s current operation.
7. Mode Indicators: These lights indicated whether or not certain functions are enabled or disabled
(Lock, IR Lock, or Hide OSD). See Other Features for more information.
8. Shift: Press and hold this button to perform the secondary function of any one of the five buttons next
to it (described below).
9. Skip Back (
and press this button to cycle through the Repeat modes. See the Operation chapter for more
information.
): Press this button to skip to the previous chapter, track, or file. Press and hold Shift
10. Skip Forward (
and hold Shift and press this button to loop a section of video or audio during playback. See the
Operation chapter for more information.
11. Stop (
enable/disable the Lock feature. See Other Features for more information.
12. Pause (
enable/disable the IR Lock feature. See Other Features for more information.
13. Play (
enable/disable the Hide OSD feature. See Other Features for more information.
4
): Press this button to stop playback. Press and hold Shift and press this button to
): Press this button to pause playback. Press and hold Shift and press this button to
): Press this button to start or resume playback. Press and hold Shift and press this button to
): Press one of these buttons to skip to the previous or next track or chapter. Press

Rear Panel
11
2
1. Audio Outputs (balanced, XLR): These outputs send the audio signal to your external speakers,
receiver, etc. Use XLR cables to make these connections. See Setup > Connections for more
information.
2. Audio Outputs (unbalanced, RCA): These outputs send the audio signal to your external speakers,
receiver, etc. Use RCA cables to make these connections. See Setup > Connections for more
information.
3. 7.1 Outputs (unbalanced, RCA): These 8 outputs send the audio signal to your 7.1 surround sound
system. Use RCA cables to make these connections. Please refer to the documentation for your sound
system, as well.
4. Coaxial Output: This output sends the digital audio and video signal to your TV. Use a standard
coaxial cable to make this connection.
5. HDMI Output: This output sends an HDMI audio and video signal from an external device. Use a
standard coaxial cable to make this connection.
6. LAN Port: This input lets you connect a host device (usually a computer) to DN-500BD. You can use
the host device to control DN-500BD via commands sent from it. Alternatively, use this connection to
access the internet. Use a standard Ethernet cable to make this connection.
3
7.1
45 6 7 8
9
7. USB Input: This input receives the audio and video signal from a connected USB device. Use a
standard USB cable to make this connection.
8. Remote Input: This input lets you connect a host device (usually a computer) to DN-500BD. You can
use the host device to control DN-500BD via commands sent from it (using RS-232C serial
communication). Use a standard Ethernet cable to make this connection.
9. AC In: Use the included power cable to connect this input to a power outlet. See Setup >
Connections for more information.
5
STWX
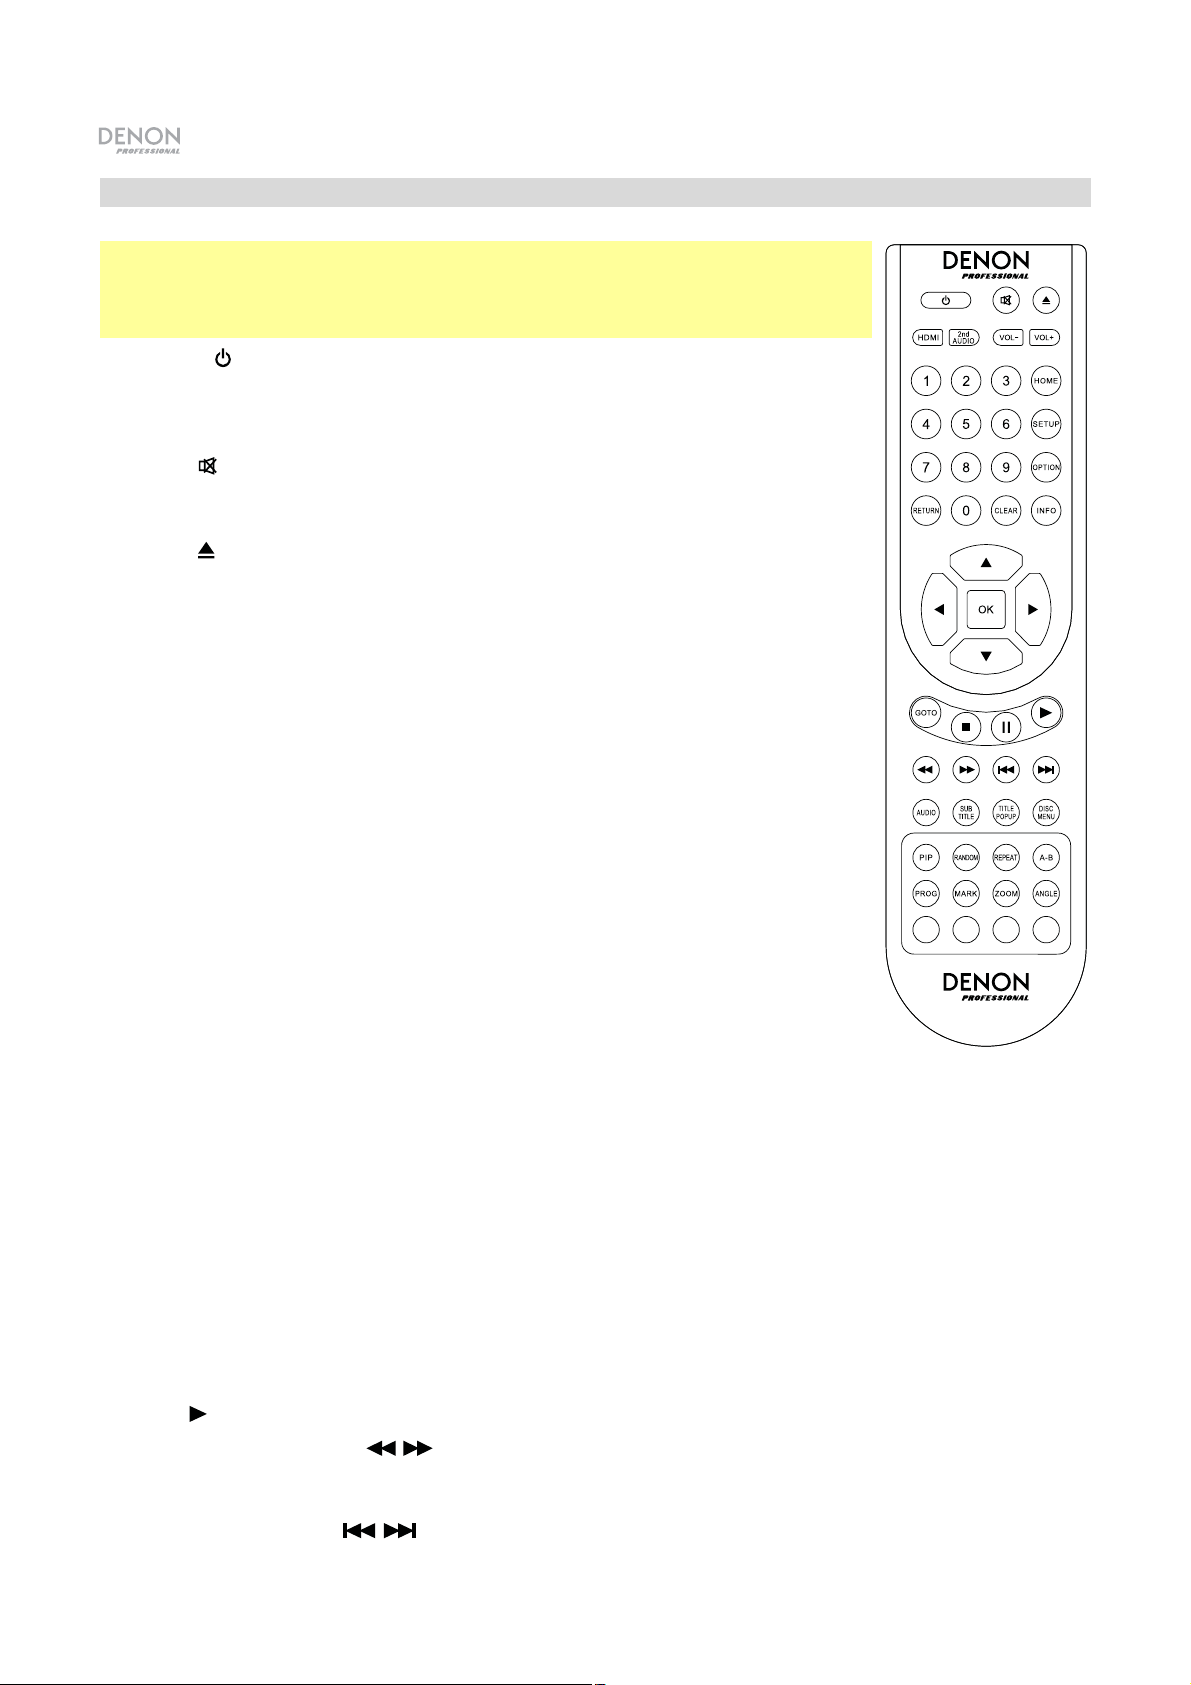
Remote Control
Important: Point the remote control at the remote sensor when operating it. If the
remote sensor is exposed to direct sunlight, strong artificial light (like from an
interverter-type fluorescent lamp), or infrared light, the unit or remote control may
not function properly.
1. Power (
button on DN-500BD will be red when it is off or green when it is on. Make
sure the AC In is properly connected to a power outlet. Do not turn the unit off
during media playback—doing so could damage your media.
2. Mute (
work, set the Output Volume to Variable instead of Fixed (see Adjusting the
Settings > Setting > Audio Setup to learn how to do this).
): Press this button to turn DN-500BD on/off. The light above the
): Press this button to mute DN-500BD’s audio. If this button does not
3. Eject (
): Press this to eject the disc tray.
4. HDMI: Press this button to select the next available picture resolution: Auto
(DN-500BD will detect the optimal resolution automatically), 480i/576i,
480p/576p, 720p, 1080i, or 1080p.
5. 2nd Audio: Press this button to select the language of the audio used with the
Picture-in-Picture feature. This feature is available only on discs that support it.
See Operation > Adjusting the Sound for more information.
6. Volume –/+: Press these buttons to lower or raise the volume (respectively). If
these buttons do not work, set the Output Volume to Variable instead of
Fixed (see Adjusting the Settings > Setting > Audio Setup to learn how to
do this).
7. Number Buttons (0–9): Press these buttons to enter their corresponding
numbers. While playing media and not viewing an additional menu or screen,
entering a number or numbers will select that disc chapter or audio track.
8. Return: Press this button to return to the previous menu/screen.
9. Clear: Press this button to clear (delete everything in) the current field.
10. Home: Press this button to open the Home screen. See Operation > Getting
Started (Home Screen) for more information.
11. Setup: Press this button to open the Setup Menu. See Operation > Adjusting the Settings > Setting
information.
for mor
e
12. Option: Press this button to open the Options Menu. See Operation > Adjusting the Settings >
Options for more information.
13. Info:
14. Cursor Buttons (S
Press this button to open the Information screen.
): Use these buttons to navigate through the files and folders.
15. OK: Press this button to confirm a selection.
16. GoTo: Press this button to manually enter a time you want to skip to. See the Operation chapter for
more information.
17. Stop (
18. Pause (
19. Play (
20. Search Back/Forward (
): Press this button to stop playback.
): Press this button to pause playback.
): Press this button to start or resume playback.
/ ): Press these buttons to rewind/fast-forward, respectively. Each time
you press the same button, the speed will increase. You can do this up to 5 times before it returns to
normal playback speed.
21. Skip Back/Forward (
/ ): Press one of these buttons to skip to the previous or next track or
chapter.
6

22. Audio: Press this button during video playback to show current audio setting in the upper-left corner
of the screen. Each press after that will select the next available setting. The available settings depend
on the supported audio configurations of your video. For example, a video file may let you select
Stereo, Mono, Left, or Right, while a Blu-ray Disc may let you select DTS-HD MA (Master Audio) or
Dolby Digital in various languages.
23. Subtitle: Press this button to show the current subtitle language in the upper-right corner of the
screen. Each press after that will select the next available subtitle language. Select Off to disable the
subtitles.
24. Title Popup: Press this button to view the disc’s title menu without stopping playback.
25. Disc Menu: Press this button to stop playback and return to the disc’s main/top menu.
26. PIP: Press this button to enable/disable the Picture-in-Picture feature.
27. Random: Press this button to cycle through the Random modes. See the Operation chapter for more
information.
28. Repeat: Press this button to cycle through the Repeat modes.
29. A-B: Use this button to loop a section of video or audio during playback.
30. Prog: Press this button to show the Program page, which lets you select tracks that will play in a
specific order. See Operation > Playing Audio Discs > Additional Functions for more information.
31. Mark: Press this button to “mark” a location of a video.
32. Zoom: Press this button to zoom in or out of the picture. Each press will select the next available
zoom distance: 2x, 3x, 4x, 1/2, 1/3, and 1/4. When no zoom distance is shown on the screen, the
picture is at
its normal zoom distance.
33. Angle: Press this button to select a different camera angle. This feature is available only on certain
DVD or Blu-ray Discs.
34. Red, Green, Yellow, Blue: Press these buttons to perform functions that are specific to the disc you
are using. (Your disc may provide information about how to use these buttons.) These functions vary
between discs and may not be supported on all discs.
Battery Usage
To replace the battery:
1. On the back of the remote control, push the small tab inward and remove the battery compartment
door.
2. Remove any old batteries from the compartment and insert 2 new AAA batteries. Make sure each one
is facing the proper direction according to its polarities (+ or –).
3. Push the battery compartment door back into its original position.
Important: Keep the following points in mind when using or replacing batteries:
• Use 2 AAA batteries.
• Do not handle batteries roughly or disassemble them.
• When replacing the batteries, place them with their polarities (+ and –) facing the correct directions.
• Do not leave batteries in a place subject to high temperature or direct sunlight.
• Keep batteries in a place beyond the reach of infants or children. If a battery is swallowed, consult a
physician immediately.
• Discard any leaking battery immediately. Be careful when handling it as the electrolyte can burn your
skin or clothes. If the electrolyte touches your skin or clothes, immediately wash with tap water and
consult a physician.
• Before discarding a battery, insulate it with tape, etc. and dispose of it in a place without fire, by
following the directions or regulations laid down by the local authorities in the area of its disposal.
7
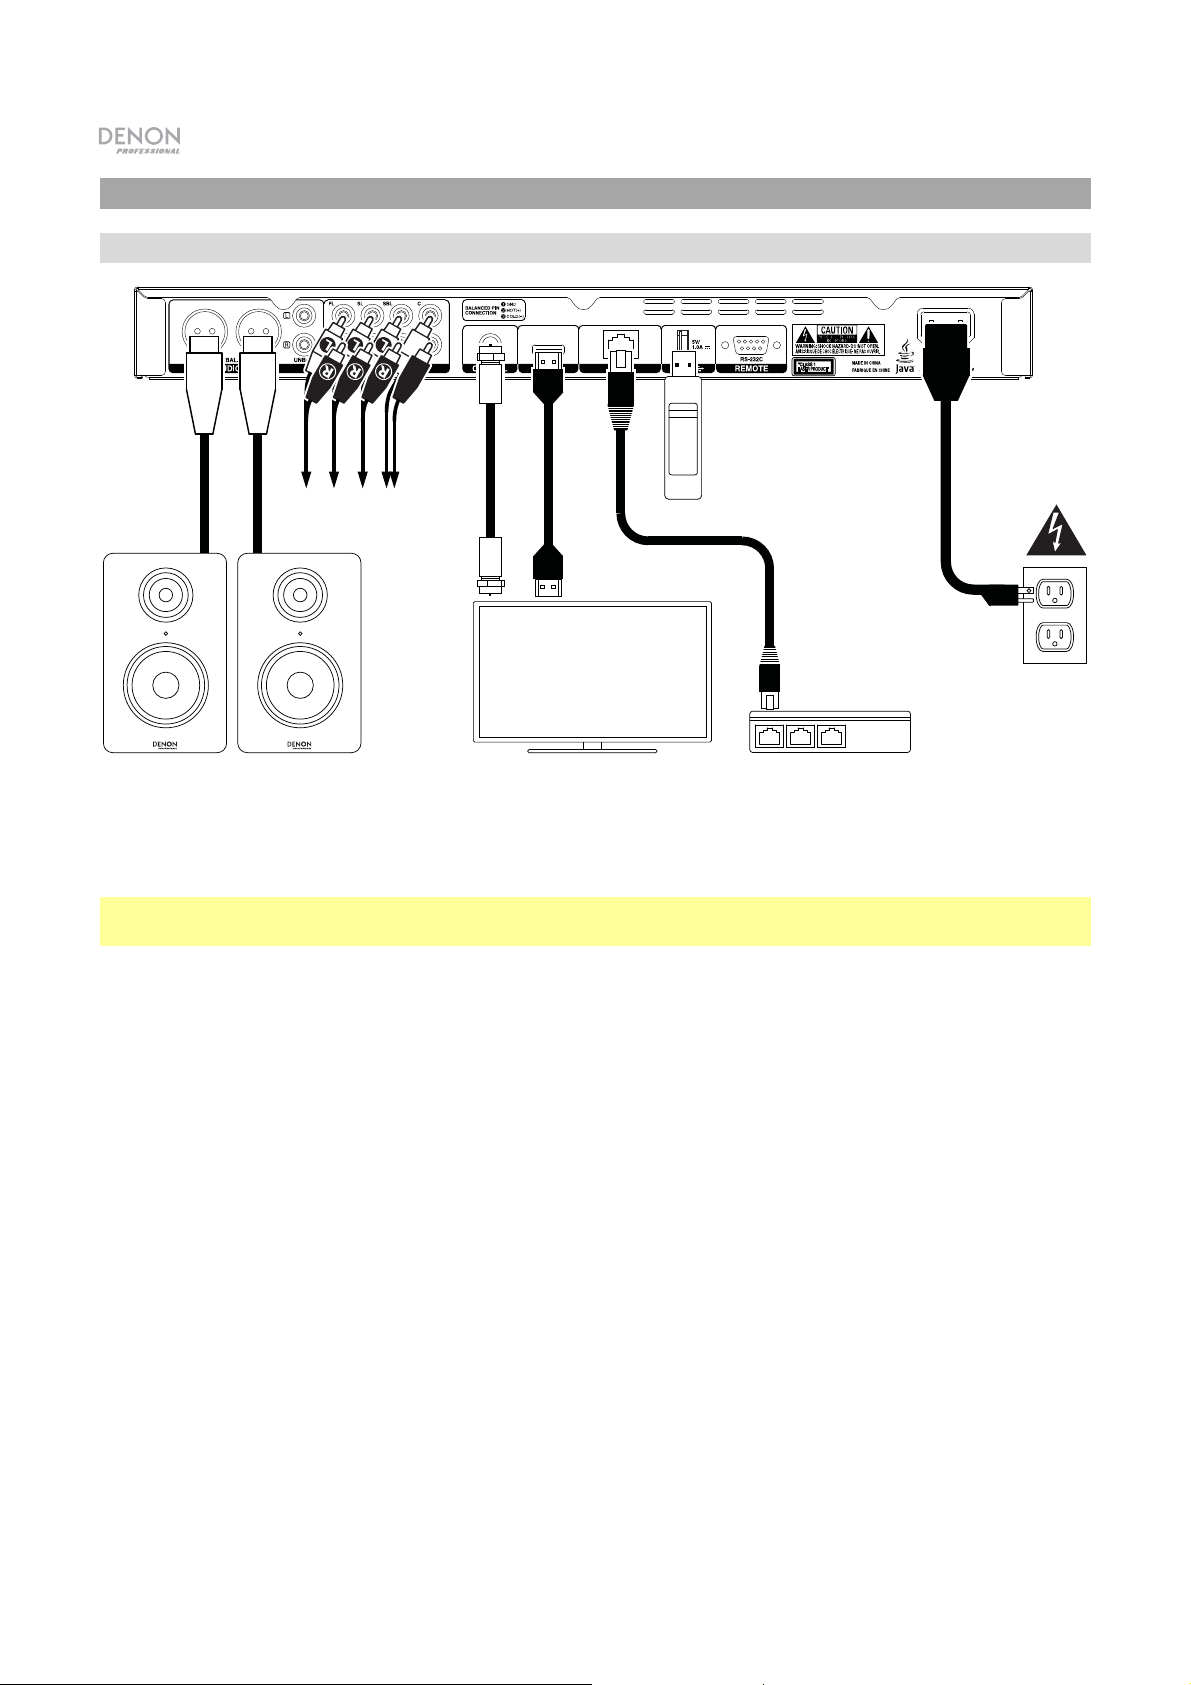
Setup
Connections
USB hard drive
To 7.1
sound system
Power
Powered Monitors,
receiver, amp, etc.
TV or display
Modem
Items not listed in
Introduction > Box Contents are sold separately.
Important: Connect all cables securely and properly (with stereo cables: left with left, right with right). Do
not bundle or wrap them with the power cable.
Not all of these steps may apply to your specific audio/video setup, but you will need to do Steps 1 and 5
at the very least.
1. Connect DN-500BD to your TV monitor or display by doing one of the following:
• Use an HDMI cable to connect the HDMI Output to the HDMI input of your TV monitor or display.
• Use a coaxial HDMI cable to connect the coaxial output to the coaxial input of your TV monitor.
2. Optional: Connect DN-500BD to your sound system by doing either/both of the following:
• Use XLR cables or a stereo RCA cable to connect the audio outputs (balanced or unbalanced) to
the analog inputs of your external receiver, amp, powered speakers, etc.
• Use RCA cables to connect the 7.1 outputs to your 7.1 surround sound system.
3. Optional: Connect a USB hard drive with playable content to the USB port (front panel or rear panel).
4. Optional: Use a 9-pin D-Sub cable to connect the Remote Input to a host device (usually a computer)
that will control it.
5. Optional: Use an Ethernet cable to connect the LAN port to your modem or a host device.
6. After completing all the connections, use the included power cable to connect the AC In to a power outlet.
8
Initial Wizard
1. Press DN-500BD’s Power button to power it on. Make sure your TV is on, too.
2. The Initial Wizard screen will appear. On each page of the Initial Wizard:
• Use the up/down cursor buttons (ST) on the remote control to move through the available options.
• Press OK to confirm your selection and move to the next page.
• Press Skip Back (
) to return to the previous page.
3. On Page 1, press OK on the remote control to move to the next screen.
4. On Page 2, select the language you want the display to use.
5. On Page 3, select the broadcasting standard for your location: NTSC, PAL, or Multi. Select Multi only
if your TV supports both NTSC and PAL systems.
6. On Page 4, select your TV’s resolution. Once you press OK, the resolution will change temporarily. At
that point, select Yes or No to confirm that you want to use that resolution. If you do not do this within
12 seconds, the resolution will return to the previous setting.
7. On Page 5, select your TV’s aspect ratio. Once you press OK, the aspect ratio will change and you
continue to Page 5. If you do not want to use that aspect ratio, press Skip Back (
) to return to the
previous page and select a different one.
8. On Page 6, press OK to view the Home screen and start using DN-500BD, or press Skip Back (
to return to the previous page.
)
9

Operation
If the unit is off, press the Power Button to power it on.
Getting Started (Home Screen)
To select what kind of media you want to play:
1. On the remote control, press Home to open the Home screen.
2. Press the left/right cursor buttons (WX) on the remote control to move through the options.
• Blu-ray Disc: Select this to play a video disc in the standard Blu-ray or DVD format.
• Media Center: Select this to browse the contents of a USB drive (mass storage class) with video,
audio, or picture files.
• Setting: Select this to open the Setting menu for DN-500BD.
3. To confirm your choice, press OK on the remote control.
Playing Video Discs
DN-500BD can play and view the following video disc formats:
Supported Blu-ray Disc formats
Supported DVD formats
See the Basic Functions section to learn some basic operations.
See Additional Functions to learn more advanced ones.
BD25, BD50, BD-ROM, BD-R, BD-RE
DVD, DVD+R, DVD-R, DVD+RW, DVD-RW
Basic Functions
Important: Do not place heavy objects on top of DN-500BD. Doing so can cause issues with disc
playback or damage the unit.
To play a disc:
1. Press Eject (
2. Insert a disc into the disc tray, and press Eject (
it. The display will show LoAd when the disc is loading and then bdnU when the disc is loaded.
3. If DN-500BD has not played the disc before, it will start playing automatically.
If DN-500BD has played the disc before, you can do either of the following:
• Press Return on the remote control to play the disc from the beginning.
• Press OK on the remote control to play the disc from the point where you last stopped it.
To stop playback, press Stop (
To pause playback, press Pause (
Pause (
10
) or Play (
) on DN-500BD or the remote control to open the disc tray.
) on DN-500BD or the remote control again to close
) on DN-500BD or the remote control.
) on DN-500BD or the remote control.
) on DN-500BD or the remote control. To resume playback, press
 Loading...