


DN-300R Mkii
Table of contents
 Loading...
)
)
)
)
)
)
User Guide
Guía del usuario
Guide d’utilisation
Guida per l’uso
Benutzerhandbuch
Appendix
English (3–11
Español (12–20
Français (21–29
Italiano (30–38
Deutsch (39–47
English (49–50

2
k
User Guide (English)
Introduction
Please see this guide’s Setup chapter to learn how to integrate DN-300R MKII with your audio
system, and then refer to the Operation chapter to start using DN-300R MKII.
Box Contents
DN-300R MKII
Power Cable
(4) Rubber Feet
Rack Ears (attached)
User Guide
Safety & Warranty Manual
Support
For the latest information about this product (documentation, technical specifications, system
requirements, compatibility information, etc.) and product registration, visit denonpro.com.
For additional product support, visit denonpro.com/support.
Safety Instructions
Before turning the power
on:
About condensation:
Cautions on using mobile
phones:
Moving the unit:
About care:
Rackmount warnings:
(required rack specifications for
mounting the unit in a rack)
Make sure all connections are secure and correct and that there are
no problems with the connection cables.
Power is supplied to some of the circuitry even when the unit is
powered off. When the unit will not be used for long periods of time,
disconnect the power cable from the power outlet.
If there is a major difference in temperature between the inside of the
unit and the surroundings, condensation may form inside the unit,
causing the unit not to operate properly. If this happens, let the unit
sit for an hour or two while powered off, and wait until there is little
difference in temperature before using the unit.
Using a mobile phone near this unit may cause noise. If this occurs,
move the mobile phone away from this unit when it is in use.
Before moving the unit, turn off its power and disconnect the power
cable from the power outlet. Next, disconnect its connection cables
from other devices before moving it.
Wipe the cabinet and control panel clean with a soft cloth.
Follow the instructions when using a chemical cleaner.
Do not use benzene, paint thinner, insecticide, or other organic
solvents to clean the unit. These materials can cause material
changes and discoloration.
EIA standard 19-inch (48.3cm) rac
1U-size installation compatible rack
Rack that has a guide rail or shelf board that can support this device.
3
Features
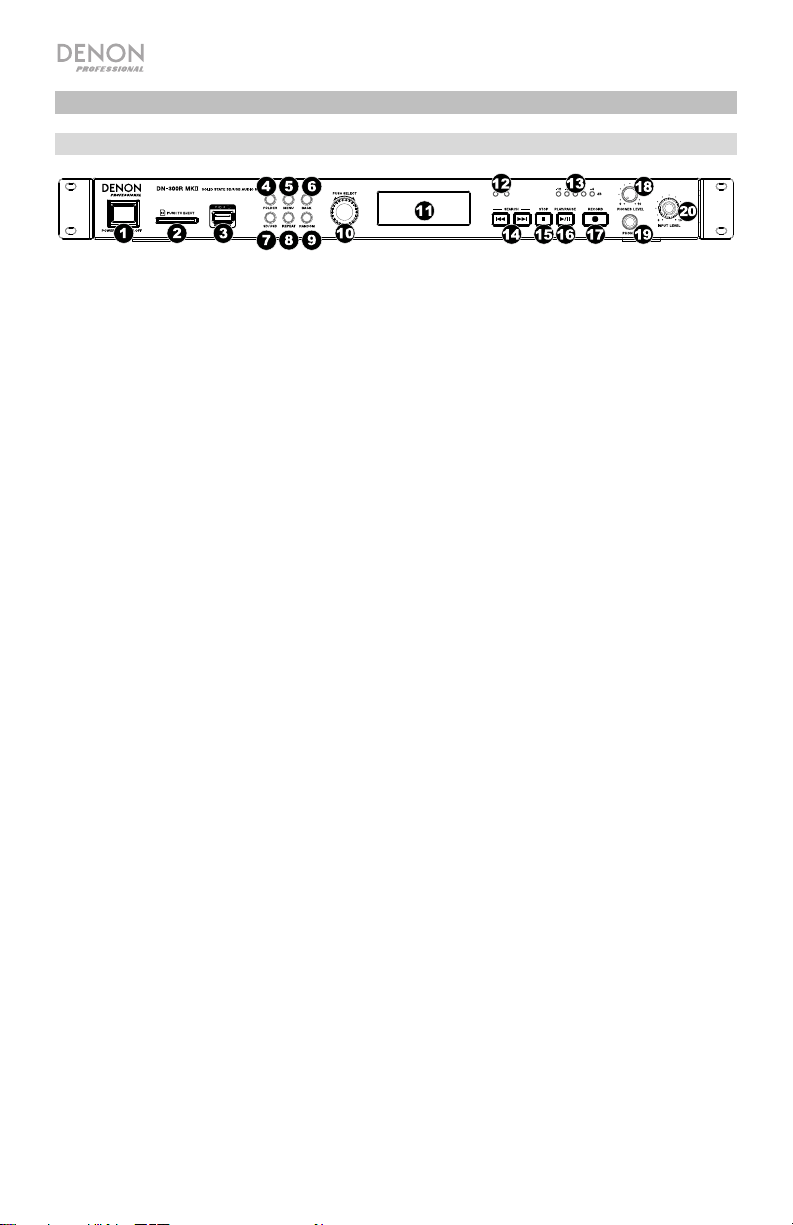
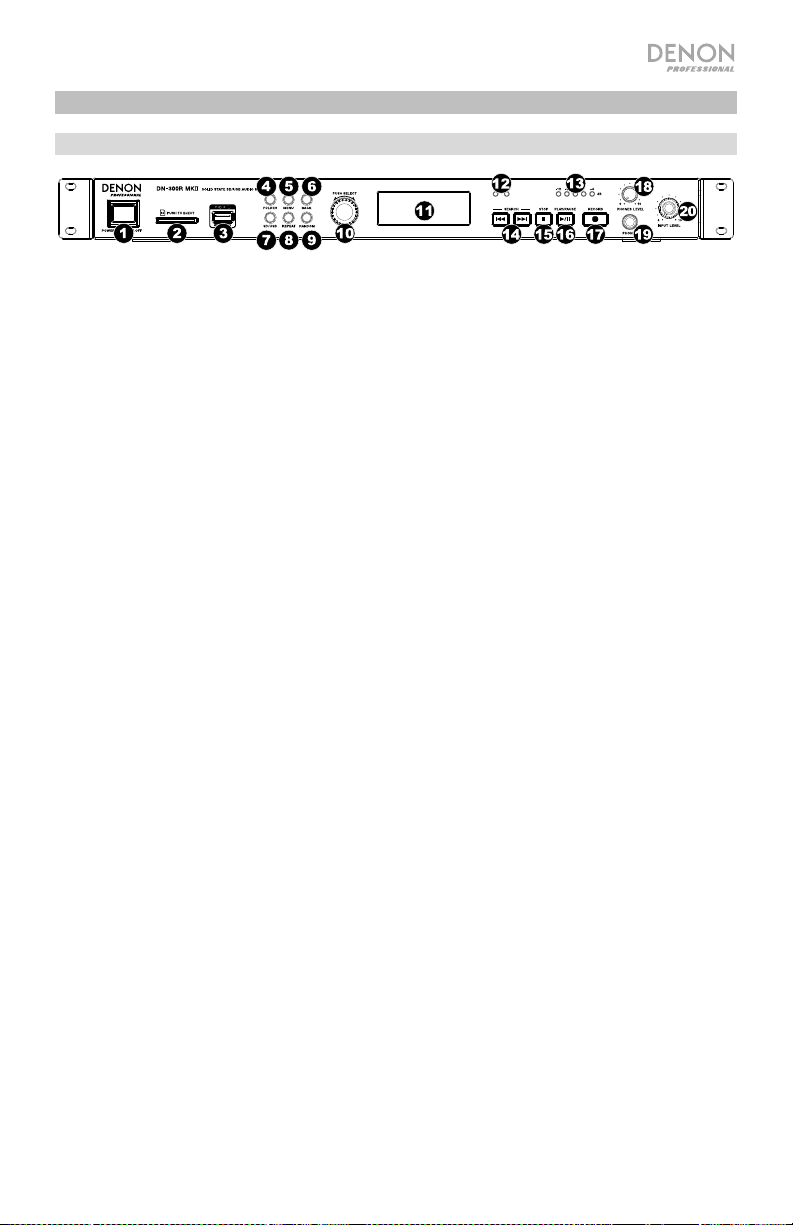
Front Panel
1. Power: Press this switch to turn DN-300R MKII on or off. Make sure the power input is
properly connected to a power outlet. Do not turn the unit off during media recording or
playback—doing so could damage your media.
2. SD Card Slot: Insert an SDHC or SDXC card to this slot.
3. USB Port: Connect a mass-storage-class USB device to this port.
4. Folder: Press this button to view this list of folders on the active device (SD or USB).
5. Menu: Press this button to access the Menu.
6. Back: Press this button to move back a level in the Menu.
7. SD/USB: Press this button to toggle between SD, USB, and SD+USB recording modes.
8. Repeat: Press this button to cycle through the Repeat playback modes. See Operation >
Playback > Playback Modes for more information.
9. Random: Press this button to turn Random playback mode on or off. See Operation >
Playback > Playback Modes for more information.
10. Jog Dial: Turn this dial to select tracks or to edit options shown in the Display. Press this
dial to confirm a selection.
11. Display: This screen indicates the unit’s current operation.
12. SD/USB Indicators: These LEDs will be lit red to indicate an SD Card and/or USB Device
is connected and selected for recording. If another device is connected but not selected
for recording, the respective LED will turn blue when playback or recording is stopped.
13. Input Level Indicators: Indicates the input signal level from the Audio Inputs. If the red
LED consistently lights, it is recommended to lower the input level.
14. Track/Search Buttons: Pr
ess one of these buttons to move to the previous or next track.
Press and hold one of these buttons to rewind/fast-forward.
15. Stop: Press this button to stop recording or playback.
16. Play/Pause: Press this button to start, resume, or pause playback.
17. Record: Press this button to start recording. While recording, the button will be solidly lit;
when Auto Track is turned On, the button will blink.
18. Headphone Level: Adjusts the volume of the headphones.
19. Headphones Jack: Connect headphones to this 1/4” (6.35 mm) TRS jack.
20. Input Level: Adjusts the volume of the Audio Inputs.
4
r
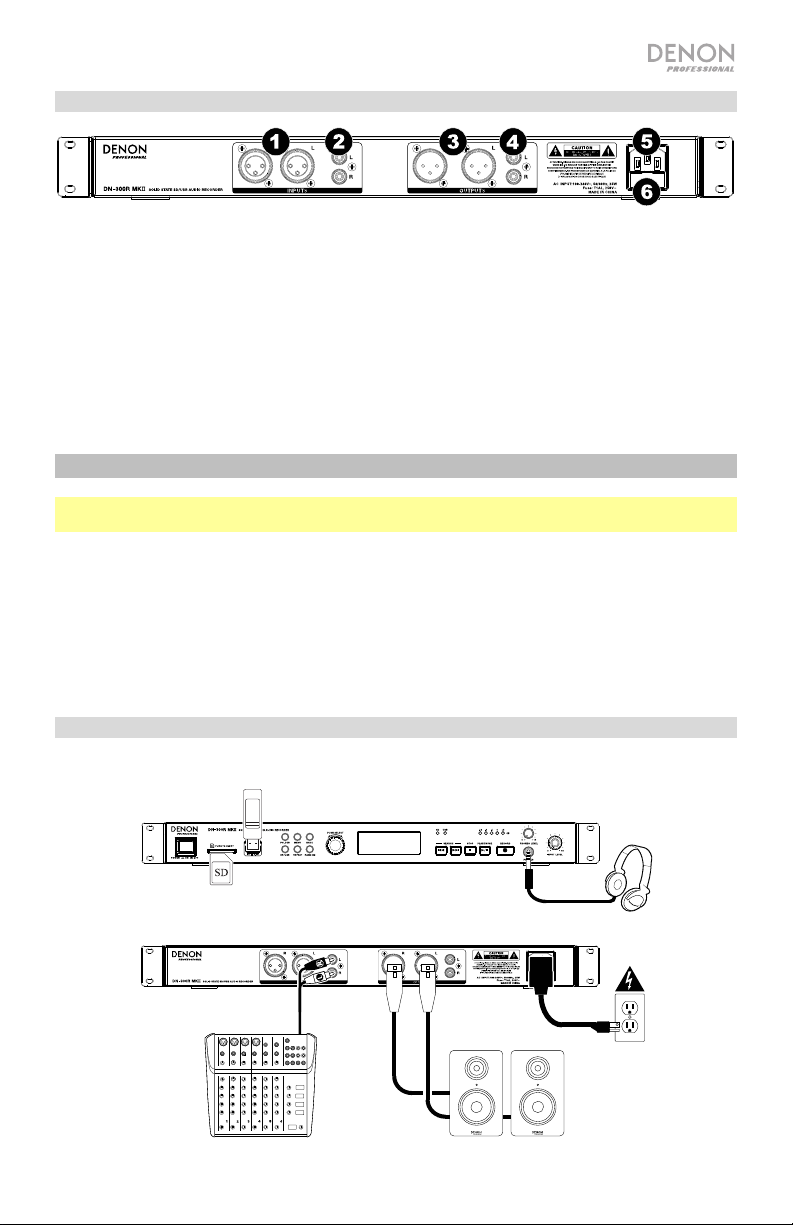
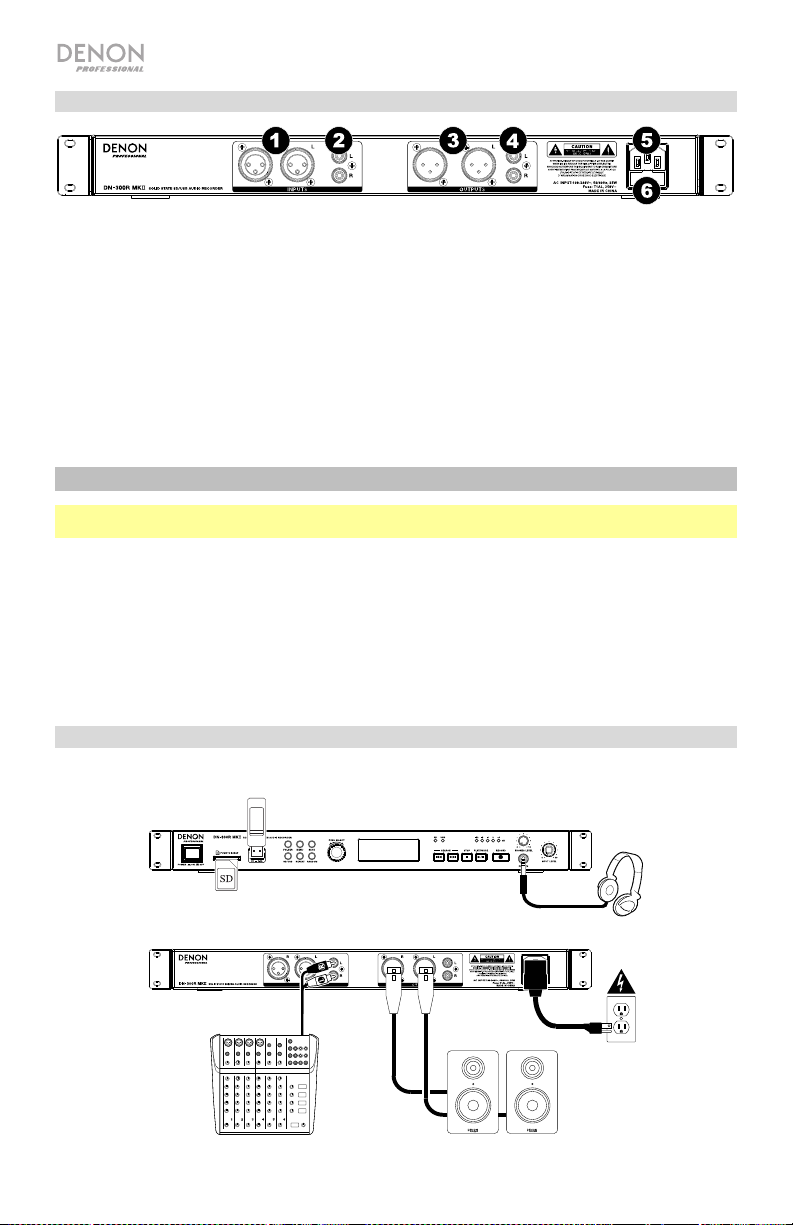
Rear Panel
1. Audio Inputs (balanced XLR): Use XLR cables to connect an external audio source to these
inputs.
2. Audio Inputs (unbalanced RCA): Use RCA cables to connect an external audio source to these
inputs.
3. Audio Outputs (balanced XLR): Use XLR cables to connect these outputs to external speakers,
sound system, etc.
4. Audio Outputs (unbalanced RCA): Use RCA cables to connect these outputs to external
speakers, sound system, etc.
5. Power Input: Use the included power cable to connect this input to a power outlet.
6. Fuse: If the fuse blows, replace it with a fuse of the same type. Using a fuse with an incorrect
rating can damage the unit and/or fuse.
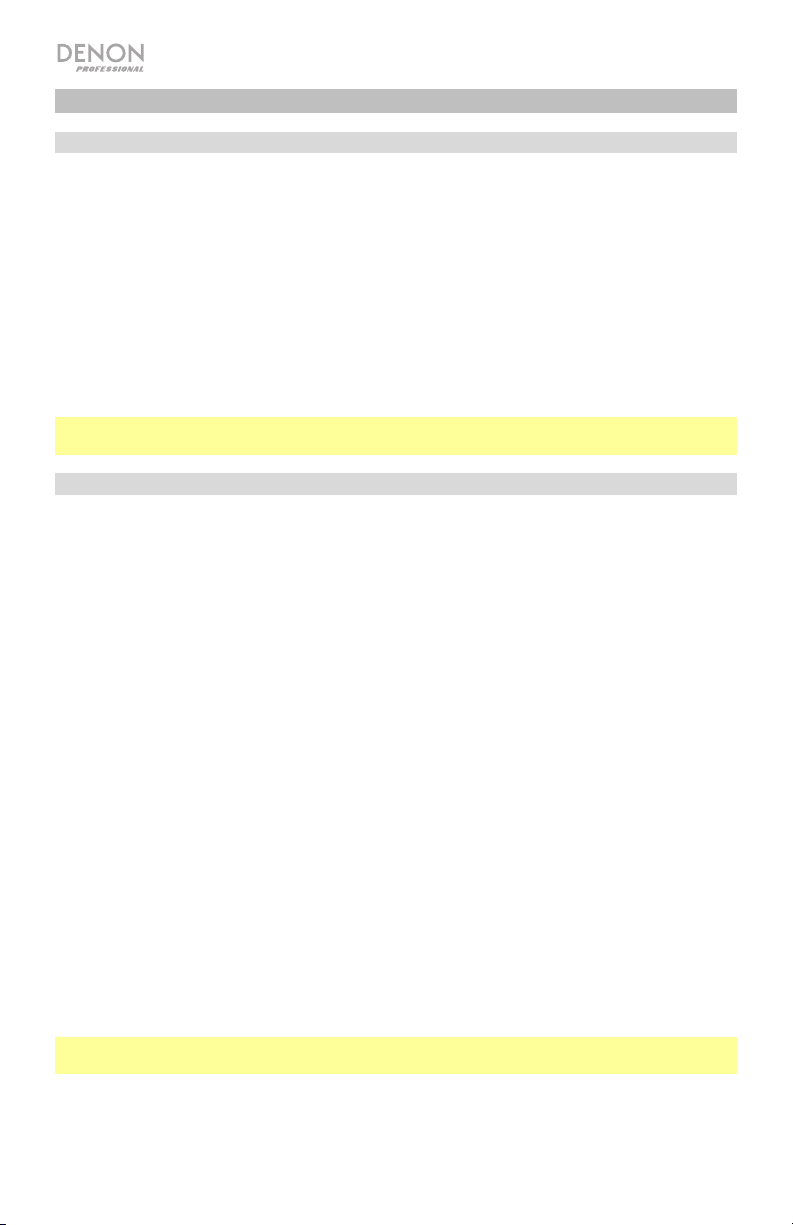
Setup
Important: Connect all cables securely and properly (with stereo cables: left with left, right with
right), and do not bundle them with the power cable.
1. Use XLR or stereo RCA cables to connect the outputs of your audio sources to the Inputs
(balanced or unbalanced) of DN-300R MKII.
2. Use XLR or stereo RCA cables to connect the Outputs (balanced or unbalanced) to the inputs
of your external receiver, amp, powered monitors, etc.
3. After completing all the connections, use the included power cable to connect the Power In to a
power outlet.
4. Power on all of your input sources.
5. Power on DN-300R MKII.
Connection Diagram
Items not listed under Introduction > Box Contents are sold separately.
USB Device
Headphones
SD Card
Power
Mixe
Powered
Monitors
5
Operation
Recording
To record files onto a USB device or SD Card:
1. Do one or both of the following:
• Insert your USB device (mass storage class) into the USB Port.
• Insert your SDHC/SDXC card into the SD Card Slot until you hear it “click.”
2. Connect your external audio source to the Audio Inputs using XLR or RCA cables.
3. If the unit is off, press the Power button to power it on.
4. Select your desired media type by pressing the SD/USB button.
5. Press the Record button to begin recording.
6. When you are finished recording, press the Stop button.
Important: Please see Menu Operation to learn more about the different settings for
Recording.
Playback
To play audio files on a USB device or SD card:
1. Do one of the following:
• Connect your USB device (mass storage class) to the USB Port.
• Insert your SDHC/SDXC card into the SD Card Slot until you hear it “click.”
2. If the unit is off, press the Power button to power it on.
3. Select your desired media type by pressing the SD/USB button.
4. Select an audio file by turning the Jog Dial or by pressing the Track/Search buttons. If
your media contains folders, use the Folder button to display the list of folders.
5. To start playback, press the Play/Pause button on the unit.
When playing audio files, you can perform any of the following operations:
• To start, resume, or pause playback, press the Play/Pause button.
• To stop playback, press the Stop button.
• To rewind or fast-forward through the track, press and hold one of the Track/Search
buttons. To resume playback, release the button.
• To select another folder or audio file, follow the steps described in Step 4 above.
• To remove a USB device, gently remove it from the USB Port when it is not playing or
recording. (Removing a USB device while it is playing or recording can damage it.)
• To remove an SD card, gently press it into the SD Card Slot when it is not playing or
recording. The SD card will spring out, after which you can remove it. (Removing an SD
card while it is playing or recording can damage it.)
Important: Please see Other Information to learn more about the types of USB devices and
SD cards the DN-300R MKII supports.
6
Playback Modes
Press the Repeat button to cycle through the following options:
• Play All: Plays back all files on the device and then stops. This is the default playback mode.
• Play Folder: Plays all files in the currently selected folder, but not any sub-folders, and then
stops. The Play Folder Icon ( ) appears in the display.
• Play One: Plays a single track and then stops. The Play One Icon ( ) appears in the display.
• Repeat All: Repeats all files on the device. The Repeat Icon (
• Repeat Folder: Repeats all files in the currently selected folder, but not any sub-folders. The
Repeat Folder Icon (
• Repeat One: Repeats a single file. The Repeat One Icon ( ) appears in the display.
Press the Random button to cycle through the following options:
• On: Shuffles all files on the device or in the selected folder, but not any sub-folders, for random
playback. The Random Icon (R) appears in the display.
• Off: Files are played consecutively in the order of their track number. This is the default playback
mode.
Note: You can combine Random playback and Play All, Play Folder, Repeat All, or Repeat Folder
modes.
) appears in the display.
) appears in the display.
Menu Operation
1. Record
1. Auto Lvl: Turns Auto Level On or Off. When Auto Level is On, the recording level for the Inputs
is automatically kept around -3 dB (±3 dB).
2. Rec Mode: Sets how and what kind of files are recorded from the following options:
• Mono: Records a single mono file to your selected device(s).
• Stereo (default): Records a single stereo file to your selected device(s).
• Dual Mono: When recording to SD or USB, records two mono audio files to the device at
the same time. The second file will record at -10 dB to help protect your recording against
accidental peaks in the audio source. When recording to both SD and USB, records two
mono audio files to each device (creating a total of four files between both devices). The
second file on each device will record at -10 dB.
• Dual Stereo: When recording to SD or USB, records two stereo files to the device at the
same time. The second file will record at -10 dB. When recording to both SD and USB,
records two stereo files to each device (creating a total of four files between both devices).
The second file on each device will record at -10 dB.
Note: Dual Mono and Dual Stereo are only available with 44.1K/16bit WAV recording.
If you select one of the Dual recording options, DN-300R MKII will prompt you to test the SD
card and/or USB drive to ensure it is compatible with Dual recording functions. Turn the Jog Dial
to select Yes, and press it to confirm. DN-300R MKII will test the SD card and/or USB drive and
display whether the test has passed or failed. Class 10 or greater SDHC/SDXC cards are
required when using Dual recording.
7

3. Pre Rec: Turns Pre-Record On or Off. When Pre-Record is On, a 2 second buffer of audio
is kept in memory. When the record button is pressed, this buffer is used at the beginning
of the recording.
Note: Pre-Record cannot be used with 48K/24bit WAV recording.
4. Auto Track: Turns Auto Track On or Off. When Auto Track is Off, new tracks must be
created manually (by starting and stopping recording). When Auto Track is On, the Record
button will flash, and recording will start and stop based on the options below. Press the
Jog Dial to choose the options below, then select its value.
• Level: Starts and stops recording when the input level passes a certain threshold. Set
to -24, -30, -36, or -42 dB.
• Time: Stops recording after a period of time has elapsed. Set to 1 min, 5 min (default),
10 min, 15 min, 30 min, 1 hr, 2 hr, 8 hr, 12 hr, or 24 hr. You can also press Stop to
end the recording at any time.
Note: If using the 8 hr, 12 hr, or 24 hr options, make sure to set the Format to MP3.
WAV files will be too large and stop recording before the set time.
2. Browse
1. SD: Select this option to view the contents of an SD card.
2. USB: Select this option to view the contents of a USB drive.
3. System
1. Format: Select this option to set the recording format. Choose WAV (44.1K/16bit or
48K/24bit) or MP3 (192Kbps or 256Kbps).
2. Info: Select this option to view the following information:
• Format: Displays the current recording format.
• Rec Mode: Displays the current recording mode.
• Media Size: Displays the total size of the connected device.
• Free Size: Displays the remaining free space on the connected device.
• Time Left: Displays the remaining recording time on the connected device.
• Tracks: Displays the number of tracks on the connected device.
• Folders: Displays the number of folders on the connected device.
4. Utility
1. Time/Date: Displays the current date and time. Turn the Jog Dial to switch between the
date and time, and press it to edit the current setting. Use the Back button to return to the
main menu when you have finished editing.
2. FW Version: Shows the current firmware version.
3. Format: Select this option to format your connected SD or USB device. Doing so will
erase the contents of the device, and cannot be undone.
4. Default: Select this option to revert DN-300R MKII to its factory default settings. This
cannot be undone.
8

Other Information
USB Devices / SD Cards
When playing audio files on a USB device or SD card, note the following:
• DN-300R MKII does not charge any connected USB device and does not support USB
hubs, USB extension cables, or SD card readers.
• DN-300R MKII supports USB devices that are mass storage class or compatible with MTP.
• DN-300R MKII supports USB devices and SDHC/SDXC cards with a capacity of:
o USB: 256 MB – 2 TB
o SDHC card: 4 GB – 32 GB
o SDXC card: 64 GB – 128 GB
Note: Class 4 or greater SDHC/SDXC cards are recommended, and Class 10 or greater is
required for Dual recording.
• DN-300R MKII supports FAT16 or FAT32 file systems only.
• You can have up to 99 folders, and up to 2 folder levels, including the root directory.
• You can have up to 999 audio files. If the USB device or SD card contains more than 1000
files, some audio files may not play or appear correctly.
• File names, folder names, and text characters can use up to 255 characters. Only
uppercase letters, lowercase letters, numbers, and symbols can be displayed. Japanese
file names will not be shown.
• Copyright-protected files might not play properly and/or may appear as Unknown File.
• DN-300R MKII supports the following tag data:
MP3 WAV
o ID3 tags: Version 1.x – 2.4 o ID3 tags: Version 1.x – 2.4
o Sample rate: 44.1 kHz o Sample rate: 44.1, 48 kHz
o Bit rate: 64–320 kbps o Bit depth: 16 bit/24 bit
o Format: MPEG1 Audio Layer 3 o Format: Waveform Audio File Format
o File extension: .mp3 o File extension: .wav
9
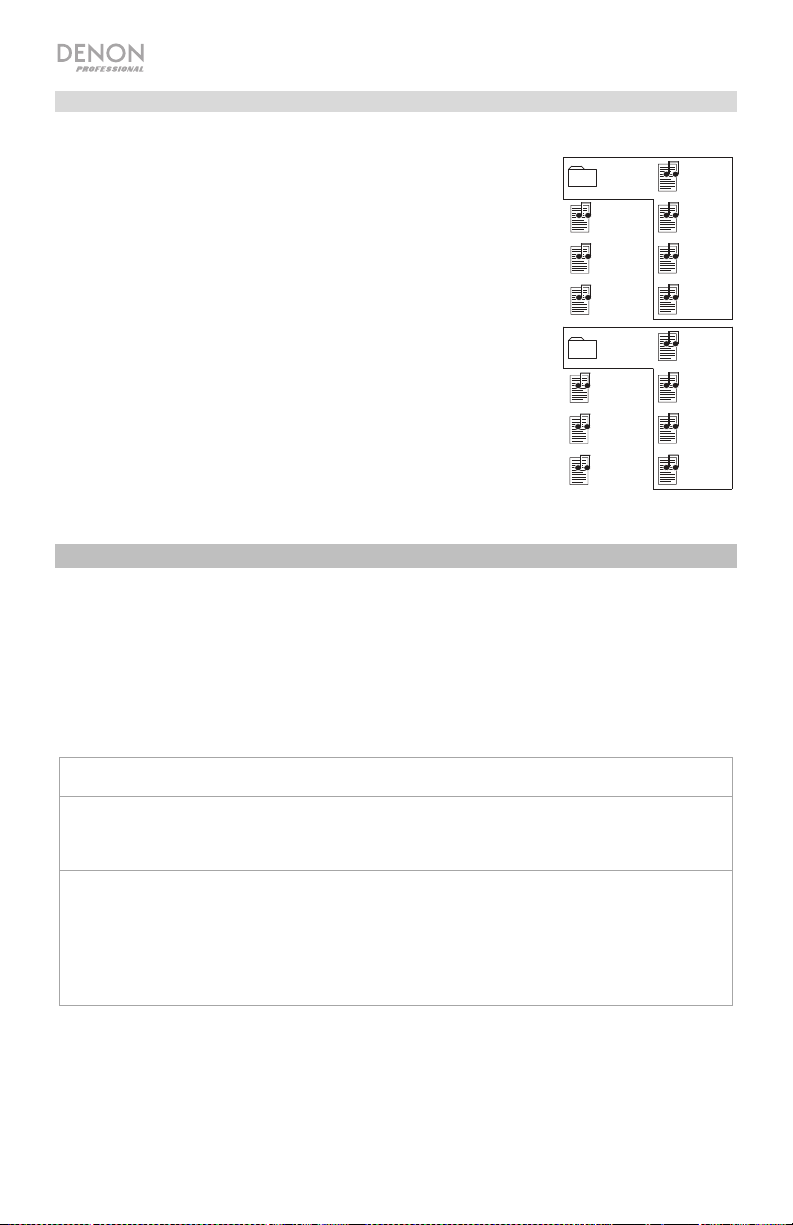
Audio File Playback Order
When playing audio files stored within multiple folders, the playback
order of each folder is automatically set when the unit reads the
media. The files in each folder will play in the same order in which
they were added to the media. (This order may appear differently on
your computer and/or in your software than it does on the unit.)
The image here illustrates how folders are structured into levels on
your media.
The folder structure also determines the playback order: For audio
files on a USB device or SD card, files in the root level will play,
then files in the first folder of the first level, then files in the second
folder of the second level, and so on.
Level 1 (root) Level 2
Folder 1
File 1
File 2
File 3
Folder 2
File 4
File 5
File 6
File 7
File 8
File 9
File 10
File 11
File 12
File 13
File 14
Troubleshooting
If you encounter a problem, try doing these things first:
• Make sure all cables and other connected devices are properly and securely connected.
• Make sure you are using DN-300R MKII as described in this user guide.
• Make sure your other devices or media are working properly.
• If you believe DN-300R MKII is not working properly, check the following table for your
problem and solution.
Problem: Solution: Please see:
Power does not turn
on.
DN-300R MKII does
not produce any
sound, or the sound
is distorted.
10
Make sure DN-300R MKII’s power input is
properly connected to a power outlet using the
included power cable.
Make sure all cable and device connections
are secure and correct.
Make sure none of the cables are damaged.
Make sure the settings on your device,
loudspeaker, mixer, etc. are correct.
Setup
Setup
Problem: Solution: Please see:
No Device appears
even when a USB
device or SD card is
inserted.
Files on a USB
device or SD card do
not appear.
Files on a USB
device or SD card
cannot play.
Disconnect and reconnect the USB device or
SD card to make sure it is securely inserted.
Make sure the USB device is of a mass
storage class or compatible with MTP.
Make sure the USB device or SD card is
formatted using a FAT16 or FAT32 file system.
Do not use a USB hub, USB extension cable,
or SD card reader.
The unit does not supply power to USB
devices. If your USB device requires a power
source, connect it to one.
Not all USB devices or SD cards are
guaranteed to work; some may not be
recognized.
Make sure the files are of a supported file
format. Files that are not supported by this unit
will not appear.
Make sure the USB device or SD card uses a
folder structure that the unit supports: up to 99
folders (up to 2 folder levels, including the root)
and up to 999 files.
If your USB device or SD card is partitioned,
make sure the files are in the first partition. The
unit will not show other partitions.
Make sure the files are of a supported file
format. Files that are not supported by this unit
will not appear.
Make sure the files are not copyrightprotected. The unit cannot play copyrightprotected files.
Other Information
> USB Devices /
SD Cards
Other Information
> USB Devices /
SD Cards
Other Information
> USB Devices /
SD Cards
Files on an SD card
are not recorded
properly (noise,
clicks, or incorrect
speed).
File names do not
appear properly.
Make sure the card is Class 4 or greater, or
Class 10 or greater if you are using Dual
recording.
Make sure the files are using only supported
characters. Characters that are not supported
will be replaced with a “.”
Other Information
> USB Devices /
SD Cards
Other Information
> USB Devices /
SD Cards
11

Guía del usuario (Español)
Introducción
Consulte el capítulo Ajustes de esta guía para aprender a integrar el DN-300R MKII con su sistema
de audio y luego consulte el capítulo Operación para comenzar a utilizar el DN-300R MKII.
Contenido de la caja
DN-300R MKII
Cable de corriente
(4) Patas de goma
Orejetas para rack (sujetas a la unidad)
Guía del usuario
Manual sobre la seguridad y garantía
Instrucciones de seguridad
Para más información, consulte también el Manual de seguridad y garantía incluido.
Antes de encender la unidad:
Acerca de la condensación:
Precauciones sobre el uso de
teléfonos móviles:
Cómo mover la unidad:
Cómo cuidar la unidad:
Advertencias para el montaje
en rack:
(especificaciones para rack requeridas
para montar la unidad en un rack)
Soporte
Para obtener la información más reciente acerca de este
producto (documentación, especificaciones técnicas,
requisitos de sistema, información de compatibilidad,
etc.) y registrarlo, visite denonpro.com.
Para obtener soporte adicional del producto, visite
denonpro.com/support.
Asegúrese de que todas las conexiones estén aseguradas y
correctas y que no haya problemas con los cables de conexión.
Algunos circuitos permanecen alimentados aun cuando la
unidad está apagada. Cuando la unidad no se utilizará durante
largos períodos de tiempo, desconecte el cable de corriente de
la toma de corriente.
Si existe una gran diferencia de temperatura entre el interior de
la unidad y los alrededores, puede acumularse condensación en
el interior, haciendo que la unidad no funcione correctamente. Si
esto ocurriera, deje la unidad apagada durante una o dos horas
y espere hasta que haya una menor diferencia de temperatura
antes de utilizar la unidad.
Utilizar un teléfono móvil cerca de esta unidad puede ocasionar
ruido. Si esto ocurriera, aleje el teléfono móvil de la unidad
cuando lo esté utilizando.
Antes de mover la unidad, apáguela y desconecte el cable de
corriente de la toma de corriente. A continuación, desconecte
sus cables de conexión con otros dispositivos antes de moverlo.
Limpie el gabinete y el panel de control con un paño suave.
Siga las instrucciones cuando utilice un limpiador químico.
No utilice benceno, diluyente de pintura, insecticidas u otros
solventes orgánicos para limpiar la unidad. Estas sustancias
pueden causar cambios y decoloración en los materiales.
Rack EIA estándar de 19 pulg. (48,3 cm)
Rack compatible con instalación de tamaño 1U
Rack que posee un riel guía o estante capaz de acomodar este
dispositivo
12
Características
Panel frontal
1. Interruptor de encendido: Pulse este interruptor para encender o apagar la unidad. Asegúrese
de que la entrada AC In esté conectada firmemente a la toma de corriente. No apague la unidad
mientras esté reproduciendo medios—esto podría dañarlos.
2. Ranura para tarjeta SD: Inserte una tarjeta SDHC/SDXC en esta ranura.
3. Puerto USB: Conecte un dispositivo USB de almacenamiento masivo a este puerto.
4. Folder: Pulse este botón para visualizar la lista de carpetas en el dispositivo activo (SD o USB).
5. Menu: Pulse este botón para acceder al menú.
6. Back: Pulse este botón para volver al nivel anterior del menú.
7. SD/USB: Pulse este botón para alternar entre los modos SD, USB y SD+USB.
8. Repeat: Pulse este botón para alternar entre los modos de repetición de reproducción. Para
obtener más información, consulte Operación > Reproducción > Modos de reproducción.
9. Random: Pulse este interruptor para encender o apagar el modo de reproducción aleatoria.
Para obtener más información, consulte Operación > Reproducción > Modos de
reproducción.
10. Tecla giratoria: Gire este cuadrante para seleccionar las pistas o para editar las opciones que
se muestran en la pantalla. Pulse esta tecla giratoria para confirmar una selección.
11. Pantalla: Esta pantalla indica el funcionamiento actual de la unidad.
12. Indicadores SD/USB: Estos LED se iluminarán de color rojo para indicar cuando se conecta y
selecciona para grabación una tarjeta SD y/o dispositivo USB. Si hay otro dispositivo conectado
que no está seleccionado para grabación, su LED respectivo se iluminará de color azul cuando
se detenga la reproducción o grabación.
13. Indicadores del nivel de entrada: Indica el nivel de la señal de entrada proveniente de las
entradas de audio. Si el LED rojo se enciende constantemente, se recomienda disminuir el nivel
de entrada.
14. Botones Track/Search: Pulse uno de estos botones para pasar a la pista anterior o siguiente.
Mantenga pulsado uno de estos botones para rebobinar/avanzar rápidamente.
15. Stop: Pulse este botón para detener la reproducción o grabación.
16. Play/Pause (Reproducción/Pausa): Pulse este botón para iniciar, reanudar o poner en pausa la
reproducción.
17. Record: Pulse este botón para comenzar la grabación. Durante la grabación, este botón se
encenderá permanentemente; cuando la opción de pista automática esté activada, el botón
parpadeará.
18. Nivel de auriculares: Ajusta el volumen de los auriculares.
19. Zócalo para auriculares: Conecte auriculares a este conector TRS de 6,35 mm (1/4 pulg.).
20. Input Level: Ajusta el volumen de las entradas de audio.
13
Panel trasero
1. Entradas de audio (XLR balanceadas): Utilice cables XLR para conectar una fuente de audio externa
a estas entradas.
2. Entradas de audio (RCA no balanceadas): Utilice cables RCA para conectar una fuente de audio
externa a estas entradas.
3. Salidas de audio (XLR balanceadas): Utilice cables XLR para conectar a estas salidas a altavoces
externos, un sistema de sonido, etc.
4. Salidas de audio (RCA desbalanceadas): Utilice cables RCA para conectar a estas salidas a
altavoces externos, un sistema de sonido, etc.
5. Entrada AC In (corriente alterna): Utilice el cable de corriente incluido para conectar esta entrada a
una toma de corriente.
6. Fusible: Si el fusible de la unidad está roto, reemplazarla con una el fusible con especificación
apropiada. Si utiliza un fusible de especificación incorrecta, puede dañarse la unidad y/o el fusible.
Ajustes
Importante: Conecte todos los cables firme y correctamente (los cables estéreo: izquierdo con izquierdo,
derecho con derecho) y no los agrupe junto con el cable de corriente.
1. Utilice cables XLR o RCA estéreo para conectar las salidas de sus fuentes de audio a las entradas (no
balanceadas o balanceadas) del DN-300R MKII.
2. Utilice cables XLR o RCA estéreo para conectar las salidas (balanceadas o no balanceadas) a las
entradas de su receptor externo, amplificador, monitores alimentados, etc.
3. Una vez completadas todas las conexiones, utilice el cable de corriente incluido para conectar la
entrada AC Input a una toma de corriente.
4. Encienda todas sus fuentes de entrada.
5. Encienda el DN-300R MKII.
Diagrama de conexión
Los elementos que no se enumeran en Introducción > Contenido de la caja se venden por separado.
Unidad USB
Auriculares
14
Mezclador
Tarjeta SD
Corriente
Monitores
alimentados
Operación
Grabación
Para grabar archivos a un dispositivo USB o tarjeta SD:
1. Realice uno de los siguientes procedimientos:
• Inserte su dispositivo USB (de clase de almacenamiento masivo) en el puerto USB.
• Inserte su tarjeta SDHC/SDXC en la ranura para tarjeta SD hasta que escuche un "clic".
2. Conecte su fuente de audio externa a las entradas de audio mediante cables XLR o RCA
cables.
3. Si la unidad está apagada, pulse el botón Power para encenderla.
4. Seleccione el tipo de medio deseado pulsando el botón SD/USB.
5. Pulse el botón Record nuevamente para comenzar la grabación.
6. Cuando termine de grabar, pulse el botón Stop.
Importante: Consulte Operación del menú para aprender más sobre los diferentes ajustes para la
grabación.
Reproducción
Para reproducir archivos de audio desde un dispositivo USB o tarjeta SD:
1. Seleccione una de los siguientes procedimientos:
• Conecte su dispositivo USB (de clase de almacenamiento masivo) en el puerto USB.
• Inserte su tarjeta SDHC/SDXC en la ranura para tarjeta SD hasta que escuche un "clic".
2. Si la unidad está apagada, pulse el botón Power para encenderla.
3. Seleccione el tipo de medio deseado pulsando el botón SD/USB.
4. Seleccione un archivo de audio girando la tecla giratoria o pulsando los botones
Track/Search. Si su medio contiene carpetas, utilice el botón Folder para mostrar la lista de
carpetas.
5. Para comenzar la reproducción, pulse el botón Play/Pause en la unidad o control remoto.
Al reproducir archivos de audio, puede llevar a cabo cualquiera de las siguientes operaciones:
• Para comenzar, reanudar o realizar una pausa en la reproducción, pulse el botón
Play/Pause.
• Para detener la reproducción, pulse el botón Stop.
• Para rebobinar o avanzar rápidamente por la pista, mantenga pulsado alguno de los botones
Track/Search. Para reanudar la reproducción, suelte el botón.
• Para seleccionar otra carpeta o archivo de audio, siga los pasos descritos en el Paso 4
anterior.
• Para extraer un dispositivo USB, extráigalo suavemente del puerto USB cuando no se esté
reproduciendo o grabando. (Extraer un dispositivo USB mientras se está reproduciendo o
grabando podría dañarlo).
• Para extraer una tarjeta SD, presiónela suavemente contra la ranura para tarjetas SD cuando
no se esté reproduciendo o grabando. La tarjeta SD saltará hacia fuera, luego de lo cual podrá
extraerla. (Extraer una tarjeta SD mientras se está reproduciendo o grabando podría dañarla).
Importante: Consulte Otra información para aprender más sobre los tipos de CD, dispositivos
USB, y tarjetas SD soportadas por el DN-300R MKII.
15

Modos de reproducción
Pulse el botón Repeat para recorrer las siguientes opciones:
• Play All (Reproducir todo): Reproduce todos los archivos presentes en el dispositivo y luego se
detiene. Éste es el modo de reproducción predeterminado.
• Play Folder (Reproducir carpeta): Reproduce todos los archivos presentes en la carpeta
actualmente seleccionada, sin incluir las sub-carpetas, y luego se detiene. El icono de
Reproducir carpeta ( ) aparecerá en la pantalla.
• Play One (Reproducir uno): Reproduce una única pista y luego se detiene. El icono de
Reproducir uno ( ) aparecerá en la pantalla.
• Repeat All (Repetir todo): Repite todos los archivos presentes en el dispositivo. El icono de
Repetir todo ( ) aparecerá en la pantalla.
• Repeat Folder (Repetir carpeta): Repite todos los archivos presentes en la carpeta
actualmente seleccionada, sin incluir las sub-carpetas. El icono de Repetir carpeta (
aparecerá en la pantalla.
• Repeat One (Repetir uno): Repite un único archivo. El icono de Repetir uno ( ) aparecerá en la
pantalla.
Pulse el botón Random para recorrer las siguientes opciones:
• On (Encendido): Mezcla todos los archivos presentes en el dispositivo, o en la carpeta
seleccionada, sin incluir las sub-carpetas, para la reproducción aleatoria. El icono de modo de
reproducción aleatoria (R) aparecerá en la pantalla.
• Off (Apagado): Los archivos se reproducen de forma consecutiva según el orden de su número
de pista. Éste es el modo de reproducción predeterminado.
Nota: Puede combinar el modo de reproducción aleatoria y los modos Reproducir todo,
Reproducir carpeta, Repetir todo, o Repetir carpeta.
Operación del menú
1. Record
1. Auto Lvl: Activa y desactiva la característica de nivel automático. Cuando el nivel automático
está activado, el nivel de grabación de las entradas se mantiene automáticamente alrededor de
los -3 dB (±3 dB).
2. Rec Mode: Ajusta cómo y qué tipo de archivos se graban seleccionando entre las siguientes
opciones:
• Mono: Se graba un único archivo mono en su(s) dispositivo(s) seleccionado(s).
• Stereo (Estéreo) (predeterminado): Se graba un único archivo estéreo en su(s) dispositivo(s)
seleccionado(s).
• Dual Mono (Mono doble): Al grabar a un medio de almacenamiento SD o USB, se graban
dos archivos de audio mono en el dispositivo simultáneamente. El segundo archivo se
grabará a -10 dB para ayudar a proteger la grabación contra los picos accidentales en la
fuente de audio. Al grabar a medios de almacenamiento SD y USB, se grabará dos archivos
de audio mono en cada dispositivo (por tanto, se producirá cuatros archivos entre ambos
dispositivos). El segundo archivo en cada dispositivo se grabará a -10 dB.
)
16
Loading...