


 Loading...
User Guide
Guía del usuario
Guide d’utilisation
Guida per l’uso
Benutzerhandbuch
Appendix
English ( 3 – 16 )
Español ( 17 – 30 )
Français ( 31 – 44 )
Italiano ( 45 – 58 )
Deutsch ( 59 – 72 )
English ( 73 – 74 )

2

User Guide (English)
Introduction
Thank you for purchasing the SC5000 Prime. At Denon DJ, we know how serious music is to you. That’s why we design our equipment with only one thing in mind—to make your performance the best it can be.
Features:
•7-inch HD display with multi-touch gestures
•24-bit/96kHz digital audio outputs
•Dual-layer playback with individual audio outputs
•Play uncompressed audio formats (FLAC, ALAC, WAV)
•8 multifunction triggers for Cues, Loops, Slices and Rolls
•8-inch rugged metal jog wheel with HD jog display
•Customizable RGB color around the jog wheel
•(3) USB and (1) SD input for music playback
•LAN output to link to up to four players
•Includes Engine Prime music management software
Box Contents
SC5000 Prime
(2) RCA Audio Cables (stereo pairs)
USB Cable
USB Extension Cable
Networking Cable
Power Cable
Cleaning Cloth
Software Download Card
User Guide
Safety & Warranty Manual
Important: Visit denondj.com and find the webpage for SC5000 Prime to download the Engine Prime software.
Support
For the latest information about this product (documentation, technical specifications, system requirements, compatibility information, etc.) and product registration, visit denondj.com.
For additional product support, visit denondj.com/support.
3
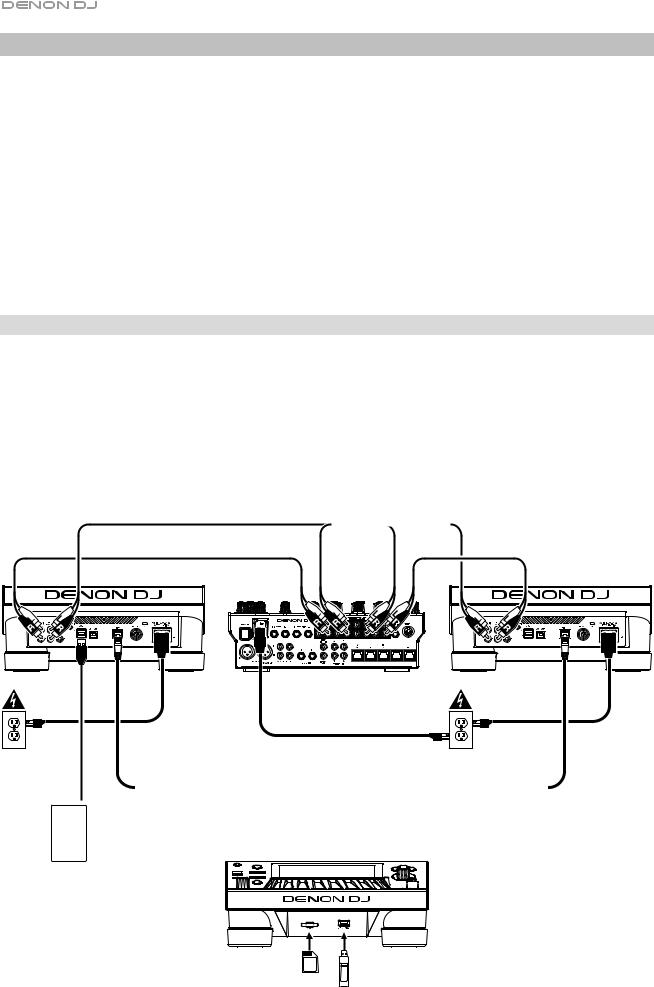
Setup
1.Make sure all of your devices are powered off or all of their volume levels are at their minimum positions.
2.Connect SC5000 Prime’s audio outputs (Layer A/B or Digital Outputs A/B) to the inputs of your mixer.
3.Connect SC5000 Prime’s Link ports according to one of the following connection diagram examples.
4.Connect any output devices (turntables, headphones, power amplifiers, loudspeakers, etc.) to the outputs of your mixer.
5.Connect all of your devices to power sources.
When starting a session, power on (1) SC5000 Prime and other input sources, (2) your mixer, and then (3) output devices.
When ending a session, power off (1) output devices, (2) your mixer, and then (3) SC5000 Prime and other input sources.
Connection Diagrams
Items shown but not listed under Introduction > Box Contents are sold separately.
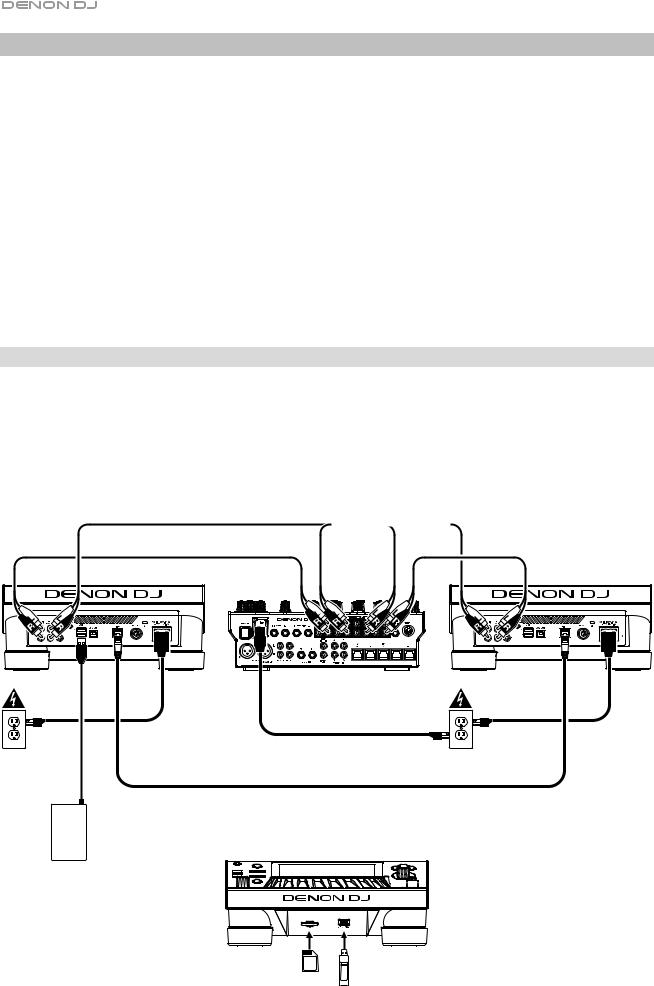
Example 1
This example shows 2 SC5000 Prime units with their Link ports connected to each other directly.
SC5000 Prime
(rear panel)
SC5000 Prime
(rear panel)
X1800 Prime mixer |
(rear panel) |
Power outlet |
Power outlet |
|
|
|
|
|
|
|
|
|
|
USB drive
SC5000 Prime
(front panel)
SD card |
USB drive |
4

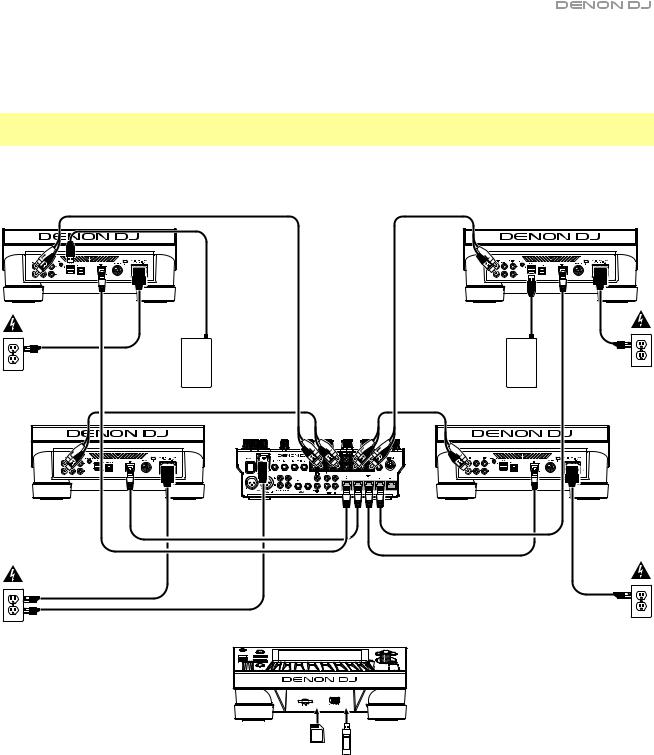
Example 2
This example shows 4 SC5000 Prime units with their Link ports connected to Link Ports 1–4 of a Denon DJ X1800 Prime mixer. All 4 units are networked through the mixer.
Note: If you will use a different mixer with this setup, connect the Link ports all 4 SC5000 Prime units to an Ethernet hub instead of to the mixer.
SC5000 Prime
(rear panel)
SC5000 Prime
(rear panel)
|
USB |
USB |
|
Power |
drive |
drive |
Power |
|
|
||
outlet |
|
|
outlet |
SC5000 |
|
|
SC5000 |
Prime |
|
|
Prime |
(rear panel) |
|
|
(rear panel) |
|
|
X1800 Prime mixer |
|
|
|
(rear panel) |
|
Power |
Power |
outlet |
outlet |
|
SC5000 Prime |
|
(front panel) |
SD card |
USB drive |
RF Warning: This is a mobile device. Maintain a distance of at least 8 inches / 20 centimeters of separation between the transmitter’s radiating structure(s) and your body or other people nearby.
5

Devices & File Analysis
SC5000 Prime can play music files from USB drives, SD cards, or other connected SC5000 Prime units. Make sure you are using only the supported file systems (for USB drives or SD cards) and file formats (for music files) listed below.
Supported file systems: exFAT, FAT32 (recommended), HFS+ (read-only), NTFS (read-only)
Supported file formats: AAC/M4A |
MP3 (32–320 kbps) |
AIF/AIFF (44.1–192 kHz, 16–32-bit) |
MP4 |
ALAC |
Ogg Vorbis |
FLAC |
WAV (44.1–192 kHz, 16–32-bit) |
Although SC5000 Prime can play tracks that have not been analyzed yet, pre-analyzing them allows its features to work most effectively. You can analyze tracks in one of two ways:
•On SC5000 Prime, load the track: When you load a track to play, SC5000 Prime will automatically analyze it (if it has not already been analyzed). This may take a moment to complete, depending on the length of the track. You can start playing the track from the beginning immediately, though you will need to wait a moment for the analysis to finish.
•Use Engine Prime software: The included Engine Prime software can pre-analyze your music library to use with SC5000 Prime. You can also use it to organize your library by creating crates and playlists. It also manages your SC5000 Prime hardware preferences (see Operation to learn more about this).
Visit denondj.com and find the webpage for SC5000 Prime to download the Engine Prime software.
To eject a USB drive or SD card:
1.Make sure none of its tracks are being played on any connected SC5000 Prime units. Ejecting a device unloads its tracks from all networked SC5000 Prime units.
2.Press Media Eject. A list of connected devices will appear in the main display.
3.Tap and hold your finger on the name of your device until the meter is depleted and the device name disappears from the list. If a track on the device is currently playing, you will be asked if you want to continue ejecting, which will stop the track. Tap Cancel to cancel ejecting the device, or tap OK to eject it.
To eject additional devices, repeat Step 3.
To return to the previous screen, press Media Eject again, or tap the X in the upper-right corner.
Networking
You can network multiple SC5000 Prime units together, enabling them to share track databases, timing and BPM information, and other data seamlessly over this connection.
This feature provides some advantages while performing. For instance, if you are using four SC5000 Prime units, you can use one of them to browse through all tracks on all devices (USB drives or SD cards) connected to any of those SC5000 units. You can then play any of those tracks immediately without having to move a device from one unit to the other.
To network SC5000 Prime units together, use the included networking cables to do one of the following:
•If you are using only two SC5000 Prime units, connect their two Link ports.
•If you are using two or more SC5000 Prime units, connect each of their Link ports to a Link port (1–4) on your Denon DJ X1800 Prime mixer.
•If you are using two or more SC5000 Prime units, connect each of their Link ports to an Ethernet port on a router.
The Network (Media Status) light will turn on when the SC5000 Prime unit is properly connected to a network.
Configuration
SC5000 Prime has several settings that you can customize in the Shortcuts (basic settings) and the Preferences (advanced settings). See Operation > Configuration to learn about these settings.
To open the Shortcuts, press Shortcuts.
To open the Preferences, press and hold View/Preferences/Utility.
6
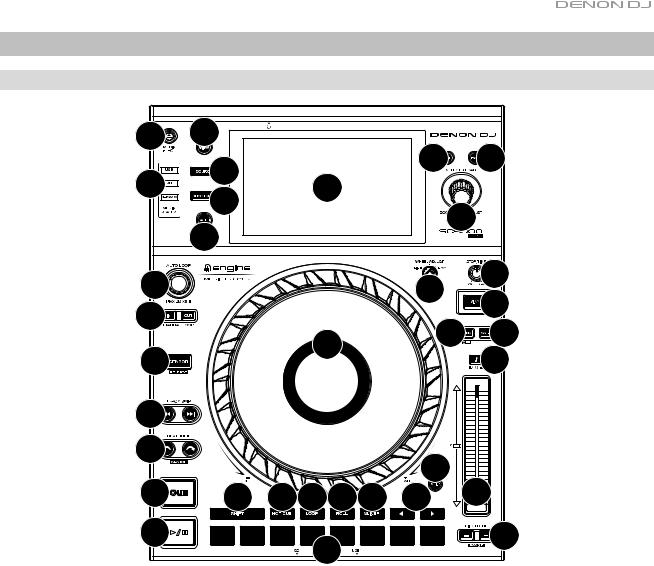
Features
Top Panel
4 |
8 |
|
5 |
|
6 |
2 |
3 |
1 |
|
||
|
|
|
|||
9 |
|
7 |
|
||
|
|
|
|
||
|
10 |
|
|
|
|
|
|
|
|
|
|
33 |
|
|
12 |
|
13 |
|
|
|
14 |
||
32 |
|
|
|
|
|
|
|
21 |
22 |
||
|
|
11 |
|||
25 |
|
|
|
20 |
|
|
|
|
|
||
17 |
|
|
|
|
|
34 |
|
|
24 |
|
|
16 |
|
|
18 |
||
23 |
27 28 29 30 |
31 |
|||
15 |
|
26 |
|
|
19 |
|
|
|
|
|
|
Media Selection & Browsing
1.Main Display: This full-color multi-touch display shows information relevant to SC5000 Prime’s current operation. Touch the display (and use the hardware controls) to control the interface. See Operation > Main Display Overview for more information.
2.Media Selection: These lights will illuminate to indicate if the corresponding type of media is connected: USB, SD, or Network.
3.Source: Press this button to show a list of available devices connected to SC5000 Prime in the main display (other networked SC5000 Prime units, USB drives, SD card, etc.). Tap a device in the list to select it.
4.Media Eject: Press this button to show a list of available devices connected to that SC5000 Prime unit in the main display (i.e., USB drives connected to its USB ports or an SD card inserted into its SD card slot).
To eject a device, make sure none of its tracks are being played (ejecting a device unloads its tracks from all networked SC5000 Prime units), and then tap and hold your finger on its name in the main display until the device name is no longer shown.
5.Back: Press this button to move to the previous window. While in Performance View, press this button to enter Browse View.
6.Forward: Press this button to move to the next window. While in Performance View, press this button to enter Browse View.
7.Select/Load: While performing, turn this knob to zoom in and out of the track’s waveform.
While in Browse View, turn this knob to scroll through the list. Press this knob to select an item or load the currently selected track to the deck. Press and hold Shift and turn this knob to scroll quickly through the list.
8.View/Preferences/Utility: Press this button to switch between the library view and track view. Press and hold this button to enter the Preferences and Utility window.
9.Shortcuts: Press this button to acess a short menu of playback and display options.
7

Playback & Transport Controls
10.Layer: Press this button to switch the layer focus of the SC5000 Prime.
11.Platter: This capacitive, touch-sensitive platter controls the audio playhead when the wheel is touched and moved. The display in the center shows information relevant to the performance, including the current playhead position, the current auto loop size, or current layer. See Operation > Platter Display Overview for more information.
When the Vinyl button is on, move the platter to “scratch” the track as you would with a vinyl record. When the Vinyl button is off (or if you are touching only the side of the platter), move the platter to temporarily adjust the track’s speed, which is useful for beat alignment.
12.Wheel Adjust: Turn this knob to set how resistant the platter is to adjustments. This knob applies a brake to the platter to prevent unintentional drifting due to environmental vibrations from bass frequencies, surface instability, etc.
13.Stop Time: Controls the rate at which the track slows to a complete stop (“brake time”) when you pause it by pressing Play/Pause (/ ).
14.Vinyl: Press this button to activate or deactivate a “vinyl mode” for the platter. When activated, move the platter to “scratch” the track as you would with a vinyl record. When deactivated, move the platter to temporarily adjust the track’s speed, which is useful for beat alignment.
15.Play/Pause (/ ): This button pauses or resumes playback.
Press and hold Shift and then press this button to “stutter-play” the track from the initial cue point.
16.Cue: During playback, press this button to return the track to the initial cue point and stop playback. If you have not set a temporary cue point, then press this button to return to the start of the track. (To set a temporary cue point, make sure the track is paused, move the platter to place the audio playhead at the desired location, and then press this button.)
If the deck is paused, press and hold this button to play the track from the initial cue point. Release the button to return the track to the initial cue point and pause it. To continue playback without returning to the initial cue point, press and hold this button and then press and hold the Play button, and then release both buttons.
During playback, press and hold Shift and then press this button to set the initial cue point.
17.Track Skip: Press either of these buttons to skip to the previous or next track.
Press the Previous Track button in the middle of a track to return to the beginning of the track.
Sync & Pitch Controls
18.Pitch Fader: Move this fader to adjust the speed (pitch) of the track. You can adjust its total range by pressing and holding Shift and pressing one of the Pitch Bend buttons.
Important: If Sync is activated, moving the pitch fader on the “master” SC5000 Prime unit will change the speed of all synced units, while moving the pitch fader on other units will do nothing.
19.Pitch Bend –/+: Press and hold one of these buttons to momentarily reduce or increase (respectively) the speed of the track.
Press and hold Shift and then press one of these buttons to set the range of the pitch fader.
20.Key Lock/Pitch Reset: Press this button to activate or deactivate Key Lock. When Key Lock is activated, the track’s key will remain the same even if you adjust its speed.
Press and hold Shift and press this button to reset the track’s pitch to its original pitch (0%) regardless of the position of the pitch fader.
21.Sync/Sync Off: Press this button to activate Sync.
To sync two or more SC5000 Prime units, press Sync on the unit that you want to control the BPM, which becomes the “master.” After Sync is activated on that unit, press Sync on any additional units. The tempo of each unit will immediately synchronize to match the tempo of the master unit.
Press and hold Shift and press this button to deactivate Sync.
22.Master: Press this button to set this SC5000 Prime unit as the one that controls the master tempo. All connected SC5000 Prime units with Sync activated will use this tempo. If you stop the “master” SC5000 Prime, the next-longest- playing SC5000 Prime in the setup will automatically become the new “master” (unless you change it manually).
Performance Controls
23.Shift: Press and hold this button to access secondary functions of other controls.
24.Slip: Press this button to enable or disable Slip Mode. In Slip Mode, you can jump to cue points, use the platters, or pause the track while the track’s timeline continues (the lower half of the waveform in the display will continue moving forward). In other words, when you stop whatever action you are performing, the track will resume normal playback from where it would have been if you had never done anything (i.e., as if the track had been playing forward the whole time).
25.Censor/Reverse: Press this button to activate or deactivate the Censor feature: the playback of the track will be reversed, but when you release the button, normal playback will resume from where it would have been if you had never engaged the Censor feature (i.e., as if the track had been playing forward the whole time).
Press and hold Shift and then press this button to reverse the playback of the track normally. Press this button again to return playback to the normal forward direction.
8

26.Performance Pads: These pads have different functions on each deck depending on the current pad mode.
27.Hot Cue: Press this button to enter Hot Cue Mode. See Operation > Performing > Pad Modes for more information.
28.Loop: Press this button once to enter Manual Loop Mode. Press it once more to enter Auto Loop Mode. See Operation > Performing > Pad Modes for more information.
29.Roll: Press this button to enter Roll Mode. See Operation > Performing > Pad Modes for more information.
30.Slicer: Press this button to enter Slicer Mode. See Operation > Performing > Pad Modes for more information.
31.Parameter /: Use these buttons for various functions in each Pad Mode. See Operation > Performing > Pad Modes for more information.
32.Loop In/Loop Out: Press either of these buttons to create a Loop In or Loop Out point at the current location. Their placement will be affected by the Quantize and Smart Loops settings. See Operation > Configuration > Shortcuts for more information.
33.Auto Loop/Loop Move: Turn this knob to set the size of an automatic loop. The value will be shown in the main display and platter display.
Press this knob to activate or deactivate an automatic loop at the current location of the track.
Tip: You can assign auto loops to pads in Manual Loop Mode. See Operation > Performing > Pad Modes for more information. Press and hold Shift and turn this knob to shift the active loop to the left or right.
34.Beat Jump: Press either of these buttons to skip backward or forward through the track. Use the Auto Loop knob to determine the beat jump size.
Press and hold Shift and then press one of these buttons to search backward or forward through the track.
Front Panel
1.Front USB Port: Connect a standard USB drive to this USB port. When you select that USB drive as a source (press the Source button), you can use the display to select and load tracks on your USB drive. There are also two similar USB ports on the rear panel. You can use the included USB extension cable to accommodate larger or smaller USB thumb drives.
2.SD Card Slot: Insert a standard SD or SDHC card to this slot. When you select that SD card as a source (press the Source button), you can use the display to select and load tracks on your SD card.
2 |
1 |
Rear Panel
1.Power Input: Use the included power cable to connect this input to a power outlet.
SC5000 Prime has a protection circuit to keep it powered on for |
8 |
|
9 |
|
10 seconds after an unexpected power loss. Within 10 seconds |
|
|
||
after losing power (you will see a message in the display), |
|
|
|
|
reconnect it to your power source to return to normal operation. |
6 7 5 4 |
3 |
2 |
1 |
2. Power Button: Press this button to power SC5000 Prime on |
||||
or off. Power on SC5000 Prime only after you have connected |
|
|
|
|
all of your input devices and before you power on your |
|
|
|
|
amplifiers and loudspeakers. Power off your amplifiers and |
|
|
|
|
loudspeakers before powering off SC5000 Prime. |
|
|
|
|
Press and hold this button for 10 seconds to reset SC5000 Prime. |
|
|
|
|
3.Link Port: Use the included networking cable to connect this port to another SC5000 Prime or to your Denon DJ X1800 Prime mixer. Each networked SC5000 Prime can share track databases, timing and BPM information, and other track data over this connection.
4.USB Port to PC (USB Out): Use a standard USB cable (included) to connect this USB port to an available USB port on your computer. This connection sends and receives MIDI messages to and from the computer.
5.Rear USB Ports 2/3: Connect standard USB drives to these USB ports. When you select one of those USB drives as a source (press the Source button), you can use the display to select and load tracks on your USB drives. There is also a similar USB port on the front panel.
6.Layer A/B Outputs: Use standard RCA cables to connect these outputs to your DJ mixer. The A Line Outputs send out the audio signal from Layer A. The B Line Outputs send out the audio signal from Layer B.
7.Digital Outputs A/B: Use standard digital coaxial cables to connect these 24-bit/96 KHz outputs to devices and mixers such as the Denon DJ X1800 Prime mixer.
8.Remote Input: Use a standard remote start cable to connect this input to the remote-start output of your mixer (if available). While connected to a remote-start-compatible mixer, moving the crossfader toward the side that corresponds to this SC5000 Prime (or raising the channel fader for its channel) will automatically start the track on the currently selected layer.
9.Kensington® Lock Slot: Use this slot to secure SC5000 Prime to a table or other surface.
9
Operation
Main Display Overview
Performance View
|
Continuous |
|
Bars |
Track |
|
play on/off |
|
elapsed |
tempo |
|
Track |
|
Sync |
|
|
Quantize |
|
|
|
Artist |
on/off |
Beat counter |
state |
Track key |
Deck |
|
|
|
|
Crates |
|
|
|
|
Playlists/ |
|
|
|
|
History |
|
|
|
|
Prepare List |
|
|
|
|
Files |
|
|
|
|
Search |
|
|
|
|
Layer |
|
|
|
|
Initial cue point |
Playhead |
|
Loop |
Hot cue markers |
|
(track overview) |
region |
|
|
Loop on/off |
Auto-loop |
Time remaining/ |
Playhead |
|
|
length |
elapsed |
|
|
Key lock on/off
Deck tempo
Pitch fader range
Total pitch adjustment
Waveform
Bar numbers
Pad functions
Track overview
Swipe left or right on the track overview to scan through the track while the track is paused.
Note: You can use this feature this during playback if Needle Lock is off. If Needle Lock is on, make sure the platter is in Vinyl Mode (press Vinyl so it is lit) and touch the top of the platter while swiping the track overview. See Configuration > Preferences to learn about Needle Lock.
Spread or pinch your fingers on the waveform to zoom in or out of it, respectively. Alternatively, turn the
Select/Load knob.
Tap an icon to select it (e.g., the icons for Crates, Playlists, Prepare List, Files, or Search on the left side).
Tap a button to activate or deactivate it (e.g., the Quantize, Continue, or Key Lock buttons).
Tap the time to switch between the elapsed time and remaining time.
You can also show or hide the beat grid controls in Performance View. The beat grid is automatically detected and set when the track is analyzed.
To show the beat grid controls, press and hold the Select/Load knob for a second. Six buttons will appear at the bottom of the display, and the beat grid markers will appear on the waveform.
To reset the beat grid, tap Reset.
To shift the downbeats of the beat grid left or right (in one-beat increments), tap the < or > buttons, respectively, or turn the Select/Load knob.
To freely shift/“slide” the beat grid left or right, move the platter.
To halve or double the number of beat grid markers, tap /2 or X2, respectively.
To hide the beat grid controls, tap Close.
10
Browse View
Use the Browse View to view your music library and load a track to the deck. You can also search through crates and playlists, add tracks to the Prepare list, and search through your tracks using sorting and filtering features.
Important: Visit denondj.com and find the webpage for SC5000 Prime to download the Engine Prime software.
Use the five icons on the left side to navigate while in Browse View:
•Crates: Your crates are collections of tracks arranged however you want. You may have crates for different genres or styles, for albums from a specific decade, etc. You can use the included Engine Prime software to create crates to use here.
•Playlists/History: Your playlists are lists of tracks arranged in a specific order. You may have playlists for different types of clubs or events, for specific genres, etc. You can use the included Engine Prime software to create playlists to use here. This is also where you can view the playback history. If there are no playlists, only the history will be shown in this view.
•Prepare: You can load tracks to the Prepare list so that you can refer to them later when you want to play them during your performance (rather than searching through your entire library for the next track to play).
•Files: Use this option to browse the list of all files on a USB drive or SD card.
•Search: Use this option to search through your tracks by keyword. The search results are based on the album name, artist name, track name, key, and tempo.
Swipe a list up or down to browse through it (e.g., your list of crates, your list of playlists, or your list of tracks). Alternatively, press the Back or Forward buttons to select a list, and then turn the Select/Load knob. Press and hold Shift and turn the Select/Load knob to scroll quickly through the list. You can also tap and drag the scroll bar on the right edge of the list.
Tap an icon or item in a list to select it. Alternatively, press the Select/Load knob.
Swipe a track to the right to load it to the deck. Alternatively, press the Select/Load knob.
Swipe a track to the left to add it to the Prepare list. Alternatively, press and hold Shift and press the Select/Load knob. Swipe a track to the left in the Prepare list to remove it.
Tap and hold your finger on a track to show its information window. Tap the information window to close it.
Tap the Search field and use the keyboard that appears in the display to search through your tracks by keyword. The search results are based on the album name, artist name, track name, key, and tempo.
Platter Display Overview
Normally, the platter display shows the following information:
•the current position of the playhead.
•the album artwork of the current track.
The platter display temporarily shows the following information:
•the current size of an auto loop after you turn the Auto Loop knob.
•the current layer after you press the Layer button.
•the position of the secondary playhead when Slip is active.
11

Performing
Loading & Removing Tracks
While viewing any track list:
To load a track to the deck, swipe the track to the right. Alternatively, press the Select/Load knob.
To add a track to the Prepare list, swipe the track to the left. Alternatively, press and hold Shift and press the Select/Load knob.
To show a track’s information, tap and hold your finger on it.
While viewing the Prepare list:
To remove a track from the Prepare list, swipe the track to the left.
To remove all tracks from the Prepare list, tap the Clear button in the upper-right corner of the display.
Searching & Filtering Tracks
To search, tap the Search field and use the keyboard that appears in the display. The search results are based on the following criteria: album name, artist name, track name, key, and tempo.
To hide the keyboard, tap the keyboard icon in the lower-right corner of the virtual keyboard. Alternatively, tap anywhere on the screen other than the keyboard or the Search field.
To filter your tracks, tap Genre, Album, Artist, Key, or BPM, and then tap one of the available options. Only tracks tagged with that genre, album, artist, key, or BPM will be shown. (By default, the key is notated using the Camelot system.)
Note: You can also use the Preferences to set whether you want to show tracks with the same key only or tracks with compatible keys as well as the “tolerance” of BPM filter (to include tracks with tempos within 1–15 BPM of the selection). See Configuration > Preferences to learn more.
To sort the list of results by album, artist, track name, key, or tempo, tap one of the 5 icons in the upper-right corner. Tap it again to reverse-sort the results.
Album Artist Track Key |
BPM |
Playback & Cueing
To play or pause a track, press Play/Pause (/ ).
To scratch a track, press Vinyl so it is lit brightly and then move the platter.
To set the cue point, press Shift+Cue at the desired location during playback.
To return to the cue point and stop, press Cue.
To return to the cue point and keep playing, press Shift+Play/Pause (/ ).
To reverse playback, press Shift+Censor/Reverse. The button will flash while playback is reversed.
To return to normal playback, press Censor/Reverse.
To censor playback, press and hold Censor.
To return to normal playback, release Censor. Normal playback will resume from where it would have been if you had never engaged the Censor feature (i.e., as if the track had been playing forward the whole time).
To skip to the previous or next track, press one of the Track Skip / buttons.
To return to the beginning of a track, press Track Skip in the middle of a track.
To scan quickly through the track, press and hold Shift and then press one of the Beat Jump buttons.
To enable or disable Slip Mode, press Slip. In Slip Mode, you can jump to cue points, use the platters, or pause the track while the track’s timeline continues (the lower half of the waveform in the main display will continue moving forward). When you stop whatever action you are performing, the track will resume normal playback from where it would have been if you had never done anything (i.e., as if the track had been playing forward the whole time).
12

To jump to a specific location in the track:
•If Needle Lock is disabled: tap the desired location in the track overview.
•If Needle Lock is enabled: pause playback and then tap the desired location in the track overview. Alternatively, make sure the platter is in Vinyl Mode (press Vinyl so it is lit), touch the top of the platter, and tap the desired location in the track overview.
See Configuration > Preferences to learn about Needle Lock.
To zoom in and out of the waveform, place two fingers on the display and spread them apart or pinch them together. Alternatively, turn the Select/Load knob.
Looping & Beat-Jumping
To create and activate an auto loop, press the Auto Loop knob.
To set the auto loop length, turn the Auto Loop knob to select the number of beats: 1/32, 1/16, 1/8, 1/4, 1/2, 1, 2, 4, 8,
16, 32, or 64.
To create and activate a manual loop, press Loop In to set the start point, and then press Loop Out to set the end point. The loop will be activated immediately, and the loop will be indicated as a shaded area in the waveform and track overview.
To deactivate a loop, press the Auto Loop knob.
To move the loop, press and hold Shift and turn the Auto Loop knob while the loop is activated.
To double or halve the length of a loop, turn the Auto Loop knob while the loop is activated.
To beat-jump through a track, press one of the Beat Jump buttons. Each press will skip through the track by the length of an auto loop, which you can set by turning the Auto Loop knob.
Syncing & Pitch Adjustment
To activate sync, press Sync on the unit that you want to control the BPM, which becomes the “master.” After Sync is activated on that unit, press Sync on any additional units. The tempo of each unit will immediately synchronize to match the tempo of the master unit.
The Sync state icon in the display will indicate the current status:
•Sync Off: Sync is deactivated.
•Tempo Sync: Only the tempo is synced (the BPM will match that of the master unit).
•Beat Sync: The tempo will be synced, and the track will be automatically be beat-matched with the track on the master unit.
To deactivate sync on an SC5000 Prime unit, press Shift+Sync.
To set a different SC5000 Prime unit as the master, press Master. All connected SC5000 Prime units with Sync activated will use the tempo of this unit.
To adjust the track’s pitch, move the pitch fader. You can do this only when the deck is not synced.
Important: If Sync is activated, moving the pitch fader on the “master” SC5000 Prime unit will change the speed of all synced units, while moving the pitch fader on other units will do nothing.
To adjust the track’s pitch momentarily, press and hold one of the Pitch Bend –/+ buttons.
To adjust the range of the pitch fader, press and hold Shift and press one of the Pitch Bend –/+ buttons to select +4%, 8%, 10%, 20%, 50%, or 100%.
To reset the track’s pitch to 0%, press Shift+Key Lock/Pitch Reset. The track’s pitch will return to its original pitch (0%) regardless of the position of the pitch fader.
To lock or unlock the track’s key, tap the Key Lock icon in the master display. Alternatively, press Shift+Key Lock. When Key Lock is activated, the track’s key will remain the same even if you adjust its speed.
13
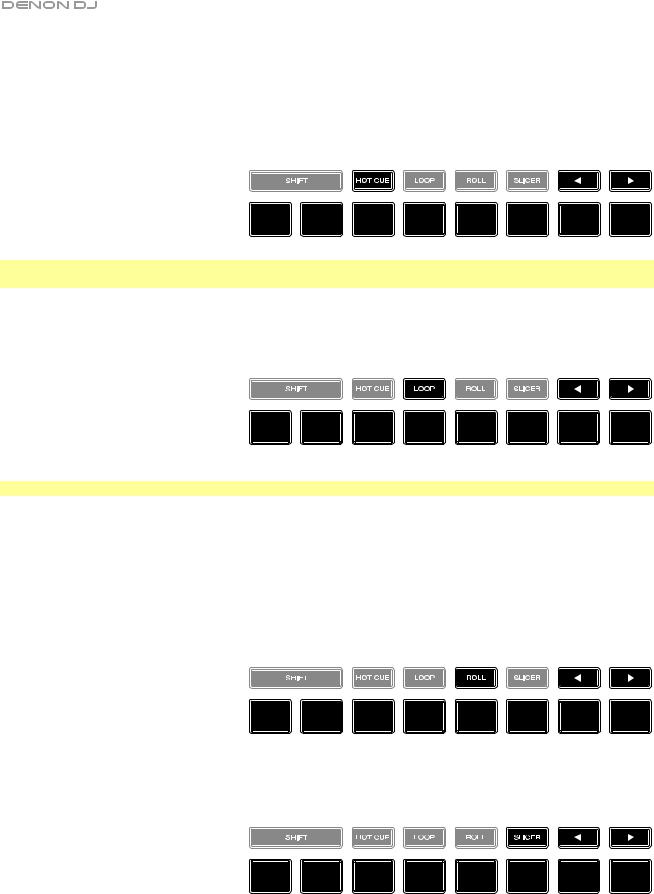
Pad Modes
The 8 pads have different functions in each pad mode. The Parameter / buttons will make adjustments specific to each pad mode.
To enter each pad mode, press the corresponding button: Hot Cue, Loop, Roll, or Slicer.
Hot Cue Mode
Hot |
Hot |
Hot |
Hot |
Hot |
Hot |
Hot |
Hot |
Cue 1 |
Cue 2 |
Cue 3 |
Cue 4 |
Cue 5 |
Cue 6 |
Cue 7 |
Cue 8 |
In Hot Cue Mode, you can use each pad to jump to an assigned hot cue point.
Tip: You can use the Engine Prime software to set, name, and assign colors to your hot cue points. The names and colors will appear in the display for reference.
To assign a hot cue to a pad, press an unlit pad at the desired location in the track. The pad will light up when a hot cue point is assigned.
To jump to a hot cue point, press the corresponding pad.
To clear a hot cue from a pad, press Shift and the desired pad. The pad will turn off when there is no hot cue point assigned to it.
Loop Modes
Loop |
Loop |
Loop |
Loop |
Loop |
Loop |
Loop |
Loop |
1 |
2 |
3 |
4 |
5 |
6 |
7 |
8 |
In Manual Loop Mode, you can use each pad to activate an assigned loop. Pressing Loop for the first time will always enter Manual Loop Mode.
Tip: You can use the Engine Prime software to set and name your loops. The names will appear in the display for reference.
To assign a loop to a pad and activate it, press an unlit pad to create a Loop In point at the current location, and then press it again to create the Loop Out point at another location. You can also assign an auto loop to a pad by pressing an unlit pad while in the auto loop. The loop will activate immediately, and the pad will light up.
To activate a loop, press the corresponding pad.
To delete a loop, press Shift and the desired pad.
In Auto Loop Mode, you can use each pad to create and activate an auto loop. Pressing Loop while in Manual Loop Mode will enter Auto Loop Mode.
To activate an auto loop, press a pad. The display will show the length of the auto loop for each pad.
To deactivate an auto loop, press the pad again.
Roll Mode
(T denotes a triplet- |
1/8-Beat |
1/4T-Beat |
1/4-Beat |
1/2T-Beat |
1/2-Beat |
1T-Beat |
1-Beat |
2-Beat |
|
based time division) |
|||||||||
Roll |
Roll |
Roll |
Roll |
Roll |
Roll |
Roll |
Roll |
||
|
In Roll Mode, you can press and hold each pad to trigger a “loop roll” of a certain length while the track’s timeline continues (the lower half of the waveform in the display will continue moving forward). When you release the pad, the track will resume normal playback from where it would have been if you had never done anything (i.e., as if the track had been playing forward the whole time).
To trigger a roll, press the corresponding pad. Pads with triplet-based loop rolls are indicated are lit with a different color.
Slicer Mode
Slice |
Slice |
Slice |
Slice |
Slice |
Slice |
Slice |
Slice |
1 |
2 |
3 |
4 |
5 |
6 |
7 |
8 |
In Slicer Mode, the 8 pads represent 8 sequential beats—“slices”—in the beatgrid. When you press Slicer, you automatically activate an 8-beat loop. The currently playing slice is represented by the currently lit pad; the light will “move through the pads” as it progresses through the 8-slice phrase. You can press a pad to play that slice. When you release the pad, the track will resume normal playback from where it would have been if you had never pressed it (i.e., as if the track had been playing forward the whole time).
To play a slice, press the corresponding pad.
14

Configuration
Important: All items in the Shortcuts screen are also in the Preferences. If you change a setting in one screen, it will also change it in the other.
Shortcuts
To open the Shortcuts screen, press Shortcuts.
To close the Shortcuts screen, tap the X in the upper-right corner.
In the Shortcuts screen, tap an option to select it:
•Layer Color: This setting determines the color of the light ring around the platter for each layer. Tap A or B in the center to select the layer, and then tap a color to select it. The light ring will change color immediately. Tap the X to return to the previous screen.
•Cue/Loop Quantization: This setting determines the degree of quantization for time-based features. Select 1/8 beat, 1/4 beat, 1/2 beat, 1 beat, or 4 beats.
•Sync Mode: This setting determines the degree of synchronization applied when you press the Sync button on SC5000 Prime:
o Tempo: Only the tempo will be synced (the BPM will match that of the master deck).
oBeat: The tempo will be synced, and the track will be automatically be beat-matched with the track on the master unit.
oBar: The tempo will be synced, and the track will be automatically bar-matched with the track on the master unit (the downbeats of each bar will be aligned).
•Screen Brightness: This setting determines the brightness of the main display: Low, Mid, High, or Max.
•Player #: This setting determines the number of this player. When selecting a source device to browse, this number is shown next to the device name in the display.
Preferences
To open the Preferences screen, press and hold View/Preferences/Utility and then tap the Preferences tab.
To close the Preferences screen, tap the X in the upper-right corner.
In the Preferences screen, swipe up or down to scroll through the options, and tap an option to select it:
•Track Start Position: This setting determines where the beginning of a track is after it loads. Select the actual start of the file (Track Start) or the automatically detected beginning of an audio signal (Cue Position).
•Default Speed Range: This settings determines the range of the pitch fader. Select +4%, 8%, 10%,
20%, or 50%.
•Sync Mode: This setting determines the degree of synchronization applied when you press the Sync button on SC5000 Prime:
o Tempo: Only the tempo will be synced (the BPM will match that of the master deck).
oBeat: The tempo will be synced, and the track will be automatically be beat-matched with the track on the master unit.
oBar: The tempo will be synced, and the track will be automatically bar-matched with the track on the master unit (the downbeats of each bar will be aligned).
•Cue/Loop Quantization: This setting determines the degree of quantization for time-based features: hot cue points, loops, and loop rolls. Select 1/8 beat, 1/4 beat, 1/2 beat, 1 beat, or 4 beats.
•Paused Hot Cue Behavior: This setting determines how pads will play their hot cue points. When set to Momentary, playback will start from a hot cue point when you press and hold its pad— release the pad to return to the hot cue point. When set to Trigger, playback will start from a hot cue point (and continue) when you press and release its pad.
15

•Default Loop Size: This setting determines the default size of an auto loop when you load a new track to the deck: 1, 2, 4, 8, or 16 beats.
•Smart Loops: This setting determines whether or not a manual loop will be automatically expanded or reduced to a conventional length (e.g., 2 beats, 4 beats, 8 beats, etc.) when you set it. Select On or Off. This setting works independently of the quantization setting.
•Time Format: This setting determines whether or not pitch adjustment affects how the track time is displayed. When set to Static, the track’s time corresponds to locations in the track as usual; adjusting the pitch does not affect it. When set to Dynamic, the track’s time will automatically adjust to account for changes in pitch. For instance, if you set the pitch fader to -8%, the track time will increase so it is 8% longer.
•Track End Warning: This setting determines how long before the end of a track SC5000 will warn you that it is nearing the end. If the track is on the currently selected layer, the platter ring and track overview will flash. If the track is on the opposite layer, the Layer button will flash.
•Lock Playing Deck: This setting determines whether or not you will be able to load a track to the deck as it is playing. Select On or Off. When this setting is on, the deck must be paused in order to load a track to it.
•Needle Lock: This setting determines whether or not you can tap the track overview in the display to jump to that location in the track during playback. Select On or Off. You can use the track overview while playback is stopped regardless of this setting. Alternatively, make sure the platter is in Vinyl Mode (press Vinyl so it is lit), touch the top of the platter, and tap the desired location in the track overview.
•Pad Lock: This setting determines whether the pads and pad mode buttons (Hot Cue, Loop, Roll, Slicer) are enabled or disabled. Select On or Off.
•Key Notation: This setting determines how the track key is notated in the display. You can view the key as all Sharps, all Flats, Open Key, or Camelot.
•Key Filter: This setting determines whether the Key filter shows tracks with the same key only (Match) or tracks with compatible keys (Compatible).
•BPM Range: This setting determines the lowestand highest-possible BPM values that will be used when tracks are analyzed: 58–115, 68–135, 75–155, or 88–175 BPM.
•BPM Filter Tolerance: This setting determines the “tolerance” of the BPM filter so you can include tracks with tempos that are within a small range of the selected tempo. Select +0, 1, 2, 3, 5, 10, or 15.
•Show Only File Name: This setting determines if you will view tracks by their file names instead of by their metadata (tags). Select On or Off.
•Deck Layer Colors: These settings determine the colors of the light ring around the platter for each layer on each player. Tap the arrow next to A or B to select the layer, and then tap a color to select it. The light ring will change color immediately. Tap the X to return to the previous screen.
Utility
To open the Utility screen, press and hold View/Preferences/Utility and then tap the Utility tab.
To close the Utility screen, tap the X in the upper-right corner.
In the Utility screen, swipe up or down to scroll through the options, and tap an option to select it:
•Player #: This setting determines the number of this player. When selecting a source device to browse, this number is shown next to the device name in the display.
•Layer B: This determines whether this SC5000 Prime will use both deck layers (On) or just one (Off).
•Screen Brightness: This setting determines the brightness of the main display: Low, Mid, High, or Max.
•Model: This is the product name.
•Firmware Version: This is the current version of the unit’s Engine Prime operating system.
•SC5000 Controller: This is the current version of the unit’s controller firmware.
•SC5000 Display: This is the current version of the unit’s display firmware.
•Update Firmware: Use this option to restart SC5000 Prime in Update Mode, which enables you to update its firmware. Follow the firmware update instructions included with the firmware update package you downloaded.
16

Guía del usuario (Español)
Introducción
Gracias por comprar el SC5000 Prime. En Denon DJ, sabemos que usted se toma la música en serio. Por eso es que diseñamos nuestros equipos con una sola cosa en mente—hacer que pueda tocar su mejor interpretación.
Características:
•Pantalla HD de 18 cm (7 pulg.) con gestos multitáctiles
•Salidas de audio digital a 24 bits / 96 kHz
•Reproducción de dos capas con salidas de audio individuales
•Reproduce formatos de audio sin compresión (FLAC, ALAC, WAV)
•8 disparadores multifunción para cues, bucles, cortes y rulos
•Robusta rueda de avance metálica de 20 cm (8 pulg.) con pantalla HD
•Color RGB personalizable alrededor de la rueda de avance
•(3) entradas USB y (1) entrada SD para la reproducción de música
•Salida LAN para enlazar hasta cuatro reproductores
•Incluye el software de gestión musical Engine Prime
Contenido de la caja
SC5000 Prime
(2) Cables de audio RCA Cable USB
Cable alargador USB
Cable de red
Cable de corriente
Paño de limpieza
Tarjeta de descarga de software
Guía del usuario
Manual sobre la seguridad y garantía
Importante: Visite denondj.com y busque la página web de SC5000 Prime para descargar el software Engine Prime.
Soporte
Para obtener la información más reciente acerca de este producto (documentación, especificaciones técnicas, requisitos de sistema, información de compatibilidad, etc.) y registrarlo, visite denondj.com.
Para obtener soporte adicional del producto, visite denondj.com/support.
17
Instalación
1.Asegúrese de que todos sus dispositivos estén apagados o que todos sus niveles de volumen estén en sus posiciones mínimas.
2.Conecte las salidas de audio del SC5000 Prime (Layer A/B o Digital Outputs A/B) a las entradas de su mezclador.
3.Conecte los puertos Link del SC5000 Prime a uno de los siguientes ejemplos de diagrama de conexión.
4.Conecte cualquier dispositivo de salida (giradiscos, auriculares, amplificadores de potencia, altavoces, etc.) a las salidas de su mezclador.
5.Conecte todos sus dispositivos a sus fuentes de corriente.
Al iniciar una sesión, encienda (1) el SC5000 Prime y las demás fuentes de entrada, (2) su mezclador y luego (3) los dispositivos de salida.
Al finalizar una sesión, apague (1) los dispositivos de salida, (2) su mezclador y luego (3) el SC5000 Prime y las demás fuentes de entrada.
Diagramas de conexión
Los elementos que se muestran pero que no se enumeran en Introducción > Contenido de la caja se venden por separado.
Ejemplo 1
Este ejemplo muestra 2 unidades SC5000 Prime con sus puertos Link conectados entre sí directamente.
SC5000 Prime
(panel trasero)
SC5000 Prime
(panel trasero)
|
Mezclador X1800 Prime |
|
(panel trasero) |
Toma de |
Toma de |
corriente |
corriente |
Unidad USB
SC5000 Prime
(panel frontal)
Tarjeta SD |
Unidad USB |
18
Ejemplo 2
Este ejemplo muestra 4 unidades SC5000 Prime con sus puertos Link conectados a los Puertos Link 1–4 de un mezclador X1800 Prime de Denon DJ. Todas las unidades están en red a través del mezclador.
Nota: Si utilizará un mezclador diferente para esta configuración, conecte los puertos Link de las 4 unidades SC5000 Prime a un concentrador Ethernet en lugar de al mezclador.
SC5000 Prime
(panel trasero)
SC5000 Prime
(panel trasero)
Unidad
USB
SC5000
Prime
(panel trasero)
Suministro eléctrico
Unidad |
USB |
SC5000 |
Prime |
(panel trasero) |
Suministro
eléctrico
SC5000 Prime
(panel frontal)
Tarjeta SD Unidad USB
Advertencia de radiofrecuencias: Este es un dispositivo móvil. Mantenga una distancia de al menos 20 centímetros / 8 pulgadas entre la(s) estructura(s) de los transmisores que irradian radiofrecuencias y su cuerpo u otras personas en las cercanías.
19

Análisis de archivo y dispositivos
El SC5000 Prime puede reproducir archivos de música desde unidades USB, tarjetas SD u otras unidades SC5000 Prime conectadas. Asegúrese de estar usando únicamente los sistemas de archivos soportados (para unidades USB o tarjetas SD) y formatos de archivo (para archivos de música) que se enumeran a continuación.
Sistemas de archivos soportados: exFAT, FAT32 (recomendado), HFS+ (sólo lectura), NTFS (sólo lectura)
Formatos de archivo compatibles: AAC/M4A |
MP3 (32–320 kbps) |
AIF/AIFF (44,1–192 kHz, 16–32 bits) MP4 |
|
ALAC |
Ogg Vorbis |
FLAC |
WAV (44,1–192 kHz, 16–32 bits) |
Si bien el SC5000 Prime puede reproducir pistas que aún no se han analizado, efectuarles un pre-análisis permite que sus características funcionen de forma más efectiva. Puede analizar pistas en una de dos maneras:
•En el SC5000 Prime, cargue la pista: Cuando carga una pista para reproducirla, el SC5000 Prime la analizará automáticamente (si aún no hubiera sido analizada). Esto puede demorar un momento en terminar, dependiendo de la longitud de la pista. Puede empezar a reproducir la pista desde el comienzo inmediatamente, aunque tendrá que esperar unos momentos a que termine el análisis.
•Use el software Engine Prime: El software Engine Prime incluido puede pre-analizar la biblioteca de música que utilizará con el SC5000 Prime. También lo puede utilizar para organizar su biblioteca creando cajas y listas de reproducción. También administra sus preferencias de hardware del SC5000 Prime (consulte Funcionamiento para conocer más sobre este tema).
Visite denondj.com y busque la página web de SC5000 Prime para descargar el software Engine Prime.
Cómo eyectar una unidad USB o tarjeta SD:
1.Asegúrese de no estar reproduciendo ninguna de sus pistas en ninguna unidad SC5000 Prime conectada. Eyectar un dispositivo descarga sus pistas de todas las unidades SC5000 Prime en red.
2.Pulse Media Eject. Aparecerá una lista de dispositivos conectados en la pantalla principal.
3.Toque y mantenga su dedo sobre el nombre de su dispositivo hasta que el medidor se agote y el nombre del dispositivo desaparezca de la lista. Si se está reproduciendo actualmente una pista del dispositivo, se le preguntará si desea continuar con la eyección, lo cual detendrá la pista. Toque Cancel para cancelar la eyección del dispositivo o toque OK para eyectarlo.
Para detectar dispositivos adicionales, repita el paso 3.
Para regresar a la pantalla anterior, pulse Media Eject nuevamente o toque la X en la esquina superior derecha.
Conexiones en red
Puede conectar múltiples unidades SC5000 Prime entre sí mediante una red, permitiéndoles compartir bases de datos de pistas, información de sincronización y BPM y cualquier otro dato de forma transparente a través de esta conexión. Esta característica brinda algunas ventajas para sus actuaciones. Por ejemplo, si está usando cuatro unidades SC5000 Prime, puede usar una de ellas para explorar todas las pistas en todos los dispositivos (unidades USB o tarjetas SD) conectadas a cualquiera de estas unidades SC5000. Entonces podrá reproducir cualquiera de estas pistas inmediatamente sin tener que trasladar un dispositivo desde una unidad a otra.
Para conectar unidades SC5000 Prime entre sí mediante una red, utilice los cables de red incluidos para realizar una de las siguientes acciones:
•Si sólo está usando dos unidades SC5000 Prime, conecte sus dos puertos Link.
•Si está usando dos o más unidades SC5000 Prime, conecte cada uno de sus puertos Link a un puerto Link (1–4) en su mezclador X1800 Prime de Denon DJ.
•Cita utilizando dos o más unidades SC5000 Prime, conecte cada uno de sus puertos Link a un puerto Ethernet de un enrutador.
Se encenderá la luz Network (Media Status) cuando la unidad SC5000 Prime esté correctamente conectada a una red.
Configuración
El SC5000 Prime tiene diversos ajustes que puede personalizar en los Accesos directos (configuración básica) y las Preferencias (configuración avanzada). Consulte Funcionamiento > Configuración para aprender sobre estos ajustes.
Para abrir los Accesos directos, pulse Shortcuts.
Para abrir las Preferencias, mantenga pulsado View/Preferences/Utility.
20
Características
Panel superior
4 |
8 |
|
5 |
|
6 |
2 |
3 |
1 |
|
||
|
|
|
|||
9 |
|
7 |
|
||
|
|
|
|
||
|
10 |
|
|
|
|
|
|
|
|
|
|
33 |
|
|
12 |
|
13 |
|
|
|
14 |
||
32 |
|
|
|
|
|
|
|
21 |
22 |
||
|
|
11 |
|||
25 |
|
|
|
20 |
|
|
|
|
|
||
17 |
|
|
|
|
|
34 |
|
|
24 |
|
|
16 |
|
|
18 |
||
23 |
27 28 29 30 |
31 |
|||
15 |
|
26 |
|
|
19 |
|
|
|
|
|
|
Selección y exploración de medios
1.Pantalla principal: Esta pantalla multitáctil a todo color muestra información relevante sobre el funcionamiento actual del SC5000 Prime. Toque la pantalla (y utilice los controles de hardware) para controlar la interfaz. Consulte
Funcionamiento > Vista general de la pantalla principal para obtener más información.
2.Selección de medios: Estas luces se iluminarán para indicar si el tipo de medio correspondiente está conectado:
USB, SD o Network.
3.Fuente: Pulse este botón para mostrar una lista de dispositivos disponibles conectados al SC5000 Prime en la pantalla principal (otras unidades SC5000 Prime en red, unidades USB, tarjeta SD, etc.) Toque un dispositivo de la lista para seleccionarlo.
4.Media Eject: Pulse este botón para mostrar una lista de dispositivos disponibles conectados a esa unidad SC5000 Prime en la pantalla principal (por ejemplo, unidades de memoria USB conectadas a sus puertos USB o una tarjeta SD insertada en su ranura para tarjeta SD).
Para expulsar un dispositivo, asegúrese de que no se esté reproduciendo ninguna de sus pistas (expulsar un dispositivo descarga todas sus pistas de todas las unidades SC5000 Prime conectadas a la red), y luego toque y mantenga su dedo sobre su nombre en la pantalla principal hasta que ya no aparezca el nombre del dispositivo.
5.Back: Pulse este botón para pasar a la ventana anterior. Estando en la vista de actuación, pulse el botón para entrar en la vista de exploración.
6.Forward: Pulse este botón para pasar a la ventana siguiente. Estando en la vista de actuación, pulse el botón para entrar en la vista de exploración.
7.Select/Load: Durante su actuación, gire esta perilla para agrandar o achicar la forma de onda de la pista.
Estando en la vista de exploración, gire esta perilla para desplazarse por la lista. Pulse esta perilla para seleccionar un elemento o cargar en la bandeja la pista actualmente seleccionada. Mantenga pulsado Shift y luego gire esta perilla para recorrer la lista rápidamente.
8.View/Preferences/Utility: Pulse este botón para alternar entre la vista de la biblioteca y la vista de la pista. Mantenga pulsado este botón para entrar a la ventana de preferencias y utilidades.
9.Shortcuts: Pulse este botón para acceder a un menú reducido con opciones de reproducción y visualización.
21

Controles de reproducción y transporte
10.Layer: Pulse este botón para conmutar el foco de la capa del SC5000 Prime.
11.Plato: Este plato capacitivo sensible al tacto controla el cabezal de reproducción cuando se toca y se mueve la rueda. La pantalla en el centro muestra información relevante para su actuación, incluyendo la posición actual de la cabeza de reproducción, el tamaño del bucle automático actual o la capa actual. Consulte Funcionamiento > Vista general de la pantalla del plato para obtener más información.
Cuando el botón Vinyl (Vinilo) está encendido mueva el plato para “rayar” la pista como si se tratara de un disco de vinilo. Cuando el botón Vinyl está apagado (o si está tocando solo el costado del plato), mueva el plato para ajustar temporalmente la velocidad de la pista.
12.Wheel Adjust: Gire esta perilla para ajustar la resistencia del plato a los movimientos. Esta perilla aplica un freno al plato para evitar deslizamientos accidentales debido a vibraciones ambientales provenientes de frecuencias graves, inestabilidad de la superficie, etc.
13.Stop Time: Controla la desaceleración con la cual la pista disminuye su velocidad hasta detenerse completamente (“tiempo de frenado”) cuando hace una pausa pulsando Play/Pause (/ ).
14.Vinyl: Pulse este botón para activar/desactivar un “modo vinilo” para el plato. Cuando está activado, mueva el plato para “rayar” la pista como si se tratara de un disco de vinilo. Cuando está desactivado, mueva el plato para ajustar temporalmente la velocidad de la pista, lo cual resulta útil para alinear los beats.
15.Play/Pause (/ ): Con este botón se pone en pausa o reanuda la reproducción.
Mantenga pulsado Shift y pulse este botón para que la pista “tartamudee” desde el punto de cue inicial.
16.Cue: Durante la reproducción, pulse este botón para regresar la pista al punto de cue inicial y detener la reproducción. Si no estableció un punto de cue temporal, pulse este botón para regresar al principio de la pista. (Para establecer un punto de cue temporal, asegúrese de que la pista esté en pausa, mueva el plato para posicionar el cabezal de reproducción en la posición deseada y luego pulse este botón).
Si la bandeja está en pausa, mantenga pulsado este botón para reproducir la pista desde el punto de cue inicial. Suelte el botón para regresar la pista al punto de cue inicial y ponerla en pausa. Para continuar la reproducción sin volver al punto de cue inicial, mantenga pulsado este botón y luego mantenga pulsado el botón Play y luego suelte ambos botones.
Durante la reproducción, mantenga pulsado Shift y pulse este botón para establecer el punto de cue inicial.
17.Track Skip: Pulse uno de estos botones para saltar a la pista anterior o siguiente.
Si se encuentra actualmente en la mitad de una pista, pulse Previous Track (pista anterior) para regresar al comienzo de la misma.
Controles de sincronización y tono
18.Fader de tono: Mueva este fader para ajustar la velocidad (tono) de la pista. Puede ajustar su rango total manteniendo pulsado Shift y pulsando uno de los botones Pitch Bend.
Importante: Si se activa la sincronización, al mover el fader de tono en la unidad SC5000 Prime “maestra” se modificarán las velocidades de todas las unidades sincronizadas, mientras que mover el fader de tono en las otras unidades no hará nada.
19.Pitch Bend –/+: Mantenga pulsado uno de estos botones para reducir o aumentar (respectivamente) la velocidad de la pista momentáneamente.
Mantenga pulsado Shift y pulse uno de estos botones para ajustar el rango del fader de tono.
20.Bloqueo de nota/Reestablecer tono: Pulse este botón para activar o desactivar el bloqueo de nota. Una vez activado el bloqueo de nota, el tono de la pista permanecerá igual por más que modifique su velocidad.
Mantenga pulsado Shift y pulse este botón para restablecer el tono original de la pista (0%) independientemente de la posición del fader de tono.
21.Sync/Sync Off: Pulse este botón para activar la sincronización.
Para sincronizar dos o más unidades SC5000 Prime, pulse Sync en la unidad que desea que controle los BPM, la cual se convierte en la unidad “maestra”. Una vez que se activa la sincronización en esa unidad, pulse Sync en las unidades adicionales. El tiempo de cada unidad se sincronizará inmediatamente para coincidir con el tempo de la unidad maestra.
Mantenga pulsado Shift (Función secundaria) y pulse este botón para desactivar la sincronización.
22.Master: Pulse este botón para configurar esta unidad SC5000 Prime como la que controla el tempo maestro. Todas las unidades SC5000 Prime conectadas con la sincronización activada usarán este tempo. Si detiene a la unidad SC5000 Prime “maestra”, la siguiente unidad SC5000 Prime de reproducción más larga en la configuración se transformará automáticamente en la nuevo unidad “maestra” (a menos que la modifique manualmente).
Controles de actuación
23.Shift: Mantenga pulsado este botón para acceder a las funciones secundarias de otros controles.
24.Slip: Pulse este botón para activar o desactivar el modo de resbalamiento. En el modo de resbalamiento, puede saltar hacia puntos de cue, usar el plato o poner la pista en pausa, mientras la línea de tiempo de la pista continua (la mitad inferior de la forma de onda en la pantalla seguirá moviéndose hacia delante). En otras palabras, cuando detenga la acción que esté realizando, se reanudará la reproducción normal de la pista desde donde habría estado si nunca hubiera hecho nada (es decir, como si la pista hubiera estado reproduciéndose en avance todo el tiempo).
25.Censor/Reverse: Pulse este botón para activar o desactivar la característica Censor: la reproducción de la pista se invertirá, pero cuando suelte el botón, se seguirá reproduciendo normalmente desde donde estaría si nunca hubiera activado la característica Censor (es decir, como si la pista hubiera estado reproduciéndose hacia adelante todo ese tiempo).
Mantenga pulsado Shift y pulse este botón para invertir la reproducción de la pista normalmente. Pulse este botón nuevamente para regresar la reproducción a la dirección normal hacia adelante.
22

26.Pads para actuaciones en vivo: Estos pads tienen distintas funciones en cada bandeja en función del modo de pad activo.
27.Hot Cue: Pulse este botón para entrar al modo de cue rápido. Consulte Funcionamiento > Actuaciones > Modos de pad para obtener más información.
28.Loop: Pulse este botón una vez para entrar al modo de bucle manual. Púlselo una vez más para entrar al modo de bucle automático. Consulte Funcionamiento > Actuaciones > Modos de pad para obtener más información.
29.Roll: Pulse este botón para entrar al modo de redoble. Consulte Funcionamiento > Actuaciones > Modos de pad para obtener más información.
30.Slicer: Pulse este botón para entrar al modo cortador. Consulte Funcionamiento > Actuaciones > Modos de pad para obtener más información.
31.Parámetro /: Utilice estos botones para las diversas funciones en cada modo de pad. Consulte Funcionamiento > Actuaciones > Modos de pad para obtener más información.
32.Loop In/Loop Out: Pulse cualquiera de estos botones para crear un punto de entrada o de salida de bucle en la posición actual. Su posicionamiento se verá afectado por los ajustes de Quantize y Smart Loops. Consulte Funcionamiento > Configuración > Accesos directos para obtener más información.
33.Auto Loop/Loop Move: Gire esta perilla para ajustar el tamaño de un bucle automático. El valor aparecerá en la pantalla principal y en la pantalla del plato.
Pulse esta perilla para activar o desactivar un bucle automático en la posición actual de la pista.
Consejo: Puede asignar bucles automáticos a pads estando en el modo de bucle manual. Consulte Funcionamiento > Actuaciones > Modos de pad para obtener más información.
Mantenga pulsado Shift y gire esta perilla para desplazar el bucle activo a la izquierda o a la derecha.
34.Beat Jump: Pulse uno de estos botones para saltar hacia delante o hacia atrás en la pista. Use la perilla Auto Loop para determinar el tamaño del salto de beats.
Mantenga pulsado Shift y luego pulse uno de estos botones para desplazarse hacia delante o hacia atrás (respectivamente) por la pista.
Panel frontal
1.Puerto USB delantero: Conecte una unidad USB estándar a este
puerto USB. Cuando seleccione esa unidad USB como fuente (pulsando el botón Source), podrá usar la pantalla para seleccionar y cargar pistas en su unidad USB. También existen dos puertos USB similares en el panel trasero. Puede usar el cable alargador USB incluido para conectar unidades de memoria USB más grandes o pequeñas.
2.Ranura para tarjeta SD: Inserte una tarjeta SD o SDHC estándar en esta ranura. Cuando seleccione esa tarjeta SD como fuente (pulsando el botón Source), podrá usar la pantalla para seleccionar y cargar pistas en su tarjeta SD.
2 |
1 |
Panel trasero
1.Entrada de corriente: Utilice el cable de corriente incluido para
conectar esta entrada a una toma de corriente.
El SC5000 Prime cuenta con un circuito de protección que lo mantiene encendido durante 10 segundos después de un corte de corriente imprevisto. Dentro de esos 10 segundos después de cortarse la corriente (verá un mensaje en la pantalla) deberá volver a conectarlo a la fuente de corriente para poder regresar al funcionamiento normal.
|
8 |
|
9 |
|
6 |
7 5 4 |
3 |
2 |
1 |
2.Botón de encendido: Pulse este botón para encender o apagar el SC5000 Prime. Encienda el SC5000 Prime únicamente después de haber conectado todos sus dispositivos de entrada y antes de
encender sus amplificadores y altavoces. Apague sus amplificadores y altavoces antes de apagar el SC5000 Prime. Mantenga pulsado este botón durante 10 segundos para desconectar el SC5000 Prime.
3.Puerto Link: Use el cable de red incluido para conectar este puerto a otro SC5000 Prime o a su mezclador X1800 Prime de Denon DJ. Cada unidad SC5000 Prime conectada en red puede compartir bases de datos de pistas, información de sincronización y BPM y cualquier otro dato de forma transparente a través de esta conexión.
4.Puerto USB a PC (USB Out): Utilice un cable USB (incluido) para conectar este puerto USB a un puerto USB disponible en su ordenador. Esta conexión envía y recibe mensajes MIDI desde y hacia el ordenador.
5.Puertos USB traseros 2/3: Conecte unidades USB estándar a estos puertos USB. Cuando seleccione una de esas unidades USB como fuente (pulsando el botón Source), podrá usar la pantalla para seleccionar y cargar pistas en sus unidades USB. También existe un puerto USB similar en el panel trasero.
6.Layer A/B Outputs: Utilice cables RCA estéreo para conectar estas salidas a su mezclador de DJ. Las salidas de línea A envían la señal de audio desde la Capa A. Las salidas de línea B envían la señal de audio desde la Capa B.
7.Digital Outputs A/B: Use cables RCA estándar para conectar estas salidas de 24 bits/96 KHz a dispositivos y mezcladores tales como el mezclador X1800 Prime de Denon DJ.
8.Entrada Remote: Use un cable de inicio remoto estándar de 5 patillas para conectar esta entrada a la salida de su mezclador (si está disponible). Estando conectado a un mezclador compatible con inicio remoto, al mover el crossfader hacia el lado que corresponda a este SC5000 Prime (o al aumentar el fader de este canal) comenzará automáticamente la reproducción de la pista en la capa actualmente seleccionada.
9.Ranura de bloqueo Kensington®: Utilice esta ranura a fin de sujetar el SC5000 Prime a una mesa u otra superficie.
23
Loading...