


 Loading...
AV SURROUND PREAMPLIFIER
DN-500AV
Owner’s Manual
version Basic
version Advanced
Information
CAUTION
RISK OF ELECTRIC SHOCK
DO NOT OPEN
CAUTION:
TO REDUCETHE RISK OF ELECTRIC SHOCK, DO NOT REMOVE COVER (OR BACK). NO USER-SERVICEABLE PARTS INSIDE. REFER SERVICINGTO QUALIFIED SERVICE PERSONNEL.
The lightning flash with arrowhead symbol, within an equilateral triangle, is intended to alert the user to the presence of uninsulated “dangerous voltage” within the product’s enclosure that may be of sufficient magnitude to constitute a risk of electric shock to persons.
The exclamation point within an equilateral triangle is intended to alert the user to the presence of important operating and maintenance (servicing) instructions in the literature accompanying the appliance.
CAUTION:
USE OF CONTROLS OR ADJUSTMENTS OR REFOR-MANCE OF PROCEDURES OTHER THANTHOSE SPECIFIED HEREIN MAY RESULT IN HAZARDOUS RADIATION EXPOSURE.
IMPORTANT TO SAFETY
WARNING:
To reduce the risk of fire and electric shock, this apparatus should not be exposed to rain or moisture and objects filled with liquids, such as vases, should not be placed on this apparatus.
CAUTION
1.Handle the power supply cord carefully
Do not damage or deform the power supply cord. If it is damaged or deformed, it may cause electric shock or malfunction when used. When removing from wall outlet, be sure to remove by holding the plug attachment and not by pulling the cord.
2.Do not open the rear cover
In order to prevent electric shock, do not open the top cover. If problems occur, contact your DENON DEALER.
3.Do not place anything inside
Do not place metal objects or spill liquid inside the system. Electric shock or malfunction may result.
Please, record and retain the Model name and serial number of your set shown on the rating label.
Model No. DN-500AV Serial No.
FCC INFORMATION (For US customers)
1.COMPLIANCE INFORMATION
Product Name: AV Surround Preamplifier
Model Number: This unit
This product complies with Part 15 of the FCC Rules. Operation is subject to the following two conditions: (1) this product may not cause harmful interference, and (2) this product must accept any interference received, including interference that may cause undesired operation.
Denon Professional div. D&M Professional 1100 Maplewood Drive Itasca, IL 60143 Tel. 630-741-0330
2.IMPORTANT NOTICE: DO NOT MODIFY THIS PRODUCT
This product, when installed as indicated in the instructions contained in this manual, meets FCC requirements. Modification not expressly approved by DENON may void your authority, granted by the FCC, to use the product.
3.IMPORTANT
When connecting this product to network hub or router, use only a shielded STP or ScTP LAN cable which is available at retailer.
Follow all installation instructions. Failure to follow instructions could void your authority, granted by the FCC, to use the product.
4.NOTE
This product has been tested and found to comply with the limits for a Class B digital device, pursuant to Part 15 of the FCC Rules. These limits are designed to provide reasonable protection against harmful interference in a residential installation.
This product generates, uses and can radiate radio frequency energy and, if not installed and used in accordance with the instructions, may cause harmful interference to radio communications. However, there is no guarantee that interference will not occur in a particular installation. If this product does cause harmful interference to radio or television reception, which can be determined by turning the product OFF and ON, the user is encouraged to try to correct the interference by one or more of the following measures:
•Reorient or relocate the receiving antenna.
•Increase the separation between the equipment and receiver.
•Connect the product into an outlet on a circuit different from that to which the receiver is connected.
•Consult the local retailer authorized to distribute this type of product or an experienced radio/TV technician for help.
For Canadian customers:
This Class B apparatus complies with Canadian ICES-003.
Cet appareil numérique de la classe B est conforme à la norme NMB-003 du Canada.
I
version Basic
version Advanced
Information

IMPORTANT SAFETY INSTRUCTIONS
READ BEFORE OPERATING EQUIPMENT
This product was designed and manufactured to meet strict quality and safety standards. There are, however, some installation and operation precautions which you should be particularly aware of.
1.Read these instructions.
2.Keep these instructions.
3. Heed all warnings.
4.Follow all instructions.
5.Do not use this apparatus near water.
6.Clean only with dry cloth.
7.Do not block any ventilation openings. Install in accordance with the manufacturer’s instructions.
8.Do not install near any heat sources such as radiators, heat registers, stoves, or other apparatus (including amplifiers) that produce heat.
9.Do not defeat the safety purpose of the polarized or grounding-type plug. A polarized plug has two blades with one wider than the other. A grounding type plug has two blades and a third grounding prong. The wide blade or the third prong are provided for your safety. If the provided plug does not fit into your outlet, consult an electrician for replacement of the obsolete outlet.
10.Protect the power cord from being walked on or pinched particularly at plugs, convenience receptacles, and the point where they exit from the apparatus.
11.Only use attachments/accessories specified by the manufacturer.
12.Use only with the cart, stand, tripod, bracket, or table specified by the
manufacturer, or sold with the apparatus. When a cart is used, use caution when moving the cart/apparatus combination to avoid injury from tip-over.
13. Unplug this apparatus during lightning storms or when unused for long periods of time.
14. Refer all servicing to qualified service personnel. Servicing is required
when the apparatus has been damaged in any way, such as power-supply cord or plug is damaged, liquid has been spilled or objects have fallen into
the apparatus, the apparatus has been exposed to rain or moisture, does not operate normally, or has been dropped.
15.Batteries shall not be exposed to excessive heat such as sunshine, fire or the like.
16.This product is equipped with a three-wire grounding type plug, a plug having a third (grounding) pin.
This plug will only fit into a grounding-type power outlet.
If you are unable to insert the plug into the outlet, contact your electrician to replace your obsolete outlet. Do not defeat the safety purpose of the grounding-type plug.
CAUTION: (English)
To completely disconnect this product from the mains, disconnect the plug from the wall socket outlet.
The mains plug is used to completely interrupt the power supply to the unit and must be within easy access by the user.
Do not expose batteries to excessive heat such as sunshine, fire or the like.
VORSICHT: (Deutsch)
Um dieses Gerät vollständig von der Stromversorgung abzutrennen, trennen Sie bitte den Netzstecker von der Wandsteckdose ab.
Die Hauptstecker werden verwendet, um die Stromversorgung zum Gerät völlig zu unterbrechen; er muss für den Benutzer gut und einfach zu erreichen sein.
Setzen Sie Batterien nicht übermäßiger Wärme aus, z. B. Sonnenstrahlung, Feuer oder dergleichen.
PRECAUTION: (Français)
Pour déconnecter complètement ce produit du courant secteur, débranchez la prise de la prise murale.
La prise secteur est utilisée pour couper complètement l’alimentation de l’appareil et l’utilisateur doit pouvoir y accéder facilement.
N’exposez pas les batteries à une chaleur excessive telle que le soleil, le feu ou autre.
ATTENZIONE: (Italiano)
Per scollegare definitivamente questo prodotto dalla rete di alimentazione elettrica, togliere la spina dalla relativa presa.
La spina di rete viene utilizzata per interrompere completamente l’alimentazione all’unità e deve essere facilmente accessibile all’utente.
Non esporre le batterie a un calore eccessivo, per esempio al sole, al fuoco o altre fonti.
PRECAUCIÓN: |
(Español) |
Para desconectar completamente este producto de la alimentación eléctrica, desconecte el enchufe del enchufe de la pared.
El enchufe de la alimentación se utiliza para interrumpir por completo el suministro de alimentación a la unidad y debe de encontrarse en un lugar al que el usuario tenga fácil acceso.
No exponga las pilas a calor excesivo, como a la luz solar, el fuego, etc.
VOORZICHTIGHEID: |
(Nederlands) |
Om de voeding van dit product volledig te onderbreken moet de stekker uit het stopcontact worden getrokken.
De netstekker wordt gebruikt om de stroomtoevoer naar het toestel volledig te onderbreken en moet voor de gebruiker gemakkelijk bereikbaar zijn.
Stel de batterijen niet bloot aan felle zonneschijn, brand, enzovoorts.
FÖRSIKTIHETSMÅTT: |
(Svenska) |
Koppla loss stickproppen från eluttaget för att helt skilja produkten från nätet.
Stickproppen används för att helt bryta strömförsörjningen till apparaten, och den måste vara lättillgänglig för användaren.
Utsätt inte batterierna för stark hetta såsom solsken, eld eller liknande.
ATENÇÃO: |
(Português) |
Para desligar completamente este produto da corrente, desligue a ficha da tomada eléctrica.
A ficha eléctrica é utilizada para interromper completamente a alimentação da unidade e deve estar num local onde o utilizador lhe possa aceder facilmente.
Não exponha as pilhas a fontes de calor excessivo, como luz solar, fogo ou semelhantes.
II
version Basic
version Advanced
Information

nnNOTE ON USE / HINWEISE ZUM GEBRAUCH / OBSERVATIONS RELATIVES A L’UTILISATION / NOTE SULL’USO / NOTAS SOBRE EL USO /
ALVORENS TE GEBRUIKEN / OBSERVERA / NOTA SOBRE UTILIZAÇÃO
|
|
WARNINGS |
|
WARNHINWEISE |
AVERTISSEMENTS |
AVVERTENZE |
ADVERTENCIAS |
WAARSCHUWINGEN |
VARNINGAR |
AVISOS |
||
|
|
• Avoid high temperatures. |
• Vermeiden Sie hohe Temperaturen. |
• Eviter des températures |
• Evitate di esporre l’unità a |
• Evite altas temperaturas. |
• Vermijd hoge temperaturen. |
• Undvik höga |
• Evite temperaturas altas. |
|||
|
|
Allow for sufficient heat |
|
Beachten Sie, dass eine |
élevées. |
temperature elevate. |
Permite la suficiente |
Zorg er bij installatie in een |
temperaturer. |
Assegure uma suficiente |
||
|
|
dispersion when installed |
|
ausreichende Belüftung |
Tenir compte d’une |
Assicuratevi che vi sia |
dispersión del calor cuando |
audiorack voor, dat de door |
Se till att det finns |
dispersãodo calor quando a |
||
|
|
in a rack. |
|
gewährleistet wird, wenn das Gerät |
dispersion de chaleur |
un’adeguata dispersione del |
está instalado en la consola. |
het toestel geproduceerde |
möjlighet till god |
unidade forinstalada numa |
||
|
|
• Handle the power cord |
|
auf ein Regal gestellt wird. |
suffisante lors de |
calore quando installate l’unità |
• Maneje el cordón de |
warmte goed kan worden |
värmeavledning vid |
prateleira. |
||
|
|
carefully. |
• Gehen Sie vorsichtig mit dem |
l’installation sur une étagère. |
in un mobile per componenti |
energía con cuidado. |
afgevoerd. |
montering i ett rack. |
• Manuseie o cabo de |
|||
|
|
Hold the plug when |
|
Netzkabel um. |
• Manipuler le cordon |
audio. |
Sostenga el enchufe |
• Hanteer het netsnoer |
• Hantera nätkabeln |
alimentaçãocom cuidado. |
||
|
|
unplugging the cord. |
|
Halten Sie das Kabel am |
d’alimentation avec |
• Manneggiate il cavo di |
cuando desconecte el |
voorzichtig. |
varsamt. |
Puxe pela ficha quando |
||
|
|
• Keep the unit free from |
|
Stecker, wenn Sie den Stecker |
précaution. |
alimentazione con attenzione. |
cordón de energía. |
Houd het snoer bij de stekker |
Håll i kabeln när den |
desligar ocabo de |
||
|
|
moisture, water, and |
|
herausziehen. |
Tenir la prise lors du |
Tenete ferma la spina quando |
• Mantenga el equipo libre |
vast wanneer deze moet |
kopplas från el-uttaget. |
alimentação. |
||
|
|
dust. |
• Halten Sie das Gerät von |
débranchement du cordon. |
scollegate il cavo dalla presa. |
de humedad, agua y |
worden aanof losgekoppeld. |
• Utsätt inte apparaten för |
• Mantenha a unidade |
|||
|
|
• Unplug the power cord |
|
Feuchtigkeit, Wasser und Staub |
• Protéger l’appareil contre |
• Tenete l’unità lontana |
polvo. |
• Laat geen vochtigheid, |
fukt, vatten och damm. |
afastada dahumidade, da |
||
|
|
when not using the unit |
|
fern. |
l’humidité, l’eau et la |
dall’umidità, dall’acqua e dalla |
• Desconecte el cordón de |
water of stof in het apparaat |
• Koppla loss nätkabeln |
água e do pó. |
||
|
|
for long periods of time. |
• Wenn das Gerät längere Zeit |
poussière. |
polvere. |
energía cuando no utilice |
binnendringen. |
om apparaten inte |
• Desligue o cabo de |
|||
|
|
|||||||||||
|
|
• Do not obstruct the |
|
nicht verwendet werden soll, |
• Débrancher le cordon |
• Scollegate il cavo di |
el equipo por mucho |
• Neem altijd het netsnoer uit |
kommer att användas i |
alimentaçãoquando não |
||
|
|
ventilation holes. |
|
trennen Sie das Netzkabel vom |
d’alimentation lorsque |
alimentazione quando |
tiempo. |
het stopkontakt wanneer het |
lång tid. |
estiver a utilizar aunidade por |
||
|
|
• Do not let foreign |
|
Netzstecker. |
l’appareil n’est pas utilisé |
prevedete di non utilizzare |
• No obstruya los orificios |
apparaat gedurende een lange |
• Täpp inte till |
longos períodos detempo. |
||
|
|
objects into the unit. |
• Decken Sie den Lüftungsbereich |
pendant de longues |
l’unità per un lungo periodo di |
de ventilación. |
periode niet wordt gebruikt. |
ventilationsöppningarna. |
• Não obstrua os orifícios |
|||
|
|
• Do not let insecticides, |
|
nicht ab. |
périodes. |
tempo. |
• No deje objetos extraños |
• De ventilatieopeningen |
• Se till att främmande |
deventilação. |
||
|
|
benzene, and thinner |
• Lassen Sie keine fremden |
• Ne pas obstruer les trous |
• Non coprite i fori di |
dentro del equipo. |
mogen niet worden |
föremål inte tränger in i |
• Não deixe objectos |
|||
|
|
come in contact with |
|
Gegenstände in das Gerät |
d’aération. |
ventilazione. |
• No permita el contacto |
beblokkeerd. |
apparaten. |
estranhos dentro da |
||
|
|
|
unidade. |
|||||||||
|
|
the unit. |
|
kommen. |
• Ne pas laisser des objets |
• Non inserite corpi estranei |
de insecticidas, gasolina y |
• Laat geen vreemde |
• Se till att inte |
|||
|
|
|
• Não permita que |
|||||||||
|
|
• Never disassemble or |
• Lassen Sie das Gerät nicht |
étrangers dans l’appareil. |
all’interno dell’unità. |
diluyentes con el equipo. |
voorwerpen in dit apparaat |
insektsmedel på |
insecticidas, benzina |
|||
|
|
modify the unit in any |
|
mit Insektiziden, Benzin oder |
• Ne pas mettre en contact |
• Assicuratevi che l’unità non |
• Nunca desarme o |
vallen. |
spraybruk, bensen och |
e diluente entrem em |
||
|
|
way. |
|
Verdünnungsmitteln in Berührung |
des insecticides, du benzène |
entri in contatto con insetticidi, |
modifique el equipo de |
• Voorkom dat insecticiden, |
thinner kommer i kontakt |
contacto com a unidade. |
||
|
|
• Ventilation should not |
|
kommen. |
et un diluant avec l’appareil. |
benzolo o solventi. |
ninguna manera. |
benzeen of verfverdunner met |
med apparatens hölje. |
• Nunca desmonte ou |
||
|
|
be impeded by covering |
• Versuchen Sie niemals das Gerät |
• Ne jamais démonter ou |
• Non smontate né modificate |
• La ventilación no debe |
dit toestel in contact komen. |
• Ta inte isär apparaten |
modifique dealguma forma |
|||
|
|
a unidade. |
||||||||||
|
|
the ventilation openings |
|
auseinander zu nehmen oder zu |
modifier l’appareil d’une |
l’unità in alcun modo. |
quedar obstruida por |
• Dit toestel mag niet |
och försök inte bygga |
|||
|
|
|
• A ventilação não deve |
|||||||||
|
|
with items, such as |
|
verändern. |
manière ou d’une autre. |
• Le aperture di ventilazione |
haberse cubierto las |
gedemonteerd of aangepast |
om den. |
|||
|
|
|
ser obstruída, tapando as |
|||||||||
|
|
newspapers, tablecloths |
• Die Belüftung sollte auf keinen |
• Ne pas recouvrir les orifices |
non devono essere ostruite |
aperturas con objetos |
worden. |
• Ventilationen bör |
aberturas de ventilação |
|||
|
|
or curtains. |
|
Fall durch das Abdecken der |
de ventilation avec des |
coprendole con oggetti, quali |
como periódicos, |
• De ventilatie mag niet |
inte förhindras |
com objectos, como |
||
|
|
• Naked flame sources |
|
Belüftungsöffnungen durch |
objets tels que des journaux, |
giornali, tovaglie, tende e |
manteles o cortinas. |
worden belemmerd door |
genom att täcka för |
jornais, toalhas ou cortinas. |
||
|
|
such as lighted candles |
|
Gegenstände wie beispielsweise |
nappes ou rideaux. Cela |
così via. |
• No deberán colocarse |
de ventilatieopeningen af |
ventilationsöppningarna |
• Não devem ser colocadas |
||
|
|
should not be placed on |
|
Zeitungen, Tischtücher, Vorhänge |
entraverait la ventilation. |
• Non posizionate sull’unità |
sobre el aparato |
te dekken met bijvoorbeeld |
med föremål såsom |
junto à unidade fontes de |
||
|
|
|
chama aberta, como velas |
|||||||||
|
|
the unit. |
|
o. Ä. behindert werden. |
• Ne jamais placer de flamme |
fiamme libere, come ad |
fuentes inflamables sin |
kranten, een tafelkleed of |
tidningar, bordsdukar |
|||
|
|
|
acesas. |
|||||||||
|
|
• Observe and follow local |
• Auf dem Gerät sollten keinerlei |
nue sur l'appareil, notamment |
esempio candele accese. |
protección, como velas |
gordijnen. |
eller gardiner. |
||||
|
|
• Respeite as |
||||||||||
|
|
regulations regarding |
|
direkte Feuerquellen wie |
des bougies allumées. |
• Prestate attenzione agli aspetti |
encendidas. |
• Plaats geen open vlammen, |
• Placera inte öppen |
|||
|
|
|
regulamentações locais |
|||||||||
|
|
battery disposal. |
|
beispielsweise angezündete |
• Veillez à respecter les lois en |
legati alla tutela dell’ambiente |
• A la hora de deshacerse |
bijvoorbeeld een brandende |
eld, t.ex. tända ljus, på |
|||
|
|
|
relativas à eliminação de |
|||||||||
|
|
• Do not expose the unit |
|
Kerzen aufgestellt werden. |
vigueur lorsque vous jetez |
nello smaltimento delle |
de las pilas, respete la |
kaars, op het apparaat. |
apparaten. |
|||
|
|
|
pilhas. |
|||||||||
|
|
to dripping or splashing |
• Bitte beachten Sie bei der |
les piles usagées. |
batterie. |
normativa para el cuidado |
• Houd u steeds aan de |
• Tänk på miljöaspekterna |
||||
|
|
• Não exponha a unidade a |
||||||||||
|
|
fluids. |
|
Entsorgung der Batterien |
• L’appareil ne doit pas |
• L’apparecchiatura non deve |
del medio ambiente. |
milieuvoorschriften wanneer |
när du bortskaffar |
gotejamento ou salpicos |
||
|
|
• Do not place objects |
|
die örtlich geltenden |
être exposé à l’eau ou à |
essere esposta a gocciolii o |
• No exponer el aparato |
u gebruikte batterijen |
batterier. |
|||
|
|
|
de líquidos. |
|||||||||
|
|
filled with liquids, such |
|
Umweltbestimmungen. |
l’humidité. |
spruzzi. |
al goteo o salpicaduras |
wegdoet. |
• Apparaten får inte |
|||
|
|
|
• Não coloque objectos com |
|||||||||
|
|
as vases, on the unit. |
• Das Gerät sollte keiner tropfenden |
• Ne pas poser d’objet |
• Non posizionate sull’unità |
cuando se utilice. |
• Stel het apparaat niet bloot |
utsättas för vätska. |
||||
|
|
líquidos, como jarras, em |
||||||||||
|
|
• Do not handle the mains |
|
oder spritzenden Flüssigkeit |
contenant du liquide, par |
alcun oggetto contenente |
• No colocar sobre el |
aan druppels of spatten. |
• Placera inte föremål |
|||
|
|
|
cima da unidade. |
|||||||||
|
|
cord with wet hands. |
|
ausgesetzt werden. |
exemple un vase, sur |
liquidi, come ad esempio i |
aparato objetos llenos de |
• Plaats geen voorwerpen |
fyllda med vätska, t.ex. |
|||
|
|
|
• Não manuseie o cabo de |
|||||||||
|
|
• When the switch is in |
• Auf dem Gerät sollten keine mit |
l’appareil. |
vasi. |
líquido, como jarros. |
gevuld met water, |
vaser, på apparaten. |
alimentação com as mãos |
|||
|
|
the OFF (STANDBY) |
|
Flüssigkeit gefüllten Behälter wie |
• Ne pas manipuler le cordon |
• Non toccare il cavo di |
• No maneje el cable de |
bijvoorbeeld een vaas, op het |
• Hantera inte nätsladden |
|||
|
|
|
molhadas. |
|||||||||
|
|
position, the equipment |
|
beispielsweise Vasen aufgestellt |
d’alimentation avec les |
alimentazione con le mani |
alimentación con las |
apparaat. |
med våta händer. |
|||
|
|
|
• Quando o interruptor |
|||||||||
|
|
is not completely |
|
werden. |
mains mouillées. |
bagnate. |
manos mojadas. |
• Raak het netsnoer niet met |
• Även om strömbrytaren |
|||
|
|
switched off from |
• Das Netzkabel nicht mit feuchten |
• Lorsque l’interrupteur |
• Quando l’interruttore è nella |
• Cuando el interruptor |
natte handen aan. |
står i det avstängda läget |
se encontra na posição |
|||
|
|
MAINS. |
|
oder nassen Händen anfassen. |
est sur la position OFF |
posizione OFF (STANDBY), |
está en la posición OFF |
• Als de schakelaar op OFF |
OFF (STANDBY), så är |
OFF (STANDBY), o |
||
|
|
|
equipamento não está |
|||||||||
|
|
• The equipment shall |
• Wenn der Schalter ausgeschaltet |
(STANDBY), l’appareil |
l’apparecchiatura non è |
(STANDBY), el equipo |
(STANDBY) staat, is het |
utrustningen inte helt |
||||
|
|
completamente desligado |
||||||||||
|
|
be installed near the |
|
ist (OFF (STANDBY)-Position), ist |
n’est pas complètement |
completamente scollegata da |
no está completamente |
apparaat niet volledig |
bortkopplad från det |
|||
|
|
|
da REDE ELÉCTRICA. |
|||||||||
|
|
power supply so that the |
|
das Gerät nicht vollständig vom |
déconnecté du SECTEUR |
MAINS. |
desconectado de la |
losgekoppeld van de |
elektriska nätet (MAINS). |
|||
|
|
|
• O equipamento deve ser |
|||||||||
|
|
power supply is easily |
|
Stromnetz (MAINS) abgetrennt. |
(MAINS). |
• L’apparecchio va installato |
alimentación MAINS. |
netspanning (MAINS). |
• Utrustningen ska |
instalado junto da fonte de |
||
|
|
accessible. |
• Das Gerät sollte in der Nähe einer |
• L’appareil sera installé près |
in prossimità della fonte di |
• El equipo se instalará cerca |
• De apparatuur wordt in de |
vara installerad nära |
||||
|
|
alimentação, para que a |
||||||||||
|
|
|
|
|
Netzsteckdose aufgestellt werden, |
de la source d’alimentation, |
alimentazione, in modo che |
de la fuente de alimentación |
buurt van het stopcontact |
strömuttaget så att |
||
|
|
|
|
|
fonte de alimentação esteja |
|||||||
|
|
|
|
|
damit es leicht an das Stromnetz |
de sorte que cette dernière |
quest’ultima sia facilmente |
de manera que resulte fácil |
geïnstalleerd, zodat dit altijd |
strömförsörjningen är |
||
|
|
|
|
|
facilmente acessível. |
|||||||
|
|
|
|
|
angeschlossen werden kann. |
soit facilement accessible. |
accessibile. |
acceder a ella. |
gemakkelijk toegankelijk is. |
lätt att tillgå. |
||
|
|
|
|
|
||||||||
|
|
|
|
|
|
|||||||
|
|
|
|
|
|
|
|
|
|
|
|
|
III
version Basic
version Advanced
Information

•DECLARATION OF CONFORMITY |
(English) |
We declare under our sole responsibility that this product, to which this declaration relates, is in conformity with the following standards:
EN60065, EN55013, EN55020, EN61000-3-2 and EN61000-3-3.
Following the provisions of Low Voltage Directive 2006/95/EC and EMC Directive 2004/108/ EC, the EC regulation 1275/2008 and its frame work Directive 2009/125/EC for Energy-related
Products (ErP).
•ÜBEREINSTIMMUNGSERKLÄRUNG |
(Deutsch) |
Wir erklären unter unserer Verantwortung, daß dieses Produkt, auf das sich diese Erklärung bezieht, den folgenden Standards entspricht:
EN60065, EN55013, EN55020, EN61000-3-2 und EN61000-3-3.
Gemäß den Bestimmungen der Niederspannungsrichtlinie 2006/95/EG und EMV Richtlinie 2004/108/EG, der Verordnung (EG) Nr. 1275/2008 der Kommission und deren Rahmenrichtlinie 2009/125/EG zu energieverbrauchsrelevanten Produkten (ErP).
•DECLARATION DE CONFORMITE |
(Français) |
Nous déclarons sous notre seule responsabilité que l’appareil, auquel se réfère cette déclaration, est conforme aux standards suivants:
EN60065, EN55013, EN55020, EN61000-3-2 et EN61000-3-3.
Selon la directive 2006/95/EC concernant la basse tension et la directive CEM 2004/108/EC, la réglementation européenne 1275/2008 et la directive 2009/125/EC établissant un cadre de travail applicable aux produits liés à l’énergie (ErP).
•DICHIARAZIONE DI CONFORMITÀ |
(Italiano) |
Dichiariamo con piena responsabilità che questo prodotto, al quale la nostra dichiarazione si riferisce, è conforme alle seguenti normative:
EN60065, EN55013, EN55020, EN61000-3-2 e EN61000-3-3.
Facendo seguito alle disposizioni della direttiva sul basso voltaggio 2006/95/EC alla direttiva EMC 2004/108/EC, alla norma EC 1275/2008 e alla relativa legge quadro 2009/125/EC in materia di prodotti alimentati ad energia (ErP).
QUESTO PRODOTTO E’ CONFORME
AL D.M. 28/08/95 N. 548
•DECLARACIÓN DE CONFORMIDAD |
(Español) |
Declaramos bajo nuestra exclusiva responsabilidad que este producto al que hace referencia esta declaración, está conforme con los siguientes estándares:
EN60065, EN55013, EN55020, EN61000-3-2 y EN61000-3-3.
De acuerdo con la directiva sobre baja tensión 2006/95/CE y la directiva sobre CEM 2004/108/ CE, la normativa CE 1275/2008 y su directiva marco 2009/125/EC para productos relacionados con la energía (ErP).
•EENVORMIGHEIDSVERKLARING |
(Nederlands) |
Wij verklaren uitsluitend op onze verantwoordelijkheid dat dit produkt, waarop deze verklaring betrekking heeft, in overeenstemming is met de volgende normen:
EN60065, EN55013, EN55020, EN61000-3-2 en EN61000-3-3.
Volgens de voorzieningen van lage spanningsrichtlijn 2006/95/EC en EMC-richtlijn 2004/108/ EC, de EU-richtlijn 1275/2008 en de kaderrichtlijn 2009/125/EC voor energieverbruikende producten (ErP).
•ÖVERENSSTÄMMELSESINTYG |
(Svenska) |
Härmed intygas helt på eget ansvar att denna produkt, vilken detta intyg avser, uppfyller följande standarder:
EN60065, EN55013, EN55020, EN61000-3-2 och EN61000-3-3.
Uppfyller reglerna i lågspänningsdirektivet 2006/95/EC och EMC-direktivet 2004/108/ EC, EU-förordningen 1275/2008 och ramverksdirektivet 2009/125/EC för energirelaterade produkter (ErP).
•DECLARAÇÃO DE CONFORMIDADE |
(Português) |
Declaramos sob nossa exclusiva responsabilidade que este produto, ao qual se refere esta declaração, se encontra em conformidade com as seguintes normas:
EN60065, EN55013, EN55020, EN61000-3-2 e EN61000-3-3.
De acordo com as provisões da Directiva de Baixa Tensão 2006/95/CE e a Directiva CEM 2004/108/CE, o Regulamento (CE) 1275/2008 e a respectiva Directiva-Quadro 2009/125/CE para produtos relacionados com o consumo de energia (ErP).
D&M Professional Europe
A division of D&M Europe B.V. Beemdstraat 11
5653 MA Eindhoven The Netherlands
version Basic
version Advanced
Information
IV
A NOTE ABOUT RECYCLING:
This product’s packaging materials are recyclable and can be reused. Please dispose of any materials in accordance with the local recycling regulations.
When discarding the unit, comply with local rules or regulations.
Batteries should never be thrown away or incinerated but disposed of in accordance with the local regulations concerning battery disposal.
This product and the supplied accessories, excluding the batteries, constitute the applicable product according to the WEEE directive.
HINWEIS ZUM RECYCLING:
Das Verpackungsmaterial dieses Produktes ist zum Recyceln geeignet und kann wieder verwendet werden. Bitte entsorgen Sie alle Materialien entsprechend der örtlichen Recycling-
Vorschriften.
Beachten Sie bei der Entsorgung des Gerätes die örtlichen Vorschriften und Bestimmungen.
Die Batterien dürfen nicht in den Hausmüll geworfen oder verbrannt werden; bitte entsorgen Sie die Batterien gemäß der örtlichen Vorschriften. Dieses Produkt und das im Lieferumfang enthaltene Zubehör (mit Ausnahme der Batterien!)
entsprechen der WEEE-Direktive.
UNE REMARQUE CONCERNANT LE RECYCLAGE:
Les matériaux d’emballage de ce produit sont recyclables et peuvent être réutilisés. Veuillez disposer des matériaux conformément aux lois sur le recyclage en vigueur.
Lorsque vous mettez cet appareil au rebut, respectez les lois ou réglementations en vigueur.
Les piles ne doivent jamais être jetées ou incinérées, mais mises au rebut conformément aux lois en vigueur sur la mise au rebut des piles.
Ce produit et les accessoires inclus, à l’exception des piles, sont des produits conformes à la directive DEEE.
NOTA RELATIVA AL RICICLAGGIO:
I materiali di imballaggio di questo prodotto sono riutilizzabili e riciclabili. Smaltire i materiali conformemente alle normative locali sul riciclaggio.
Per lo smaltimento dell’unità, osservare le normative o le leggi locali in vigore.
Non gettare le batterie, né incenerirle, ma smaltirle conformemente alla normativa locale sui rifiuti chimici.
Questo prodotto e gli accessori inclusi nell’imballaggio sono applicabili alla direttiva RAEE, ad eccezione delle batterie.
ACERCA DEL RECICLAJE:
Los materiales de embalaje de este producto son reciclables y se pueden volver a utilizar. Disponga de estos materiales siguiendo los reglamentos de reciclaje de su localidad.
Cuando se deshaga de la unidad, cumpla con las reglas o reglamentos locales.
Las pilas nunca deberán tirarse ni incinerarse. Deberá disponer de ellas siguiendo los reglamentos de su localidad relacionados con los desperdicios químicos.
Este producto junto con los accesorios empaquetados es el producto aplicable a la directiva RAEE excepto pilas.
EEN AANTEKENING MET BETREKKING TOT DE RECYCLING:
Het inpakmateriaal van dit product is recycleerbaar en kan opnieuw gebruikt worden. Er wordt verzocht om zich van elk afvalmateriaal te ontdoen volgens de plaatselijke voorschriften.
Volg voor het wegdoen van de speler de voorschriften voor de verwijdering van witen bruingoed op.
Batterijen mogen nooit worden weggegooid of verbrand, maar moeten volgens de plaatselijke voorschriften betreffende chemisch afval worden verwijderd.
Op dit product en de meegeleverde accessoires, m.u.v. de batterijen is de richtlijn voor afgedankte elektrische en elektronische apparaten (WEEE) van toepassing.
OBSERVERA ANGÅENDE ÅTERVINNING:
Produktens emballage är återvinningsbart och kan återanvändas. Kassera det enligt lokala återvinningsbestämmelser.
När du kasserar enheten ska du göra det i överensstämmelse med lokala regler och bestämmelser.
Batterier får absolut inte kastas i soporna eller brännas. Kassera dem enligt lokala bestämmelser för kemiskt avfall. Denna apparat och de tillbehör som levereras med den uppfyller gällande WEEE-direktiv, med undantag av batterierna.
UMA NOTA SOBRE A RECICLAGEM:
Os materiais de embalagem deste produto são recicláveis e podem ser reutilizados. Elimine quaisquer materiais de acordo com as normas de reciclagem locais.
Quando eliminar a unidade, obedeça às regras ou normas locais.
As pilhas nunca devem ser deitadas fora ou incineradas, mas sim eliminadas de acordo com as normais locais relativas aos resíduos químicos.
Este produto e os respectivos acessórios embalados em conjunto constituem o produto aplicável de acordo com a directiva WEEE, excepto as pilhas.
n CAUTIONS ON INSTALLATION
VORSICHTSHINWEISE ZUR AUFSTELLUNG PRÉCAUTIONS D’INSTALLATION PRECAUZIONI SULL’INSTALLAZIONE EMPLAZAMIENTO DE LA INSTALACIÓN
VOORZORGSMAATREGELEN BIJ DE INSTALLATIE FÖRSIKTIGHET VID INSTALLATIONEN PRECAUÇÕES DE INSTALAÇÃO
z
z z
z |
WandWall |
|
Paroi |
|
Parete |
|
Pared |
|
Muur |
|
Vägg |
|
Parede |
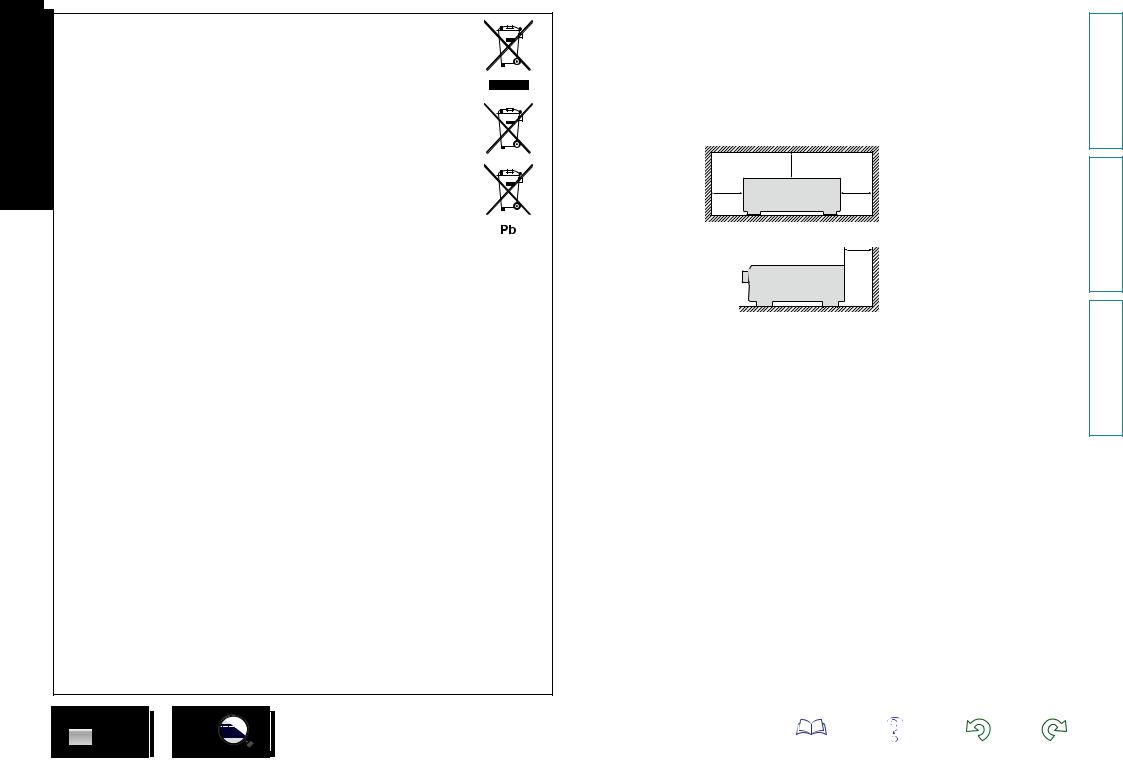
zzFor proper heat dispersal, do not install this unit in a confined space, such as a bookcase or similar enclosure.
•More than 0.1 m (4 in.) is recommended.
•Do not place any other equipment on this unit.
zzStellen Sie das Gerät nicht an einem geschlossenen Ort, wie in einem Bücherregal oder einer ähnlichen
Einrichtung auf, da dies eine ausreichende Belüftung des Geräts behindern könnte.
•Empfohlen wird über 0,1 m.
•Keine anderen Gegenstände auf das Gerät stellen.
zzPour permettre la dissipation de chaleur requise, n’installez pas cette unité dans un espace confiné tel qu’une bibliothèque ou un endroit similaire.
•Une distance de plus de 0,1 m (4 po.) est recommandée.
•Ne placez aucun matériel sur cet appareil.
zzPer una dispersione adeguata del calore, non installare questa apparecchiatura in uno spazio ristretto, come ad esempio una libreria o simili.
•Si raccomanda una distanza superiore ai 0,1 m.
•Non posizionare alcun altro oggetto o dispositivo su questo dispositivo.
zzPara la dispersión del calor adecuadamente, no instale este equipo en un lugar confinado tal como una librería o unidad similar.
•Se recomienda dejar más de 0,1 m (4 pulg.) alrededor.
•No coloque ningún otro equipo sobre la unidad.
zzPlaats dit toestel niet in een kleine afgesloten ruimte, zoals een boekenkast e.d., omdat anders de warmte niet op gepaste wijze kan worden afgevoerd.
•Meer dan 0,1 m is aanbevolen.
•Plaats geen andere apparatuur op het toestel.
zzFör att tillförsäkra god värmeavledning får utrustningen inte installeras i instängda utrymmen, som t.ex. en bokhylla eller liknande.
•Mer än 0,1 m rekommenderas.
•Placera ingen annan utrustning ovanpå den här enheten.
zzPara uma correcta dispersão do calor, não instale esta unidade num espaço confinado, como uma estante de livros ou uma estrutura semelhante.
•São recomendados mais de 0,1 m.
•Não coloque qualquer outro equipamento sobre est unidade.
V
version Basic
version Advanced
Information

Getting started
Thank you for purchasing this DENON Professional product. To ensure proper operation, please read this owner’s manual carefully before using the product. After reading, be sure to keep the documentation for future reference.
Contents
Getting started···············································································1 Accessories···················································································1 Features························································································2 Cautions on handling·····································································3
Basic version············································································4
Connections···················································································5 Important information····································································5 Connecting a power amplifier·······················································6 Connecting an HDMI-compatible device·······································7 Connecting a TV··········································································10
Connecting a Blu-ray Disc player/DVD player······························11 Connecting a set-top box (Satellite tuner/Cable TV)····················11 Connecting a digital camcorder···················································12 Connecting a control dock for iPod·············································12 Connecting an iPod or USB memory device to the USB port·····13 Connecting a CD player·······························································14 Connecting to a network (LAN)···················································15 Connecting an external control device········································16 Connecting the power cord·························································17
Settings························································································18 Making the network settings (Network Setup)···························18 Playback (Basic operation)··························································19 Important information··································································19 Playing a Blu-ray Disc player/DVD player·····································20 Playing a CD player······································································20 Playing an iPod············································································21 Playing network audio·································································25 Playing a USB memory device····················································30
Selecting a listening mode (Surround mode)···························33 Selecting a listening mode··························································33
Advanced version································································37
Speaker installation/connection (Advanced connection)········38 Install···························································································38 Connect·······················································································40 Playback (Advanced operation)··················································46 Convenient functions··································································46
Playback in ZONE2 (Separate room) ·········································51 Audio output················································································51 Playback······················································································52 Quick select function···································································53 Sleep timer function····································································53
How to make detailed settings··················································54 Menu map···················································································54 Examples of menu screen displays·············································55 Examples of menu and front display···········································56 Inputting characters ····································································57 Audio Adjust················································································59 Information··················································································63 System Setup··············································································64 Input Setup··················································································77
Operating the connected devices by remote control unit·······82 Operating AV devices··································································82 Registering preset codes····························································83 Operating devices·······································································86
Specifying the zone used with the main remote control unit······88 Resetting the remote control unit···············································88 Serial remote control··································································89 RS-232C control··········································································89 IP Control (Ethernet)····································································90 Communication protocol·····························································91
Information···········································································110
Part names and functions·························································111 Front panel················································································111 Display·······················································································112 Rear panel·················································································113 Remote control unit···································································114
Other information······································································116 Trademark information······························································116 Surround····················································································117 Relationship between video signals and monitor output··········121 Explanation of terms·································································122
Troubleshooting········································································125 Resetting the microprocessor···················································128 Specifications·············································································129
Accessories |
|
Check that the following parts are supplied with the product. |
|
q Getting Started......................................................................... |
1 |
w CD-ROM (Owner’s manual)..................................................... |
1 |
e Warranty (for North America model only)................................ |
1 |
r Power cord............................................................................... |
2 |
t Remote control unit (RC-1156)................................................ |
1 |
y R6/AA batteries........................................................................ |
2 |
r
U.S.A and Canada |
European,U.K and |
|
Asia/Pacific |
|
t |
1
version Basic
version Advanced
Information
Features
Setup wizard, providing easy-to-follow setup instructions
First select the language when prompted. Then simply follow the instructions displayed on the TV screen to set up the language select, network, etc.
Easy to use, Graphical User Interface
This unit is equipped with an easy to see “Graphical User Interface” that uses menu displays and levels. The use of level displays increases operability of the this unit.
Direct play for iPod® and iPhone® via USB (vpage 13)
Music data from an iPod can be played back if you connect the USB cable supplied with the iPod via the USB port of this unit, and also an iPod can be controlled with the remote control unit for this unit. When an iPod is connected, merely pressing iPod 1 on the main unit starts playback of music from the iPod.
Supports HDMI (with 3D, ARC, Deep Color,
“x.v.Color”, Auto Lip Sync and HDMI control function) (vpage 7)
This unit can output 3D video signals input from a Blu-ray Disc player to a TV that supports a 3D system. This unit also supports the ARC (Audio Return Channel) function, which reproduces TV sound with this unit via an HDMI cable used for connecting the unit and a TVz.
zThe TV should support the ARC function.
6-HDMI inputs and 1-output
The unit is equipped with 6 HDMI input connectors for connecting devices with HDMI connectors, such as a Blu-ray Disc player, game machine, HD video camera, etc.
High definition audio support
The unit is equipped with a decoder which supports high-quality digital audio format for Blu-ray Disc players such as Dolby TrueHD, DTS-HD Master Audio, etc.
2
version Basic
version Advanced
Information

Cautions on handling
•Before turning the power on
Check once again that all connections are correct and that there are no problems with the connection cables.
•Power is supplied to some of the circuitry even when the unit is set to the standby mode. When going
on vacation or leaving home for long periods of time, be sure to unplug the power cord from the power outlet.
• About condensation
If there is a major difference in temperature between the inside of the unit and the surroundings, condensation (dew) may form on the operating parts inside the unit, causing the unit not to operate properly.
If this happens, let the unit sit for an hour or two with the power turned off and wait until there is little difference in temperature before using the unit.
•Cautions on using mobile phones
Using a mobile phone near this unit may result in noise. If that occurs, move the mobile phone away from this unit when it is in use.
•Moving the unit
Turn off the power and unplug the power cord from the power outlet. Next, disconnect the connection cables to other system units before moving the unit.
•Operable time for continuous use
This unit can be used continually for up to 24 hours. Continuing to use this unit for longer than 24 hours may result in operations failing to function correctly. To continue use for longer than 24 hours, restart the unit every 24 hours.
•About care
•Wipe the cabinet and control panel clean with a soft cloth.
•Follow the instructions when using a chemical cleaner.
•Benzene, paint thinner or other organic solvents as well as insecticide may cause material changes and discoloration if brought into contact with the unit, and should therefore not be used.
3
version Basic
version Advanced
Information

Basic version
Basic version
Here, we explain the connections and basic operation methods for this unit.
FConnections vpage 5 FSettings vpage 18
FPlayback (Basic operation) vpage 19
FSelecting a listening mode (Surround mode) vpage 33
|
|
|
|
|
|
Connection |
vpage 6, |
|
|
|
|
|
|
|
|
|
|
|
|
|
|
||
|
|
|
|
|
|
Playback |
– |
|
|
|
|
|
|
|
|
|
|
|
|
|
|
||
|
|
|
|
|
|
|
|
|
|
||
|
|
|
|
|
|
|
|
||||
|
|
|
|
|
|
|
|
|
|
|
|
|
|
|
|
|
|
Connection |
vpage 8, 11 |
|
|
|
|
|
|
|
|
|
|
Playback |
vpage 20 |
|
|
|
|
|
|
|
|
|
|
|
|
|
|
|
|
|
|
|
|
|
|
Connection |
vpage 14 |
|
|
|
|
|
|
|
|
|
|
Playback |
vpage 20 |
|
|
|
|
|
|
|
|
|
|
|
|
|
|
||
|
|
|
|
|
|
|
|
|
|
|
|
|
|
|
|
|
|
Connection |
vpage 12 |
|
|
|
|
|
|
|
|
|
|
|
|
|
|
||
|
|
|
|
|
|
Playback |
vpage 21 |
|
|
|
|
|
|
|
|
|
|
|
|
|
|
||
|
|
|
|
|
|
|
|
|
|
|
|
|
|
|
|
|
|
Connection |
vpage 13 |
|
|
|
|
|
|
|
|
|
|
Playback |
vpage 30 |
|
|
|
|
|
|
|
|
|
|
|
|
|
|
||
|
|
|
|
|
|
|
|
|
|
|
|
|
|
|
|
|
|
Connection |
vpage 8, 12 |
|
|
|
|
|
|
|
|
|
|
Playback |
– |
|
|
|
|
|
|
|
|
|
|
|
|
|
|
|
|
Connection |
vpage 8, 10 |
Playback |
– |
Connection |
vpage 8, 11 |
Playback |
vpage 20 |
Connection |
vpage 8, 11 |
Playback |
– |
Connection |
vpage 13 |
Playback |
vpage 23 |
Connection |
vpage 8 |
Playback |
– |
Connection |
vpage 15 |
Playback |
vpage 25 |
For speaker connections, see page 40, C page 6 “Connecting a power amplifier”.
4
version Basic
version Advanced
Information
Connections
Important information
•Make connections as follows before using this unit. Select an appropriate connection type according to the devices to be connected.
•You may need to make some settings on this unit depending on the connection method. Refer to each description for more information.
•Select the cables (sold separately) according to the devices being connected.
NOTE
•Do not plug in the power cord until all connections have been completed. When the Setup wizard is running, follow the instructions in the Setup wizard screen for making connections. (Power is not supplied to the input/output terminals while the Setup wizard is running.)
•When running the Setup wizard, turn off the power supply of connected devices.
•When making connections, also refer to the operating instructions of the other devices being connected.
•Be sure to connect the left and right channels properly (left with left, right with right).
•Do not bundle power cords together with connection cables. Doing so can result in noise.
Converting input video signals for output (Video conversion function)
This unit is equipped with four types of video input connectors (HDMI, Component video, S-Video and Video) and three types of video output connectors (HDMI, Component video, and Video).
Use the connectors corresponding to the devices to be connected.
This function automatically converts various formats of video signals input to this unit into the formats used to output the video signals from this unit to a monitor.
|
GFlow of video signals for MAIN ZONEH |
|
|
Video device |
|
This unit |
Monitor (TV) |
|
|
||
|
|
|
|
|
Input |
Output |
|
Output |
(IN) |
(MONITOR OUT) |
Input |
HDMI connector |
HDMI connector |
HDMI connector |
HDMI connector |
Component video |
Component video |
Component video |
Component video |
connectors |
connectors |
connectors |
connectors |
S-Video connector |
S-Video |
|
|
|
connector |
|
|
Video connector |
Video connector |
Video connector |
Video connector |
•The video conversion function supports the NTSC, PAL, SECAM, NTSC 4.43, PAL-N, PAL-M and PAL-60 formats.
•Resolutions of HDMI-compatible TVs can be checked at “Monitor Info.” (vpage 63).
NOTE
•HDMI signals cannot be converted into analog signals.
•Component video input signals cannot be converted into Video format.
•When a non-standard video signal from a game machine or some other source is input, the video conversion function might not operate.
vSee overleaf
5
version Basic
version Advanced
Information

|
|
|
|
|
|
|
|
|
|
|
|
|
|
|
|
|
|
|
|
|
|
|
Important information |
||
|
|
Examples of screen display |
|
|
|
|
|
|||||
|
|
• Menu screen |
|
• Status display screen |
|
|
|
|
||||
|
|
|
|
|
|
|
When the |
input source is When the volume is adjusted. |
||||
|
|
|
|
|
|
|
switched. |
|
|
|
|
|
|
|
|
Menu |
|
|
|
|
|
|
|
|
|
|
|
|
|
|
Surr.Parameter |
|
|
|
|
|
|
|
|
|
|
|
Audio Adjust |
|
|
|
|
|
|
|
|
|
|
|
|
Information |
Tone |
|
|
|
|
|
|
|
|
|
|
|
Setup Wizard |
Manual EQ |
|
|
|
|
|
|
|
|
|
|
|
System Setup |
RESTORER |
|
|
|
|
|
|
|
|
|
|
|
Input Setup |
Audio Delay |
|
|
[Auto] |
|
Master Volume |
-55.5dB |
|
|
|
|
|
|
|
|
|
|
|
|||
|
|
|
|
|
|
|
SOURCE:BD |
|
|
|||
|
|
|
|
|
|
|
|
|
|
|
||
|
|
|
|
|
|
|
MODE |
:STEREO |
|
|
|
|
|
|
|
|
|
|
|
|
|
|
|
|
|
Status display: The operating status appears briefly on the screen when the input source is switched or the volume is changed.
NOTE
•If you operate the menu while playing back 3D video content or computer’s resolution (e.g. VGA), the playback video is replaced by the menu screen. The playback video is not displayed behind the menu screen.
•This unit does not show the status display while playing back 3D video content or computer’s resolution (e.g. VGA).
•The menu screen and status display are displayed when this unit and a TV are connected by HDMI. Furthermore, the menu screen and status display are not displayed when this unit and a TV are connected by VIDEO and COMPONENT VIDEO.
Connecting a power amplifier
•First connect a power amplifier in order to output audio from this unit.
•Switch the output voltage with the output level selector according to the connected power amplifier.
•For how to connect this unit with power amplifier, see “Connecting a power amplifier” (C page 6) and
“Speaker installation/connection (Advanced connection)” (vpage 38).
NOTE
Be sure to turn the power off before setting.
Cables used for connections
Audio cable (sold separately)
XLR cable
This unit
|
|
|
|
|
|
|
|
|
Output level |
|
|
|
|
|
|
|
|
|
selector |
RCA |
RCA |
RCA |
RCA |
RCA |
RCA |
RCA |
RCA |
RCA |
RCA |
XLR |
XLR |
XLR |
XLR |
XLR |
XLR |
XLR |
XLR |
XLR |
XLR |
SPEAKERS |
SPEAKERS |
SPEAKERS |
SPEAKERS |
SPEAKERS |
SPEAKERS |
SPEAKERS |
SPEAKERS |
SPEAKERS |
SPEAKERS |
Power amplifier
6
version Basic
version Advanced
Information
Connecting an HDMI-compatible device
You can connect up to seven HDMI-compatible devices (6-inputs/1-output) to the unit.
HDMI function
This unit supports the following HDMI functions:
•3D
•Deep Color (vpage 122)
•Auto Lip Sync (vpage 68, 122)
•“x.v.Color”, sYCC601 color, Adobe RGB color, Adobe YCC601 color (vpage 122, 123, 124)
•High definition digital audio format
•ARC (Audio Return Channel)
•Content Type
•CEC (HDMI control)
Copyright protection system
In order to play back digital video and audio such as BD-Video or DVD-Video via HDMI connection, both this unit and TV or the player need to support the copyright protection system known as HDCP (Highbandwidth Digital Content Protection System). HDCP is copyright protection technology comprised of data encryption and authentication of the connected AV devices. This unit supports HDCP.
•If a device that does not support HDCP is connected, video and audio are not output correctly. Read the owner’s manual of your television or player for more information.
About HDMI cables
•When a device supporting Deep Color is connected, use a cable compatible with “High Speed HDMI cable” or “High Speed HDMI cable with Ethernet”.
•When the ARC function is used, connect a device with a “Standard HDMI cable with Ethernet” or “High Speed HDMI cable with Ethernet” for HDMI.
About 3D function
This unit supports input and output of 3D (3 dimensional) video signals of HDMI.
To play back 3D video, you need a TV and player that provide support for the HDMI 3D function and a pair of 3D glasses.
NOTE
•When playing back 3D video, refer to the instructions provided in the manual of your playback device together with this manual.
•If you operate the menu while playing back 3D video content, the playback video is replaced by the menu screen. The playback video is not displayed behind the menu screen.
•This unit does not show the status display while playing back 3D video content.
•If 3D video with no 3D information is input, the menu screen and status display on this unit are displayed over the playback video.
•If 2D video is converted to 3D video on the television, the menu screen and status display on this unit are not displayed correctly. To view the menu screen and status display on this unit correctly, turn the television setting that converts 2D video to 3D video off.
About ARC (Audio Return Channel) function
The Audio Return Channel in HDMI enables a TV, via a single HDMI cable, to send audio data “upstream” to this unit.
NOTE
•To enable the ARC function, set “HDMI Control” to “ON” (vpage 68).
•When connecting a TV that does not support the ARC function, a separate connection using an audio cable is required. In this case, refer to “Connecting a TV” (vpage 10) for the connection method.
HDMI control function (vpage 46)
This function allows you to operate external devices from the unit and operate the unit from external devices.
NOTE
•The HDMI control function may not work depending on the device it is connected to and its settings.
•You cannot operate a TV or Blu-ray Disc player/DVD player that is not compatible with the HDMI control function.
7
About Content Type
HDMI enables simple, automated picture setting selection with no user intervention.
NOTE
To enable the Content Type, set “Video Mode” to “Auto” (vpage 79).
vSee overleaf
version Basic
version Advanced
Information
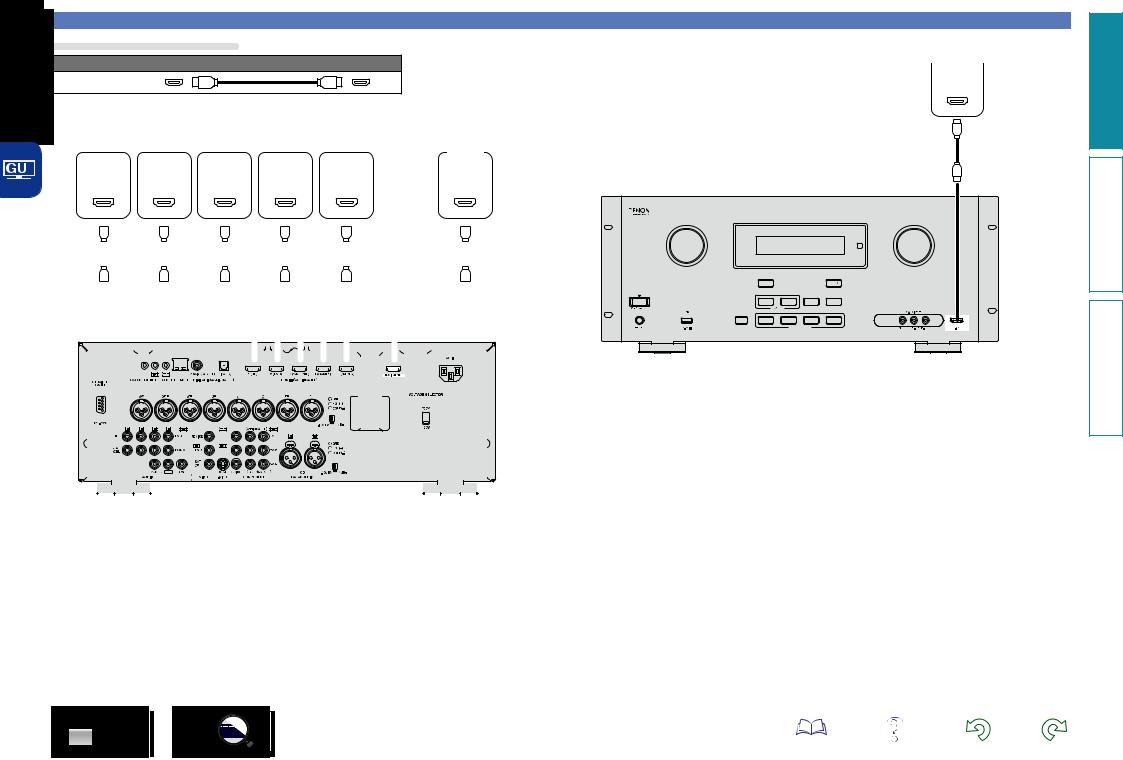
Cables used for connections
Audio and video cable (sold separately)
HDMI cable
• This interface allows transfer of digital video signals and digital audio signals over a single HDMI cable.
|
|
|
|
Blu-ray |
|
|
|
|
|
|
|
|
|
|
|
|
|
|
|
|
|
|
|
|
|
|
|
|
|
|
|
|
|
|
|
|
|
|
|
|
|
|
|
|
|
|
|
|
|
|
|
|
|
|
|
|
|
|
|
|
|
|
|
|
|
|
|
|
|
|
|
|
|
|
|
||||||||
|
|
|
|
|
|
|
|
|
|
|
|
|
|
|
|
|
|
|
|
|
|
|
|
|
|
|
|
|
|
|
|
|
|
|
|
|
|
|
|
|
|
|
|
|
|
|
|
|
|
|
|
|
|
|
|
|
|
|
|
|
|
|
|
|
|
|
|
|
|
|
|
|
|
|
|||||||||
|
|
|
|
|
|
Disc |
|
|
|
|
|
DVD |
|
|
|
Set-top |
|
|
|
|
|
|
Game |
|
|
|
Game |
|
|
|
|
|
|
|
|
|
|
|
|
|
|
|
|
|
|
|
|||||||||||||||||||||||||||||||||||||
|
|
|
|
|
|
|
|
|
|
|
|
|
|
|
|
|
|
|
|
|
|
|
|
|
|
|
|
|
|
|
|
|
|
|
|
|
|
|
|
|
|
||||||||||||||||||||||||||||||||||||||||||
|
|
|
|
|
|
|
|
|
|
|
|
|
|
|
|
|
|
|
|
|
|
|
|
|
|
|
|
|
|
|
|
|
|
TV |
|
|
|
||||||||||||||||||||||||||||||||||||||||||||||
|
|
|
|
|
player |
|
|
|
|
|
player |
|
|
|
|
box |
|
|
|
|
|
console 1 |
|
|
console 2 |
|
|
|
|
|
|
|
|
|
|
|
|
|
|
|
|
||||||||||||||||||||||||||||||||||||||||||
|
|
|
|
|
|
|
|
|
|
|
|
|
|
|
|
|
|
|
|
|
|
|
|
|
|
|
|
|
|
|
|
|
|
|
|
|
|
|
|
|
|
|
|
|
|
|
|
|
|
|
|
|
|
|
|
|
|
|
|
|
|
|
|
|
|
|
|
|
|
|
|
|
|
|
|
|
|
|
|
|
|
|
|
|
|
|
|
|
|
HDMI |
|
|
|
|
HDMI |
|
|
|
|
HDMI |
|
|
|
|
|
|
|
|
HDMI |
|
|
HDMI |
|
|
|
|
|
|
|
|
|
|
|
|
HDMI |
|
|
|
|||||||||||||||||||||||||||||||||||||||
|
|
|
|
|
|
OUT |
|
|
|
|
OUT |
|
|
|
|
OUT |
|
|
|
|
|
|
|
|
OUT |
|
|
OUT |
|
|
|
|
|
|
|
|
|
|
|
|
|
IN |
|
|
|
||||||||||||||||||||||||||||||||||||||
|
|
|
|
|
|
|
|
|
|
|
|
|
|
|
|
|
|
|
|
|
|
|
|
|
|
|
|
|
|
|
|
|
|
|
|
|
|
|
|
|
|
|
|
|
|
|
|
|
|
|
|
|
|
|
|
|
|
|
|
|
|
|
|
|
|
|
|
|
|
|
|
|
|
|
|
|
|
|
|
|
|
|
|
|
|
|
|
|
|
|
|
|
|
|
|
|
|
|
|
|
|
|
|
|
|
|
|
|
|
|
|
|
|
|
|
|
|
|
|
|
|
|
|
|
|
|
|
|
|
|
|
|
|
|
|
|
|
|
|
|
|
|
|
|
|
|
|
|
|
|
|
|
|
|
|
|
|
|
|
|
|
|
|
|
|
|
|
|
|
|
|
|
|
|
|
|
|
|
|
|
|
|
|
|
|
|
|
|
|
|
|
|
|
|
|
|
|
|
|
|
|
|
|
|
|
|
|
|
|
|
|
|
|
|
|
|
|
|
|
|
|
|
|
|
|
|
|
|
|
|
|
|
|
|
|
|
|
|
|
|
|
|
|
|
|
|
|
|
|
|
|
|
|
|
|
|
|
|
|
|
|
|
|
|
|
|
|
|
|
|
|
|
|
|
|
|
|
|
|
|
|
|
|
|
|
|
|
|
|
|
|
|
|
|
|
|
|
|
|
|
|
|
|
|
|
|
|
|
|
|
|
|
|
|
|
|
|
|
|
|
|
|
|
|
|
|
|
|
|
|
|
|
|
|
|
|
|
|
|
|
|
|
|
|
|
|
|
|
|
|
|
|
|
|
|
|
|
|
|
|
|
|
|
|
|
|
|
|
|
|
|
|
|
|
|
|
|
|
|
|
|
|
|
|
|
|
|
|
|
|
|
|
|
|
|
|
|
|
|
|
|
|
|
|
|
|
|
|
|
|
|
|
|
|
|
|
|
|
|
|
|
|
|
|
|
|
|
|
|
|
|
|
|
|
|
|
|
|
|
|
|
|
|
|
|
|
|
|
|
|
|
|
|
|
|
|
|
|
|
|
|
|
|
|
|
|
|
|
|
|
|
|
|
|
|
|
|
|
|
|
|
|
|
|
|
|
|
|
|
|
|
|
|
|
|
|
|
|
|
|
|
|
|
|
|
|
|
|
|
|
|
|
|
|
|
|
|
|
|
|
|
|
|
|
|
|
|
|
|
|
|
|
|
|
|
|
|
|
|
|
|
|
|
|
|
|
|
|
|
|
|
|
|
|
|
|
|
|
|
|
|
|
|
|
|
|
|
|
|
|
|
|
|
|
|
|
|
|
|
|
|
|
|
|
|
|
|
|
|
|
|
|
|
|
|
|
|
|
|
|
|
|
|
|
|
|
|
|
|
|
|
|
|
|
|
|
|
|
|
|
|
|
|
|
|
|
|
|
|
|
|
|
|
|
|
|
|
|
|
|
|
|
|
|
|
|
|
|
|
|
|
|
|
|
|
|
|
|
|
|
|
|
|
|
|
|
|
|
|
|
|
|
|
|
|
|
|
|
|
|
|
|
|
|
|
|
|
|
|
|
|
|
|
|
|
|
|
|
|
|
|
|
|
|
|
|
|
|
|
|
|
|
|
|
|
|
|
|
|
|
|
|
|
|
|
|
|
|
|
|
|
|
|
|
|
|
|
|
|
|
|
|
|
|
|
|
|
|
|
|
|
|
|
|
|
|
|
|
|
|
|
|
|
|
|
|
|
|
|
|
|
|
|
|
|
|
|
|
|
|
|
|
|
|
|
|
|
|
|
|
|
|
|
|
|
|
|
|
|
|
|
|
|
|
|
|
|
|
|
|
|
|
|
|
|
|
|
|
|
|
|
|
|
|
|
|
|
|
|
|
|
|
|
|
|
|
|
|
|
|
|
|
|
|
|
|
|
|
|
|
|
|
|
|
|
|
|
|
|
|
|
|
|
|
|
|
|
|
|
|
|
|
|
|
|
|
|
|
|
|
|
|
|
|
|
|
|
|
|
|
|
|
|
|
|
|
|
|
|
|
|
|
|
|
|
|
|
|
|
|
|
|
|
|
|
|
|
|
|
|
|
|
|
|
|
|
|
|
|
|
|
|
|
|
|
|
|
|
|
|
|
|
|
|
|
|
|
|
|
|
|
|
|
|
|
|
|
|
|
|
|
|
|
|
|
|
|
|
|
|
|
|
|
|
|
|
|
|
|
|
|
|
|
|
|
|
|
|
|
|
|
|
|
|
|
|
|
|
|
|
|
|
|
|
|
|
|
|
|
|
|
|
|
|
|
|
|
|
|
|
|
|
|
|
|
|
|
|
|
|
|
|
|
|
|
|
|
|
|
|
|
|
|
|
|
|
|
|
|
|
|
|
|
|
|
|
|
|
|
|
|
|
|
|
|
|
|
|
|
|
|
|
|
|
|
|
|
|
|
|
|
|
|
|
|
|
|
|
|
|
|
|
|
|
|
|
|
|
|
|
|
|
|
|
|
|
|
|
|
|
|
|
|
|
|
|
|
|
|
|
|
|
|
|
|
|
|
|
|
|
|
|
|
|
|
|
|
|
|
|
|
|
|
|
|
|
|
|
|
|
|
|
|
|
|
|
|
|
|
|
|
|
|
|
|
|
|
|
|
|
|
|
|
|
|
|
|
|
|
|
|
|
|
|
|
|
|
|
|
|
|
|
|
|
|
|
|
|
|
|
|
|
|
|
|
|
|
|
|
|
|
|
|
|
|
|
|
|
|
|
|
|
|
|
|
|
|
|
|
|
|
|
|
|
|
|
|
|
|
|
|
|
|
|
|
|
|
|
|
|
|
|
|
|
|
|
|
|
|
|
|
|
|
|
|
|
|
|
|
|
|
|
|
|
|
|
|
|
|
|
|
|
|
|
|
|
|
|
|
|
|
|
|
|
|
|
|
|
|
|
|
|
|
|
|
|
|
|
|
|
|
|
|
|
|
|
|
|
|
|
|
|
|
|
|
|
|
|
|
|
|
|
|
|
|
|
|
|
|
|
|
|
|
|
|
|
|
|
|
|
|
|
|
|
|
|
|
|
|
|
|
|
|
|
|
|
|
|
|
|
|
|
|
|
|
|
|
|
|
|
|
|
|
|
|
|
|
|
|
|
|
|
|
|
|
|
|
|
|
|
|
|
|
|
|
|
|
|
|
|
|
|
|
|
|
|
|
|
|
|
|
|
|
|
|
|
|
|
|
|
|
|
|
|
|
|
|
|
|
|
|
|
|
|
|
|
|
|
|
|
|
|
|
|
|
|
|
|
|
|
|
|
|
|
|
|
|
|
|
|
|
|
|
|
|
|
|
|
|
|
|
|
|
|
|
|
|
|
|
|
|
|
|
|
|
|
|
|
|
|
|
|
|
|
|
|
|
|
|
|
|
|
|
|
|
|
|
|
|
|
|
|
|
|
|
|
|
|
|
|
|
|
|
|
|
|
|
|
|
|
|
|
|
|
|
|
|
|
|
|
|
|
|
|
|
|
|
|
|
|
|
|
|
|
|
|
|
|
|
|
|
|
|
|
|
|
|
|
|
|
|
|
|
|
|
|
|
|
|
|
|
|
|
|
|
|
|
|
|
|
|
|
|
|
|
|
|
|
|
|
|
|
|
|
|
|
|
|
|
|
|
|
|
|
|
|
|
|
|
|
|
|
|
|
|
|
|
|
|
|
|
|
|
|
|
|
|
|
|
|
|
|
|
|
|
|
|
|
|
|
|
|
|
|
|
|
|
|
|
|
|
|
|
|
|
|
|
|
|
|
|
|
|
|
|
|
|
|
|
|
|
|
|
|
|
|
|
|
|
|
|
|
|
|
|
|
|
|
|
|
|
|
|
|
|
|
|
|
|
|
|
|
|
|
|
|
|
|
|
|
|
|
|
|
|
|
|
|
|
|
|
|
|
|
|
|
|
|
|
|
|
|
|
|
|
|
|
|
|
|
|
|
|
|
|
|
|
|
|
|
|
|
|
|
|
|
|
|
|
|
|
|
|
|
|
|
|
|
|
|
|
|
|
|
|
|
|
|
|
|
|
|
|
|
|
|
|
|
|
|
|
|
|
|
|
|
|
|
|
|
|
|
|
|
|
|
|
|
|
|
|
|
|
|
|
|
|
|
|
|
|
|
|
|
|
|
|
|
|
|
|
|
|
|
|
|
|
|
|
|
|
|
|
|
|
|
|
|
|
|
|
|
|
|
|
|
|
|
|
|
|
|
|
|
|
|
|
|
|
|
|
|
|
|
|
|
|
|
|
|
|
|
|
|
|
|
|
|
|
|
|
|
|
|
|
|
|
|
|
|
|
|
|
|
|
|
|
|
|
|
|
|
|
|
|
|
|
|
|
|
|
|
|
|
|
|
|
|
|
|
|
|
|
|
|
|
|
|
|
|
|
|
|
|
|
|
|
|
|
|
|
|
|
|
|
|
|
|
|
|
|
|
|
|
|
|
|
|
|
|
|
|
|
|
|
|
|
|
|
|
|
|
|
|
|
|
|
|
|
|
|
|
|
|
|
|
|
|
|
|
|
|
|
|
|
|
|
|
|
|
|
|
|
|
|
|
|
|
|
|
|
|
|
|
|
|
|
|
|
|
|
|
|
|
|
|
|
|
|
|
|
|
|
|
|
|
|
|
|
|
|
|
|
|
|
|
|
|
|
|
|
|
|
|
|
|
|
|
|
|
|
|
|
|
|
|
|
|
|
Connecting an HDMI-compatible device
Digital camcorder
HDMI
OUT
SOURCE SELECT |
MASTER VOLUME |
|
DIMMER |
|
|
iPod |
|
ON/OFF |
SELECT |
SLEEP |
STATUS |
KEY LOCK |
1 |
2 |
3 |
4 |
|
|
QUICK SELECT |
|
|
|
|
AV SURROUND PREAMPLIFIER DN-500AV |
|
|
GFront panelH
GRear panelH
version Basic
version Advanced
Information
8
•When this unit is connected to other devices with HDMI cables, connect this unit and TV also with an HDMI cable.
•When connecting a device that supports Deep Color, please use a “High Speed HDMI cable” or “High Speed HDMI cable with Ethernet”.
•Video signals are not output if the input video signals do not match the monitor’s resolution. In this case, switch the Blu-ray Disc/DVD player’s resolution to a resolution with which the monitor is compatible.
•When this unit and monitor are connected with an HDMI cable, if the monitor is not compatible with HDMI audio signal playback, only the video signals are output to the monitor.
NOTE
The audio signal from the HDMI output connector (sampling frequency, number of channels, etc.) may be limited by the HDMI audio specifications of the connected device regarding permissible inputs.
Connecting to a device equipped with a DVI-D connector
When an HDMI/DVI conversion cable (sold separately) is used, the HDMI video signals are converted to
DVI signals, allowing connection to a device equipped with a DVI-D connector.
NOTE
•No sound is output when connected to a device equipped with a DVI-D connector. Make separate audio connections.
•Signals cannot be output to DVI-D devices that do not support HDCP.
•Depending on the combination of devices, the video signals may not be output.
9
Connecting an HDMI-compatible device
nnSettings related to HDMI connections
Set as necessary. For details, see the respective reference pages.
Input Assign (vpage 78)
Set this to change the HDMI input connector to which the input source is assigned.
HDMI Setup (vpage 68)
Make settings for HDMI video/audio output.
• Auto Lip Sync |
• HDMI Audio Out |
• HDMI Control |
• Standby Source |
• P.Off Control |
|
NOTE
The audio signal input from the HDMI input connector can be output as an output signal from the HDMI output connector by setting the HDMI audio output destination to TV.
Audio signals input via the Analog/Coaxial/Optical input connectors cannot be output from the HDMI output connector.
version Basic
version Advanced
Information
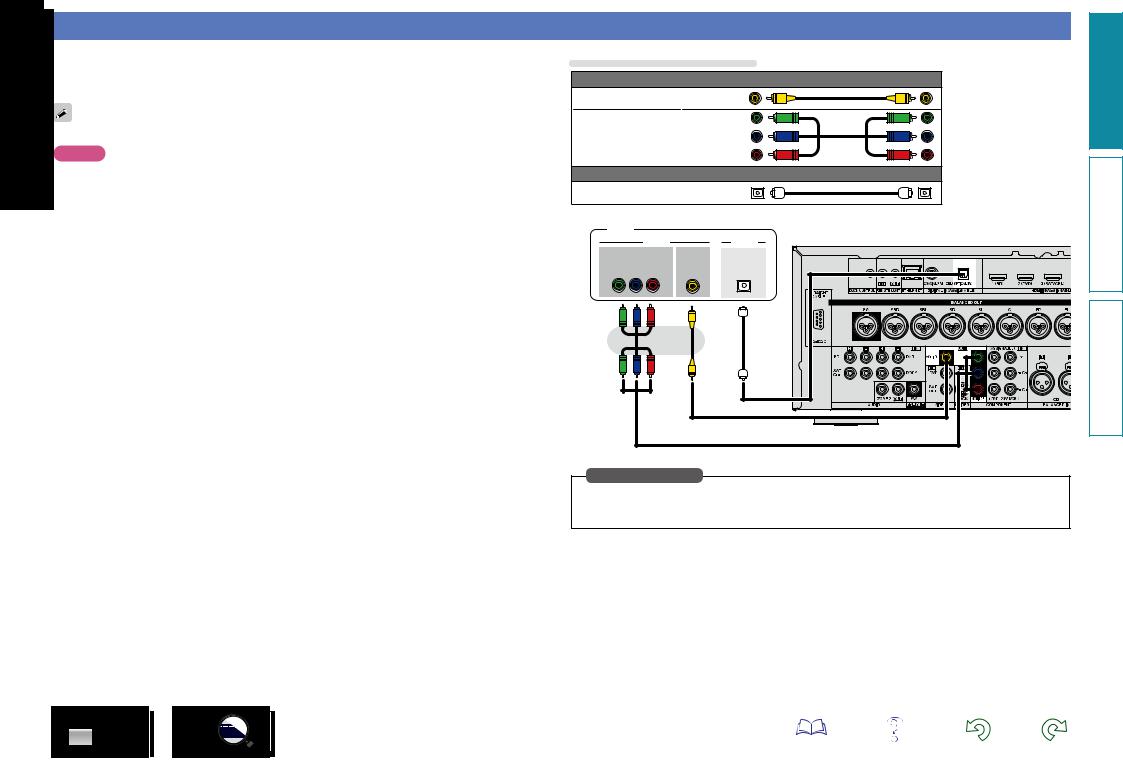
Connecting a TV
•Select the connector to use and connect the device.
•For video connections, see “Converting input video signals for output (Video conversion function)” (vpage 5).
•For instructions on HDMI connections, see “Connecting an HDMI-compatible device” (vpage 7).
To listen to TV audio through this device, use the optical digital connection.
NOTE
The optical connection is not required when a TV compatible with the ARC function (Audio Return Channel HDMI standard function) is connected to this unit via an HDMI connection.
For details, see “About ARC (Audio Return Channel) function” (vpage 7) or refer to the instruction manual for your TV.
Cables used for connections |
||||
|
|
|
Video cable (sold separately) |
|
Video cable |
|
|
|
|
Component video |
|
|
||
cable |
|
|
|
|
|
|
|
Audio cable (sold separately) |
|
Optical cable |
|
|
|
|
TV |
|
|
|
|
|
|
VIDEO |
|
AUDIO |
COMPONENT VIDEO |
VIDEO |
OPTICAL |
||
|
IN |
|
IN |
OUT |
Y |
PB |
PR |
|
|
Set as Necessary
Set this to change the digital input connector or component video input connector to which the input source is assigned.
“Input Assign” (vpage 78)
version Basic
version Advanced
Information
10

Connecting a Blu-ray Disc player/DVD player
•Select the connector to use and connect the device.
•For instructions on HDMI connections, see “Connecting an HDMI-compatible device” (vpage 7).
Cables used for connections
Video cable (sold separately) |
|
Video cable |
|
Component |
|
video cable |
|
Audio cable (sold separately) |
|
L |
L |
Audio cable |
|
R |
R |
|
|
|
|
|
|
|
|
|
|
|
|
|
Blu-ray Disc |
|
|
|
|
|
|
|
|
|
|
|
|
|
|
|
|||||||||||
|
DVD player |
|
|
|
|
|
|
|
|
|
|
|
player |
|
|
|
|
|
|
|
|
|
|
|
|
|
|
|
|
|
|
|
|
||||||
|
|
|
|
|
|
|
|
|
|
|
|
|
|
|
|
|
|
|
|
|
|
|
|
|
|
|
|
|
|
|
|
|
|
|
|
|
|
|
|
|
|
VIDEO |
|
|
|
|
|
|
|
AUDIO |
|
|
|
|
|
AUDIO |
|
|
|
|
|
|
|
|
|
|
|
|
|
|
|
|
|
|
|||||
|
|
|
|
|
|
|
|
|
|
|
|
|
|
|
|
|
|
|
|
|
|
|
|
|
|
|
|
|
|
|
|
|
|
|
|
|
|||
|
|
|
|
|
|
|
|
|
|
|
|
|
|
|
|
|
|
|
|
|
|
|
|
|
|
|
|
|
|
|
|
|
|
|
|
|
|
||
COMPONENT VIDEO |
|
|
VIDEO |
|
|
|
AUDIO |
|
|
|
|
|
AUDIO |
|
|
|
|
|
|
|
|
|
|
|
|
|
|
|
|
|
|
|
|||||||
|
|
|
|
|
|
|
|
|
|
|
|
|
|
|
|
||||||||||||||||||||||||
|
OUT |
|
|
OUT |
|
|
|
OUT |
|
|
|
|
|
OUT |
|
|
|
|
|
|
|
|
|
|
|
|
|
|
|
|
|
|
|||||||
|
Y PB PR |
|
|
|
|
|
|
|
L R |
|
|
|
|
|
L R |
|
|
|
|
|
|
|
|
|
|
|
|
|
|
|
|
|
|
||||||
|
|
|
|
|
|
|
|
|
|
|
|
|
|
|
|
|
|
|
|
|
|
|
|
|
|
|
|
|
|
|
|
|
|
|
|
|
|
|
|
|
|
|
|
|
|
|
|
|
|
|
|
|
|
|
|
|
|
|
|
|
|
|
|
|
|
|
|
|
|
|
|
|
|
|
|
|
|
|
|
|
|
|
|
|
|
|
|
|
|
|
|
|
|
|
|
|
|
|
|
|
|
|
|
|
|
|
|
|
|
|
|
|
|
|
|
|
|
|
|
|
|
|
|
|
|
|
|
|
|
|
|
|
|
|
|
|
|
|
|
|
|
|
|
|
|
|
|
|
|
|
|
|
|
|
|
|
|
|
|
L |
R |
L |
R |
L |
R |
L |
R |
Set as Necessary
Set this to change the digital input connector or component video input connector to which the input source is assigned.
“Input Assign” (vpage 78)
When you want to play back HD Audio (Dolby TrueHD, DTS-HD, Dolby Digital Plus, DTS Express) and Multichannel PCM with this unit, use an HDMI connection (vpage 7 “Connecting an HDMI-compatible device”).
Connecting a set-top box (Satellite tuner/Cable TV)
•You can watch satellite or cable TV.
•Select the connector to use and connect the device.
•For instructions on HDMI connections, see “Connecting an HDMI-compatible device” (vpage 7).
Cables used for connections
Video cable (sold separately) |
|
Video cable |
|
Component |
|
video cable |
|
Audio cable (sold separately) |
|
L |
L |
Audio cable |
|
R |
R |
Coaxial |
|
digital cable |
|
Satellite tuner/Cable TV |
|
|
||||
|
|
VIDEO |
|
AUDIO |
|
|
COMPONENT VIDEO |
VIDEO |
COAXIAL |
AUDIO |
|||
|
OUT |
|
OUT |
OUT |
OUT |
|
Y |
PB |
PR |
|
|
L |
R |
|
|
|
|
|
L |
R |
|
|
|
|
|
L |
R |
Set as Necessary
Set this to change the digital input connector or component video input connector to which the input source is assigned.
“Input Assign” (vpage 78)
11
version Basic
version Advanced
Information

Connecting a digital camcorder
For instructions on HDMI connections, see “Connecting an HDMI-compatible device” (vpage 7).
Cables used for connections
Video cable (sold separately)
Video cable
Audio cable (sold separately)
Audio cable |
|
L |
|
L |
|
R |
|
R |
|
|
|
|
||
Digital camcorder |
|
|
||
VIDEO |
AUDIO |
|
|
|
VIDEO |
AUDIO |
|
|
|
OUT |
OUT |
|
MASTER VOLUME |
|
|
L |
R |
|
|
|
L |
R |
|
|
|
|
|
|
i-Pod |
|
L |
R |
|
|
|
|
SELECT |
SLEEP |
STATUS |
|
|
2 |
3 |
4 |
|
|
QUICK SELECT |
|
|
|
|
RROUND PREAMPLIFIER DN-500AV |
|
|
Set as Necessary
Set this to change the digital input connector or component video input connector to which the input source is assigned.
“Input Assign” (vpage 78)
NOTE
When a non-standard video signal from a game machine or some other source is input, the video conversion function might not operate. In this case, use the monitor output of the same connector as the input.
Connecting a control dock for iPod
•For a control dock for iPod, use ASD-1R or ASD-11R made by DENON (sold separately).
•For instructions on the control dock for iPod settings, refer to the control dock for iPod’s operating instructions.
•For details on the operations, see “Use a DENON control dock for iPod to play back” (vpage 21).
Control dock for iPod
Use the AV/Control
Cable supplied with the DENON control dock for iPod.
|
ASD-11R |
R |
L |
R |
L |
version Basic
version Advanced
Information
12
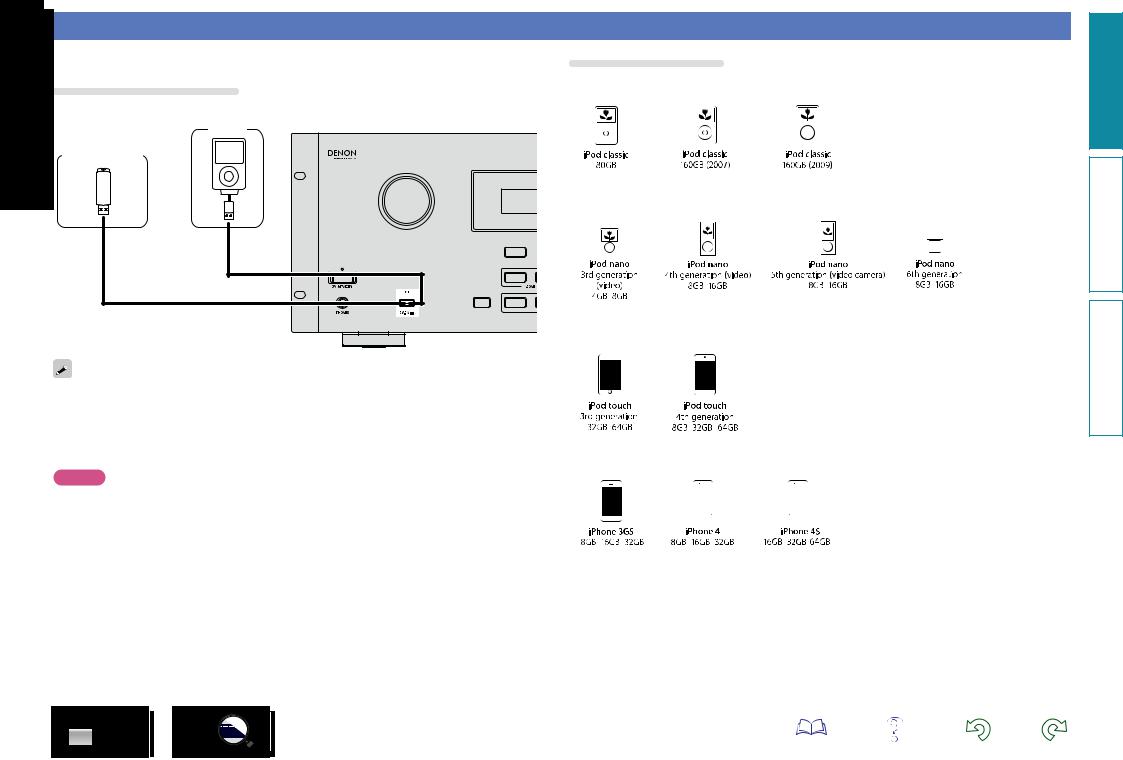
Connecting an iPod or USB memory device to the USB port
For details on the operations, see “Connect an iPod directly to the USB port to play back” (vpage 23) or “Playing a USB memory device” (vpage 30).
Cables used for connections
To connect an iPod to this unit, use the USB cable supplied with the iPod.
iPod
USB memory device
SOURCE SELECT
or
DIMMER
ON/OFF
KEY LOCK |
1 |
AV SURROUND
Supported iPod models
• iPod classic
• iPod nano
• iPod touch
• When you want to play back a video file stored on an iPod, use a DENON control dock for iPod (ASD-1R and ASD-11R, sold separately) (vpage 12 “Connecting a control dock for iPod”).
• This unit supports playback from 5th generation iPod touch, iPod classic and iPod nano or later.
• D&M does not guarantee that all USB memory devices will operate or receive power. When using a portable USB connection type HDD of the kind to which an AC adapter can be connected to supply
power, use the AC adapter.
• iPhone
NOTE
•USB memory devices will not work via a USB hub.
•Do not use an extension cable when connecting a USB memory device. This may cause radio interference with other devices.
•This unit does not support playback on an iPad. Do not connect an iPad to the unit.
•When connecting an iPhone to this unit, keep the iPhone at least 20 cm away from this unit. If the iPhone is kept closer to this unit and a telephone call is received by the iPhone, noise may be output from this device.
13
version Basic
version Advanced
Information
(as of June 2012)
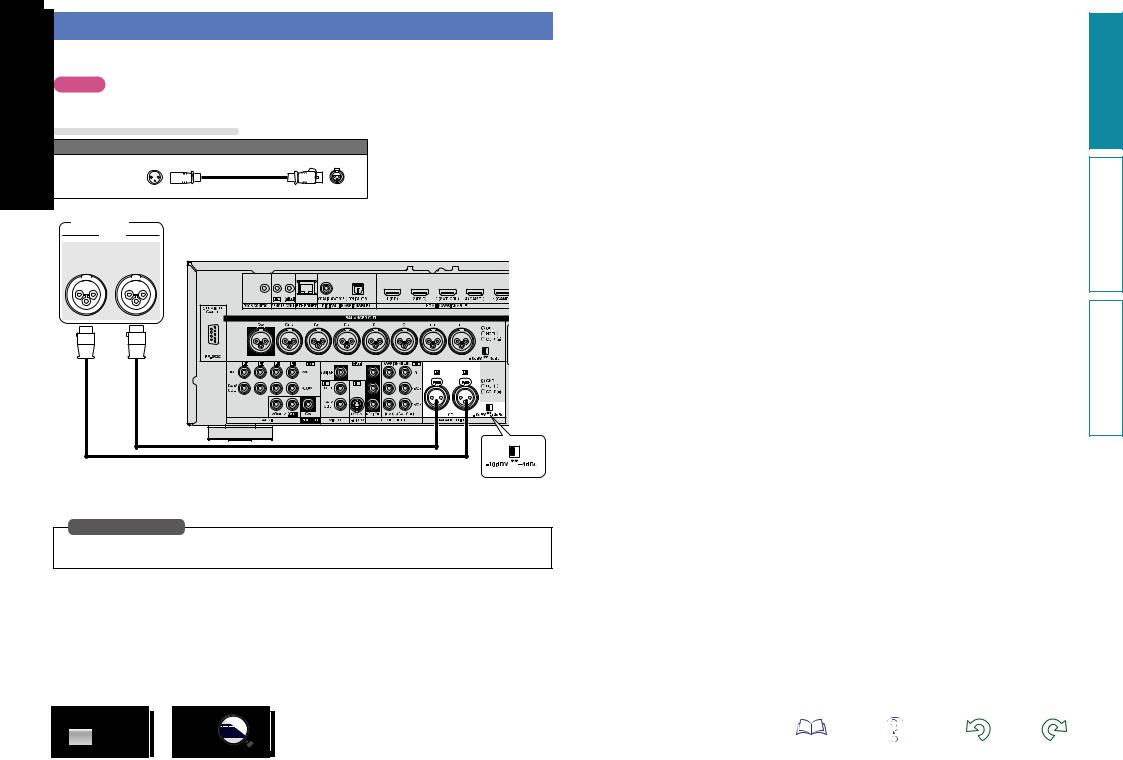
Connecting a CD player
• Select the connector to use and connect the device.
• Switch the input voltage with the input level selector according to the connected CD player.
NOTE
Be sure to turn the power off before setting.
Cables used for connections
Audio cable (sold separately)
XLR cable
CD player
AUDIO
AUDIO
OUT
L R
Input level |
selector |
Set as Necessary
Set this to change the digital input connector to which the input source is assigned.
“Input Assign” (vpage 78)
14
version Basic
version Advanced
Information
Connecting to a network (LAN)
•This unit lets you play via your network (LAN) music files stored on a computer.
You can also operate this unit from a computer using the Web control function.
•You can update by downloading the latest firmware from the D&M Professional website.
For more information, on the menu, select “Firmware Update” (vpage 75).
•See “Network Setup” on the menu (vpage 70) for more information on network setting.
Cables used for connections
Cable (sold separately)
Ethernet cable
Computer
Modem
Internet
To WAN side |
To LAN port |
To LAN port |
LAN port/ |
|
Ethernet |
||
|
||
|
connector |
Router
Required system
nnBroadband internet connection
nnModem
Device that connects to the broadband circuit and conducts communications on the Internet.
A type that is integrated with a router is also available.
nnRouter
When using this unit, we recommend you use a router equipped with the following functions:
•Built-in DHCP server
This function automatically assigns IP addresses on the LAN.
•Built-in 100BASE-TX switch
When connecting multiple devices, we recommend a switching hub with a speed of 100 Mbps or greater.
nnEthernet cable (CAT-5 or greater recommended)
•Use only a shielded STP or ScTP LAN cable which is available at retailer.
•Some flat type Ethernet cables are easily affected by noise. We recommend using a normal type cable.
•If you have an Internet provider contract for a line on which network settings are made manually, make the settings at “Network Setup” (vpage 70).
•With this unit, it is possible to use the DHCP and Auto IP functions to make the network settings automatically.
•When using this unit with the broadband router’s DHCP function enabled, this unit automatically performs the IP address setting and other settings.
When using this unit connected to a network with no DHCP function, make the settings for the IP address, etc., at “Network Setup” (vpage 70).
•When setting manually, check the setting contents with the network administrator.
NOTE
•A contract with an ISP is required to connect to the Internet.
No additional contract is needed if you already have a broadband connection to the Internet.
•The types of routers that can be used depend on the ISP. Contact an ISP or a computer shop for details.
•D&M assumes no responsibility whatsoever for any communication errors or troubles resulting from customer’s network environment or connected devices.
•This unit is not compatible with PPPoE. A PPPoE-compatible router is required if you have a contract for a type of line set by PPPoE.
•Do not connect an ETHERNET connector directly to the LAN port/
Ethernet connector on your computer.
•To listen to audio streaming, use a router that supports audio streaming.
For connections to the Internet, contact an ISP (Internet Service Provider) or a computer shop.
version Basic
version Advanced
Information
15
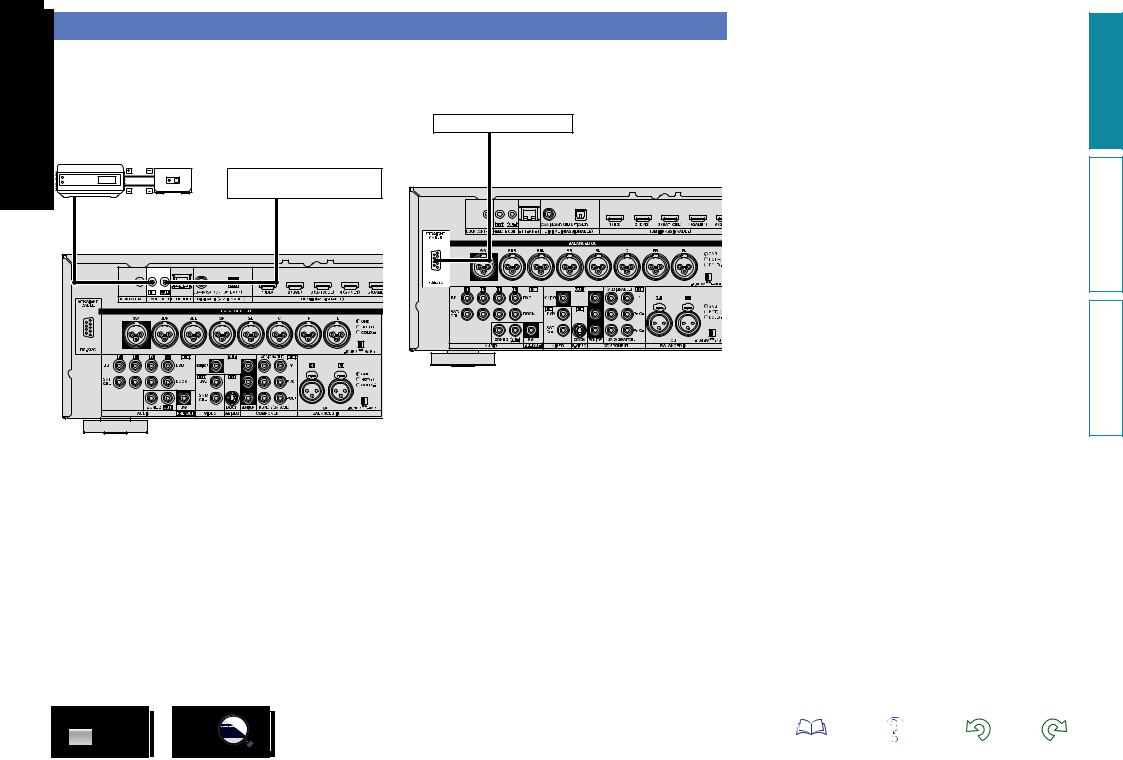
Connecting an external control device
REMOTE CONTROL jacks |
|
RS-232C connector |
If this unit is installed in a location that is out of range of the signal from the remote control unit, you can still operate the unit and the devices connected to it by using a commercially available IR receiver. You can also use it to remotely control ZONE2 (another room).
Infrared Infrared retransmitter sensor
AUX |
Input |
Output |
OUT |
|
|
Device equipped with a REMOTE CONTROL IN jack
When you connect an external control device, you can control this unit with the external control device.
External serial controller
Perform the operation below beforehand. q Turn on the power of this unit.
w Turn off the power of this unit from the external controller. e Check that the unit is in the standby mode.
16
version Basic
version Advanced
Information
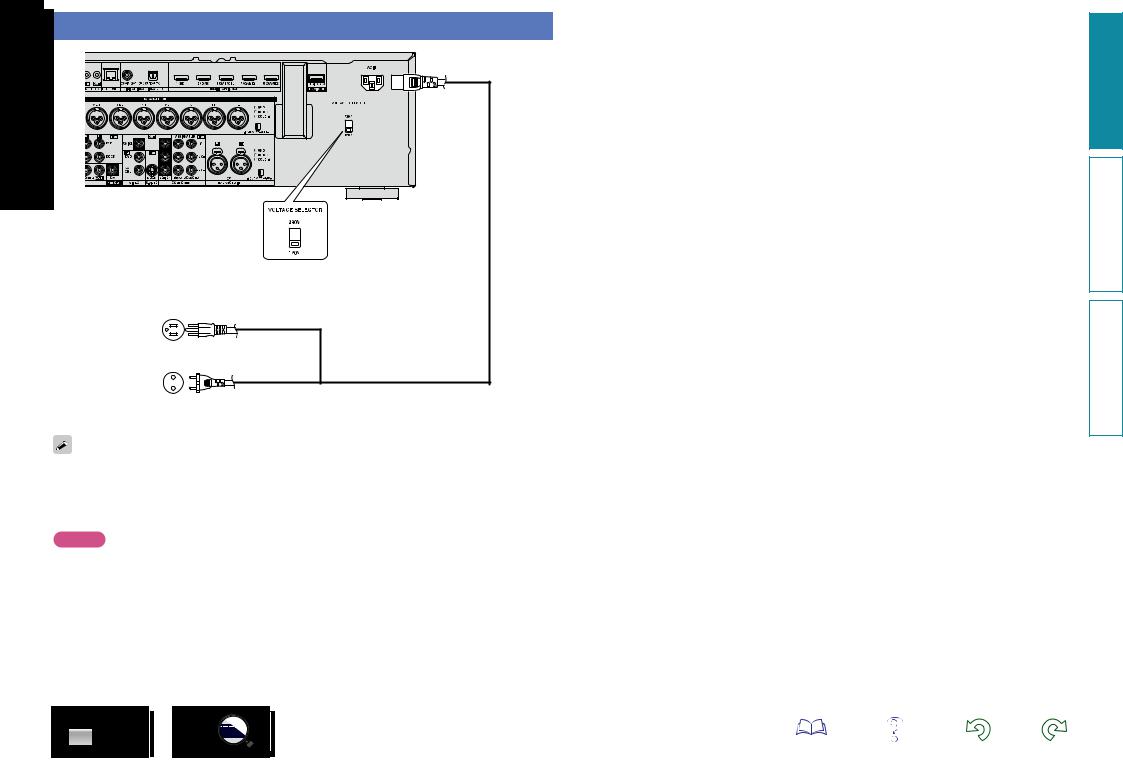
Connecting the power cord
Power cord (Supplied)
To household power outlet (AC 120 V, 60 Hz)
(U.S.A and Canada models)
or
To household power outlet (AC 230 V, 50/60 Hz) (European,U.K and Asia/Pacific models)
Use the voltage selector to switch the voltage according to your region. (It is set to 230V at the time of purchase.)
•U.S.A and Canada : 120 V
•European and U.K : 230 V
•Other Countries : Switch the voltage according to your region.
NOTE
Be sure to turn the power off before setting.
17
version Basic
version Advanced
Information

Settings
Here, we explain “Network Setup”, which allows you to connect this unit to a network (LAN).
This unit lets you play via your network (LAN) music files stored on a computer.
nn Making the network settings (Network Setup)
(vpage 18)
Playback (Basic operation) (vpage 19)
Selecting a listening mode (Surround mode)
(vpage 33)
Playback (Advanced operation) (vpage 46)
Making the network settings (Network Setup)
This unit can be connected to a network (LAN) to listen to play back music files and still image (JPEG) files stored on a computer.
1
2 Turn on this unit (C page 5 “Getting Started”).
This unit performs automatic network setup due to the DHCP function.
When connecting to a network that has no DHCP function, perform the setting in “Network Connect.” (vpage 70).
18
version Basic
version Advanced
Information

Playback (Basic operation)
Settings (vpage 18)
nn Selecting the input source (vpage 19) nn Adjusting the master volume (vpage 20)
nn Turning off the sound temporarily (vpage 20)
nn Playing a Blu-ray Disc player/DVD player
(vpage 20)
nn Playing a CD player (vpage 20) nn Playing an iPod (vpage 21)
nn Playing network audio (vpage 25)
nn Playing a USB memory device (vpage 30)
Selecting a listening mode (Surround mode)
(vpage 33)
Playback (Advanced operation) (vpage 46)
Important information
Before starting playback, make the connections between the different devices and the settings on the unit.
NOTE
Also refer to the operating instructions of the connected devices when playing them.
Selecting the input source
Press the input source select button (BD, SAT/CBL, TV, NET/USB, DVD, V.AUX, DOCK, GAME1, GAME2 or
CD) to be played back.
The desired input source can be selected directly.
You can also use the following operation to select an input source.
nnUsing the knob on the main unit
Turn SOURCE SELECT.
•Turning SOURCE SELECT switches the input source, as shown below.
 SAT/CBL
 GAME1
GAME1
 GAME2
GAME2 
 V.AUX
V.AUX 
 DOCK
DOCK 
 TV
TV 
 DVD
DVD 
 BD
BD 
 CD
CD 
 NET/USB
•When iPod 1on the main unit is pressed, the input source of this unit is switched to “DOCK” or “NET/USB” and the connected iPod is automatically played (vpage 24 “iPod play function”).
nnUsing the “Source Select” menu
Switch the remote control unit to the J(MAIN ZONE) mode when performing this operation (vpage 82 “Operating AV devices”).
If the remote control unit is in K (ZONE2) mode, the “Source Select” menu will not be displayed when SOURCE SELECT is
pressed.
Source Select |
The currently selected input |
|
source is highlighted. |
||
|
||
|
|
Player |
|
Video |
Network |
BD |
|
SAT/CBL |
Favorites |
DVD |
|
TV |
Media Server |
CD |
|
GAME1 |
|
DOCK |
|
GAME2 |
|
USB/iPod |
V.AUX |
|
|
|
|
|
|
[ |
] Move |
[ENTER] Enter |
|
q Press SOURCE SELECT.
Display the “Source Select” menu.
w Use uio p to select the input source, then press ENTER.
The input source is set and the source selection menu is turned off.
•When using with an iPod connected directly to the USB port of this unit, select “USB/iPod” for the input source.
•Input sources that are not going to be used can be set ahead of time. Make this setting at “Source Delete” (vpage 73).
•To turn off the source selection menu without selecting an input source, press SOURCE SELECT again.
•When SOURCE SELECT is pressed, the AMP-operation mode starts automatically (vpage 82).
version Basic
version Advanced
Information
19
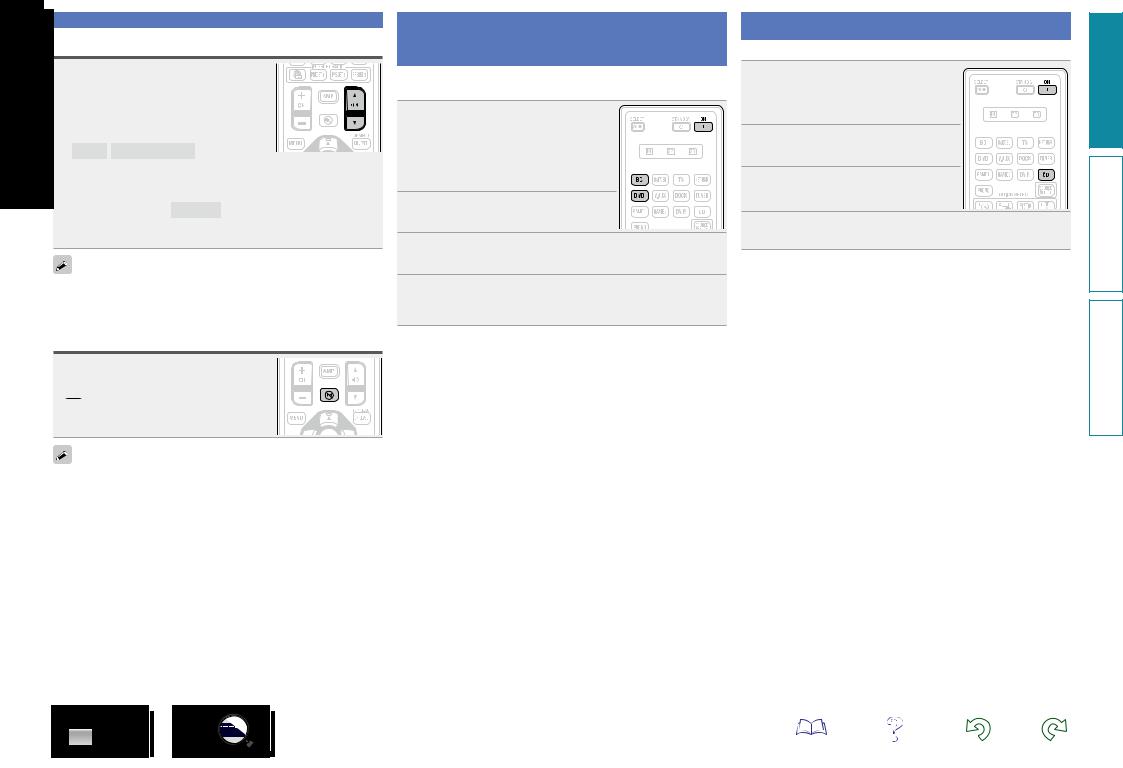
Important information
Adjusting the master volume
Use Mdfto adjust the volume.
nn When the “Volume Display” setting (vpage 73) is “Relative”
GAdjustable rangeH
– – – –80.5dB – 18.0dB
nn When the “Volume Display” setting (vpage 73) is
“Absolute”
GAdjustable rangeH 0.0 – 99.0
•The variable range differs according to the input signal and channel level setting.
You can also operate via the main unit. In this case, perform the
following operations.
Turn MASTER VOLUME to adjust the volume.
Turning off the sound temporarily
Press N.
• The power indicator flashes green.
• “MUTE” indicator on the display lights.
•

 appears on a TV screen.
•The sound is reduced to the level set at “Mute Level” (vpage 73).
•To cancel, press Nagain. Muting can also be canceled by adjusting the master volume.
Playing a Blu-ray Disc player/DVD player
The following describes the procedure for playing Blu-ray Disc player/
DVD player.
1 Prepare for playback.
q Turn on the power of the TV, subwoofer and player.
w Change the TV input to the input of this unit.
e Load the disc in the player.
2 Pressunit. ON to turn on power to the
3 Press BD or DVD to switch an input source for a player used for playback.
4 Play the device connected to this unit.
Make the necessary settings on the player (language setting, subtitles setting, etc.) beforehand.
20
Playing a CD player
The following describes the procedure for playing CD player.
1 Prepare for playback.
q Turn on the power of the subwoofer and player.
w Load the disc in the player.
2 Pressunit. ON to turn on power to the
3 Press CD to switch the input source to the CD player.
4 Play the device connected to this unit.
version Basic
version Advanced
Information
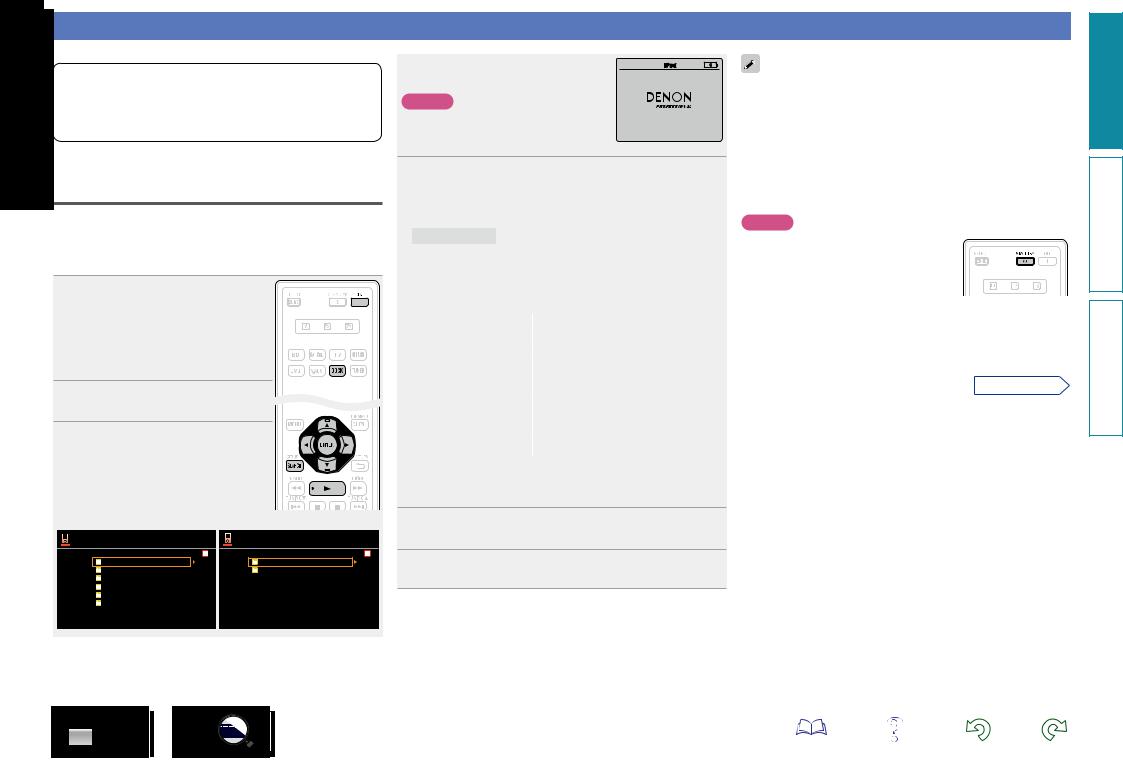
Playing an iPod
There are two methods for iPod playback.
q Use a DENON control dock for iPod to play back.
You can play back both video, photo and audio.
w Connect an iPod directly to the USB port to play back (vpage 23).
You can play back audio only.
qUse a DENON control dock for iPod to play back
If you use a separately sold DENON control dock for iPod (ASD-1R or ASD-11R), you will be able to play back videos, photos, music, and other content on the iPod.
nnListening to music on an iPod
1 Prepare for playback.
q Connect the DENON control dock for iPod to this unit (vpage 12
“Connecting a control dock for iPod”).
w Set the iPod in the DENON control dock for iPod.
2 unit.Press ON to turn on power to the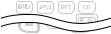
3 Press DOCK to switch the input source to “DOCK”.
• If “Browse mode” is selected in step 4, the following screen is displayed on a TV screen, depending on the connected control
dock for iPod. |
|
|
|
(When using an ASD-1R) |
|
(When using an ASD-11R) |
|
Music |
[1/6] |
iPod |
[1/2] |
Playlists |
|
Music |
|
Artists |
|
Videos |
|
Albums |
|
|
|
Songs |
|
|
|
Genres |
|
|
|
Composers |
|
|
|
• In “Browse mode”, the iPod display is shown at right.
NOTE
If the connections screen is not displayed, |
OK to disconnect. |
|
the iPod may not be properly connected |
||
|
||
Reconnect it. |
|
4 Press SEARCH and hold it down for 2 seconds or more to select the display mode.
•There are two modes for displaying the contents recorded on the iPod.
Browse mode Display iPod information on the TV screen.
•English letters, numbers and certain symbols are displayed. Incompatible characters are displayed as “.” (period).
Remote mode |
Display iPod information on the iPod screen. |
• “Remote iPod” is displayed on the display of this unit.
Display mode |
|
|
|
|
|
|
|
|
Browse mode |
|
|
Remote mode |
|
||
|
|
|
|
|
|
|
|
Playable |
Music file |
|
P |
|
P |
||
|
|
|
|
|
|
|
|
Photo file |
|
|
|
|
P z2 |
||
files |
|
|
|
|
|
|
|
Video file |
|
Pz1 |
|
P z2 |
|||
|
|
|
|||||
|
Remote |
|
|
|
|
|
|
Active |
control unit |
|
P |
|
P |
||
buttons |
(This unit) |
|
|
|
|
|
|
|
iPod |
|
|
|
|
P |
|
|
|
|
|
|
|
|
|
z1 When using an ASD-11R DENON control dock for iPod.
z2 Video may not be output, depending on the combination of ASD-1R or ASD-11R DENON control dock for iPod and iPod.
5 Use uito select the item, then press ENTER or pto select the file to be played.
6 Press ENTER, por 1.
Playback starts.
21
•You can specify the duration of the on-screen display to be displayed
(default: 30 sec) at menu “iPod” (vpage 74). When the iPod display is off, you can press uio p to return to the previous screen.
•To play back compressed audio with extended bass or treble reproduction, we recommend playback in RESTORER mode (vpage 62). The default setting is “Mode3”.
•In Browse mode, press STATUS on the main unit during playback to check the title name, artist name, and album name on the display of this unit.
NOTE
• Press STANDBY and set this unit’s power the standby mode before disconnecting iPod. You can also switch the input source to other than “DOCK” and then disconnect the iPod.
•Depending on the type of iPod and the software version, some functions may not operate.
•Note that D&M will accept no responsibility whatsoever for any problems arising with the data on an iPod when using this unit in conjunction with the iPod.
vSee overleaf
version Basic
version Advanced
Information

nnViewing videos on an iPod in the Browse mode
When an iPod equipped with a video function is connected to a DENON ASD-11R control dock for iPod, image files can be played in the Browse mode.
1 Use ui to select “Videos”, then press ENTER or p.
2 Use uito select the search item or folder, then press ENTER or p.
3 Use ui to select the video file, then press ENTER, por 1.
Playback starts.
nnViewing photos and videos on an iPod in the
Remote mode
This unit can play back on a TV screen photos and data stored on an iPod equipped with a slide show or video function.
1 Press and hold SEARCH to set the Remote mode.
“Remote iPod” is displayed on the display of this unit.
2 Watching the iPod’s screen, use ui to select “Photos” or
“Videos”.
•Depending on the iPod model, it may be necessary to operate the iPod unit directly.
3 Press ENTER until the image you want to view is displayed.
“TV Out” at the iPod’s “Slide show Settings” or “Video Settings” must be set to “On” in order to display the iPod’s photo data or videos on the monitor. For details, see the iPod’s operating instructions.
NOTE
Video may not be output, depending on the combination of ASD-1R or ASD-11R and iPod.
22
|
Playing an iPod |
|
nniPod operation |
|
|
Operation buttons |
Function |
|
MENU |
Amp menu |
|
|
Cursor operation / |
|
uiop |
Auto search (cue, ui) / |
|
|
Manual search (Press and hold, ui) |
|
ENTER |
Enter / Pause |
|
(Press and release) |
||
|
||
ENTER |
Stop |
|
(Press and hold) |
||
|
||
SEARCH |
Page search modez |
|
(Press and release) |
||
|
||
SEARCH |
Browse / Remote mode switching |
|
(Press and hold) |
||
|
||
RETURN B |
Return |
|
6 7 |
Manual search |
|
(Press and hold) |
(fast-reverse/fast-forward) |
|
1 |
Playback / Pause |
|
8 9 |
Auto search (cue) |
|
3 |
Pause |
|
2 |
Stop |
|
TV Z/ X |
TV power on/standby (Default : SONY) |
|
TV INPUT |
Switch TV input (Default : SONY) |
•Repeat playback (vpage 81 “Repeat”)
•Shuffling playback (vpage 81 “Shuffle”)
zz When the menu screen is displayed, press SEARCH, then press o
(previous page) or p (next page). To cancel, press ui or SEARCH.
version Basic
version Advanced
Information
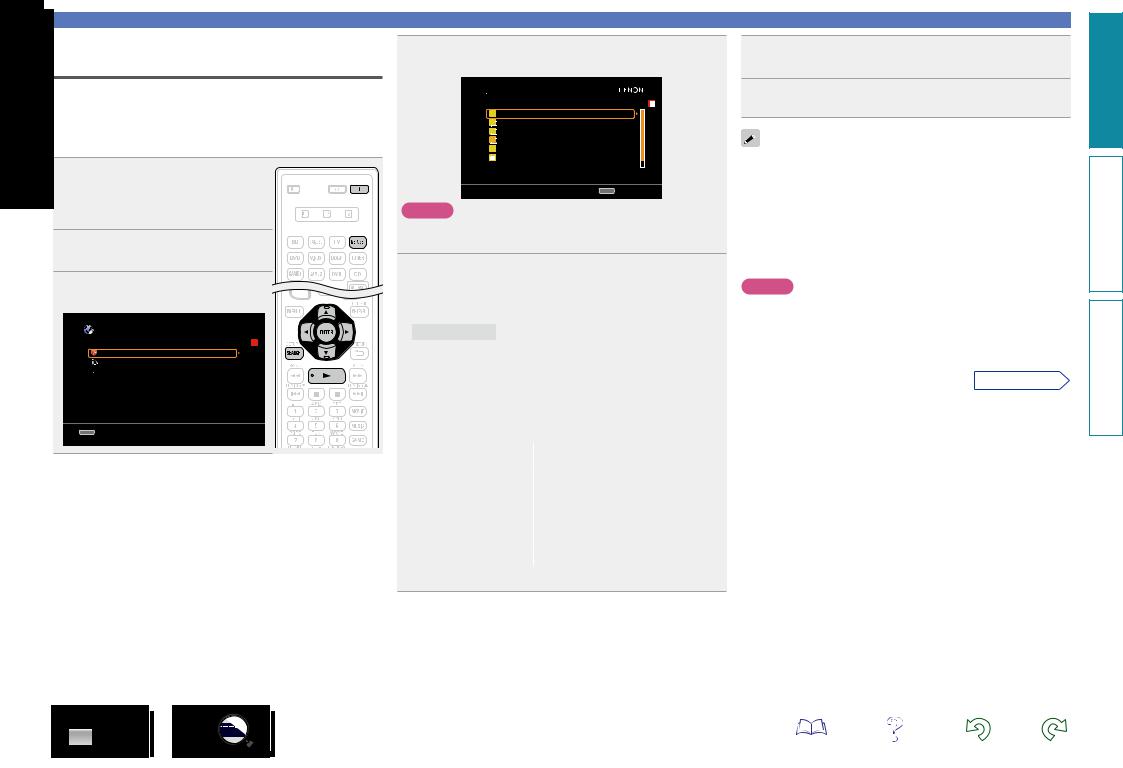
wConnect an iPod directly to the USB port to play back
You can use the USB cable provided with the iPod to connect the iPod with the unit’s USB port.
•This unit supports audio playback from the iPod (fifth generation or later), iPod nano, iPod classic, iPod touch and iPhone (it is not compatible with iPod shuffle).
1Connect the iPod to the USB port
(vpage 13 “Connecting an 


iPod or USB memory device to the USB port”).
2 Pressunit. ON to turn on power to the
|
Press NET/USB to switch the |
|
||||
3 input source to “NET/USB”. |
|
|||||
|
||||||
|
DENON:[DN-500AV] |
[1/3] |
|
|
|
|
|
Favorites |
|
|
|
|
|
|
|
|
|
|
|
|
|
|
|
|
|
|
|
Media Server iPod
CH +/- Preset
4 Use uito select “iPod”, then press ENTER or p.
iPod |
[1/8] |

 Playlists


 Artists


 Albums

 Songs
Songs
 Podcasts
Genres
 Composers
SEARCH P/Search
NOTE
If the “iPod” is not displayed, the iPod may not be properly connected. Reconnect it.
5 Press SEARCH and hold it down for 2 seconds or more to select the display mode.
•There are two modes for displaying the contents recorded on the iPod.
Browse mode Display iPod information on the TV screen.
•English letters, numbers and certain symbols are displayed. Incompatible characters are displayed as “.” (period).
Remote mode |
Display iPod information on the iPod screen. |
•“Remote iPod” is displayed on the display of this unit.
•The Remote mode is not supported on fifth generation iPod or first generation iPod nano.
Display mode |
|
|
|
|
|
|
|
|
Browse mode |
|
|
Remote mode |
|
||
|
|
|
|
|
|
|
|
Playable |
Music file |
|
P |
|
P |
||
files |
Video file |
|
|
|
|
z |
|
|
|
|
|
|
|
|
|
|
Remote |
|
|
|
|
|
|
Active |
control unit |
|
P |
|
P |
||
buttons |
(This unit) |
|
|
|
|
|
|
|
iPod |
|
|
|
|
P |
|
|
|
|
|
|
|
|
|
zzOnly the sound is played.
Playing an iPod
6 Use uito select the item, then press ENTER or pto select the file to be played.
7 Press ENTER, por 1.
Playback starts.
•You can specify the duration of the on-screen display to be displayed
(default: 30 sec) at menu “iPod” (vpage 74). When the iPod display is off, you can press uio p to return to the previous screen.
•To play back compressed audio with extended bass or treble reproduction, we recommend playback in RESTORER mode (vpage 62). The default setting is “Mode3”.
•In Browse mode, press STATUS on the main unit during playback to check the title name, artist name, and album name.
NOTE
•Depending on the type of iPod and the software version, some functions may not operate.
•Note that D&M will accept no responsibility whatsoever for any problems arising with the data on an iPod when using this unit in conjunction with the iPod.
vSee overleaf
version Basic
version Advanced
Information
23
nniPod operation
|
|
|
|
|
|
|
Operation buttons |
Function |
|
|
|
|
|
|
|
MENU |
Amp menu |
|
|
|
|
|
|
|
||
|
|
|
|
|
|
|
|
Cursor operation / |
|
|
|
|
|
|
|
uiop |
Auto search (cue, ui) / |
|
|
|
|
|
|
|
|
Manual search (Press and hold, ui) |
|
|
|
|
|
|
|
ENTER |
Enter / Pause |
|
|
|
|
|
|
|
(Press and release) |
|
|
|
|
|
|
|
|
|
|
|
|
|
|
|
|
|
|
|
|
|
|
|
|
|
|
|
|
|
|
|
|
|
|
|
ENTER |
Stop |
|
|
|
|
|
|
|
(Press and hold) |
|
|
|
|
|
|
|
|
|
|
|
|
|
|
|
|
|
SEARCH |
Page searchz1 / Character sortz2 |
|
|
|
|
|
|
|
||
|
|
|
|
|
|
|
(Press and release) |
|
|
|
|
|
|
|
|
|
|
|
|
|
|
|
|
|
SEARCH |
Browse / Remote mode switching |
|
|
|
|
|
|
|
(Press and hold) |
|
|
|
|
|
|
|
|
|
|
|
|
|
|
|
|
|
RETURN B |
Return |
|
|
|
|
|
|
|
6 7 |
Manual search |
|
|
|
|
|
|
|
(Press and hold) |
(fast-reverse/fast-forward) |
|
|
|
|
|
|
|
1 |
Playback / Pause |
|
|
|
|
|
|
|
8 9 |
Auto search (cue) |
|
|
|
|
|
|
|
3 |
Pause |
|
|
|
|
|
|
|
2 |
Stop |
|
|
|
|
|
|
|
TV Z/ X |
TV power on/standby (Default : SONY) |
|
|
|
|
|
|
|
TV INPUT |
Switch TV input (Default : SONY) |
•Repeat playback (vpage 81 “Repeat”)
•Random playback (vpage 81 “Shuffle”)
z1 When the menu screen is displayed, press SEARCH, then press
o (previous page) or p (next page).
To cancel, press ui or SEARCH twice.
z2 When the menu screen is displayed, press SEARCH twice, then press o p to select the first letter you want to search mode.
• If it is not possible to search the list, “unsorted list.” is displayed. To cancel, press ui or SEARCH.
If the list is not in alphabetical order, you may not be able to perform a character sort.
Playing an iPod
iPod play function
If iPod 1 on the main unit is pressed when a control dock for iPod or an iPod (USB) is connected, the iPod starts playback.
Press iPod 1.
• This unit’s input source switches to
“DOCK” or “NET/USB”.
• iPod playback starts.
NOTE
If both a control dock for iPod (“DOCK”) and an iPod (“NET/USB”) are connected, playback with control dock for iPod (“DOCK”) takes priority.
24
version Basic
version Advanced
Information
Loading...