


 Loading...
User Guide
Guía del usuario
Guide d’utilisation
Guida per l’uso
Benutzerhandbuch
Appendix
English ( 2 – 13 )
Español ( 14 – 25 )
Français ( 26 – 37 )
Italiano ( 38 – 49 )
Deutsch ( 50 – 61 )
English ( 62 )
User Guide (English)
Introduction
Box Contents
DN-700AVP
Power Cable
FM Antenna
Remote Control
User Guide
Safety & Warranty Manual
Support
For the latest information about this product (documentation, technical specifications, system requirements, compatibility information, etc.) and product registration, visit denonpro.com.
For additional product support, visit denonpro.com/support.
Safety and Precautions
•Keep the unit free from moisture, water, and dust.
•Do not block the ventilation holes.
•Do not let foreign objects fall into the ventilation holes.
Before turning the power on
•Check that all connections are correct and that there are no problems with the connection cables.
•Power is supplied to some of the circuitry even when the unit is set to the standby mode. When leaving home for long periods of time, be sure to unplug the power cord from the power outlet.
Condensation
•If there is a major difference in temperature between the inside of the unit and the surroundings, condensation (dew) may form on the operating parts inside the unit, causing the unit not to operate properly. If this happens, let the unit sit for an hour or two with the power turned off and wait until there is little difference in temperature before using the unit.
Cautions on using mobile phones
•Using a mobile phone near this unit may result in interference with video and audio signals. If that occurs, move the mobile phone away from this unit when it is in use.
Operable time for continuous use
•This unit can be used continually for up to 24 hours. Continuing to use this unit for longer than 24 hours may result in operations failing to function correctly. To continue use for longer than 24 hours, restart the unit every 24 hours.
Care and cleaning
•Wipe the cabinet and control panel clean with a soft, nonabrasive cloth.
•Benzene, paint thinner, or other solvents may cause discoloration if brought into contact with the unit, and should not be used.
2
Features
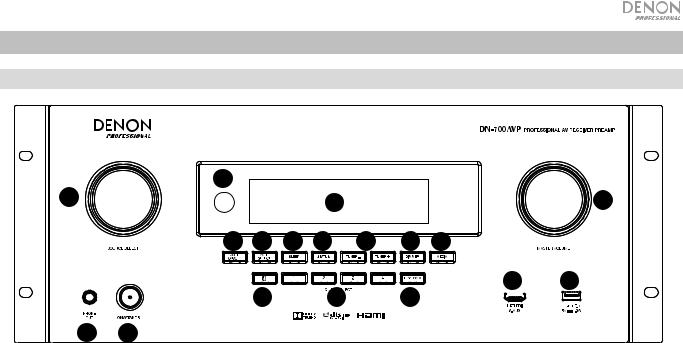
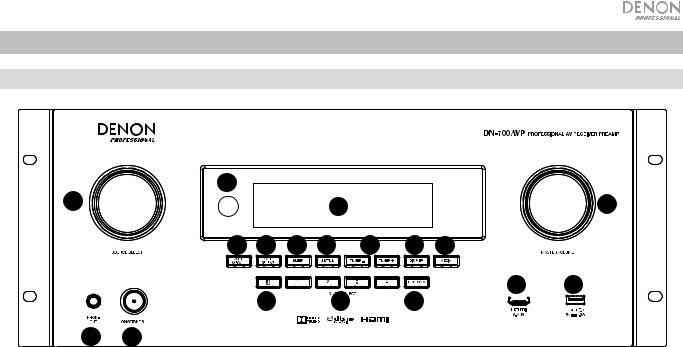
Front Panel
5 |
|
|
|
|
|
|
1 |
|
|
4 |
|
|
6 |
7 |
8 |
9 |
10 |
11 |
12 |
13 |
14 |
15 |
17 |
18 |
16 |
|
32
1.Source Select Knob: Turn this knob to select the input source. Select from Bluetooth, TV, Tuner, DVD, Dock, BD, SAT/CBL, Game1, Game2, CD, and Multimedia (select from music streaming services, Internet radio, saved favorite files on a network, media server, or a connected USB flash drive).
2.ON/Standby: Press this button to turn the unit on/off. When the unit is off, it will be in a standby mode.
3.Phone Output: Connect your headphones to this 1/4” (6.35 mm) headphone output.
4.VFD Display: The display is used to show information about the selected audio source, the FM radio station, Internet radio, setup menus, and various functions.
5.IR Sensor: Aim the remote control here to adjust the unit’s settings.
6.Master Volume: Use this knob to control the master volume of the unit.
7.Zone On/Off: Use this switch to turn zone two on or off.
8.Zone Select: Use this button to select which source input is mapped to Zone 2.
9.Sleep: Use this switch to set the sleep timer in increments of 10 minutes up to 120 minutes.
10.Status: Use this switch to display information about the audio source, HDMI connection, and Unlock status.
11.Tuner -/+: Use these buttons to select the FM radio channel.
12.Dimmer: Use the switch to control the brightness of the VFD display.
13.Media: Use this to switch to a connected USB flash drive, Internet Radio, or media server.
14.Bluetooth: Press this button to pair the unit with a Bluetooth device. Press and hold this button for 3 seconds to disconnect from a paired Bluetooth device.
15.Quick Selects: Use these switches to select preset audio, video, or HDMI input sources.
16.Key Lock: Press and hold this button for 3 seconds to lock all other switches on the front panel. A message will be shown on the display indicating that all keys are locked.
17.HDMI IN: Connect a HDMI device to this front panel HDMI input.
18.USB Port: Connect a USB flash drive here with music and picture files. WMA (Windows Media Audio), MP3 (MPEG-1 Audio Layer-3), WAV, MPEG-4 AAC, and FLAC (Free Lossless Audio Codec) are supported.
3
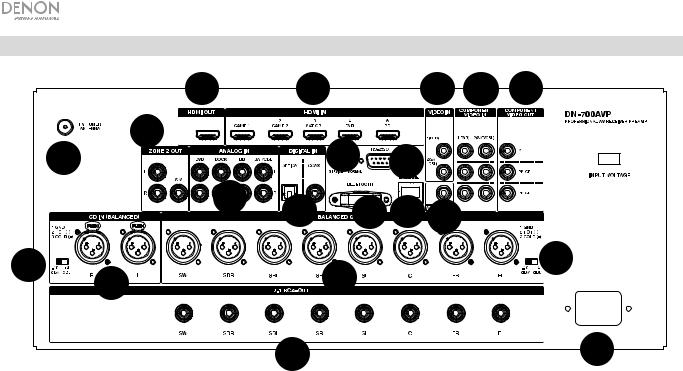
Rear Panel
|
|
5 |
|
4 |
|
|
3 |
9 |
10 |
|
11 |
17 |
|
|
20 |
7 |
|
|
|
|
|
6 |
|
|
|
|
|||
|
|
|
1 |
19 2 |
8 |
|
|
||
|
|
|
|
|
|
||||
13 |
|
12 |
|
|
14 |
|
|
|
15 |
|
|
|
|
|
|
|
|
||
|
|
|
|
18 |
|
|
|
|
16 |
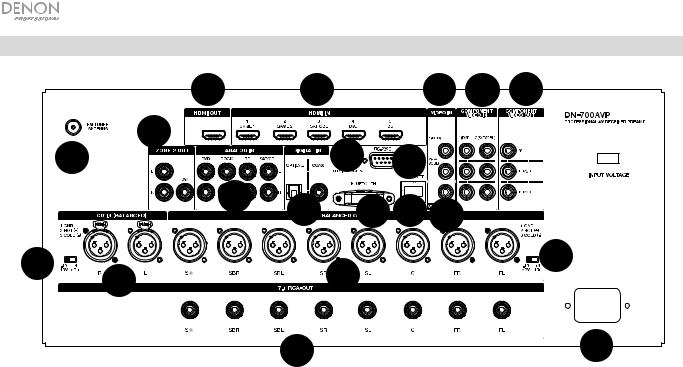
1.Digital Inputs: Connect devices with coaxial and optical audio inputs here.
2.Network Connector: This connector is used to connect the unit to a LAN (local area network). The port is used to stream audio from a media server or to connect to Internet radio.
3.Composite Video Inputs: Connect video outputs from a composite video device here.
4.HDMI Inputs: Use these 5 HDMI inputs to directly route the video and audio from a Blu-ray player or DVD player to the HDMI output.
5.HDMI Out: Connect this HDMI output to a TV, projector, computer monitor, or DVR.
6.Analog Audio Inputs: Connect the audio output of your sound sources here.
7.Serial Port: This input lets you connect a host device (usually a computer) to DN-700AVP. You can use the host device to control DN-700AVP via commands sent from it (using RS-232C serial communication).
8.Video Out (Composite): Connect this video output to the video input of another video source.
9.Video Inputs (Component): Connect the video inputs to the video output of another video source.
10.Video Outputs (Component): Connect the video outputs to the video input of another video source.
11.FM Tuner Antenna: Connect the included antenna here to get reception for FM radio sources.
12.CD In: Connect these balanced XLR inputs to the output of a preamp or mixer.
13.Input Level Setting Switch: Adjust this to switch the audio input level to -10 dBv or +4 dBu.
14.Balanced Outputs: Connect these individual surround channel XLR outputs to the input of a mixer or preamp.
15.Balanced Output Level: Adjust this to switch the surround channel XLR output level to -10 dBv or +4 dBu.
16.Power Input: Connect the included power cable here.
17.Zone 2 Outputs: Sends the audio signal from the L/R and subwoofer output to another location.
18.7.1 RCA Out: Use these coaxial outputs to send individual channels of the surround mix of the audio to a speaker setup (75W per channel).
19.Bluetooth Antenna: The integrated antenna is used for Bluetooth reception.
20.Firmware Update: The “Service/Normal” switch is used to set the mode for the USB connection for the firmware upgrade. For normal operation, this switch should be left in the Normal position.
4
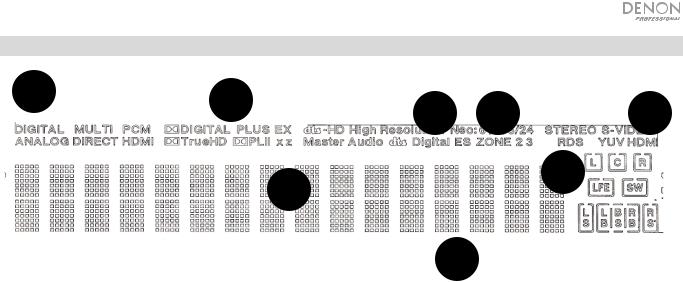
Display
2 |
1 |
7 |
5 |
8 |
|
|
3 4
6
1.Decoder Indicators: This illuminates when the respective decoders are operating.
2.Input Signal Indicators: This illuminates when an input signal is detected.
3.Information Display: The input source name, surround mode, setting values, and other information is shown here.
4.Speaker Indicator: This illuminates when the surround channel speaker is in use.
5.Zone 2 Indicator: This illuminates when Zone 2 is powered on.
6.Master Volume Indicator: This illuminates when the master volume is adjusted.
7.Input Mode Indicators: Sets the audio input modes for the different input sources.
8.HDMI Indicator: This illuminates when playing a source using a HDMI connection.
5
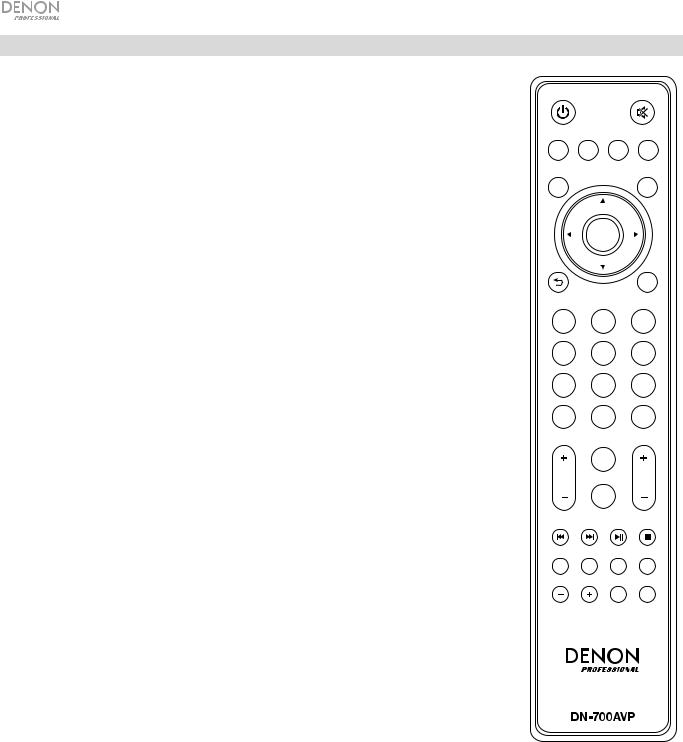
Remote Control
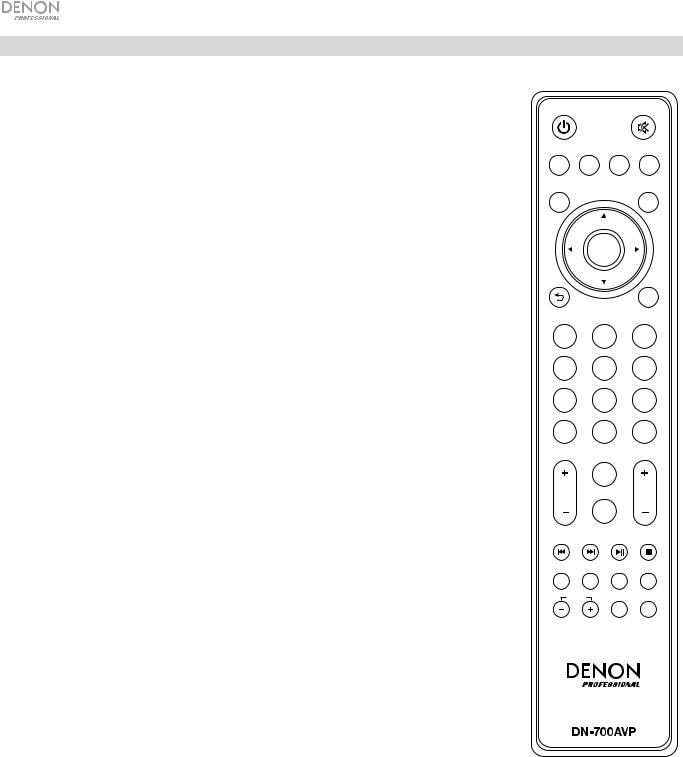
Power: Turns the power on and off for the unit.
Mute: Silences the sound output. Press again to resume the sound output.
Zone On/Off: Turns on/off the video/audio output for the selected zone.
Zone Select: Map Zone 2 to the desired source input.
 ZONE
ZONE 
Display: Press to view the input source settings on your TV or computer monitor.
Stereo Direct: In Stereo Direct mode, the audio is played back as close to how it was originally recorded.
Menu: Access the settings for adjusting video settings, audio settings, input sources, system settings, and the Setup Wizard.
Speaker Setup: Adjust the parameters for surround sound speaker outputs. Select the type of speaker (small or large) connected to the surround outputs using the or buttons.
Cursor Buttons: Selects an audio track or navigates through the menus.
Enter: Press to confirm a menu selection.
Back: Press to go to the previous menu or exit out of a menu.
OSD: Press to turn off the on-screen front panel display.
BD/DVD: Selects the BD/DVD input source.
GAME 1/2: Selects the GAME 1/2 input source.
SAT/CBL: Selects the SAT/CBL input source.
CD: Selects the CD input source.
Media: Selects the Multimedia input source.
BT: Selects the BT input source.
FM: Selects the FM input source.
HDMI: Press to cycle through one of the 6 HDMI input sources.
Surround: Select from the different surround sound modes.
DOCK: Selects the Dock input source.
Audio In: Select an audio input to map to the currently selected source. Select from HDMI, Analog, Coax (coaxial), and Opt (optical).
Station +/-: Press these buttons to cycle through one of 20 radio station memory locations.
Tone: Adjusts the treble and bass qualities for the sound source.
Channel Select: Press this button to cycle through each of the surround sound channels. Press the or buttons to adjust the channel level.
ON/OFF |
SEL |
DISPLAY |
STEREO |
|
DIRECT |
||||
|
|
|
||
MENU |
|
|
SPK |
|
|
|
SET |
||
|
|
|
ENTER
|
|
OSD |
|
TV |
BD/ |
GAME |
|
DVD |
1/2 |
||
|
|||
SAT/ |
CD |
MEDIA |
|
CBL |
|||
|
|
||
BT |
FM |
HDMI |
|
SURR. |
DOCK |
AUDIO |
|
IN |
|||
|
|
||
|
TONE |
|
|
STATION |
|
VOL |
CH SEL
SUB
STEREO ST/MONO ON/OFF LFETRIM
Volume +/-: Adjust the master volume for the input source.
|<<: Skip to the previous USB track or Bluetooth track.
>>|: Skip to the next USB track or Bluetooth track.
Play/Pause: Play/pause the USB track or Bluetooth track.
Stop: Stops the currently playing USB track or Bluetooth track.
Stereo: Press to select to have a stereo signal outputted alone or to have a stereo signal with the subwoofer output.
Stereo/Mono: Press this button to alternate between Stereo mode and Mono mode.
Sub On/Off: Turn the subwoofer audio output on/off.
LFE Trim: This Low Frequency Effect emphasizes low frequency sound, outputting 20 Hz – 120 Hz bass. This adjusts the level of the low-frequency effects channel in a movie soundtrack or multi-channel music recording. Note that this is not a subwoofer level control, so it will work only on 5.1 channel soundtracks that contain a LFE.
Tuning -/+: Selects the FM radio station.
 TUNING
 MEM PTY
Memory: When playing back files from a network/media server or listening to the radio, press Mem to register the file/radio station as a favorite preset.
PTY (Program Type) Search: In Tuner mode, press this button to search for and store a certain style of radio programming.
1.When in Tuner mode, press the PTY button. "PTY SEL" will show on the display.
2.Choose the PTY program using the Tuner + or Tuner - buttons.
3.Press PTY to confirm the selection. "PTY SRH" will show on the display.
If the PTY program is found, the new program will play. If no PTY program is found, "No found" will show on the display.
6
Setup
Items not listed under Introduction > Box Contents are sold separately.
Tablet
Blu-ray Player
Computer
Monitor
Power |
Amplifier |
7

Getting Started
Use the Setup Wizard to adjust the following settings:
•Set the language for the instructions seen on your TV/computer monitor.
•Set the audio/video source and sound options for each speaker.
•Configure the settings so that connected devices can be operated using the included remote control.
•Configure network settings to play audio files from a media server or Internet radio.
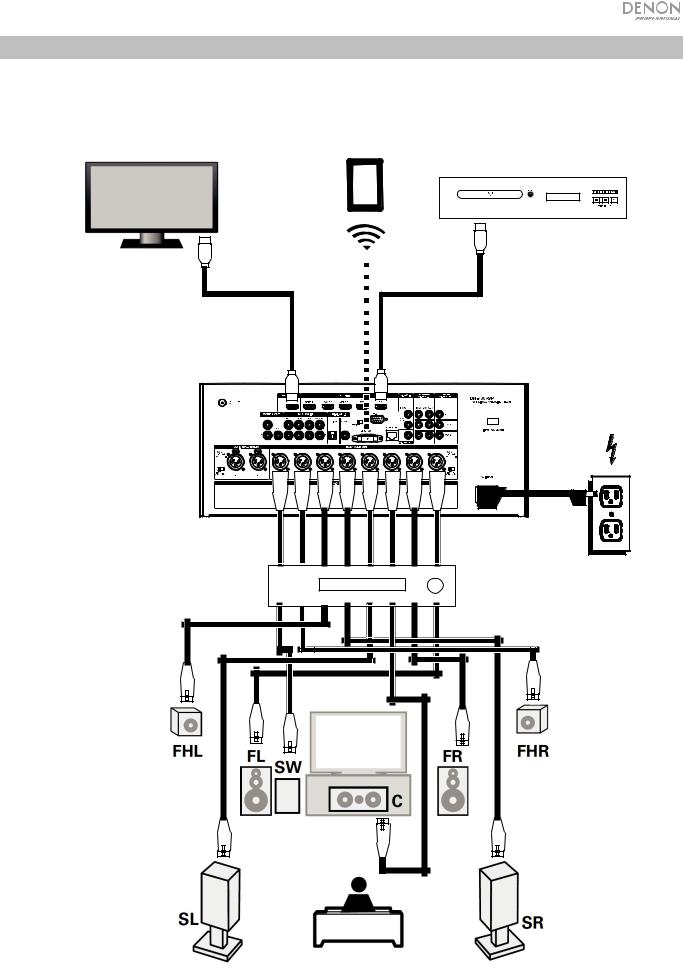
1.Connect your surround sound speakers to DN-700AVP.
2.Switch your television/computer monitor to the input source connected to DN-700AVP’s HDMI output.
3.Power on DN-700AVP.
4.Press Zone Select to map the Zone 2 to the desired source input.
5.Press Enter to start the Setup Wizard.
6.Follow the Setup Wizard instructions to setup your video and audio sources.
Operation
Selecting an Input Source
To select from the input source options, turn the Source Select knob on the front panel or press one of the Quick Select buttons. Alternatively, press one of the pre-mapped source buttons on the remote control.
Saving Sources to Quick Select Buttons
1.Use the Source Select knob to select an input source.
2.Press and hold one of the Quick Select buttons for 2 seconds. The selected source will be stored to the
Quick Select location.
Adjusting Individual Surround Channel Volume
Press the Channel Select button on the remote control to cycle through each of the surround sound channels. Use the or buttons to adjust the individual channel volume.
Adjusting the Master Volume
Adjust the Master Volume using the front panel knob. Alternatively, use the remote control or buttons to adjust the master volume. Press the Mute button on the remote control to turn off the sound temporarily. To cancel muting, press the Mute button again, adjust the Master Volume knob, or adjust the remote control Vol +/- buttons.
8
Assigning Sources to the Input Connectors
This screen appears when the Input Setup ► Each Input Source ► Input Assign menu is selected. Use the Input Assign menu to route the HDMI inputs, digital inputs, and component inputs to the different sources.
1.If DN-700AVP is powered off, press the Power button to power it on.
2.Press the Menu button on the remote control. Use the , ,◄, ► buttons to navigate to the Input Setup ► Each Input Source ► Input Assign menu.
3.Use the , ,◄, ► buttons to move to the source you want to set.
4.Press Enter, then use cursor ◄ and ► buttons to select the input to be assigned.
5.Press Enter to save the setting.
Notes:
•The default HDMI connector assignments/source numbers can be seen on the rear panel. These HDMI connectors can be reassigned to different input sources. For example, the Blu-ray source which is assigned to (5) BD by default can be reassigned to input (2) Game 2 from the Input Assign menu.
•An input source to which an HDMI input connector cannot be assigned will be seen as – – –.
•To play the video signal assigned at HDMI combined with the audio signal assigned at Input Assign ► Digital, select
Digital in the Input Mode.
•When HDMI Control is set to On, the HDMI input cannot be assigned to TV.
Using the Dock Audio Inputs for Media Playback
1.If DN-700AVP is powered off, press the Power button to power it on.
2.Connect your media device to the Dock inputs on DN-700AVP.
3.Press Dock on the remote control or use the Source Select knob to choose Dock as the audio input source.
4.Start playback from your media device and adjust the source volume.
Playing Files on a USB Flash Drive
A USB flash drive can be connected to the USB port of this unit to play music and picture files. Only USB flash drives conforming to mass storage class and MTP (Media Transfer Protocol) standards can be played on DN-700AVP, in the FAT16 or FAT32 format.
The supported file formats are: WMA (Windows Media Audio), MP3 (MPEG-1 Audio Layer-3), WAV, MPEG-4 AAC, and FLAC (Free Lossless Audio Codec).
To play files on a USB flash drive:
1.If DN-700AVP is off, press the Power button to power it on.
2.Connect your USB flash drive (mass storage class) to the USB port.
3.Select Multimedia as your desired media type and use the Cursor ◄ and ► buttons on the remote control to select
USB.
4.Select a file from the list displayed on DN-700AVP or your TV/computer monitor.
To move through audio files or folders, press the Cursor ◄ and ► buttons on the remote control. Press Enter to open a folder or to select an audio file to begin playing.
Playing Audio from a Bluetooth Device
1.If DN-700AVP is powered off, press the Power button to power it on.
2.Use the Source Select knob to choose Bluetooth.
3.Press the Bluetooth button.
4.Navigate to your Bluetooth device’s setup screen, find “DN-700AVP” and connect.
5.Begin to play music on your Bluetooth device.
To disconnect a paired Bluetooth device, press and hold the Bluetooth button for 3 seconds. Alternatively, use the Source Select knob to choose another playback source and disconnect pairing.
Note: If your Bluetooth device prompts for a pairing code, enter 0000.
9
Listening to the Radio
1.If DN-700AVP is powered off, press the Power button to power it on.
2.Use the Source Select knob to choose Tuner. The audio from the broadcast will start automatically.
Important: Make sure you have properly connected the FM antenna.
3.To select a radio station, use the Tuner -/+ buttons on the unit or the Tuning -/+ buttons on the remote control. Hold either the Tuning + or Tuning – button down for 2 seconds to scan and stop at the next radio station with a strong signal.
Note: RDS is a method for the transmission of additional information via VHF stations. For example, the name of the station broadcasting, the name of the program, or the type of program will be shown on the multifunction display. It can only function if the local broadcasting stations have the RDS transmission and the signal is strong enough.
To save/recall a radio station preset:
1.If DN-700AVP is powered off, press the Power button to power it on.
2.Use the Source Select knob to choose Tuner.
3.Select a radio station using the Tuner -/+ buttons on the unit or the Tuning -/+ buttons on the remote control.
4.Press the Mem button on the remote control, then press the Tuning -/+ buttons to select a preset memory location. Press the Mem button again to save the radio station to the selected location.
5.To recall a saved radio station, press the Station +/- buttons to cycle through the saved radio station presets.
Playing Audio from the Zone 2 Outputs
You can simultaneously play back the same audio source in both the Main Zone and Zone 2.
1.Press Zone On/Off to turn on the Zone 2 power.
2.Press Zone Select to map Zone 2 to the desired source input.
3.Play back your audio source.
Note: It is not possible to play digital input signals using the HDMI,
Coaxial, or Optical input for Zone 2.
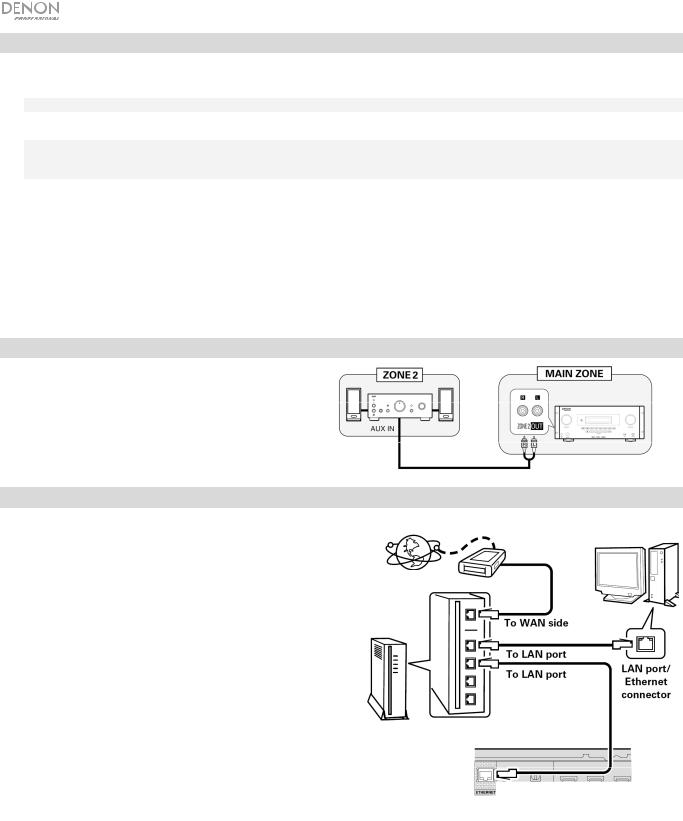
Connecting to a Network
You can play music files stored on a computer or from Internet radio stations via your network (LAN).
Required equipment:
•Broadband Internet connection
•Modem
•Router: We recommend using a router equipped with a built-in DHCP server and a built-in 100BASE-TX switch. When connecting multiple devices, we recommend a switching hub with a speed of 100 Mbps or greater.
•Ethernet cable (CAT-5 or greater recommended): Use only a shielded STP or ScTP LAN cable.
If you are using an Internet service on which network settings are made manually or with no DHCP function, adjust the settings directly from the Network Setup menu. When adjusting network settings manually, confirm the settings with your network administrator.
Do not connect the Ethernet cable from DN-700AVP directly to the LAN port/Ethernet connector on your computer.
1.Connect your Ethernet cable from DN-700AVP to your network.
2.Turn on DN-700AVP. DN-700AVP will connect automatically on networks with DHCP.
When connecting to a network that has no DHCP function, manually adjust the settings in the Network Connect menu.
Computer
Modem
Internet
|
WAN |
|
|
|
|
|
|
|
|
|
|
|
|
|
|
|
|
|
To LAN port |
|
|
|
|
|
|
|
|
|
LAN port/ |
|
To LAN port |
|
|
|
|
|
|
|
|
Ethernet |
|
|
|
|
|
|
|
|
|
|
|||
|
|
|
|
|
port |
|
|
|
|
|
|
Router
10
Playing Network/Media Server Files
1.If DN-700AVP is powered off, press the Power button to power it on.
2.Use the Source Select knob to choose Multimedia as the source, select Media Server using the or buttons, then press Enter or ►.
3.Press the or buttons to select the server, then press Enter or ►.
4.Use the or buttons to select the file, then press Enter or ►. Playback will begin once buffering reaches “100%”.
Listening to Streaming Music/Internet Radio
You can listen to streaming music services or radio broadcasts distributed over the Internet. The Internet radio stations can be selected by genre and location.
1.If DN-700AVP is powered off, press the Power button to power it on.
2.Verify that the network settings on DN-700AVP are correct.
3.Use the Source Select knob to choose Multimedia.
4.Use the Cursor ◄ and ► buttons on the remote control to select a music streaming service or an Internet radio station, then press Enter or ►.
5.Press or to select the station, then press Enter or ►. Playback will begin once buffering reaches “100%”.
Saving Internet radio stations as Favorites
1.If DN-700AVP is powered off, press the Power button to power it on.
2.Use the Source Select knob to choose Multimedia.
3.Use the Cursor ◄ and ► buttons on the remote control to select an Internet radio station, then press Enter or ►.
4.Select an Internet radio station, then press Enter or ► to start playback.
5.While the Internet radio station you want to store as a preset is playing, press Mem.
6.Press or to select Favorites, then press Enter.
7.Press ◄ to select Add.
Listening to Internet radio stations registered in your Favorites
1.If DN-700AVP is powered off, press the Power button to power it on.
2.Use the Source Select knob to choose Multimedia.
3.Use the Cursor ◄ and ► buttons on the remote control to select Favorites.
4.Press or to select the Internet radio station, then press Enter or ►. Playback will begin once buffering reaches “100%”.
11

Troubleshooting
If you encounter a problem, try doing these things first:
•Make sure all cables and other connected devices are properly and securely connected.
•Make sure you are using DN-700AVP as described in this user guide.
•Make sure your other devices or media are working properly.
•If you believe DN-700AVP is not working properly, check the following table for your problem and solution.
Problem: |
Solution: |
|
|
Power does not turn on. |
Make sure the power cable is properly connected to DN-700AVP and the power |
|
outlet. |
|
|
The Display is off |
Set the Dimmer to a setting other than “Off”. |
|
|
The power button indicator blinks red at 2 second |
The temperature inside the unit has risen. Turn off the power and re-apply the |
intervals |
power after the temperature has sufficiently fallen. |
|
Re-install the unit in a place with good ventilation. |
|
|
No audio is outputted |
Check the audio cable connections. |
|
When outputting HDMI audio from the speakers, set “HDMI Audio Out” on the |
|
menu to “AMP”. |
|
Ensure the sound is not muted. |
|
When outputting HDMI audio from a TV, set “HDMI Audio Out” on the menu to |
|
“TV”. |
|
|
No video is outputted. |
Check the video cable connections. |
|
Set the source on DN-700AVP to match the connected video input. |
|
Set your TV to the correct input source. |
|
If using HDMI cables, check whether the TV is compatible with copyright |
|
protection (HDCP). If connected to a device not compatible with HDCP, video will |
|
not be output correctly. |
|
|
Dolby TrueHD, DTSHD, Dolby Digital Plus audio is not |
Ensure HDMI cables are used. |
outputted. |
|
|
|
When a USB flash drive is connected, “USB” is not |
Check that the USB flash drive is properly connected. |
displayed in the menu. |
Ensure a USB flash drive conforming to mass storage class or MTP standards is |
|
|
|
connected. |
|
Connect the USB flash drive directly to the USB port (not through a USB hub). |
|
|
Files on a USB flash drive cannot be played. |
Ensure the USB flash drive has been formatted as FAT16 or FAT32. |
|
If the USB flash drive is divided into multiple partitions, only files stored in the top |
|
partition can be played. |
|
The file type is not supported. |
|
You are attempting to play a file that is copyright protected. Files that are |
|
copyright protected cannot be played on this unit. |
|
|
The file names are not displayed properly (“...”, etc.). |
Unsupported file name characters are used. Characters that cannot be displayed |
|
are replaced with a “.”. |
|
|
12

Problem: |
Solution: |
|
|
Files stored on a computer/media server cannot be |
Files are stored in a non-compatible format. |
played. |
Files that are copyright protected cannot be played on this unit. |
|
|
|
|
The computer/media server is not found or cannot |
The computer or router’s firewall is activated. |
connect. |
Ensure the computer’s power is turned on. |
|
|
|
Ensure the server is launched. |
|
Ensure the correct IP address is being used. |
|
|
Sound is poor during playback over a network. |
The network’s signal transfer speed is slow or the Internet radio station is |
|
congested. |
|
|
Audio from my Bluetooth device does not play through |
Make sure you have properly paired your Bluetooth device. |
DN-700AVP. |
Improve the Bluetooth signal reception by moving your Bluetooth device closer to |
|
|
|
DN-700AVP. Bluetooth range is affected by walls, obstructions, and movement. |
|
For optimal performance, place your device in your room at line of sight, so it is |
|
unaffected by walls, furniture, etc. |
|
|
Pairing my Bluetooth device to DN-700AVP requires a |
Enter 0000 as the PIN. (Some older Bluetooth devices may require you to enter a |
PIN. |
PIN.) |
|
|
DN-700AVP cannot be operated with the remote |
Replace with new batteries. |
control. |
Operate the remote control unit within a distance of about 23 feet (7 m) from the |
|
|
|
unit and at an angle of within 30° of the front panel IR sensor. |
|
Remove any obstacle between this unit and the remote control. |
|
The unit’s remote control sensor is exposed to strong light (direct sunlight, |
|
fluorescent lights, etc.). Move the unit to a place in which the remote control |
|
sensor will not be exposed to strong light. |
|
|
13

Guía del usuario (Español)
Introducción
Contenido de la caja
DN-700AVP
Cable de corriente
Antena de FM
Control remoto
Guía del usuario
Manual sobre la seguridad y garantía
Soporte
Para obtener la información más reciente acerca de este producto (documentación, especificaciones técnicas, requisitos de sistema, información de compatibilidad, etc.) y registrarlo, visite denonpro.com.
Para obtener soporte adicional del producto, visite denonpro.com/support.
Seguridad y precauciones
•Mantenga a esta unidad alejada de la humedad, el agua y el polvo.
•No bloquee los orificios de ventilación.
•No permita que caigan objetos extraños en los orificios de ventilación.
Antes de encender la unidad
•Compruebe que todas las conexiones sean correctas y que no haya problemas con los cables de conexión.
•Se suministra corriente a algunos de los circuitos aun cuando la unidad está en modo de espera. Si planea no utilizar la unidad durante un largo período, asegúrese desenchufar el cable de corriente de la toma de corriente.
Condensación
•Si existe una gran diferencia de temperatura entre el interior de la unidad y los alrededores, puede acumularse condensación (rocío) en las piezas operativas en el interior de la unidad, haciendo que la unidad no funcione correctamente. Si esto ocurriera, deje la unidad apagada durante una o dos horas y espere hasta que haya una menor diferencia de temperatura antes de utilizar la unidad.
Precauciones sobre el uso de teléfonos móviles
•Usar un teléfono móvil cerca de esta unidad podría dar como resultado interferencia en las señales de vídeo y audio. Si esto ocurriera, aleje el teléfono móvil de la unidad cuando lo esté utilizando.
Tiempo de funcionamiento para uso continuo
•Esta unidad se puede usar de manera continua durante un máximo de 24 horas. Usar esta unidad más de 24 horas podría dar como resultado que las operaciones no funcionen correctamente. Para seguir utilizando la unidad durante más de 24 horas, reiníciela cada 24 horas.
Mantenimiento y limpieza
•Limpie el gabinete y el panel de control con un paño no abrasivo suave.
•El benceno, diluyente de pintura y otros solventes podrían causar decoloración si entran en contacto con la unidad y por lo tanto no deben usarse.
14
Características
Panel frontal
5 |
|
|
|
|
|
|
1 |
|
|
4 |
|
|
6 |
7 |
8 |
9 |
10 |
11 |
12 |
13 |
14 |
15 |
17 |
18 |
16 |
|
32
1.Perilla Source Select: Gire esta perilla para seleccionar la fuente de entrada. Seleccione entre Bluetooth, TV, Sintonizador, DVD, Estación de acoplamiento, BD, SAT/CBL, Juego 1, Juego 2, CD y Multimedios (seleccione un servicio de streaming de música, radio por Internet, archivos favoritos guardados en una red, un servidor de medios o una unidad de almacenamiento USB conectada).
2.ON/Standby: Pulse este botón para encender o apagar la unidad. Cuando la unidad este apagada, se encontrará en modo de espera.
3.Salida para auriculares: Conecte auriculares a esta salida de 6,35 mm (1/4 pulg.).
4.Pantalla VFD: La pantalla se usa para mostrar información sobre la fuente de audio seleccionada, la estación de radio FM, la radio de internet, los menús de configuración y diversas funciones.
5.Sensor infrarrojo: Apunte el control remoto hacia aquí para cambiar los ajustes de la unidad.
6.Master Volume: Utilice esta perilla para controlar el volumen maestro de la unidad.
7.Zone On/Off: Utilice este interruptor para encender y apagar la zona dos.
8.Zone Select: Utilice este botón para seleccionar la fuente de entrada que se asigna a la Zona 2.
9.Sleep: Utilice este interruptor para ajustar el temporizador de hibernación en incrementos de 10 minutos hasta 120 minutos.
10.Status: Utilice este interruptor para mostrar información sobre la fuente de audio, conexión HDMI y estado de desbloqueo.
11.Tuner -/+: Utilice estos botones para seleccionar el canal de radio FM.
12.Dimmer: Utilice este interruptor para controlar el brillo de la pantalla de VFD.
13.Media: Utilice este interruptor para alternar entre una unidad de almacenamiento USB conectada, una radio de Internet o un servidor de medios.
14.Bluetooth: Pulse este botón para aparear la unidad con un dispositivo Bluetooth. Mantenga pulsado este botón durante 3 segundos para desconectar la unidad de un dispositivo Bluetooth apareado.
15.Quick Selects: Utilice estos interruptores para seleccionar fuentes de audio, vídeo o HDMI predefinidas.
16.Key Lock: Mantenga pulsado este botón durante 3 segundos para bloquear todos los demás interruptores del panel delantero. Aparecerá un mensaje en la pantalla indicando que todas las teclas están bloqueadas.
17.Entrada HDMI: Conecte un dispositivo HDMI a la entrada HDMI este panel delantero.
18.Puerto USB: Conecte aquí una unidad de memoria USB con archivos de música e imágenes. (La unidad soporta WMA (Windows Media Audio), MP3 (MPEG-1 Audio Layer-3), WAV, MPEG-4 AAC, y FLAC (Free Lossless Audio Codec).
15
Panel trasero
|
|
5 |
|
4 |
|
|
3 |
9 |
10 |
|
11 |
17 |
|
|
20 |
7 |
|
|
|
|
|
6 |
|
|
|
|
|||
|
|
|
1 |
19 2 |
8 |
|
|
||
|
|
|
|
|
|
||||
13 |
|
12 |
|
|
14 |
|
|
|
15 |
|
|
|
|
|
|
|
|
||
|
|
|
|
18 |
|
|
|
|
16 |
1.Entradas digitales: Conecte aquí dispositivos con entradas de audio coaxial y óptico.
2.Conector de red: Este conector se utiliza para conectar la unidad a una LAN (red de área local). El puerto se utiliza para transmitir audio desde un servidor de medios o para conectarse a una radio de internet.
3.Entradas de vídeo compuesto: Conecte aquí las salidas de vídeo de un dispositivo de vídeo compuesto.
4.Entradas HDMI: Utilice estas 5 entradasHDMI para encaminar el vídeo y audio proveniente de un reproductor Blu-ray o de DVD directamente hacia la salida HDMI.
5.Salida HDMI: Conecte esta salida HDMI a un TV, proyector, monitor de ordenador o DVR.
6.Entradas de audio analógicas: Conecte la salida de audio de sus fuentes de sonido aquí.
7.Puerto en serie: Esta entrada le permite conectar un dispositivo anfitrión (usualmente un ordenador) al DN700AVP. Puede utilizar dispositivo anfitrión para controlar el DN-700AVP mediante el envío de comandos (utilizando la comunicación en serie RS-232C).
8.Salida de vídeo (compuesto): Conecte esta salida de vídeo a la entrada de vídeo de otra fuente de vídeo.
9.Entradas de vídeo (componente): Conecte las entradas de vídeo a la salida de vídeo de otra fuente de vídeo.
10.Salidas de vídeo (componente): Conecte las salidas de vídeo a la entrada de vídeo de otra fuente de vídeo.
11.FM Tuner Antenna: Conecte aquí la antena incluida para poder captar las fuentes de radio FM.
12.CD In: Conecte estas entradas XLR balanceadas a la salida de un preamplificador o mezclador.
13.Interruptor de ajuste de nivel de entrada: Ajuste este interruptor para cambiar el nivel de entrada de audio a -10 dBv o +4 dBu.
14.Salidas balanceadas: Conecte estas salidas XLR de canal surround individual a la entrada de un mezclador o preamplificador.
15.Nivel de salida balanceada: Ajuste este interruptor para cambiar el nivel de salida XLR del canal surround a -10 dBv o +4 dBu.
16.Entrada de corriente: Conecte aquí el cable de alimentación incluido.
17.Salidas de la Zona 2: Envía la señal de audio desde la salida L/R y de subwoofer a otra ubicación.
18.7.1 Salida RCA: Utilice estas salidas coaxiales para enviar los canales individuales de la mezcla de audio surround a un conjunto de altavoces (75 W por canal).
19.Antena Bluetooth: La antena integrada se usa para la recepción de Bluetooth.
20.Actualización de firmware: El interruptor “Service/Normal” se utiliza para ajustar el modo de la conexión USB para la actualización de firmware. Para que la unidad funcione de modo normal, este interruptor debe dejarse en la posición Normal.
16

Pantalla
2 |
1 |
7 |
5 |
8 |
|
|
3 4
6
1.Indicadores del decodificador: Estos indicadores se iluminan cuando los respectivos decodificadores están funcionando.
2.Indicadores de la señal de entrada: Estos indicadores se iluminan cuando se detecta una señal de entrada.
3.Pantalla de información: Aquí se muestra el nombre de la fuente de entrada, el modo de surround, los ajustes de la configuración y demás información.
4.Indicador del altavoz: Este indicador se ilumina cuando el altavoz del canal de surround se encuentra en uso.
5.Indicador de la Zona 2: Este indicador se ilumina cuando la Zona 2 está encendida.
6.Indicador de volumen maestro: Este indicador se ilumina cuando se ajusta el volumen maestro.
7.Indicador de modo de entrada: Ajusta los modos de entrada de audio para las diferentes fuentes de entrada.
8.Indicador HDMI: Este indicador se ilumina cuando se está reproduciendo una fuente utilizando una conexión HDMI.
17
Control remoto
Encendido: Enciende y apaga la unidad.
Silencio: Silencia la salida de sonido. Púlselo nuevamente para reanudar la salida de sonido.
Encendido/apagado de zona: Enciende/apaga la salida de vídeo/audio para la zona seleccionada.
Selección de zona (Sel): Asigne la Zona 2 a la entrada de la fuente deseada.
Pantalla: Pulse este botón para visualizar los ajustes de la fuente de entrada del monitor de su TV u ordenador.
Stereo Direct: En modo Stereo Direct, el audio se reproduce lo más parecido a cómo se grabó originalmente.
Menu: Acceda a los ajustes para configurar los ajustes de vídeo, los ajustes de audio, las fuentes de entrada, los ajustes del sistema y el Asistente de configuración.
Ajuste de altavoz (Spk Set): Ajuste los parámetros de las salidas de los altavoces del sonido surround.
Seleccione el tipo de altavoz (pequeño o grande) conectado a las salidas de surround utilizando los botones
o .
Botones del cursor: Selecciona una pista de audio o se desplaza a través de los menús.
Enter: Pulse para confirmar una selección del menú.
Volver: Pulse para volver al menú anterior o salir de un menú.
OSD: Pulse para apagar la pantalla del panel delantero.
BD/DVD: Selecciona la fuente de entrada BD/DVD.
GAME 1/2: Selecciona la fuente de entrada GAME 1/2.
SAT/CBL: Selecciona la fuente de entrada SAT/CBL.
CD: Selecciona la fuente de entrada CD.
Multimedia: Selecciona la fuente de entrada de multimedios.
BT: Selecciona la fuente de entrada BT.
FM: Selecciona la fuente de entrada FM
HDMI: Púlselo para recorrer las 6 fuentes de entrada HDMI.
Surround (Surr.): Seleccione uno de los diferentes modos de sonido surround.
DOCK: Selecciona la fuente de entrada de la estación de acoplamiento.
Audio In: Seleccione una entrada de audio para asignar a la fuente actualmente seleccionada. Seleccione entre HDMI, Analog, Coax (coaxial) u Opt (óptica).
Station +/-: Pulse estos botones para recorrer las 20 ubicaciones de memoria para estaciones de radio.
Tone: Ajusta la calidad de los graves y agudos de la muestra de sonido.
Selección de canal (Sel): Pulse este botón para alternar los canales de sonido surround. Pulse los botones o para ajustar el nivel del canal.
 ZONE
ZONE 
ON/OFF |
SEL |
DISPLAY |
STEREO |
|
DIRECT |
||||
|
|
|
||
MENU |
|
|
SPK |
|
|
|
SET |
||
|
|
|
ENTER
|
|
OSD |
|
TV |
BD/ |
GAME |
|
DVD |
1/2 |
||
|
|||
SAT/ |
CD |
MEDIA |
|
CBL |
|||
|
|
||
BT |
FM |
HDMI |
|
SURR. |
DOCK |
AUDIO |
|
IN |
|||
|
|
||
|
TONE |
|
|
STATION |
|
VOL |
CH SEL
SUB
STEREO ST/MONO ON/OFF LFETRIM
Volumen +/- (Vol): Ajuste el volumen de la fuente de entrada. |
TUNING |
MEM PTY |
|
|
|<<: Pase a la pista USB o pista Bluetooth anterior.
>>|: Pase a la pista USB o pista Bluetooth siguiente.
Play/Pause: Reproduzca/ponga en pausa la pista USB o pista Bluetooth.
Parar: Detenga la pista USB o pista Bluetooth actualmente en reproducción.
Stereo: Púlselo para que se emita una señal estéreo sola o junto con la salida del subwoofer.
Estéreo/Mono (St/Mono): Pulse este botón para alternar entre el modo estéreo y el modo monoaural.
Sub On/Off: Activa y desactiva la salida de audio del subwoofer.
LFE Trim: Este efecto de baja frecuencia enfatiza los sonidos de baja frecuencia, emitiendo graves entre 20 y 120 Hz. Ajusta el nivel del canal de efectos de baja frecuencia de la banda de sonido de una película o grabación de música multi-canal. Tenga en cuenta que este no es un control de nivel de subwoofer, de manera que sólo funcionará en bandas de sonido de canales 5.1 que contengan LFE.
Tuning -/+: Selecciona la estación de radio FM.
Memoria (Mem): Al reproducir archivos desde una red/servidor de medios o al escuchar la radio, pulse Mem para registrar el archivo/estación de radio como un preset favorito.
Búsqueda de PTY (tipo de programa): En modo de sintonizador, pulse este botón para buscar y almacenar un estilo determinado de programa de radio.
1.Cuando esté en modo Sintonizador, pulse el botón PTY. Aparecerá “PTY SEL” en la pantalla.
2.Seleccione el programa PTY utilizando los botones Tuner + o Tuner -.
3.Pulse PTY para confirmar la selección. Aparecerá “PTY SRH” en la pantalla.
Si se encuentra el programa PTY, se reproducirá el programa nuevo. Si no se encuentra el programa PTY, aparecerá "No found" en la pantalla.
18

Instalación
Los elementos que no se enumeran en Introducción > Contenido de la caja se venden por separado.
Reproductor Blu-ray
Tableta
Monitor del ordenador
Suministro
Amplificado eléctrico
19

Para comenzar
Utilice el Asistente de configuración para configurar los siguientes ajustes:
•Ajuste el idioma de las instrucciones que aparecen en el monitor de su TV/ordenador.
•Ajuste la fuente de audio/vídeo y las opciones de sonido de cada altavoz.
•Configure los ajustes de manera que los dispositivos conectados puedan operarse usando el control remoto incluido.
•Configure los ajustes de la red para reproducir archivos de audio desde un servidor de medios o desde una radio de internet.
1.Conecte sus altavoces de sonido surround al DN-700AVP.
2.Ajuste el monitor de su televisor/ordenador para que muestre la fuente de entrada conectada a la salida HDMI del DN-700AVP.
3.Encienda el DN-700AVP.
4.Pulse Zone Select para asignar la Zona 2 a la entrada de audio deseada.
5.Pulse Enter para abrir el Asistente de configuración.
6.Si las instrucciones del Asistente de configuración para configurar sus fuentes de audio y vídeo.
Operación
Selección de una fuente de entrada
Para seleccionar una de las opciones de fuentes de entrada, gire la perilla Source Select del panel delantero o pulse uno de los botones Quick Select. Como alternativa, pulse uno de los botones de fuente preasignados del control remoto.
Como guardar fuentes en los botones de selección rápida
1.Use la perilla Source Select para seleccionar una fuente de entrada.
2.Mantenga pulsado uno de los botones Quick Select durante 2 segundos. La fuente seleccionada se almacenará en la ubicación Quick Select.
Como ajustar el volumen de un canal individual de surround
Pulse el botón Channel Select del control remoto para alternar entre cada uno de los canales de sonido surround. Utilice los botones o para ajustar el volumen del canal individual.
Cómo ajustar el volumen maestro
Ajuste el Master Volume utilizando la perilla del panel frontal. Como alternativa, utilice los botones o del control remoto para ajustar el volumen maestro. Pulse el botón Mute del control remoto para apagar el sonido temporalmente. Para cancelar el silenciamiento, pulse nuevamente el botón Mute, ajuste la perilla Master Volume o ajuste los botones Vol +/- del control remoto.
20
Loading...