


 Loading...
User Guide
Guía del usuario
Guide d’utilisation
Guida per l’uso
Benutzerhandbuch
Appendix
English ( 2 – 5 )
Español ( 6 – 9 )
Français ( 10 – 13 )
Italiano ( 14 – 17 )
Deutsch ( 18 – 21 )
English ( 22 – 23 )

User Guide (English)
Introduction
The DN-312X is an ultra-slim 1U rack-mounted 12-channel mixer with 6 mic/line combination inputs and 6 additional line inputs. It has balanced XLR outputs, a 1/4” (6.35 mm) mono output that can be used to connect the DN-312X to a remote mixer, a pair of RCA stereo outputs that can be used to connect to a remote recording device, and 1/4” (6.35 mm) mic monitoring port that can be used to monitor the mics’ signals. The DN-312X provides individual volume control for all inputs in addition to volume control for the mono output port and a master volume control. It has a 3-level equalizer and a controlled priority for Mic/Line 1. It can be powered from standard AC or 24 V DC power source.
Please see this guide’s Setup chapter to learn how to integrate DN-312X with your audio system.
Box Contents
DN-312X
Power Cable
User Guide
Safety & Warranty Manual
Support
For the latest information about this product (system requirements, compatibility information, etc.) and product registration, visit denonpro.com.
2

Features
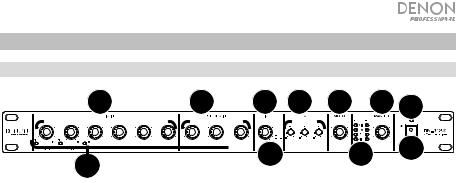
Front Panel
3 |
4 |
6 |
8 |
9 |
10 |
2 |
||||
|
|
|
|
|
|
|
|
|
|
|
5


 7
7


 11
11


 1
1
1.Power Switch: Use this switch to power DN-312X on or off.
2.Power Light: This light illuminates when DN-312X is powered on.
3.Mic In Level: Turn these knobs to set the input level of the corresponding mic/line inputs (Channels 1–6).
4.Stereo In Level: Turn these knobs to set the input level of the corresponding line inputs (Channels 7/8–11/12).
5.Signal (Sig) Lights: Indicates that the channel’s incoming audio signal is within an optimal range.
6.Mic Level: Turn this knob to set the input level of the Mic Monitor output. Use the Mic On/Off button to enable to disable it.
7.Mic On/Off: Press this to turn enable or disable the Mic Monitor output. When the button is depressed (in the down position), the signal from the mic/line inputs (Channels 1–6) will be sent to the Mic Monitor output, and the Line Outs will be disabled. When the button is raised (in the up position), the Mic Monitor output will be disabled, and all channels will be sent to the Line Outs.
8.EQ: Turn these knobs to increase (“boost”) or reduce (“cut”) the amount of bass frequencies (Low), mid-range frequencies (Mid), and treble frequencies (High) of the main mix.
9.Mono Level: Turn this knob to adjust the level of the Mono Out.
10.Master Level: Turn this knob to adjust the level of the Line Outs, Mono Out, and Rec Out.
11.Level Meters: These lights indicate the audio level of the Line Outs, Mono Out, and Rec Out. The Clip light can light up occasionally, but if it happens too often, reduce the volume of the mix and/or individual channels.
3

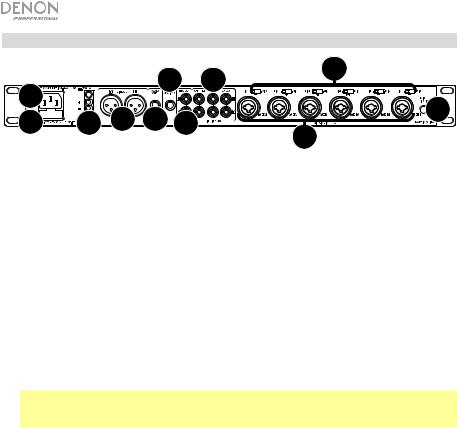
Rear Panel
|
|
|
10 |
7 |
5 |
|
1 |
|
|
|
|||
|
8 |
9 |
|
|
6 |
|
2 |
3 |
11 |
|
|||
|
4 |
|||||
|
|
|
|
|
|
|
1.AC Power Input: Use the included power cable to connect this input to a power outlet. Alternatively, use the DC power input, described below. (If both power inputs are connected to power outlets, DN-312X will draw its power from the AC power input.)
2.Fuse Cover: If the fuse is broken, use a screwdriver or other tool to lift this tab, and replace the fuse with a fuse with the same rating. Using a fuse with an incorrect rating can damage the unit and/or fuse.
3.DC Power Input: Use a separate DC power supply to connect this input to a power outlet. Alternatively, use the AC power input, described above. (If both power inputs are connected to power outlets, DN-312X will draw its power from the AC power input.)
4.Mic/Line Inputs (Channels 1–6): Connect microphones or line-level devices to these inputs with XLR or 1/4” (6.35 mm) cables.
5.Input Selector (Channels 1–6): Use these switches to set what type of audio source is connected to each mic/line input: a microphone without phantom power (Mic), a microphone with +18–21V of phantom power (Ph), or a line-level device (Line).
Note: Most dynamic microphones do not require phantom power, while most condenser microphones do. Consult your microphone’s documentation to find out whether it needs phantom power.
6.Mic 1 Priority: Turn this knob to set how loud the volume level of all other inputs will be when the Channel 1 mic/line input receives an incoming signal. At its lowest setting, a signal received by the Channel 1 mic/line input will mute all other input signals entirely. At its highest setting, a signal received by the Channel 1 mic/line input will not affect the other input signals at all.
7.Line Inputs (Channels 7/8–11/12): Connect line-level devices to these inputs with standard stereo RCA cables.
8.Line Out: Use standard XLR cables to connect these outputs to your loudspeakers or amplifier system. Use the Master Level knob to control the level of these outputs.
9.Mono Out: Use a standard 1/4” (6.35 mm) TS cable to connect this output to a remote recording device, remote mixer, etc. The signal sent from this output is a summed mono signal of the line outs.
10.Mic Monitor: Use a standard 1/4” (6.35 mm) cable to connect this output to a powered monitor, remote mixer, etc. When the Mic On/Off button is depressed (in the down position), the signal from the mic/line inputs (Channels 1–6) will be sent to this output, and the Line Outs will be disabled. When the Mic On/Off button is raised (in the up position), this output will be disabled, and all channels will be sent to the Line Outs.
11.Rec Out: Use standard stereo RCA cables to connect these outputs to a remote recording device, remote mixer, etc. Use the Master Level knob to control the level of these outputs.
4

Setup
Items not listed under Introduction > Box Contents are sold separately.
To set up DN-312X with your sound system:
1.If you are using any audio source with RCA outputs (Blu-ray® players, stereos, etc.), use standard RCA cables to connect them to the line inputs on the rear panel. Your audio sources must be line-level (no phono-level turntables).
2.If you are using microphones or other audio sources that send a line-level signal, connect them to the mic/line inputs on the rear panel.
3.Use standard XLR or 1/4” (6.35 mm) TRS cables to connect the line outputs on the rear panel to your loudspeakers, remote mixer, etc.
4.If you want to send the main mix to a remote recording device, remote mixer, etc., use a standard 1/4” (6.35 mm) TS cable to connect the Mono Out on the rear panel to it. Alternatively, use standard stereo RCA cables to connect the Rec Outs on the rear panel to it.
5.Use the included power cable to connect DN-312X to a power outlet.
6.Power on all of your audio sources (Blu-ray players, stereos, microphones, etc.).
7.Power on DN-312X.
Example
(to input on remote mixer)
Microphones
Loudspeakers |
Blu-ray Player |
5
Guía del usuario (Español)
Introducción
El DN-312X es un mezclador de 12 canales ultra delgado de 1 U para montaje en rack con 6 entradas combinadas para micrófono/línea y seis entradas de línea adicionales. Cuenta con salidas XLR balanceadas, una salida mono de 6,35 milímetros (1/4 pulg.) que puede utilizarse para conectar el DN-312X a un mezclador remoto, un par de salidas estéreo RCA que pueden utilizarse para conectarlo a un dispositivo de grabación remoto y un puerto para monitoreo de micrófonos de que puede utilizarse para monitorizar las señales del micrófono. El DN-312X proporciona un control de volumen individual para todas las entradas además de un control de volumen para el puerto de salida mono y un control de volumen maestro. Cuenta con un ecualizador de tres niveles y un control de prioridad para el micrófono/línea 1. Se puede alimentar con una fuente de corriente de CA estándar o de 24 VCC
Consulte el capítulo Ajustes de esta guía para aprender a integrar el DN-312X con su sistema de audio.
Contenido de la caja
DN-312X
Cable de corriente
Guía del usuario
Manual sobre la seguridad y garantía
Soporte
Para obtener la información más completa acerca de este product (los requisitos del sistema, compatibilidad, etc) y registro del producto, visite denonpro.com.
6
Características
Panel frontal
3 |
4 |
6 |
8 |
9 |
10 |
2 |
||||
|
|
|
|
|
|
|
|
|
|
|
5


 7
7


 11
11


 1
1
1.Interruptor de encendido: Utilice este interruptor para encender y apagar el DN-312X.
2.Luz de encendido: Esta luz se ilumina cuando el DN-312X está encendido.
3.Nivel de entrada de micrófono: Gire estas perillas para ajustar el nivel de entrada de las entradas de micrófono/línea mic/line inputs correspondientes (canales 1–6).
4.Nivel de la entrada estéreo: Gire estas perillas para ajustar el nivel de entrada de las entradas de línea line inputs correspondientes (Canales 7/8–11/12).
5.Luces de señal (Sig): Indican que la señal de audio entrante del canal está dentro de un rango óptimo.
6.Nivel de micrófono: Gire esta perilla para ajustar el nivel de volumen de la salida Mic Monitor (monitor de micrófono) Utilice el botón Mic On/Off (encender/apagar micrófono) para activarlo o desactivarlo.
7.Encender/apagar micrófono: Pulse este botón para activar o desactivar la salida Mic Monitor. Cuando este botón está oprimido (en la posición hacia abajo), la señal desde las entradas mic/line inputs (canales 1–6) se enviarán a la salida Mic Monitor y se desactivará las salidas de línea Line Outs. Cuando este botón está levantado (en la posición hacia arriba), la salida Mic Monitor se desactivará y todos los canales se enviarán a las salidas de línea Line Outs.
8.Ecualizador: Gire estas perillas para aumentar (“reforzar”) o reducir (“recortar”) la cantidad de frecuencias bajas (Low), frecuencias medias (Mid) y frecuencias agudas (High) de la mezcla principal.
9.Nivel mono: Gire esta perilla para ajustar el nivel de la salida Mono Out.
10.Nivel maestro: Gire esta perilla para ajustar el nivel de las salidas Line Outs, Mono Out y Rec Out (salida de grabación).
11.Medidores de nivel: Estas luces indican el nivel de audio de las salidas Line Outs, Mono Out y Rec Out (salida de grabación). Puede encenderse ocasionalmente la luz de recorte, pero si sucede con demasiada frecuencia, reduzca el volumen de la mezcla y/o los canales individuales.
7
Panel trasero
|
|
|
10 |
7 |
5 |
|
1 |
|
|
|
|||
|
8 |
9 |
|
|
6 |
|
2 |
3 |
11 |
|
|||
|
4 |
|||||
|
|
|
|
|
|
|
1.Potencia de corriente alterna de entrada: Utilice el cable de corriente incluido para conectar esta entrada a una toma de corriente. Como alternativa, utilice la entrada de corriente continua, descrita a continuación. (Si ambas entradas de corriente se conectan a tomas de corriente, el DN-312X consumirá la corriente de su fuente de corriente alterna).
2.Tapa de fusibles: Si se quemó el fusible, use un destornillador u otra herramienta para levantar esta lengüeta a fin de reemplazar el fusible con otro de la misma especificación. Si utiliza un fusible de especificación incorrecta, puede dañarse la unidad y/o el fusible.
3.Entrada de corriente de CC: Utilice una fuente de corriente continua separada estándar para conectar esta entrada a una toma de corriente. Como alternativa, utilice la entrada de corriente alterna, descrita más arriba. (Si ambas entradas de corriente se conectan a tomas de corriente, el DN-312X consumirá la corriente de su fuente de corriente alterna).
4.Entradas de micrófono/línea (Canales 1–6): Conecte a estas entradas micrófonos o dispositivos de nivel de línea con cables XLR de 6,35 mm (1/4 pulg.).
5.Selector de entrada (Canales 1–6): Utilice estos interruptores para ajustar el tipo de fuente de audio conectada a cada entrada mic/line input: un micrófono sin potencia fantasma (Mic), un micrófono con potencia fantasma de +18–21 V (Ph) o un dispositivo de nivel de línea (Line).
Nota: La mayoría de los micrófonos dinámicos no requieren alimentación fantasma, mientras que la mayoría de los micrófonos de condensador la requieren. Consulte la documentación de su micrófono para averiguar si necesita alimentación fantasma.
6.Prioridad de micrófono 1: Gire esta perilla para ajustar qué tan fuerte será el nivel de volumen de todas las demás entradas cuando la entrada mic/line input del canal 1 reciba una señal entrante. En su ajuste más bajo, una señal recibida por la entrada micrófono/línea del canal 1 silenciará completamente todas las demás señales de entrada. En su ajuste más alto, una señal recibida por la entrada micrófono/línea del canal 1 no afectará en lo absoluto las demás señales de entrada.
7.Entradas de línea (Canales 7/8–11/12): Conecte dispositivos de nivel de línea a estas entradas con cables RCA estéreo estándar.
8.Salida de línea (Line Out): Utilice cables RCA estándar para conectar estas salidas a sus altavoces o sistema de amplificación. Use la perilla Master Level (nivel maestro) para controlar el nivel de estas salidas.
9.Salida mono: Utilice un cable TS estándar de 6,35 mm (1/4 pulg.) para conectar esta salida a un dispositivo de grabación remoto, un mezclador remoto, etc. La señal enviada por esta salida es una señal monoaural sumada de las salidas line outs.
10.Monitor de micrófono: Utilice un cable estándar de 6,35 mm (1/4 pulg.) para conectar esta salida a un monitor alimentado, mezclador remoto, etc. Cuando el botón Mic On/Off está oprimido (en la posición hacia abajo), la señal proveniente de las entradas mic/line inputs (canales 1–6) se enviará a esta salida y se desactivarán las salidas Line Outs. Cuando este botón Mic On/Off está levantado (en la posición hacia arriba), esta salida se desactivará y todos los canales se enviarán a las salidas de línea.
11.Salida de grabación: Utilice cables RCA estéreo estándar para conectar estas salidas a un dispositivo de grabación externo, mezclador externo, etc. Utilice la perilla Master Level para controlar el nivel de estas salidas.
8
Loading...