


User Guide
Guía del usuario
Guide d’utilisation
Guida per l’uso
Benutzerhandbuch
Appendix
English ( 3 – 7 )
Español ( 8 – 12 )
Français ( 13 – 17 )
Italiano ( 18 – 22 )
Deutsch ( 23 – 27 )
English ( 28 – 31 )
User Guide (English)
Introduction
Package Contents
MC4000 |
Software Download Card |
User Guide |
USB Cable |
Serato DJ Voucher Card |
Safety & Warranty Manual |
Power Adapter |
|
|
Support
For the latest information about this product (system requirements, compatibility information, etc.) and product registration, visit denondj.com.
Setup
Important: Occasionally, we may update MC4000’s firmware to improve its performance. Visit denondj.com to check for available firmware updates, especially after you update your software (firmware updates may address new software features).
Note: Items not listed under the Introduction > Package Contents are sold separately.
1.Windows users only: Download and install the latest drivers from denondj.com.
2.Download and install the latest version of Serato DJ Intro from serato.com.
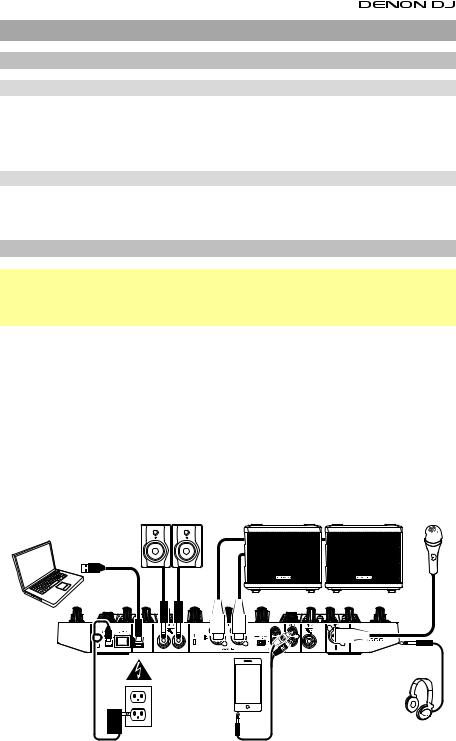
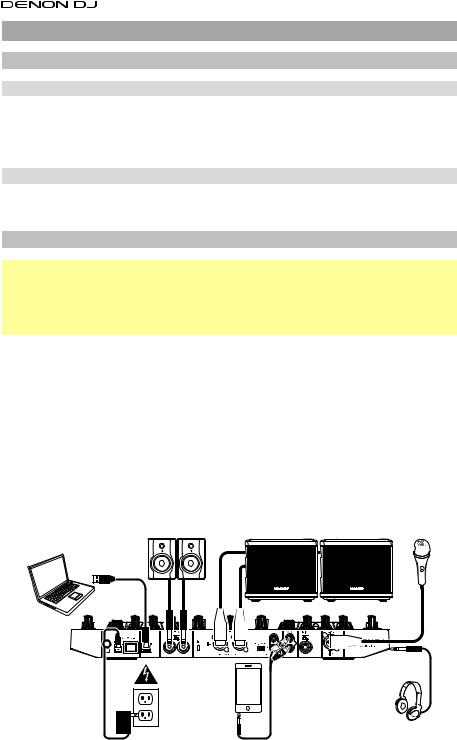
3.Connect input sources (microphones, CD players, etc.) to MC4000.
4.Connect output devices (headphones, power amplifiers, sub-mixer, etc.) to MC4000.
5.Plug all devices into power sources, and turn on devices in proper order:
•When starting a session, turn on (1) input sources, (2) MC4000, (3) output devices.
•When ending a session, turn off (1) output devices, (2) MC4000, (3) input sources.
6.Using a standard USB cable (included), connect the USB port on MC4000 to your computer.
7.Open Serato DJ Intro and go! For more information on how to use Serato DJ Intro with MC4000, visit serato.com/dj/support and select Denon DJ MC4000.
Monitors |
Powered Loudspeakers |
Microphone |
Computer
|
Headphones |
|
(to front panel) |
|
Audio Player |
Power |
(smartphone, tablet, etc.) |
3
Features
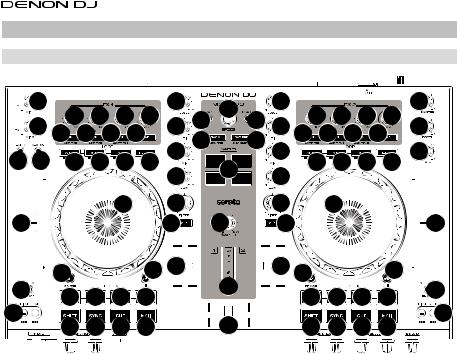
Top Panel
33 |
18 |
18 18 |
19 |
1 |
26 |
|
|
|
|
|
|
1 |
18 |
18 18 |
19 |
36 |
|
|
|
|||||||||||||||||||||||||||||||||
33 |
2 |
27 |
|
|
|
|
|
|
|
|
|
27 |
|
2 |
37 |
|
|
|
||||||||||||||||||||||||||||||||||
|
|
|
|
|
|
|
|
|||||||||||||||||||||||||||||||||||||||||||||
|
|
|
|
|
|
20 20 |
20 |
21 |
2 |
28 |
|
|
|
|
|
|
|
29 |
|
2 |
20 20 |
20 |
21 |
|
|
|
|
|
|
|
|
|||||||||||||||||||||
|
|
|
|
|
|
|
|
|
|
|
|
|
|
|
|
|
|
|
|
|
38 |
|
|
|
||||||||||||||||||||||||||||
34 35 |
22 |
23 |
24 25 |
|
|
30 |
|
|
|
|
|
|
22 |
23 |
24 25 |
|||||||||||||||||||||||||||||||||||||
|
|
|
|
|
|
|
|
|
|
|
|
|
2 |
|
|
|
|
|
|
2 |
|
|
|
|
|
|
|
|
|
|
|
|
|
|
||||||||||||||||||
|
|
|
|
|
|
|
|
|
|
|
|
|
|
|
|
|
|
|
|
|
|
|
|
|
|
|
|
|
|
|
|
|
|
|
|
|
|
|
|
|
|
|
|
|
|
|||||||
|
|
|
|
|
|
|
|
|
|
|
|
|
|
|
|
|
|
|
|
|
|
|
|
|
|
|
|
|
|
|
|
|
|
|
|
|
|
|
|
|
|
|
|
|
|
|||||||
|
|
|
|
|
|
|
|
|
|
13 |
|
3 |
|
|
|
|
|
|
|
|
|
|
|
|
|
|
|
|
|
|
|
|
3 |
|
13 |
|
|
|
|
|
|
|
|
|
|
|
|
|||||
|
|
|
|
|
|
|
|
|
|
|
|
|
|
|
|
|
|
|
|
|
|
|
|
|
|
|
|
|
|
|
|
|
|
|
|
|
|
|
|
|
|
|
|
|||||||||
|
|
|
|
|
|
|
|
|
|
|
|
|
|
|
|
|
|
|
|
|
|
|
|
|
|
|
|
|
|
|
|
|
|
|
|
|
|
|
|
|
|
|
|
|||||||||
|
|
|
|
|
|
|
|
|
|
|
|
|
|
|
|
|
|
|
|
|
|
|
|
|
|
|
|
|
|
|
|
|
|
|
|
|
|
|
|
|
|
|
|
|||||||||
|
|
|
|
|
|
|
|
|
|
|
|
|
|
|
|
|
|
|
|
|
|
|
|
|
|
|
|
|
|
|
|
|
|
|
|
|
|
|
|
|
|
|
|
|||||||||
|
|
|
|
|
|
|
|
|
|
|
|
|
|
|
|
|
|
|
|
|
|
|
|
|
|
|
|
|
|
|
|
|
|
|
|
|
|
|
|
|
|
|
|
|||||||||
|
|
|
|
|
|
|
|
|
|
|
|
|
|
|
|
|
|
|
|
|
|
|
|
|
|
|
|
|
|
|
|
|
|
|
|
|
|
|
|
|
|
|
|
|||||||||
|
|
|
|
|
|
|
|
|
|
|
|
|
|
|
|
|
|
|
|
|
|
|
|
|
|
|
|
|
|
|
|
|
|
|
|
|
|
|
|
|
|
|
|
|||||||||
|
|
|
|
|
|
|
|
|
|
|
|
|
|
|
|
|
|
|
|
|
|
|
|
|
|
|
|
|
|
|
|
|
|
|
|
|
|
|
|
|
|
|
|
|||||||||
|
|
|
|
|
|
|
|
|
|
|
|
|
|
|
|
|
|
|
|
|
|
|
|
|
|
|
|
|
|
|
|
|
|
|
|
|
|
|
|
|
|
|
|
|||||||||
|
|
|
|
|
|
|
|
|
|
|
|
|
|
|
|
|
|
|
|
|
|
|
|
|
|
|
|
|
|
|
|
|
|
|
|
|
|
|
|
|
|
|
|
|||||||||
|
|
|
|
|
|
|
|
|
|
|
|
|
|
|
|
|
|
|
|
|
|
|
|
|
|
|
|
|
|
|
|
|
|
|
|
|
|
|
|
|
|
|
|
|||||||||
|
|
|
|
|
|
|
|
|
|
|
|
|
4 |
|
31 |
|
|
|
|
|
|
|
|
4 |
|
|
|
|
|
|
|
|
|
|
|
|
|
|
||||||||||||||
|
|
|
|
|
|
|
|
|
|
|
|
|
|
|
|
|
|
|
|
|
|
|
|
|
|
|
|
|
|
|
|
|
|
|
|
|||||||||||||||||
|
|
|
|
|
|
|
|
|
|
|
|
|
|
|
|
|
|
|
|
|
|
|
|
|
|
|
|
|
|
|
|
|
|
|||||||||||||||||||
|
|
|
|
|
|
|
|
|
|
|
|
|
|
|
|
|
|
|
|
|
|
|
|
|
|
|
|
|
|
|
|
|
|
|
||||||||||||||||||
17 |
|
|
|
|
|
|
|
|
|
|
|
|
|
|
|
|
|
|
|
|
|
|
|
|
|
|
|
|
|
|
17 |
|
||||||||||||||||||||
|
|
|
|
|
|
|
|
|
|
|
|
|
|
|
|
|
|
|
|
|
|
|
|
|
|
|
|
|
|
|
||||||||||||||||||||||
|
|
|
|
|
|
|
|
|
|
|
|
|
|
|
|
|
|
|
|
|
|
|
||||||||||||||||||||||||||||||
|
|
|
|
|
|
|
|
|
|
|
|
|
|
|
|
|
|
|
|
|
|
|
|
|
|
|
|
|
|
|
|
|
|
|
|
|
|
|
|
|
|
|
|
|
|
|
|
|
|
|
|
|
|
|
|
|
|
|
|
|
|
|
|
|
|
|
|
|
|
|
|
|
|
|
|
|
|
|
|
|
|
|
|
|
|
|
|
|
|
|
|
|
|
|
|
|
|
|
|
|
|
|
|
|
|
|
|
|
|
|
|
|
|
|
|
|
|
|
|
|
|
|
|
|
|
|
|
|
|
|
|
|
|
|
|
|
|
|
|
|
|
|
|
|
|
|
|
|
|
|
|
|
|
|
|
|
|
|
|
|
|
|
|
|
|
|
|
|
|
|
|
|
|
|
|
|
|
|
|
|
|
|
|
|
|
|
|
|
|
|
|
|
|
|
|
|
|
|
|
|
|
|
|
|
|
|
|
|
|
|
|
|
|
|
|
|
|
|
|
|
|
|
|
|
|
|
|
|
|
|
|
|
|
|
|
|
|
|
|
|
|
|
|
|
|
|
|
|
|
|
|
|
|
|
|
|
|
|
|
|
|
|
|
|
|
|
|
|
|
|
|
|
|
|
|
|
|
|
|
|
|
|
|
|
|
|
|
|
|
|
|
|
|
|
|
|
|
|
|
|
|
|
|
|
|
|
|
|
|
|
|
|
|
|
|
|
|
|
|
|
|
|
|
|
|
|
|
|
|
|
|
|
|
|
|
|
|
|
|
|
|
|
|
|
|
|
|
|
|
|
|
|
|
|
|
|
|
|
|
|
|
|
|
|
|
|
|
|
|
|
|
|
|
|
|
|
|
|
|
|
|
|
|
|
|
|
|
|
|
|
|
|
|
|
|
|
|
|
|
|
|
|
|
|
|
|
|
|
|
|
|
|
|
|
|
|
|
|
|
|
|
|
|
|
|
|
|
|
|
|
|
|
|
|
|
|
|
|
|
|
|
|
|
|
|
|
|
|
|
|
|
|
|
|
|
|
|
|
|
|
|
|
|
|
|
|
|
|
|
|
|
|
|
|
|
|
|
|
|
|
|
|
|
|
|
|
|
|
|
|
|
|
|
|
|
|
|
|
|
|
|
|
|
|
|
|
|
|
|
|
|
|
|
|
|
|
|
|
|
|
|
|
|
|
|
|
|
|
|
|
|
|
|
|
|
|
|
|
|
|
|
|
|
|
|
|
|
|
|
|
|
|
|
|
|
|
|
|
|
|
|
|
|
|
|
|
|
|
|
|
|
|
|
|
|
|
|
|
|
|
|
|
|
|
|
|
|
|
|
|
|
|
|
|
|
|
|
|
|
|
|
|
|
|
|
|
|
|
|
|
|
|
|
|
|
|
|
|
|
|
|
|
|
|
|
|
|
|
|
|
|
|
|
|
|
|
|
|
|
|
|
|
|
|
|
|
|
|
|
|
|
|
|
|
|
|
|
|
|
|
|
|
|
|
|
|
|
|
|
|
|
|
|
|
|
|
|
|
|
|
|
|||||||
|
|
|
|
|
|
14 |
|
|
|
|
12 |
|
5 |
|
|
|
|
|
|
|
|
|
|
|
|
|
|
|
|
|
|
|
|
5 |
14 |
|
|
|
|
12 |
|
|
|
|
|
|
|
|
||||
|
|
|
|
|
|
|
|
|
|
|
|
|
|
|
|
|
|
|
|
|
|
|
|
|
|
|
|
|
|
|
|
|
|
|
|
|
|
|
|
|
||||||||||||
|
|
|
|
|
|
|
|
|
|
|
|
|
|
|
|
|
|
|
|
|
|
|
|
|
|
|
|
|
|
|
|
|
|
|
|
|
|
|
|
|
|
|
||||||||||
|
|
|
|
|
|
|
|
|
|
|
|
|
|
|
|
|
|
|
|
|
|
|
|
|
|
|
|
|
|
|
|
|
|
|
|
|
|
|
|
|
||||||||||||
|
|
|
|
|
|
|
|
|
|
|
|
|
32 |
|
|
|
|
|
|
|
|
|
|
|
|
|
|
|
|
|
|
|||||||||||||||||||||
15 |
|
|
|
|
|
|
|
|
|
|
|
|
|
|
|
|
|
|
|
15 |
|
|||||||||||||||||||||||||||||||
|
|
|
|
|
|
|
|
|
|
|
|
|
|
|
|
|
|
|
|
|
|
|
|
|||||||||||||||||||||||||||||
|
|
|
|
|
|
|
|
|
|
|
|
|
|
|
|
|
|
|
|
|
|
|
|
|||||||||||||||||||||||||||||
|
|
11 |
11 |
11 |
11 |
|
|
|
|
|
|
|
|
|
|
|
|
|
|
|
11 |
11 |
|
11 |
|
11 |
|
|||||||||||||||||||||||||
|
|
|
|
|
|
|
|
|
|
|
|
|
|
|
|
|
|
|
||||||||||||||||||||||||||||||||||
|
|
|
|
|
|
|
|
|
|
|
|
|
|
|
|
|
|
|
|
|
|
|
|
|
|
|
|
|
|
|
|
|
|
|
|
|
|
|
|
|
|
|||||||||||
16 |
|
|
|
|
|
|
|
|
|
|
|
|
|
|
|
|
|
|
|
|
|
|
|
|
|
|
|
|
|
|
|
|
|
|
|
|
|
|
|
|
|
|
16 |
|||||||||
|
|
|
7 |
8 |
|
9 10 |
|
|
|
|
|
|
|
|
|
|
|
|
|
6 |
|
|
|
|
|
|
|
|
|
|
|
7 |
8 |
|
9 10 |
|||||||||||||||||
|
|
|
|
|
|
|
|
|
|
|
|
|
|
|
|
|
|
|
|
|
|
|
|
|
|
|
|
|
|
|
|
|
|
|
|
|
||||||||||||||||
|
|
|
|
|
|
|
|
|
|
|
|
|
|
|
|
|
|
|
|
|
|
|
|
|
|
|
|
|
|
|
|
|
|
|
|
|
|
|
|
|||||||||||||
|
|
|
|
|
|
|
|
|
|
|
|
|
|
|
|
|
|
|
|
|
|
|
|
|
|
|
|
|
|
|
|
|
|
|
|
|
|
|
|
|
|
|
|
|
|
|
|
|
|
|
|
|
1.Channel Level: Turn this knob to adjust the level of the pre-fader, pre-EQ audio signal for the channel.
2.Channel EQ: Turn these knobs to boost or cut the high, mid-range, and low frequencies for the channel.
3.Channel Filter: Turn this knob to adjust the filter applied to the channel. Turn the knob counterclockwise to apply a low-pass filter. Turn the knob clockwise to apply a high-pass filter.
4.Channel Cue: Press this button to send the channel’s pre-fader signal to the headphones’ cue channel.
5.Channel Fader: Use this fader to adjust the channel’s volume level.
6.Crossfader: Use this crossfader to mix between the two decks.
7.Shift: Press and hold this button to access secondary functions of other controls.
8.Sync / Sync Off: Press this button to automatically match the corresponding Deck’s tempo with the opposite Deck’s tempo and phase.
Press and hold Shift and press this button to deactivate Sync.
9.Cue / Track Start: During playback, press this button to return the track to a temporary cue point. If you have not set a temporary cue point, then press this button to return to the start of the track. (To set a temporary cue point, make sure the track is paused, move the platter to place the audio playhead at the desired location, and then press this button.)
If the deck is paused, press and hold this button to play the track from the temporary cue point. Release the button to return the track to the temporary cue point and pause it. To continue playback without returning to the temporary cue point, press and hold this button and then press and hold the Play button, and then release both buttons.
Press and hold Shift and then press this button to return to the start of the track.
4

10.Play/Pause / Stutter: This button pauses or resumes playback.
Press and hold Shift and then press this button to “stutter-play” the track from the last set cue point.
11.Hot Cues: Press any of these 4 pads to set and jump to a hot cue point. To set a hot cue point, press an unlit pad at the desired location in the track (the pad will then be lit). To jump to that hot cue point, press the lit pad. To delete a hot cue point, press and hold Shift and then press a lit pad.
12.Pad Mode: Use this button to access advanced pad modes when using Serato DJ.
13.Platter: This capacitive, touch-sensitive platter controls the audio playhead when the wheel is touched and moved. When the Vinyl button is on, move the platter to “scratch” the track as you would with a vinyl record. When the Vinyl button is off (or if you are touching only the side of the platter), move the platter to temporarily adjust the track’s speed.
While editing a loop, move the platter to adjust the Loop In or Loop Out point. Press and hold Shift and then move the platter to move quickly through the track.
14.Vinyl / Censor: Press this button activate/deactivate a “vinyl mode” for the platter. When activated, you can use the platter to “scratch” the track as you would with a vinyl record.
Press and hold Shift and then press and hold this button to activate the Censor feature: the playback of the track will be reversed, but when you release the button, normal playback will resume from where it would have been if you had never engaged the Censor feature (i.e., as if the track had been playing forward the whole time).
15.Key Lock / Range: Press this button to activate/deactivate Key Lock. When Key Lock is activated, the track’s key will remain the same even if you adjust its speed.
Press and hold Shift and then press this button to cycle through the available ranges of the pitch fader.
16.Pitch Bend -/+ / / : Press and hold one of these buttons to momentarily reduce or increase (respectively) the speed of the track.
Press and hold Shift and then press and hold one of these buttons to rewind or fastforward (respectively) through the track.
17.Pitch Fader: Move this fader to adjust the speed (pitch) of the track. You can adjust its total range with the Key Lock / Range button.
18.FX Level: Turn this knob to adjust the level of the corresponding effect. The FX On button under the knob must be lit for this knob to function.
Press and hold Shift and then turn this knob to scroll through the list of effects.
19.FX Beats: Turn this knob to adjust the rate of time-based effects on that deck.
20.FX On / Select: Press this button to turn the corresponding effect on or off. Press and hold Shift and then press this button to select an effect in the software.
21.FX Tap: Tap this button repeatedly at the desired tempo to set the rate of the effects’ lowfrequency oscillators (LFOs). Press and hold this button to reset Beat Multiplier to the Deck’s BPM.
22.Auto-Loop / Auto 4: Press this button to create an auto-loop with the length that is set in the software. Press and hold Shift and then press this button to create a 4-bar auto-loop, regardless of the auto-loop length setting.
23.X 1/2 Loop / Loop In: Press this button to halve the length of the current loop. Press and hold Shift and then press this button to create a Loop In point at the current location.
24.X 2 Loop / Loop Out: Press this button to double the length of the current loop. Press and hold Shift and then press this button to create a Loop Out point at the current location.
25.Reloop: Press this button to skip to the last-played loop and activate it immediately.
5
26.Browse / Library Knob: Turn this knob to navigate through the software. Press the knob to select an item. Press and hold Shift and then turn this knob to browse quickly through the tracks in your library.
27.Load: Press this button to load the currently selected track to the deck. Press it quickly twice to load the same track to both decks (“instant doubles”).
28.Back / Panel: Press this button to move to the previous window of the software. Press and hold Shift and then press this button to cycle through the panels in the software.
29.Load Prep / Open Prep: Press this button to load the currently selected track to the Prepare Crate.
Press and hold Shift and then press this button to jump to the Prepare Crate in the software.
30.Sampler Pads: Press these pads to play their corresponding samples in the software’s sampler (1–4). Press and hold Shift and then press a pad to stop its sample playback.
31.Sample Level: Turn this knob to adjust the volume level of the software’s sampler.
32.Level Meters: These LEDs display the audio signal depending on the state of each deck and Channel Fader. The meters are not affected by the position of the Master Knob.
If a Channel Fader is at its minimum position, the meter will show the deck’s pre-fader level. The left meter represents Deck 1, and the right meter represents Deck 2.
If a Channel Fader is higher than its minimum position, both meters will show the summed, post-fader output of the playing deck(s).
Press the Cue button on a deck to split the meters between a cued deck (Channel Fader at its minimum position) and a playing deck (Channel Fader higher than its minimum position). The LEDs for the Cue deck will change only if audio is playing. Otherwise, it will continue showing the summed, post-fader output of the playing deck.
33.Mic Volume: Turn these knobs to adjust the volume levels of the corresponding microphone inputs. The Peak light next to each knob indicates the current signal level by its color: green (low), amber (normal/optimal), or red (maximum/peak).
Important: The audio signals from the microphones are routed directly to the Master Outputs. They are not routed into/through the software.
34.Mic Echo: Press this button to activate/deactivate the reverb effect on the microphones’ audio signal.
35.Mic Talk Over / Post: Press this button to activate/deactivate the “talkover” feature, which automatically reduces the volume level of the master mix when you speak into the microphone.
Press and hold Shift and then press this button to activate/deactivate the “post” feature. When on, the microphones’ signal will not be sent to the Booth Outputs.
36.Master: Turn this knob to adjust the volume level of the Master Outputs.
37.Booth: Turn this knob to adjust the volume level of the Booth Outputs.
38.Aux: Turn this knob to adjust the input volume of the Aux Inputs.
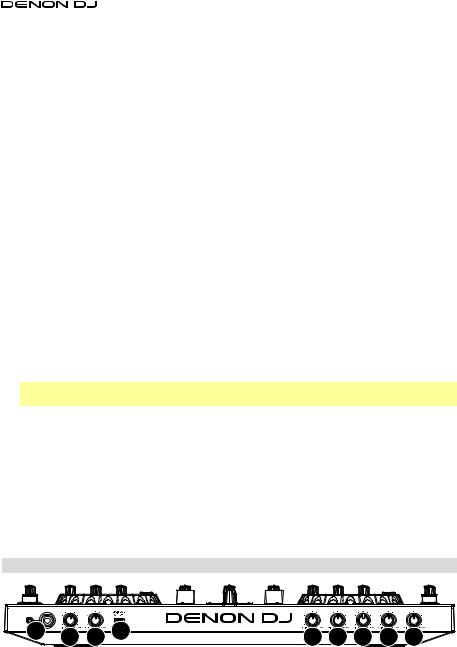
Front Panel
1 |
2 |
3 |
4 |
5 |
5 |
5 |
5 |
6 |
1.Phones Outputs (1/4” or 1/8” / 6.35 mm or 3.5 mm): Connect headphones to these 1/4” (6.35
mm)and 1/8” (3.5 mm) jacks for monitoring the signal. The headphone volume is controlled using the Monitor Level knob.
2.Monitor Level: Adjusts the volume for headphone cueing in the software.
3.Monitor Pan: Adjusts the software’s audio output to the headphones, mixing between the cue output and the master mix output.
6
4.Split Cue: When this switch is in the On position, the headphone audio will be “split” such that all channels sent to cue channel are summed to mono and sent to the left headphone channel and the master mix is summed to mono and sent to the right channel. When the switch is in the Off position, the cue channel and master mix will be “blended” together.
5.Mic EQ: Turn these knobs to boost or cut the high and low frequencies for the corresponding microphones.
6.Mic Echo Level: Turn this knob to adjust the amount of the reverb effect on the microphones’ audio signal.
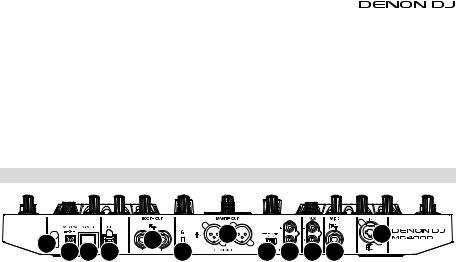
Rear Panel
2 |
1 3 4 |
8 |
5 |
|
|
10 |
|
12 |
7 |
6 |
9 11 |
||
|
1.Power Input: Use the included power adapter (5 VDC, 3 A, center-positive) to connect this input to your power source.
2.Cable Restraint: You can secure cables to this restraint to help avoid disconnecting them accidentally.
3.Power Button: Press this button to power MC4000 on or off. Power on MC4000 only after you have connected all of your input devices and before you power on your amplifiers and loudspeakers. Power off your amplifiers and loudspeakers before powering off MC4000.
4.USB Port: Use a standard USB cable (included) to connect this USB port to an available USB port on yoru computer. This connection sends and receives audio and control information to and from the computer.
5.Master Outputs (XLR, balanced): Use standard RCA cables to connect these outputs to loudspeakers or an amplifier system. Use the Master knob on the top panel to control the volume level.
6.Master Outputs (RCA, unbalanced): Use standard RCA cables to connect these outputs to loudspeakers or an amplifier system. Use the Master knob on the top panel to control the volume level.
7.Stereo/Mono: Use this switch to set the channel configuration of the Master Outputs: Stereo (binaural audio using separate left and right channels) or Mono (summed monaural audio through both left and right channels).
8.Booth Outputs (1/4” / 6.35 mm): Use standard RCA cables to connect these outputs to booth monitors or a booth amplifier system. Use the Booth knob on the top panel to control the volume level.
9.Aux Inputs: Use standard RCA cables to connect these line-level inputs to an external audio source (smartphone, tablet, media player, etc.). Use the Aux knob on the top panel to control the volume level.
10.Mic 1 Input (XLR or 1/4” / 6.35 mm): Use a standard XLR or 1/4” (6.35 mm) cable (not included) to connect a standard dynamic microphone to this input. Use the Mic 1 Volume knob on the top panel to control the volume level.
11.Mic 2 Input (1/4” / 6.35 mm): Use a standard 1/4” (6.35 mm) cable (not included) to connect a standard dynamic microphone to this input. Use the Mic 2 Volume knob on the top panel to control the volume level.
12.Kensington® Lock: Use this slot to secure MC4000 to a table or other surface.
7
Guía del usuario (Español)
Introducción
Contenido del paquete
MC4000 |
Tarjeta de descarga de software |
Guía del usuario |
Cable USB |
Vale de descuento de Serato DJ |
Manual sobre la seguridad y garantía |
Adaptador de alimentación |
|
|
Soporte
Para obtener la información más completa acerca de este product (los requisitos del sistema, compatibilidad, etc) y registro del producto, visite denondj.com.
Instalación
Importante: Ocasionalmente, puede que actualicemos el firmware del MC4000 para mejorar su funcionamiento. Visite denondj.com para encontrar las actualizaciones de firmware disponibles, especialmente luego de actualizar su software (las actualizaciones de firmware pueden contemplar las nuevas características del software).
Nota: Los elementos que no se enumeran en Introducción > Contenido del paquete se venden por separado.
1.Usuarios de Windows: Descargue y instale los drivers más recientes de denondj.com.
2.Descargue y instale la versión más reciente de Serato DJ de serato.com.
3.Conecte al MC4000 las fuentes de entrada (micrófonos, reproductores de CD, etc.).
4.Conecte al MC4000 los dispositivos de salida (auriculares, amplificadores de potencia, submezclador, etc.).
5.Enchufe todos los dispositivos a la fuente de alimentación y enciéndalos en el orden correcto:
•Para iniciar la sesión, encienda (1) las fuentes de entrada, (2) el MC4000 y la unidad de pantalla y
(3) los dispositivos de salida.
•Para finalizar la sesión, apague (1) los dispositivos de salida, (2) el MC4000 y la unidad de pantalla y (3) las fuentes de entrada.
6.Con el cable USB estándar (incluido), conecte el puerto USB del MC4000 a su ordenador.
7.¡Abra Serato DJ y a tocar! Para más información acerca de cómo usar Serato DJ con MC4000, visite serato.com/dj/support y seleccione Denon DJ MC4000.
Monitores |
Altavoces activos |
Micrófono |
Computadora
|
Reproductor de audio |
|
(smartphone [teléfonos |
|
inteligentes], tableta, etc.) |
Toma de |
Auriculares |
corriente |
(en el panel frontal) |
|
8

Características
Panel superior
33 |
18 |
18 18 |
19 |
1 |
26 |
|
|
|
|
|
|
1 |
18 |
18 18 |
19 |
36 |
|
|
|
|||||||||||||||||||||||||||||||||
33 |
2 |
27 |
|
|
|
|
|
|
|
|
|
27 |
|
2 |
37 |
|
|
|
||||||||||||||||||||||||||||||||||
|
|
|
|
|
|
|
|
|||||||||||||||||||||||||||||||||||||||||||||
|
|
|
|
|
|
20 20 |
20 |
21 |
2 |
28 |
|
|
|
|
|
|
|
29 |
|
2 |
20 20 |
20 |
21 |
|
|
|
|
|
|
|
|
|||||||||||||||||||||
|
|
|
|
|
|
|
|
|
|
|
|
|
|
|
|
|
|
|
|
|
38 |
|
|
|
||||||||||||||||||||||||||||
34 35 |
22 |
23 |
24 25 |
|
|
30 |
|
|
|
|
|
|
22 |
23 |
24 25 |
|||||||||||||||||||||||||||||||||||||
|
|
|
|
|
|
|
|
|
|
|
|
|
2 |
|
|
|
|
|
|
2 |
|
|
|
|
|
|
|
|
|
|
|
|
|
|
||||||||||||||||||
|
|
|
|
|
|
|
|
|
|
|
|
|
|
|
|
|
|
|
|
|
|
|
|
|
|
|
|
|
|
|
|
|
|
|
|
|
|
|
|
|
|
|
|
|
|
|||||||
|
|
|
|
|
|
|
|
|
|
|
|
|
|
|
|
|
|
|
|
|
|
|
|
|
|
|
|
|
|
|
|
|
|
|
|
|
|
|
|
|
|
|
|
|
|
|||||||
|
|
|
|
|
|
|
|
|
|
13 |
|
3 |
|
|
|
|
|
|
|
|
|
|
|
|
|
|
|
|
|
|
|
|
3 |
|
13 |
|
|
|
|
|
|
|
|
|
|
|
|
|||||
|
|
|
|
|
|
|
|
|
|
|
|
|
|
|
|
|
|
|
|
|
|
|
|
|
|
|
|
|
|
|
|
|
|
|
|
|
|
|
|
|
|
|
|
|||||||||
|
|
|
|
|
|
|
|
|
|
|
|
|
|
|
|
|
|
|
|
|
|
|
|
|
|
|
|
|
|
|
|
|
|
|
|
|
|
|
|
|
|
|
|
|||||||||
|
|
|
|
|
|
|
|
|
|
|
|
|
|
|
|
|
|
|
|
|
|
|
|
|
|
|
|
|
|
|
|
|
|
|
|
|
|
|
|
|
|
|
|
|||||||||
|
|
|
|
|
|
|
|
|
|
|
|
|
|
|
|
|
|
|
|
|
|
|
|
|
|
|
|
|
|
|
|
|
|
|
|
|
|
|
|
|
|
|
|
|||||||||
|
|
|
|
|
|
|
|
|
|
|
|
|
|
|
|
|
|
|
|
|
|
|
|
|
|
|
|
|
|
|
|
|
|
|
|
|
|
|
|
|
|
|
|
|||||||||
|
|
|
|
|
|
|
|
|
|
|
|
|
|
|
|
|
|
|
|
|
|
|
|
|
|
|
|
|
|
|
|
|
|
|
|
|
|
|
|
|
|
|
|
|||||||||
|
|
|
|
|
|
|
|
|
|
|
|
|
|
|
|
|
|
|
|
|
|
|
|
|
|
|
|
|
|
|
|
|
|
|
|
|
|
|
|
|
|
|
|
|||||||||
|
|
|
|
|
|
|
|
|
|
|
|
|
|
|
|
|
|
|
|
|
|
|
|
|
|
|
|
|
|
|
|
|
|
|
|
|
|
|
|
|
|
|
|
|||||||||
|
|
|
|
|
|
|
|
|
|
|
|
|
|
|
|
|
|
|
|
|
|
|
|
|
|
|
|
|
|
|
|
|
|
|
|
|
|
|
|
|
|
|
|
|||||||||
|
|
|
|
|
|
|
|
|
|
|
|
|
|
|
|
|
|
|
|
|
|
|
|
|
|
|
|
|
|
|
|
|
|
|
|
|
|
|
|
|
|
|
|
|||||||||
|
|
|
|
|
|
|
|
|
|
|
|
|
|
|
|
|
|
|
|
|
|
|
|
|
|
|
|
|
|
|
|
|
|
|
|
|
|
|
|
|
|
|
|
|||||||||
|
|
|
|
|
|
|
|
|
|
|
|
|
4 |
|
31 |
|
|
|
|
|
|
|
|
4 |
|
|
|
|
|
|
|
|
|
|
|
|
|
|
||||||||||||||
|
|
|
|
|
|
|
|
|
|
|
|
|
|
|
|
|
|
|
|
|
|
|
|
|
|
|
|
|
|
|
|
|
|
|
|
|||||||||||||||||
|
|
|
|
|
|
|
|
|
|
|
|
|
|
|
|
|
|
|
|
|
|
|
|
|
|
|
|
|
|
|
|
|
|
|||||||||||||||||||
|
|
|
|
|
|
|
|
|
|
|
|
|
|
|
|
|
|
|
|
|
|
|
|
|
|
|
|
|
|
|
|
|
|
|
||||||||||||||||||
17 |
|
|
|
|
|
|
|
|
|
|
|
|
|
|
|
|
|
|
|
|
|
|
|
|
|
|
|
|
|
|
17 |
|
||||||||||||||||||||
|
|
|
|
|
|
|
|
|
|
|
|
|
|
|
|
|
|
|
|
|
|
|
|
|
|
|
|
|
|
|
||||||||||||||||||||||
|
|
|
|
|
|
|
|
|
|
|
|
|
|
|
|
|
|
|
|
|
|
|
||||||||||||||||||||||||||||||
|
|
|
|
|
|
|
|
|
|
|
|
|
|
|
|
|
|
|
|
|
|
|
|
|
|
|
|
|
|
|
|
|
|
|
|
|
|
|
|
|
|
|
|
|
|
|
|
|
|
|
|
|
|
|
|
|
|
|
|
|
|
|
|
|
|
|
|
|
|
|
|
|
|
|
|
|
|
|
|
|
|
|
|
|
|
|
|
|
|
|
|
|
|
|
|
|
|
|
|
|
|
|
|
|
|
|
|
|
|
|
|
|
|
|
|
|
|
|
|
|
|
|
|
|
|
|
|
|
|
|
|
|
|
|
|
|
|
|
|
|
|
|
|
|
|
|
|
|
|
|
|
|
|
|
|
|
|
|
|
|
|
|
|
|
|
|
|
|
|
|
|
|
|
|
|
|
|
|
|
|
|
|
|
|
|
|
|
|
|
|
|
|
|
|
|
|
|
|
|
|
|
|
|
|
|
|
|
|
|
|
|
|
|
|
|
|
|
|
|
|
|
|
|
|
|
|
|
|
|
|
|
|
|
|
|
|
|
|
|
|
|
|
|
|
|
|
|
|
|
|
|
|
|
|
|
|
|
|
|
|
|
|
|
|
|
|
|
|
|
|
|
|
|
|
|
|
|
|
|
|
|
|
|
|
|
|
|
|
|
|
|
|
|
|
|
|
|
|
|
|
|
|
|
|
|
|
|
|
|
|
|
|
|
|
|
|
|
|
|
|
|
|
|
|
|
|
|
|
|
|
|
|
|
|
|
|
|
|
|
|
|
|
|
|
|
|
|
|
|
|
|
|
|
|
|
|
|
|
|
|
|
|
|
|
|
|
|
|
|
|
|
|
|
|
|
|
|
|
|
|
|
|
|
|
|
|
|
|
|
|
|
|
|
|
|
|
|
|
|
|
|
|
|
|
|
|
|
|
|
|
|
|
|
|
|
|
|
|
|
|
|
|
|
|
|
|
|
|
|
|
|
|
|
|
|
|
|
|
|
|
|
|
|
|
|
|
|
|
|
|
|
|
|
|
|
|
|
|
|
|
|
|
|
|
|
|
|
|
|
|
|
|
|
|
|
|
|
|
|
|
|
|
|
|
|
|
|
|
|
|
|
|
|
|
|
|
|
|
|
|
|
|
|
|
|
|
|
|
|
|
|
|
|
|
|
|
|
|
|
|
|
|
|
|
|
|
|
|
|
|
|
|
|
|
|
|
|
|
|
|
|
|
|
|
|
|
|
|
|
|
|
|
|
|
|
|
|
|
|
|
|
|
|
|
|
|
|
|
|
|
|
|
|
|
|
|
|
|
|
|
|
|
|
|
|
|
|
|
|
|
|
|
|
|
|
|
|
|
|
|
|
|
|
|
|
|
|
|
|
|
|
|
|
|
|
|
|
|
|
|
|
|
|
|
|
|
|
|
|
|
|
|
|
|
|
|
|
|
|
|
|
|
|
|
|
|
|
|
|
|
|
|
|
|
|
|
|
|
|
|
|
|
|
|
|
|
|
|
|
|
|
|
|
|
|
|
|
|
|
|
|
|||||||
|
|
|
|
|
|
14 |
|
|
|
|
12 |
|
5 |
|
|
|
|
|
|
|
|
|
|
|
|
|
|
|
|
|
|
|
|
5 |
14 |
|
|
|
|
12 |
|
|
|
|
|
|
|
|
||||
|
|
|
|
|
|
|
|
|
|
|
|
|
|
|
|
|
|
|
|
|
|
|
|
|
|
|
|
|
|
|
|
|
|
|
|
|
|
|
|
|
||||||||||||
|
|
|
|
|
|
|
|
|
|
|
|
|
|
|
|
|
|
|
|
|
|
|
|
|
|
|
|
|
|
|
|
|
|
|
|
|
|
|
|
|
|
|
||||||||||
|
|
|
|
|
|
|
|
|
|
|
|
|
|
|
|
|
|
|
|
|
|
|
|
|
|
|
|
|
|
|
|
|
|
|
|
|
|
|
|
|
||||||||||||
|
|
|
|
|
|
|
|
|
|
|
|
|
32 |
|
|
|
|
|
|
|
|
|
|
|
|
|
|
|
|
|
|
|||||||||||||||||||||
15 |
|
|
|
|
|
|
|
|
|
|
|
|
|
|
|
|
|
|
|
15 |
|
|||||||||||||||||||||||||||||||
|
|
|
|
|
|
|
|
|
|
|
|
|
|
|
|
|
|
|
|
|
|
|
|
|||||||||||||||||||||||||||||
|
|
|
|
|
|
|
|
|
|
|
|
|
|
|
|
|
|
|
|
|
|
|
|
|||||||||||||||||||||||||||||
|
|
11 |
11 |
11 |
11 |
|
|
|
|
|
|
|
|
|
|
|
|
|
|
|
11 |
11 |
|
11 |
|
11 |
|
|||||||||||||||||||||||||
|
|
|
|
|
|
|
|
|
|
|
|
|
|
|
|
|
|
|
||||||||||||||||||||||||||||||||||
|
|
|
|
|
|
|
|
|
|
|
|
|
|
|
|
|
|
|
|
|
|
|
|
|
|
|
|
|
|
|
|
|
|
|
|
|
|
|
|
|
|
|||||||||||
16 |
|
|
|
|
|
|
|
|
|
|
|
|
|
|
|
|
|
|
|
|
|
|
|
|
|
|
|
|
|
|
|
|
|
|
|
|
|
|
|
|
|
|
16 |
|||||||||
|
|
|
7 |
8 |
|
9 10 |
|
|
|
|
|
|
|
|
|
|
|
|
|
6 |
|
|
|
|
|
|
|
|
|
|
|
7 |
8 |
|
9 10 |
|||||||||||||||||
|
|
|
|
|
|
|
|
|
|
|
|
|
|
|
|
|
|
|
|
|
|
|
|
|
|
|
|
|
|
|
|
|
|
|
|
|
||||||||||||||||
|
|
|
|
|
|
|
|
|
|
|
|
|
|
|
|
|
|
|
|
|
|
|
|
|
|
|
|
|
|
|
|
|
|
|
|
|
|
|
|
|||||||||||||
|
|
|
|
|
|
|
|
|
|
|
|
|
|
|
|
|
|
|
|
|
|
|
|
|
|
|
|
|
|
|
|
|
|
|
|
|
|
|
|
|
|
|
|
|
|
|
|
|
|
|
|
|
1.Nivel del canal: Gire esta perilla para ajustar el nivel de la señal de audio del pre-fader y preecualizador del canal.
2.Ecualizador del canal: Gire estas perillas para aumentar o disminuir las frecuencias altas, medias y bajas del canal.
3.Filtro de canal: Gire esta perilla para ajustar el filtro aplicado al canal. Gire esta perilla en sentido antihorario para aplicar un filtro pasabajos. Gire esta perilla en sentido horario para aplicar un filtro pasaaltos.
4.Cue del canal: Pulse este botón para enviar la señal del pre-fader del canal al canal de cue de los auriculares.
5.Fader de canal: Utilice este fader para ajustar el nivel del volumen del canal.
6.Crossfader: Utilice este crossfader para mezclar las dos bandejas.
7.Función secundaria: Mantenga pulsado este botón para acceder a las funciones secundarias de otros controles.
8.Sincronización / Sincronización desactivada: Pulse este botón para hacer coincidir automáticamente el tempo de la bandeja correspondiente con el tempo y la fase de la bandeja opuesta.
Mantenga pulsado Shift (Función secundaria) y pulse este botón para desactivar la sincronización.
9.Comienzo del cue / pista: Durante la reproducción, pulse este botón regresar la pista a un punto de cue temporal. Si no estableció un punto de cue temporal, pulse este botón para regresar al principio de la pista. (Para establecer un punto de cue temporal, asegúrese de que la pista esté en pausa, mueva el plato para posicionar el cabezal de reproducción en la posición deseada y luego pulse este botón).
Si la bandeja está en pausa, mantenga pulsado este botón para reproducir la pista desde el punto de cue temporal. Suelte el botón para regresar la pista al punto de cue temporal y ponerla en pausa. Para continuar la reproducción sin volver al punto de cue temporal, mantenga pulsado este botón y luego mantenga pulsado el botón Play y luego suelte ambos botones.
Mantenga pulsado Shift y pulse este botón para volver al comienzo de la pista.
9

10.Reproducción / pausa / tartamudeo: Con este botón se pone en pausa o reanuda la reproducción.
Mantenga pulsado Shift y pulse este botón para que la pista “tartamudee” desde el último punto de cue.
11.Cues rápidos: Pulse cualquiera de estos 4 pads para definir y saltar a un punto de cue rápido. Para definir un punto de cue rápido, pulse un pad apagado en la ubicación deseada en la pista (entonces el pad quedará iluminado). Para saltar a ese punto de cue rápido, pulse el pad iluminado. Para eliminar un punto de cue rápido, mantenga pulsado Shift y luego pulse un pad iluminado.
12.Modo de pad: Utilice este botón para acceder a los modos de pad avanzados cuando utilice Serato DJ.
13.Plato: Este plato capacitivo sensible al tacto controla el cabezal de reproducción cuando se toca y se mueve la rueda. Cuando el botón Vinyl (Vinilo) está encendido mueva el plato para “rayar” la pista como si se tratara de un disco de vinilo. Cuando el botón Vinyl está apagado (o si está tocando solo el costado del plato), mueva el plato para ajustar temporalmente la velocidad de la pista.
Al editar un loop (bucle), mueva el plato para ajustar los puntos de entrada y salida del loop.
Mantenga pulsado Shift y luego mueva el plato para desplazarse rápidamente por la pista.
14.Vinilo / Censor: Pulse este botón para activar/desactivar un “modo vinilo” para el plato. Una vez activado, puede utilizar el plato para “rayar” la pista como si se tratara de un disco de vinilo.
Mantenga pulsado Shift y luego mantenga pulsado este botón para activar la característica Censor: la reproducción de la pista se invertirá, pero cuando suelte el botón, se seguirá reproduciendo normalmente desde donde estaría si nunca hubiera activado la característica Censor (es decir, como si la pista hubiera estado reproduciéndose hacia adelante todo ese tiempo).
15.Bloqueo de tono / rango: Pulse este botón para activar/desactivar el bloqueo de tono. Una vez activado el bloqueo de tono, el tono de la pista permanecerá igual por más que modifique su velocidad.
Mantenga pulsado Shift y luego pulse este botón para alternar por los rangos disponibles del fader de tono.
16.Inflexión de tono -/+ / / : Mantenga pulsado uno de estos botones para reducir o aumentar (respectivamente) la velocidad de la pista momentáneamente.
Mantenga pulsado Shift y luego mantenga pulsado uno de estos botones para rebobinar o avanzar (respectivamente) la pista.
17.Fader de pitch: Mueva este fader para ajustar la velocidad (tono) de la pista. Puede ajustar el rango completo con el botón Key Lock / Range.
18.Nivel de efectos: Gire esta perilla para ajustar el nivel del efecto correspondiente. El botón FX On (Efectos activados) bajo la perilla debe estar iluminado para que esta perilla funcione.
Mantenga pulsado Shift y luego pulse esta perilla para recorrer la lista de efectos.
19.Efectos de beats: Gire esta perilla para ajustar la frecuencia de los efectos basados en el tiempo con esa bandeja.
20.Activación / selección de efectos: Pulse este botón para encender o apagar el efecto correspondiente. Mantenga pulsado Shift y pulse este botón para seleccionar un efecto en el software.
21.Tap de efectos: Toque este botón repetidamente al tempo deseado para ajustar la frecuencia de los osciladores de baja frecuencia (LFO) del efecto. Mantenga pulsado este botón para reiniciar el multiplicador de beats a las BPM de la bandeja.
22.Loop automático / Auto 4: Pulse este botón para crear un loop automático con la longitud definida en el software. Mantenga pulsado Shift y luego pulse este botón para crear un loop automático de 4 barras, independientemente del ajuste de longitud del loop automático.
23.Loop X 1/2 / entrada de loop: Pulse este botón para reducir a la mitad la longitud del loop actual. Mantenga pulsado Shift y pulse este botón para crear un punto de entrada de loop en la posición actual.
10
 Loading...