


 Loading...
User Guide
Guía del usuario
Guide d’utilisation
Guida per l’uso
Benutzerhandbuch
Appendix
English ( 3 – 6 )
Español ( 7 – 10 )
Français ( 11 – 14 )
Italiano ( 15 – 18 )
Deutsch ( 19 – 22 )
English ( 23 )

2

User Guide (English)
Introduction
Please see this guide’s Setup chapter to learn how to integrate DN-508A with your audio system.
Box Contents
DN-508A
(8) 4-Pin Euroblock Connectors
(8) 3-Pin Euroblock Connectors
Power Cable
User Guide
Safety & Warranty Manual
Support
For the latest information about this product (documentation, technical specifications, system requirements, compatibility information, etc.) and product registration, visit denonpro.com.
For additional product support, visit denonpro.com/support.
3
Features
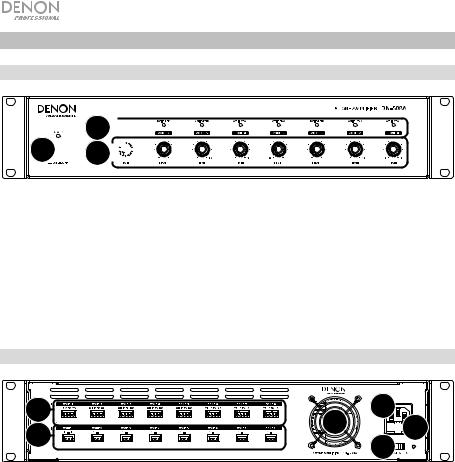
Front Panel
3 
 1
1 2
2 


1.Power Switch: Press this button to power DN-508A on or off.
2.Level Knobs: Turn these knobs to set the output level for each zone.
3.Active/Peak Lights: These lights will illuminate different colors to show the signal status of each zone input:
•Blue: The input is receiving a signal at an optimal level.
•Red: The input’s signal is “peaking” (higher than 0 dB). Turn its Level knob counterclockwise or reduce the volume of the source to prevent “clipping” (distortion).
Rear Panel
6 |
4 |
2 |
5 |
3 |
|
|
1 |
|
|
|
1.Voltage Select Switch: Set this switch to the correct voltage for your country/region.
2.Power Inlet: Use the included power cable to connect this input to a power outlet.
3.Fuse: If the unit’s fuse is broken, lift this tab to replace the fuse. Replace it with a fuse with an appropriate rating. Using a fuse with an incorrect rating can damage the unit and/or fuse.
4.Cooling Fan: The speed of the fan adjusts automatically to cool the unit. Do not block this vent.
5.Inputs: Use Euroblock connectors to connect these zone inputs to your audio sources. Each zone has a ground (G), cold/negative (–), and hot/positive (+) connector. Make sure the wiring of each device matches each connection.
6.Outputs: Use Euroblock connectors to connect these zone outputs to your loudspeakers. Each zone has a connector for common (COM), 4Ω, 70V, and 100V. Make sure the wiring of each loudspeaker is done properly for each output.
4

Setup
Items not listed under Introduction > Box Contents are sold separately.
1.Use the included Euroblock connectors to connect the inputs on the rear panel to your audio sources.
•Each zone input has a ground (G), cold/negative (–), and hot/positive (+) connector.
2.Use the included Euroblock connectors to connect the outputs on the rear panel to your loudspeakers.
•Each zone output has a connector for common (COM), 4Ω, 70V, and 100V.
3.Use the included power cable to connect the power inlet to a power outlet.
4.Power on all of your audio sources (Blu-ray® players, stereos, microphones, amplifiers, etc.).
5.Press the power switch to power on DN-508A.
6.Adjust the level knobs for each zone input as necessary.
Example:
To Zone Speakers
Amplifier |
|
|
IN-Command |
|
Receiver |
|
Blu-ray Player |
Microphones |
Power |
Zone 1 |
Zone 2 |
Zone 3 |
Zone 4 |
Zone 5 |
Zone 6 |
5

Troubleshooting
If you encounter a problem, try doing these things first:
•Make sure all cables and other connected devices are properly and securely connected.
•Make sure you are using DN-508A as described in this user guide.
•Make sure your other devices or media are working properly.
•If you believe DN-508A is not working properly, check the following table for your problem and solution.
Problem: |
Solution: |
Please see: |
|
|
|
Power does not turn on. |
Make sure DN-508A’s power inlet is |
Setup |
|
properly connected to a power outlet |
|
|
using the included power cable. |
|
|
|
|
DN-508A does not |
Make sure all cable and device |
Setup |
produce any sound, or |
connections are secure and correct. |
|
the sound is distorted. |
Make sure none of the cables are |
|
|
|
|
|
damaged. |
|
|
Make sure the settings on your |
|
|
loudspeaker, mixer, etc. are correct. |
|
|
|
|
6
Guía del usuario (Español)
Introducción
Consulte el capítulo Instalación de esta guía para aprender a integrar el DN-508A con su sistema de audio.
Contenido de la caja
DN-508A
(8) 4-patillas conectores Euroblock
(8) 3-patillas conectores Euroblock
Cable de corriente
Guía del usuario
Manual sobre la seguridad y garantía
Soporte
Para obtener la información más reciente acerca de este producto (documentación, especificaciones técnicas, requisitos de sistema, información de compatibilidad, etc.) y registrarlo, visite denonpro.com.
Para obtener soporte adicional del producto, visite denonpro.com/support.
7
Características
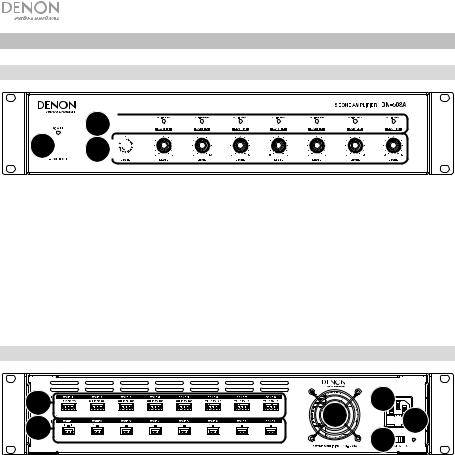
Panel frontal
3 
 1
1 2
2 


1.Interruptor de encendido: Pulse este botón para encender o apagar el DN-508A.
2.Perilla de nivel: Gire estas perillas para ajustar el nivel de salida de cada zona.
3.Luces activas/pico: Estas luces se encenderán con diferentes colores para mostrar el estado de la señal de cada entrada de zona:
•Verde: La entrada está recibiendo una señal con un nivel óptimo.
•Rojo: La señal de la entrada está llegando a su pico (más de 0 dB). Gire su perilla Level (Nivel) en sentido antihorario o disminuya el volumen de la fuente para evitar el "recorte" (distorsión).
Panel trasero
6 |
4 |
2 |
5 |
3 |
|
|
1 |
|
|
|
1.Interruptor selector de voltaje: Ajuste este interruptor al voltaje correcto para su país/región.
2.Entrada de corriente: Utilice el cable de corriente incluido para conectar esta entrada a una toma de corriente.
3.Fusible: Si el fusible de la unidad está roto, levante esta lengüeta para reemplazar el fusible. Reemplácelo por un fusible con especificación apropiada. Si utiliza un fusible de especificación incorrecta, puede dañarse la unidad y/o el fusible.
4.Ventilador: La velocidad del ventilador se ajusta automáticamente para enfriar la unidad. No bloquee este respiradero.
5.Entradas: Utilice conectores Euroblock para conectar estas entradas de zona a sus fuentes de audio. Cada entrada tiene un conector a tierra (G), un conector frío/negativo (–), y un conector caliente/positivo (+). Asegúrese de que el cableado de cada dispositivo coincida con cada conexión.
6.Salidas: Utilice conectores Euroblock para conectar estas salidas de zona a sus altavoces. Cada zona tiene un conector del común (COM), 4 Ω, 70 V y 100 V. Asegúrese de que el cableado de cada altavoz sea el correcto para cada salida.
8
Loading...