


 Loading...
User Guide
Guía del usuario
Guide d’utilisation
Guida per l’uso
Benutzerhandbuch
Appendix
English ( 3 – 9 )
Español ( 10 – 16 )
Français ( 17 – 23 )
Italiano ( 24 – 30 )
Deutsch ( 31 – 37 )
English ( 38 )

User Guide (English)
Introduction
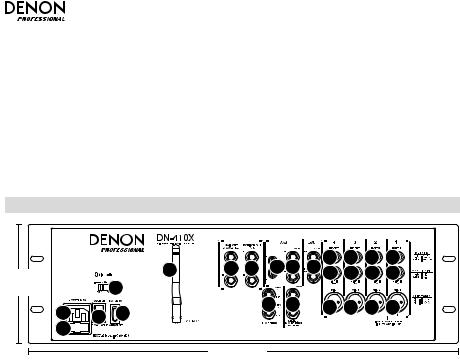
DN-410X is a rackmount audio mixer with 10 channels and Bluetooth® connectivity. Designed for professional A/V applications, conference rooms, nightclubs, and restaurants, this mixer features balanced XLR inputs, balanced 1/4” (6.35mm) TRS inputs, and simple single-button Bluetooth pairing.
Please see this guide’s Setup chapter to learn how to integrate DN-410X with your audio system, and then refer to the Operation chapter to start using DN-410X.
Box Contents
DN-410X
Power Cable
User Guide
Safety & Warranty Manual
Support
For the latest information about this product (system requirements, compatibility information, etc.) and product registration, visit denonpro.com.
Setup
Items not listed under Introduction > Box Contents are sold separately.
1.Use either XLR cables or 1/4” (6.35mm) cables to connect the DN-410X’s outputs (balanced or unbalanced) to your loudspeakers, mixer, amplifier, or other device that accepts line-level inputs (this device must be powered off).
Important: For stereo operation, make sure all left (L) and right (R) outputs are connected to left and right inputs, respectively.
2.Use either XLR cables or 1/4” (6.35mm) cables to connect the DN-410X’s inputs (mic or line) to your microphones or other audio input sources.
3.Use the included power cable to connect DN-410X’s power input to your power source.
Important: Do not use DN-410X near a microwave oven, which can interfere with the reception.
4.Power on your audio input sources first, power on DN-410X, and then power on your loudspeakers last.
See the Connection Diagram on the next page.
3

Connection Diagram
Front Panel View
Microphones |
Bluetooth device |
(smartphone, tablet, computer, etc.) |
Headphones
Rear Panel View
|
|
|
|
|
|
|
|
|
|
|
|
PA loudspeakers |
|
|
|
|
|
|
|
|
|
|
|
Loudspeakers |
|
|
|
|
|
Microphones |
|||||||||||||||||||||||||||||||||||||||||||||||||||||||||||||||||||||||
|
|
|
|
|
|
|
|
|
|
|
|
|
|
|
|
|
|
|
|
|
|
|
|
|
|
|
|
|
|
|
|
|
|
|
|
|
|
|
|
|
|
|
|
|
|
|
|
|
|
|
|
|
|
|
|
|
|
|
|
|
|
|
|
|
|
|
|
|
|
|
|
|
|
|
|
|
|
|
|
|
|
|
|
|
|
|
|
|
|
|
|
|
|
|
|
|
|
|
|
|
|
|
|
|
|
|
|
|
|
|
|
|
|
|
|
|
|
|
|
|
|
|
|
|
|
|
|
|
|
|
|
|
|
|
|
|
|
|
|
|
|
|
|
|
|
|
|
|
|
|
|
|
|
|
|
|
|
|
|
|
|
|
|
|
|
|
|
|
|
|
|
|
|
|
|
|
|
|
|
|
|
|
|
|
|
|
|
|
|
|
|
|
|
|
|
|
|
|
|
|
|
|
|
|
|
|
|
|
|
|
|
|
|
|
|
|
|
|
|
|
|
|
|
|
|
|
|
|
|
|
|
|
|
|
|
|
|
|
|
|
|
|
|
|
|
|
|
|
|
|
|
|
|
|
|
|
|
|
|
|
|
|
|
|
|
|
|
|
|
|
|
|
|
|
|
|
|
|
|
|
|
|
|
|
|
|
|
|
|
|
|
|
|
|
|
|
|
|
|
|
|
|
|
|
|
|
|
|
|
|
|
|
|
|
|
|
|
|
|
|
|
|
|
|
|
|
|
|
|
|
|
|
|
|
|
|
|
|
|
|
|
|
|
|
|
|
|
|
|
|
|
|
|
|
|
|
|
|
|
|
|
|
|
|
|
|
|
|
|
|
|
|
|
|
|
|
|
|
|
|
|
|
|
|
|
|
|
|
|
|
|
|
|
|
|
|
|
|
|
|
|
|
|
|
|
|
|
|
|
|
|
|
|
|
|
|
|
|
|
|
|
|
|
|
|
|
|
|
|
|
|
|
|
|
|
|
|
|
|
|
|
|
|
|
|
|
|
|
|
|
|
|
|
|
|
|
|
|
|
|
|
|
|
|
|
|
|
|
|
|
|
|
|
|
|
|
|
|
|
|
|
|
|
|
|
|
|
|
|
|
|
|
|
|
|
|
|
|
|
|
|
|
|
|
|
|
|
|
|
|
|
|
|
|
|
|
|
|
|
|
|
|
|
|
|
|
|
|
|
|
|
|
|
|
|
|
|
|
|
|
|
|
|
|
|
|
|
|
|
|
|
|
|
|
|
|
|
|
|
|
|
|
|
|
|
|
|
|
|
|
|
|
|
|
|
|
|
|
|
|
|
|
|
|
|
|
|
|
|
|
|
|
|
|
|
|
|
|
|
|
|
|
|
|
|
|
|
|
|
|
|
|
|
|
|
|
|
|
|
|
|
|
|
|
|
|
|
|
|
|
|
|
|
|
|
|
|
|
|
|
|
|
|
|
|
|
|
|
|
|
|
|
|
|
|
|
|
|
|
|
|
|
|
|
|
|
|
|
|
|
|
|
|
|
|
|
|
|
|
|
|
|
|
|
|
|
|
|
|
|
|
|
|
|
|
|
|
|
|
|
|
|
|
|
|
|
|
|
|
|
|
|
|
|
|
|
|
|
|
|
|
|
|
|
|
|
|
|
|
|
|
|
|
|
|
|
|
|
|
|
|
|
|
|
|
|
|
|
|
|
|
|
|
|
|
|
|
|
|
|
|
|
|
|
|
|
|
|
|
|
|
|
|
|
|
|
|
|
|
|
|
|
|
|
|
|
|
|
|
|
|
|
|
|
|
|
|
|
|
|
|
|
|
|
|
|
|
|
|
|
|
|
|
|
|
|
|
|
|
|
|
|
|
|
|
|
|
|
|
|
|
|
|
|
|
|
|
|
|
|
|
|
|
|
|
|
|
|
|
|
|
|
|
|
|
|
|
|
|
|
|
|
|
|
|
|
|
|
|
|
|
|
|
|
|
|
|
|
|
|
|
|
|
|
|
|
|
|
|
|
|
|
|
|
|
|
|
|
|
|
|
|
|
|
|
|
|
|
|
|
|
|
|
|
|
|
|
|
|
|
|
|
|
|
|
|
|
|
|
|
|
|
|
|
|
|
|
|
|
|
|
|
|
|
|
|
|
|
|
|
|
|
|
|
|
|
|
|
|
|
|
|
|
|
|
|
|
|
|
|
|
|
|
|
|
|
|
|
|
|
|
|
|
|
|
|
|
|
|
|
|
|
|
|
|
|
|
|
|
|
|
|
|
|
|
|
|
|
|
|
|
|
|
|
|
|
|
|
|
|
|
|
|
|
|
|
|
|
|
|
|
|
|
|
|
|
|
|
|
|
|
|
|
|
|
|
|
|
|
|
|
|
|
|
|
|
|
|
|
|
|
|
|
|
|
|
|
|
|
|
|
|
|
|
|
|
|
|
|
|
|
|
|
|
|
|
|
|
|
|
|
|
|
|
|
|
|
|
|
|
|
|
|
|
|
|
|
|
|
|
|
|
|
|
|
|
|
|
|
|
|
|
|
|
|
|
|
|
|
|
|
|
|
|
|
|
|
|
|
|
|
|
|
|
|
|
|
|
|
|
|
|
|
|
|
|
|
|
|
|
|
|
|
|
|
|
|
|
|
|
|
|
|
|
|
|
|
|
|
|
|
|
|
|
|
|
|
|
|
|
|
|
|
|
|
|
|
|
|
|
|
|
|
|
|
|
|
|
|
|
|
|
|
|
|
|
|
|
|
|
|
|
|
|
|
|
|
|
|
|
|
|
|
|
|
|
|
|
|
|
|
|
|
|
|
|
|
|
|
|
|
|
|
|
|
|
|
|
|
|
|
|
|
|
|
|
|
|
|
|
|
|
|
|
|
|
|
|
|
|
|
|
|
|
|
|
|
|
|
|
|
|
|
|
|
|
|
|
|
|
|
|
|
|
|
|
|
|
|
|
|
|
|
|
|
|
|
|
|
|
|
|
|
|
|
External processor (compressor)
External processor (reverb)
Power
4

Features
Front Panel
7 2 |
7 2 |
7 2 |
7 2 |
7 2 |
7 2 |
|
7 2 |
|
1 |
1 |
1 |
1 |
1 |
1 |
1 |
9 |
|
3 |
3 |
3 |
3 |
3 |
3 |
3 |
||
|
5.25” |
4 |
4 |
4 |
4 |
4 |
4 |
4 |
10 |
(13.3cm) |
5 |
5 |
5 |
5 |
5 |
5 |
5 |
11 |
|
||||||||
|
6 |
6 |
6 |
6 |
6 |
6 |
6 |
11 |
|
8 |
8 |
8 |
8 |
8 |
8 |
8 |
|
|
|
12 13 14 |
15 |
|
18 |
17 |
19 |
|
16


 20
20
19” (48.3 cm)
1.Trim: Sets the channel’s input level. Adjust this so that the Peak LED lights on the loudest passages and then back it down so it no longer peaks.
2.Peak LED: The LED will flash if the signal is “clipping.” If this happens, decrease the setting of the Gain knob or Channel Fader.
Note: Avoid amplifier “clipping” at all costs. Clipping occurs when the power amplifier is distorting and working beyond its limits. Amplifier distortion is the major cause of speaker failure.
3.Hi EQ: Provides up to 15 dB of boost or cut to the 12 KHz frequency range.
4.Lo EQ: Provides up to 15 dB of boost or cut to the 80 Hz frequency range.
5.Aux 1: Sends the channel’s signal to auxiliary processors, onstage monitors, or headphone amplifiers. Aux 1 is pre-fader, meaning it takes the signal before the channel fader position. This is ideal for sending a signal to monitors or headphone amplifiers.
6.Aux 2: Sends the channel’s signal to auxiliary processors, onstage monitors, or headphone amplifiers. Aux 2 is post-fader, meaning it takes the signal after the channel fader position. This is ideal for sending a signal to outboard processors.
7.Channel Fader: Controls the signal level of the Mic and Line inputs.
8.Pan/Bal: Directs the output signal to the left or right Main Out. Pan controls are found on mono channels, sending the mono source to either the left or the right speakers or anywhere in between. The Bal controls are found on stereo channels which take a stereo source and varies the relative level of the channels, so that the left channel will not come out of the right speaker when adjusting the Bal control fully right and vice-versa.
9.Ext In: 1/8” (3.5mm) stereo line level input for Channels 9 and 10.
10.Ext Out: 1/8” (3.5mm) stereo output that mirrors the Main Outputs.
11.Mic Input 1/2: XLR-1/4” (6.35mm) combo inputs for use with dynamic and condenser mics. The signal level is controlled with Channel Faders 1 and 2, respectively. When front panel Mic Inputs 1 and 2 are in use, this will disable the rear panel Mic Inputs 1 and 2.
12.Power LED: Indicates whether DN-410X is powered on or off.
13.Phantom Power LED: Indicates whether the phantom power is enabled for the Mic Inputs.
14.Pair/Unpair: Press this button to pair a Bluetooth device or to disconnect a paired Bluetooth device. DN-410X has a transmission range up to 100 feet (30.5 meters).
5
15.Pair LED: This LED will illuminate when DN-410X is paired with a Bluetooth audio device.
16.LED Meters: Displays the audio signal level of the main outputs.
17.Master Fader: Adjusts the speaker’s Main Out volume, which includes the Mic/Line Inputs, Ext. In, and the audio of a paired Bluetooth device.
18.Stereo Aux Return: Controls the signal level returning from the Aux Inputs.
19.Phones/Monitor Knob: Adjusts the signal level sent to the Monitor Out and the Phones Output.
20.Phones Output: Connect headphones to this stereo 1/4” (6.35mm) output.
Rear Panel
5.25”
(13.3cm)
|
|
|
|
|
|
|
14 |
14 |
14 |
14 |
|
|
6 |
7 |
8 |
1112 |
12 13 |
13 |
13 |
13 |
|
|
|
3 |
|
|
9 |
|
|
|
|
|
1 |
4 |
5 |
|
|
10 |
13 |
13 |
13 |
13 |
|
|
|
|
|
|
|
|
|
|||
2 |
|
|
|
|
|
|
|
|
|
|
19” (48.3 cm)
1.Power Input: Insert the included power cable here.
2.Fuse: If the unit’s fuse is broken, lift this tab to replace the fuse. Replace it with a fuse with an appropriate rating (printed under the unit’s power cable input). Using a fuse with an incorrect rating can damage the unit and/or fuse.
3.Voltage Selector: Change this voltage selector setting only when necessary (e.g., when traveling to a country or region with a different voltage). Selecting an improper voltage setting can damage the unit.
4.Power On/Off Switch: Turns DN-410X’s power on or off.
5.Phantom Power Switch: Provides phantom power (+48V) for condenser microphones. Phantom power is applied to the XLR Mic Inputs.
6.Antenna: Adjusts the reception of the signal that is being received from a Bluetooth source such as a PC, Mac, iOS device, Android, etc.). DN-410X has a transmission range up to 100 feet (30.5 meters).
7.Main Out: Use standard 1/4” (6.35mm) TRS cables to connect this output to the house speaker, recorder, or amplifier system. Control the level of this output using the Master Fader.
8.Monitor Out: Use standard 1/4” (6.35mm) TS cables to connect this output to your monitor speaker or amplifier system. Control the level of this output using the
Phones/Monitor knob.
9.Aux Sends: Two mono 1/4” (6.35mm) TRS auxiliary sends allow you to connect effects that can be blended in with the source (or “dry”) signals. One typical example is to use one aux send for a reverb unit and the other for a monitor mix for the musicians.
6

10.Stereo Aux Return: Connect the outputs of an external device to these inputs with 1/4” (6.35mm) mono cables. This is usually reserved for outboard effects devices but can also be used as an extra input channel for synthesizers, drum machines, etc. If your source is mono, plug it into the left jack and it will be heard on both the left and right sides.
11.Ext In (RCA): These stereo RCA jacks accept consumer-level (-10dBv) inputs from sources such as tape decks, CD players, and MP3 players. Only connect consumer-level equipment to these jacks. Professional-level equipment operating at +4dBu will distort unless you significantly lower the volume on such equipment.
12.Stereo Line Inputs: Connect line-level devices to these inputs with 1/4” (6.35mm) cables.
Note: If you want to connect a standard turntable to DN-410X, use a dedicated turntable- to-line-level preamplifier.
13.Mic/Line Inputs: Channels 1–4 of the mixer accept microphones via the XLR connectors or mono line-level sources via the 1/4” (6.35mm) connectors. Channels 9/10 can be used with the Ext In or with a paired Bluetooth device.
Warning: Channels 1–4 each have mic level and line level inputs. Attach either a microphone or a 1/4” (6.35mm) cable to the mic/line channel, but do not attach both cables to the same channel at any one time. In extreme cases, doing so can damage your microphone.
14.Insert: 1/4” (6.35mm) TRS jacks on Channels 1–4 allow you to connect external processors (gates, compressors, pitch correction devices, etc.) into the signal path of these channels. The insert signal is brought into the channel directly after the preamplifier (controlled with the Trim knob) and before the channel’s EQ and fader. The insert jacks require use of an “insert” cable, which has a TRS (tip-ring-sleeve) connector on one end for connection to DN-410X and two TS (tip-sleeve) connectors on the other end. Attach the “send” connector to the input of your external processor. Then, attach the “return” connector to the output of your processor. See the insert cable diagram under Multitrack Audio Recording.
7

Operation
Pairing a Bluetooth Device
You can play audio from an audio device that sends its signal over a Bluetooth connection (e.g., smartphones, tablet computers, etc.). DN-410X uses Bluetooth 3.0 and has a transmission range up to 100 feet (30.5 meters).
Once you “pair” your Bluetooth device with DN-410X, they are “connected” wirelessly. You can play audio on your Bluetooth device, and it will be sent out of DN-410X’s outputs (balanced and unbalanced).
Important:
•DN-410X will not receive audio from a phone call. While using it, we recommend disabling your cellular connection, if possible.
•Do not use DN-410X near a microwave oven, which can interfere with the reception.
To pair your Bluetooth device to DN-410X:
1.Turn on your Bluetooth device.
2.Power on DN-410X.
3.Press the Pair/Unpair button on DN-410X.
Note: You can pair with an iPhone, iPad, Android device, or other smartphone, tablet, or computer equipped with Bluetooth that supports A2DP. Android users should consider updating their OS if experiencing trouble with pairing or playing music.
4.Navigate to your Bluetooth device’s setup screen, find DN-410X and connect. DN-410X’s pairing LED will light up solid when it is paired.
Note: If your Bluetooth device prompts for a pairing code, enter 0000.
Note: If your Bluetooth device is not able to pair to the mixer, press the Pair/Unpair button on the mixer to break previous Bluetooth connections and reset the Bluetooth module.
To disconnect pairing, press the Pair/Unpair button on DN-410X.
Multitrack Audio Recording
The Insert jack can also be used as a direct output to a multitrack recorder. The “send” provides the cleanest mic preamp signal by sending the signal to the recorder prior to it reaching the mixer’s EQ and channel fader. Use a standard TRS cable and insert the plug on the mixer’s side only until the first “click” (the ring connector). This will send the preamp signal to the recorder without interrupting the normal signal flow through the mixer.
Send: to your external device’s input.
Insert: to DN-410X’s
Insert jack.
Return: from your external device’s output.
8

Troubleshooting
If you encounter a problem, try doing these things first:
•Make sure all cables and other connected devices are properly and securely connected.
•Make sure you are using DN-410X as described in this User Guide.
•Make sure your other devices or media are working properly.
•If you believe DN-410X is not working properly, check the following table for your problem and solution.
Problem: |
Solution: |
Please see: |
|
|
|
Power does not turn on. |
Make sure DN-410X’s power input is |
Setup |
|
properly connected to a power outlet |
|
|
using the included power adapter. |
|
|
|
|
DN-410X does not |
Make sure all cable and device |
Setup |
produce any sound, or |
connections are secure and correct. |
|
the sound is distorted. |
Make sure none of the cables are |
|
|
|
|
|
damaged. |
|
|
Make sure the settings on your |
|
|
Bluetooth device, loudspeaker, mixer, |
|
|
etc. are correct. |
|
|
|
|
Audio from my Bluetooth |
Make sure you have properly paired |
Setup and Operation |
device does not play |
your Bluetooth device. |
|
through DN-410X. |
Improve the Bluetooth signal reception |
|
|
|
|
|
by moving your Bluetooth device |
|
|
closer to DN-410X. Also, remove |
|
|
obstacles (walls, furniture, etc.) so |
|
|
there is a clear line of sight between |
|
|
your Bluetooth device and DN-410X. |
|
|
|
|
Pairing my Bluetooth |
Enter 0000 as the PIN. (Some older |
Operation |
device to DN-410X |
Bluetooth devices may require you to |
|
requires a PIN. |
enter a PIN.) |
|
|
|
|
9

Guía del usuario (Español)
Introducción
El DN-410X es un mezclador de audio para montaje en rack con 10 canales y conectividad Bluetooth®. Diseñado para aplicaciones de A/V profesionales, salones de conferencias, clubes nocturnos y restaurantes, este mezclador cuenta con entradas XLR balanceadas, entradas TRS balanceadas de 6,35 mm (1/4 pulg.) y apareamiento Bluetooth simple con un solo botón.
Consulte el capítulo Instalación para información acerca de cómo integrar el DN-410X con su sistema de audio y luego consulte el capítulo Funcionamiento para comenzar a utilizar el DN-410X.
Contenido de la caja
DN-410X
Cable de alimentación
Guía del usuario
Manual sobre la seguridad y garantía
Soporte
Para obtener la información más completa acerca de este product (los requisitos del sistema, compatibilidad, etc) y registro del producto, visite denonpro.com.
Instalación
Los elementos que no se enumeran en Introducción > Contenido de la caja se venden por separado.
1.Utilice ya sea cables XLR o de 6,35 mm (1/4 pulg.) para conectar las salidas del DN-410X (balanceadas o no balanceadas) a sus altavoces, mezclador, amplificador u otro dispositivo que acepte entradas de nivel de línea (este dispositivo debe estar apagado).
Importante: Para operación estéreo, asegúrese de que todas las salidas izquierdas (L) y derechas (R) estén conectadas a las entradas izquierda y derecha, respectivamente.
2.Utilice ya sea cables XLR o de 6,35 mm (1/4 pulg.) para conectar las entradas del DN410X (micrófono o línea) a sus micrófonos u otras fuentes de entrada de audio.
3.Utilice el cable de corriente incluido para conectar la entrada de corriente del DN-410X a su fuente de alimentación.
Importante: No utilice el DN-410X cerca de un horno de microondas, puesto que puede interferir con la recepción.
4.Encienda primero sus fuentes de entrada de audio, encienda el DN-410X y luego encienda sus altavoces en último término.
Consulte el diagrama de conexión de la página siguiente.
10

Diagrama de conexión
Vista del pannello frontal
Microfónos |
Dispositivo Bluetooth |
(teléfono inteligente [smartphone], |
|
|
tableta, computadora, etc.) |
Auriculares
Vista del pannello trasero
|
|
|
|
|
|
|
|
|
Altavoces principales |
|
|
|
|
|
|
|
|
|
|
|
|
|
|
|
Monitores |
|
|
|
|
|
|
Microfónos |
|||||||||||||||||||||||||||||||||||||||||||||||||||||||||||||||||||||
|
|
|
|
|
|
|
|
|
|
|
|
|
|
|
|
|
|
|
|
|
|
|
|
|
|
|
|
|
|
|
|
|
|
|
|
|
|
|
|
|
|
|
|
|
|
|
|
|
|
|
|
|
|
|
|
|
|
|
|
|
|
|
|
|
|
|
|
|
|
|
|
|
|
|
|
|
|
|
|
|
|
|
|
|
|
|
|
|
|
|
|
|
|
|
|
|
|
|
|
|
|
|
|
|
|
|
|
|
|
|
|
|
|
|
|
|
|
|
|
|
|
|
|
|
|
|
|
|
|
|
|
|
|
|
|
|
|
|
|
|
|
|
|
|
|
|
|
|
|
|
|
|
|
|
|
|
|
|
|
|
|
|
|
|
|
|
|
|
|
|
|
|
|
|
|
|
|
|
|
|
|
|
|
|
|
|
|
|
|
|
|
|
|
|
|
|
|
|
|
|
|
|
|
|
|
|
|
|
|
|
|
|
|
|
|
|
|
|
|
|
|
|
|
|
|
|
|
|
|
|
|
|
|
|
|
|
|
|
|
|
|
|
|
|
|
|
|
|
|
|
|
|
|
|
|
|
|
|
|
|
|
|
|
|
|
|
|
|
|
|
|
|
|
|
|
|
|
|
|
|
|
|
|
|
|
|
|
|
|
|
|
|
|
|
|
|
|
|
|
|
|
|
|
|
|
|
|
|
|
|
|
|
|
|
|
|
|
|
|
|
|
|
|
|
|
|
|
|
|
|
|
|
|
|
|
|
|
|
|
|
|
|
|
|
|
|
|
|
|
|
|
|
|
|
|
|
|
|
|
|
|
|
|
|
|
|
|
|
|
|
|
|
|
|
|
|
|
|
|
|
|
|
|
|
|
|
|
|
|
|
|
|
|
|
|
|
|
|
|
|
|
|
|
|
|
|
|
|
|
|
|
|
|
|
|
|
|
|
|
|
|
|
|
|
|
|
|
|
|
|
|
|
|
|
|
|
|
|
|
|
|
|
|
|
|
|
|
|
|
|
|
|
|
|
|
|
|
|
|
|
|
|
|
|
|
|
|
|
|
|
|
|
|
|
|
|
|
|
|
|
|
|
|
|
|
|
|
|
|
|
|
|
|
|
|
|
|
|
|
|
|
|
|
|
|
|
|
|
|
|
|
|
|
|
|
|
|
|
|
|
|
|
|
|
|
|
|
|
|
|
|
|
|
|
|
|
|
|
|
|
|
|
|
|
|
|
|
|
|
|
|
|
|
|
|
|
|
|
|
|
|
|
|
|
|
|
|
|
|
|
|
|
|
|
|
|
|
|
|
|
|
|
|
|
|
|
|
|
|
|
|
|
|
|
|
|
|
|
|
|
|
|
|
|
|
|
|
|
|
|
|
|
|
|
|
|
|
|
|
|
|
|
|
|
|
|
|
|
|
|
|
|
|
|
|
|
|
|
|
|
|
|
|
|
|
|
|
|
|
|
|
|
|
|
|
|
|
|
|
|
|
|
|
|
|
|
|
|
|
|
|
|
|
|
|
|
|
|
|
|
|
|
|
|
|
|
|
|
|
|
|
|
|
|
|
|
|
|
|
|
|
|
|
|
|
|
|
|
|
|
|
|
|
|
|
|
|
|
|
|
|
|
|
|
|
|
|
|
|
|
|
|
|
|
|
|
|
|
|
|
|
|
|
|
|
|
|
|
|
|
|
|
|
|
|
|
|
|
|
|
|
|
|
|
|
|
|
|
|
|
|
|
|
|
|
|
|
|
|
|
|
|
|
|
|
|
|
|
|
|
|
|
|
|
|
|
|
|
|
|
|
|
|
|
|
|
|
|
|
|
|
|
|
|
|
|
|
|
|
|
|
|
|
|
|
|
|
|
|
|
|
|
|
|
|
|
|
|
|
|
|
|
|
|
|
|
|
|
|
|
|
|
|
|
|
|
|
|
|
|
|
|
|
|
|
|
|
|
|
|
|
|
|
|
|
|
|
|
|
|
|
|
|
|
|
|
|
|
|
|
|
|
|
|
|
|
|
|
|
|
|
|
|
|
|
|
|
|
|
|
|
|
|
|
|
|
|
|
|
|
|
|
|
|
|
|
|
|
|
|
|
|
|
|
|
|
|
|
|
|
|
|
|
|
|
|
|
|
|
|
|
|
|
|
|
|
|
|
|
|
|
|
|
|
|
|
|
|
|
|
|
|
|
|
|
|
|
|
|
|
|
|
|
|
|
|
|
|
|
|
|
|
|
|
|
|
|
|
|
|
|
|
|
|
|
|
|
|
|
|
|
|
|
|
|
|
|
|
|
|
|
|
|
|
|
|
|
|
|
|
|
|
|
|
|
|
|
|
|
|
|
|
|
|
|
|
|
|
|
|
|
|
|
|
|
|
|
|
|
|
|
|
|
|
|
|
|
|
|
|
|
|
|
|
|
|
|
|
|
|
|
|
|
|
|
|
|
|
|
|
|
|
|
|
|
|
|
|
|
|
|
|
|
|
|
|
|
|
|
|
|
|
|
|
|
|
|
|
|
|
|
|
|
|
|
|
|
|
|
|
|
|
|
|
|
|
|
|
|
|
|
|
|
|
|
|
|
|
|
|
|
|
|
|
|
|
|
|
|
|
|
|
|
|
|
|
|
|
|
|
|
|
|
|
|
|
|
|
|
|
|
|
|
|
|
|
|
|
|
|
|
|
|
|
|
|
|
|
|
|
|
|
|
|
|
|
|
|
|
|
|
|
|
|
|
|
|
|
|
|
|
|
|
|
|
|
|
|
|
|
|
|
|
|
|
|
|
|
|
|
|
|
|
|
|
|
|
|
|
|
|
|
|
|
|
|
|
|
|
|
|
|
|
|
|
|
|
|
|
|
|
|
|
|
|
|
|
|
|
|
|
|
|
|
|
|
|
|
|
|
|
|
|
|
|
|
|
|
|
|
|
|
|
|
|
|
|
|
|
|
|
|
|
|
|
|
|
|
|
|
|
|
|
|
|
|
|
|
|
|
|
|
|
|
|
|
|
|
|
|
|
|
|
|
|
|
|
|
|
|
|
|
|
|
|
|
|
|
|
|
|
|
|
|
|
|
|
|
|
|
|
|
|
|
|
|
|
|
|
|
|
|
|
|
|
|
|
|
|
|
|
|
|
|
|
|
|
|
|
|
|
|
|
|
|
|
|
|
|
|
|
|
|
|
|
|
|
|
|
|
|
|
|
|
|
|
|
Procesador de efectos externo (compresor)
Procesador de efectos externo (reverberación)
Suministro eléctrico
11

Características
Panel frontal
7 2 |
7 2 |
7 2 |
7 2 |
7 2 |
7 2 |
|
7 2 |
|
1 |
1 |
1 |
1 |
1 |
1 |
1 |
9 |
|
3 |
3 |
3 |
3 |
3 |
3 |
3 |
||
|
13,3cm |
4 |
4 |
4 |
4 |
4 |
4 |
4 |
10 |
(5,25 pulg) |
5 |
5 |
5 |
5 |
5 |
5 |
5 |
11 |
|
||||||||
|
6 |
6 |
6 |
6 |
6 |
6 |
6 |
11 |
|
8 |
8 |
8 |
8 |
8 |
8 |
8 |
|
|
|
12 13 14 |
15 |
|
18 |
17 |
19 |
|
16


 20
20
48,3 cm (19 pulg)
1.Ganacia: Permite fijar el nivel de entrada del canal. Ajústelo de modo que el LED de pico se encienda en los pasajes de mayor volumen y luego retrocédalo de modo que no se encienda.
2.LED de pico: El LED destella con luz roja si la señal se está recortando. Si esto sucede, disminuya el ajuste de la perilla de ganancia o el fader de canal.
Nota: Evite el (“recorte”) del amplificador a toda costa. El recorte se produce ocurre cuando el amplificador de potencia distorsiona y funciona más allá de sus límites. La distorsión del amplificador es la causa principal de los fallos en los bafles.
3.Ecualizador de agudos: Proporciona hasta 15 dB de refuerzo o corte a la gama de frecuencias de 12 kHz.
4.Ecualizador de graves: Proporciona hasta 15 dB de refuerzo o corte a la gama de frecuencias de 80 Hz.
5.Auxiliar 1: Envía la señal del canal a procesadores auxiliares, monitores de escenario o amplificadores para auriculares. Aux 1 es un pre-fader, lo que significa que toma la señal antes de la posición del fader de canal. Aux 1 es ideal para enviar una señal a monitores o amplificadores de auriculares.
6.Auxiliar 2: Envía la señal del canal a procesadores auxiliares, monitores de escenario o amplificadores para auriculares. Aux 2 es un post-fader, lo que significa que toma la señal después de la posición del fader de canal. Aux 2 es ideal para enviar una señal a procesadores externos.
7.Fader de canal: Controla el nivel de señal de las entradas de micrófono y de línea.
8.Pan/Bal: Dirige la señal de salida a la salida principal Main Out izquierda o derecha. Los controles Pan se encuentran en los canales mono y envían la fuente mono ya sea a los altavoces izquierdo o derecho o a algo entre medio. Los controles Bal se encuentran en los canales estéreo que toman una fuente estéreo y varían el nivel relativo de los canales, de modo que el canal izquierdo no salga por el altavoz derecho cuando se ajusta el control Balance totalmente a la derecha y viceversa.
9.Entrada externa: Entrada de nivel de línea estéreo de 3,5 mm (1/8 pulg.) para los
Canales 9 y 10.
10.Salida externa: Salida estéreo de 3,5 mm (1/8 pulg.) que es el espejo de las salidas principales.
11.Entrada de micrófono 1/2: Entradas combo XLR de 6,35 mm (1/4 pulg.) para usar con micrófonos dinámicos y de condensador. El nivel de señal se controla con los faders de canal 1 y 2, respectivamente. Cuando se usan las entradas de micrófono 1 y 2 del panel frontal, se inhiben las entradas de micrófono 1 y 2 del panel trasero.
12
Loading...