


! C # |
|
|
|
|
|||
D I f i fe |
|
|
|
||||
e i i i ef e i i i e |
|
|
|||||
|
|
|
|
|
|||
" |
#" ! " " " " |
|
|
||||
|
i i iI I e |
|
|
|
|||
e e e e i e i e |
|
|
|||||
i e e f i e e e e |
|
|
|||||
ei |
|
|
|
|
|
|
|
|
|
|
|
|
|
||
# |
!" # ! $ # |
|
|
|
|||
|
I CCIi e e |
|
|
|
|||
|
i i e i e |
e e i |
|
|
|
||
f i ie e e i i |
e e e i |
|
|
|
|||
|
|
|
|
|
|
|
|

Table of Contents
IMPORTANT SAFETY PRECAUTIONS. . . . . . .4 .
Overview . . . . . . . . . . . . . . . . . . 6. . . . . . . . .
Before using your appliance for the first0time. . |
8 |
Filling up the pipe system. . . . . . . . . . . . . . . 9. . . . . . .
Controls . . . . . . . . . . . . . . . . . . 10. . . . . . . . .
Preparation . . . . . . . . . . . . . . . . .13. . . . . . . . .
General . . . . . . . . . . . . . . . . . . . 13. . . . . . . . . .
Using espresso/ coffee0beans. . . . . . . . . . . 13. . . . . . .
Adjusting the grinding0unit. . . . . . . . . . . . .14. . . . . . . .
Using ground coffee. . . . . . . . . . . . . . . 14. . . . . . . . .
Preparing hot water. . . . . . . . . . . . . . . 15. . . . . . . . .
Steam for heating drinks. . . . . . . . . . . . . .15. . . . . . . .
Preparing frothy milk. . . . . . . . . . . . . . . 16. . . . . . . . .
Changing settings / programming. . . . . . . . .17. . .
Programming . . . . . . . . . . . . . . . . .17. . . . . . . . .
Language . . . . . . . . . . . . . . . . . . 18. . . . . . . . . .
Water hardness. . . . . . . . . . . . . . . . .18. . . . . . . . .
Water filter. . . . . . . . . . . . . . . . . . .19. . . . . . . . .
Temperature . . . . . . . . . . . . . . . . . 21. . . . . . . . . .
Current time . . . . . . . . . . . . . . . . . .21. . . . . . . . .
Timer . . . . . . . . . . . . . . . . . . . . 21. . . . . . . . . .
Standby mode . . . . . . . . . . . . . . . . .22. . . . . . . . .
Displaying number of0brews. . . . . . . . . . . .22. . . . . . .
RESET function. . . . . . . . . . . . . . . . .22. . . . . . . . .
System messages. . . . . . . . . . . . . . 23. . . . . . . . .
Cleaning the appliance. . . . . . . . . . . . . 24. . . . . . . .
Descaling the appliance. . . . . . . . . . . . .28. . . . . . . .
Trouble shooting . . . . . . . . . . . . . . .31. . . . . . . . .
3

IMPORTANT SAFETY PRECAUTIONS
WARNING: to avoid risk of fire and electric shock that can exist in all electric appliances, basic safety precautions, including the following, should always be practiced:
When using electrical appliances, basic safety precautions should always be follo including the following:
1. |
Read |
all |
instructions. |
|
|
|
|
|
|
|
|
|
|
|||
2. |
Do |
not |
touch |
hot |
surfaces. Use handles or knobs. |
|
|
|
||||||||
3. |
To |
protect against |
fire, |
electric |
shock |
and |
personal injury, |
do |
not |
immerse c |
||||||
|
plug or |
appliance |
in water or other |
liquids. |
|
|
|
|
|
|||||||
4. |
Close |
supervision |
is necessary when any appliance is used by |
or |
near childr |
|||||||||||
|
When |
children |
become |
old enough |
to |
use |
the |
appliance, |
it is the legal resp |
|||||||
|
of |
the |
parents |
or |
legal |
guardian to |
ensure |
that |
they are |
instructed |
in safe p |
|||||
|
by |
qualified persons. |
|
|
|
|
|
|
|
|
|
|
||||
5. |
Unplug from outlet when not in |
use |
and |
before |
cleaning. |
Allow the appliance |
||||||||||
|
before |
putting |
on |
or taking off |
parts, |
and |
before |
cleaning |
the |
appliance. |
||||||
6.Do not operate any appliance with a damaged cord or plug or after the ap malfunctions, or has been damaged in any way. Return appliance to the nea
|
authorized service facility for |
examination, repair or adjustment. |
|
|
|||||
7. |
The use of accessory attachments not recommended by the appliance |
||||||||
|
manufacturer |
may result in |
fire, |
electric shock, |
or personal injury. |
|
|||
8. |
Do |
not use |
outdoors. |
|
|
|
|
|
|
9. |
Do |
not let the cord hang |
over |
the edge of |
a table |
or counter, or touch h |
|||
10.Do |
not place on or near a hot gas or electric burner, or in a heated oven |
||||||||
11.To |
disconnect, turn any control |
to •off" then |
remove |
plug from |
wall |
outlet. |
|||
12.Do |
not use appliance for other than intended use. |
|
|
|
|||||
13.Use |
extreme |
caution when |
dispensing hot steam as |
described |
in this |
manual |
|||
SAVE THESE INSTRUCTIONS
HOUSEHOLD USE ONLY
4
CAUTION
This appliance is designed for domestic |
use and for processing normal quantities |
|||||||||
food and not for industrial use. Any servicing other than cleaning |
and |
user |
mai |
|||||||
should |
be performed by |
an |
authorized |
service representative. |
|
|
|
|||
Do not immerse base |
in |
water |
or |
try |
to disassemble. |
|
|
|
||
To |
reduce the risk of |
fire |
or electric |
shock, do not |
open the |
enclosure. |
Rep |
|||
be |
done by authorized service |
personnel only. |
|
|
|
|
||||
Check voltage to be |
sure |
that |
the |
voltage indicated |
on the name |
plate |
agre |
|||
your voltage. |
|
|
|
|
|
|
|
|
|
|
Do |
not use the inner |
compartment |
for storing heavy |
parts and |
do |
not load. |
||||
To prevent fingers or hands from being pinched or crushed, carefully push b the inner compartment into the appliance .
Never use warm or hot water to fill the water container! Use cold water onl
Keep your hands and the cord away from hot parts of the appliance during operation.
Never |
clean |
with |
scouring powders or hard implements. |
||
Never |
use |
a |
steam cleaner. |
||
Carefully |
read |
the |
operating instructions and save these instructions. |
||
Do not |
touch |
the |
grinder! |
||
A short power supply cord is provided to reduce the risk resulting from becomi
entangled in or tripping over a longer cord. |
|
|
|
|
||||||||
Extension cords are |
available |
and |
may be |
used |
if care is |
exercised in |
their |
us |
||||
If an |
extension |
cord |
is |
used, |
|
|
|
|
|
|
|
|
1. the |
marked |
electrical |
rating |
of |
the extension |
cord should |
be at least |
as |
grea |
|||
as the electrical rating |
of |
the appliance, |
and |
|
|
|
|
|||||
2. the |
longer cord should |
be |
arranged so |
that |
it will not drape over the count |
|||||||
a table top where it |
could be pulled on by |
children or |
tripped over |
unintenti |
||||||||
This appliance has a polarized plug (one prong |
is wider than the other). As a |
|||||||||||
feature, this plug will fit |
into |
a polarized outlet |
only one way. If the plug does |
|||||||||
into the outlet, |
reverse |
the |
plug. |
If it still |
does |
not fit, contact a qualified electr |
||||||
Do not |
modify |
the plug |
in |
any way. |
|
|
|
|
|
|||
5
Overview
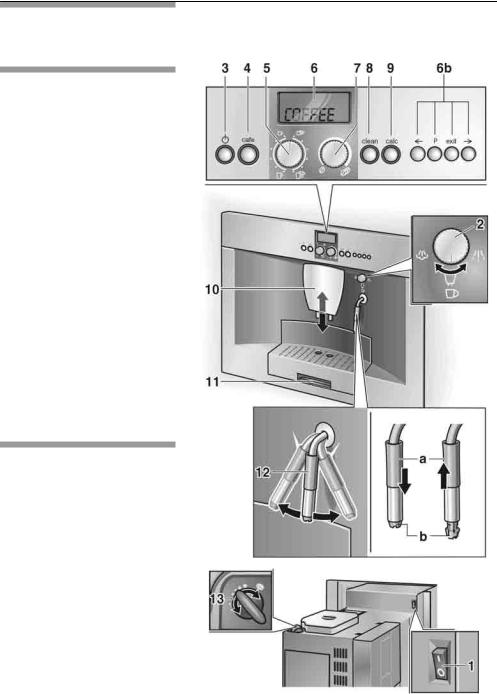
Controls
1 |
Power |
switch |
|
|
2 |
Function selector |
|
||
|
coffee/steam/hot |
water |
||
3 |
On/Off button |
|
||
4 |
button |
|
|
|
5 |
Rotary |
knob |
for |
adjusting |
|
the filling quantity |
|||
|
x- / - |
|
||
6 |
Display |
with |
function |
|
|
buttons |
(6b) |
|
|
7 |
Rotary |
knob |
for |
adjusting |
|
the coffee strength |
|||
|
- |
|
|
|
8 |
button |
|
|
|
9 |
descaling button |
|||
Appliance components
10Height)adjustable coffee outlet
11Inner compartment release button
12Hinged nozzle (frothing milk/steam/ hot water)
a Sleeve
b Nozzle
13 Rotary knob for adjustable grinding degree
6
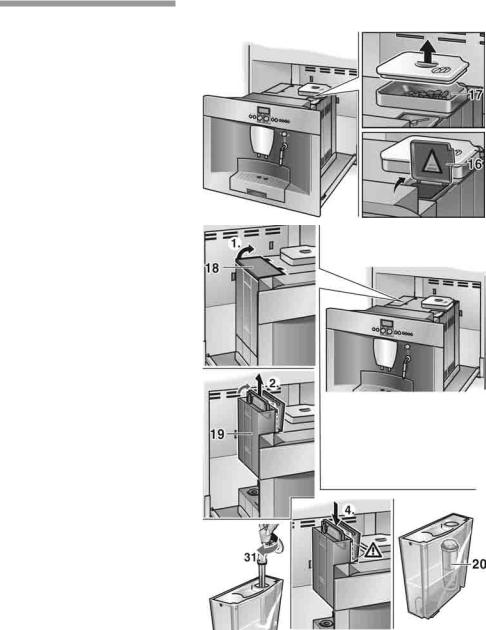
Appliance components
15 Door for brewing unit
16 Ground coffee bypass with cover and cleaning tabled duct
17 Fresh whole bean container with aroma cover
18 Lid for water tank
19 Removable water tank
20 Water Filter
7
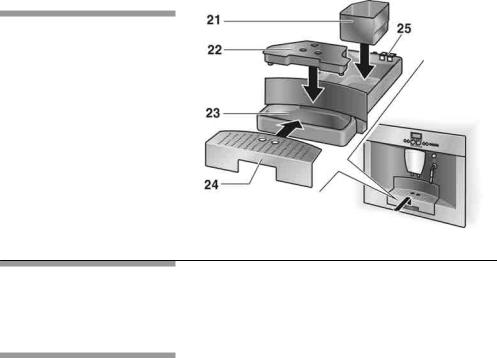
ppliance components
21 Coffee dreg tray (dishwasher'safe)
22 Splash guard
23 Tray (for residual water)
24Grille
25Sensor Contacts
Before using first time
General
your appliance for the
Fill the respective containers with pure water and coffee beans only.
Do not use coffee beans which have been glazed, caramelized or treated with other additives containing sugar.
Ascertain the water hardness with the enclosed test strip. If a hardness value other than 3 is indicated, switch on the appliance and program accordingly (see page 18).
8

Switching on the appliance
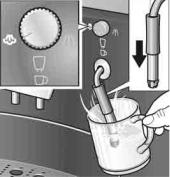
Filling up the pipe system
ILL P P PIP
PIP ILL P
Press button11 forwards and release the inner
compartment |
of the |
appliance. |
Connect the |
coiled |
cable to the chassis. |
Fill water tank19 with cold fresh water. Do not fil above •max." mark.
Fill the bean container1 with coffee beans.
Set power switch1 toI.
Return the inner compartment into original position.
Set function selector2 toX.
Press button 3.
i The appliance readyis |
for |
usewhen |
the |
||||
illuminated |
rings)on button 3 |
and on the2 |
|||||
button 4 are lit)green. |
|
|
|
||||
Note: If |
the |
appliance |
is being |
used |
for the first ti |
||
has |
not |
been |
operated |
for a prolonged period, the |
|||
cup |
of |
coffee will not |
have |
the full |
aroma. |
||
When switched on for the first time, the water pip system in the appliance may have to be refilled:
Press the2 button4.
|
|
|
To change the display to the desired language: |
|
|
|
|||
Selecting the |
language Hold |
down button% on the displayfor at least |
||
|
|
|
3 seconds. |
|
|
|
|
Press button% until the display flashes. |
|
|
|
|
Select |
the desired language with< or>. |
L |
|
|
||
LI |
|
|
Press |
button% to save the language. |
|
|
|
Press |
the6 button. |
|
|
|
||
9
Controls
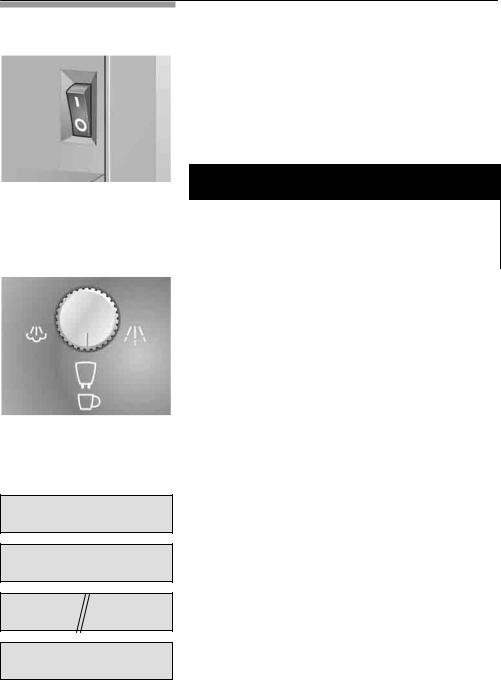
Power switch
The power switch on the rear of the appliance switches the#power supply on or off.
When the power switch has been switched on, the illuminated ring on button3 is lit green. The appliance is in standby mode.
CAUTION
C
WAT R
IT IS MI D TATI ST AM
ST AM
Do |
not press the power switch while |
|
the |
appliance |
is#operating. |
Do |
not switch |
off the appliance until it |
is |
in standby |
mode. |
|
|
|
Function |
selector |
|
Coffee, hot water or steam can be selected by rotating function selector.
|
|
WARNING |
|
|
|||
|
|
||
|
Avoid the risk of scalding! |
||
|
When |
the function selector |
is set |
|
to 0 or=, the nozzle may spurt |
||
|
slightly. |
Escaping water or |
steam |
|
is very |
hot. Do not touch nozzle12 |
|
|
or direct at people! |
|
|
|
|
|
|
The settings |
are displayed: |
|
|
Coffee |
onX position |
|
|
Hot water on0 position |
|
||
Steam |
on=position |
|
|
Displays during the brief heating up period for Stea on.
10
UNIT IS HEATING
UNIT IS RINSING
Display |
|
Display indicates |
the settings, the processes which |
are running and |
any messages issued by the |
appliance. |
|
The appliance has been programmed with standard settings for optimum operation. These settings can be changed & see chapter •Changing settings / programming".
ON/OFF Button |
|
|
|
|
|
The appliance is |
switched |
on |
or set to |
standby m |
|
with |
button . |
|
|
|
|
When |
button is |
pressed, |
the |
appliance |
heats up |
and is then rinsed. The illuminated ring on button
flashes |
during |
this process. |
||
The appliance |
is |
not |
rinsed if: |
|
- the |
appliance |
was |
still warm when switched on |
|
-coffee was not discharged before the appliance was switched to •standby" mode.
Heating and washing processes are displayed.
While coffee is being brewed, buttonis assigned a stop function. The process is terminated by pressing button .
i 4 hours after the last coffee was brewed, a rins process is automatically initiated and the applianc switches to •standby" mode. These settings can be changed & see chapter •Changing settings / programming".
Cafe button
Espresso or coffee can be brewed by pressing the 2button. The green illuminated ring flashes while%espresso or coffee is being brewed.
If the2 button is pressed again, the coffee brewing process is terminated.
11
ESPRESSO
2 ESPRESSO
NORM L PLUS
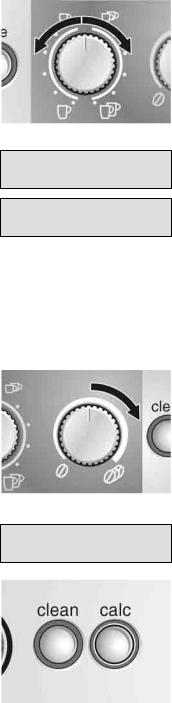
Rotary knob for adjusting the filling |
quantity |
||
( -u /8 -9 |
|
|
|
The amount of liquid can be adjusted |
by the |
rotary |
|
knob ( -u /8 -9. |
|
|
|
One of 6 settings can |
be selected by |
turning |
the |
in an counter)clockwise |
direction: |
|
|
SM LL ESPRESSO ESPRESSO
SM LL OFFEEOFFEE
L RGE OFFEE XXL OFFEE
One of 6 settings can be selected for 2 cups by turning the knob in a clockwise direction:
2 SM LL ESPRESSO
2ESPRESSO
2 SM LL OFFEES
2OFFEES
2 |
L RGE OFFEES |
2 |
XXL OFFEES |
Height adjustable coffee dispenser10 has two nozzles for filling 2 cups.
Rotary knob - 7 for adjusting the coffee strength
The amount of ground coffee can be selected by t rotary knob -7.
VERY MILD
MILD
NORM L
NORM L PLUS
STRONG
VERY STRONG
The selected coffee strength is displayed:
button
4descaling button
If the appliance requires cleaning or descaling, the illuminated ring lights up on the button or the 4 descaling button * see chapter •Cleaning the appliance" or •Descaling the appliance".
12
Preparation
General
Using espresso/ coffee beans
This fully automatic espresso/coffee machine grinds fresh coffee for each brewing process.
Preferably use a mixture of espresso and coffee beans. Store)or deep*freeze in cool, air*tight and
sealed |
containers. |
Deep*frozen |
coffee beans |
can als |
||
be ground. |
|
|
|
|
|
|
Do NOT use |
very |
oily |
or very |
dark*roasted |
coffee |
|
beans |
- This may |
cause a risk of malfunction. |
||||
When |
using |
very |
oily |
beans, |
pour the beans onto |
|
a plate and let some |
of the sticky oils evaporate |
|||||
(this will not |
harm |
the |
aroma |
of the coffee). |
|
|
Tip: To preheat cups, especially small, thick*walled espresso cups, with hot water and rinse out.
Set function selector Uto.
Select the desired amount of coffee and number cups with rotary knob( -u /8 -9.
Select the preferred coffee strength with rotary knob / -7.
Place the cup(s) under the dispenser. If required,
adjust)the height of the dispenser.
Press the2 button. The brewing process now)runs automatically.
Tip: If brewing coffee simultaneously for 2 cups, select)STRONG orV RY STRONG.
i The brewing process can be terminated by
pressing the)2 button or |
button again. |
|
Note: IfADD |
B ANSis displayed despite a full |
|
container, press |
theCafe button |
again. |
13
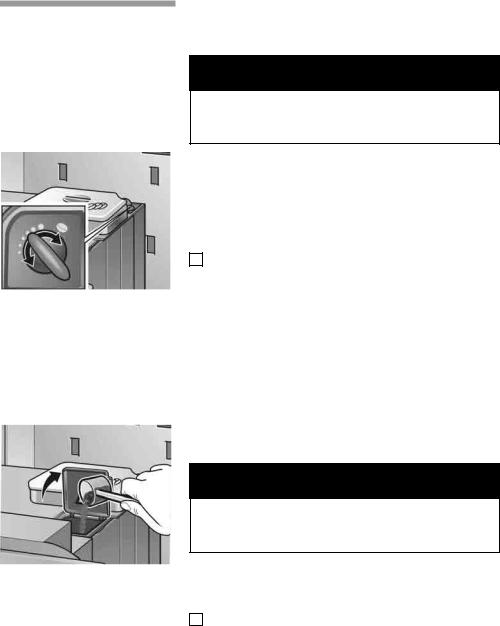
Adjusting the grinding unit
The desired degree of ground coffee can be selected with/the Rotary knob for degree of grou coffee.
CAUTION
Adjust the degree |
of |
grinding only while |
||
the |
grinding |
unit |
is/running! Otherwise |
|
the |
appliance |
may be |
damaged. |
|
Depress button11 and release the inner compartment of the appliance.
Press the2 button.
While the grinding unit is running, turn the knob
select the degree of grinding:
the smaller the dots the finer the ground coffee.
|
i |
The new setting will not become apparent until |
|
|
|
second |
or third cup of coffee. |
|
Return |
inner compartment into original position. |
|
|
Select the desired amount with the rotary knob |
||
|
|||
|
|||
Using ground coffee |
( -u /8 -9. |
||
|
Place cup(s) under the dispenser. If required, |
||
|
|
adjust |
the height of the dispenser. |
|
Depress button11 and release the inner |
||
|
|
compartment of the appliance. |
|
|
Add one to twolevel scoops of medium0fine |
||
|
|
ground |
coffee to the ground coffee duct. |
CAUTION
Do not add whole beans or instant coffee! Add a maximum two scoops of coffee.
Close |
the cover on the ground coffee duct. |
Return |
inner compartment into original position. |
Press |
the2 button. |
i Repeat the process for another cup of preground coffee.
Note: If coffee is not brewed within 90 seconds, the brewing chamber is emptied automatically in order to prevent overfilling. The appliance is rinsed.
14
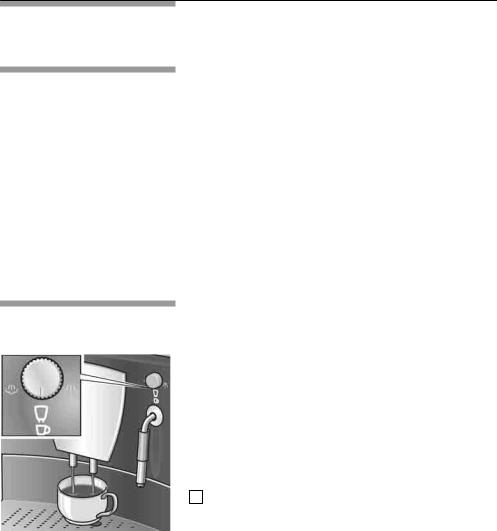
Preparing hot water
Steam for heating drinks
Push down the sleevea |
on |
nozzle |
|
|
||
Place |
an |
appropriate |
cup |
under |
the |
nozzle. |
Rotate |
function selector 0to and |
fill |
the cup. |
|||
|
|
|
|
|
||
|
|
WARNING |
|
|
||
|
|
|
||||
Avoid the risk of scalding! |
|
|
||||
When |
the function |
selector is |
set |
|||
to 0, the nozzle may spurt slightly. |
||||||
Escaping water is very hot. Do not |
||||||
touch |
nozzle or direct |
at people! |
||||
End the process by rotating the function selector back'to U position.
Push up the sleevea on nozzle
Immerse nozzle deep into the liquid which is'to'be'heated.
Slowly rotate function selector=to.
The appliance now heats up for approx. 20 seconds. Then'the liquid is heated.
|
WARNING |
|
|
|
|
|
|
Avoid the risk of scalding! |
|||
When |
the function selector |
is set |
|
to =, the nozzle may spurt slightly. |
|||
Escaping steam is very hot. Do not |
|||
touch |
nozzle or direct at |
people! |
|
End the process by rotating the function selector back'to U position.
Note: When nozzle has cooled down, clean immediately.
Dried residue is difficult to remove.
15
|
|
Push down |
the |
sleevea |
on |
nozzle |
||
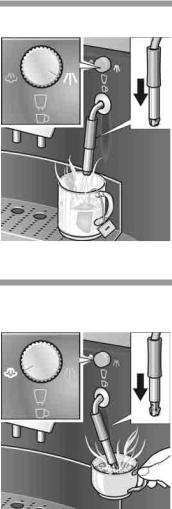
Preparing frothy milk |
||||||||
Fill a cup |
|
1 |
|
of |
milk. |
|||
|
|
approx/. full |
||||||
|
|
|
|
|
3 |
|
|
|
|
|
Immerse nozzle |
|
3 |
|
• (1 cm) into the milk. |
||
|
|
approx./4 |
||||||
Slowly rotate function selector=to.
The appliance now heats up for approx. 20 seconds. Then the milk is frothed.
|
|
WARNING |
|
|
|
|
|||
|
|
|
|
|
|
Avoid the risk of scalding! |
|
|
|
|
When |
the function selector is |
set |
|
|
to =, the nozzle may spurt slightly. |
|
||
|
Escaping steam is very hot. Do not |
|
||
|
touch |
nozzle or direct at people! |
|
|
The |
frothy |
milk can be optimized by rotating the |
||
cup |
slowly. |
|
|
|
End the process by rotating the function selector back/to U position.
Note: When nozzle has cooled down, clean immediately. 1 see •Cleaning the appliance / Cleani the nozzle".
Dried residue is very difficult to remove and impairs formation of the frothy milk.
Tip: Preferably use semi0skimmed milk.
16
Changing settings / programming
The appliance has been set so that coffee can be brewed without any additional programming
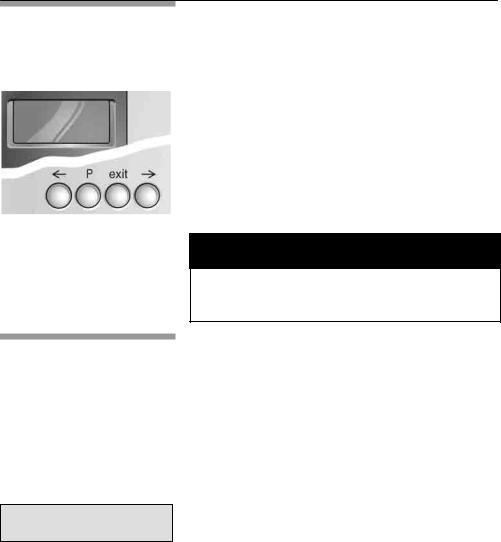
These basic settings can be changed with the function buttons under the display
<Selection button
%Access to programming mode / Save settings
6Terminate programming
> Selection button
Programming
LANGUAGE
ENGLISH
CAUTION
Do not switch off the appliance during programming Otherwise changes will not be saved
The appliance must be switched on before the standard settings can be changed
The following settings can be changed:
-Language
-Water hardness
-Filter
-Temperature
-Current time
-Timer function
-Energy saving mode
Factory settings have a grey background in this chapter ' see example opposite
17

Language
LANGUAGE
ENGLISH
Water hardness
HARDNESS
WATER 1
HARDNESS
WATER 2
HARDNESS
WATER 3
HARDNESS
WATER 4
To change the display to the desired language:
Hold down button% on display for at least 3 seconds
|
Press |
button% until |
|
the display flashes |
|
|
||||
|
Select |
the |
desired |
language with< or> |
||||||
|
Press button% to save |
the setting |
|
|
||||||
|
Press the6 button |
Back |
to standby |
|||||||
i |
The following other languages are available: |
|||||||||
|
|
|
|
|
|
|
|
|||
LANGUE |
|
|
|
|
LINGUA |
|
|
|||
FRANCAIS |
|
|
|
ITALIANO |
|
|
||||
|
|
|
|
|
|
|
|
|||
|
|
|
|
|
|
|
|
|||
SPRAK |
|
|
|
|
IDIOMA |
|
|
|||
SVENSKA |
|
|
|
ESPANOL |
|
|
||||
|
|
|
|
|
|
|
|
|||
|
|
|
|
|
|
|
|
|||
TAAL |
|
|
|
|
JASYK |
|
|
|||
NEDERL. |
|
|
|
RUSSKIY |
|
|
||||
|
|
|
|
|
|
|
|
|
||
|
|
|
|
|
|
|
|
|
||
Sprache |
|
|
|
|
|
|
|
|
||
DEUTSCH |
|
|
|
|
|
|
|
|
||
|
|
|
|
|
||||||
Ascertain the water |
|
hardness |
with the |
supplied |
||||||
|
test strip |
e g : |
|
|
|
= |
hardness |
2 |
|
|
Hold down button% on display for at least 3 seconds
Select HARDNESS WATERwith< or>
Press button% until the number in the display flashes
Select |
the |
ascertained |
hardness with< or> |
Press |
button% to save |
the setting |
|
Press the6 button Back to standby |
|||
Note: It is important for |
the descaling program that |
||
the water |
hardness is set correctly |
||
If external water softeners |
are used in the domestic |
||
water system or if filtered water is used select |
|||
HARDNESS |
WATER |
1 |
|
18
Water filter
FILTER
YES/NEW
FILTER
NO/OLD
The filter 0 reduces calcification, protects the appliance and extends the service life of the appliance.
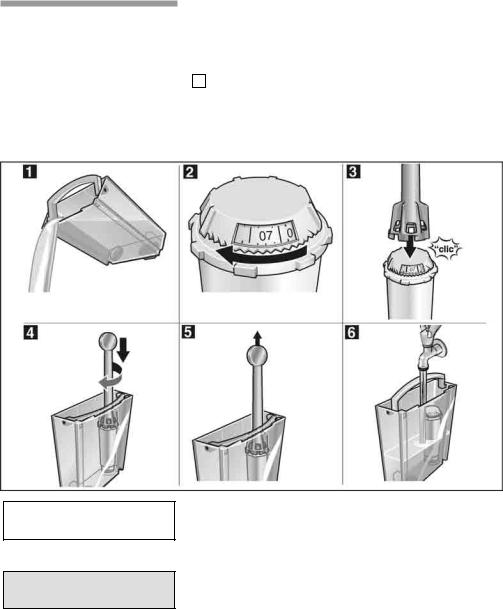
Inserting or changing |
the |
filter |
i The appliance must |
be |
switched on. |
Place a receptacle with a minimum capacity of 0.5 qt. under the nozzle1 .
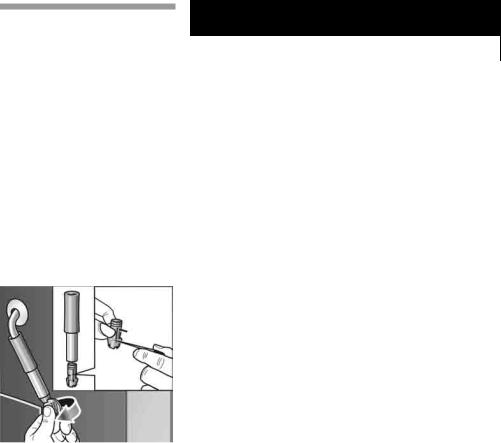
Insert or remove the filter0 with provided tool.
Hold down buttonq on display6 for at least 3 seconds.
Select FILTER |
withr ors. |
|
|||
Press buttonq, |
the |
display |
flashes. |
||
Select FILTER |
YES |
/ |
NEWwithr ors. |
||
Press buttonq to save |
the |
setting. |
|||
Turn function selector to0. |
|
||||
Note: The |
appliance |
is automatically rinsed (approx. |
|||
2 minutes), |
water |
runs |
into |
the |
receptacle and may |
be slightly |
discoloured, |
do |
not |
drink. |
|
19

T R |
|
C FFEEis displayed turn |
function selector2 |
back tou position |
|
i The water |
hardness can still be indicated in the |
|
display program however the setting is not activated
Removing the filter
i The appliance must be switched on
Unscrew the filter20 with the provided tool in an counter clockwise direction
Hold down buttonqon display6 for at least 2 seconds
Select FILTER |
ES |
/ |
withr ors |
|
Press buttonq |
display |
flashes |
||
Select FILTER |
|
/ |
LDwithr ors |
|
Press |
buttonqto save |
the setting |
||
Press |
theo button |
Back |
to standby |
|
Important
Replace the filter after approx two months or a approx 400 brews
Do not |
insert the filter if theIT |
CALCIF. |
||
message lights up First descale |
the |
appliance |
||
Before |
descaling the appliance take the filter ou |
|||
of the |
water tank |
|
|
|
When the filter has been inserted it |
must be |
|||
rinsed |
Follow the displayed instructions |
|||
If the |
|
appliance is always operated with an inse |
||
filter |
it |
should be descaled once or |
twice a ye |
|
even |
if |
the descale message is |
not |
displayed |
If softened water from a domestic descaling unit used a filter should not be inserted
Re.order the filter quoting order no 461732
20
Temperature
TEMP. normal
TEMP. high
TEMP.
MAXIMUM
Current time
TIME:
TIME 14:39
Timer
ON AT:
ON AT 07:45
The coffee temperature can be set with this functio
Hold down button% on display for at least 3 seconds.
Select TEMP. with< or>.
Press button% until |
the display |
flashes. |
|||
Change the setting |
with< or>. |
|
|||
Press |
button% to save the setting. |
|
|||
Press the6 button. Back to standby. |
|||||
The current time is programmed |
with |
this function. |
|||
This is |
required when |
using |
the |
timer |
function. |
The time |
is displayed |
in 24h |
mode. |
|
|
Hold down button% on display for at least 3 seconds.
Select TIME with< or>. |
|
Press |
button%- hours display flashes. |
Change the setting with< or>. |
|
Press |
button%- minutes display flashes. |
Change the setting with< or>. |
|
Press |
button% to save the setting. |
Press the6 button. Back to standby.
The |
set |
time |
will be |
deleted |
- if |
the |
main |
plug is |
disconnected |
-if the appliance is switched off with the power switch 1
- if |
there is a power failure. |
The |
current time must be set again. |
This function is used to set the time at which the appliance automatically switches on.
Hold down button% on display for at least 3 seconds.
Select ON |
ATwith< or>. |
|
|
Press |
button% hours display flashes. |
||
Change the |
setting with< or>. |
|
|
Press |
button% minutes display |
flashes. |
|
Change the |
setting with< or>. |
|
|
Press |
button% to save the setting. |
||
Press |
the6 button. Back to |
standby. |
|
21
Standby mode
OFF IN
4HOURS
OFF IN
2HOURS
Displaying number of!brews
NO.BREWS
86
RESET function
De(activating the |
setting: |
|||
Set |
the |
time |
to |
--:-- <with or>. |
Note: |
The |
current |
time must be set for this functi |
|
run. |
|
|
|
|
i The switch(on time is retained even if there is a power failure or the main power switch1 is turned off.
This function is used to specify after how many h following the last brew the appliance automatically switches to standby mode.
Hold down button% on display for at least 3 seconds.
|
Select OFF |
INwith< or>. |
|
Press button%, hours display flashes. |
|
|
Change the setting with< or>. |
|
|
Press button% to save the setting. |
|
|
Press the6 button. Back to standby. |
|
i |
The switch(off time is retained even if there is |
|
|
power failure |
or the power switch1 is actuated. |
The number of brewed espressos, coffees and preground coffees is displayed here. The number of brews are counted automatically.
Hold down button% on display for at least 3 seconds.
|
Select NO.BREWS |
with< or>. |
|
Press the6 button. Back to standby. |
|
i |
This number cannot be changed! |
|
Possible from •standby" mode only |
||
Simultaneously hold |
down< and> for at |
|
|
least 3 seconds ) |
all saved settings are deleted. |
i |
The display indicates the messages in the Germ |
|
|
language after the |
RESET function. |

System |
messages |
|
|
|
|
|
|
|
|
|
|||
|
|
|
The |
appliance indicates processes and messages |
|||||||||
|
|
|
on display06. |
|
|
|
|
|
|
|
|
||
|
|
|
|
|
|
|
|
|
|
|
|||
|
|
|
Meaning |
|
|
|
|
Remedial action |
|
|
|||
|
|
|
|
|
|
|
|
|
|
||||
|
|
|
No water. |
|
|
|
|
Pour fresh, cold water into |
the |
||||
ADD |
|
|
|
|
|
|
|||||||
WATER |
|
|
|
|
|
|
|
|
water tank. |
|
|
|
|
|
|
|
|
|
|
|
|
|
|
|
|
|
|
|
|
|
Note: There |
is |
always |
|
a small amount |
of water left in |
|||||
|
|
|
|
||||||||||
|
|
|
water tank. |
|
|
|
|
|
|
|
|
|
|
|
|
|
|
|
|
|
|
|
|
|
|
||
|
|
|
Water |
tank |
is |
missing |
|
Insert water |
tank. |
|
|
||
|
|
|
or0not |
inserted |
correctly. |
|
|
|
|
|
|||
|
|
|
|
|
|
|
|
||||||
|
|
|
No coffee beans. |
|
|
Add coffee beans to the bean |
|||||||
ADD |
|
|
|
|
|||||||||
BEANS |
|
|
|
|
|
|
|
|
container 17. |
|
|
|
|
|
|
|
|
|
|
|
|
|
|
|
|
|
|
|
|
|
Note: TheADD |
BEANSdisplay is lit until coffee |
|||||||||
|
|
|
|||||||||||
|
|
|
is brewed again. |
|
|
|
|
|
|
|
|||
|
|
|
|
|
|
|
|
|
|
||||
|
|
|
Water |
pipe |
system |
in |
|
thePress 2button. |
|
|
|||
FILL |
UP |
PRESS |
|
|
|||||||||
PIPE SYS |
CAFE |
appliance is |
empty. |
|
|
|
|
|
|
|
|||
|
|
|
|
|
|
|
|
|
|
|
|||
|
|
|
|
|
|
|
|
||||||
|
|
|
|
|
|
|
|
|
|||||
|
|
|
System |
heated |
up |
by |
|
Allow system to cool down by |
|||||
SYSTEM |
|
|
|||||||||||
TOO |
HOT |
|
Steam |
on. |
|
|
|
|
letting out some |
hot |
water |
||
|
|
|
|
|
|
|
0. |
|
|
|
|
||
|
|
|
|
|
|
|
|
|
|
|
|
|
|
|
|
|
|
|
|
|
|
|
|
|
|
|
|
|
|
|
|
|
|
|
|
|
|
|
|||
|
|
|
Tray |
and |
coffee |
dregRemove, empty, |
and |
re1insert |
|||||
EMPTY |
|
|
|||||||||||
TRAYS |
|
|
tray 1 |
are |
full, or |
con1 tray and |
coffee dreg |
||||||
|
|
tacts 5 soiled. |
|
|
|
tray 1. Clean and dry |
|||||||
|
|
|
|
|
|
||||||||
|
|
|
|
|
|
||||||||
|
|
|
|
|
|
|
|
|
contacts 5. |
|
|
|
|
|
|
|
|
|
|
|
|
|
|
||||
|
|
|
Tray |
and |
coffee |
dregInsert tray |
and |
coffee dreg |
|||||
TRAYS |
|
|
|||||||||||
MISSING |
|
tray 1 |
are |
missing. |
|
|
tray 1. |
|
|
|
|
||
|
|
|
|
|
|
|
|
|
|
|
|
||
|
|
|
|
|
|
|
|
||||||
|
|
|
Note: If coffee dreg tray1 is missing |
only, |
the |
display |
|||||||
|
|
|
|||||||||||
|
|
|
indicates no |
message. |
|
|
|
|
|
|
|||
|
|
|
|
|
|
|
|
|
|
||||
|
|
|
The illuminated |
ring |
on |
|
Run cleaning program |
2 |
|
||||
CLEAN |
|
|
|
|
|||||||||
UNIT |
|
|
the + button is |
lit |
|
see chapter |
•Cleaning |
the |
|||||
|
|
red. |
|
|
|
|
|
appliance". |
|
|
|
|
|
|
|
|
|
|
|
|
|
|
|
|
|
||
|
|
|
|
|
|
|
|
|
|
|
|
||
|
|
|
|
|
|
|
|
|
|||||
|
|
|
The illuminated |
ring |
on |
|
Run descaling program 2 |
||||||
UNIT |
|
|
|
||||||||||
CALCIF. |
|
the 4descaling |
|
|
see chapter |
•Descaling |
the |
||||||
|
button is lit |
red. |
|
|
appliance". |
|
|
|
|
||||
|
|
|
|
|
|
|
|
|
|||||
|
|
|
|
|
|
|
|
|
|||||
|
|
|
|
|
|
|
|
||||||
|
|
|
The filter 0 |
is |
no longer |
Change filter 0 (order |
no. |
||||||
FILTER |
|
||||||||||||
CHANGE |
|
effective after 400 |
brews46 1732) or continue operat1 |
||||||||||
|
or approx. 2 months. |
|
ing the appliance without filter. |
||||||||||
|
|
|
|
||||||||||
|
|
|
|
||||||||||
|
|
|
|
|
|
|
|
|
Change settings. |
|
|
|
|
|
|
|
|
|
|
|
|
|
|
|
|
|
|

|
|
Mean ng |
|
Remed al act on |
|||
|
|
|
|
|
|
|
|
|
|
Door |
of brewing |
unit15 |
Close door |
of brewing unit. |
|
CLOS |
|
||||||
T |
DOOR |
is not |
closed. |
|
|
|
|
|
|
|
|
|
|
||
|
|
|
|
|
|
|
|
|
|
|
|
|
|
|
|
|
|
|
|
|
Set |
function |
selector |
TURN |
ON |
|
|
|
|||
CO |
|
|
|
to U position. |
|||
|
|
|
|
|
|
||
|
|
|
|
|
|
||
|
|
|
|
|
|
|
|
|
|
Note: While the |
messagesADD |
WAT R, CLOS |
|||
|
|
T DOOR, MPTY TRAYSorTRAYS |
|||||
|
|
MISSIN are displayed, coffeecannot |
be brewed. |
||||
|
|
|
|
|
|
|
|
Clean ng the appl ance
|
|
|
|
WARNING |
|
|
|
Da ly clean ng |
|
|
|
||||
|
|
|
|
|
|
|
|
|
|
Avo d |
r sk of electr c shock! |
|
|
|
|
|
|
Pull |
out the mains plug before |
cleaning |
|
|
|
|
|
the |
appliance. |
|
|
|
|
|
|
|
|
|
|
|
|
|
|
|
|
CAUTION |
|
|
|
|
|
|
|
|
|
||
|
|
Do not use scouring agents! |
|
|
|
||
|
|
Never |
immerse the appliance in water! |
|
|||
|
|
Do |
not use a steam cleaner! |
|
|
|
|
|
|
Wipe the outside of the appliance with a damp |
|||||
|
|
cloth. |
|
|
|
|
|
|
|
Rinse out |
the water tank and fill |
with fresh wat |
|||
Remove and empty tray and coffee dreg tray 1. Only the coffee dregs 1traymay be cleaned in the dishwasher!
Clean sensor contacts.
Wipe out the interior of the appliance (trays).
Note: If the appliance is switched on in a cold st with On/Off button or is set to standby after brewi coffee, the appliance is automatically rinsed. The system therefore cleans itself.
4
Cleaning program
CLEAN
UNIT
CLEAN
UNIT COFFEE
If the illuminated ring on+the |
button is lit |
red |
|
and the-messageCLEAN |
UNITis indicated |
on |
|
display when the appliance is switched on, the |
|||
appliance must be cleaned |
as |
quickly as possible. |
|
Clean the appliance with the enclosed cleaning tabl
Do not drop in the cleaning tablet until you are prompted to do so
|
WARNING |
|
|
||
Use care when handling and using |
||
cleaning |
tablet! |
|
Do not place the tablet in mouth. Keep |
||
under lock and key and out of the |
||
reach of children. Avoid contact with |
||
skin and |
eyes. Do not drink |
liquid. |
If tablet comes into contact with eyes, immediately wash eyes with plenty of water and consult a doctor.
If a tablet is swallowed, seek medical advice immediately and produce packaging or label.
These tablets have been specially developed for this appliance and are available from customer service (order no. 31 0575).
i While the cleaning program is running, the illuminated ring on the+ button flashes.
CAUTION
Never interrupt the cleaning program! Never use descaling tablets or other descaling agents.
While the cleaning program is running - approx. 15 minutes - processes and instructions are indicated on display.
5
MPTY TRAYS
UNIT IS
CL ANIN
PILL |
IN CLOS |
DUCT |
T LID |
|
|
PR SS
CA
UNIT IS
CL ANIN
MPTY TRAYS
CO
Start cleaning program
Completely fill water tank19.
Hold down+ buttonfor at least 3 seconds.
Empty and re'insert tray23 and coffee dreg tray 21.
Note: The appliance is automatically cleaned. Wait the next display (approx. 1 minute).
Depress button11 and release the inner compartment of the appliance.
|
Insert |
a cleaning tabletinto the duct16. |
|
Close |
the cover on the ground coffee duct. |
Return the inner compartment into original position.
Press the2 button.
Note: |
The appliance is automatically cleaning. Wait |
for the |
next display (approx. 10 minutes). |
Empty and re'insert tray23 and coffee dreg tray 21.
The cleaning process is complete. The illuminated ring on+ button goes out. The appliance is ready for use again.
26
Cleaning the nozzle
CAUTION
Clean |
the nozzle after each use. |
|
Place a |
suitable receptacle under |
the nozzle. |
Briefly set function selector0to. |
|
|
|
|
|
|
CAUTION |
|
|
|
|
Avoid the risk of scalding! |
|
|
When |
the function selector is |
set |
to 0, the nozzle may spurt slightly. |
||
Escaping water is very hot. Do not |
||
touch |
nozzle or direct at people! |
|
Set function selector Uto position.
Wipe the outside of the nozzle after it has cool down.
Dismantle the nozzle to clean thoroughly. Proceed as follows:
|
Unscrew |
the |
nozzle |
with a coin. |
In particular, |
clean the tip of the nozzle with |
|||
|
a brush |
and |
pointed |
implement. |
Clean all parts with hot water and detergent, rinse and dry (dishwasher'safe).
27

Descaling the appliance
UNITL IF.
If the |
illuminated ring |
on4the button is lit red and |
||
the messageUNIT |
L IF.is displayed when the |
|||
appliance is switched on, descale the appliance |
||||
immediately. If the appliance is not descaled as |
||||
instructed, it may be damaged. |
||||
Note: |
|
|
|
|
If you use a filter0 |
and |
the messageUNIT |
||
L IF. is displayed, |
the filterNOTis activated |
|||
in the settings. Follow the instructions •Change |
||||
settings/ programming |
- Filter". |
|||
If the |
appliance |
is |
always operated with an inserted |
|
filter, it |
should |
be |
descaled once or twice a year, |
|
even if |
the descale |
message is not displayed. |
||
WARNING
Use care storing and handling descaling agent!
Do not place the descaling agent in mouth. Keep under lock and key and out of the reach of children. Avoid contact with skin and eyes. Do not drink liquid.
If a descaling agent comes into contact with eyes, immediately wash eyes with plenty of water and consult a doctor. If a descaling agent is swallowed, seek medical advice immediately and
produce packaging or label.
CAUTION
Never descale the appliance with vinegar or vinegar(based agents! Do not use cleaning tablets.
Never interrupt the descaling program!
i Specially developed and suitable agents are available from customer service.
8
FILTER
NO/OLD
UNIT
CALCIF. COFFEE
EMPTY
TRAYS
DESCALER |
TURN ON |
|
IN TANK |
WATER |
|
|
|
|
|
|
|
UNIT |
DE |
|
SCALING |
|
|
|
|
|
|
|
|
TURN |
ON |
|
COFFEE |
|
|
|
|
|
|
|
|
UNIT |
DE |
|
SCALING |
|
|
|
|
|
EMPTY
TRAYS
i The illuminated ring on 4the descaling button flashes while the descaling program is running.
CAUTION
The descaling program starts in
FILTER NO/OLDprogramming mode only. Never descale the appliance while the filter is inserted.
While the descaling program is running - approx. 35 minutes - processes and instructions are indicated on display.
The specified times may differ.
Start descaling program
Hold down the4 descaling button for at least 3 seconds.
Empty and re,insert tray23 and coffee dreg tray 21.
Fill the water tank with |
water |
and add |
descalin |
|||
agent |
|
|
|
|
|
|
or |
|
|
|
|
|
|
add |
0.5 |
qt. |
of ready,prepared |
descaling |
mixture. |
|
Place |
a |
large receptacle |
under |
nozzle. |
|
|
Set function |
selector 0to |
position. |
|
|||
Note: The appliance is automatically descaled. Descaling solution flows at intervals into the receptacle. Wait for the next message on display (approx. 10 minutes).
Set function selector Uto position.
Note: The appliance is automatically descaled. Descaling solution flows at intervals into the23. tray Wait for the next message on display (approx. 10 minutes).
Empty and re,insert tray23 and coffee dreg tray 21.
29

DD
W TER
TURN ON
W TER
UNIT DE
S LING
TURN ONOFFEE
UNIT DE
S LING
EMPTY LE N TR YS ONT TS
UNIT IS
RINSING
OFFEE
Draining hot water
SYSTEM
TOO HOT
Rinse out the water tank, fill with fresh water u to max and re*insert.
Empty the receptacle and place back under the nozzle.
Set function selector 0to position.
Note: The appliance is automatically rinsed. Water flows at)intervals into the receptacle. Wait for the n message on display (approx. 4 minutes).
Set function selector Uto position.
Note: The appliance is automatically rinsed. Water flows at intervals into the tray.Wait for the next
message |
on display (approx. 4 minutes). |
Empty |
tray and coffee dreg tray1. |
Clean |
and dry contacts5. |
Re*insert tray and coffee dreg tray1.
Wipe splashes off the nozzle and appliance. Note: The appliance is automatically rinsed.
The descaling process is complete. The illuminated ring on4 descaling goes out. The appliance is ready for use again.
The descaling program requires a specific water temperature before it can start. If the water
temperature |
is)too |
high, |
drain hot |
water first! |
||||
Place |
a |
receptacle under |
the |
nozzle. |
||||
Set |
function |
selector |
0to |
position. |
||||
Water |
runs |
into |
the |
receptacle. |
||||
Set |
function |
selector |
Uto position. |
|||||
The required temperature has been reached. The descaling process can start.
0
 Loading...