


TAS 451XUC
TAS 1000UC
EN User manual
EN User manual
FR Notice d’utilisation
FR Manuel d’utilisation
ES Instrucciones de uso
ES Instrucciones de uso
TAS45 USA 090724.INDD 1 |
|
|
24.07.2009 11:22:38 |
|
|
||
|
|
|
|

Table of contents................................... |
EN |
Important Safeguards................................. |
2 |
Safety instructions ...................................... |
3 |
Your TASSIMO machine at a glance .......... |
4 |
First use of your TASSIMO machine .......... |
4 |
MAVEA MAXTRA water iltration system.... |
6 |
Controls and displays ................................. |
8 |
Display items .............................................. |
8 |
Cup size...................................................... |
9 |
How to use your TASSIMO machine ........ |
10 |
Maintenance and day to day care ............ |
12 |
Descaling.................................................. |
13 |
Disposal.................................................... |
14 |
Troubleshooting........................................ |
15 |
Warranty ................................................... |
17 |
BSH customer service.............................. |
59 |
TASSIMO customer service ..................... |
60 |
Table des matières ................................ |
FR |
Mesures de précaution............................. |
20 |
Consignes de sécurité.............................. |
20 |
Aperçu de la machine TASSIMO.............. |
22 |
Mise en service de votre machine |
|
TASSIMO.................................................. |
22 |
Uniquement pour appareils dotés d’un |
|
système de iltration d’eau........................ |
24 |
Éléments de commande et d’afichage .... |
26 |
Taille de la tasse....................................... |
27 |
Utilisation de la machine TASSIMO.......... |
28 |
Entretien et nettoyage quotidien............... |
30 |
Détartrage................................................. |
31 |
Recyclage................................................. |
33 |
Dépannage............................................... |
33 |
Garantie.................................................... |
36 |
BSH Service Aprés Vente......................... |
59 |
TASSIMO Service Aprés Vente ................ |
60 |
Índice ...................................................... |
ES |
Medidas de seguridad importantes .......... |
39 |
Instrucciones de seguridad....................... |
40 |
Descripción general de la máquina |
|
TASSIMO.................................................. |
41 |
Primer uso de la máquina TASSIMO........ |
41 |
Sistema de iltrado de agua |
|
MAVEA MAXTRA ..................................... |
43 |
Controles e indicadores visuales ............. |
45 |
Indicadores luminosos.............................. |
45 |
Tamaño de la taza .................................... |
46 |
Cómo utilizar la máquina TASSIMO ......... |
47 |
Mantenimiento y cuidado diario................ |
49 |
Descalciicación........................................ |
50 |
Eliminación de residuos............................ |
52 |
Resolución de problemas......................... |
53 |
Garantía.................................................... |
56 |
BSH Asistencia técnica............................. |
59 |
TASSIMO Asistencia técnica.................... |
60 |
|
|
TAS45 USA 090724.INDD 2 |
|
|
24.07.2009 11:22:40 |
|
|
|
|
||
|
|
|
|
||
|
|
|
|
||
|
|
|
|
||
|
|
|
|
|
|
|
|
|
|
|
|

8C |
8B8D 8A |
3A |
|
|
|
14 |
13 |
3B 
 12
12
|
6B |
6A |
6C |
|
5 |
6E |
6D |
9 |
|
2 |
1 |
|
 10
10


 4C
4C 
 4B
4B
11
 4A
4A
TAS45 USA 090724.INDD 3 |
|
|
24.07.2009 11:22:44 |
|
|
||
|
|
|
|
EN |
2 |
|
|
! Important Safeguards
When using electrical appliances, basic safety precautions should always be followed, including the following:
1Read all Instructions before using the TASSIMO brewer.
2 Do not touch hot surfaces. Use handles.
3Close supervision is necessary when the appliance is used near children.
4 Do not operate unattended.
5Do not use the TASSIMO brewer for purposes other than its intended use.
6 To disconnect, press the “off” switch, then remove plug from wall outlet.
7Unplug from outlet when not in use and before cleaning. Allow to cool before
replacing or removing parts, and before cleaning the TASSIMO brewer.
8Do not operate damaged TASSIMO brewer. Do not operate the appliance with a damaged cord or plug or after the TASSIMO brewer malfunctions, or
has been dropped or damaged in any manner. Contact the Tassimo Customer Service Department at 1-877-834-7271.
9To protect against ire, electric shock and injury to persons, do not immerse cord, plug, or body of the TASSIMO
brewer in water or in any other liquid. See use and care manual for cleaning.
10The use of accessories or attachments is not recommended by the TASSIMO
brewer manufacturer and may result in fire, electric shock or injury to persons.
11Do not use outdoors or when standing in damp area.
12Do not let cord hang over edge of table or countertops, or touch hot surfaces.
13Do not place housing, water tank or cup stand on or near a hot gas or electric burner, or in a heated oven.
14Scalding may occur if the brewing mechanism is opened during the brewing cycles.
15WARNING: Do not remove side panels of brewer. No user serviceable parts inside. Repair must be done by authorized personnel only.
Save these
Instructions
The TASSIMO machine uses a short
power-supply cord to prevent the cord from tangling and to reduce the risk of tripping
over a longer cord.
Extension cords may be used if care is exercised in their use.
If extension cord is used,
1The marked ‘electrical rating’ (nominal voltage and nominal current) of the electrical rating of the extension cord
should be at least as great as the electrical rating of the appliance, and
2The longer cord should be arranged so that it will not drape over the countertop or tabletop where it can be pulled on by children or tripped over unintentionally.
Appliance is the grounded type. The extension cord should be a grounding-type 3-wire cord.
7/2009
TAS45 USA 090724.INDD 2 |
|
|
24.07.2009 11:22:46 |
|
|
||
|
|
|
|

EN
! Please read this instruction manual and the cleaning/descaling program short instructions carefully and keep for future reference.
This instruction manual describes various models.
Thank you for choosing the TASSIMO hot
beverage system. With TASSIMO, you can enjoy your favorite drink at any time.
Premium coffee, bold espresso, creamy cappuccino and latte, or even a cup of tea or hot chocolate.
Your TASSIMO machine works exclusively with specially developed discs known
as TASSIMO DISCS (T DISCS). When you insert the T DISC, the machine automatically reads the bar code printed on the label. This contains exact details of the amount of water needed, as well as the brewing time and temperature required to prepare the chosen beverage. T DISCS are specially designed for use with the TASSIMO brewing system and offer perfect enjoyment, cup after cup. To ensure long-term enjoyment, please only use the T DISCS specially developed for the TASSIMO machine.
3
Safety instructions
! WARNING
To reduce risk of ire and electric shock, do not remove the side covers. No user serviceable parts inside. Repair should be done by an authorized service person only. Do not immerse in any liquid.
–This appliance is designed for domestic and not commercial use.
–Connect and operate the appliance only in accordance with the speciica- tions on the rating label situated on the base of the machine.
–Do not use your TASSIMO machine if either the power cord or appliance is damaged.
–Use indoors at room temperature only. Do not use more than 6560 feet / 2000 meters above sea level.
–Do not let children or persons with
reduced mental or sensory abilities or limited knowledge and experience use the appliance, unless they are supervised or have been instructed in the use of the appliance by a person who is responsible for their safety.
–Supervise children to ensure that they do not play with the appliance.
–In the event of malfunction, unplug the appliance immediately.
–To avoid potential hazards, repairs such as replacing a damaged cord should only be performed by our service personnel.
–Never immerse the appliance or power
cord in water.
To avoid the risk of scalding
–Never open the brewing unit during the brewing, cleaning or descaling process.
–Please note that the beverages are very hot when dispensed.
–Please take caution when opening the brewer mechanism clamp and handling the T DISCS as some pressure may be released and T DISCS can be hot to the touch.
7/2009
TAS45 USA 090724.INDD 3 |
|
|
24.07.2009 11:22:47 |
|
|
||
|
|
|
|
4
Your TASSIMO machine at a glance
Before reading further, please open the folded diagram page at the start of the manual out to the left.
1 Cord storage compartment
2 On/off switch
3Removable water tank a Lid for water tank
b Float
4Cup stand a Drip tray
b Height adjustment
c Cup shelf
5 Start/stop button
6Indicator lights
a Stand-by A b Automatic O c Manual N d Fill tank P e Descale Q
MAX
CALC
MAX
Bosch Home Appliances
EN
7 Lid
8Brewing unit
a T DISC holder b Piercing unit
c Drink outlet
d Bar code reading window
9Storage compartment for Service T DISC and cleaning / descaling
program short instructions
10Service T DISC
(For i rst use, cleaning and descaling)
11Cleaning / descaling program short instructions
Only for machines with water iltration system:
12Filter cartridge holder
13Filter cartridge
14Memo display
We recommend that you store the Service T DISC and the cleaning / descaling program short instructions in the compartment provided at the back of the appliance.
First use of your TASSIMO machine
Before using your TASSIMO machine for the i rst time, please remove the ilter
cartridge and proceed as follows:
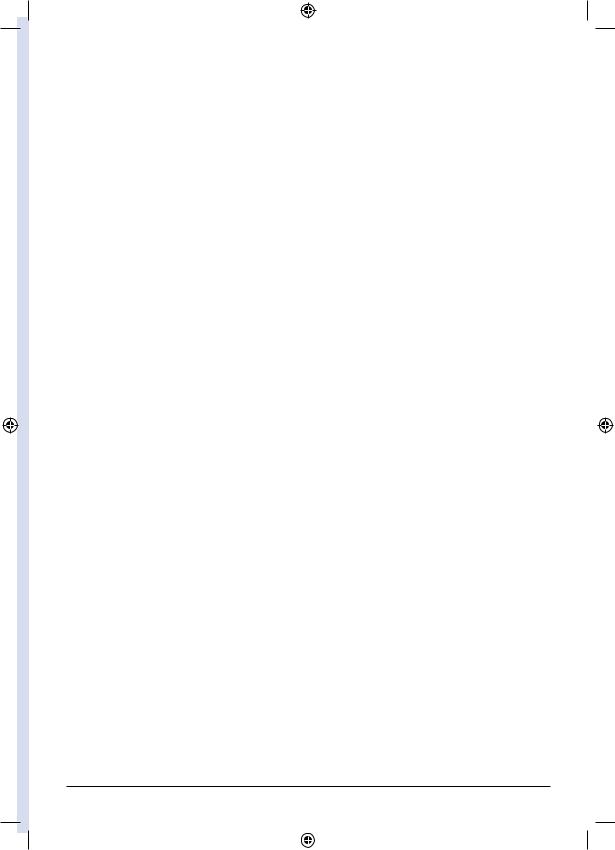
Pull a suitable length of the power cord
out of the storage compartment and plug it into the electrical socket.
Remove and rinse the water tank thoroughly under running water, and i ll it with cool fresh water up to the MAX mark.
Remove the Service T DISC from its compartment at the back of the appliance. Now replace the water tank and push it
i rmly down into place.
TAS45 USA 090724.INDD 4 |
|
|
24.07.2009 11:22:48 |
|
|
||
|
|
|
|
EN
MIN.
8 OZ.
200 ML 
5
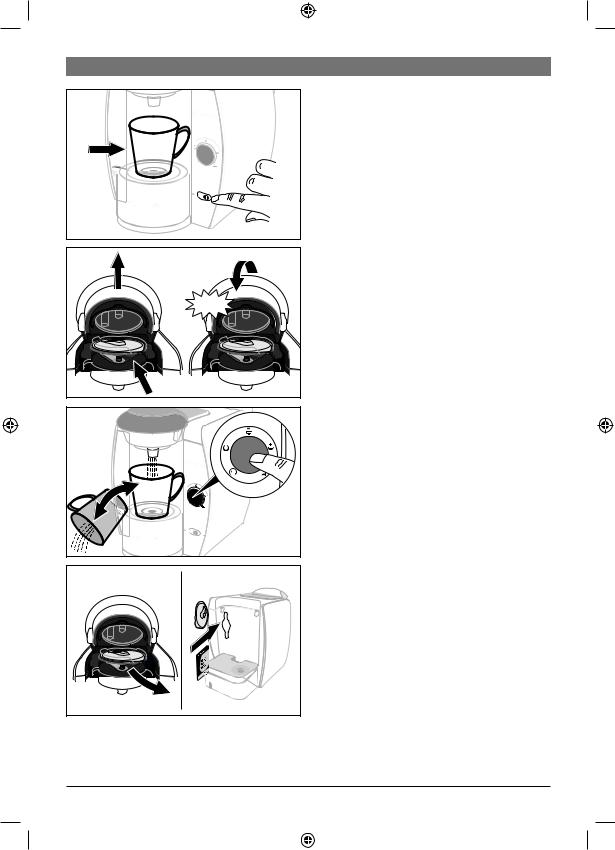
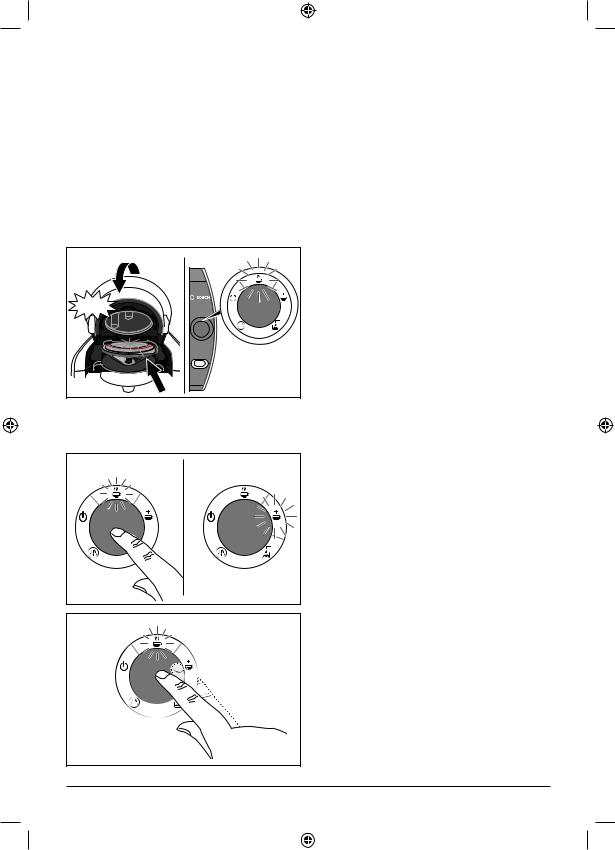
Turn the on/off switch on (I).
All display items will light up briel y and then A Stand-by stays lit.
Select a large cup (min. 8 oz / 200 ml) and place it on the cup shelf.
1. |
3. |
|
click |
|
2. |
5.
MIN. 8 OZ.
200 ML |
4. |
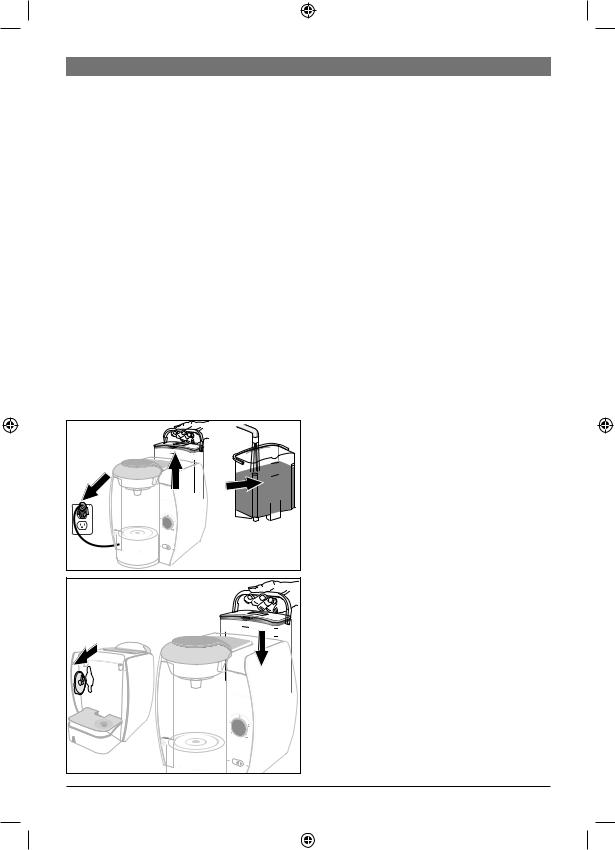
1.Open the brewing unit by lifting the lid.
2.Place the Service T DISC on the
T DISC holder with the barcode facing down. Make sure that the l ap of the
T DISC is secured in the slot to the right.
3.Now close the brewing unit by pushing the lid down i rmly until it audibly clicks into place.
4.Press the start/stop button. The cleaning process starts and dispenses water into the cup.
5.When the process is complete, empty the cup and put it back on the cup stand.
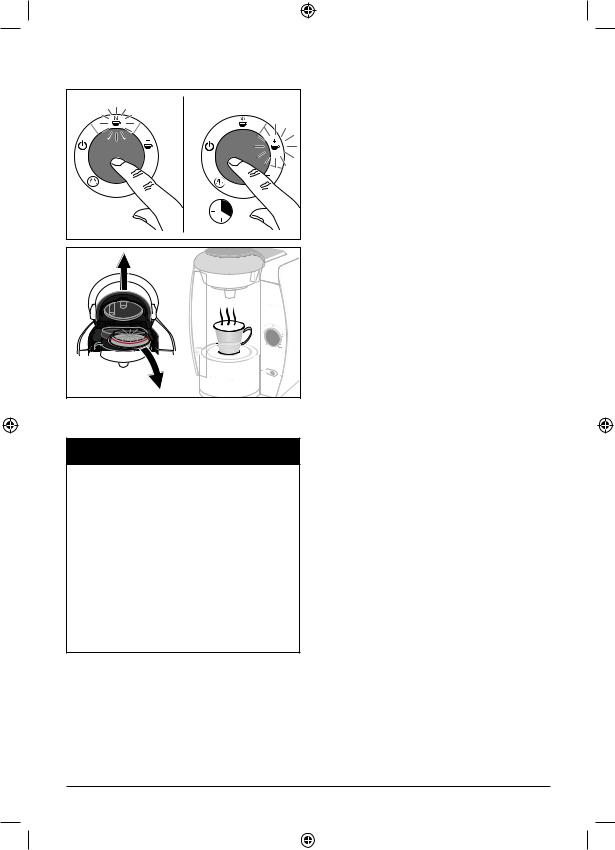
! Important:
Repeat steps 4 & 5 another 4 times.
Open the brewing unit, remove the
Service T DISC and store it in the compartment at the back of the machine behind the water tank.
7/2009
TAS45 USA 090724.INDD 5 |
|
|
24.07.2009 11:22:52 |
|
|
||
|
|
|
|

6
MAVEA MAXTRA water iltration system
Only MAVEA MAXTRA water iltration system cartridges may be used.
The MAVEA MAXTRA cartridges may be obtained from various retailers or from TASSIMO Customer Service Department at 1-877-TDISCS1 or only in the USA on www.tassimo.com.
EN
Your machine can also be operated without a i lter cartridge; simply remove the i lter holder and i lter cartridge from the water tank.
When using a new filter cartridge in the machine, please observe the following procedure:
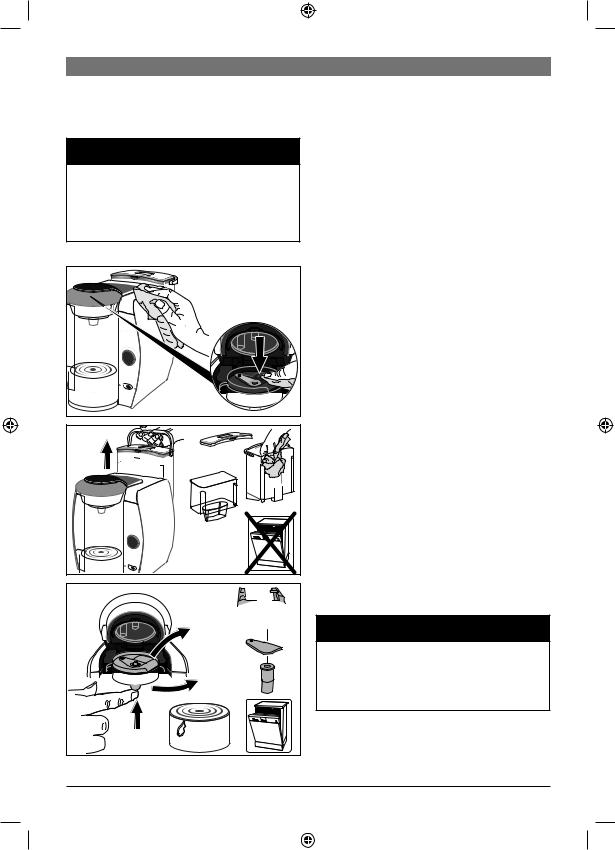
Preparing and inserting MAVEA MAXTRA ilter cartridge
Remove the filter cartridge from the protective wrap.
Immerse the filter cartridge in cold tap water and move it gently back and forth to eliminate air bubbles (approx. 5 sec.).
MAX |
CALC |
CLICK |
Remove the filter holder in the water tank and insert the filter cartridge in the appropriate chamber of the filter holder; it must make a light audible click.
Bosch Home Appliances
TAS45 USA 090724.INDD 6 |
|
|
24.07.2009 11:22:53 |
|
|
||
|
|
|
|

EN |
7 |
|
|
Holding it over the sink, fill the filter
2-3X holder with fresh, cold water and let it filter through.
Please repeat this procedure two to three times.
MAX |
MAX |
CALC |
CALC |
Tip:
If only one bar is visible, please purchase a new filter cartridge.
The MAVEA MAXTRA cartridges may be obtained from various retailers or from TASSIMO Customer Service Department at 1-877-TDISCS1 or only in the USA on www.tassimo.com.
Now place the filter holder with filter cartridge back into the water tank and fill the tank with water.
Activate MAVEA memo display
For maximum filter performance and antiscale protection, the MAVEA MAXTRA
filter cartridge must be replaced every
8 weeks.
To ensure this is done, the cover of the water tank has a built-in MAVEA memo
display. It tells you by means of bars when the filter cartridge should be replaced.
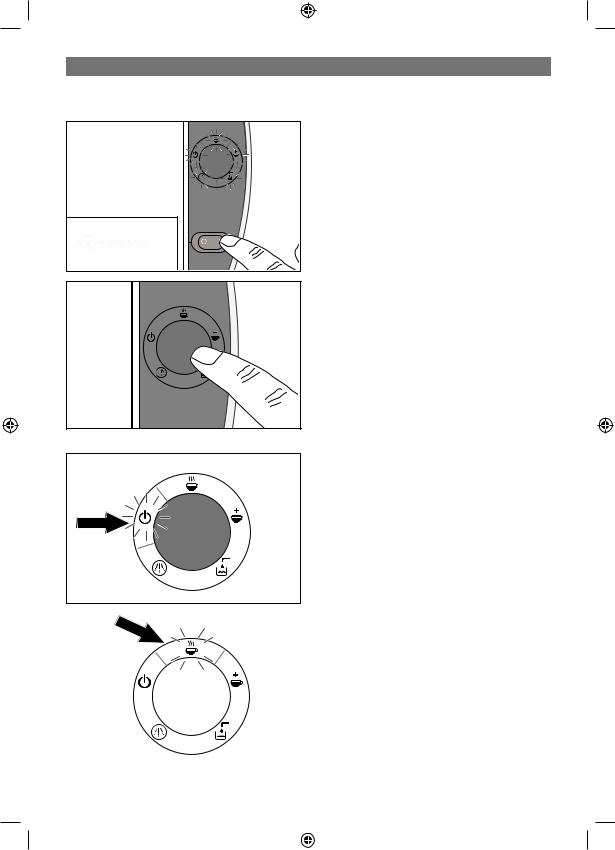
To activate the MAVEA memo display, please press and hold the start button until the four bars briefly light up twice in the
display area.
The blinking dot in the lower right corner tells you that the memo display is working.
All four bars should be visible.
Every two weeks from activate, one bar will
disappear. If no bars are visible after eight weeks and the arrow is blinking, please
replace the filter cartridge.
To remove the filter cartridge, pull it upwards on its tab.
When preparing to use a new filter cartridge, please proceed as described in the section “Preparing and inserting
MAVEA MAXTRA filter cartridge” and reset the MAVEA memo display.
Your TASSIMO machine is now ready for use.
7/2009
TAS45 USA 090724.INDD 7 |
|
|
24.07.2009 11:22:55 |
|
|
||
|
|
|
|
8
Controls and displays
6a
EN
Controls
Power switch
The on/off switch turns your TASSIMO machine on stand-by and off. When it is
switched on, all 5 display items light up briely. The stand-by light A will then
remain on until the appliance is in use.
I Note: To save energy, the appliance should be switched off after each use.
Start/stop button
Once the T DISC of your choice is properly secured in your TASSIMO machine, you may start brewing it by pressing the start/
stop button. Press again to stop the brewing process early, in order to adjust the drink to
your individual taste.
Display items
6a Stand-by A
A Stand-by icon lights up (orange) when the power switch is switched on. Now you can open the brewing unit and insert a
T DISC.
6b |
|
|
|
|
|
|
|
6b Automatic O |
|
|
|
|
|
|
|
||
|
|
|
|
|
|
|
|
|
|
|
|
|
|
|
|
|
O Automatic icon lights up (green) when |
|
|
|
|
|
|
|
|
your TASSIMO machine is ready for use. |
|
|
|
|
|
|
|
||
|
|
|
|
|
|
|
|
O Automatic icon will lash during a brew |
|
|
|
|
|
|
|
|
|
|
|
|
|
|
|
|
|
cycle after the start/stop button is pressed. |
|
|
|
|
|
|
|
|
|
|
|
|
|
|
|
|
|
|
|
|
|
|
|
|
|
|
|
Bosch Home Appliances
TAS45 USA 090724.INDD 8 |
|
|
24.07.2009 11:22:56 |
|
|
||
|
|
|
|
EN |
|
|
|
|
|
|
|
|
9 |
||||||||||
|
|
|
|
|
|
|
|
|
|
|
|
|
|
|
|
|
|
|
6c Manual N |
6c |
|
|
|
|
|
|
|
|
|
|
|
|
|
|
|||||
|
|
|
|
|
|
|
|
|
|
|
|
|
|
N Manual icon lights up (green) when the |
|||||
|
|
|
|
|
|
|
|
|
|
|
|
|
|
|
|
|
|
|
|
|
|
|
|
|
|
|
|
|
|
|
|
|
|
|
|
|
|
|
brewing process is almost complete. If you |
|
|
|
|
|
|
|
|
|
|
|
|
|
|
|
|
|
|
|
|
|
|
|
|
|
|
|
|
|
|
|
|
|
|
|
|
|
|
|
press and hold the start/stop button within |
|
|
|
|
|
|
|
|
|
|
|
|
|
|
|
|
|
|
|
20 seconds of the manual icon lighting up, |
|
|
|
|
|
|
|
|
|
|
|
|
|
|
|
|
|
|
|
you can extend the brewing process in |
|
|
|
|
|
|
|
|
|
|
|
|
|
|
|
|
|
|
|
|
|
|
|
|
|
|
|
|
|
|
|
|
|
|
|
|
|
|
|
order to adjust the strength of your drink. |
|
|
|
|
|
|
|
|
|
|
|
|
|
|
|
|
|
|
|
Using this manual operation will result in a |
|
|
|
|
|
|
|
|
|
|
|
|
|
|
|
|
|
|
|
milder tasting drink. |
|
|
|
|
|
|
|
|
|
|
|
|
|
|
|
|
|
|
|
N Manual icon l ashes during this time. |
|
|
|
|
|
|
|
|
|
|
|
|
|
|
|
|
|
|
|
6d Fill tank P |
|
|
|
|
|
|
|
|
|
|
|
|
|
|
|
|
|
|
|
|
6D |
|
|
|
6E |
|
|
|
|
|
|
|||||||||
|
|
|
|
|
|
|
|
|
|||||||||||
|
|
|
|
|
|
|
|
|
P Fill tank icon l ashes (red) when the |
||||||||||
|
|
|
|
|
|
|
|
|
|
|
|
|
|
|
|
|
|
|
|
|
|
|
|
|
|
|
|
|
|
|
|
|
|
|
|
|
|
|
removable water tank needs to be rei lled. |
|
|
|
|
|
|
|
|
|
|
|
|
|
|
|
|
|
|
|
Remove the water tank, i ll with water and |
|
|
|
|
|
|
|
|
|
|
|
|
|
|
|
|
|
|
||
|
|
|
|
|
|
|
|
|
|
|
|
|
|
|
|
|
|
|
replace it on your TASSIMO machine. |
|
|
|
|
|
|
|
|
|
|
|
|
|
|
|
|
|
|
|
6e Descale Q |
|
|
|
|
|
|
|
|
|
|
|
|
|
|
|
|
|
|
|
|
|
|
|
|
|
|
|
|
|
|
|
|
|
|
|
|
|
|
|
|
|
|
|
|
|
|
|
|
|
|
|
|
|
|
|
|
|
|
|
Q Descale icon lights up (red) when your |
|
|
|
|
|
|
|
|
|
|
|
|
|
|
|
|
|
|
|
|
|
|
|
|
|
|
|
|
|
|
|
|
|
|
|
|
|
|
|
TASSIMO machine needs to be descaled. |
|
|
|
|
|
|
|
|
|
|
|
|
|
|
|
|
|
|
|
Descale your appliance in accordance with |
|
|
|
|
|
|
|
|
|
|
|
|
|
|
|
|
|
|
|
the instructions provided under “Descaling“. |
|
|
|
|
|
|
|
|
|
|
|
|
|
|
|
|
|
|
|
|
Cup size
By adjusting the height of the cup stand,
different sized cups and glasses can be used depending on your choice of drink.
Use the default position for normal cups.
To adjust the shelf for small cups (e.g.
espresso cups), turn the height adjustment control counterclockwise until it clicks into
place.
3 OZ. |
11 OZ. |
16 OZ. |
85 ML |
325 ML |
475 ML |
For large cups or glasses, the cup stand
can be removed completely.
To avoid overl owing, select the appropriate cup size for each type of drink:
Espresso: 3 oz / 85 ml Filter coffee & Café Crema: 11 oz / 325 ml Cappuccino, Latte, Tea & Hot Chocolate
beverages: |
11 oz / 325 ml |
12 oz Coffees: |
min. 16 oz / 475 ml |
7/2009
TAS45 USA 090724.INDD 9 |
|
|
24.07.2009 11:22:57 |
|
|
||
|
|
|
|
10 |
EN |
|
|
How to use your TASSIMO machine
Important: Fill the water tank only with
cool, fresh, uncarbonated water each day for optimum flavor results. Tap water is ok
to use. Do not use chemically softened water.
click |
Your TASSIMO machine is ready for use. When ready, the A stand-by icon is lit.
Place a suitable cup size on the stand according to the type of drink required.
Adjust the height of the stand if necessary,
or remove it altogether for large cups or glasses. Make sure the distance between
the top of the cup and the brewing unit is small to avoid spattering.
Open the brewing unit by lifting the lid. Select a T DISC and insert it in the
T DISC holder with the printed side down.
Make sure that the tab of the T DISC is secured in the slot to the right.
Close the brewing unit by pushing the lid down i rmly until it clicks into place.
A Stand-by l ashes while the machine
reads the barcode.
O Automatic icon lights up (green) when
your TASSIMO machine is ready to brew your drink.
Your TASSIMO machine is designed to make the optimal drink every time. It automatically brews your favorite drink,
however you can also customize your drink with TASSIMO.
1.Automatic:
Start the brewing process by pressing the start/stop button. O Automatic icon will l ash. When the automatic brewing process is complete, N Manual icon lights up. Your drink has been brewed for optimum l avor according to predei ned settings.
2.Customized (manual operation):
a.For a stronger taste and a smaller drink: Start the brewing process by
pressing the start/stop button.
O Automatic icon will l ash. Press the start/stop button at any stage during the
brewing process to stop the process early and adjust the drink to your individual taste. Your drink is now ready. N Manual
icon lights up for 20 sec.
Bosch Home Appliances
TAS45 USA 090724.INDD 10 |
|
|
24.07.2009 11:22:58 |
|
|
||
|
|
|
|
EN |
11 |
|
|
20 SEC.
! CAUTION
To avoid risk of burn or scalding:
–Wait until orange light is displayed before opening the brewing unit.
–Do not open the brewing unit during the brewing process.
–Do not touch the piercing unit immediately after brewing.
–Please note that the beverages are very hot when dispensed.
–T DISC is hot after brewing, please handle with care
b.For a milder flavor and a larger drink:
Start the brewing process by pressing the start/stop button. O Automatic icon l ashes. When the automatic brewing process is complete, N Manual icon lights up. If you press and hold the start/ stop button within 20 seconds, you can
extend the brewing process to get your desired drink strength.
Do not open the brewing unit to remove the T DISC until the orange stand-by light is on.
Open the brewing unit and remove the
T DISC. Now you can sit back and enjoy your hot drink. If you wish, you can prepare the next drink immediately.
If you do not wish to prepare more drinks, we recommend that you turn off
your TASSIMO machine using the on/off switch.
!Note:
There may be short pauses during the brewing process. This is so the drink l avor is optimized.
Do not remove the water tank during the brewing process.
Always remove the T DISC after the brewing process when the orange Standby light comes on. Be careful and hold
it by the tab because the T DISC is hot after brewing your drink. When removing the T DISC, quickly l ip it over so that the printed side is face up to avoid any dripping.
T DISC storage
T DISCS may be stored in their own packaging or in other containers of your
choice. They should be stored in a cool, dry
place. It is not necessary to store T DISCS (especially milk T DISCS) in the refrigerator.
Do not keep them in the freezer. Provided the outer packaging is intact, T DISCS may
be used until the Best Before date which you can i nd in the outer package.
7/2009
TAS45 USA 090724.INDD 11 |
|
|
24.07.2009 11:22:59 |
|
|
||
|
|
|
|
12
Maintenance and day to day care
! WARNING
To reduce risk of ire and electric shock:
Switch off and unplug the appliance before cleaning.
Never immerse the appliance in water. Do not use a steam cleaner.
8D |
MAX |
8A  8B
8B 

8C
EN
Clean your TASSIMO machine regularly to
ensure that it continues to produce optimal quality drinks. If the appliance has been
unused for a long time, always run the
cleaning process with the Service T DISC several times to ensure that the drinks produces are of its normal high quality (see
“First use of your TASSIMO machine“). Do not use scouring agents or steam cleaners.
Clean the barcode scanner regularly
(8d) with a soft, damp cloth, so that the
TASSIMO machine can scan the barcode on the T DISC properly.
Wipe the outside of the appliance with a
soft, damp cloth.
Rinse out the water tank and i lter car- tridge holder by hand and with water only,
and do not place it in the dishwasher.
The lid of the water tank and the service
T DISC cannot be cleaned in the dishwasher.
All parts of the cup stand can be washed
in the dishwasher.
Remove the T DISC holder (8a), the piercing unit (8b) and the drink outlet (8c) and clean thoroughly. All these parts
can also be cleaned in the dishwasher.
When preparing a number of drinks one
after another, the piercing unit may be manually cleaned quickly and easily
under running water.
We recommend that you clean the brewing unit regularly using the Service T DISC as described under “First use of your TASSIMO machine“.
! CAUTION
To avoid risk of burn or scalding:
Piercing unit can be very hot immediately after brewing. Wait until it is cool before removing or cleaning
Bosch Home Appliances
TAS45 USA 090724.INDD 12 |
|
|
24.07.2009 11:23:00 |
|
|
||
|
|
|
|
EN
Important: After use, we recommend that the
Service T DISC be stored in its compartment at the back of the appliance (9).
Note: After dispensing a milky drink or hot chocolate drink, we recommend that you i rst clean the piercing unit and then
the brewing unit using the Service T DISC before making another drink.
9
13
Descaling
Your TASSIMO machine has an automatic descaling program. If Q Descale icon lights up while the appliance is on, the descaling program must be run immediately. If the descaling process is not run as instructed, the appliance may not function properly.
You have the option of purchasing descaling agents from your retailer or the Bosch Customer Service Department (for contact details, see page 59)
! CAUTION
Do not drink the liquids.
Never interrupt the descaling program.
Never use vinegar or vinegar-based products.
Note: Only for machines with water ilter
It is essential to remove the filter holder with the filter cartridge before running the descaling program.
Entkalkung
Descaling
17 oz. |
hot |
500 ml |
|
approx. |
20 min. |
3 sec. |
17 oz. |
500 ml |
Running the descaling program
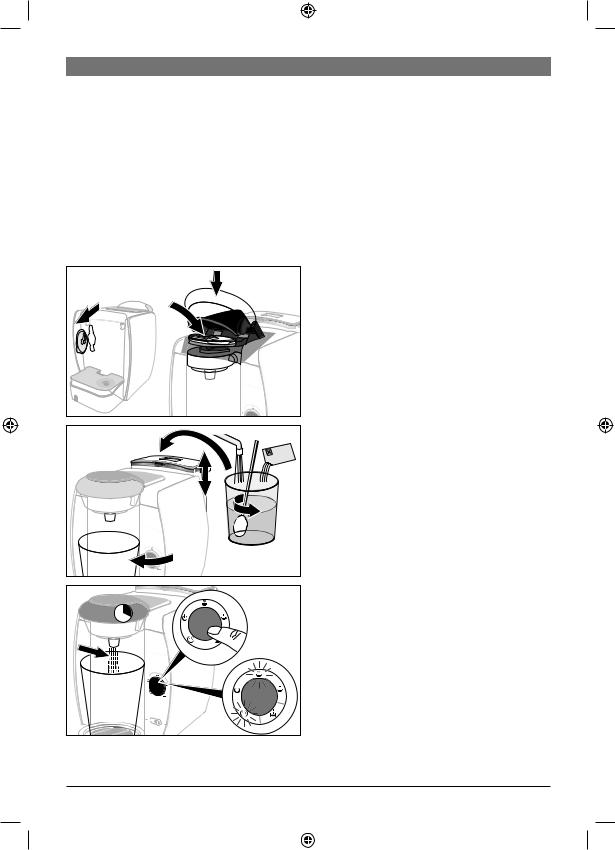
Remove the water tank from your TASSIMO machine and take the Service T DISC out (9). Insert it in the brewing
unit with the barcode face down, and close the clamp down i rmly.
Prepare descaling solution (not vinegarbased) according to the manufacturer‘s instructions. If you cannot i nd an
appropriate descaling agent at various retailers, it is available through TASSIMO
or Bosch Customer Service Department.
Replace the water tank containing the descaling solution back on the machine.
Remove the cup stand and place a suitable container (min. 17 oz / 500 ml capacity) under the drink outlet.
Press and hold the start/stop button for at least 3 seconds to start the descaling program.
7/2009
TAS45 USA 090724.INDD 13 |
|
|
24.07.2009 11:23:03 |
|
|
||
|
|
|
|

14
MAX
17 oz.
500 ml
17 oz.
500 ml
4x |
EN
The program now proceeds automatically
and Q Descale and O Automatic lights l ash. (Duration approx. 20 minutes). The
descaling solution is pumped through
the appliance at intervals and then runs into the container until the water tank is
almost empty. A little liquid is always left in the tank.
A Stand-by icon will light up after approx. 20 minutes of running descaling program.
Empty the container and replace it under the drink outlet.
Rinse the water tank thoroughly and i ll up to the MAX mark with fresh water. Replace it back onto your TASSIMO
machine.
Open and close the brewing unit keeping the Service T DISC in place on the
T DISC holder and press the start/stop button. The machine will rinse itself. Once one cycle is complete, press the button again repeating 4 more times.
The descaling process is complete. Now open the brewing unit, remove
the Service T DISC and store it in the compartment at the back of the machine
(9).
Note: For machines with water ilter
Place the i lter holder with the i lter cartridge into the water tank.
Your TASSIMO machine is ready for use again.
Important: Bosch only manufactures the TASSIMO brewer. It therefore does not guarantee the availability of TASSIMO
T DISCS. For T DISC inquiries, please contact TASSIMO or Bosch Customer
Service Department at 1-877-TDISCS1
(1-877-834-7271) and only in the USA on www.tassimo.com
All rights reserved.
Disposal A
Only for machines with water i ltration system.
Important: There is a built-in battery in the memo display. It must be disposed of
separately according to regulation.
Please dispose of the water tank cover with the memo display at appropriate public collecting sites or at specialty retailers according to ordinances.
Bosch Home Appliances
TAS45 USA 090724.INDD 14 |
|
|
24.07.2009 11:23:05 |
|
|
||
|
|
|
|
EN |
15 |
|
|
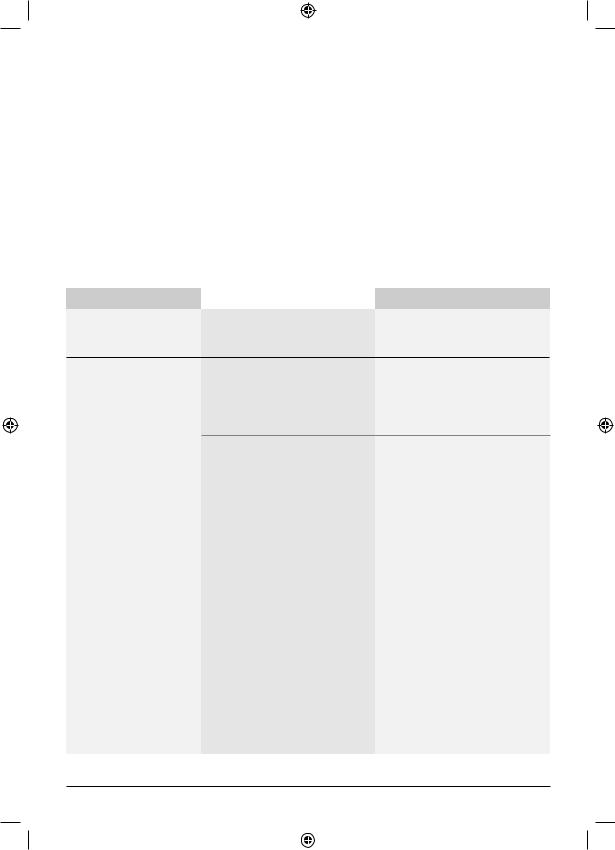
Troubleshooting
The following table provides solutions for problems and
glitches that may arise as you use your TASSIMO machine.
If you do not ind a solution for your speciic problem, or the problem persists after troubleshooting please contact TASSIMO Customer Service at 1-877-TDISCS1 (1-877-834-7271).
! Note: If piercing unit is missing, it may be purchased from TASSIMO
or Bosch Customer Service Department
at 1-877-TDISCS1 or only in the USA on www.tassimo.com.
Problem |
Possible cause |
Solution |
Appliance not working; There is no power supply. |
Check that the appliance is |
|
no symbols light up. |
|
properly plugged into the |
|
|
power supply. |
Machine brews but no The water tank was removed drink dispensed. during the brewing process or
there is air in the system.
Replace the water tank in the appropriate position in your TASSIMO machine. Start a cleaning process with the Service T DISC.
|
The loat in the water tank is |
Clean the water tank and |
|
stuck. |
ensure the loat can move. |
O Automatic mode |
No T DISC inserted. |
Check if T DISC has been |
not working, appliance |
|
inserted. |
remains in stand-by |
The barcode could not be |
Clean the bar code reading |
mode. |
detected. |
window and try again or |
|
|
smooth the barcode on the |
|
|
T DISC out with your thumb. |
|
|
|
|
|
Use another T DISC. |
|
|
|
|
|
If problems persist contact |
|
|
TASSIMO Customer Service |
|
|
Department at 1-877- |
|
|
TDISCS1. |
|
|
|
O Automatic mode |
The barcode could not be |
Clean the bar code reading |
skipped, appliance |
detected. |
window. |
goes straight to |
|
Use another T DISC. |
N Manual mode. |
|
|
|
You can still prepare the drink |
|
|
|
|
|
|
by holding down the start/stop |
|
|
button. |
|
|
|
More Customer Service information is available online at www.tassimo.com
7/2009
TAS45 USA 090724.INDD 15 |
|
|
24.07.2009 11:23:05 |
|
|
||
|
|
|
|
16 |
|
EN |
|
|
|
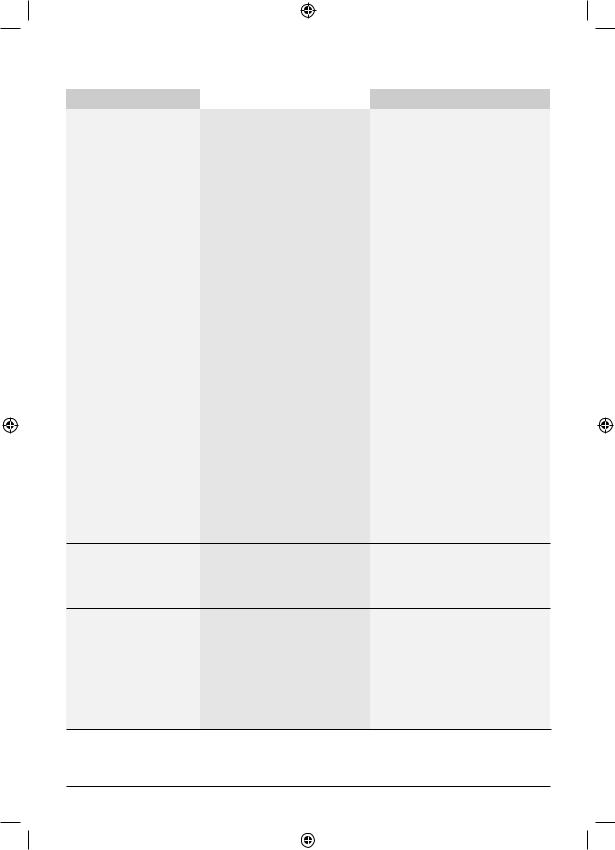
Problem |
Possible cause |
Solution |
The quality of |
The drink outlet is clogged |
Remove the drink outlet |
the crema has |
or dirty. |
from the brewing unit and |
deteriorated. |
|
detach the piercing unit. After |
|
|
cleaning everything thoroughly, |
|
|
reassemble the parts and |
|
|
replace them in the brewing |
|
|
unit. |
|
|
|
Brewing unit cannot be |
Piercing unit / T DISC holder |
Insert the T DISC holder and |
securely closed. |
is not properly inserted. |
piercing unit properly. |
|
|
|
|
The T DISC is not inserted |
Re-insert the T DISC and make |
|
properly. |
sure it is properly positioned. |
|
|
|
|
The brewing unit is not |
Push the clamp down irmly |
|
properly closed. |
until it audibly clicks into place. |
Water dripping from |
The T DISC is damaged or |
Stop the brewing process, |
the brewing unit. |
leaky. |
remove the T DISC and clean |
|
|
the brewing unit. |
|
|
|
|
The piercing unit is either |
Check to ensure that the |
|
not inserted or not inserted |
piercing unit is inserted |
|
properly. |
properly. |
|
|
|
Water on the surface |
Water from condensation. |
Condensation may occur and is |
under the cup stand. |
|
not a fault. Remove it by wiping |
|
|
with a cloth. |
|
|
|
Service T DISC is |
The Service T DISC must |
damaged or lost. |
always be used for cleaning |
|
and descaling processes. |
A Service T DISC can be purchased from TASSIMO Customer Service Department at 1-877- TDISCS1 and only in the USA on www.tassimo.com.
P Fill tank lights up |
The loat in the water tank is |
even though there is |
stuck. |
suficient water in the |
|
tank. |
|
Clean the water tank and ensure that the loat can move.
P 6d and Q 6e are lashing simulta-
neously and it is not
possible to prepare drinks.
There is an error on the |
Turn the machine off using |
machine. |
the on/off switch, wait ap- |
|
proximately 5 minutes and turn |
|
the machine back on. If P 6d |
|
and Q 6e are still lashing, |
|
please contact the TASSIMO |
|
Customer Services Department |
|
at 1-877-TDISCS1. |
More Customer Service information is available online at www.tassimo.com
Bosch Home Appliances
TAS45 USA 090724.INDD 16 |
|
|
24.07.2009 11:23:05 |
|
|
||
|
|
|
|
EN |
|
17 |
|
|
|
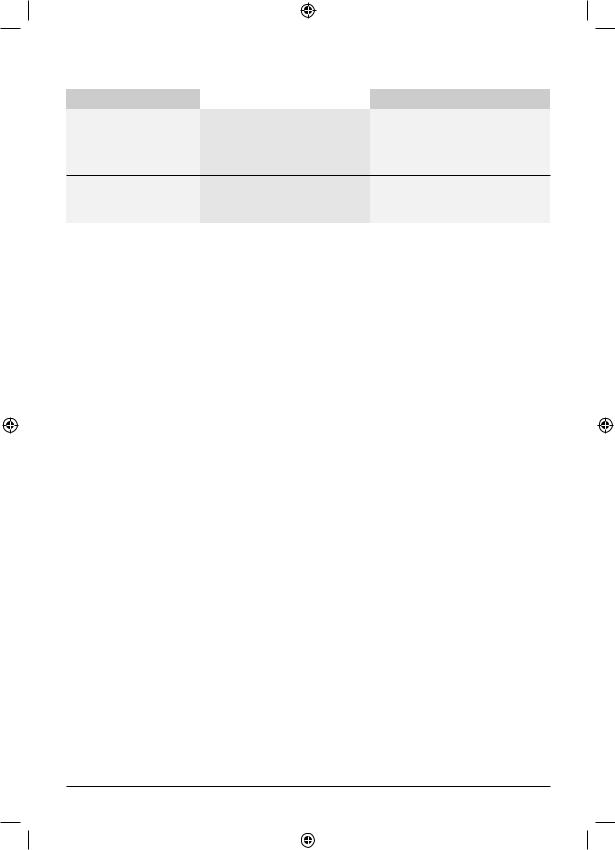
Problem |
Possible cause |
Solution |
|
|
|
Q Descale flashes even though you are using filtered or soft water.
Even filtered water contains |
Descale the appliance. |
small amounts of dissolved |
|
lime. |
|
Memo display in water Reset or purchase new one. |
Contact the TASSIMO |
tank lid is not working |
Customer Service Department |
anymore. |
at 1-877-TDISCS1. |
|
|
More Customer Service information is available online at www.tassimo.com
7/2009
TAS45 USA 090724.INDD 17 |
|
|
24.07.2009 11:23:05 |
|
|
||
|
|
|
|
 Loading...