


Use and Care Manual For Household Use Only
Notice d'utilisation et d'entretien Usage domestique uniquement Manual de instrucciones y cuidado Sólo para uso doméstico
Automatic Coffee Center
TCA 6301 UC

Use and Care Manual . . . . . . . . . . . . . . . . . . . . . . . |
3 |
READ THIS MANUAL thoroughly for important safety |
|
and operating instructions before using this appliance. |
|
Notice d'utilisation et d'entretien . . . . . . . . . . . . . 34
Avant tout utilisation, LISEZ ATTENTIVEMENT ce manuel, vous y trouverez des consignes importantes portant sur la sécurité et le fonctionnement de votre appareil.
Manual de instrucciones y cuidado . . . . . . . . . . . 67 LEA ESTAS INSTRUCCIONES cuidadosamente
por las instrucciones importantes de seguridad
y funcionamiento antes de utilizar el electrodoméstico.
2

Table of Contents |
|
IMPORTANT SAFEGUARDS . . . . . . . . . . . . . . . . . |
4 |
Overview . . . . . . . . . . . . . . . . . . . . . . . . . . . . . . . . . . |
6 |
Before using your appliance for the firstHtime . . |
8 |
Filling up the pipe system . . . . . . . . . . . . . . . . . . . . . . |
9 |
Controls . . . . . . . . . . . . . . . . . . . . . . . . . . . . . . . . . . . |
10 |
Preparation . . . . . . . . . . . . . . . . . . . . . . . . . . . . . . . . |
13 |
General . . . . . . . . . . . . . . . . . . . . . . . . . . . . . . . . . . . . |
13 |
Using espresso/ coffee:beans . . . . . . . . . . . . . . . . . . |
13 |
Adjusting the grinding:unit . . . . . . . . . . . . . . . . . . . . . |
14 |
Using ground espresso/coffee powder . . . . . . . . . . |
14 |
Preparing hot water . . . . . . . . . . . . . . . . . . . . . . . . . . |
15 |
Steam for heating drinks . . . . . . . . . . . . . . . . . . . . . . |
15 |
Preparing frothy milk . . . . . . . . . . . . . . . . . . . . . . . . . . |
16 |
Changing settings / programming . . . . . . . . . . . . |
17 |
Programming . . . . . . . . . . . . . . . . . . . . . . . . . . . . . . . |
17 |
Language . . . . . . . . . . . . . . . . . . . . . . . . . . . . . . . . . . |
18 |
Water hardness . . . . . . . . . . . . . . . . . . . . . . . . . . . . . . |
18 |
Filter . . . . . . . . . . . . . . . . . . . . . . . . . . . . . . . . . . . . . . . |
19 |
Temperature . . . . . . . . . . . . . . . . . . . . . . . . . . . . . . . . |
21 |
Current time . . . . . . . . . . . . . . . . . . . . . . . . . . . . . . . . |
21 |
Timer . . . . . . . . . . . . . . . . . . . . . . . . . . . . . . . . . . . . . . |
21 |
Standby mode . . . . . . . . . . . . . . . . . . . . . . . . . . . . . . |
22 |
Displaying number of:brews . . . . . . . . . . . . . . . . . . . |
22 |
RESET function . . . . . . . . . . . . . . . . . . . . . . . . . . . . . . |
22 |
System messages . . . . . . . . . . . . . . . . . . . . . . . . . . |
23 |
Cleaning the appliance . . . . . . . . . . . . . . . . . . . . . . |
24 |
Descaling the appliance . . . . . . . . . . . . . . . . . . . . . |
28 |
Eliminating minor malfunctions yourself . . . . . . . |
31 |
BOSCH Small Appliance Warranty . . . . . . . . . . . . |
33 |
3

d IMPORTANT SAFEGUARDS
WARNING: A risk of fire and electric shock exists in all electrical appliances and may cause personal injury or death.
When using electrical appliances, basic safety precautions should always be followed, including the following:
1.Read all instructions.
2.Do not touch hot surfaces. Use handles or knobs.
3.To protect against fire, electric shock and personal injury, do not immerse cord, plug or appliance in water or other liquids.
4.Close supervision is necessary when any appliance is used by or near children.
5.Unplug from outlet when not in use and before cleaning. Allow the appliance to cool before putting on or taking off parts, and before cleaning the appliance.
6.Do not operate any appliance with a damaged cord or plug or after the appliance malfunctions, or has been damaged in any way. Return appliance to the nearest authorized service facility for examination, repair or adjustment.
7.The use of accessory attachments not recommended by the appliance manufacturer may result in fire, electric shock, or personal injury.
8.Do not use outdoors.
9.Do not let the cord hang over the edge of a table or counter, or touch hot surfaces.
10.Do not place on or near a hot gas or electric burner, or in a heated oven.
11.To disconnect, turn any control to •off" then remove plug from wall outlet.
12.Do not use appliance for other than intended use.
13.Use extreme caution when disposing hot steam.
SAVE THESE INSTRUCTIONS
HOUSEHOLD USE ONLY
4
d CAUTION
This appliance is designed for domestic use and for processing normal quantities of food and not for industrial use. Any servicing other than cleaning and user maintenance should be performed by an authorized service representative.
qDo not immerse base in water or try to disassemble.
qTo reduce the risk of fire or electric shock, do not open the enclosure. No user serviceable parts inside. Repair should be done by authorized service personnel only.
qCheck voltage to be sure that the voltage indicated on the name plate agrees with your voltage.
qNever use warm or hot water to fill the water container! Use cold water only.
qKeep your hands and the cord away from hot parts of the appliance during operation.
qNever clean with scouring powders or hard implements.
qNever use a steam cleaner.
qCarefully read the operating instructions and keep in the document holder 10!
qDo not touch the grinder!
A short power supply cord is provided to reduce the risk resulting from becoming entangled in or tripping over a longer cord.
Extension cords are available and may be used if care is exercised in their use. If an extension cord is used,
1.the marked electrical rating of the extension cord should be at least as great as the electrical rating of the appliance, and
2.the longer cord should be arranged so that it will not drape over the counter of
a table top where it could be pulled on by children or tripped over unintentionally.
This appliance has a polarized plug (one prong is wider than the other). As a safety feature, this plug will fit into a polarized outlet only one way. If the plug does not fill fully into the outlet, reverse the plug. If it still does not fit, contact a qualified electrician. Do not modify the plug in any way.
5
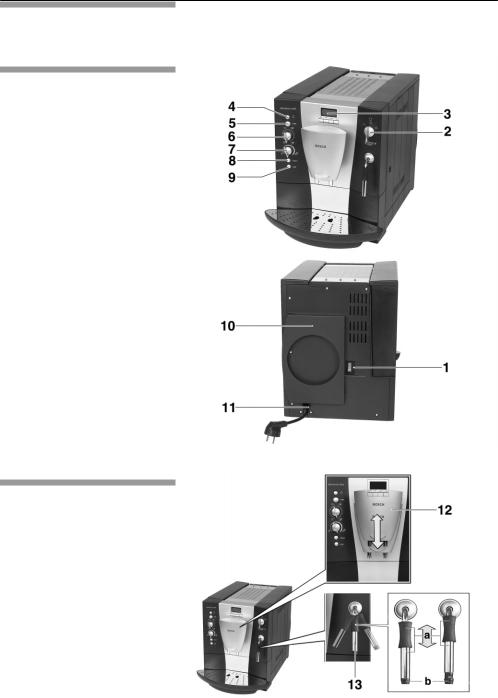
Overview
Controls
1 Power switch
2Function selector coffee/steam/hot water
3Display with 4 function buttons
4d button
5 2button
6Rotary knob for adjusting the filling quantity
(- (/ 8- 8
7Rotary knob for adjusting the coffee strength
/ - 7
8 +button
9 4descaling button
Appliance components
10Document holder
11Cord storage
12HeightBadjustable coffee outlet
13Hinged nozzle (frothing milk/steam/ hot water)
a Sleeve
b Nozzle
6
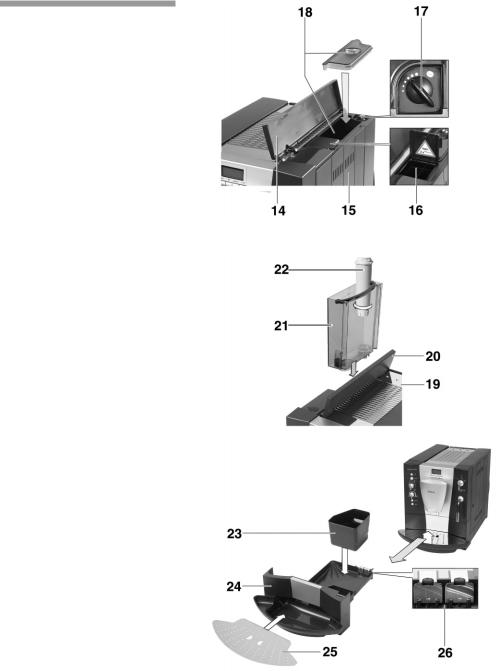
Appliance components
14Right cover of the appliance
15Door for brewing unit
16Ground coffee duct with cover = cleaning tablet duct
17Rotary knob for degree of ground coffee
18Bean container with aroma cover
19Cup shelf (pre?warming function)
20Left cover of the appliance
21Detachable water tank
22Filter
23Coffee dregs tray (dishwasher?proof)
24Tray (for residual water)
25Grille
26Contacts
7

Before using your appliance for the first3time
General
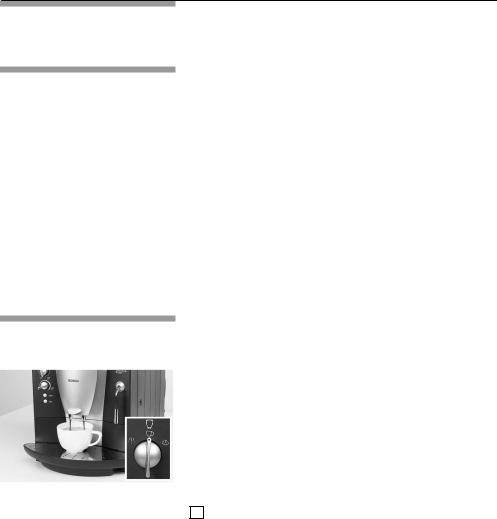
Switching on the appliance
COFFEE
Fill the respective containers with pure water and coffee beans only.
Do not usecoffee beans which have been glazed, caramelized or treated with other additives containing sugar.
Ascertain the water hardness with the enclosed test strip. If a hardness value other than 3 is indicated, switch on the appliance and program accordingly (see page 18).
qPull the power cord out of the cord storage and connect.
qFill water tank 21 with cold fresh water. Do not fill above •max." mark.
qFill the bean container 18 with coffee beans.
qSet power switch 1 to I.
qSet function selector 2 to z.
qPress button d 4.
iThe appliance is ready for use when the illuminated ringsJon button d 4 and on the 2 button 5 are litJgreen.
Note: If the appliance is being used for the first time or has not been operated for a prolonged period, the first cup of coffee will not have the full aroma and should not be drunk.
8

Filling up the pipe system
FILL UP |
PRESS |
PIPE-SYS |
CAFE |
|
|
|
|
PIPE-SYS |
|
FILLS UP |
|
|
|
For production reasons when switched on for the first time, the water pipe system in the appliance may occasionally have to be refilled:
q Press the 2button 5.
Selecting the language
LANGUAGE
ENGLISH
To change the display to the desired language:
qHold down button %on the display 3 for at least 3 seconds.
qPress button %until the display flashes.
qSelect the desired language with <or >.
qPress button %to save the language.
qPress the &button.
9
Controls
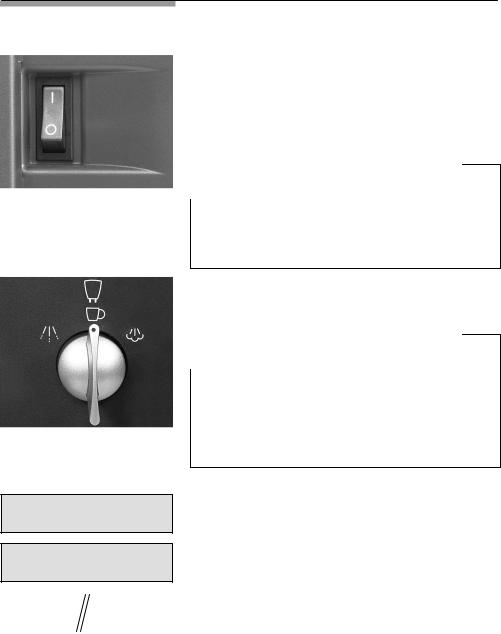
Power switch
The power switch on the rear of the appliance switches the0power supply on or off.
When the power switch has been switched on, the illuminated ring on button d 4 is lit green. The appliance is in standby mode.
d |
CAUTION |
d |
|
|
|
COFFEE
WATER
ON
UNIT IS |
MIND THE |
HEATING |
STEAM |
|
|
|
|
STEAM |
|
ON |
|
|
|
Do not press the power switch while the appliance is0operating.
Do not switch off the appliance until it is in standby mode.
Function selector
Coffee, hot water or steam can be selected by rotating function selector.
d |
WARNING |
d |
|
|
|
Risk of scalding!
When the function selector is set to 0or =, the nozzle may spurt slightly. Escaping water or steam is very hot. Do not touch nozzle 13 or direct at people!
The settings are displayed:
Coffee on z
Hot water on 0
Steam on =
Displays during the brief heating up period for Steam on.
10
UNIT IS HEATING
UNIT IS RINSING
Display
Display indicates the settings, the processes which are running and any messages issued by the appliance.
The appliance has been programmed ex works with standard settings for optimum operation. These settings can be changed ; see chapter •Changing settings / programming".
Button d
The appliance is switched on or set to standby mode with button d.
When button d is pressed, the appliance heats up and is then rinsed. The illuminated ring on button d flashes during this process.
The appliance is not rinsed if:
-the appliance was still warm when switched on or
-coffee was not discharged before the appliance was switched to •standby" mode.
Heating and washing processes are displayed.
While coffee is being brewed, button d is assigned a stop function. The process is terminated by pressing button d.
i4 hours after the last coffee was brewed, a rinsing process is automatically actuated and the appliance switches to •standby" mode.
These settings can be changed ; see chapter •Changing settings / programming".
cafe button
Espresso or coffee can be brewed by pressing the 2button. The green illuminated ring flashes whileGespresso or coffee is being brewed.
If the 2button is pressed again, the coffee brewing process is terminated.
11
ESPRESSO
2 ESPRESSO
NORMAL PLUS
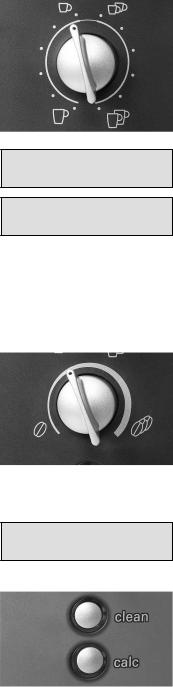
Rotary knob for adjusting the filling quantity
(- (/ 8- 8
The amount of liquid is adjusted with rotary knob (- (/ 8- 8.
One of 6 settings can be selected by rotating the knob in an counter=clockwise direction:
SMALL ESPRESSO ESPRESSO
SMALL COFFEE COFFEE
LARGE COFFEE XXL COFFEE
One of 6 settings can be selected for 2 cups by rotating the knob in a clockwise direction:
2 SMALL ESPRESSO
2ESPRESSO
2SMALL COFFEES
2COFFEES
2LARGE COFFEES
2XXL COFFEES
Outlet 12 has two nozzles for filling 2 cups.
Rotary knob /- 7for adjusting the coffee strength.
The amount of ground coffee is selected with rotary knob /- 7.
VERY MILD
MILD
NORMAL
NORMAL PLUS
STRONG
VERY STRONG
The selected coffee strength is displayed:
+button
4descaling button
If the appliance requires cleaning or descaling, the illuminated ring lights up on the +button or the 4descaling button D see chapter •Cleaning the appliance" or •Descaling the appliance".
12
Preparation
General
Using espresso/ coffee9beans
This fully automatic espresso/coffee machine grinds fresh coffee for each brewing process.
Preferably use a mixture of espresso and coffee beans. Store;or deep<freeze in cool, air<tight and sealed containers. Deep<frozen coffee beans can also be ground.
Do NOT use very oily or very dark<roasted coffee beans - Risk of malfunction.
When using very oily beans, pour the beans onto a plate and let some of the sticky oils evaporate (this will not harm the aroma of the coffee).
Tip: Prewarm cup(s), especially small, thick<walled espresso cups, on the cup shelf 19 or fill with hot water and rinse out.
Set function selector to z.
qSelect the desired amount of coffee and number of cups with rotary knob ( - (/ 8- 8.
qSelect the preferred coffee strength with rotary knob /- 7.
qPlace the cup(s) under the outlet. If required, adjust;the height of the outlet.
qPress the 2button. The brewing process now;runs automatically.
Tip: If brewing coffee simultaneously for 2 cups, select;STRONG or VERY STRONG.
iThe brewing process can be terminated by pressing the;2button or button d again.
Note: If ADD BEANS is displayed despite a full bean container, the grinder must still be filled automatically.
q Press the 2button again.
13

Adjusting the grinding8unit
Using ground espresso/coffee powder
qThe desired degree of ground coffee can be selected with3the Rotary knob for degree of ground coffee.
d |
CAUTION |
d |
|
|
|
Adjust the degree of grinding only while the grinding unit is3running! Otherwise the appliance may be damaged.
qOpen the right cover of the appliance.
qPress the 2button.
qWhile the grinding unit is running, turn the knob to select the degree of grinding:
the smaller the dots the finer the ground coffee.
iThe new setting will not become apparent until the second or third cup of coffee.
qSelect the desired amount with the rotary knob (- (/ 8- 8.
qPlace cup(s) under the outlet. If required, adjust the height of the outlet.
qOpen the right cover of the appliance and the cover on3the ground coffee duct.
qAdd one to two level scoops of mediumJfine ground coffee to the ground coffee duct.
d |
CAUTION |
d |
|
|
|
Do not add whole beans or instant coffee! Add a maximum two scoops of coffee.
qClose the cover on the ground coffee duct and the right cover of the appliance.
qPress the 2button.
iRepeat the process for another cup of preground coffee.
Note: If coffee is not brewed within 90 seconds, the brewing chamber is emptied automatically in order to prevent overfilling. The appliance is rinsed.
14
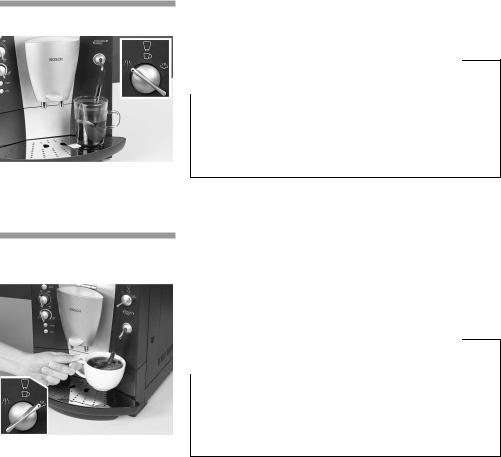
Preparing hot water
Steam for heating drinks
qPush down the sleeve a on nozzle.
qPlace an appropriate cup under the nozzle.
qRotate function selector to 0and fill the cup.
d |
WARNING |
d |
|
|
|
Risk of scalding!
When the function selector is set
to 0, the nozzle may spurt slightly. Escaping water is very hot. Do not touch nozzle or direct at people!
qEnd the process by rotating the function selector backAto z.
qPush up the sleeve a on nozzle
qImmerse nozzle deep into the liquid which isAtoAbeAheated.
qSlowly rotate function selector to =.
The appliance now heats up for approx. seconds. ThenAthe liquid is heated.
d |
WARNING |
d |
|
|
|
Risk of scalding!
When the function selector is set
to =, the nozzle may spurt slightly. Escaping steam is very hot. Do not touch nozzle or direct at people!
qEnd the process by rotating the function selector backAto z.
Note: When nozzle has cooled down, clean immediately.
Dried residue is difficult to remove.
15
Preparing frothy milk
qPush down the sleeve a on nozzle.
qFill a cup approx. 1/3 full of milk.
qImmerse nozzle approx. 1 cm into the milk.
qSlowly rotate function selector to =. The appliance now heats up for approx. 20 seconds. Then the milk is frothed.
d |
WARNING |
d |
|
|
|
Risk of scalding!
When the function selector is set
to =, the nozzle may spurt slightly. Escaping steam is very hot. Do not touch nozzle or direct at people!
qThe frothy milk can be optimized by rotating the cup slowly.
qEnd the process by rotating the function selector backIto z.
Note: When nozzle has cooled down, clean immediately. J see •Cleaning the appliance / Cleaning the nozzle".
Dried residue is very difficult to remove and impairs formation of the frothy milk.
Tip: Preferably use semiNskimmed milk.
16
Changing settings / programming
Programming
LANGUAGE
ENGLISH
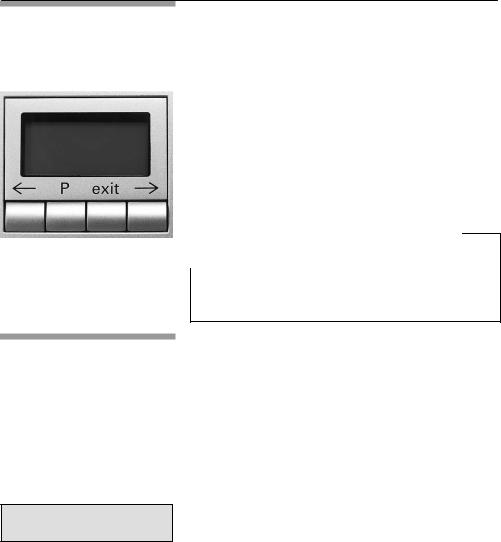
The appliance has been set ex works so that coffee can be brewed without any additional programming.
These basic settings can be changed with the function buttons under display.
<Selection button
%Access to programming mode / Save settings
&Terminate programming
>Selection button
d |
CAUTION |
d |
|
|
|
Do not switch off the appliance during programming. Otherwise changes will not be saved.
The appliance must be switched on before the standard settings can be changed.
The following settings can be changed:
-Language
-Water hardness
-Filter
-Temperature
-Current time
-Timer function
-Energy saving mode
Factory settings have a grey background in this chapter F see example opposite.
17
Language
LANGUAGE
ENGLISH
Water hardness
HARDNESS
WATER 1
HARDNESS
WATER 2
HARDNESS
WATER 3
HARDNESS
WATER 4
To change the display to the desired language:
qHold down button %on display for at least 3 seconds.
qPress button %until the display flashes.
qSelect the desired language with <or >.
qPress button %to save the setting.
qPress the &button. Back to standby.
i The following other languages are available:
LANGUE |
|
LINGUA |
FRANCAIS |
|
ITALIANO |
|
|
|
|
|
|
SPRAK |
|
IDIOMA |
SVENSKA |
|
ESPANOL |
|
|
|
|
|
|
TAAL |
|
JASYK |
NEDERL. |
|
RUSSKIY |
|
|
|
|
|
|
Sprache |
|
|
DEUTSCH |
|
|
|
|
|
qAscertain the water hardness with the supplied test strip, e.g.:  = hardness 2
qHold down button %on display for at least 3 seconds.
q Select HARDNESS WATER with <or>.
qPress button %until the number in the display flashes.
qSelect the ascertained hardness with <or >.
qPress button %to save the setting.
qPress the &button. Back to standby.
Note: It is important for the descaling program that the water hardness is set correctly.
If external water softeners are used in the domestic water system or if filtered water is used, select
HARDNESS WATER 1.
18

Filter
FILTER YES/NEW
FILTER NO/OLD
The filter 22 reduces calcification, protects the appliance and extends the service life of the appliance.
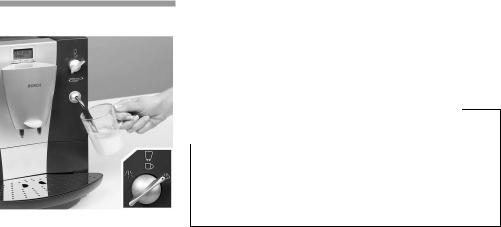
Inserting or changing the filter
i The appliance must be switched on.
qPlace utensil with a min. capacity of 17 oz. under the nozzle 13.
qScrew in the filter 22 with the screw>in aid or change.
qHold down button %on display 3 for at least 3 seconds.
qSelect FILTER with<or >.
qPress button %, the display flashes.
q Select FILTER YES / NEW with <or
>.
qPress button %to save the setting.
qRotate function selector 2 to 0.
Note: The appliance is automatically rinsed (approx. 2 min.), water runs into the utensil and may be slightly discolored, do not drink.
19

q TURN ON COFFEE is displayed, rotate function selector 2 back to z.
iThe water hardness can still be indicated in the display program, however the setting is not activated.
Removing the filter
i The appliance must be switched on.
qUnscrew the filter 22 with the screw;in aid in a counter2clockwise direction.
qHold down button %on display 3 for at least 2 seconds.
q Select FILTER |
YES |
/ NO with <or >. |
q Press button %, display flashes. |
||
q Select FILTER |
NO |
/ OLD with <or >. |
qPress button %to save the setting.
qPress the 6button. Back to standby.
Important |
|
q After approx. 13.2 gallons (FILTER |
CHANGE) |
or after 2 months at the latest the filter is exhausted |
|
and must be replaced. |
|
q Do not insert the filter if the UNIT |
CALCIF. |
message lights up. First descale the appliance.
qBefore descaling the appliance, take the filter out of the water tank.
qWhen the filter has been inserted, it must be rinsed. Follow the displayed instructions.
qIf the appliance is always operated with an inserted filter, it should be descaled once or twice a year, even if the descale message is not displayed.
qIf softened water from a domestic descaling unit is used, a filter should not be inserted.
Re;order the filter quoting order no. 461732.
20
Temperature
TEMP. normal
TEMP. high
TEMP.
MAXIMUM
Current time
TIME --:--
TIME 14:39
Timer
ON AT --:--
ON AT 07:45
The coffee temperature can be set with this function.
qHold down button %on display for at least 3 seconds.
qSelect TEMP. with <or >.
qPress button %until the display flashes.
qChange the setting with <or >.
qPress button %to save the setting.
qPress the &button. Back to standby.
The current time is programmed with this function. This is required when using the timer function. The time is displayed in 24h mode.
qHold down button %on display for at least 3 seconds.
qSelect TIME with <or >.
qPress button %- hours display flashes.
qChange the setting with <or>.
qPress button %- minutes display flashes.
qChange the setting with <or >.
qPress button %to save the setting.
qPress the &button. Back to standby. The set time will be deleted
- if the mains plug is pulled out,
- if the appliance is switched off with the power switch 1,
- if there is a power failure.
The current time must be set again.
This function is used to set the time at which the appliance automatically switches on.
qHold down button %on display for at least 3 seconds.
q Select ON AT with <or>.
qPress button %, hours display flashes.
qChange the setting with <or >.
qPress button %, minutes display flashes.
qChange the setting with <or >.
qPress button %to save the setting.
qPress the &button. Back to standby.
21

Standby mode
OFF IN 4 HOURS
OFF IN 2 HOURS
Displaying number of;brews
NO.BREWS
- - - 86
RESET function
De#activating the setting:
q Set the time to --:-- with <or>.
Note: The current time must be set for this function to run.
iThe switch#on time is retained even if there is a power failure or the power switch 1 is actuated.
This function is used to specify after how many hours following the last brew the appliance automatically switches to standby mode.
qHold down button %on display for at least 3 seconds.
q Select OFF IN with <or>.
qPress button %, hours display flashes.
qChange the setting with <or >.
qPress button %to save the setting.
qPress the &button. Back to standby.
iThe switch#off time is retained even if there is a power failure or the power switch 1 is actuated.
The number of brewed espressos, coffees and preground coffees is displayed here. The number of brews are counted automatically.
qHold down button %on display for at least 3 seconds.
qSelect NO.BREWS with<or>.
qPress the &button. Back to standby.
i This number cannot be changed!
Possible from •standby" mode only
qSimultaneously hold down <and >for at least 3 seconds F all saved settings are deleted.
iThe display indicates the messages in the german language after the RESET function.
22

System messages
The appliance indicates processes and messages on display33.
|
|
Meaning |
Remedial action |
|
|
|
|
|
|
No water. |
Pour fresh, cold water into the |
ADD |
|
||
WATER |
|
|
water tank. |
|
|
|
|
|
|
Note: There is always a small amount of water left in the |
|
|
|
||
|
|
water tank. |
|
|
|
|
|
|
|
Water tank is missing |
Insert water tank. |
|
|
or3not inserted correctly. |
|
|
|
|
|
|
|
No coffee beans. |
Add coffee beans to the bean |
ADD |
|
||
BEANS |
|
|
container 18. |
|
|
|
|
|
|
Note: The ADD BEANS display is lit until coffee |
|
|
|
||
|
|
is brewed again. |
|
|
|
|
|
FILL UP |
PRESS |
Water pipe system in the |
Press 2button. |
PIPE-SYS |
CAFE |
appliance is empty. |
|
|
|
||
|
|
|
|
|
|
|
|
|
|
System heated up by |
Allow system to cool down by |
SYSTEM |
|
||
TOO HOT |
|
Steam on. |
letting out some hot water |
|
|
0. |
|
|
|
|
|
|
|
|
|
|
|
|
|
|
|
Tray 24 and coffee dregs |
Remove, empty, and reAinsert |
EMPTY |
|
||
TRAYS |
|
tray 23 are full, or conA |
tray 24 and coffee dregs |
|
tacts 26 soiled. |
tray 23. Clean and dry |
|
|
|
||
|
|
||
|
|
|
contacts 26. |
|
|
|
|
|
|
Tray 24 and coffee dregs |
Insert tray 24 and coffee |
TRAYS |
|
||
MISSING |
|
tray 23 are missing. |
dregs tray 23. |
|
|
|
|
|
|
|
|
|
|
|
|
|
|
The illuminated ring on |
Run cleaning program E |
CLEAN |
|
||
UNIT |
|
the +button is lit |
see chapter •Cleaning the |
|
red. |
appliance". |
|
|
|
||
|
|
||
|
|
|
|
|
|
The illuminated ring on |
Run descaling program E |
UNIT |
|
||
CALCIF. |
|
the 4descaling |
see chapter •Descaling the |
|
button is lit red. |
appliance". |
|
|
|
||
|
|
||
|
|
|
|
|
|
The filter 22 is no longer |
Change filter 22 (order no. |
FILTER |
|
||
CHANGE |
|
effective after |
46 1732) or continue operatA |
|
13.2 gallons or approx. |
ing the appliance without filter. |
|
|
|
||
|
|
||
|
|
2 months. |
Change settings. |
|
|
|
|
23

|
Meaning |
Remedial action |
|
|
|
|
Door of brewing unit 15 |
Close door of brewing unit. |
CLOSE |
||
THE DOOR |
is not closed. |
|
|
|
|
|
|
|
|
|
|
|
|
Set function selector to z. |
TURN ON |
|
|
COFFEE |
|
|
|
|
|
|
|
|
|
Note: While the messages ADD WATER, CLOSE |
|
|
THE DOOR, EMPTY |
TRAYS or TRAYS |
|
MISSING are displayed, coffee cannot be brewed. |
|
|
|
|
Cleaning the appliance
Daily cleaning
d |
WARNING |
d |
|
|
|
Risk of electric shock!
Pull out the mains plug before cleaning the appliance.
d |
CAUTION |
d |
|
|
|
Do not use scouring agents!
Never immerse the appliance in water!
Do not use a steam cleaner!
qWipe the outside of the appliance with a damp cloth.
qRinse out the water tank and fill with fresh water.
qRemove and empty tray 24 and coffee dregs tray 23. Only the coffee dregs tray 23 may be cleaned in the dishwasher!
qClean contacts.
qWipe out or vacuum the interior of the appliance (trays).
Note: If the appliance is switched on in a cold state with button d or is set to standby after brewing coffee, the appliance is automatically rinsed. The system therefore cleans itself.
24

Cleaning program
CLEAN
UNIT
CLEAN
UNIT COFFEE
If the illuminated ring on the +button is lit red and the2message CLEAN UNIT is indicated on display when the appliance is switched on, the appliance must be cleaned as quickly as possible.
Clean the appliance with the enclosed cleaning tablet.
Do not drop in the cleaning tablet until you are prompted to do so.
d |
WARNING |
d |
|
|
|
Risk of injury!
Do not place the tablet in mouth. Keep under lock and key and out of the reach of children. Avoid contact with skin and eyes. Do not drink liquid.
If tablet comes into contact with eyes, immediately wash eyes with plenty of water and consult a doctor.
If a tablet is swallowed, seek medical advice immediately and produce packaging or label.
These tablets have been specially developed for this appliance and are available from customer service (order no. 31 0655).
iWhile the cleaning program is running, the illuminated ring on the +button flashes.
d |
CAUTION |
d |
|
|
|
Never interrupt the cleaning program! Never use descaling tablets or other descaling agents.
While the cleaning program is running -
approx. 15 minutes - processes and instructions are indicated on display.
25

EMPTY
TRAYS
UNIT IS
CLEANING
PILL IN |
CLOSE |
DUCT |
THE LID |
|
|
|
|
PRESS |
|
CAFE |
|
|
|
UNIT IS
CLEANING
EMPTY
TRAYS
COFFEE
Start cleaning program
qCompletely fill water tank 21.
qHold down+button for at least 3 seconds.
qEmpty and re6insert tray 24 and coffee dregs tray 23.
Note: The appliance is automatically cleaned. Wait for the next display (approx. 1 minute).
qOpen the right cover of the appliance 14 and duct cover for ground coffee 16.
qInsert a cleaning tablet into the duct 16.
qClose the cover on the ground coffee duct and the right cover of the appliance.
qPress the 2button.
Note: The appliance is automatically cleaned. Wait for the next display (approx. 10 minutes).
qEmpty and re6insert tray 24 and coffee dregs tray 23.
The cleaning process is complete. The illuminated ring on +button goes out. The appliance is ready for use again.
26
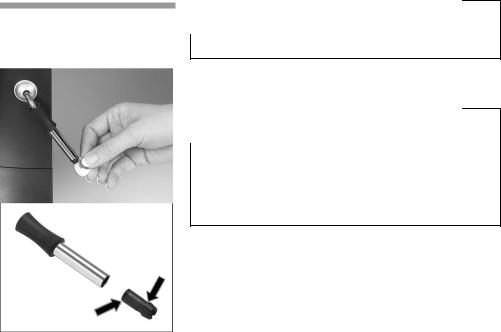
Cleaning the nozzle
d |
CAUTION |
d |
|
|
|
Clean the nozzle after each use.
qPlace a suitable receptacle under the nozzle.
qBriefly set function selector to 0.
d |
WARNING |
d |
|
|
|
Risk of scalding!
When the function selector is set
to 0, the nozzle may spurt slightly. Escaping water is very hot. Do not touch nozzle or direct at people!
qSet function selector to z.
qWipe the outside of the nozzle after it has cooled down.
qDismantle the nozzle to clean thoroughly. Proceed as follows:
qUnscrew the nozzle with a coin.
qIn particular, clean the tip of the nozzle with a brush and pointed implement.
qClean all parts with hot water and detergent, rinse and dry (dishwasherFproof).
27

Descaling the appliance
UNIT CALCIF.
If the illuminated ring on the 4button is lit red and the message UNIT CALCIF. is displayed when the appliance is switched on, descale the appliance immediately. If the appliance is not descaled as instructed, it may be damaged.
Note:
If you use a filter 22 and the message UNIT CALCIF. is displayed, the filter is NOT activated in the settings. Follow the instructions •Change settings/ programming - Filter".
If the appliance is always operated with an inserted filter, it should be descaled once or twice a year, even if the descale message is not displayed.
d |
|
WARNING |
d |
|
|
|
|
|
Risk of injury! |
|
|
|
Do not place the descaling agent in |
|
|
|
mouth. Keep under lock and key and |
|
|
|
out of the reach of children. Avoid |
|
|
|
contact with skin and eyes. Do not |
|
|
|
drink |
liquid. |
|
If a descaling agent comes into contact with eyes, immediately wash eyes with plenty of water and consult a doctor. If a descaling agent is swallowed, seek medical advice immediately and produce packaging or label.
d |
CAUTION |
d |
|
|
|
Never descale the appliance with vinegar or vinegarFbased agents! Do not use cleaning tablets.
Never interrupt the descaling program!
iSpecially developed and suitable agents are available from customer service
(order no.: 31 0451).
28

FILTER
NO/OLD
UNIT
CALCIF. COFFEE
EMPTY
TRAYS
DESCALER TURN ON IN TANK WATER
UNIT DE-
SCALING
TURN ON
COFFEE
UNIT DE-
SCALING
EMPTY
TRAYS
iThe illuminated ring on the 4descaling button flashes while the descaling program is running.
d |
CAUTION |
d |
|
|
|
The descaling program starts in
FILTER NO/OLD programming mode only. Never descale the appliance while the filter is inserted.
While the descaling program is running -
approx. 35 minutes - processes and instructions are indicated on display.
The specified times may differ.
Start descaling program
qHold down the4descaling button for at least 3 seconds.
qEmpty and reAinsert tray 24 and coffee dregs tray 23.
qFill the water tank with water and add descaling agent (total volume of liquid 17 oz.)
or
qadd 17 oz. of readyAprepared descaling mixture.
qPlace an appropriately large receptacle under nozzle.
qSet function selector to 0.
Note: The appliance is automatically descaled. Descaling solution flows at intervals into the receptacle. Wait for the next display on display (approx. 10 minutes).
q Set function selector to z.
Note: The appliance is automatically descaled. Descaling solution flows at intervals into the tray 24. Wait for the next display on display
(approx. 10 minutes).
qEmpty and reAinsert tray 24 and coffee dregs tray 23.
29

ADD
WATER
TURN ON
WATER
UNIT DE-
SCALING
TURN ON
COFFEE
UNIT DE-
SCALING
EMPTY CLEAN TRAYS CONTACTS
UNIT IS
RINSING
COFFEE
Draining hot water
SYSTEM
TOO HOT
qRinse out the water tank, fill with fresh water up to max and re4insert.
qEmpty the receptacle and place back under the nozzle.
qSet function selector to 0.
Note: The appliance is automatically rinsed. Water flows at?intervals into the receptacle. Wait for the next display on display (approx. 4 minutes).
q Set function selector to z.
Note: The appliance is automatically rinsed. Water flows at intervals into the tray 24. Wait for the next display on display (approx. 4 minutes).
qEmpty tray 24 and coffee dregs tray 23.
qClean and dry contacts 26.
qRe4insert tray 24 and coffee dregs tray 23.
qWipe splashes off the nozzle and appliance. Note: The appliance is automatically rinsed.
The descaling process is complete. The illuminated ring on 4descaling goes out. The appliance is ready for use again.
The descaling program requires a specific water temperature before it can start. If the water temperature is?too high, drain hot water first!
qPlace a suitable receptacle under the nozzle.
qSet function selector to 0. Water runs into the receptacle.
qSet function selector to z.
The required temperature has been reached. The descaling process can start.
30
 Loading...