


HP2 ENDURO

Maintenance instructions for sporty off-roading
HP2 Enduro

Motorcycle data/dealership details
Motorcycle data
Model
Vehicle identification number
Colour code
Date of first registration
Registration number
Dealership details
Person to contact in Service department
Ms/Mr
Phone number
Dealership address/phone number
(company stamp)

Details described or illustrated in this booklet may
differ from the motorcycle's
actual specification as purchased, the accessories fitted or the national-market
specification. No claims will
be entertained as a result of
such discrepancies.
Dimensions, weights, fuel
consumption and performance data are quoted to the
customary tolerances.
The right to modify designs,
equipment and accessories is
reserved.
Errors and omissions excepted.
© 2005 BMW Motorrad
Not to be reproduced either
wholly or in part without written permission from BMW
Motorrad, After Sales.
Printed in Germany.

9
BMW Motorrad
Order No:
01 41 7698 321
08.2005
1st edition GB/RF
BMW recommends
The Ultimate
Riding Machine

Maintenance instructions for sporty
off-roading
These maintenance instructions were compiled for riders
who want to leave metalled
roads and use their motorcycles for sporty off-roading.
Before you go off-roading,
BMW Motorrad recommends
installing the accessories
supplied with the motorcycle.
In this way you can effectively
protect parts of the motorcycle that could otherwise be
at risk.
These maintenance instructions describe the procedures for installing the off-road
accessories and the procedure for removing the numberplate carrier and the mirrors.
Use the headlight guard
only when off-roading.
Riding on public roads with
the headlight guard fitted to
the motorcycle is prohibited.
Sporty off-roading inevitably
increases wear and tear on
the motorcycle, so extra
checks and maintenance
work over and above those
described in the Rider's
Manual are necessary. They
too are described in this
publication.
All the work described in
these Maintenance Instructions is supplementary to the
standard maintenance work
described in the "Service"
section of the Rider's Manual.
Please bear in mind that if the
motorcycle is used for sporty
off-roading, you must comply
with these additional maintenance instructions in order to
keep the motorcycle in good
running order.
Some of the work calls for
special tools and a thorough
knowledge of motorcycles.
If you are in doubt consult a
specialist workshop, preferably your authorised BMW
Motorrad dealer.
Damage not attended
to in good time or inadequately repaired can result in
consequential damage to the
motorcycle.
Consult a specialist workshop, preferably an authorised BMW Motorrad dealer,
as soon as possible if you
discover that the motorcycle
is damaged.

Table of Contents
You can also consult the index at the end of this Rider's
Manual if you want to find a
particular topic or item of information.
1 General instructions . . . 3
Notes on these
Maintenance
Instructions . . . . . . . . . . . . . . 4
Abbreviations and
symbols . . . . . . . . . . . . . . . . . . 4
2 Overview . . . . . . . . . . . . . . 5
Conversion work
preparatory to
off-roading . . . . . . . . . . . . . . . 6
Maintenance work . . . . . . . . 6
3 Installing and removing
components . . . . . . . . . . . 9
Removing number-plate
carrier . . . . . . . . . . . . . . . . . . 10
Installing number-plate
carrier . . . . . . . . . . . . . . . . . . 11
Removing mirror . . . . . . . . . 12
Installing mirrors . . . . . . . . . 12
Installing headlight
guard . . . . . . . . . . . . . . . . . . . 12
Installing guard for final
drive . . . . . . . . . . . . . . . . . . . . 13
Installing cylinder
guard . . . . . . . . . . . . . . . . . . . 14
Installing deflector for
footbrake lever . . . . . . . . . . 14
Installing left and right
hand protectors . . . . . . . . . 15
Replacing left and right
hand frame-protector
strips . . . . . . . . . . . . . . . . . . . 18
4 Maintenance . . . . . . . . . 19
Work to be carried out
always before
off-roading . . . . . . . . . . . . . . 20
Work to be carried out
after five hours of riding in
sand, dust or mud . . . . . . . 20
Work to be carried out
after ten hours
off-roading . . . . . . . . . . . . . . 25
Work to be undertaken
once a year. . . . . . . . . . . . . . 29
5 Threaded fasteners . . . 31
Anchorage points, engine
and swinging arm . . . . . . . . 33
Anchorage points, frame
and mounted
components. . . . . . . . . . . . . 34
Anchorage points,
front . . . . . . . . . . . . . . . . . . . . 36
Threaded fasteners, front
wheel . . . . . . . . . . . . . . . . . . . 38
Body-panel screws . . . . . . 38
6 Technical data . . . . . . . . 39
Tightening torques for
internally mounted
components. . . . . . . . . . . . . 40
Tightening torques for
checking threading
fasteners . . . . . . . . . . . . . . . . 42

General instructions
Notes on these Maintenance
Instructions ..................... 4
Abbreviations and symbols ...... 4
1
3
z
General instructions

Notes on these Main-
1
tenance Instructions
4
The work explained in these
Maintenance Instructions
should be carried out in
accordance with the schedule
outlined below. Use the
operating-hours counter
described in the "Operation"
section of the Rider's Manual
to check the operating hours.
Work you must always undertake before leaving surfaced roads for sporty offroading.
Work you must undertake
z
General instructions
after five hours of riding in
mud, dust or sand.
Work you must undertake
after ten hours off-roading.
Work you must undertake
once a year.
You will find detailed information on maintenance and repair work in the Repair Manual on the CD-ROM that accompanies your motorcycle.
Abbreviations and
symbols
Indicates warnings that
you must comply with for
reasons of your safety and the
safety of others, and to protect your motorcycle against
damage.
Specific instructions on
how to operate, control,
adjust or look after items of
equipment on the motorcycle.
Indicates the end of an
item of information.
Instruction.
Result of an activity.
Reference to a page
with more detailed information.

Overview
Conversion work preparatory to
off-roading ...................... 6
Maintenance work ............... 6
2
5
z
Overview

Conversion work
2
preparatory to
6
off-roading
Removing number-plate
carrier ( 10)
Removing mirror ( 12)
Installing headlight guard
( 12)
Installing guard for final
drive ( 13)
Installing cylinder guard
z
Overview
( 14)
Installing deflector for footbrake lever ( 14)
Installing left and right hand
protectors ( 15)
Maintenance work
Work to be carried
out always before
off-roading
Checking brake disc wear
( 20)
Checking brake pads for
wear ( 20)
Checking spokes ( 20)
Work to be carried out
after five hours of riding
in sand, dust or mud
Checking alternator drive
belt ( 20)
Checking air filter for dirt
( 21)
Checking ease of movement of footbrake lever
( 23)
Checking ease of movement of shift lever ( 24)
Cleaning slider tubes ( 25)
Work to be carried
out after ten hours
off-roading
Checking air filter for dirt
( 21)
Checking ease of movement of footbrake lever
( 23)
Checking ease of movement of shift lever ( 24)
Cleaning slider tubes ( 25)
Checking steering-head
bearing ( 25)
Checking wheel bearing for
play ( 26)
Checking telescopic-fork
protector and slip-ring
( 26)
Bleeding telescopic forks
( 27)
Checking ease of movement of side stand ( 27)
Check operation of sidestand switch ( 27)
Checking spring-strut
mount for play ( 28)
Checking swinging-arm
bearings for play ( 28)
Checking flexible gaiter
( 29)

Checking Paralever bearing
for play ( 29)
Checking security of
threaded fasteners ( 29)
Work to be undertaken
once a year
Changing telescopic-fork oil
( 29)
2
7
z
Overview

2
8
z
Overview

Installing and removing
components
Removing number-plate
carrier ........................ 10
Installing number-plate
carrier ........................ 11
Removing mirror............... 12
Installing mirrors............... 12
Installing headlight guard . . .... 12
Installing guard for final drive . . . 13
Installing cylinder guard........ 14
Installing deflector for footbrake
lever . ......................... 14
Installing left and right hand
protectors . .................... 15
Replacing left and right hand
frame-protector strips ......... 18
3
9
z
Installing and removing components
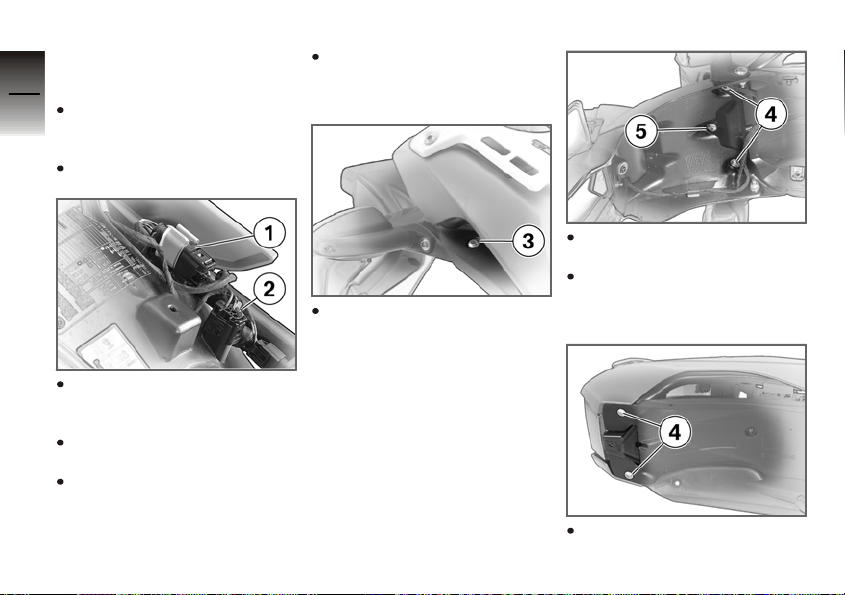
Removing number-
3
plate carrier
10
Make sure the ground is
level and firm and place the
motorcycle on its stand.
Remove the seat.
Remove plug 1 from its
holder and disconnect the
plug.
Remove protective plug 2
from its holder.
Connect plug 1 to protective plug 2.
z
Installing and removing components
Push wiring-harness end
of plug 1 into the holder of
protective plug 2.
Remove screws 3 on left
and right.
Remove screws 4 and
screw 5.
Remove the number-plate
carrier and thread out the
cables.
Reinstall screws 4.

Installing numberplate carrier
3
11
Remove screws 4.
Manoeuvre the cables into
place and hold the numberplate carrier in position.
Install screws 4 and
screw 5.
Disconnect the numberplate plug and the protective plug.
Install screws 3 on left and
right.
Remove wiring-harness end
of plug 1 from the holder.
Connect plug 1 and seat it
in the holder.
z
Installing and removing components

Seat protective plug 2 in its
holder.
3
Install the seat.
12
Installing mirrors
Removing mirror
Install clamping piece 3.
Clamping piece to clamping
block
Push back rubber sleeve 1.
Release threaded fastener 2
and remove the mirror.
Remove clamping piece 3.
z
Installing and removing components
30 Nm
Install the mirror and adjust
it to the correct position.
Tighten threaded fastener 2.
Mirror to clamping piece
25 Nm
Slip rubber sleeve 1 down
over the threaded fastener.
Installing headlight
guard
Use the headlight guard
only when off-roading.
Riding on public roads with
the headlight guard fitted to
the motorcycle is prohibited.
Position the headlight guard
with bore 1 against the instrument carrier from below and secure it with cable
tie 2.
 Loading...