

Page 1
Rider's Manual
F 800 R
BMW Motorrad
The Ultimate
Riding Machine
Page 2

Motorcycle data/dealership details
Motorcycle data
Model
Vehicle Identification Number
Colour code
Date of first registration
Registration number
Dealership details
Person to contact in Service department
Ms/Mr
Phone number
Dealership address/phone number (company stamp)
Page 3

Welcome to BMW
We congratulate you on your
choice of a motorcycle from
BMW and welcome you to the
community of BMW riders.
Familiarise yourself with your new
motorcycle so that you can ride it
safely and confidently in all traffic
situations.
Please read this Rider's Manual
carefully before starting to use
your new BMW motorcycle. It
contains important information on
how to operate the controls and
how to make the best possible
use of all your BMW's technical
features.
In addition, it contains information on maintenance and care to
help you maintain your vehicle's
reliability and safety, as well as its
value.
If you have questions concerning
your motorcycle, your authorised
BMW Motorrad dealer will gladly
provide advice and assistance.
We hope that you will enjoy riding your BMW and that all your
journeys will be pleasant and safe
BMW Motorrad.
01 41 8 550 171
*01418550171*
Page 4

Table of Contents
You can also consult the index at
the end of this Rider's Manual if
you want to find a particular topic
or item of information.
1 General instructions ... . 5
Overview . . . . . . . . . . . . . .. . .. . .. 6
Abbreviations and
symbols . . . . . . . .. . .. . .. . .. . . . . 6
Equipment . . . . . . . . . . . . . .. . .. . 7
Technical data . . . .. . .. . .. . .. . 7
Currency . . . . . . . . . . . . . . .. . .. . . 7
2 General views . .. .. .. .. .. . 9
General view, left side . . . . . . . 11
General view, right side . . . . . 13
Underneath the seat . . . . . .. . 14
Underneath the centre trim
panel . . . . . .. . .. . .. . .. . . . . . . . . 15
Multifunction switch, left . . . . 16
Multifunction switch,
right . . . . . . .. . .. . . . . . . . . . . . . .. 17
Instrument panel . . . . . . . .. . . . 18
3 Status indicators . .. .. .. 19
Multifunction display . . . . . . . . 20
Meaning of symbols . . . .. . .. . 21
Warning and telltale
lights . . . . . .. . . . . . . . . . . . . .. . .. 22
Service-due indicator .. . . . . . . 23
Kilometres travelled after fuel
down to reserve . . . . . . . . . .. . . 23
Ambient temperature. . . . . . . . 24
Tyre pressures . . . . . . . . . . . . . . 24
Warnings . . . . . . . . . . . . . . . . . .. . 25
4 Operation . .. . .. .. .. .. .. . . 35
Ignition switch/steering
lock . . . . . . . . . . . . . . . . . . . . . . . .. 36
Electronic immobiliser
(EWS) . . . .. . . . . . . . .. . . . . . . . .. 37
Clock . .. . . . . . . . .. . . . . . . . .. . . . 37
Reading . . . . . . . . . . . . . . . . . . . . . 38
Stopwatch. . . . . . . .. . . . . . . . .. . 39
Lights . . . . . . . . . . . . . . . . . . . . . . . 40
Turn indicators . . . . . . . . . . .. . . 41
Hazard warning flashers . . . . . 42
Emergency off switch (kill
switch) . . . . . . . . . .. . . . . . . . . . . . 42
Heated handlebar grips . . .. . 43
Clutch . . . .. . . . . . . . .. . . . . . . . . . 44
Brakes . . .. . . . . . . . .. . . . . . . . . . 44
Mirrors . . . . . . . . . . . . . . . . . .. . . . 45
Spring preload . . . . . . . . . . . . . . 45
Damping . . . .. . . . . . . . .. . . . . . . 46
Tyres . . . . . .. . . . . . . . . . . . . . . . . . 47
Headlight . . . . . . . . . . . . . . . . . . . . 47
Seat . . . . . . . .. . . . . . . . .. . . . . . . . 49
5 Riding .. .. .. .. .. . .. .. .. .. . 51
Safety instructions . . . . . . .. . . 52
Checklist . . . . .. . . . . . . . . . . . . . . 53
Starting. . . . . . . .. . . . . . . . .. . . . . 54
Running in . . . . . . . . . . . . . . . .. . 55
Speed . . .. . . . . . . . .. . . . . . . . .. . 56
Brakes . . .. . . . . . . . .. . . . . . . . . . 57
Parking your motorcycle . . . . 58
Refuel . . . . . . . . . . . . . . . . . . . . . . . 59
Secure motorcycle for trans-
portation . . . . . . .. . . . . . . . . . . . . 60
Page 5

6 Engineering details . .. . . 63
Brake system with
BMW Motorrad ABS . . . . .. . . 64
Tyre pressure monitoring
RDC . . . . . . . . . . . . . . . . . .. . . . . . . 66
7 Accessories . .. .. .. . .. .. . 69
General instructions . . . . . . . . . 70
Power sockets . . . . . . . . . . . . . . 70
Luggage . . . . . . .. . . . . . . . .. . . . 71
Topcase. . . .. . . . . . . . .. . . . . . . . 71
8 Maintenance . . . .. .. .. . .. 75
General instructions . . . . . . . . . 76
Toolkit. . . . . . . .. . . . . . . . .. . . . . . 76
Engine oil . . . . . . . . . . . . . . . . . . . 77
Brake system . . . . . . . . . . . . . . . 79
Coolant. . . . . . . . . . . . . . . . . . . . . . 83
Clutch . . . .. . . . . . . . .. . . . . . . . . . 84
Rims and tyres . . . .. . . . . . . . .. 85
Chain . . . . .. . . . . . . . .. . . . . . . . . . 85
Wheels . . . . . . . . .. . . . . . . . . . . . . 87
Front-wheel stand . . . . . .. . . . . 94
Lighting . . . . . . . . . . . . . . . . . . . . . 95
Body panels . . . . . . . . . . . . . . . 100
Jump starting . . . .. . . . . . . . . 103
Battery . . . . . . . . . .. . . . . . . . .. 104
9 Care ... . . .. .. .. .. .. . .. .. 107
Care products . . . . . . . . . . . . . 108
Washing motorcycle. . . . . . . 108
Cleaning easily damaged
components .. . . . . . . . .. . . . . 108
Paint care . . . . . . . . . . . . . . . . . 109
Laying up motorcycle . . . . . 110
Protective wax coating . . . . 110
Restoring motorcycle to
use . . . . . . . .. . . . . . . . .. . . . . . . 110
10 Technical data . . .. . . 111
Troubleshooting chart . . . . . 112
Threaded fasteners . . . . . . . 113
Engine . . . . . . . . . . . . . . . . . . .. 115
Fuel . . . .. . . . . . . . .. . . . . . . . .. 116
Engine oil . . . . . . . . . . . . . . . . . 116
Clutch . . . .. . . . . . . . .. . . . . . . . 117
Transmission . . .. . . . . . . . .. . 117
Rear-wheel drive . . . . . . . . . . 118
Running gear . .. . . . . . . . . . . . 118
Brakes . . .. . . . . . . . .. . . . . . . . 119
Wheels and tyres . . . . . . . . . . 119
Electrics . . .. . . . . . . . .. . . . . . . 120
Frame . . . . . . . . . . . . . . . . . . . . . 122
Dimensions . . . . . . .. . . . . . . . 122
Weights . . . . . . . . . . . . . . . . . .. 123
Riding specifications . . . . . . 123
11 Service . . .. . .. .. .. .. .. 125
BMW Motorrad Service . . . 126
BMW Motorrad Mobility
services . . . . . .. . . . . . . . .. . . . 126
Maintenance work . . . . .. . . . 126
Confirmation of mainten-
ance work . . . . . . . . . . . . . . . . . 128
Confirmation of service . . . . 133
12 Appendix . .. .. .. .. . .. . 135
Certificate . . . . . . . . .. . . . . . . . 136
13 Index .. .. .. .. .. .. .. .. . 137
Page 6

Page 7

General instructions
Overview . . . . . . . . . . . . . . . . . . . . . . . . . . . . 6
Abbreviations and symbols . . . . . . . . . . 6
Equipment . . . . . . . . . . . . . . . . . . . . . . . . . . . 7
Technical data . . . . . . . . . . . . . . . . . . . . . . . 7
Currency . . . . . . . . . . . . . . . . . . . . . . . . . . . . . 7
1
5
z
General instructions
Page 8

Overview
1
An important aspect of this
Rider's Manual is that it can
6
be used for quick and easy
reference. Consulting the
extensive index at the end of
this Rider's Manual is the fastest
way to find information on a
particular topic or item. Chapter
2 will provide you with an initial
overview of your motorcycle. All
the necessary maintenance and
servicing work on the motorcycle
is documented in Chapter 11.
This record of the maintenance
work you have had performed on
your motorcycle is a precondition
z
General instructions
for generous treatment of
goodwill claims.
When the time comes to sell
your BMW please remember to
hand over this Rider's Manual; it
is an important part of the motorcycle.
Abbreviations and symbols
Indicates warnings that you
must comply with for reasons of your safety and the safety
of others, and to protect your
product against damage.
Specific instructions on
how to operate, control, adjust or look after items of equipment on the motorcycle.
Indicates the end of an
item of information.
Instruction.
Result of an activity.
Reference to a page with
more detailed information.
Indicates the end of a
passage relating to specific accessories or items
of equipment.
Tightening torque.
Technical data.
OE Optional extra
The motorcycles are assembled complete with
all the BMW Motorrad
optional extras originally
ordered.
OA Optional accessory
You can obtain optional
accessories through
your authorised
BMW Motorrad dealer;
optional accessories have
to be retrofitted to the
motorcycle.
Page 9

Electronic immobiliser.
EWS
DWA
Anti-theft alarm.
Anti-lock brake system.
ABS
Tyre pressure monitoring.
RDC
Equipment
When you ordered your BMW
motorcycle, you chose various
items of custom equipment.
This Rider's Manual describes
optional extras (OE) offered by
BMW and selected optional accessories (OA). This explains why
the manual may also contain descriptions of equipment which
you have not ordered. Please
note, too, that your motorcycle
might not be exactly as illustrated in this manual on account
of country-specific differences.
If your motorcycle contains
equipment that has not been
described, its description can be
found in a separate manual.
Technical data
All dimensions, weights and
power ratings stated in this
Rider's Manual are quoted to the
standards and comply with the
tolerance requirements of the
Deutsches Institut für Normung
e.V. (DIN). Versions for individual
countries may differ.
Currency
The high safety and quality
standards of BMW motorcycles
are maintained by constant
development work on designs,
equipment and accessories.
Because of this, your motorcycle
may differ from the information
supplied in the Rider's Manual.
Nor can BMW Motorrad entirely
rule out errors and omissions.
We hope you will appreciate that
no claims can be entertained on
the basis of the data, illustrations
or descriptions in this manual.
1
7
z
General instructions
Page 10

1
8
z
General instructions
Page 11

General views
General view, left side. . . . . . . . . . . . . . . 11
General view, right side . . . . . . . . . . . . . 13
Underneath the seat . . . . . . . . . . . . . . . . 14
Underneath the centre trim
panel . . . . . . . . . . . . . . . . . . . . . . . . . . . . . . . 15
Multifunction switch, left . . . . . . . . . . . . 16
Multifunction switch, right . . . . . . . . . . . 17
Instrument panel . . . . . . . . . . . . . . . . . . . . 18
2
9
z
General views
Page 12

2
10
z
General views
Page 13

General view, left side
1 Payload table (on left on
steering-head bearing)
2 Seat lock ( 49)
3 Engine-oil filler neck and
oil dipstick ( 77)
2
11
z
General views
Page 14

2
12
z
General views
Page 15

General view, right side
1 Fuel filler neck ( 59)
2 Adjuster, spring preload
( 45)
3 VIN, type plate (on
steering-head bearing)
4 Brake-fluid reservoir, front
( 81)
5 Coolant level indicator (be-
hind side panel) ( 83)
6 Power socket ( 70)
7 Adjuster for damping char-
acteristic ( 46)
8 Brake-fluid reservoir, rear
( 82)
2
13
z
General views
Page 16
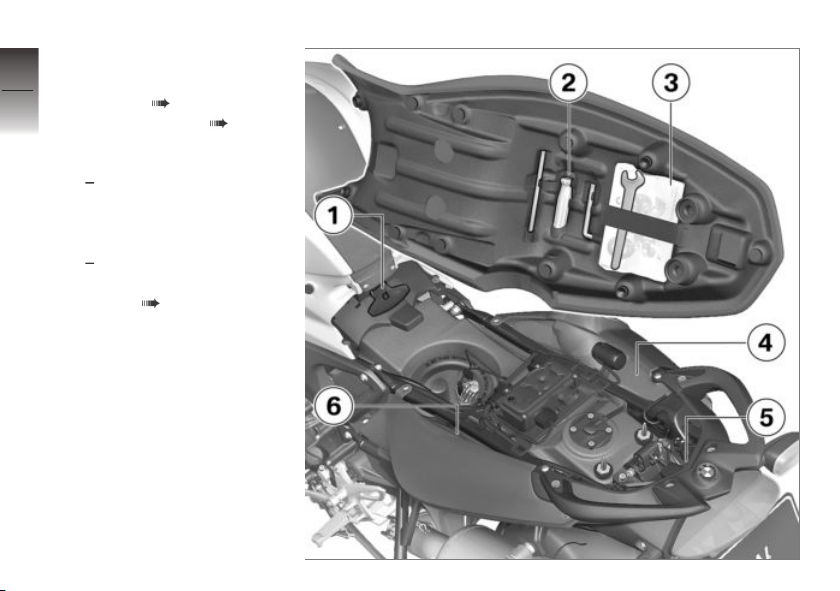
Underneath the seat
2
1 Tool for adjusting spring
14
z
General views
preload ( 45)
2 Standard toolkit ( 76)
3 Rider's Manual
4 Stowage
with first-aid kit
Location of the first-aid kit
5 Table of tyre pressures
6 Stowage
with service toolkit
Location of the service
toolkit ( 76)
OA
OA
Page 17

Underneath the centre trim panel
1 Battery ( 104)
2 Stowage
with tyre repair kit
Location of the tyre repair
kit
OA
2
15
z
General views
Page 18
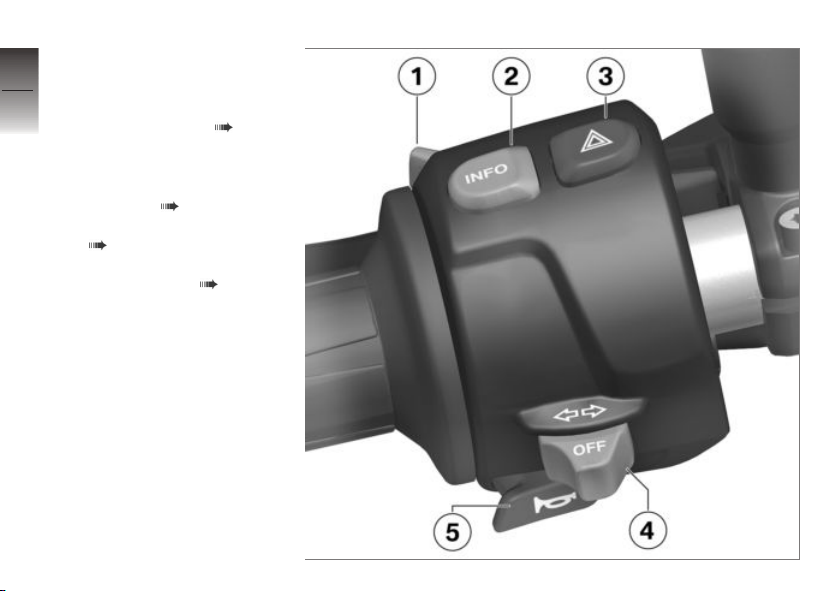
Multifunction switch,
2
left
16
1 High-beam headlight and
headlight flasher ( 41)
2 – with on-board computer
(OE)
Selecting reading in extended area ( 38)
3 Hazard warning flashers
( 42)
4 Operation of the flashing
turn indicators ( 41)
5 Horn
z
General views
Page 19

Multifunction switch, right
1 with heated handlebar
2 Starter button ( 54)
3 Emergency off switch (kill
OE
grips
Operation of the heated
handlebar grips ( 43)
switch) ( 42)
2
17
z
General views
Page 20
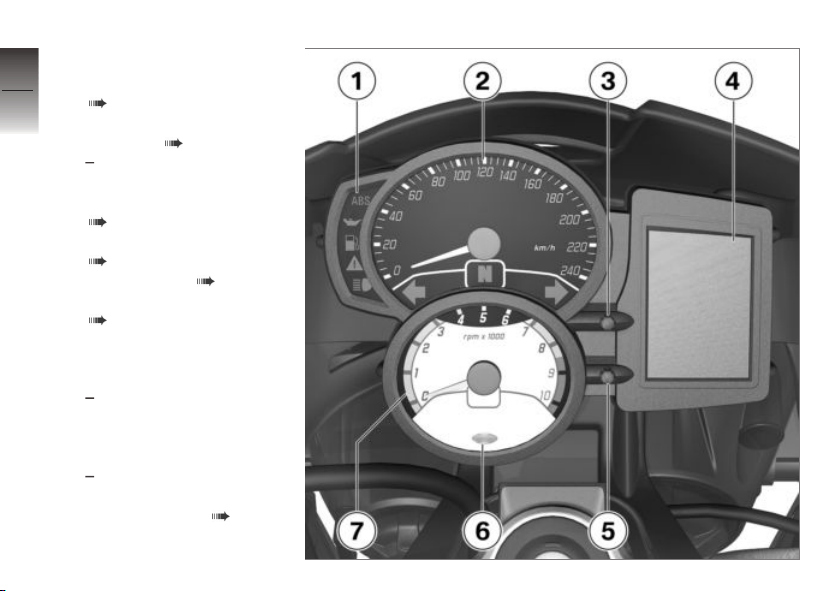
Instrument panel
2
1 Warning and telltale lights
18
z
General views
( 22)
2 Speedometer
3 Set clock ( 37).
with on-board com-
OE
puter
Operation of the stopwatch
( 39)
4 Multifunction display
( 20)
5 Select display ( 38).
Reset the tripmeter
( 38).
6 Photo-electric cell (for ad-
apting the brightness of
the instrument lighting)
with anti-theft alarm
Anti-theft alarm telltale light
(see the instructions for
use for the anti-theft alarm)
with on-board com-
OE
puter
Redline warning ( 56)
7 Rev. counter
OE
Page 21

Status indicators
Multifunction display . . . . . . . . . . . . . . . . 20
Meaning of symbols . . . . . . . . . . . . . . . . 21
Warning and telltale lights . . . . . . . . . . . 22
Service-due indicator . . . . . . . . . . . . . . . 23
Kilometres travelled after fuel down
to reserve . . . . . . . . . . . . . . . . . . . . . . . . . . . 23
Ambient temperature . . . . . . . . . . . . . . . 24
Tyre pressures . . . . . . . . . . . . . . . . . . . . . . 24
Warnings . . . . . . . . . . . . . . . . . . . . . . . . . . . 25
3
19
z
Status indicators
Page 22

Multifunction display
3
1 Trip meter ( 38)
2 Warning for engine elec-
20
z
Status indicators
tronics ( 29)
3 with on-board com-
4 Time ( 37)
5 with tyre pressure monit-
6 Warning for coolant tem-
7 Service due ( 23)
8 Values area ( 38)
9 with on-board com-
10 – with on-board computer
OE
puter
Stopwatch ( 39)
oring (RDC)
Tyre pressures ( 24)
perature ( 28)
OE
puter
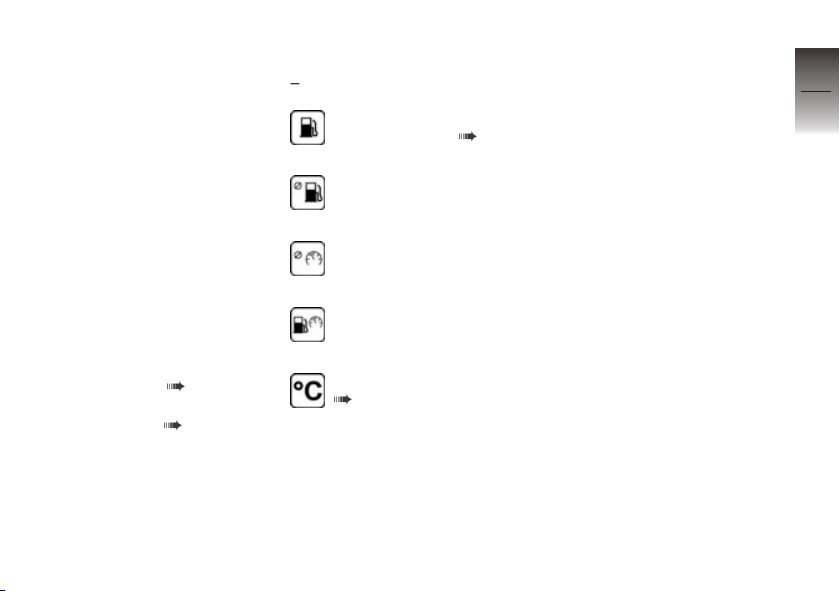
Symbols explaining the
readings shown in the values area ( 21)
(OE)
The horizontal bars indicate the level of coolant
temperature
OE
Page 23
11 – with on-board computer
(OE)
Gear indicator; "N" indicates neutral
12 – with on-board computer
(OE)
Fuel level
The horizontal bars above
the fuel-pump symbol
indicate the remaining
quantity of fuel. The top
bar is larger than the others and the quantity of fuel
it represents is significantly
larger
13 – with on-board computer
(OE)
Values area ( 38)
14 A warning is shown in the
values area ( 25)
Meaning of symbols
with on-board computer
Distance travelled after fuel
down to reserve ( 23)
Average consumption
Average speed
Current consumption
Ambient temperature
( 24)
OE
3
21
z
Status indicators
Page 24

Warning and telltale
3
lights
22
1 Oil-pressure warning light
( 29)
2 ABS warning light ( 31)
3 Warning light for fuel down
to reserve ( 28)
4 General warning light, in
combination with warnings
in the display ( 25)
5 High-beam headlight tell-
tale light
6 Telltale light for right turn
indicators
7 Telltale light for neutral
z
Status indicators
8 Telltale light for left turn
indicators
The ABS symbol might differ, depending on the spe-
cifics of national regulations.
Page 25
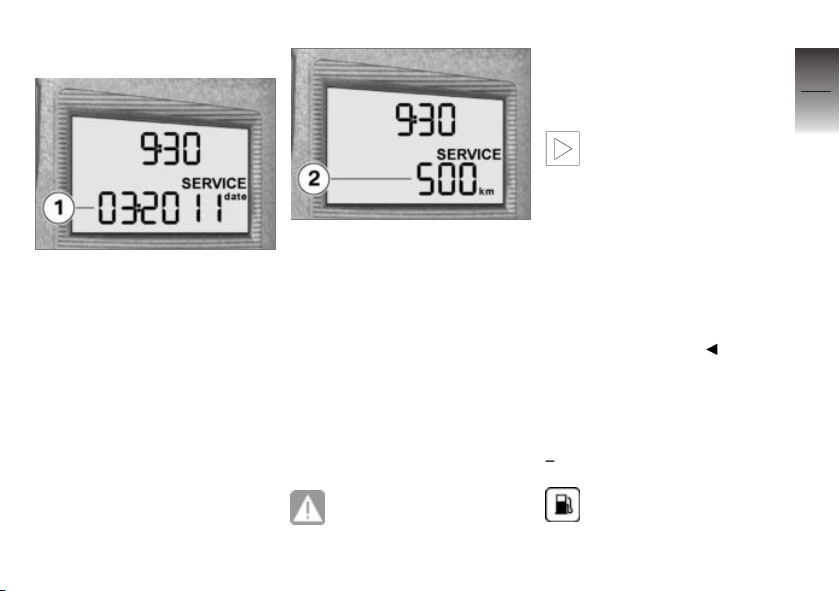
Service-due indicator
If the next service is due in less
than one month, the date for the
next service 1 is shown briefly
after the Pre-Ride Check completes. The month is shown as a
two-digit number and the year as
a four-digit number, with a colon
as separator, so in this example
the next service is due in March
2011.
If the vehicle covers long distances in the course of the year,
under certain circumstances it
might be necessary to have it
serviced at a date in advance
of the forecast due date. If the
countdown distance to the odometer reading at which a service
will be due is less than 1000 km,
the distance is counted down in
steps of 100 km 2 and is shown
briefly after the Pre-Ride Check
completes.
If service is overdue, the
due date or the odometer
reading at which service was due
is accompanied by the 'General' warning light showing yellow.
The word "Service" remains permanently visible.
If the service-due indicator
appears more than a month
before the service date, the date
saved in the instrument cluster
must be adjusted. This situation
can occur if the battery was disconnected for a prolonged period
of time.
If you want to have the date
set consult a specialist workshop, preferably an authorised
BMW Motorrad dealer.
Kilometres travelled after fuel down to reserve
with on-board computer
Once the fuel has dropped
to the reserve level, the
reading shows the kilometres
OE
3
23
z
Status indicators
Page 26
travelled since then. This counter
is reset as soon as refuelling
3
brings the total quantity of fuel
24
on board back above the reserve
level.
Ambient temperature
with on-board computer
When the motorcycle is at
a standstill the heat of the
engine can falsify the ambienttemperature reading. If the effect
of the engine's heat becomes excessive, -- temporarily appears
z
Status indicators
on the display.
If ambient temperature drops below 3 °C the temperature display flashes to draw your attention to the risk of black ice forming. The display automatically
switches from any other mode
to the temperature reading when
the temperature drops below this
threshold for the first time.
OE
Tyre pressures
with tyre pressure monitoring
OE
(RDC)
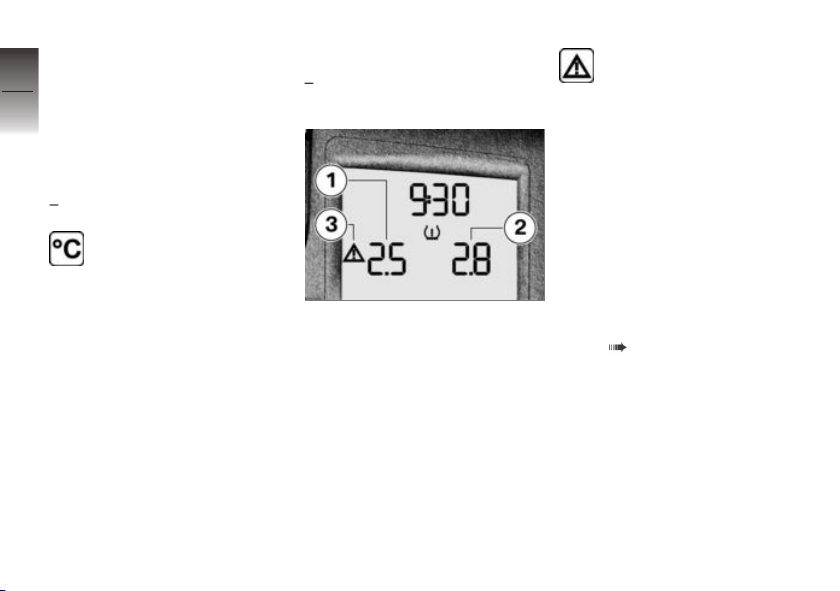
The tyre-pressure readings are
based on a reference tyre temperature of 20 °C. The front
tyre pressure is on the left 1;
the reading on the right 2 is the
rear tyre pressure. "-- --"
appears directly after the ignition is switched on, because
the sensors do not transmit tyre
pressures until the first time the
motorcycle accelerates to more
than 30 km/h.
If warning triangle 3 also
shows, the reading is a
warning. The critical pressure
flashes.
If the critical value is close to the
limit of the permissible tolerance
range, the 'General' warning light
shows yellow. If the tyre pressure registered by the sensor is
outside the permissible tolerance
range, the 'General' warning light
flashes red.
The detailed description of
BMW Motorrad RDC starts on
page ( 66).
Page 27
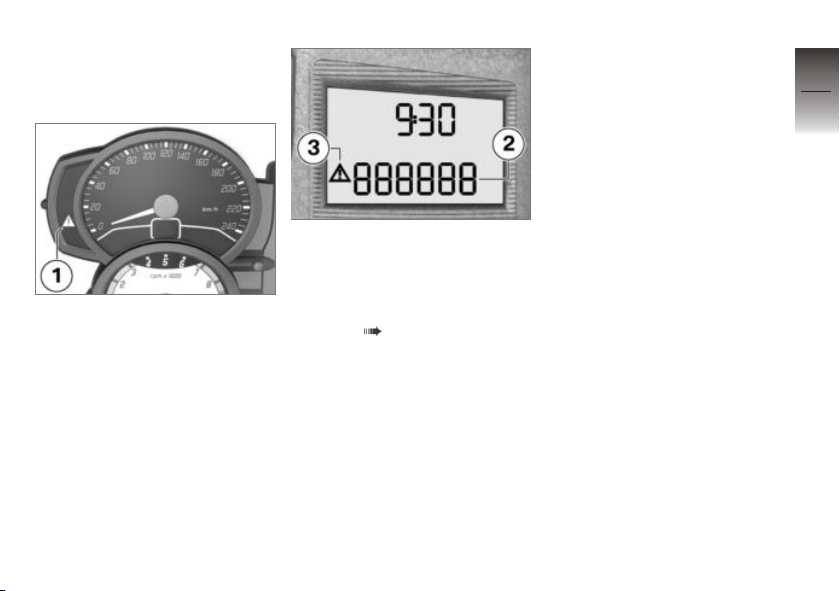
Warnings
Warnings in multifunction
display
Warnings that do not have warning lights of their own are indicated by 'General' warning light 1
showing in combination with a
text warning or a warning symbol
in the multifunction display. The
'General' warning light shows red
or yellow, depending on the urgency of the warning.
A reading in values area 2
that constitutes a warning
is accompanied by warning
triangle 3. These warnings can
alternate with the odometer
readings ( 38).
The status of the 'General' warning light matches the most urgent warning.
The possible warnings are listed
on the next page.
3
25
z
Status indicators
Page 28
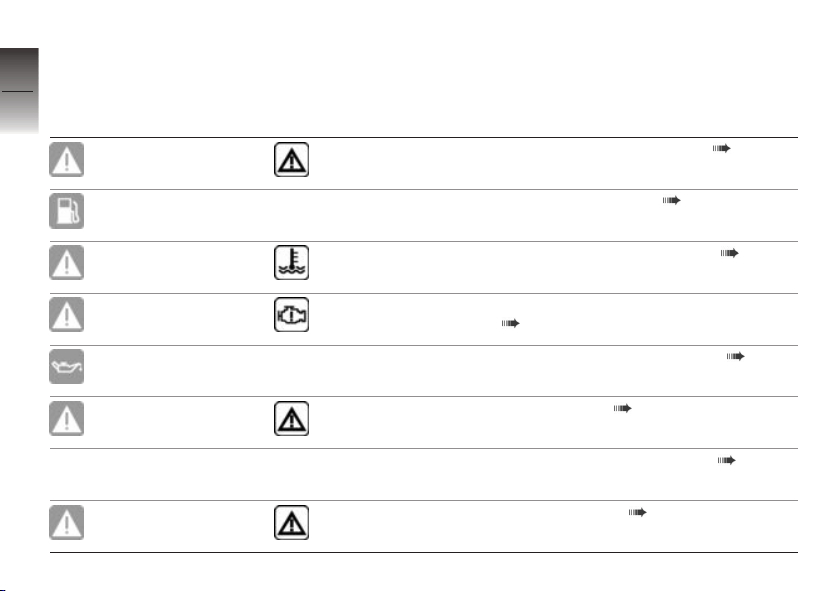
Warnings, overview
3
Warning and telltale
26
lights
Lights up yellow + "EWS" appears
Lights up Fuel down to reserve ( 28)
Warning symbols on
the display
on the display
Meaning
Electronic immobiliser active ( 28)
Lights up red Flashes
Lights up yellow Appears on the dis-
z
Status indicators
Flashes
Lights up yellow + "LAMP" appears
Lights up yellow + "DWA" appears
play
on the display
"x.x °C" flashes
on the display
Coolant temperature too high ( 28)
Engine in emergency-operation mode
( 29)
Insufficient engine oil pressure ( 29)
Bulb defective ( 29)
Outside temperature warning ( 30)
DWA battery flat ( 30)
Page 29
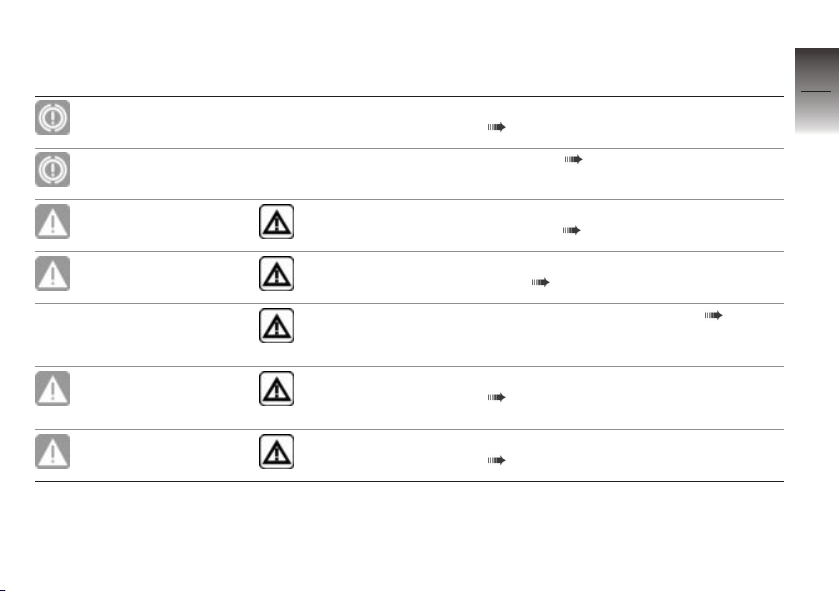
Warning and telltale
lights
Flashes
Lights up
Warning symbols on
the display
Meaning
ABS self-diagnosis not completed
( 31)
ABS fault ( 31)
3
27
Lights up yellow
Flashes red
+ "x.x" flashes Tyre pressure close to limit of permitted
+ "x.x" flashes
+ "--" or "--
--" appears on
the display
Lights up yellow + "--" or "--
--" appears on
the display
Lights up yellow
+ "RdC" appears
on the display
tolerance ( 31)
Tyre pressure outside permitted tolerance ( 31)
Signal transmission disrupted ( 32)
Sensor defective or system error
( 33)
Battery of tyre-pressure sensor weak
( 33)
z
Status indicators
Page 30
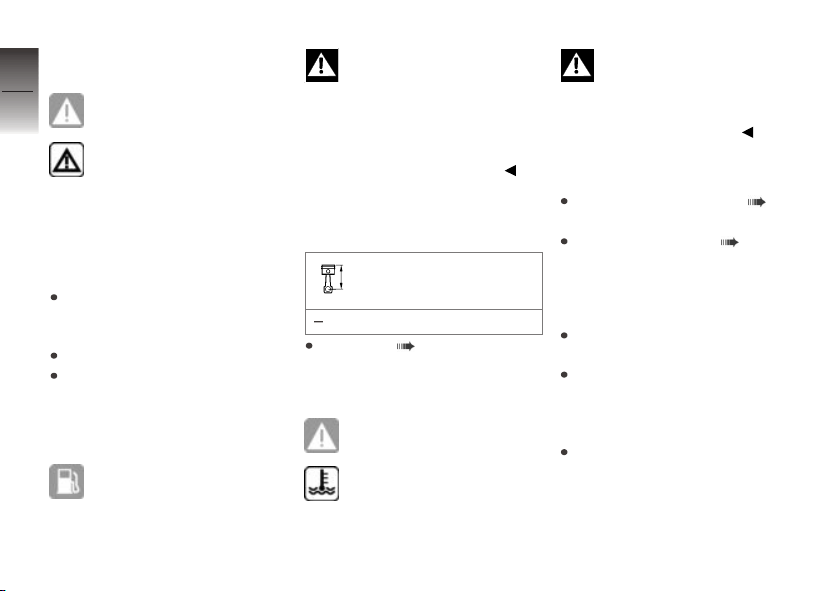
Electronic immobiliser
3
active
28
z
Status indicators
General warning light shows
yellow.
+ "EWS" appears on the
display.
Possible cause:
The key being used is not au-
thorised for starting, or communication between key and engine
electronics is disrupted.
Remove all other vehicle keys
from the same ring as the ignition key.
Use the reserve key.
Have the defective key replaced, preferably by an authorised BMW Motorrad dealer.
Fuel down to reserve
Warning light for fuel down
to reserve shows.
A shortage of fuel can res-
ult in misfires. This can
cause the engine to switch off
unexpectedly (risk of accident)
and damage the catalytic converter.
Do not run the fuel tank dry.
Possible cause:
The fuel tank contains no more
than the reserve quantity of fuel.
Fuel reserve
approx. 3 l
Refuelling ( 59).
Coolant temperature too
high
General warning light shows
red.
The temperature symbol
flashes.
Riding when the engine is
overheated could result in
engine damage.
Compliance with the information
set out below is essential.
Possible cause:
If the coolant level is too low.
Check the coolant level ( 83).
If the coolant level is too low:
Topping up coolant ( 83).
Possible cause:
The coolant temperature is too
high.
If possible, ride in the part-load
range to cool down the engine.
In traffic jams, switch off the
engine, but leave the ignition
switched on so that the radiator fan continues to operate.
If the coolant temperature is often too high, have the fault rectified as soon as possible by a
specialist workshop, preferably
Page 31
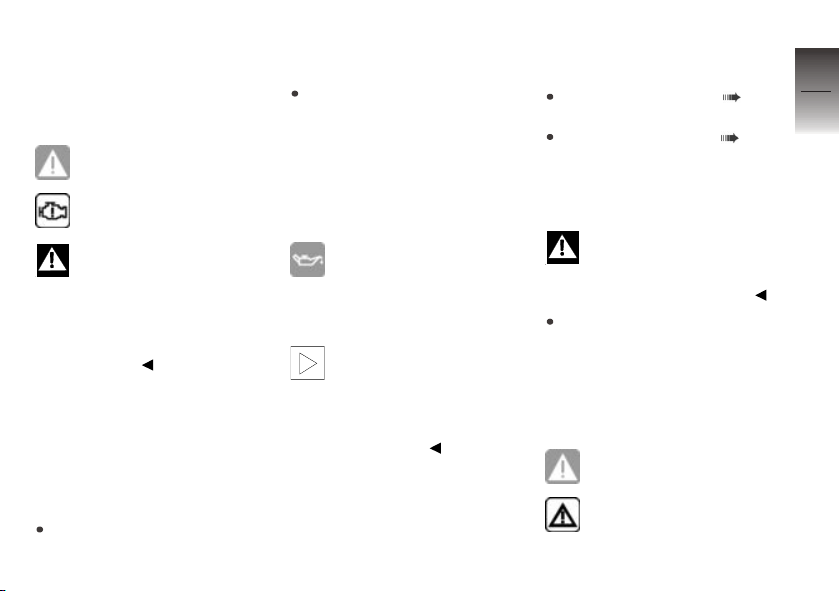
an authorised BMW Motorrad
dealer.
Engine in emergencyoperation mode
General warning light shows
yellow.
Engine symbol appears on
the display.
The engine is running in
emergency operating mode.
Unusual engine response is a
possibility.
Adapt your style of riding accordingly. Avoid accelerating sharply
and overtaking.
Possible cause:
The engine control unit has dia-
gnosed a fault. In exceptional
cases, the engine stops and refuses to start. Otherwise, the engine runs in emergency operating
mode.
You can continue to ride, but
bear in mind that the usual en-
gine performance might not be
available.
Have the fault rectified as
quickly as possible by a
specialist workshop, preferably
an authorised BMW Motorrad
dealer.
Insufficient engine oil
pressure
Warning light for engine-oil
pressure flashes.
The oil pressure in the lube-oil
system is too low. Stop immediately and switch off the engine.
The insufficient oil pres-
sure warning does not fulfil
the function of an oil gauge. The
only way of checking whether
the oil level is correct is to check
with the oil dipstick.
Possible cause:
The engine-oil level is too low.
Check engine oil level ( 77).
If the oil level is too low:
Top up the engine oil ( 78).
Possible cause:
The engine-oil pressure is insuffi-
cient.
Riding when engine-oil
pressure is low can result
in engine damage.
Do not continue your journey.
Have the fault rectified as
quickly as possible by a
specialist workshop, preferably
an authorised BMW Motorrad
dealer.
Bulb defective
General warning light shows
yellow.
+ "LAMP" appears on the
display.
3
29
z
Status indicators
Page 32
A defective bulb places
3
30
z
Status indicators
your safety at risk because
it is easier for other users to
oversee the motorcycle.
Replace defective bulbs as
soon as possible; always carry a
complete set of spare bulbs if
possible.
Possible cause:
Bulb defective.
Visually inspect to ascertain
which bulb is defective.
Replacing bulbs for low-beam
headlight and high-beam headlight ( 95).
Replacing bulb for parking light
( 96).
Replacing bulb for brake light
and rear light ( 98).
Replacing bulbs for front and
rear turn indicators ( 99).
Outside temperature
warning
with on-board computer
"x.x °C" (ambient temperature) flashes.
Possible cause:
The air temperature measured
at the motorcycle is lower than
3 °C.
The ambient temperature
warning does not mean that
there is no risk of ice forming at
measured temperatures above
3 °C.
Always take extra care when
temperatures are low; remember
that the danger of black ice forming is particularly high on bridges
and where the road is in shade.
Ride carefully and think well
ahead.
OE
DWA battery flat
with anti-theft alarm
General warning light shows
yellow.
+ "DWA" appears on the
display.
This error message appears
only briefly after the pre-
ride check completes.
Possible cause:
The integral battery in the anti-
theft alarm has lost its entire original capacity. There is no assurance that the anti-theft alarm
will be operational if the vehicle's
battery is disconnected.
Seek the advice of a specialist
workshop, preferably an authorised BMW Motorrad dealer.
OE
Page 33
ABS self-diagnosis not
completed
ABS warning light flashes.
Possible cause:
The ABS function is not
available, because selfdiagnosis did not complete. The
motorcycle has to move forward
a few metres for the wheel
sensors to be tested.
Pull away slowly. Bear in mind
that the ABS function is not
available until self-diagnosis has
completed.
ABS fault
ABS warning light shows.
Possible cause:
The ABS control unit has detec-
ted a fault.
You can continue to ride. Bear
in mind that the ABS function
is not available. Bear in mind
the more detailed information
on certain situations that can
lead to ABS fault messages
( 65).
Have the fault rectified as
quickly as possible by a
specialist workshop, preferably
an authorised BMW Motorrad
dealer.
Tyre pressure close
to limit of permitted
tolerance
with tyre pressure monitoring
OE
(RDC)
General warning light shows
yellow.
+ "x.x" (critical pressure)
flashes.
Possible cause:
Measured tyre pressure is close
to the limit of permitted tolerance.
Correct the tyre pressure as
stated on the inside cover of
the Rider's Manual.
Before you adjust tyre pres-
sure, read the information
on temperature compensation
and adjusting pressure in the
section entitled "Engineering
details".
Tyre pressure outside
permitted tolerance
with tyre pressure monitoring
OE
(RDC)
General warning light
flashes red.
+ "x.x" (critical pressure)
flashes.
3
31
z
Status indicators
Page 34
Possible cause:
3
Measured tyre pressure is outside permitted tolerance.
32
Check the tyre for damage
and to ascertain whether the
vehicle can be ridden with the
tyre in its present condition.
If the vehicle can be ridden with
the tyre in its present condition:
Out-of-tolerance tyre pres-
sures impair the motorcycle's handling characteristics.
Adapt your style of riding
accordingly.
Correct the tyre pressure at the
z
Status indicators
earliest possible opportunity.
Have the tyre checked for
damage by a specialist
workshop, preferably an
authorised BMW Motorrad
dealer.
If you are unsure whether the
vehicle can be ridden with the
tyre in its present condition:
Do not continue your journey.
Notify the breakdown service.
Have the tyre checked for
damage by a specialist
workshop, preferably an
authorised BMW Motorrad
dealer.
Signal transmission
disrupted
with tyre pressure monitoring
OE
(RDC)
+ "--" or "-- --" ap-
pears on the display.
Possible cause:
The vehicle has not yet
accelerated past the threshold of
approximately 30 km/h. The RDC
sensors do not start transmitting
signals until the motorcycle
reaches a speed above this
threshold ( 66).
Increase speed above this
threshold and observe the RDC
readings. Assume that a permanent fault has not occurred
unless the 'General' warning
light comes on to accompany
the symptoms. Under these
circumstances:
Have the fault rectified by a
specialist workshop, preferably
an authorised BMW Motorrad
dealer.
Possible cause:
Wireless communication with the
RDC sensors has been disrupted.
Possible causes include radiocommunication systems operating in the vicinity and interfering
with the link between the RDC
control unit and the sensors.
Move to another location and
observe the RDC readings. Assume that a permanent fault
has not occurred unless the
'General' warning light comes
on to accompany the symptoms. Under these circumstances:
Page 35
Have the fault rectified by a
specialist workshop, preferably
an authorised BMW Motorrad
dealer.
Sensor defective or
system error
with tyre pressure monitoring
OE
(RDC)
General warning light shows
yellow.
+ "--" or "-- --" ap-
pears on the display.
Possible cause:
Motorcycle is fitted with wheels
not equipped with RDC sensors.
Fit wheels and tyres equipped
with RDC sensors.
Possible cause:
1 or 2 RDC sensors have failed.
Have the fault rectified by a
specialist workshop, preferably
an authorised BMW Motorrad
dealer.
Possible cause:
A system error has occurred.
Have the fault rectified by a
specialist workshop, preferably
an authorised BMW Motorrad
dealer.
Battery of tyre-pressure
sensor weak
with tyre pressure monitoring
OE
(RDC)
General warning light shows
yellow.
+ "RdC" appears on the
display.
This error message appears
only briefly after the pre-
ride check completes.
Possible cause:
The tyre-pressure battery is al-
most at full capacity. There is no
assurance of how long the tyre
pressure control system can remain operational.
Seek the advice of a specialist
workshop, preferably an authorised BMW Motorrad dealer.
3
33
z
Status indicators
Page 36

3
34
z
Status indicators
Page 37

Operation
Ignition switch/steering lock . . . . . . . . . 36
Electronic immobiliser (EWS) . . . . . . . 37
Clock . . . . . . . . . . . . . . . . . . . . . . . . . . . . . . . 37
Reading. . . . . . . . . . . . . . . . . . . . . . . . . . . . . 38
Stopwatch . . . . . . . . . . . . . . . . . . . . . . . . . . 39
Lights . . . . . . . . . . . . . . . . . . . . . . . . . . . . . . . 40
Turn indicators . . . . . . . . . . . . . . . . . . . . . . 41
Hazard warning flashers . . . . . . . . . . . . . 42
Emergency off switch (kill
switch) . . . . . . . . . . . . . . . . . . . . . . . . . . . . . . 42
Heated handlebar grips . . . . . . . . . . . . . 43
Clutch . . . . . . . . . . . . . . . . . . . . . . . . . . . . . . 44
Brakes . . . . . . . . . . . . . . . . . . . . . . . . . . . . . . 44
Mirrors . . . . . . . . . . . . . . . . . . . . . . . . . . . . . . 45
Spring preload . . . . . . . . . . . . . . . . . . . . . . 45
Damping . . . . . . . . . . . . . . . . . . . . . . . . . . . . 46
Tyres . . . . . . . . . . . . . . . . . . . . . . . . . . . . . . . 47
Headlight . . . . . . . . . . . . . . . . . . . . . . . . . . . 47
Seat . . . . . . . . . . . . . . . . . . . . . . . . . . . . . . . . 49
4
35
z
Operation
Page 38
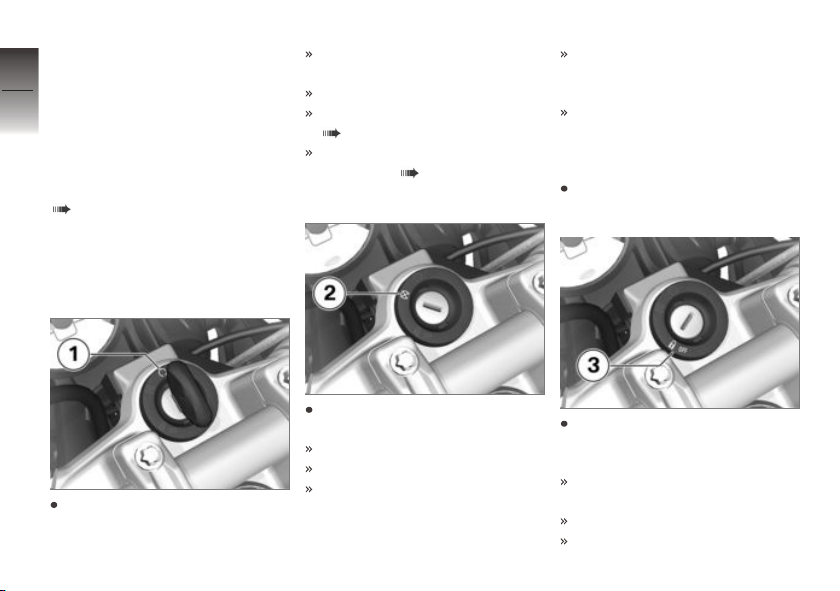
Ignition switch/steering
4
lock
36
Keys
You receive 2 ignition keys.
Please consult the information on
the electronic immobiliser (EWS)
if an ignition key is lost or mislaid
( 37).
Ignition switch/steering lock, fuel
filler cap lock and seat lock are all
operated with the same key.
z
Operation
Switching on ignition
Parking lights and all function
circuits switched on.
Engine can be started.
Pre-ride check is performed
( 54).
ABS self-diagnosis is
performed ( 55).
Switching off ignition
Electrically powered accessories remain operational for a limited period of time.
The battery can be recharged
via the on-board socket.
Lock the handlebars
Turn the handlebars all the way
to left.
Turn the ignition key to posi-
tion 1.
Turn the ignition key to position 2.
Lights switched off.
Handlebars not locked.
Ignition key can be removed.
Turn the ignition key to
position 3, while moving the
handlebars slightly.
Ignition, lights and all function
circuits switched off.
Handlebars locked.
Ignition key can be removed.
Page 39
Electronic immobiliser (EWS)
The electronic design of the
motorbike allows it to access
data stored in the ignition key
by means of a ring antenna located in the ignition switch. The
engine control unit will only allow
the engine to be started if the
key is identified as "authorised".
A spare key attached to
the same ring as the ignition key used to start the engine could "irritate" the electronics, in which case the enabling
signal for starting is not issued.
The EWS warning appears in the
multifunction display.
Always keep the spare key separately from the ignition key.
If you lose your key, you can
have it barred by your authorised
BMW Motorrad dealer. If you
wish to do this, you will need to
bring all other keys for the motorbike with you.
The engine cannot be started by
a barred key, but a key that has
been barred can subsequently be
reactivated.
You can obtain emergency/extra
keys only through an authorised
BMW Motorrad dealer. The keys
are part of an integrated security
system, so the dealer is under an
obligation to check the legitimacy
of all applications for replacement/extra keys.
Clock
Set clock
Attempting to set the clock
while riding the motorcycle
can lead to accidents.
Set the clock only when the motorcycle is stationary.
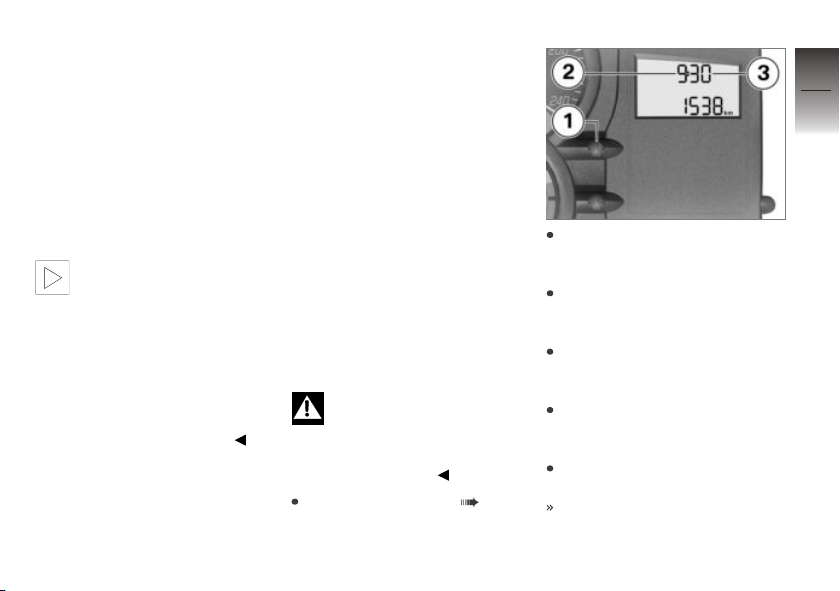
Switching on ignition ( 36).
Press and hold down button 1
until the hours number 2
flashes.
Repeatedly press the button
until the hours number is correct.
Press and hold down the button until the minutes number 3
flashes.
Repeatedly press the button
until the minutes number is
correct.
Hold down the button until the
minutes number stops flashing.
This completes the process.
4
37
z
Operation
Page 40
Reading
4
Select display
38
Switching on ignition ( 36).
with tyre pressure monitoring
OE
(RDC)
Tyre pressures
Average consumption
Current consumption
z
Operation
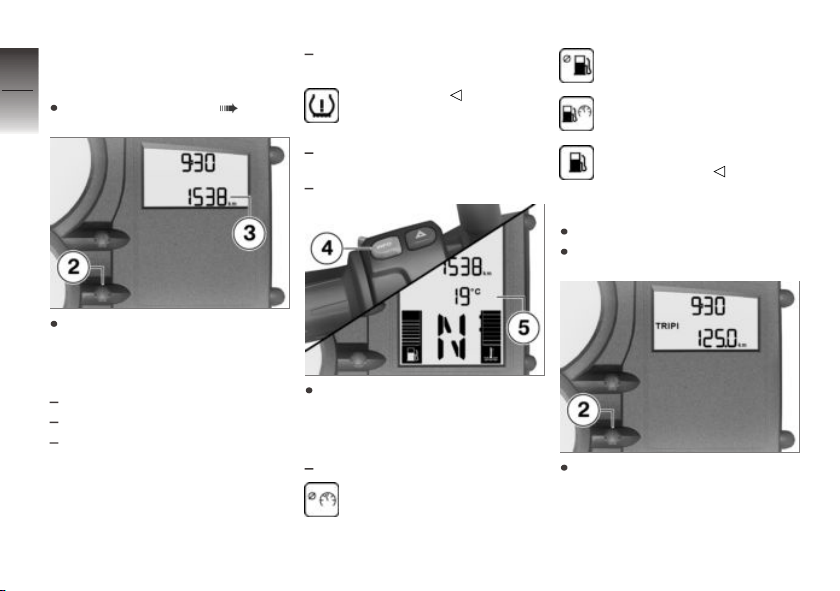
Press button 2 to select the
reading in values area 3.
The following values can be displayed:
Odometer (shown)
Tripmeter 1 (Trip I)
Tripmeter 2 (Trip II)
Warnings, if applicable
with on-board computer
Press button 4 to select the
reading in values area 5.
The following values can be displayed:
Ambient temperature
Average speed
OE
Distance travelled after fuel
down to reserve
Resetting tripmeter
Switch on the ignition.
Select the desired tripmeter.
Press and hold down button 2
until the tripmeter reading is
reset.
Page 41
Resetting average values
with on-board computer
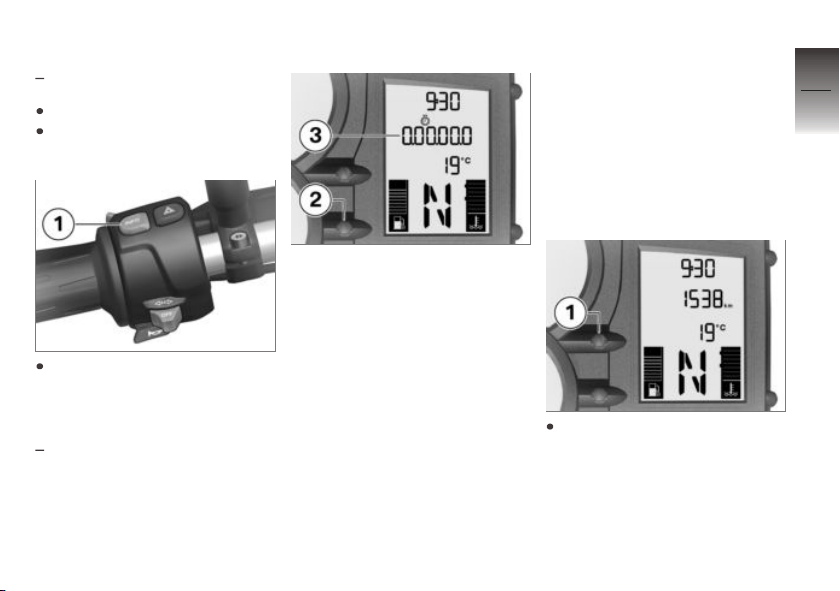
Switch on the ignition.
Select average consumption or
average speed.
Press and hold down button 1
until the value shown is reset.
OE
Stopwatch
with on-board computer
OE
Stopwatch
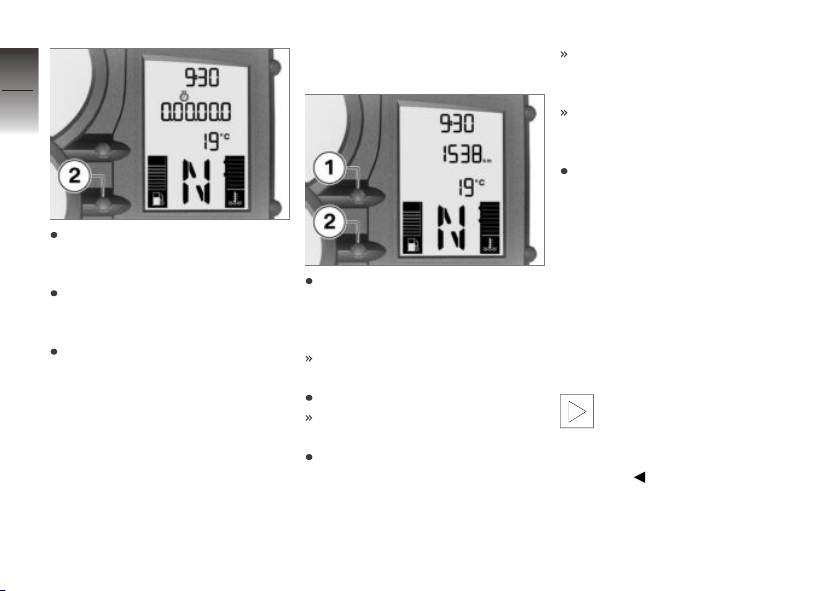
You can switch from the odometer reading to a stopwatch 3.
The readout is in hours, minutes,
seconds and tenths of a second,
with dots as separators.
By swapping the functions of
button 2 and the INFO button
on the handlebar fitting you can
make the stopwatch easier to
use (as a lap timer) as you ride.
If you swap the functions in this
way the stopwatch and the odometer are operated by means of
the INFO button and you must
use button 2 to operate the onboard computer.
The stopwatch continues to time
in the background if you switch
back temporarily to the odometer
reading. Similarly, the stopwatch
continues timing if you temporarily switch off the ignition.
Operating stopwatch
If necessary, use button 1 to
switch from the odometer to
the stopwatch.
4
39
z
Operation
Page 42
4
40
When the stopwatch is
stopped, press button 2 to
start timing with the stopwatch.
z
Operation
When the stopwatch is running,
press button 2 to stop timing
with the stopwatch.
Press and hold down button 2
to reset the stopwatch.
Changing button
functions
Press button 1 and button 2
at the same time and hold
them down until the reading
changes.
FLASH (redline warning) ap-
pears, along with ON or OFF.
Press button 2.
LAP (Lap-Timer) and ON or
OFF appear.
Repeatedly press button 1 until
the reading shows the mode
you want.
ON: Stopwatch operated by
means of the INFO button on
the handlebar fitting.
OFF: Stopwatch operated by
means of button 2 in the instrument panel.
To save the setting, press
button 1 and button 2 at
the same time and hold
them down until the reading
changes.
Lights
Side light
The side lights switch on automatically when the ignition is
switched on.
The side lights place
a strain on the battery.
Do not switch the ignition
on for longer than absolutely
necessary.
Page 43
Low-beam headlight
The low-beam headlight switches
on automatically when you start
the engine.
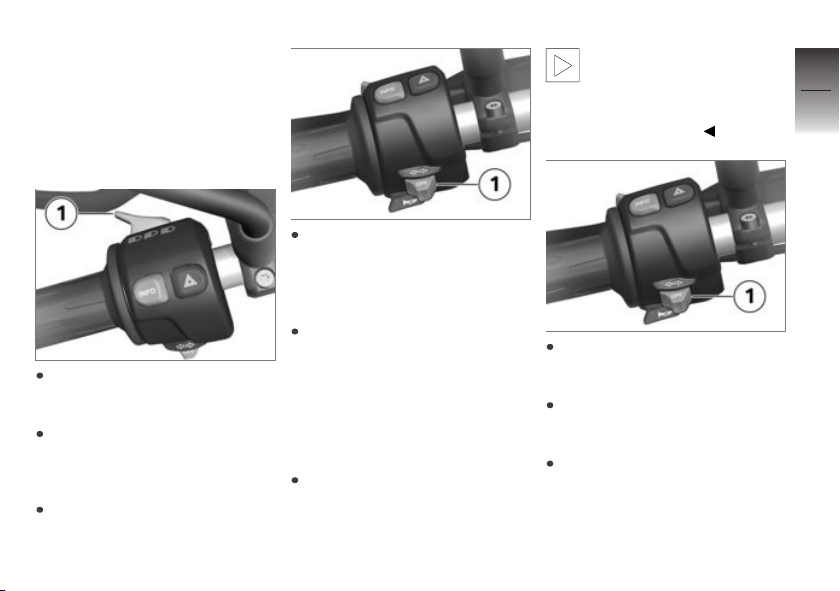
High-beam headlight and
headlight flasher
Push switch 1 forward to
switch on the high-beam
headlight.
Pull switch 1 back to operate
the headlight flasher.
Parking light
Switch off the ignition.
Immediately after switching off
the ignition, push button 1 to
the left and hold it in this position until the parking lights
come on.
Switch the ignition on and off
again to switch off the parking
lights.
Turn indicators
Operating flashing turn
indicators
Switch on the ignition.
The turn indicators are can-
celled automatically after
you have ridden for approximately
10 seconds and covered a distance of about 300 m.
Push button 1 to the left to
switch on the left flashing turn
indicators.
Push button 1 to the right to
switch on the right flashing turn
indicators.
Centre button 1 to cancel the
flashing turn indicators.
4
41
z
Operation
Page 44
Hazard warning
4
flashers
42
Operating hazard warning
flashers
Switch on the ignition.
The hazard warning flash-
ers place a strain on the
battery. Do not use the hazard
warning flashers for longer than
absolutely necessary.
z
Operation
If you press a turn-indic-
ator button with the ignition
switched on, the turn-indicator
function is activated instead of
the hazard warning flashers, and
remains active until you release
the button. The hazard warning
flashers recommence flashing as
soon as the button is released.
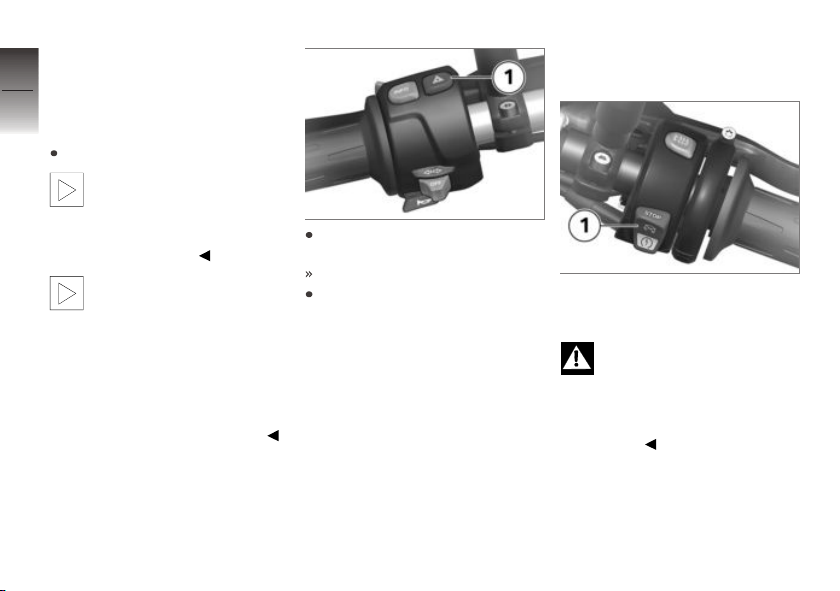
Press button 1 to switch on
the hazard warning flashers.
Ignition can be switched off.
Press button 1 again to switch
off the hazard warning flashers.
Emergency off switch (kill switch)
1 Emergency off switch (kill
switch)
Operating the kill switch
when riding can cause
the rear wheel to lock and thus
cause a fall.
Do not operate the kill switch
when riding.
The emergency off switch is a
kill switch for switching off the
engine quickly and easily.
Page 45
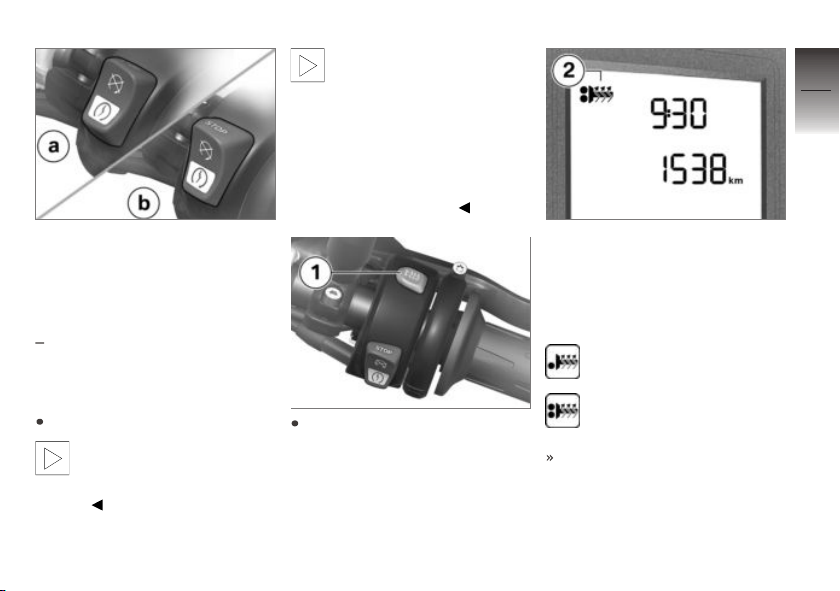
a Engine switched off
b Normal operating position
(run)
Heated handlebar grips
with heated handlebar grips
Operate the heated
handlebar grips
Start the engine.
The heating in the heated
handlebar grips can be activated only when the engine is
running.
OE
The increase in power con-
sumption caused by having the heated handlebar grips
switched on can drain the battery
if you are riding at low engine
speeds. If the charge level is low,
the heated handlebar grips are
switched off to ensure the battery's starting capability.
Repeatedly press button 1 until
the desired heating stage appears on the display.
The handlebar grips have twostage heating. Stage two 2 is
for heating the grips quickly: it
is advisable to switch back to
stage one as soon as the grips
are warm.
50 % heating power
100 % heating power
The selected heating stage will
be saved if you allow a certain
length of time to pass without
making further changes.
4
43
z
Operation
Page 46
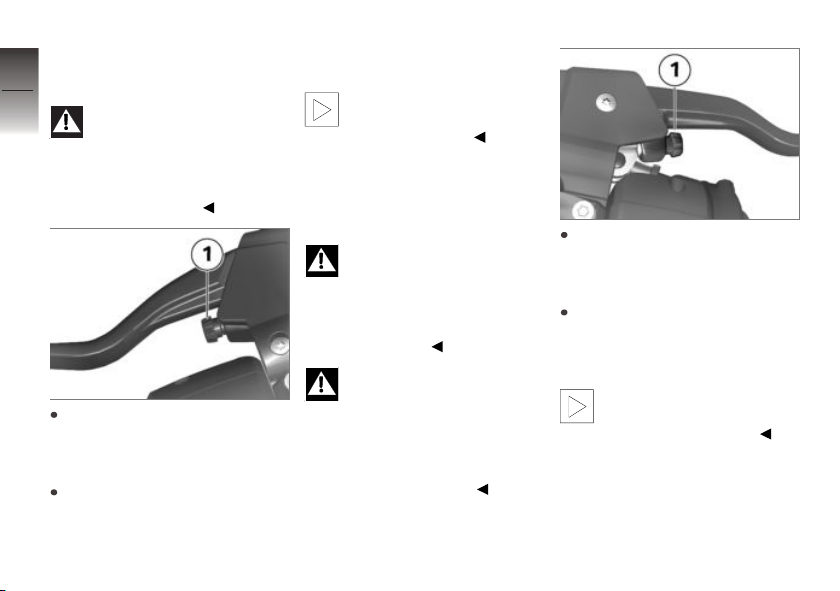
Clutch
4
Adjusting clutch lever
44
z
Operation
Attempting to adjust the
clutch lever while riding the
motorcycle can lead to accidents.
Do not attempt to adjust the
clutch lever unless the motorcycle is at a standstill.
Turn adjusting screw 1
clockwise to increase the span
between the clutch lever and
the handlebar grip.
Turn adjusting screw 1
counter-clockwise to reduce
the span between the clutch
lever and the handlebar grip.
The adjusting screw is
easier to turn if you push
the clutch lever forward.
Brakes
Adjust the handbrake
lever
Changing the position of
the brake-fluid reservoir can
allow air to penetrate the brake
system.
Do not twist the handlebar fitting
or the handlebars.
Attempting to adjust the
handbrake lever while riding
the motorcycle can lead to accidents.
Do not attempt to adjust the
handbrake lever unless the motorcycle is at a standstill.
Turn adjusting screw 1
clockwise to increase the span
between the brake lever and
the handlebar grip.
Turn adjusting screw 1
counter-clockwise to reduce
the span between the brake
lever and the handlebar grip.
The adjusting screw is
easier to turn if you push
the handbrake lever forward.
Page 47
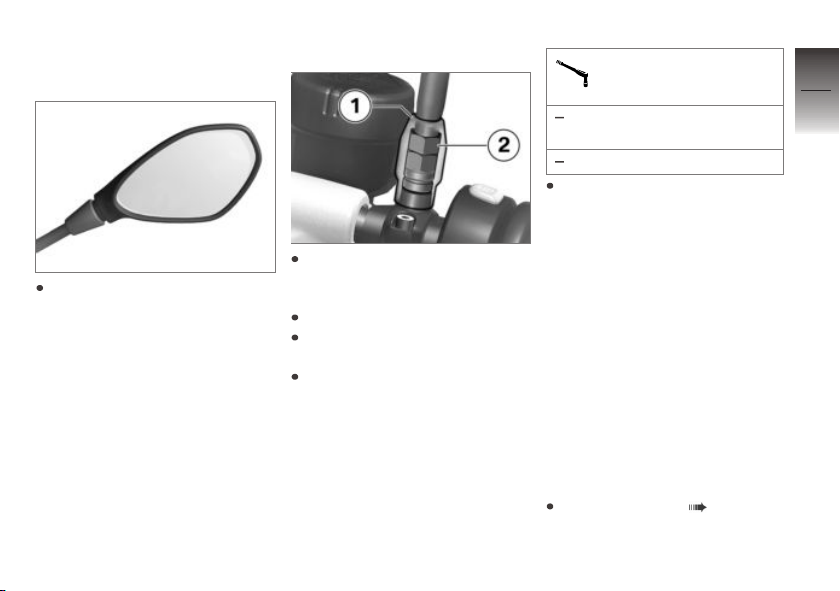
Mirrors
Adjusting mirrors
Adjusting mirror arm
Locknut (mirror) to
clamping piece
Joining compound: MultiWax spray
20 Nm
Push the protective cap over
the threaded fastener.
4
45
Turn the mirror to the correct
position.
Push protective cap 1 up over
the threaded fastener on the
mirror arm.
Slacken nut 2.
Turn the mirror arm to the appropriate position.
Tighten the nut to the specified tightening torque, while
holding the mirror arm to ensure that it does not move out
of position.
Spring preload
Setting
It is essential to set spring preload of the rear suspension to
suit the load carried by the motorcycle. Increase spring preload
when the motorcycle is heavily
loaded and reduce spring preload
accordingly when the motorcycle
is lightly loaded.
Adjusting spring preload
for rear wheel
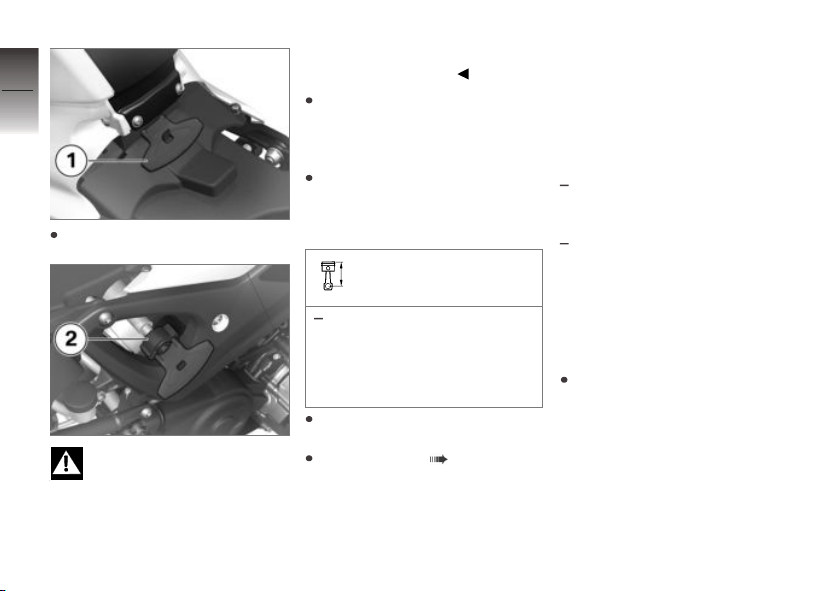
Remove the seat ( 49).
z
Operation
Page 48
4
46
Remove on-board toolkit 1.
z
Operation
Your motorcycle's hand-
ling will suffer if you do not
match the spring-preload and
damping-characteristic settings.
Adjust the damping characteristic
to suit spring preload.
If you want to increase spring
preload, use the tool from the
on-board toolkit to turn knob 2
clockwise.
If you want to reduce spring
preload, use the tool from the
on-board toolkit to turn knob 2
counter-clockwise.
Basic setting of spring
preload, rear
Turn adjusting screw as far
as it will go counter-clockwise, then back it off 12
clicks. (Full load of fuel, with
rider 85 kg)
Stow the on-board toolkit in its
correct position.
Install the seat ( 49).
Damping
Setting
Damping must be adapted to suit
the condition of the surface on
which the motorcycle is ridden
and to suit spring preload.
An uneven surface requires
softer damping than a smooth
surface.
An increase in spring preload
requires firmer damping, a reduction in spring preload requires softer damping.
Adjust the damping for
rear wheel
Make sure the ground is level
and firm and place the motorcycle on its stand.
Page 49
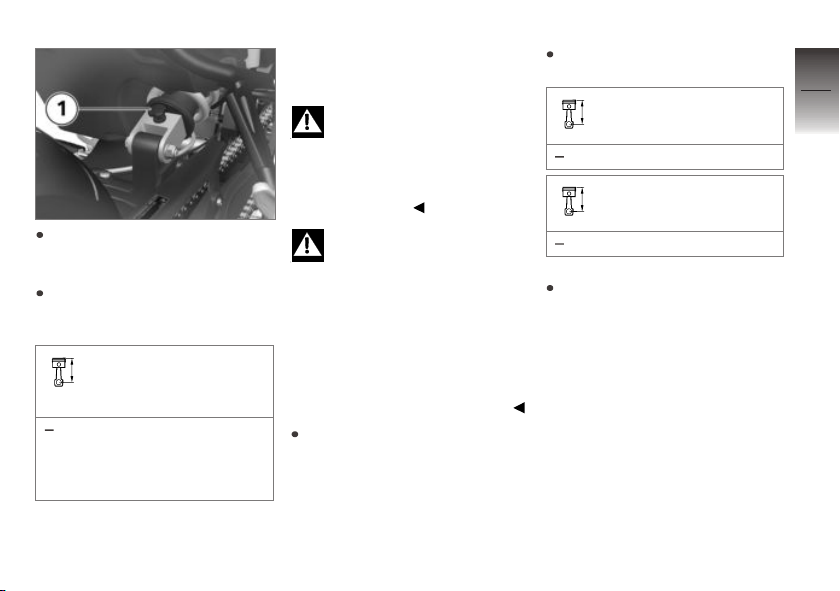
If you want to increase damping, turn adjusting screw 1
clockwise.
If you want to reduce damping,
turn adjusting screw 1 counterclockwise.
Basic setting of rear-suspension damping charac-
teristic
Turn adjusting screw as far
as it will go clockwise, then
back it off 3/4 turns (Full
load of fuel, with rider 85 kg)
Tyres
Checking tyre pressure
Incorrect tyre pressures im-
pair the motorcycle's handling characteristics and increase
the rate of tyre wear.
Always check that the tyre pressures are correct.
At high road speeds, tyre
valves installed perpendicular to the wheel rim have a tendency to open.
In order to avoid sudden deflation, fit valves installed perpendicular to the rim with valve caps
complete with rubber seals and
make sure the valve caps are
screwed firmly on to the valves.
Make sure the ground is level
and firm and place the motorcycle on its stand.
Check tyre pressures against
the data below.
Tyre pressure, front
2.5 bar (Tyre cold)
Tyre pressure, rear
2.9 bar (Tyre cold)
If tyre pressure is incorrect:
Correct tyre pressure.
Headlight
Adjusting headlight for
driving on left/driving on
right
If the motorcycle is ridden in a
country where the opposite rule
of the road applies, its asymmetric low-beam headlight will tend
to dazzle oncoming traffic.
Have the headlight set
accordingly by a specialist
4
47
z
Operation
Page 50
workshop, preferably an
authorised BMW Motorrad
4
dealer.
48
Headlight beam throw and
spring preload
Headlight beam throw is generally kept constant when spring
preload is adjusted to suit load.
However, a spring preload adjustment might not suffice if
the motorcycle is very heavily
z
Operation
loaded. Under these circumstances, headlight beam throw
has to be adjusted to suit the
weight carried by the motorcycle.
If there are doubts about
the correct headlight range,
seek the advice of a specialist
workshop, preferably an authorised BMW Motorrad dealer.
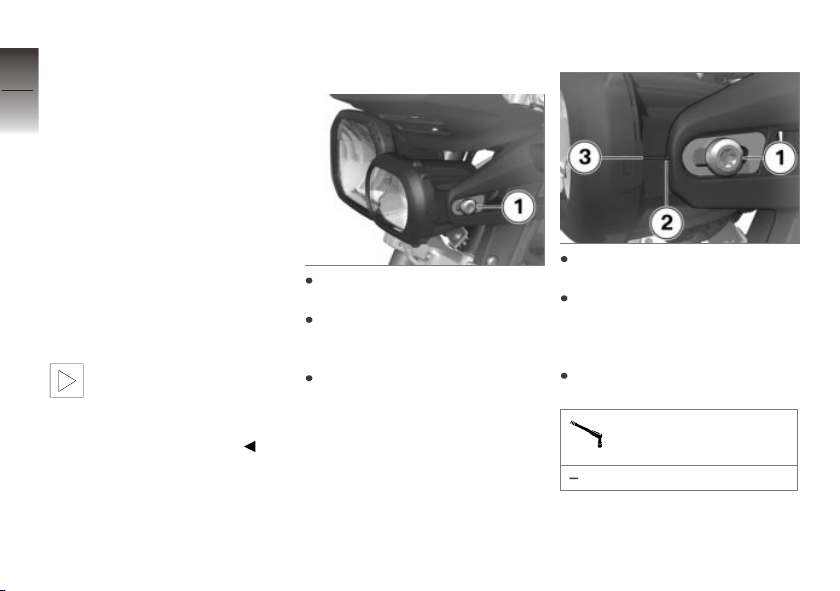
Adjusting headlight beam
throw
Slacken screws 1 on left and
right.
Adjust beam throw by tilting
the headlight slightly about its
horizontal axis.
Tighten screws 1 on left and
right.
Beam-throw basic setting
Slacken screws 1 on left and
right.
Tilt the headlight slightly
about its horizontal axis until
arrowhead 2 is pointing toward
marker 3.
Tighten screws 1 on left and
right.
Headlight to headlight
bracket
8 Nm
Page 51
Seat
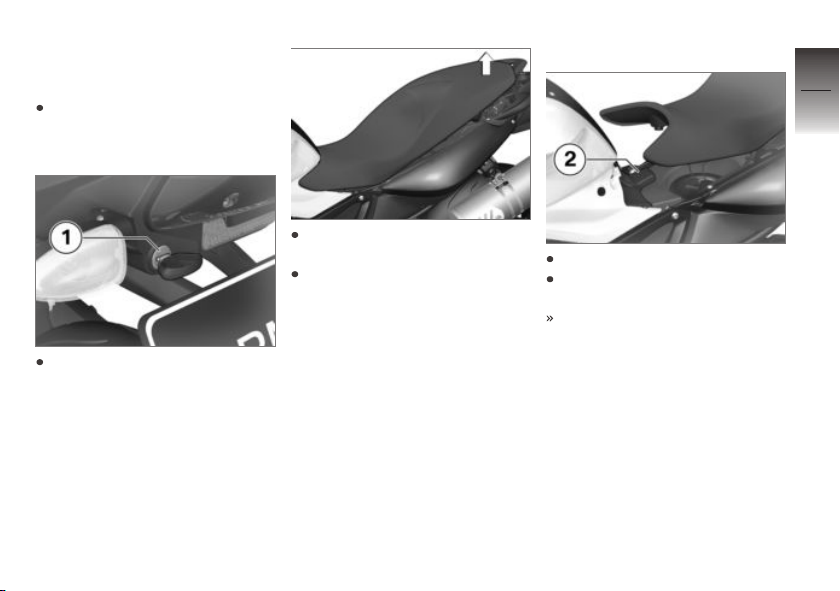
Removing seat
Make sure the ground is level
and firm and place the motorcycle on its stand.
Turn the key to the left in seat
lock 1 and hold it in this position while pressing down the
rear part of the seat.
Lift the seat at the rear and
release the key.
Remove the seat and place it,
upholstered side down, on a
clean surface.
Installing seat
Engage the seat in holder 2.
Firmly press down on the seat
at the rear.
The seat engages with an audible click.
4
49
z
Operation
Page 52

4
50
z
Operation
Page 53

Riding
Safety instructions . . . . . . . . . . . . . . . . . . 52
Checklist . . . . . . . . . . . . . . . . . . . . . . . . . . . . 53
Starting . . . . . . . . . . . . . . . . . . . . . . . . . . . . . 54
Running in . . . . . . . . . . . . . . . . . . . . . . . . . . 55
Speed . . . . . . . . . . . . . . . . . . . . . . . . . . . . . . 56
Brakes . . . . . . . . . . . . . . . . . . . . . . . . . . . . . . 57
Parking your motorcycle . . . . . . . . . . . . 58
Refuel . . . . . . . . . . . . . . . . . . . . . . . . . . . . . . 59
Secure motorcycle for transporta-
tion . . . . . . . . . . . . . . . . . . . . . . . . . . . . . . . . . 60
5
51
z
Riding
Page 54
Safety instructions
5
Rider's equipment
52
The following clothing will protect
you for every journey:
Helmet
Motorcycling jacket and
trousers
Gloves
Boots
z
Riding
This applies even to short
journeys, and to every season
of the year. Your authorised
BMW Motorrad dealer will be
glad to advise you on the correct
clothing for every purpose.
Correct loading
Overloading and imbal-
anced loads can adversely
affect the motorcycle's handling.
Do not exceed the permissible
gross weight and be sure to
comply with the instructions on
loading.
Set spring preload, damping
characteristic and tyre pressures to suit total weight.
with topcase
Note the maximum permissible
payload and the speed limit for
riding with topcase fitted, as
stated on the label inside the
topcase.
with tank rucksack
Note the maximum permissible
payload of the tank bag.
≤5 kg
with tankbag
Note the maximum permissible
payload of the tankbag.
≤5 kg
OA
OA
Payload of tank bag
OA
Payload of tankbag
Speed
If you ride at high speed, always
bear in mind that various boundary conditions can adversely affect the handling of your motorcycle, e.g.:
Spring-strut and shock-absorber system not set up correctly
Imbalanced load
Loose clothing
Insufficient tyre pressure
Poor tyre tread
Added luggage systems such
as cases, topcase and tank
rucksack
Risk of poisoning
Exhaust fumes contain carbon
monoxide, which is colourless
and odourless but highly toxic.
Inhaling the exhaust fumes
therefore represents a
health hazard and can even
Page 55
cause loss of consciousness with
fatal consequences.
Do not inhale exhaust fumes.
Do not run the engine in an enclosed space.
Catalytic converter
If misfiring causes unburned fuel
to enter the catalytic converter,
there is a danger of overheating
and damage.
The following guidelines must be
observed:
Do not run the fuel tank dry
Do not attempt to start or run
the engine with a spark-plug
cap disconnected
Stop the engine immediately if
it misfires
Use only unleaded fuel
Comply with all specified maintenance intervals
Unburned fuel will destroy
the catalytic converter.
Note the points listed for protection of the catalytic converter.
Risk of overheating
Cooling would be
inadequate if the engine
were allowed to idle for a lengthy
period with the motorcycle at
a standstill: overheating would
result. In extreme cases, the
motorcycle could catch fire.
Do not allow the engine to idle
unnecessarily. Ride away immediately after starting the engine.
Tampering
Tampering with motor-
cycle settings (e.g. electronic engine management unit,
throttle valves, clutch) can cause
damages to the components in
question and lead to failure of
safety-relevant functions. Damage caused in this way is not
covered by the warranty.
Do not tamper with the motor-
cycle in any way that could result
in tuned performance.
Checklist
Use the following checklist to
check important functions, settings and wear limits before you
ride off.
Brakes
Brake-fluid levels, front and rear
Clutch
Damping-characteristic setting
and spring preload
Tyre-tread depth and tyre
pressures
Cases correctly installed and
luggage secured
At regular intervals:
Engine oil level (every refuelling
stop)
Brake-pad wear (every third
refuelling stop)
Tension and lubrication of the
drive chain
5
53
z
Riding
Page 56
Starting
5
Starting engine
54
z
Riding
Gearbox lubrication is en-
sured only when the engine
is running. Inadequate lubrication
can result in damage to the gearbox.
Do not allow the motorcycle to
roll for a lengthy period of time or
push it a long distance with the
engine switched off.
Switch on the ignition.
Pre-ride check is performed
( 54).
ABS self-diagnosis is
performed ( 55).
Select neutral or, if a gear is
engaged, pull the clutch lever.
You cannot start the mo-
torcycle with the side stand
extended and a gear engaged.
The engine will switch itself off
if you start it with the gearbox in
neutral and then engage a gear
before retracting the side stand.
When starting a cold engine
at low ambient temperatures:
disengage the clutch and turn
the twistgrip slightly to open
the throttle.
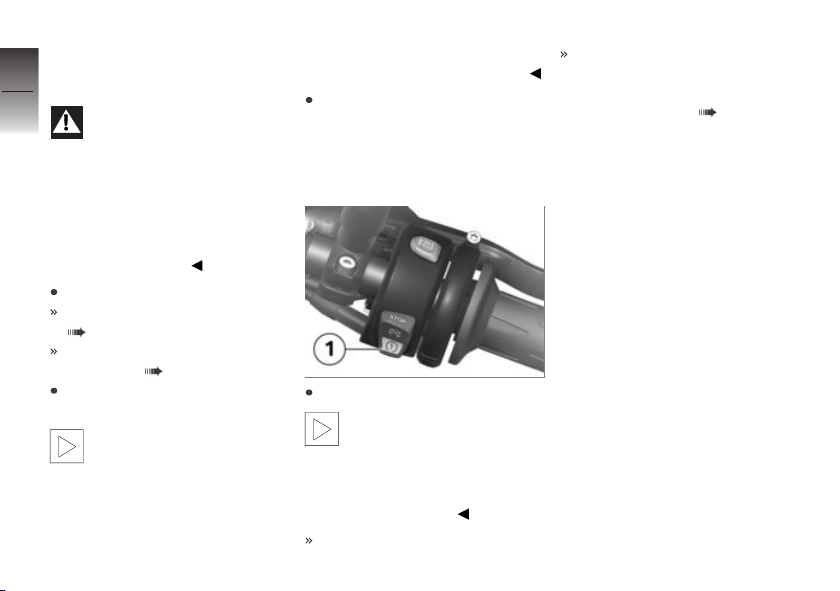
Press starter button 1.
The start attempt is auto-
matically interrupted if battery voltage is too low. Recharge
the battery before you start the
engine, or use jump leads and a
donor battery to start.
The engine starts.
If the engine refuses to start,
consult the troubleshooting
chart in the section entitled
"Technical data" ( 112).
Pre-ride check
The instrument panel runs a test
of the instruments and the telltale
and warning lights when the ignition is switched on: this is the
so-called "Pre-Ride-Check". The
test is aborted if you start the engine before it completes.
Phase 1
The rev. counter and speedometer needles both swing to
the limit values on their scales.
At the same time, all the warning lights and telltale lights are
switched on in succession.
Phase 2
The general warning light
changes from yellow to red.
Page 57
Phase 3
The rev. counter and speedometer needles both swing to
the starting position on their
scales. At the same time, all the
warning lights and telltale lights
switched on in the initial phase
are switched off in reverse sequence.
If a needle did not move or if a
warning light or telltale light did
not show:
Have the fault rectified as
quickly as possible by a
specialist workshop, preferably
an authorised BMW Motorrad
dealer.
ABS self-diagnosis
BMW Motorrad ABS performs
self-diagnosis to ensure its operability. Self-diagnosis is performed automatically when you
switch on the ignition. The motorcycle has to move forward a
few metres for the wheel-speed
sensors to be tested.
Phase 1
Test of the diagnosable system
components with the vehicle at a
standstill.
ABS warning light flashes.
Phase 2
Test of the wheel-speed sensors
as the vehicle pulls away from
rest.
ABS warning light flashes.
ABS self-diagnosis
completed
The ABS warning light goes out.
Make sure that all the warning
and telltale lights come on in
the pre-ride check.
After the ABS self-diagnosis
completes, an indicator showing an ABS fault will appear.
You can continue to ride. Bear
in mind that the ABS function
is not available.
Have the fault rectified as
quickly as possible by a
specialist workshop, preferably
an authorised BMW Motorrad
dealer.
Running in
Engine
Until the first running-in check,
vary the throttle opening and
engine-speed range frequently;
avoid riding at constant engine
rpm for prolonged periods.
Try to do most of your riding during this initial period on
twisting, fairly hilly roads, avoiding high-speed main roads and
highways if possible.
5
55
z
Riding
Page 58
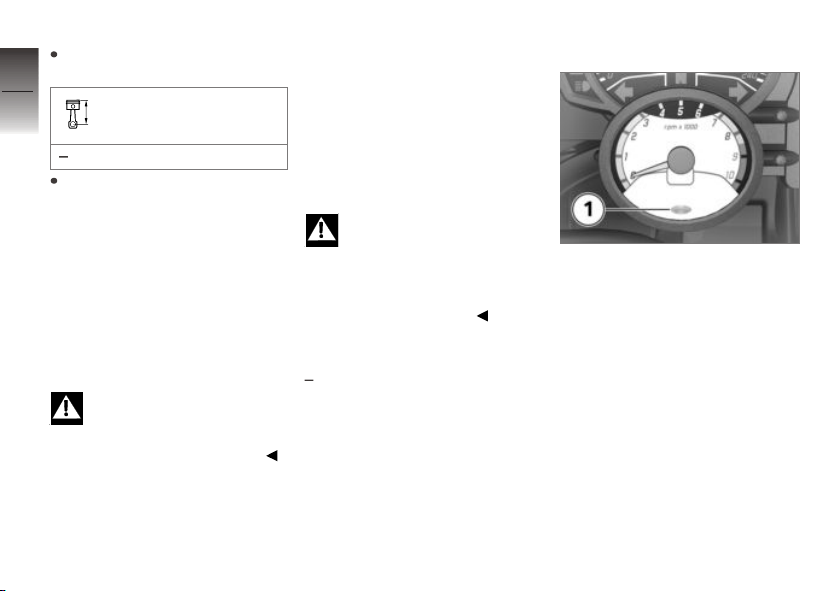
Comply with the rpm limits for
running in.
5
56
z
Riding
Running-in speed
<5000 min
Do not omit the first running-in
check after 500 - 1200 km.
-1
Brake pads
New brake pads have to bed
down before they can achieve
their optimum friction levels. You
can compensate for this initial reduction in braking efficiency by
exerting greater pressure on the
levers.
New brake pads can extend
stopping distance by a significant margin.
Apply the brakes in good time.
Tyres
New tyres have a smooth surface. This must be roughened by
riding in a restrained manner at
various heel angles until the tyres
are run in. This running in procedure is essential if the tyres are
to achieve maximum grip.
New tyres do not provide
full grip straight away. Wet
roads and extremely sharp inclines pose a risk of accident.
Ride carefully and avoid
extremely sharp inclines.
Speed
with on-board computer
OE
Redline warning
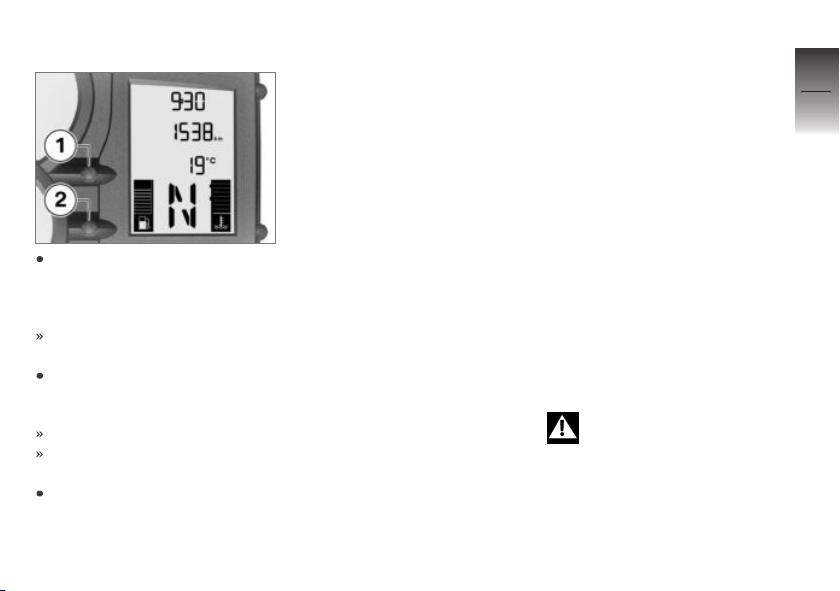
The redline warning indicates
that engine revolutions have
reached the rev. counter's red
segment. The anti-theft alarm
telltale light 1 flashes red to indicate that the engine is redlining.
The signal remains active until you shift up or reduce engine
speed. You can activate or deactivate the redline warning.
Page 59
Activating redline warning
Press button 1 and button 2
at the same time and hold
them down until the reading
changes.
FLASH (redline warning) ap-
pears, along with ON or OFF.
Repeatedly press button 1 until
the reading shows the mode
you want.
ON: Redline warning activated.
OFF: Redline warning deactiv-
ated.
To save the setting, press
button 1 and button 2 at
the same time and hold
them down until the reading
changes.
Brakes
How can stopping
distance be minimised?
Each time the brakes are applied,
a load distribution shift takes
place with the load shifting forward from the rear to the front
wheel. The sharper the motorcycle decelerates, the more load
is shifted to the front wheel. The
higher the wheel load, the more
braking force can be transmitted
without the wheel locking.
To optimise stopping distance,
apply the front brakes rapidly and
keep on increasing the force you
apply to the brake lever. This
makes the best possible use of
the dynamic increase in load at
the front wheel. Remember to
pull the clutch at the same time.
In the "panic braking situations"
that are trained so frequently
braking force is applied as rapidly as possible and with the
rider's full force applied to the
brake levers; under these circumstances the dynamic shift in load
distribution cannot keep pace
with the increase in deceleration
and the tyres cannot transmit the
full braking force to the surface
of the road.
Under these circumstances the
front wheel can lock up.
BMW Motorrad ABS prevents
the front wheel from locking up.
Descending mountain
passes
There is a danger of the
brakes fading if you use
only the rear brakes when descending mountain passes. Under
extreme conditions, the brakes
could overheat and suffer severe
damage.
5
57
z
Riding
Page 60
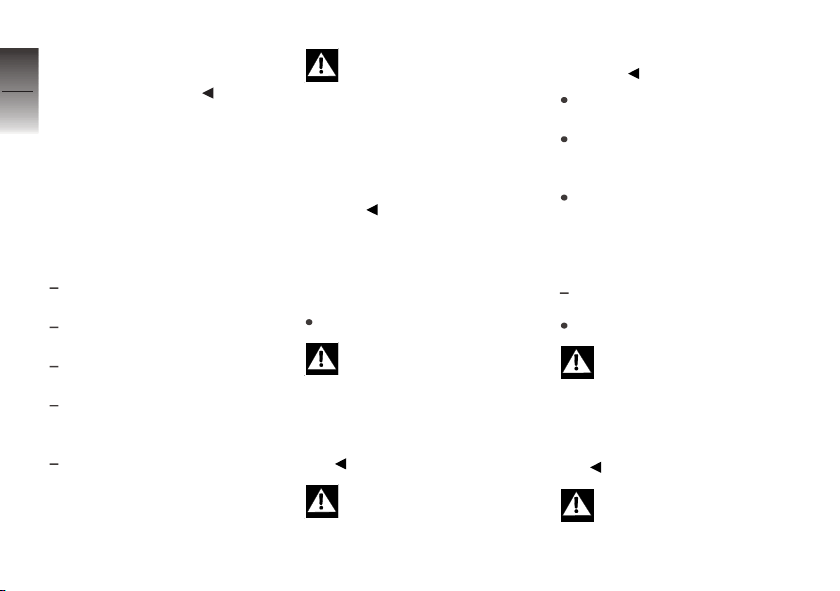
Use both front and rear brakes,
and make use of the engine's
5
braking effect as well.
58
Wet and dirty brakes
Wetness and dirt on the brake
discs and the brake pads diminish braking efficiency.
Delayed braking action or poor
braking efficiency must be
z
Riding
reckoned with in the following
situations:
Riding in the rain or through
puddles of water
After the vehicle has been
washed
Riding on salted or gritted
roads
After work has been carried on
the brakes, due to traces of oil
or grease
Riding on dirt-covered surfaces
or off-road
Wetness and dirt result in
poor braking efficiency.
Apply the brakes lightly while
riding to remove wetness and
dirt, or dismount and clean the
brakes.
Think ahead and brake in good
time until full braking efficiency is
restored.
Parking your motorcycle
Side stand
Switch off the engine.
If the ground is soft or un-
even, there is no guarantee that the motorcycle will rest
firmly on the stand.
Always check that the ground
under the stand is level and
firm.
The side stand is designed
to support only the weight
of the motorcycle.
Do not lean or sit on the
motorcycle with the side stand
extended.
Extend the side stand and prop
the motorcycle on the stand.
If the camber of the roadway
permits, turn the handlebars all
the way to the left.
On a gradient, the motorcycle
should always face uphill; select 1st gear.
Centre stand
with centre stand
Switch off the engine.
If the ground is soft or un-
even, there is no guarantee that the motorcycle will rest
firmly on the stand.
Always check that the ground
under the stand is level and
firm.
Excessive movements
could cause the centre
OA
Page 61
stand to retract, and the vehicle
would topple in consequence.
Do not lean or sit on the motorcycle with the centre stand
extended.
Extend the centre stand and lift
the motorcycle onto the stand.
Refuel
Fuel grade
For optimum fuel consumption,
fuel should be sulphur-free or as
low-sulphur as possible.
Leaded fuel will destroy the
catalytic converter.
Do not attempt to run the vehicle
on leaded fuel or fuel with metallic additives, e.g. manganese or
iron.
Fuels with a maximum Ethanol
content of 10 %, i.e. E10, can
be fuelled.
Recommended fuel
grade
Premium unleaded, (max. 10
% ethanol, E10)
95 ROZ/RON
89 AKI
Refuelling
Fuel is highly flammable. A
naked flame close to the
fuel tank can cause a fire or explosion.
Do not smoke. Never bring a
naked flame near the fuel tank.
Fuel expands when hot.
Fuel escaping from an
overfilled tank could make its way
onto the road surface. This could
cause a fall.
Do not overfill the fuel tank.
Fuel attacks plastics, which
become dull or unsightly.
Wipe plastic parts immediately
after contact with fuel.
Leaded fuel will destroy the
catalytic converter.
Do not attempt to run the vehicle
on leaded fuel or fuel with metallic additives, e.g. manganese or
iron.
Make sure the ground is level
and firm and place the motorcycle on its side stand.
The volume of the tank can
be utilised to the full only
when the motorcycle is propped
on its side stand.
Open the protective cap.
5
59
z
Riding
Page 62
5
60
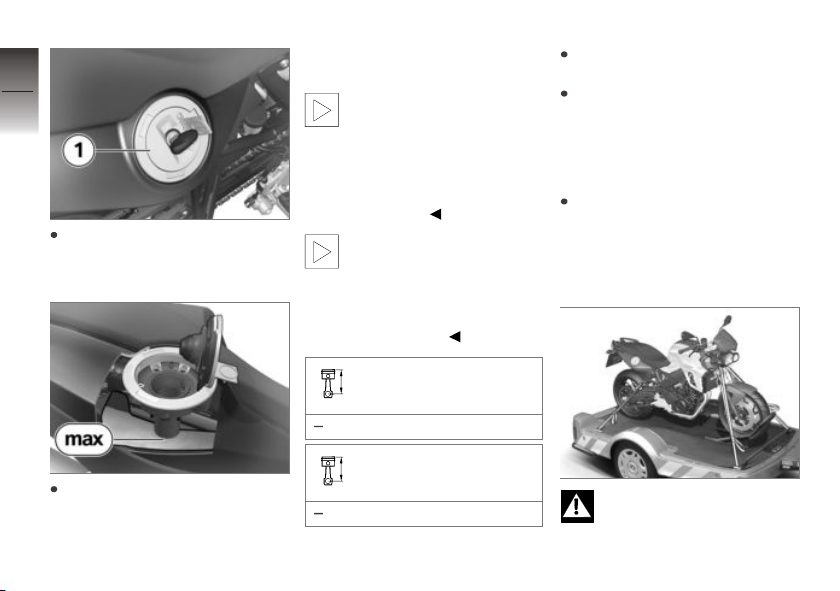
Use the ignition key to unlock
z
Riding
cap 1 of the fuel tank and pop
the cap open.
Refuel with fuel of the grade
stated below; do not fill the
tank past the bottom edge of
the filler neck.
If filling occurs after the fuel
level has gone below the
reserve limit, the amount filled
must be greater than the reserve
amount for the new fuel level to
be recognised and the warning
light to switch off.
The "Usable fuel capacity"
specified in the technical
data is the quantity that the fuel
tank could hold if it had been run
dry and the engine had cut out
due to a lack of fuel.
Usable fuel capacity
approx. 16 l
Fuel reserve
approx. 3 l
Press the fuel tank cap down
firmly to close.
Remove the key and close the
protective cap.
Secure motorcycle for transportation
Make sure that all components
that might come into contact
with straps used to secure the
motorcycle are adequately protected against scratching.
The motorcycle can topple
and fall on its side.
Secure motorcycle against top-
Page 63
pling; this is best done with the
support of a 2nd person.
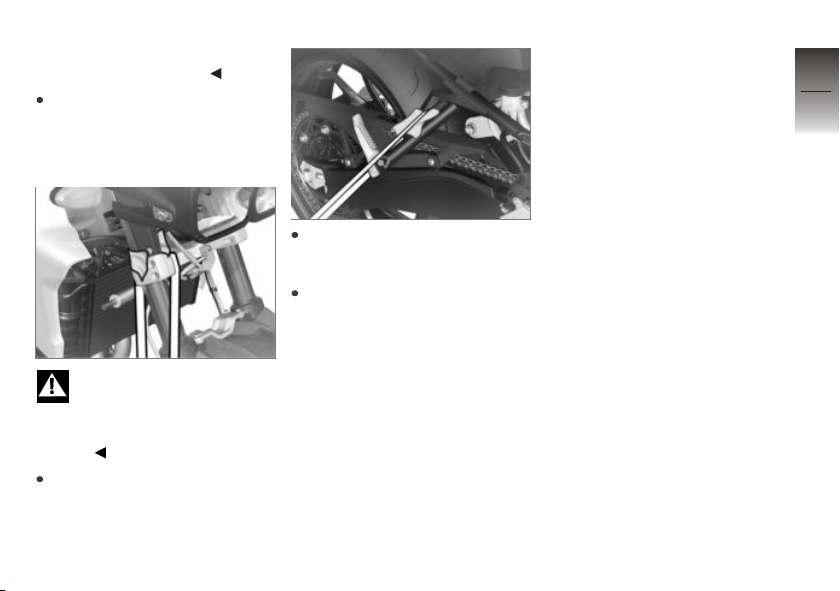
Push the motorcycle onto the
transportation flat and hold it in
position: do not place it on the
side stand or centre stand.
5
61
Risk of damaging compon-
ents.
Take care not to trap
components such as brake lines
or wires.
At the front, secure the straps
to the bottom fork bridge on
both sides and tighten the
straps.
At the rear, secure the straps
to the rear footrests on both
sides and tighten the straps.
Tighten all the straps uniformly;
the vehicle's suspension should
be compressed as tightly as
possible front and rear.
z
Riding
Page 64

5
62
z
Riding
Page 65

Engineering details
Brake system with BMW Motorrad
ABS . . . . . . . . . . . . . . . . . . . . . . . . . . . . . . . . 64
Tyre pressure monitoring RDC . . . . . 66
6
63
z
Engineering details
Page 66

Brake system with
6
BMW Motorrad ABS
64
How does ABS work?
The amount of braking force that
can be transferred to the road
depends on factors that include
the coefficient of friction of the
road surface. Loose stones, ice
and snow or a wet road all have
much lower coefficients of friction
than a clean, dry asphalt surface.
The lower the coefficient of friction, the longer the braking distance.
If the rider increases braking
pressure to the extent that brak-
z
Engineering details
ing force exceeds the maximum
transferable limit, the wheels start
to lock and the motorcycle loses
its directional stability; a fall is
imminent. Before this situation
can occur, ABS intervenes and
adapts braking pressure to the
maximum transferable braking
force. The wheels continue to
turn and the driving stability is
retained irrespective of the road
condition.
What are the effects of
surface irregularities?
Surface irregularities can cause
the wheels to lose contact temporarily with the road surface. If
this happens the braking force
that can be transmitted to the
road can drop to zero. If the
brakes are applied under these
circumstances the ABS has to
reduce braking force to ensure
that directional stability is maintained when the wheels regain
contact with the road surface.
At this instant the ABS must
assume an extremely low coefficient of friction, so that the
wheels will continue to rotate under all imaginable circumstances,
because this is the precondition
for ensuring directional stability.
As soon as it registers the actual
circumstances, the system reacts instantly and adjusts braking
force accordingly to achieve optimum braking.
Rear wheel lift
Under very severe and sudden
deceleration, however, under
certain circumstances it is possible that the BMW Motorrad
ABS will be unable to prevent
the rear wheel from lifting clear
of the ground. If this happens
the outcome can be a highsiding
situation in which the motorcycle
can flip over.
Severe braking can cause
the rear wheel to lift off the
ground.
When you brake, bear in mind
that ABS control cannot always
be relied on to prevent the rear
wheel from lifting clear of the
ground.
Page 67
What is the design
baseline for
BMW Motorrad ABS?
Within the limits imposed by
physics, the BMW Motorrad ABS
ensures directional stability on
any surface.The system is not
optimised for special requirements that apply under extreme
competitive situations off-road or
on the track.
Special situations
The speeds of the front and rear
wheels are compared as one
means of detecting a wheel's
incipient tendency to lock. If
the system registers implausible values for a lengthy period
the ABS function is deactivated
for safety reasons and an ABS
fault message is issued. Self-diagnosis has to complete before
fault messages can be issued.
In addition to problems with the
BMW Motorrad ABS, exceptional
riding conditions can lead to a
fault message being issued.
Exceptional riding
conditions:
Riding for a lengthy period with
the front wheel lifted off the
ground (wheelie)
Rear wheel rotating with the
vehicle held stationary by applying the front brake (burnout)
Heating up with the motorcycle
on the centre stand or an auxiliary stand, engine idling or with
a gear engaged
Rear wheel locked for a lengthy
period, for example while descending off-road
If a fault message is issued on
account of exceptional riding
conditions as outlined above, you
can reactivate the ABS function
by switching the ignition off and
on again.
What significance
devolves on regular
maintenance?
Invariably, a technical sys-
tem cannot perform beyond
the abilities dictated by its level
of maintenance.
In order to ensure that the
BMW Motorrad ABS is always
maintained in optimum condition,
it is essential for you to comply
strictly with the specified
inspection intervals.
Reserves for safety
The potentially shorter braking
distances which BMW Motorrad
ABS permits must not be used
as an excuse for careless riding.
ABS is primarily a means of ensuring a safety margin in genuine
emergencies.
Take care when cornering! When
you apply the brakes on a corner,
the motorcycle's weight and
6
65
z
Engineering details
Page 68

momentum take over and even
BMW Motorrad ABS is unable to
6
counteract their effects.
66
Tyre pressure monitoring RDC
with tyre pressure monitoring
OE
(RDC)
Function
A sensor integrated into each
tyre measures the air temperature and the air pressure inside
the tyre and transmits this information to the control unit.
Each sensor has a centrifugal-
z
Engineering details
force tripswitch that does not
enable transmission of the
measured values until the
motorcycle has accelerated to
about 30 km/h. The display
shows -- for each tyre until
the tyre-pressure signal is
received for the first time. The
sensors continue to transmit
the measured-value signals for
approximately 15 minutes after
the motorcycle comes to a stop.
The control unit can administrate four sensors, so two different sets of wheels with RDC
sensors can be alternated on
the motorcycle. An error message is issued if wheels without
sensors are fitted to a motorcycle
equipped with an RDC control
unit.
Temperature
compensation
Tyre pressure is a temperaturesensitive variable: pressure increases as tyre temperature rises
and decreases as tyre temperature drops. Tyre temperature
depends on ambient temperature, on the style of riding and
the duration of the ride.
The tyre-pressure readings
shown by the multifunction
display are temperaturecompensated; the reference tyre
temperature for these readings
is always 20 °C. The gauges
on forecourt air lines do not
compensate for temperature.
The tyre pressure recorded
depends on tyre temperature. In
most instances, therefore, these
gauge readings will not tally with
the pressures shown by the
multifunction display.
Tyre-pressure ranges
The RDC control unit differentiates between three tyre-pressure
ranges, all of which are parameterised for the motorcycle:
Tyre pressure within permitted
tolerance
Tyre pressure close to limit of
permitted tolerance
Tyre pressure outside permitted tolerance
Page 69

Pressure adaptation
Compare the RDC readings
on the multifunction display
with the value in the table on
the inside cover of the Rider's
Manual. Then use the air line to
compensate for the difference
between the RDC reading and
the value in the table.
Example: according to the
Rider's Manual, tyre pressure
should be 2.5 bar, but the
reading in the multifunction
display is 2.3 bar. The gauge on
the air line shows 2.4 bar. You
must now increase tyre pressure
by the 0.2 bar difference
between the value in the table
and the RDC reading; when the
air-line gauge shows 2.6 bar,
the tyre is inflated to the correct
pressure.
6
67
z
Engineering details
Page 70

6
68
z
Engineering details
Page 71

Accessories
General instructions . . . . . . . . . . . . . . . . . 70
Power sockets . . . . . . . . . . . . . . . . . . . . . . 70
Luggage . . . . . . . . . . . . . . . . . . . . . . . . . . . . 71
Topcase . . . . . . . . . . . . . . . . . . . . . . . . . . . . 71
7
69
z
Accessories
Page 72

General instructions
7
70
z
Accessories
BMW Motorrad cannot
examine or test each
product of outside origin to
ensure that it can be used on
or in connection with BMW
motorcycles without constituting
a safety hazard. Country-specific
official authorisation does not
suffice as assurance. Tests
conducted by these instances
cannot make provision for all
operating conditions experienced
by BMW motorcycles and,
consequently, they are not
sufficient in some circumstances.
Use only parts and accessories approved by BMW for your
motorcycle.
BMW has conducted extensive testing of the parts and accessory products to establish
that they are safe, functional and
suitable. Consequently, BMW
accepts product liability. BMW
accepts no liability whatsoever for
parts and accessories that it has
not approved.
Whenever you are planning
modifications, comply with all
the legal requirements. Make
sure that the vehicle does not
infringe the national road-vehicle
construction and use regulations
applicable in your country.
Also bear in mind the information on the effect of wheel size
on suspension-control systems
( 87).
Your BMW Motorrad dealer can
offer expert advice on the choice
of genuine BMW parts, accessories and other products.
You can check out the entire
range of optional accessories
from BMW Motorrad by visiting out website: "www.bmw-
motorrad.com".
Power sockets
Connection of electrical
devices
You can start using electrical
devices connected to the motorcycle's sockets only when
the ignition is switched on.
Cable routing
The cables from the power
sockets to the auxiliary devices
must be routed in such a way
that they do not impede the
rider.
The cable routing should not
restrict the steering angle or
obstruct handling.
The cables must not be
trapped.
Automatic shutdown
The sockets will be automatically switched off during the
start procedure.
Page 73
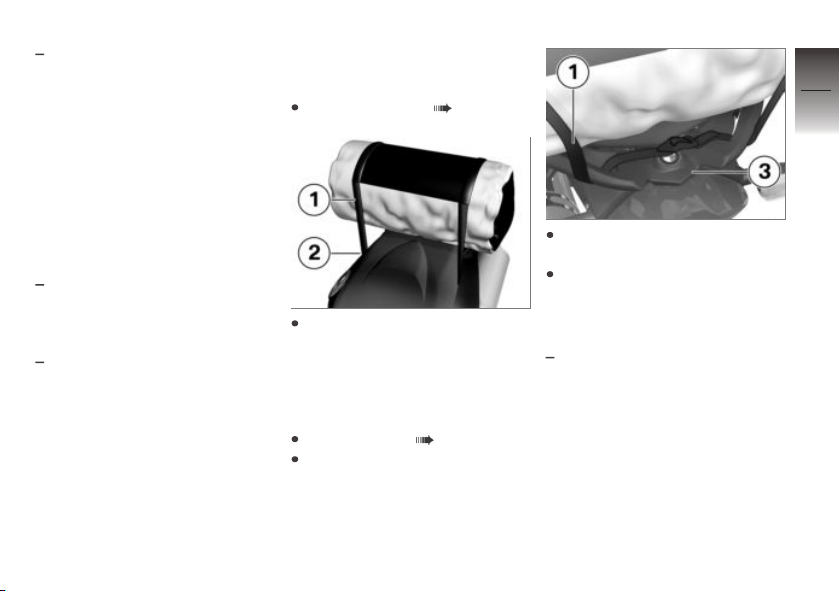
The power supply to the sockets is switched off no more
than 15 minutes after the ignition is switched off, in order to
prevent overloading of the onboard electrics. Low-wattage
electrical accessories might not
be recognised by the vehicle’s
electronics. In such cases,
power sockets are switched
off very shortly after the ignition
is turned off.
If the battery charge state is
too low to maintain the motorcycle's start capability, the
power sockets are switched off.
The power sockets are also
switched off when the maximum load capability as stated
in the technical data is exceeded.
Luggage
Lashing luggage
Remove the seat ( 49).
Pull luggage strap 1 through
underneath the seat in the vicinity 2 of the filler neck of the
fuel tank. Make sure that the
strap is in front of the ribs on
the underside of the seat.
Install the seat ( 49).
Position the luggage strap appropriately to hold the item
of luggage and route it to the
rear.
Pass luggage strap 1 through
grab handles 3 and pull it tight.
Check that the luggage is secure.
Topcase
with topcase
OA
7
71
z
Accessories
Page 74
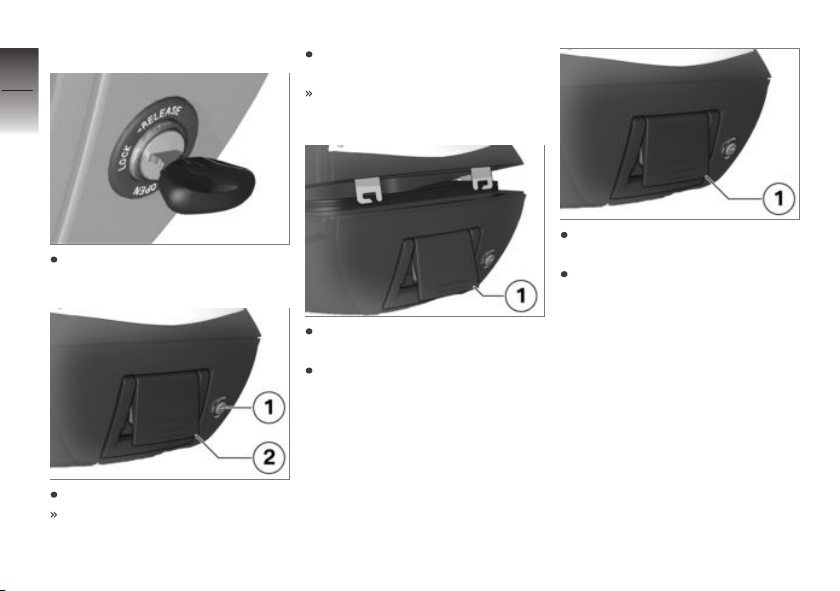
Opening topcase
7
72
Turn the key to the OPEN position in the topcase lock.
z
Accessories
Push lock barrel 1 forward.
Lever 2 pops up.
Pull the release lever all the
way up.
The lid of the topcase opens.
Closing topcase
Push release lever 1 down until
it engages.
Turn the key in the topcase
lock to the LOCK position and
remove the key from the lock.
Pull release lever 1 all the way
up.
Close the lid of the topcase
and hold it down. Check that
nothing is trapped between the
lid and the case.
Page 75
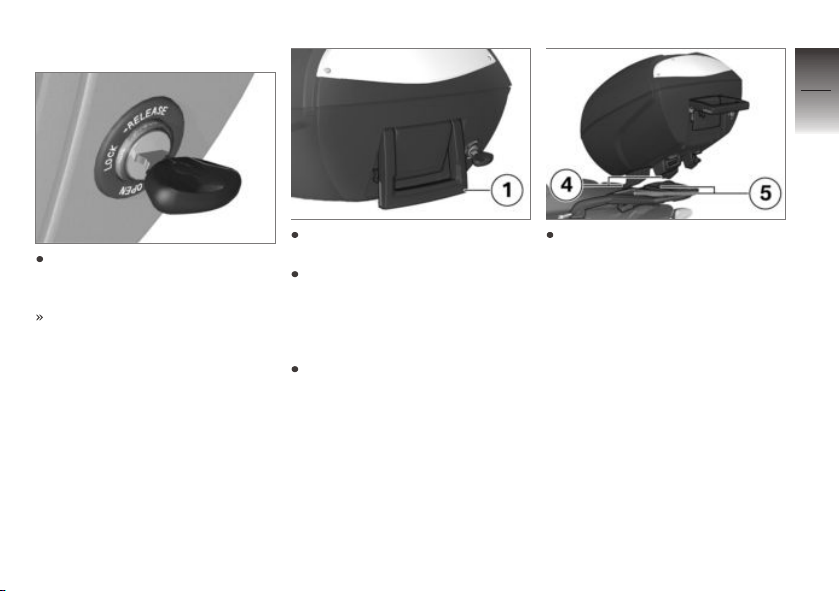
Removing the topcase
7
73
Turn the key to the
RELEASE position in the
topcase lock.
The handle pops out.
Pull handle 1 up as far as it will
go.
Lift the topcase at the rear and
remove it from the luggage
carrier.
Installing topcase
Pull the handle up as far as it
will go.
Hook the topcase into position
on the luggage carrier. Make
sure that hooks 4 are securely
seated in the corresponding
keepers 5.
z
Accessories
Page 76
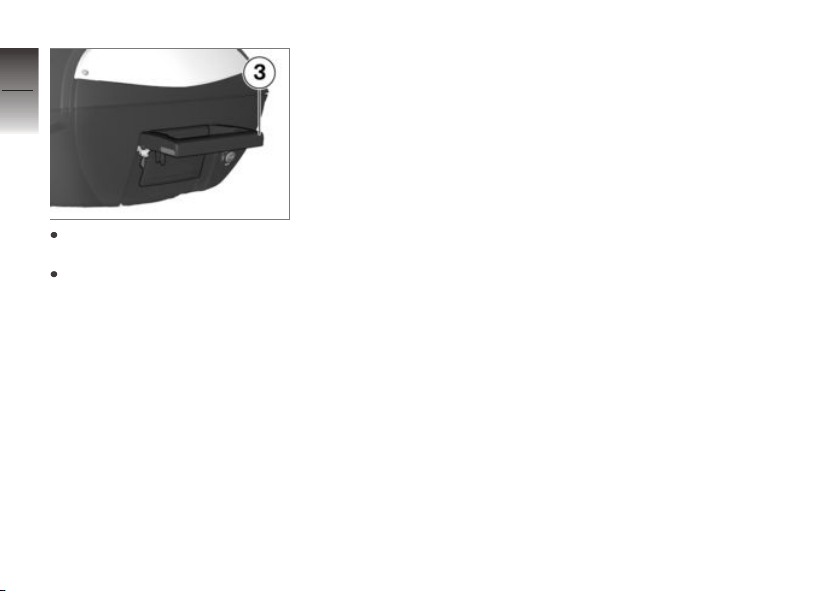
7
74
Push handle 3 down until it
engages.
Turn the key in the topcase
lock to the LOCK position and
z
Accessories
remove the key from the lock.
Page 77

Maintenance
General instructions . . . . . . . . . . . . . . . . . 76
Toolkit . . . . . . . . . . . . . . . . . . . . . . . . . . . . . . 76
Engine oil . . . . . . . . . . . . . . . . . . . . . . . . . . . 77
Brake system . . . . . . . . . . . . . . . . . . . . . . . 79
Coolant . . . . . . . . . . . . . . . . . . . . . . . . . . . . . 83
Clutch . . . . . . . . . . . . . . . . . . . . . . . . . . . . . . 84
Rims and tyres . . . . . . . . . . . . . . . . . . . . . . 85
Chain . . . . . . . . . . . . . . . . . . . . . . . . . . . . . . . 85
Wheels . . . . . . . . . . . . . . . . . . . . . . . . . . . . . 87
Front-wheel stand . . . . . . . . . . . . . . . . . . 94
Lighting . . . . . . . . . . . . . . . . . . . . . . . . . . . . . 95
Body panels . . . . . . . . . . . . . . . . . . . . . . . 100
Jump starting . . . . . . . . . . . . . . . . . . . . . . 103
Battery . . . . . . . . . . . . . . . . . . . . . . . . . . . . . 104
8
75
z
Maintenance
Page 78
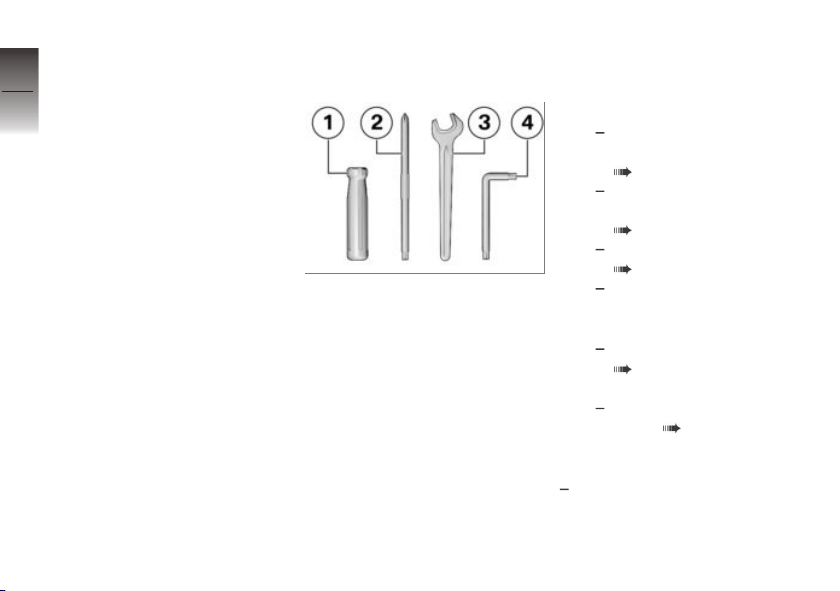
General instructions
8
The "Maintenance" chapter describes straightforward proced-
76
ures for checking and replacing
certain wear parts.
Special tightening torques are listed as applicable. The tightening
torques for the threaded fasteners on your vehicle are listed in
the section entitled "Technical
data".
Further information on maintenance and repair works is available
z
Maintenance
from your BMW Motorrad authorised dealer in the form of a DVD.
Some of the work requires special tools and a thorough knowledge of the technology involved.
If you are in doubt consult a
specialist workshop, preferably
your authorised BMW Motorrad
dealer.
Toolkit
Standard toolkit
1 Screwdriver handle
2 Reversible screwdriver
blade
With cross recess and Torx
T25
Replacing bulbs for front
and rear turn indicators
( 99).
Replacing bulb for brake
light and rear light
( 98).
Removing battery
( 105).
Removing body panels.
3 Open-ended spanner
Width across flats 17
Adjust the mirror arm
( 45).
4 Torx wrench, T40
Adjusting headlight beam
throw ( 48).
Service toolkit
with service toolkit
OA
Page 79
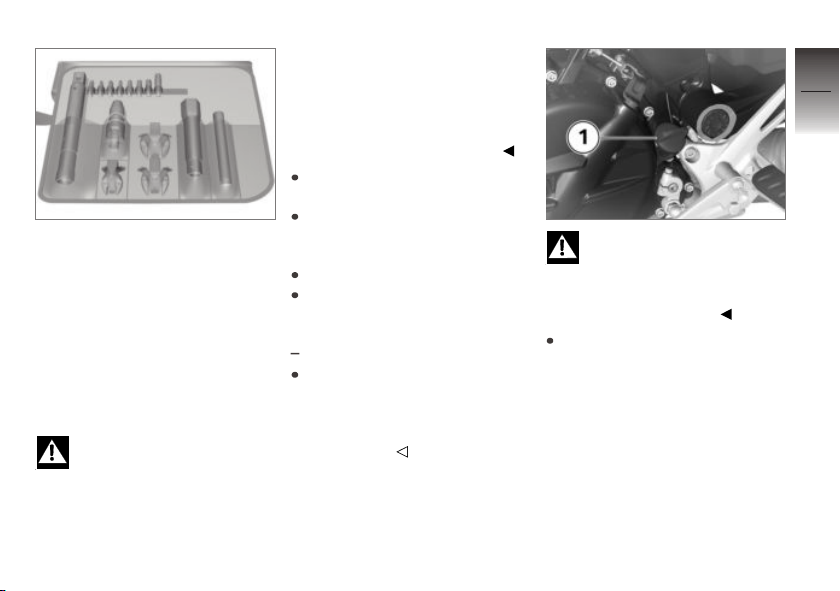
BMW Motorrad has assembled
a service toolkit that is ideal for
carrying out extended work (e.g.
removing and installing wheels)
on this motorcycle. You can obtain the tools set from your authorised BMW Motorrad dealer.
Engine oil
Check engine oil level
The oil level varies with
the temperature of the
oil. The higher the temperature,
the higher the level of oil in the
sump. Checking the oil level with
the engine cold or after no more
than a short ride will lead to misinterpretation of oil level.
In order to ensure that the engine oil level is read correctly,
check the oil level only after at
engine operating temperature.
Wipe the area around the oil
filler neck clean.
Allow the engine to idle until
the fan starts up, then allow it
to idle one minute longer.
Switch off the engine.
Make sure the engine is at operating temperature and hold
the motorcycle upright.
with centre stand
Check that the engine is at operating temperature, make sure
the ground is level and firm
and place the motorcycle on its
centre stand.
OA
The motorcycle can topple
and fall on its side.
Secure motorcycle against toppling; this is best done with the
support of a 2nd person.
Remove oil dipstick 1.
8
77
z
Maintenance
Page 80
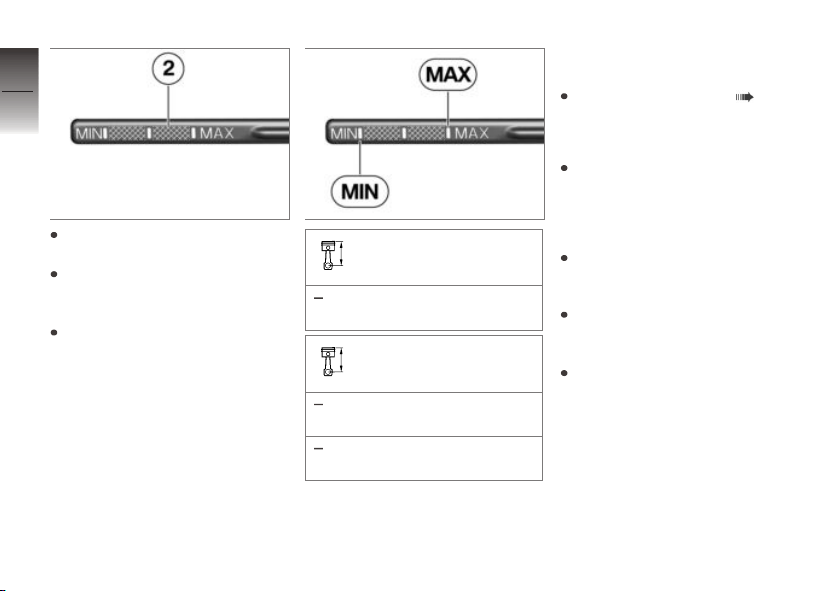
8
78
Use a dry cloth to wipe gauge
length 2 clean.
Seat the oil dipstick on the oil
filler neck, but do not engage
z
Maintenance
the threads.
Remove the oil dipstick and
check the oil level.
Engine oil, specified level
Between MIN and MAX
marks
Engine oil, quantity for
topping up
products recommended by
BMW Motorrad
max 0.4 l (Difference
between MIN and MAX)
If the oil level is below the MIN
mark:
Top up the engine oil ( 78).
If the oil level is above the MAX
mark:
Have the oil level corrected
by a specialist workshop,
preferably an authorised
BMW Motorrad dealer.
Install the oil dipstick.
Topping up engine oil
Make sure the ground is level
and firm and place the motorcycle on its stand.
Wipe the area around the filler
neck clean.
Page 81
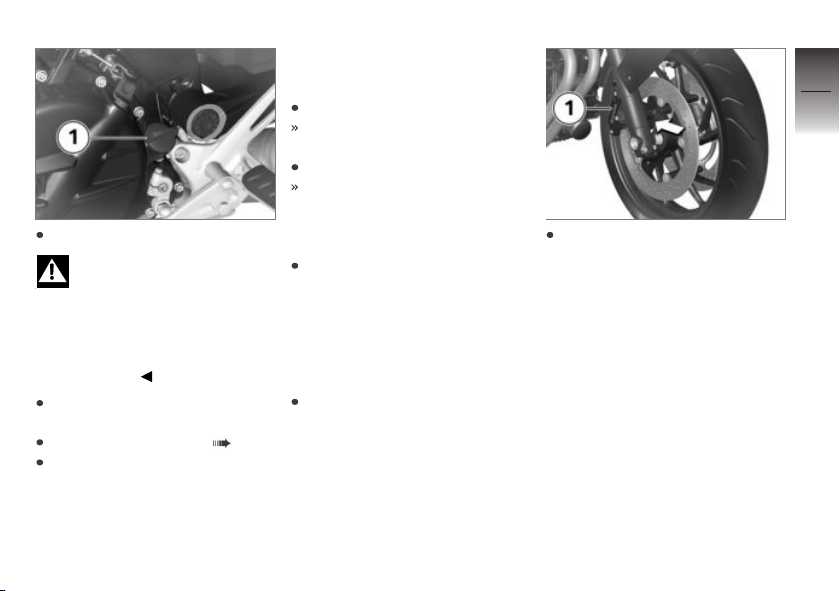
Remove oil dipstick 1.
Damage to the engine
can result if it is operated
without enough oil, but the same
also applies if the oil level is too
high.
Always make sure that the oil
level is correct.
Top up the engine oil to the
specified level.
Check engine oil level ( 77).
Install the oil dipstick.
Brake system
Check operation of brakes
Pull the front brake lever.
The pressure point must be
clearly perceptible.
Press the footbrake lever.
The pressure point must be
clearly perceptible.
If pressure points are not clearly
perceptible:
Have the brakes checked by a
specialist workshop, preferably
an authorised BMW Motorrad
dealer.
Check front brake pad
thickness
Make sure the ground is level
and firm and place the motor-
cycle on its stand.
Visually inspect the left and
right brake pads to ascertain
their thickness. Viewing direction: between wheel and front
suspension toward brake calipers 1.
8
79
z
Maintenance
Page 82
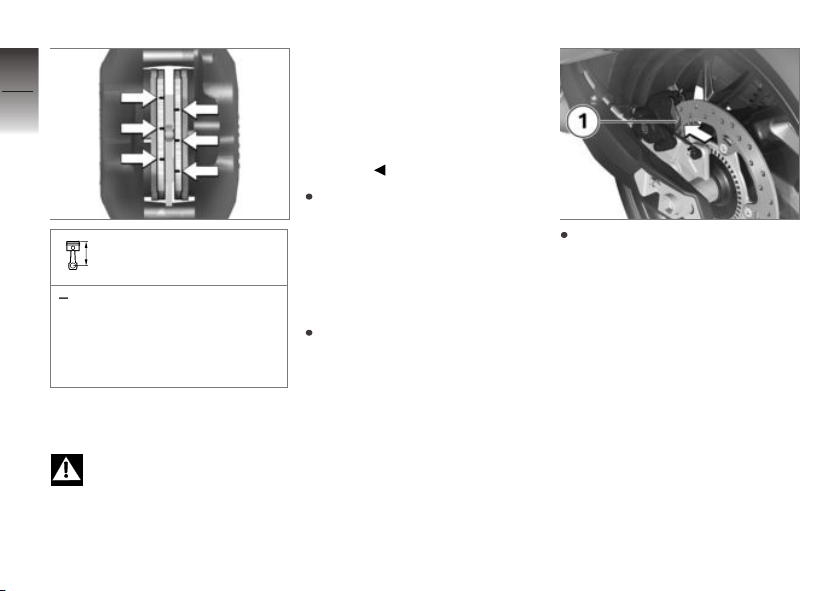
8
80
Brake-pad wear limit,
front
z
min 1.0 mm (Friction pad
Maintenance
only, without backing
plate. The wear indicators
(grooves) must be clearly
visible.)
If the wear indicating marks are
no longer clearly visible:
Brake pads worn past the
minimum permissible thickness can cause a reduction in
braking efficiency and under
certain circumstances they can
cause damage to the brake system.
In order to ensure the dependability of the brake system, do not
permit the brake pads to wear
past the minimum permissible
thickness.
Have the brake pads replaced
by a specialist workshop,
preferably an authorised
BMW Motorrad dealer.
Check rear brake pad
thickness
Make sure the ground is level
and firm and place the motorcycle on its stand.
Visually inspect the brake pads
to ascertain their thickness.
Viewing direction: from the rear
toward brake caliper 1.
Page 83
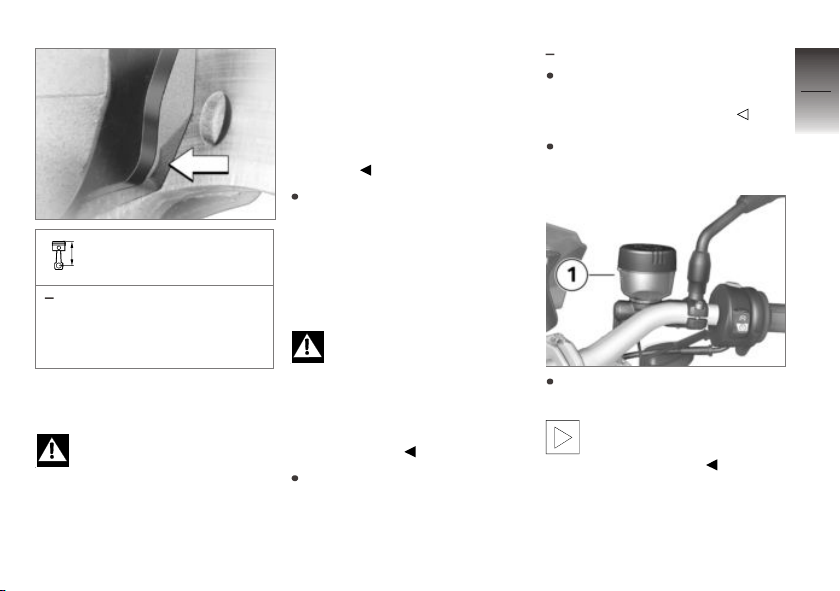
Brake-pad wear limit,
rear
min 1.0 mm (Friction pad
only, without backing plate.
The wear indicators must be
clearly visible.)
If the wear indicating mark is no
longer visible:
Brake pads worn past the
minimum permissible thickness can cause a reduction in
braking efficiency and under
certain circumstances they can
cause damage to the brake system.
In order to ensure the dependability of the brake system, do not
permit the brake pads to wear
past the minimum permissible
thickness.
Have the brake pads replaced
by a specialist workshop,
preferably an authorised
BMW Motorrad dealer.
Check brake-fluid level,
front brakes
A low fluid level in the
brake reservoir can allow air
to penetrate the brake system.
This significantly reduces braking
efficiency.
Check the brake-fluid level at
regular intervals.
Make sure the ground is level
and firm and hold the motorcycle upright.
with centre stand
Make sure the ground is level
and firm and place the motorcycle on its centre stand.
Move the handlebars to the
straight-ahead position.
Check the brake fluid level in
front reservoir 1.
Wear of the brake pads
causes the brake fluid level
in the reservoir to sink.
OA
8
81
z
Maintenance
Page 84
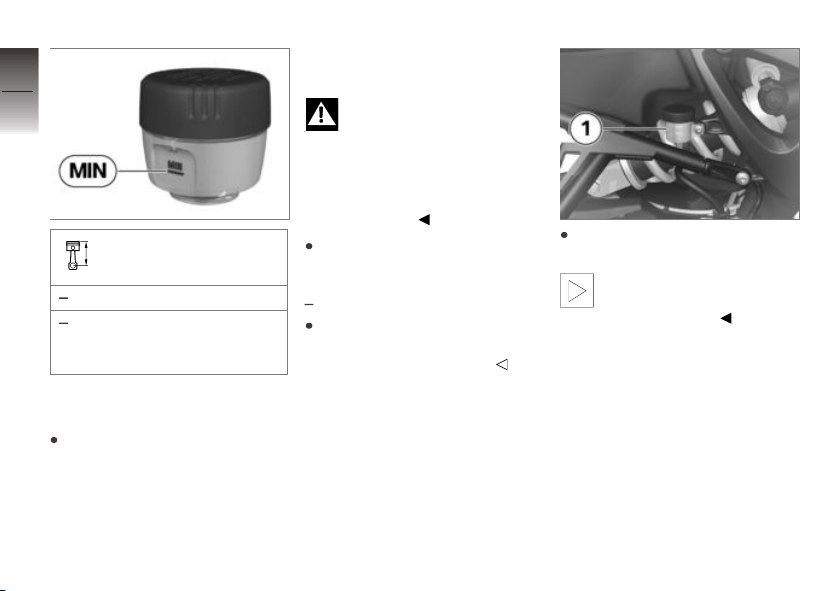
8
82
Brake fluid level, front
(visual inspection)
z
Brake fluid, DOT4
Maintenance
Do not permit the brake fluid
level to drop below the MIN
mark.
If the brake fluid level drops below the permitted level:
Have the defect rectified as
quickly as possible by a specialist workshop, preferably
an authorised BMW Motorrad
dealer.
Check the brake-fluid
level, rear brakes
A low fluid level in the
brake reservoir can allow air
to penetrate the brake system.
This significantly reduces braking
efficiency.
Check the brake-fluid level at
regular intervals.
Make sure the ground is level
and firm and hold the motorcycle upright.
with centre stand
Make sure the ground is level
and firm and place the motorcycle on its centre stand.
OA
Check the brake fluid level in
rear reservoir 1.
Wear of the brake pads
causes the brake fluid level
in the reservoir to sink.
Page 85
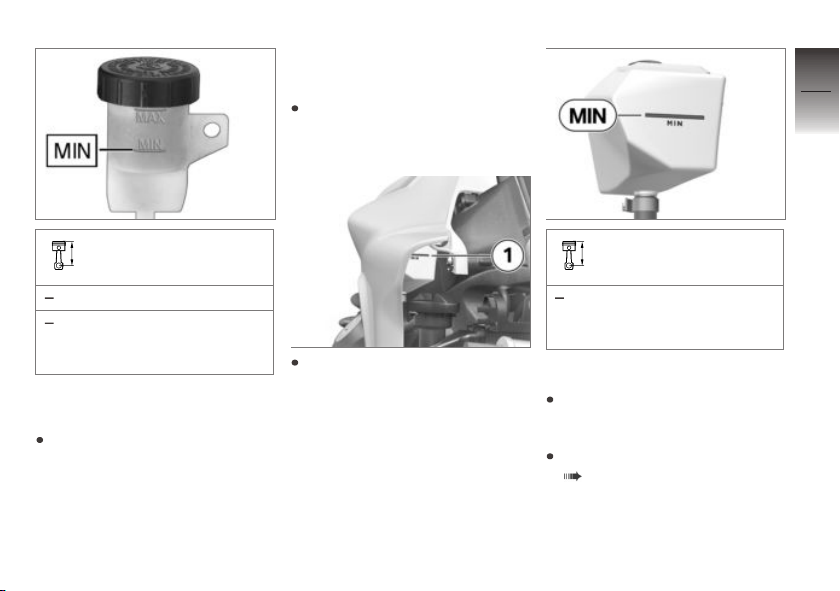
Coolant
Checking coolant level
Make sure the ground is level
and firm and place the motorcycle on its stand.
8
83
Brake fluid level, rear
(visual inspection)
Brake fluid, DOT4
Do not permit the brake fluid
level to drop below the MIN
mark.
If the brake fluid level drops below the permitted level:
Have the defect rectified as
quickly as possible by a specialist workshop, preferably
an authorised BMW Motorrad
dealer.
Check the coolant level in expansion tank 1. Viewing direction: from in front through the
opening in the side panel to
the expansion tank.
Minimum quantity of
coolant
Do not permit the fluid level
to drop below the MIN mark
on the reservoir
If the coolant drops below the
permitted level:
Top up the coolant.
Topping up coolant
Remove the right side panel
( 101).
z
Maintenance
Page 86
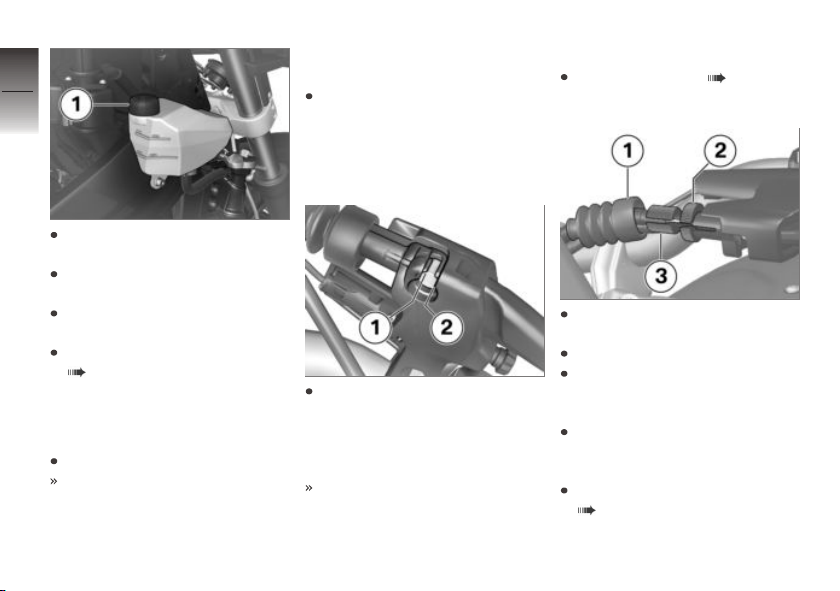
8
84
Open cap 1 of the expansion
tank.
Top up coolant to specified
level.
z
Maintenance
Close the cap of the expansion
tank.
Install the right side panel
( 102).
Clutch
Checking clutch function
Pull the clutch lever.
The pressure point must be
clearly perceptible.
If the pressure point is not clearly
perceptible:
Have the clutch checked by a
specialist workshop, preferably
an authorised BMW Motorrad
dealer.
Checking the clutch play
Operate the clutch lever until
resistance can be felt whilst
observing the notch between
edges 1 and 2 in the manual
valve.
The inner edge 1 of the brake
cable should be able to move
up to the edge 2 of the manual
valve.
Clutch play is out of tolerance:
Adjust clutch play ( 84).
Adjust clutch play
Move the rubber grommet 1 to
one side.
Slacken nut 2.
To increase clutch play: screw
the adjusting screw 3 into the
manual valve.
To reduce clutch play: unscrew the adjusting screw 3
from the manual valve.
Checking the clutch play
( 84).
Page 87
Tighten nut 2 while holding the
adjusting screw 3 in position.
Fasten the rubber grommet 1
over the nut.
Rims and tyres
Checking rims
Make sure the ground is level
and firm and place the motorcycle on its stand.
Visually inspect the rims for
defects.
Have any damaged rims inspected by a specialist workshop and replaced if necessary, preferably by an authorised BMW Motorrad dealer.
Check the tyre tread
depth
Your motorcycle's handling
and grip can be impaired
even before the tyres wear to
the minimum tyre tread depth
permitted by law.
Have the tyres changed in good
time before they wear to the
minimum permissible tread
depth.
Make sure the ground is level
and firm and place the motorcycle on its stand.
Measure the tyre tread depth
in the main tread grooves with
wear marks.
Wear indicators are built
into the main profile
grooves on each tyre. The tyre
is worn out when the tyre tread
has worn down to the level of
the marks. The locations of the
marks are indicated on the edge
of the tyre, e.g. by the letters TI,
TWI or by an arrow.
If the tyre tread is worn to minimum:
Replace tyre or tyres, as applicable.
Chain
Lubricating chain
Dirt, dust and inadequate
lubrication will result in accelerated wear and significantly
shorten the drive chain's useful
life.
Clean and lubricate the drive
chain at regular intervals.
Lubricate the drive chain every
1000 km at the latest. Lubricate the chain more frequently if
the motorcycle is ridden in wet,
dusty or dirty conditions.
Switch the ignition off and select neutral.
Clean the drive chain with a
suitable cleaning product, dry it
and apply chain lubricant.
Wipe off excess lubricant.
8
85
z
Maintenance
Page 88
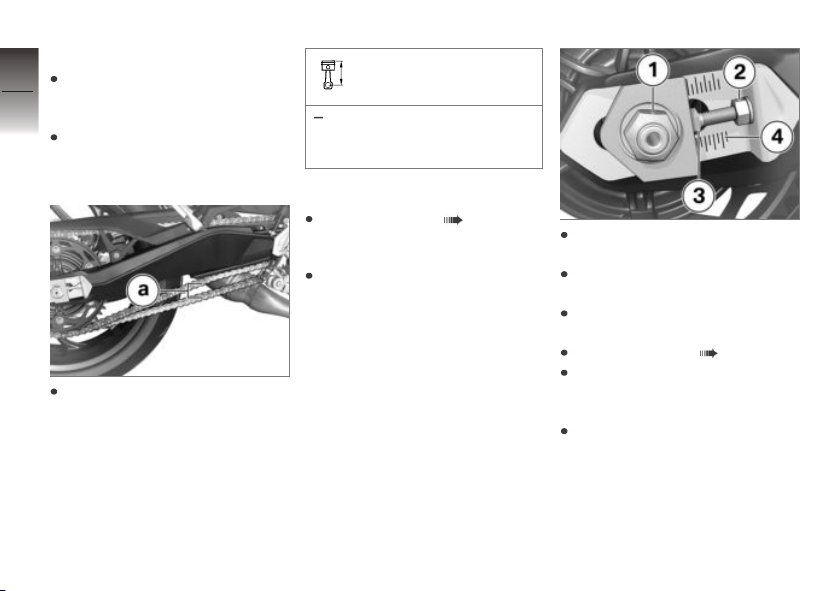
Check chain sag
8
Make sure the ground is level
and firm and place the motor-
86
cycle on its stand.
Turn the rear wheel until it
reaches the position with the
lowest amount of chain sag.
z
Maintenance
Use a screwdriver to push the
chain up and down and measure difference a.
Chain deflection
30...40 mm (Motorcycle with
no weight applied, supported
on its side stand)
If measured value is outside permitted tolerance:
Adjust chain sag ( 86).
Adjust chain sag
Make sure the ground is level
and firm and place the motorcycle on its stand.
Slacken quick-release axle
nut 1.
Slacken locknuts 2 on left and
right.
Use adjusting screws 3 on left
and right to adjust chain sag.
Check chain sag ( 86).
Make sure that scale readings 4 are the same on left and
right.
Tighten locknuts 2 on left and
right to the specified tightening
torque.
Page 89
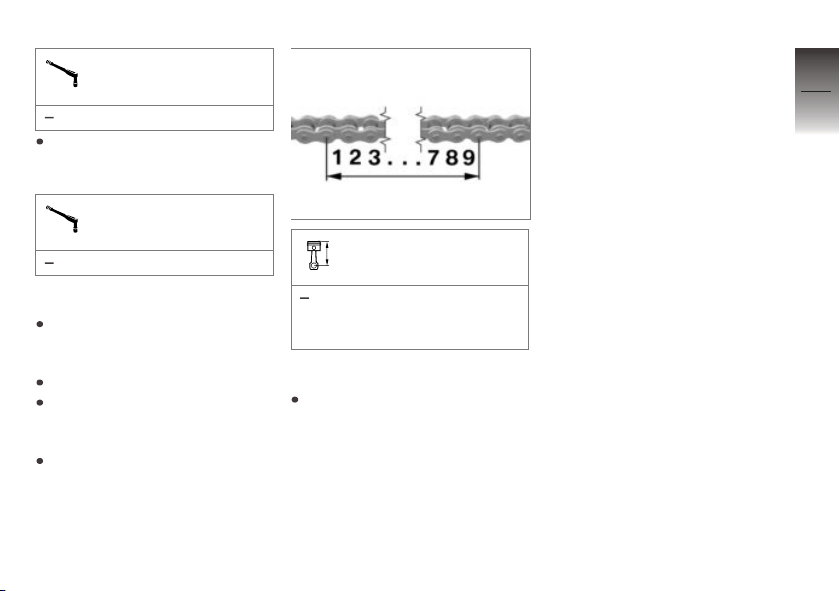
Locknut of the final-drive
chain tensioning screw
19 Nm
Tighten quick-release axle
nut 1 to the specified tightening torque.
Rear quick-release axle
in swinging arm
100 Nm
Checking the chain wear
Make sure the ground is level
and firm and place the motorcycle on its stand.
Engage 1st gear.
Turn the rear wheel in the normal direction of travel until the
chain is tensioned.
Measure the length of the
chain over 9 rivets below the
rear wheel swinging arm.
Permissible chain length
max 144.30 mm (measured
over 9 pins, chain pulled
taut)
If the chain has stretched to the
maximum permissible length:
Seek the advice of a specialist
workshop, preferably an authorised BMW Motorrad dealer.
Wheels
Tyre recommendation
For each size of tyre
BMW Motorrad tests certain
makes, and approves those
that it certifies as roadworthy. If
BMW Motorrad has not approved
the wheels and tyres, it cannot
assess their suitability or provide
any guarantee of road safety.
Use only wheels and tyres approved by BMW Motorrad for
your type of motorcycle.
You can obtain detailed
information from your authorised
BMW Motorrad dealer or on
the Internet at www.bmwmotorrad.com.
Effect of wheel size on
ABS
The wheel size has a large influence on the functionality of
the ABS system. In particular,
the diameter and the width of a
8
87
z
Maintenance
Page 90
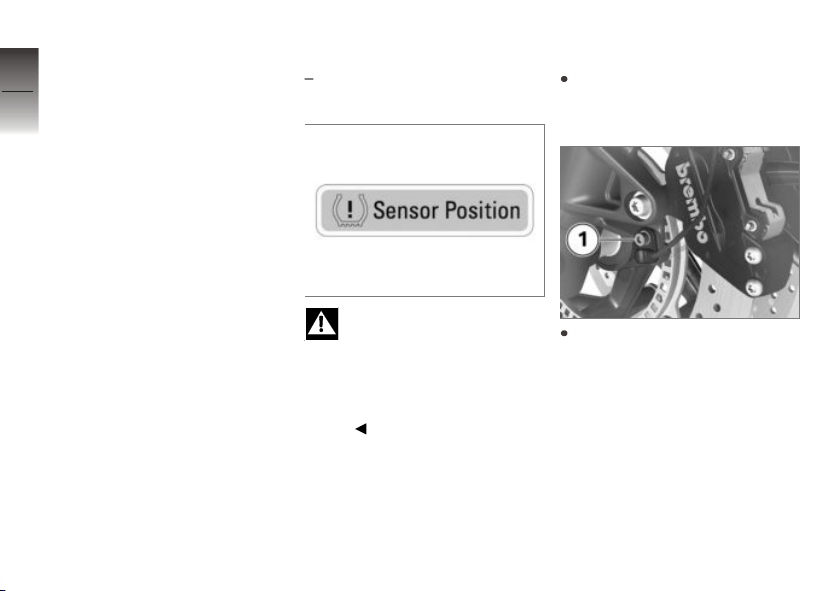
vehicle's wheels are programmed
into the control unit and are fun-
8
damental to all calculations. Any
88
change in these influencing variables, caused for example by a
switch to non-standard installed
wheels, can have serious effects
on the performance of the control systems.
The sensor rings are essential
for correct road-speed calculation, and they too must match
the motorcycle's control systems and consequently cannot
z
Maintenance
be changed.
If you decide that you would like
to fit non-standard wheels to
your motorcycle, it is very important to consult a specialist
workshop beforehand, preferably
an authorised BMW Motorrad
dealer. In some cases, the data
programmed into the control
units can be changed to suit the
new wheel sizes.
RDC adhesive label
with tyre pressure monitoring
OE
(RDC)
Incorrect tyre fitting can
damage the RDC sensors.
Be sure to explain to the authorised BMW Motorrad dealer
or the specialist workshop that
the wheel is fitted with an RDC
sensor.
If the motorcycle is equipped
with RDC, each wheel rim bears
an adhesive label indicating the
position of the RDC sensor.
Removing front wheel
Make sure the ground is level
and firm and place the motorcycle on its stand.
Remove screw 1 and remove
the speed sensor from its bore.
Page 91
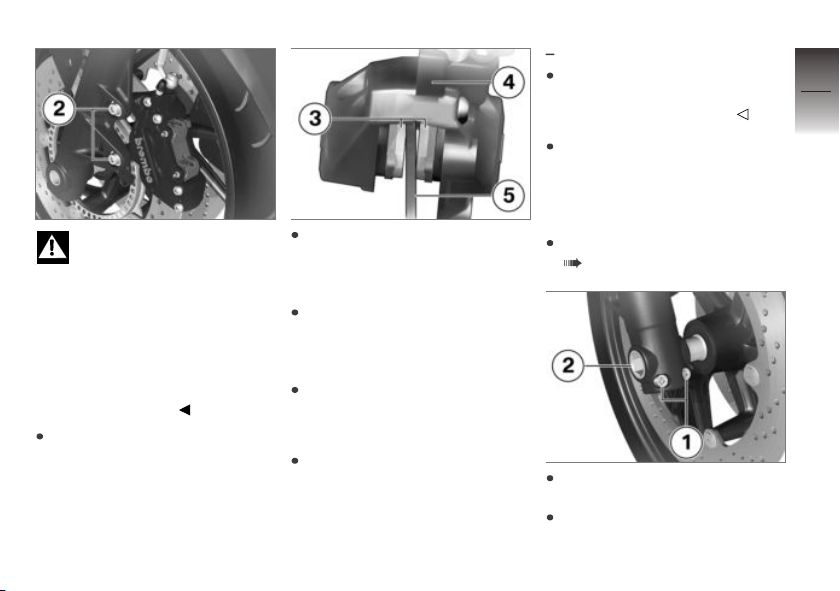
Once the calipers have
been removed, there is
a risk of the brake pads being
pressed together to the extent
that they cannot be slipped back
over the brake disc on reassembly.
Do not operate the handbrake
lever when the brake calipers
have been removed.
Remove screws 2 of the brake
calipers on left and right.
Force the brake pads 3 slightly
apart by rocking brake caliper 4
back and forth against brake
disc 5.
Mask off the parts of the wheel
rim that could be scratched in
the process of removing the
brake callipers.
Carefully pull the brake callipers
back and out until clear of the
brake discs.
Make sure the ground is level
and firm and place the motorcycle on a suitable auxiliary
stand.
with centre stand
Make sure the ground is level
and firm and place the motorcycle on its centre stand.
Raise front of motorcycle until
the front wheel can turn freely.
BMW Motorrad recommends
the BMW Motorrad front-wheel
stand for lifting the motorcycle.
Install the front-wheel stand
( 94).
Slacken axle clamping
screws 1.
Remove quick-release axle 2,
while supporting the wheel.
OA
8
89
z
Maintenance
Page 92
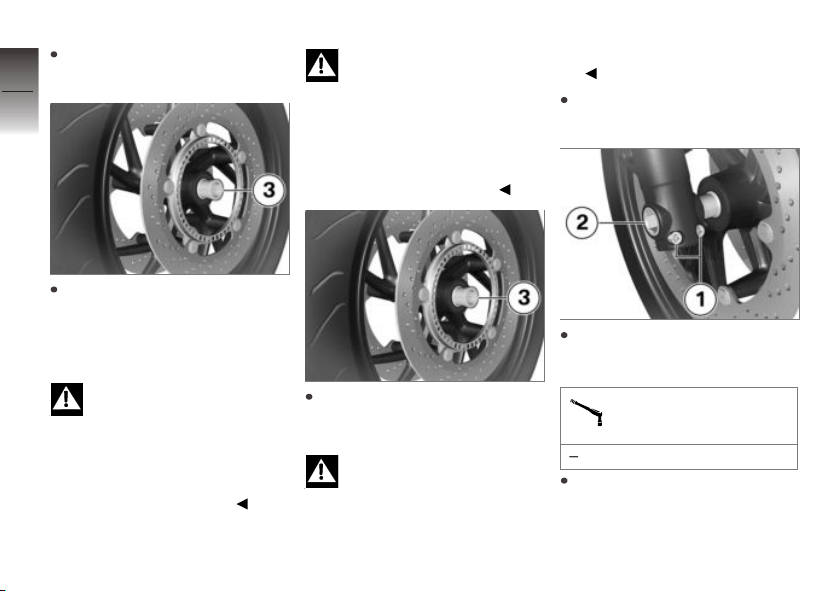
Roll the front wheel forward to
remove.
8
90
Remove spacing bushing 3
from the left-hand side of the
z
Maintenance
wheel hub.
Installing front wheel
Malfunctions are possible
when the ABS system intervenes if non-standard wheels
are installed.
See the information on the effect
of wheel size on the ABS system
at the start of this chapter.
Threaded fasteners not
tightened to the specified
torque can work loose or their
threads can suffer damage.
Always have the security of the
fasteners checked by a specialist
workshop, preferably an authorised BMW Motorrad dealer.
Slip spacing bushing 3 onto
the left-hand side of the wheel
hub.
The front wheel must be
installed right way round to
rotate in the correct direction.
Note the direction-of-rotation ar-
rows on the tyre or the wheel
rim.
Roll the front wheel into position between the front forks.
Raise the front wheel, insert
quick-release axle 2 and
tighten to specified torque.
Quick-release axle in fork
leg
50 Nm
Tighten axle clamping screws 1
to the specified tightening
torque.
Page 93
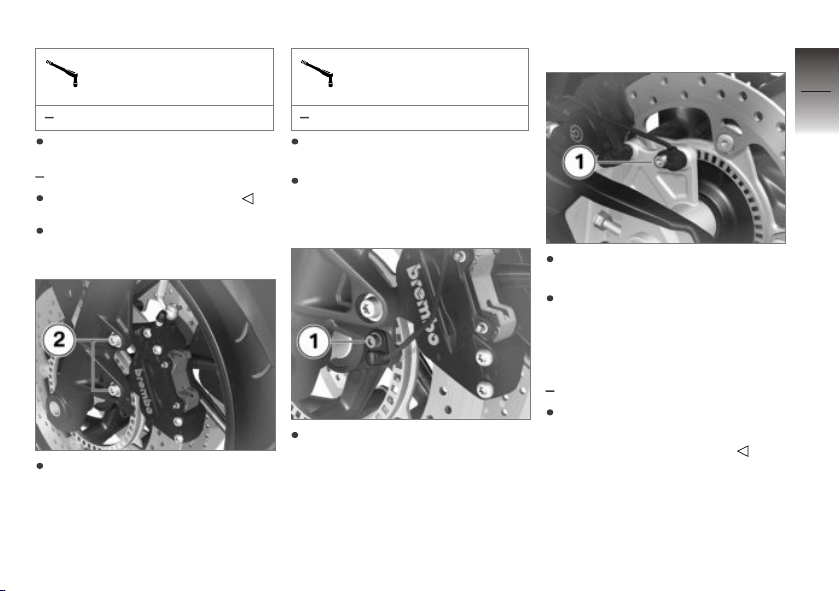
Clamp of quick-release
axle
20 Nm
Remove the front-wheel stand.
without centre stand
Remove the auxiliary stand.
Ease the brake calipers on to
the brake discs.
Tighten screws 2 of the brake
calipers on left and right to the
specified torque.
OA
Brake caliper on fork leg
30 Nm
Remove the adhesive tape
from the wheel rim.
Operate the brake several
times until the brake pads are
bedded.
Insert the speed sensor into
the bore and install screw 1.
Remove the rear wheel
Remove screw 1 and remove
the speed sensor from its bore.
Make sure the ground is level
and firm and place the motorcycle on a suitable auxiliary
stand.
with centre stand
Make sure the ground is level
and firm and place the motorcycle on its centre stand.
OA
8
91
z
Maintenance
Page 94
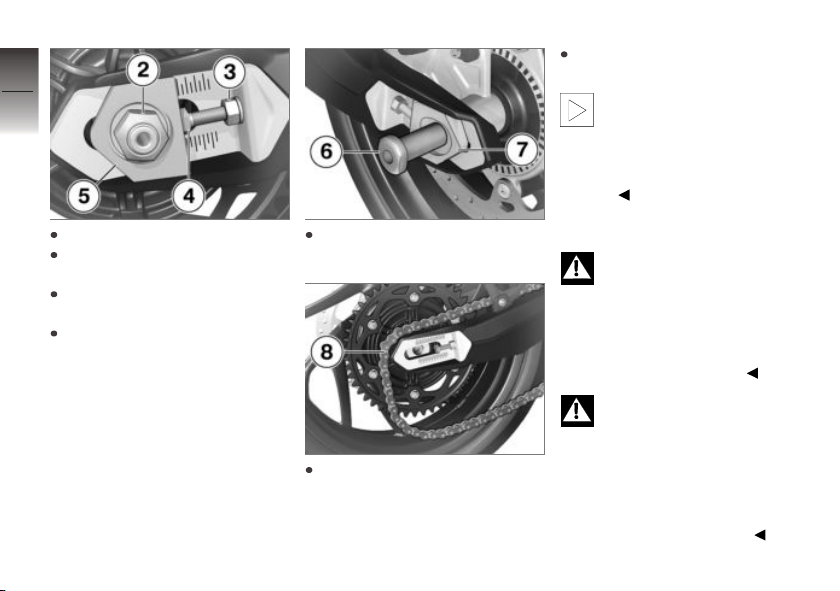
8
92
Roll the rear wheel back until it
is clear of the swinging arm.
The sprocket and the
spacer sleeves on left
and right are loose fits in the
wheel. Make sure that these
parts are not damaged or lost on
removal.
Remove axle nut 2.
Slacken locknuts 3 on left and
right.
Slacken adjusting screws 4 on
z
Maintenance
left and right.
Remove adjusting plate 5 and
push the axle in as far as it will
go.
Remove quick-release axle 6
and remove adjusting plate 7.
Roll the rear wheel as far
forward as possible and
disengage chain 8 from the
sprocket.
Install the rear wheel
Malfunctions are possible
when the ABS system intervenes if non-standard wheels
are installed.
See the information on the effect
of wheel size on the ABS system
at the start of this chapter.
Threaded fasteners not
tightened to the specified
torque can work loose or their
threads can suffer damage.
Always have the security of the
fasteners checked by a specialist
workshop, preferably an authorised BMW Motorrad dealer.
Page 95
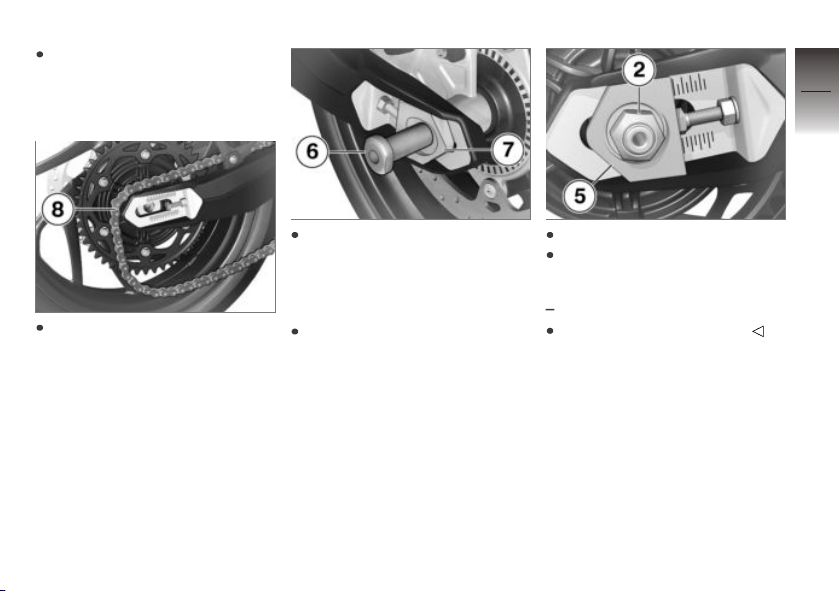
Roll the rear wheel into the
swinging arm, making sure that
the brake disc passes between
the brake pads.
8
93
Roll the rear wheel as far
forward as possible and loop
chain 8 over the sprocket.
Seat left adjusting plate 7 in
the swinging arm and install
quick-release axle 6 in the
brake caliper and the rear
wheel.
Make sure that the axle fits
into the recess of the adjusting plate.
Install right adjusting plate 5.
Install nut 2, but do not tighten
it at this point.
without centre stand
Remove the auxiliary stand.
OA
z
Maintenance
Page 96
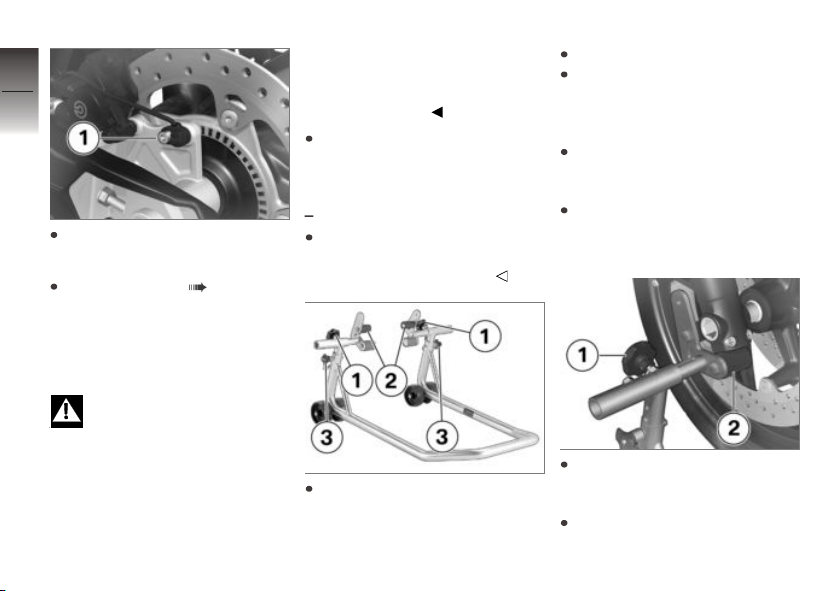
8
94
Insert the speed sensor into
the bore and install screw 1.
Adjust chain sag ( 86).
z
Maintenance
Front-wheel stand
Installing front-wheel
stand
The BMW Motorrad front
wheel stand is not designed
to support the motorcycle
without the assistance of an
auxiliary stand. A motorcycle
resting only on the front wheel
stand and the rear wheel can
topple.
Place the motorcycle on an auxiliary stand before lifting the front
wheel with the BMW Motorrad
front-wheel stand.
Make sure the ground is level
and firm and place the motorcycle on a suitable auxiliary
stand.
with centre stand
Make sure the ground is level
and firm and place the motorcycle on its centre stand.
Use basic stand (83 30 0 402
241) with front-wheel adapter
(83 30 0 402 242).
OA
Slacken adjusting screws 1.
Push the two adapters 2 apart
until the front forks fit between
them. Adjust the adapter studs
to suit the front suspension.
Use locating pins 3 to set the
front-wheel stand to the desired height.
Centre the front-wheel stand
relative to the front wheel and
push it against the front axle.
Align the two adapters 2 so
that the front forks are securely
seated.
Tighten adjusting screws 1.
Page 97
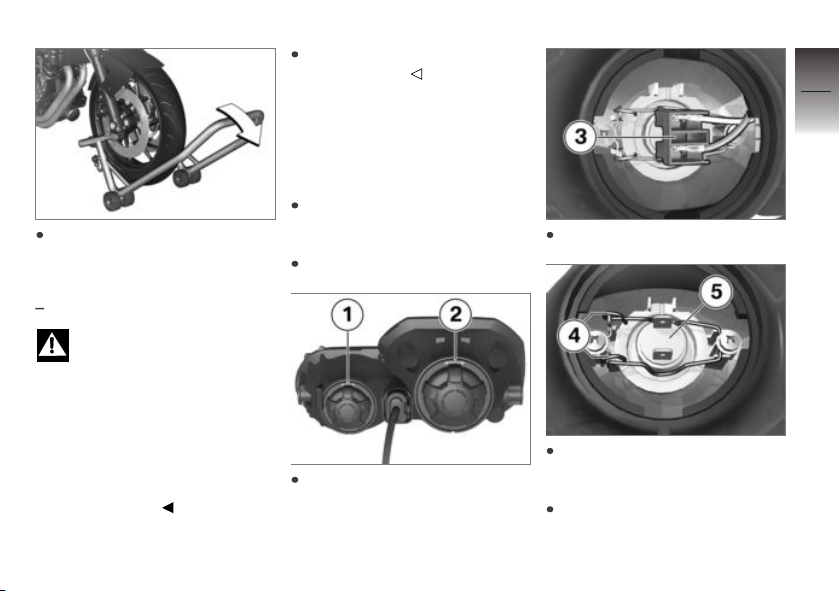
Apply uniform pressure to push
the front-wheel stand down
and raise the motorcycle.
with centre stand
If the motorcycle is raised
too far the centre stand will
lift clear of the ground and the
motorcycle could topple to one
side.
When raising the motorcycle,
make sure that the centre stand
remains on the ground. If necessary, adjust the height of the
front-wheel stand.
OA
Make sure the motorcycle is
standing firmly.
Lighting
Replacing bulbs for lowbeam headlight and highbeam headlight
Make sure the ground is level
and firm and place the motorcycle on its stand.
Switch off the ignition.
Remove cover 1 for the highbeam headlight or cover 2 for
the low-beam headlight.
Disconnect plug 3.
Disengage spring clips 4 from
the fastenings and swing them
aside.
Remove bulb 5.
8
95
z
Maintenance
Page 98
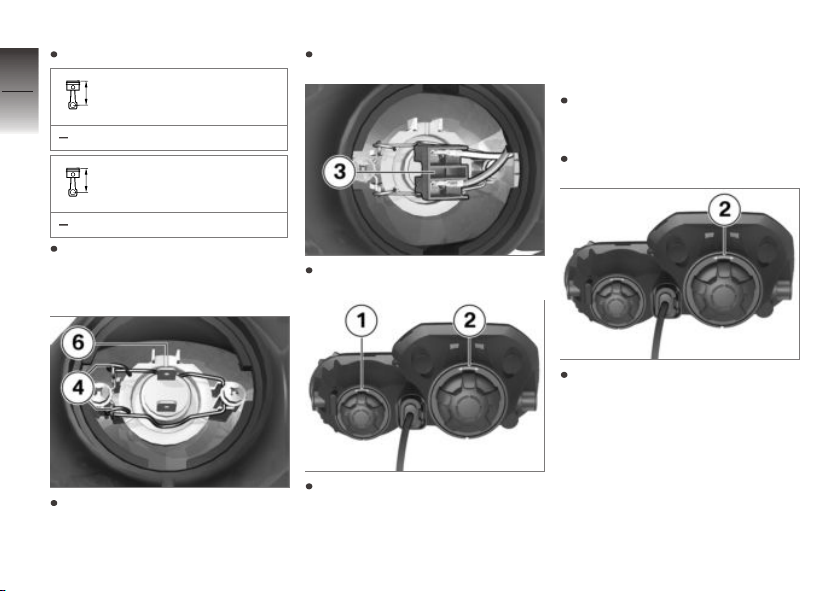
Replace the defective bulb.
8
96
z
Maintenance
Bulb for high-beam
headlight
H7 / 12 V / 55 W
Bulbs for the low-beam
headlight
H7 / 12 V / 55 W
Hold the bulb by the base only,
in order to keep the glass free
of foreign matter.
Close and lock spring clips 4.
Connect plug 3.
Replacing bulb for parking
light
Make sure the ground is level
and firm and place the motorcycle on its stand.
Switch off the ignition.
Remove cover 2.
Install the bulb, making sure
that alignment is correct at position 6.
Install cover 1 or cover 2, as
applicable.
Page 99
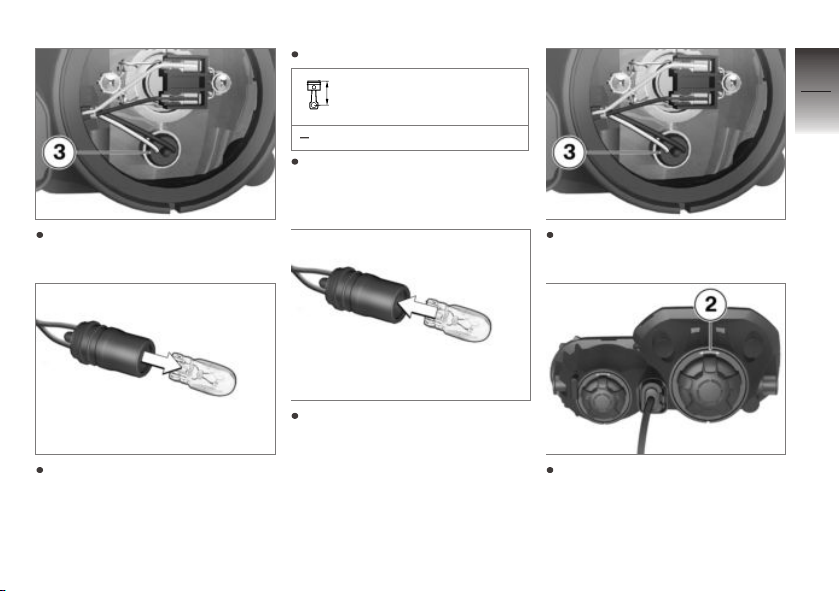
Replace the defective bulb.
Bulb for parking light
W5W / 12 V / 5 W
Use a clean, dry cloth to hold
the bulb in order to keep the
glass free of foreign matter.
8
97
Remove bulb 3 for the parking
light from the bulb housing.
Remove the bulb from the bulb
holder.
Push the bulb into the bulb
socket.
Insert parking light 3 into the
bulb housing.
Install cover 2.
z
Maintenance
Page 100
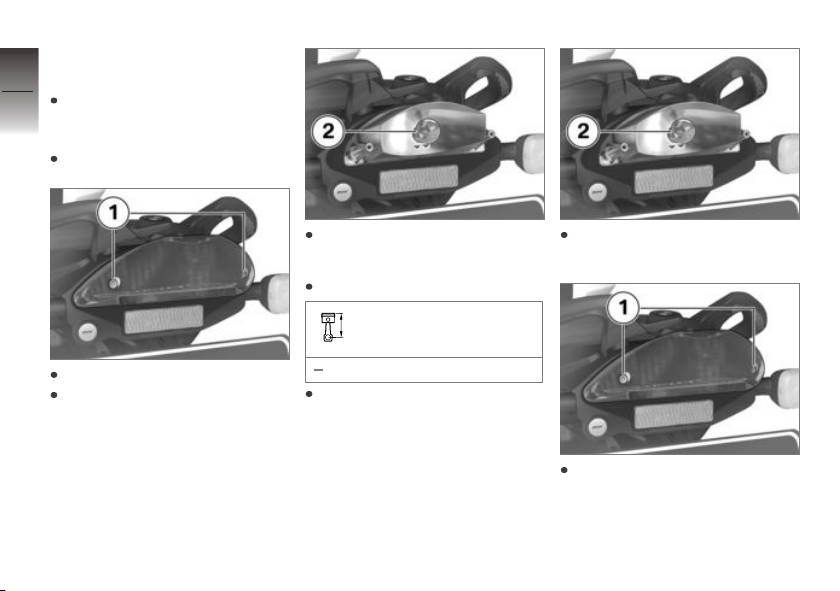
Replacing bulb for brake
8
light and rear light
Make sure the ground is level
98
and firm and place the motorcycle on its stand.
Switch off the ignition.
z
Maintenance
Remove screws 1.
Ease the glass to the rear to
remove.
Remove bulb 2 for the brake
light and rear light.
Replace the defective bulb.
Bulb for tail light/brake
light
P21/5W / 12 V / 5 W / 21 W
Use a clean, dry cloth to hold
the bulb in order to keep the
glass free of foreign matter.
Install bulb 2 for the brake light
and rear light.
Hold the glass in position and
install screws 1.
 Loading...