


BlackBerry Q10 Smartphone
Version: 10.3.2
User Guide

Published: 2015-05-13
SWD-20150513134513016

Contents
Setup and basics........................................................................................................................................... 6
New in this release.........................................................................................................................................6
Your device at a glance.................................................................................................................................. 8
What's different about the BlackBerry 10 OS?...............................................................................................10
Notification icons.........................................................................................................................................16
Menu icons..................................................................................................................................................17
Setting up your device..................................................................................................................................17
Using gestures.............................................................................................................................................21
Advanced interactions................................................................................................................................. 28
Personalizing your device.............................................................................................................................29
Device Switch.............................................................................................................................................. 30
About BlackBerry ID.................................................................................................................................... 40
Phone and voice.......................................................................................................................................... 43
Phone..........................................................................................................................................................43
Notifications and ringtones.......................................................................................................................... 52
Voicemail.....................................................................................................................................................59
BlackBerry Hub and email........................................................................................................................... 62
BlackBerry Hub and email........................................................................................................................... 62
joyn for BlackBerry 10 devices..................................................................................................................... 92
Media..........................................................................................................................................................95
Change the media volume............................................................................................................................95
Supported audio and video file extensions, formats, and codecs................................................................... 95
Troubleshooting: Media............................................................................................................................... 96
Camera........................................................................................................................................................96
Pictures.....................................................................................................................................................106
Music........................................................................................................................................................ 113
Videos....................................................................................................................................................... 118

BlackBerry Story Maker............................................................................................................................. 123
Media sharing............................................................................................................................................126
FM Radio...................................................................................................................................................127
Settings..................................................................................................................................................... 130
Customize your device settings.................................................................................................................. 130
Update your device software......................................................................................................................134
Battery and power..................................................................................................................................... 135
Connections.............................................................................................................................................. 143
BlackBerry Keyboard and typing................................................................................................................ 169
Language.................................................................................................................................................. 177
Keyboard input methods............................................................................................................................179
Screen display........................................................................................................................................... 190
Accessibility.............................................................................................................................................. 192
Media cards and storage............................................................................................................................209
Using your device with BlackBerry Link...................................................................................................... 214
Applications and features...........................................................................................................................224
Organizing apps.........................................................................................................................................224
About the BlackBerry Assistant..................................................................................................................226
Calendar....................................................................................................................................................230
Contacts....................................................................................................................................................241
Clock.........................................................................................................................................................248
Android Apps.............................................................................................................................................252
Maps and GPS........................................................................................................................................... 254
Browser.....................................................................................................................................................262
Smart Tags................................................................................................................................................ 270
File Manager..............................................................................................................................................274
Calculator..................................................................................................................................................277
Productivity and work.................................................................................................................................279
About BlackBerry Balance and your work space ........................................................................................ 279
Remember................................................................................................................................................ 285

Security and backup.................................................................................................................................. 292
Passwords and locking...............................................................................................................................292
What to do if your device is lost or stolen.....................................................................................................298
BlackBerry Protect.................................................................................................................................... 299
Wiping your device to delete your device data.............................................................................................300
Security settings........................................................................................................................................ 301
Password Keeper.......................................................................................................................................304
Legal notice...............................................................................................................................................308

User Guide Setup and basics
Setup and basics
New in this release
Introducing BlackBerry 10 OS version 10.3.2
BlackBerry 10 OS version 10.3.2 provides you with new features and improvements designed to make your BlackBerry
device even more secure and to help you be more productive.
BlackBerry Hub
From the list of attachments, you can open the email related to an attachment, making it easier to reply to the message.
You can clear the list of recent contacts, to prevent those contacts from appearing as suggestions when you compose a
message.
• Open a related email for an attachment
• Clear recent contact suggestions
Calendar
The Meeting Mode feature has been enhanced. You can choose the calendars, as well as the type and duration of calendar
events that are affected by Meeting Mode.
When you schedule a meeting, you can now see when the meeting occurs in other time zones.
You can set your calendar to display growing numbers to indicate the busyness of a day. The size indicates only how busy
you are during working hours.
• Configure Meeting Mode
• Preview time zones in an event
• Change how your calendar is displayed
Camera
Improvements have been made to the Camera app, for better results in areas with low light.
By default, the Face Detection feature is turned on and it has been improved to bring faces into better focus.
6

User Guide Setup and basics
Turn off Face Detection
BlackBerry Assistant
You can set, pause, resume, or stop the timer by using the BlackBerry Assistant app.
Things you can do with the BlackBerry Assistant
Peek gesture
When you slide your finger up from the bottom of the screen and hold your finger in place, the date appears at the top of
the screen.
File transfers
MTP support has been added to the BlackBerry 10 OS, allowing you to more quickly transfer media files between your
computer and your device using a USB connection.
Transfer files between your computer and device using a USB connection
BlackBerry Browser
Voice support has been added to the BlackBerry Browser. This feature lets you hear content on webpages read aloud.
The BlackBerry Browser has been updated with more protection against known malware and phishing attacks.
To access the Private Browsing feature, you can now tap in the lower-left corner of the screen. If you have other tabs
open, you can switch back to them during a private browsing session.
• Turn on voice support in reader mode
• Turn on private browsing
Security
BlackBerry Protect includes an anti-theft feature that is designed to provide more protection for the data on your device by
more closely associating your device with your BlackBerry ID.
If you set up your device using the Setup app and you enter or create a BlackBerry ID, BlackBerry Protect is turned on
automatically. If you turn off BlackBerry Protect, you can turn on the feature later from the BlackBerry Protect Settings
screen.
7

User Guide Setup and basics
If you update your device to BlackBerry 10 OS version 10.3.2 from an earlier version of the BlackBerry 10 OS, and you
don’t have BlackBerry Protect turned on, a notification provides information about how to turn on BlackBerry Protect.
When the BlackBerry Protect anti-theft feature is turned on, you must enter your BlackBerry ID to perform a security wipe.
When you wipe the device, (for example, to switch to a new device or give away your device) the anti-theft feature is turned
off.
If your device is ever lost or stolen, you can log in to the BlackBerry Protect website at protect.blackberry.com. From the
BlackBerry Protect website, you can try to view your device location on a map, lock your device, and wipe the data from
your device.
• Finding and protecting a lost device
• Set up BlackBerry Protect on your device
Secure messaging
If your email account is supported by Microsoft Exchange ActiveSync, you can use S/MIME for that account. If your
organization uses an LDAP directory, you can configure your settings so that S/MIME certificates for users in the LDAP
directory are available to you.
Configure your LDAP server settings
Phone
If your organization supports the use of multiple phone lines, you can make calls and send text messages using different
phone numbers. Having different phone lines helps you and your organization to distinguish between personal use and
work use of your device.
Switch between your work phone line and personal phone line
Your device at a glance
8

User Guide Setup and basics
1. Headset jack
2. Lock screen (Press); Power on/off (Press and hold); Reset (Press and hold for 10 seconds)
3. Front camera
4. Notification LED
5. Volume up
6. Mute (Press); BlackBerry Assistant (Press and hold)
7. Volume down
8. Microphone
9. Speaker
10. USB port
11. HDMI port
9

User Guide Setup and basics
What's different about the BlackBerry 10 OS?
If you're new to a BlackBerry 10 device, you might be eager to learn more about what makes it different from other
BlackBerry devices. Find information about the home screen, settings, messages, and apps. Learn where to find your
phone number and PIN and find out how to search.
How do I get back to the home screen?
To get back to the home screen at any time, swipe up from the bottom of the screen.
How do I get to the menu?
There is no Menu key ( ) on your BlackBerry 10 device. You can find more features and options by exploring the
menus.
To see more actions that you can perform in an app, tap or .
10

User Guide Setup and basics
How do I change my settings and options?
Do any of the following:
• To find the settings and help for an app, swipe down from the top of the screen.
• To find the settings for the device, on the home screen, swipe down from the top of screen. Tap Settings.
Note: In an app, to find the device settings, use two fingers and swipe down from the top of the screen. Tap
Settings.
11

User Guide Setup and basics
Where is my email or other messages?
All of your email, text messages, social networking notifications, missed calls, and voice mail messages can be found in the
BlackBerry Hub. The BlackBerry Hub isn't like other apps on your BlackBerry device. It's at the core of the BlackBerry 10
experience, and it's always running so that you stay connected no matter what you're doing on your device.
You can peek at the BlackBerry Hub or open it from anywhere on your device. From the bottom of the screen, slide your
finger up and to the right.
12

User Guide Setup and basics
Where are the phone keys and my notification settings?
Phone keys
To answer a call, touch the circle at the bottom of the screen and slide your finger to the left. Release your finger when the
circle covers .
To decline a call, touch the circle at the bottom of the screen and slide your finger to the right. Release your finger when the
circle covers .
To make a call, in the Phone app, tap . Type a number. Tap Call.
Notification settings
To change a notification setting, on the home screen, swipe down from the top of the screen. Tap Settings >
Notifications. You can customize a profile, set a custom ring tone or notification for a contact, or create a profile.
: To turn on All Alerts Off mode quickly, on the home screen, swipe down from the top of the screen. Tap .
Tip
Where are my apps?
Some of the apps that you used on your old BlackBerry device might not be available on your BlackBerry 10 device. In the
BlackBerry World storefront, you can check if your old apps are available on the My World screen or find new apps.
How do I edit or move text?
There is no trackpad or trackball on your BlackBerry 10 device. You can use the touch screen to select, cut, copy, and
paste text or move the cursor.
Select text
Touch and hold a character or word.
13

User Guide Setup and basics
• To cancel your selection, tap anywhere on the screen.
• To change your text selection, drag the handles.
Move text
1. Touch and hold your finger on a word or in a text field.
2. Release your finger from the screen.
3. Tap an option.
Tip: If you aren't sure what a menu icon means, touch and hold the icon to see what it does. Slide your finger off the icon to
avoid selecting it.
Move the cursor
1. Tap a word or text field to show the cursor.
2. Do any of the following:
• To move the cursor to another spot, drag the circle.
• To move the cursor one character at a time, tap the top, bottom, left or right of the circle.
: Make sure that you place your finger on the outer part of the circle so that you can still see the cursor.
Tip
14

User Guide Setup and basics
Where are my tasks, memos, and voice notes?
• If you used BlackBerry Link to transfer the files from your old BlackBerry device to your new device, your tasks, memos,
and voice notes should be in the new BlackBerry Remember app.
• If you previously used tasks in BBM Groups, you still have access to those tasks in BBM.
Where do I find my files?
You can find your files in the File Manager app. If you added a work account to your BlackBerry device and your
administrator turned on BlackBerry Balance technology, your device data, apps, and network access are divided into a
work space and a personal space. The separate spaces help you to avoid accidentally copying work data into a personal
app, or displaying confidential work data during a BBM Video chat. To switch spaces, drag your finger down on the middle
of the home screen and tap Personal or Work.
Where can I find my device info and passwords?
Where can I find my PIN?
In BBM, tap your profile picture. On your profile page, your PIN appears under your barcode. In an email or text
message, you can also type mypin to display your PIN.
How do I find my own phone number?
On the home screen, tap . In the Calls or Contact view, in the center of the screen, swipe down, and your phone
number appears at the top of the screen. In an email or text message, you can also type mynumber to display your
phone number.
Where can I find details about my device software version and hardware?
On the home screen, swipe down from the top of the screen. Tap Settings > About. To change the type of
information displayed, tap an option in the drop-down list.
In a message, note, or task, you can type myver followed by a space, to see your device model and the BlackBerry
10 OS version it is running. This feature might not be supported by your input language.
15

User Guide Setup and basics
How do I search?
If you want to find something on your BlackBerry device, such as a message, a song, or an app, or if you want to search the
Internet, you can say or type your search in the BlackBerry Assistant. To open the BlackBerry Assistant, on the home
screen, tap .
What is BlackBerry Link?
BlackBerry Link is software that you can install on your computer to link data, media files, and applications on your
BlackBerry device to your computer.
BlackBerry Link is the latest version of BlackBerry Desktop Software and can be used with your BlackBerry 10 device.
To download BlackBerry Link, on your computer, visit www.blackberry.com/BlackBerryLink and select the Windows or Mac
option.
Notification icons
The notification icons show you that you have new or unopened items for your accounts in the BlackBerry Hub. When you
have a new item, the indicator appears on the notification icon. You can peek at your notifications by sliding your
finger up from the bottom of the screen from anywhere on your BlackBerry device.
Icon
16
Description
Email message
Text message
BBM message
Facebook message
Twitter message
LinkedIn message
Phone call
Voice mail message
Notification messages from apps and services such as BlackBerry World

User Guide Setup and basics
Menu icons
Tip: If you aren't sure what a menu icon means, touch and hold the icon to see what it does. Slide your finger off the icon to
avoid selecting it.
Here's a description of the most common menu icons:
Icon Description
Open a menu of actions
Open a list of ways to navigate or filter information
Compose a message
View attachments
Share an item, such as a picture, with someone
Reply to an email
Reply to all recipients of an email
Forward an email
Record a voice note
Add a new entry in the Remember app and the Calendar app
Setting up your device
To set up your BlackBerry 10 device, you need a micro SIM card. If you don't have a SIM card or don't have the right type of
SIM card, contact your service provider.
If you want more storage for pictures, videos, music, and documents, insert a media card (microSD card).
When you're ready, open the Setup app. This app helps you transfer content from your old device, and add your email,
BBM, instant messaging, and social networking accounts.
Insert the SIM card
CAUTION
not insert a SIM card adapter into your device.
: Your BlackBerry device is designed for use with a micro SIM card. To avoid possible damage to your device, do
17

User Guide Setup and basics
Depending on your service provider and where you purchased your BlackBerry device, the SIM card might already be
inserted.
To remove the back cover, press and slide it down.
1.
With the metal contacts facing away from you, insert the micro SIM card into the top slot as shown.
2.
To remove the SIM card, first remove the battery. Using your index finger, push the SIM card toward the battery cavity.
Slide the SIM card out completely using your index finger and thumb, or by pressing on the top of the SIM card with your
thumb.
18

User Guide Setup and basics
Insert a media card
To remove the back cover, press and slide it down.
1.
With the metal contacts facing away from you, insert the media card (microSD card) into the bottom slot.
2.
Insert or remove the battery
Before you start using your BlackBerry device, you should charge the battery. The battery in the box that your device came
in isn't fully charged.
19

User Guide Setup and basics
To remove the back cover, press and slide down the cover.
1.
2. Do one of the following:
• To insert the battery, align the contacts.
• To remove the battery, lift and pull out the battery from the end opposite to the battery contacts.
Set up your device using the Setup app
Tip: A network connection is required for some of the features within the Setup app.
You can use the Setup app to do any of the following:
• Learn about new features and view tutorials to learn about gestures and keys
20

User Guide Setup and basics
• Add your email, BBM, instant messaging, and social networking accounts
• Learn how to transfer content from your old device
• Customize your sounds and notifications
• Set a password for your device
• Set up payment options for purchases from the BlackBerry World storefront
• Customize your device settings
The Setup app prompts you to sign in with your existing BlackBerry ID and allows you to create a new one. If you aren't sure
whether you already have a BlackBerry ID, on your computer, visit www.blackberry.com/blackberryid.
To open the Setup app, on the home screen, tap .
Using gestures
Take a moment to find out how to navigate your BlackBerry device using touch screen gestures.
Move around the home screen
To become familiar with the home screen, try using the following gestures.
To get back to the home screen at any time, swipe up from the bottom of the screen.
1.
To see your messages in the BlackBerry Hub, slide your finger from left to right.
2.
21

User Guide Setup and basics
To see the apps that are open (if any), slide your finger from right to left. To see all your apps, continue sliding your
3.
finger from right to left.
Peek at the BlackBerry Hub
To see your messages, you can peek at the BlackBerry Hub, or open it, from anywhere on your BlackBerry device.
From the bottom of the screen, slide your finger up and to the right.
22

User Guide Setup and basics
Tip: Keep your finger on the screen while you peek at the BlackBerry Hub. To go back to what you were doing, slide your
finger back down.
Show the menus
You can find features, options, and help by exploring the menus.
Do any of the following:
• To see more actions that you can perform in an app, tap or .
• To see more actions for a specific item, such as a song or picture, touch and hold the item.
Tip: To see the names of the icons that appear on the right side of the screen, touch and hold the icon. Slide your finger
off the icon to avoid selecting it.
• To find the settings and help for an app, swipe down from the top of the screen.
23

User Guide Setup and basics
• To find the settings for the device, on the home screen, swipe down from the top of screen.
Note: In an app, to find the device settings, use two fingers and swipe down from the top of the screen.
Scroll and move between items
Slide your finger to scroll through a list, pan a webpage, or move between pictures.
Do any of the following:
• To scroll, slide your finger up and down.
24

User Guide Setup and basics
• To move between the BlackBerry Hub and your apps, slide your finger left and right.
Use a slider
If a slider appears on your screen, you can use the slider to progress through a file, such as a song or video, or scroll
through multiple pages, such as the pages of an eBook.
On the slider, drag the slider handle.
25

User Guide Setup and basics
Select items
Do any of the following:
• To select an item, simply tap it. If the item can be opened, it opens.
• To highlight an item without opening it, touch and hold the item.
• To highlight multiple items, such as pictures or songs that you want to share, touch and hold one item. Tap and tap
more items. To clear an item, tap it again.
26

User Guide Setup and basics
Zoom in to or zoom out from the screen
If you want to see an image in more detail, or if you're having trouble reading words that are too small, you can magnify the
screen by zooming in. To see more of the screen, zoom out.
Do any of the following:
• To zoom in, slide your fingers apart.
• To zoom out, slide your fingers together.
27

User Guide Setup and basics
Advanced interactions
If you’re looking for ways to do things more quickly or efficiently, consider using the following gestures:
• Lift to wake
• Flip to mute
• Flip to save power
• Hold to stay awake
Lift to wake
If this feature is turned on, when you pick up your BlackBerry device from a flat surface, your device wakes up
automatically. You don’t have to press the Power/Lock key or swipe up from the bottom of the screen to start using your
device.
To turn on or turn off this feature, tap Settings > Advanced Interaction. Tap the Lift to Wake switch.
Flip to mute
If this feature is turned on, when you receive a call and it isn’t a convenient time to respond, you can turn your device
facedown to silence the ring tone or vibration. You still receive a notification of the missed call.
28

User Guide Setup and basics
To turn on or turn off this feature, tap Settings > Advanced Interaction. Tap the Flip to Mute switch.
Flip to save power
If this feature is turned on, when you place your device facedown on a flat surface, your device goes into standby mode to
extend battery life. You still receive notifications for incoming calls, messages, and alarms.
To turn on or turn off this feature, tap Settings > Advanced Interaction. Tap the Flip to Save Power switch.
Hold to stay awake
If this feature is turned on, the screen stays on longer while you hold your device in your hand. This setting overrides the
value set in Settings > Display > Screen Timeout.
To turn on or turn off this feature, tap Settings > Advanced Interaction. Tap the Hold to Stay Awake switch.
Personalizing your device
Learn how to personalize your device and make it uniquely yours. For example, you can change settings, download apps,
change your ring tone, and set your wallpaper.
• Customize your device settings
• Customize your Quick Settings
• Downloading and installing Android apps from the Amazon Appstore
• Move an app icon or open app around the home screen
29

User Guide Setup and basics
• Change your ringtone
• Change your font size
• Set your wallpaper
• Set an alarm
• Bookmark a favorite webpage
• Add a signature to an email account
• Add a contact or number to your speed dial list
Device Switch
Preparing to switch devices
Before you begin switching to your new BlackBerry 10 device, take a moment to make sure that you have completed the
following actions:
• Complete all of the instructions in the Setup app that opens the first time that your BlackBerry 10 device starts after you
insert the battery. You can find the Setup app on the home screen of your device.
• If you have information saved to your SIM card, such as contact information, save the data to the storage space on your
previous device or your media card before you begin to switch devices.
• If you have any usernames or passwords saved on your previous device, such as your BlackBerry ID, consider
temporarily writing this information down so that you have it when you're ready to add accounts to your new device.
Update BBM
If you switch from a BlackBerry device running the BlackBerry OS (version 5.0 to 7.1), you should update to the latest
available version of BBM and associate BBM with your BlackBerry ID before you switch devices.
1. To see which version of BBM is running on your previous device, look for BlackBerry Messenger in your list of
installed applications.
2. To download BBM 7.0 or later on your previous device, visit the BlackBerry World storefront or www.bbm.com.
If you can't update your version of BBM, in BBM, press the key > Options > Back Up. Select a backup option.
See which version of device software is installed on your previous device
If you switch from a BlackBerry device, to see which version of software is installed on your previous device, on the home
screen of your previous device, do one of the following:
• Click Options > About.
• Click Options > Device > About Device Versions.
30

User Guide Setup and basics
About SIM cards
BlackBerry 10 devices use either micro SIM cards or nano SIM cards. You might need to contact your service provider to
get the appropriate SIM card for your device.
Using your BlackBerry ID to switch devices
When you switch to a new BlackBerry device, during setup, you are prompted to enter your BlackBerry ID username and
password. It's important to sign in using the same
your apps and settings are associated with your BlackBerry ID.
For example, when you use your existing BlackBerry ID on your new device, you can reinstall apps that you downloaded on
your previous device from the BlackBerry World storefront, if a version of that app exists for your new device.
BlackBerry ID that you used on your previous device, because many of
Find your BlackBerry ID on your old device
If you created a BlackBerry ID on a previous BlackBerry device, it's important to sign in using your existing BlackBerry ID
on your new device, because many of your apps and settings are associated with it.
1. On the home screen of your previous device, click Options or Settings.
2. Depending on your device, do one of the following:
• Click Third Party Applications > BlackBerry ID.
• Click Device > BlackBerry ID.
• Click or tap BlackBerry ID.
Switching from a device running BlackBerry Device Software 5 or BlackBerry 6
If you switch from a device running BlackBerry Device Software 5 or BlackBerry 6, the following data transfer methods are
available to you:
Transfer method Data transferred
Device Switch app (using either a Wi-Fi
network or a media card)
Data saved to the storage space on your previous device, including the
following:
• Contacts
• Calendar entries
• Pictures
• Videos (not DRM)
• Music (not DRM)
31

User Guide Setup and basics
Transfer method Data transferred
• Documents
• Tasks and memos
• Email account info (you must enter the account passwords)
BlackBerry Link Data saved to the storage space on your previous device, including the
following:
• Contacts
• Calendar entries
• Pictures
• Videos
• Music
• Tasks and memos
• Settings
• Phone history
• Fonts
• BBM contacts
• BlackBerry Browser bookmarks and folders
• Alarm and clock settings
• Text messages (SMS and MMS)
• Password Keeper records
Switching from a device running BlackBerry 7
If you switch from a BlackBerry device running a version of BlackBerry 7, the following data transfer methods are available
to you:
Transfer method Data transferred
Device Switch app (using either a Wi-Fi
network or a media card)
Media card Data saved to the storage space and media card on your previous device,
32
Data saved to the storage space on your previous device, including the
following:
• Contacts
• Calendar entries
• Pictures
• Videos (not DRM)
• Music (not DRM)
• Documents
• Tasks and memos
• Email account info (you must enter the account passwords)
including the following:

User Guide Setup and basics
Transfer method Data transferred
• Pictures
• Videos
• Music
• Alarm settings
• BBM contacts
• BlackBerry Browser bookmarks and folders
• Text messages (SMS and MMS)
• Phone history
• Wireless connection profiles
BlackBerry Link Data saved to the storage space on your previous device, including the
following:
• Contacts
• Calendar entries
• Pictures
• Videos
• Music
• Tasks and memos
• Settings
• Alarm and clock settings
• BBM contacts
• BlackBerry Browser bookmarks and folders
• Text messages (SMS and MMS)
• Phone history
• Fonts
• Password Keeper records
Switching from a BlackBerry 10 device
If you switch from a BlackBerry 10 device to a new BlackBerry 10 device, the following data transfer methods are available
to you:
Transfer method Data transferred
Device Switch app (using either a Wi-Fi network
or a media card)
Data saved to the storage space on your previous device, including the
following:
• Contacts
• Calendar entries
• Pictures
• Videos (not DRM)
33

User Guide Setup and basics
Transfer method Data transferred
• Music (not DRM)
• Documents
• Tasks and notes from BlackBerry Remember
• Text messages (SMS)
BlackBerry Link Data saved to the storage space on your previous device, including the
following:
• Contacts
• Calendar entries
• Pictures
• Videos
• Music
• Tasks and notes from BlackBerry Remember
• Text messages (SMS and MMS)
• Settings
• Phone history
• Fonts
• BBM contacts
• BlackBerry Browser bookmarks and folders
• Alarm and clock settings
• Password Keeper records
SIM card (your previous device must use the
same size of SIM card as your new device)
• Contacts saved on your SIM card
Switching from an iPhone or Android device
If you switch from an iPhone or Android device to a BlackBerry 10 device, you can use the Device Switch app to transfer
your data. You can transfer your contacts, calendar entries, pictures, music, and videos. When you finish setting up your
BlackBerry device, you can add your email accounts and sync the contact and calendar info to your new device.
Transfer data using a Wi-Fi network and the Device Switch app
You can use the Device Switch app to transfer data from a device running BlackBerry OS version 5.0 to 7.1, a device
running the BlackBerry 10 OS, a device running iOS 6 and later, or a device running Android 2.3 and later to your new
BlackBerry 10 device.
To use the Device Switch app, both of your devices must be connected to the same Wi-Fi network, preferably a home Wi-Fi
network, since some corporate or public Wi-Fi networks can block the Device Switch app from working.
34

User Guide Setup and basics
1. On your new BlackBerry 10 device, download the Device Switch app. To find the Device Switch app, on your device,
visit the BlackBerry World storefront, or www.deviceswitch.com.
2. Connect both of your devices to the same Wi-Fi network.
3. To transfer your data, complete the instructions on the screen.
Note: Only the data that is saved in the storage space on your device is transferred. Any data that is wirelessly backed up or
synchronized with a web-based account isn't transferred to your new device. To transfer data that is synchronized with a
web-based account, add the account to your device. Any information that is saved to your media card isn't transferred
when you use the Device Switch app, but you can insert your media card into your new device.
Transfer data using a media card and the Device Switch app
This data transfer method is available if you switch from a BlackBerry device running the BlackBerry OS (version 5.0 to 7.1)
or the BlackBerry 10 OS.
Only the data saved in the storage space on your previous device or on the media card is transferred. Any data that is
wirelessly backed up or synchronized with a web-based account isn't transferred to your new device. This method is
designed to move the data in your personal space but not the data in your work space.
1. On your new BlackBerry 10 device, download the Device Switch app. To find the Device Switch app, on your device,
visit the
2. On your previous device, download the Device Switch app.
3. On your previous device, open the Device Switch app.
4. On your previous device, tap Next > Transfer via Media Card > Back Up to Media Card.
5. When the backup is complete, remove the media card from your previous device and insert it into your new device.
6. On your new device, in the Device Switch app, tap Next > Transfer via Media Card > Restore from Media Card.
7. Complete the instructions on the screen.
BlackBerry World storefront, or www.deviceswitch.com.
Transfer data using a media card
This data transfer method is available if you switch from a BlackBerry device running a version of BlackBerry 7.
This method is designed to move the data in your personal space but not the data in your work space.
Only the data saved in the storage space on your previous device is transferred. Any data that is wirelessly backed up or
synchronized with a web-based account isn't transferred to your new device.
1. On your previous device, click Setup > Device Switch.
2. Click Using a Media Card > Save Data.
3. Complete the instructions on the screen.
35

User Guide Setup and basics
4. When the backup is complete, remove the media card from your previous device and insert it into your BlackBerry 10
device.
5.
On your BlackBerry 10 device, on the home screen, tap > .
6. Complete the instructions on the screen.
Transfer data using BlackBerry Link on a computer
This data transfer method is available if you switch from a BlackBerry device running the BlackBerry OS (version 5.0 to 7.1)
or the BlackBerry 10 OS. You can use BlackBerry Link to transfer data and settings, such as phone history, media files,
browser bookmarks, and more, to your new BlackBerry 10 device. BlackBerry Link is designed to move the data in your
personal space but not the data in your work space.
Only the data saved in the storage space on your previous device is transferred. Any data that is wirelessly backed up or
synchronized with a web-based account isn't transferred to your new device.
1. On your computer, download and install BlackBerry Link from www.blackberry.com/BlackBerryLink.
2. Open BlackBerry Link.
3. Connect your current BlackBerry device to your computer using a USB cable.
4. Complete the instructions on the screen.
5. When prompted, connect your new BlackBerry 10 device to your computer using a USB cable.
6. Complete the instructions on the screen.
Back up your device data
Using a computer and BlackBerry Link, you can back up and restore most of the data on your BlackBerry device. You can
back up your settings, phone history, fonts, saved searches, messages, organizer data, browser bookmarks, and media
files.
You should regularly create and save a backup file on your computer, especially before you update any software.
Maintaining a current backup file on your computer might allow you to recover device data if your device is lost, stolen, or
corrupted by an unforeseen issue.
Note: If your device is activated on an Enterprise Mobility Management solution from BlackBerry, contact your
administrator to verify if you are able to back up and restore your device data.
Transfer contact info using a SIM card
BlackBerry 10 devices use either micro SIM cards or nano SIM cards. You can use this method if you're switching from
another BlackBerry 10 that uses the same size of SIM card.
1. On your previous device, tap Contacts.
2. Swipe down from the top of the screen.
3.
Tap .
36

User Guide Setup and basics
4. Under SIM Card, tap Copy Contacts from Device to SIM Card.
5. When your contacts are copied to your SIM card, remove the SIM card and insert it into your new device.
6. On your new device, tap Contacts.
7. Swipe down from the top of the screen.
8.
Tap .
9. Under SIM Card, tap Import Contacts from SIM Card.
Note: If you have BlackBerry Balance installed on your device, contact information saved in your work space might not be
copied to your SIM card.
After you switch devices
After you finish switching to your new BlackBerry 10 device, if you used a media card in your previous device, move it to
your new device. Also, consider doing the following:
• Delete the data on your previous device using a security wipe.
• Download apps from the BlackBerry World storefront or from the Amazon Appstore.
• Explore the Help app on your new device and discover tips and tricks.
For information about returning your previous BlackBerry device for recycling and safe disposal, visit www.blackberry.com/
recycling. The recycling and trade-up program is available only in certain areas.
Add email and social networking accounts to your new device
Calendar and contact information that is associated with an email or social networking account can be added when you
add the account to your new BlackBerry 10 device. If you used the Device Switch app to switch from a BlackBerry device
running the BlackBerry OS (version 5.0 to 7.1), your email accounts might already be set up on your new BlackBerry 10
device.
1. On the home screen, swipe down from the top of the screen.
2.
Tap Settings > Accounts.
3.
If necessary, tap .
4. Tap a type of account.
5. Do one of the following:
• If you're adding an email account, enter the email address. Tap Next. Enter the password for the account. Tap
Next. If necessary, change any sync settings.
• If you're adding a social networking account, enter your account information. If necessary, change any sync
settings or reminder settings.
6. Tap Done.
37

User Guide Setup and basics
Deleting the data on your BlackBerry device
After you transfer data to your new BlackBerry 10 device, consider deleting all of the data on your previous BlackBerry
device. A security wipe is designed to permanently delete your data so it can't be recovered. This includes email accounts,
downloaded apps, media files, documents, browser bookmarks, and settings.
When the security wipe is completed, your device turns off automatically. To turn on your device, press the Power/Lock
key.
Wipe the data on devices running the BlackBerry OS (version 5.0 - 7.1)
1. On the home screen of your device, tap the Options app.
2. Tap Security or Security Options.
3. Tap Security Wipe.
4. Select the items that you want to delete.
5. Type blackberry.
6. Tap Wipe Data or Wipe.
Wipe the data on devices running the BlackBerry 10 OS
1. On the home screen, swipe down from the top of the screen.
2.
Tap Settings.
3. Tap Security and Privacy > Security Wipe.
4. Type blackberry.
5. Tap Delete Data.
If you're planning to give away or recycle your device, remember to also remove your SIM card and media card.
Download your apps from BlackBerry World
You can reinstall apps and games that you buy as many times as you need to on the same BlackBerry device, and on up to
four additional devices, without having to pay for the items again.
1. On your BlackBerry 10 device, tap the BlackBerry World icon.
2. If prompted, enter your BlackBerry ID username and password.
3.
Tap .
4. Tap My World > My Apps & Games.
5. Tap Available.
38

User Guide Setup and basics
• To reinstall one app or game, tap next to the app or game that you want to install.
• To reinstall multiple apps and games, at the bottom of the screen, tap > . Tap the apps and games that
you want to reinstall. Tap .
Troubleshooting: Device Switch
My previous device doesn't detect my new BlackBerry 10 device
When you use a Wi-Fi network and the Device Switch app to switch devices, your devices might not be able to connect if
you use a corporate, academic, or public Wi-Fi network. When you switch devices, try using a home network that allows
connections.
If you use a home network to connect your devices and you still can’t connect your devices, try the following:
1. Unplug your router from the power source and restart both devices.
2. Wait 30 seconds.
3. Plug in the router and make sure that it’s turned on.
4. Wait 2 minutes.
5. Move both devices approximately 3 feet (1.83 m) from the router.
6. Turn on both devices.
7. Try running the Device Switch app again.
The Device Switch app is supported by Media Mushroom. For questions or more info, visit www.deviceswitch.com or
contact Media Mushroom at contact@mediamushroom.com.
I can't switch my SIM card to my new BlackBerry 10 device
BlackBerry 10 devices use either micro SIM cards or nano SIM cards. You might need to contact your service provider to
get the appropraite SIM card for your device.
Some of the data from my previous device isn't on my new device
The type of device you transferred data from and the version of device software on your previous device determines what
data can be transferred to your new device. For a list of the type of data that is transferred, visit www.blackberry.com/
deviceswitch.
Try any of the following:
• Check that your personal email accounts are set up. Email accounts aren't transferred and need to be set up in the
BlackBerry Hub on the device.
• Check that your work email accounts are set up. Contact your administrator for the information required to activate the
account.
39

User Guide Setup and basics
• Look for memos and tasks in the BlackBerry Remember app.
• Transfer apps by downloading them from the BlackBerry World storefront.
I can't transfer items using my media card
Try any of the following:
• Back up items from your media card to another source, such as your BlackBerry device built-in media storage or your
desktop computer. Format your media card or purchase a new media card. Save the items that you backed up to the
media card and then try transferring the items again.
• Use BlackBerry Link to transfer your info from one device to another. To download BlackBerry Link, on your computer,
visit
www.blackberry.com/BlackBerryLink and select the Windows or Mac option.
About BlackBerry ID
A BlackBerry ID gives you convenient access to multiple BlackBerry products and services. After you create a BlackBerry
ID, you can use your email address and password to log in to any BlackBerry product that supports BlackBerry ID. With
BlackBerry ID, you can manage apps that you downloaded from the BlackBerry World storefront and download the apps
when you switch devices. You should sign in with the same BlackBerry ID on all of your BlackBerry devices.
If you previously created a BlackBerry ID, you must use it when you set up your new device instead of creating a new
BlackBerry ID. You can log in to both a tablet and smartphone using the same BlackBerry ID.
Set up a new BlackBerry ID
: It's important to choose a password that you can remember. For your BlackBerry ID username, be sure to use an email
Tip
address that you use frequently. Recovery details can be sent to the email address that you use as your BlackBerry ID
username if you forget your BlackBerry ID password. The email address that you use as a BlackBerry ID username doesn't
have to be associated with your BlackBerry device.
1. To create a new BlackBerry ID when you set up your BlackBerry device, on the BlackBerry ID screen, tap Create
New.
2. Complete the instructions on the screen.
Confirm your BlackBerry ID username
When you create a BlackBerry ID, you receive an email message that allows you to confirm the email address that you use
as your BlackBerry ID. If you forget your BlackBerry ID password, you can reset it easily if you confirmed the email address
that you use as your BlackBerry ID username.
If you didn't confirm the email address that you use as your BlackBerry ID username when you created your BlackBerry ID,
you can receive a new confirmation email message.
40

User Guide Setup and basics
1. On the home screen, swipe down from the top of the screen.
2.
Tap Settings > BlackBerry ID.
3. Tap Confirm. An email message is sent to the email address that you use as your BlackBerry ID.
4. Open the email message and follow the instructions on the screen.
Change your BlackBerry ID password
1. On the home screen, swipe down from the top of the screen.
2.
Tap Settings > BlackBerry ID.
3. Tap Change Password.
Change your BlackBerry ID information
You can change your username, screen name, first name, or last name.
1. On the home screen, swipe down from the top of the screen.
2.
Tap Settings > BlackBerry ID.
3.
Tap .
Using your BlackBerry ID to switch devices
Using your BlackBerry ID on a new device
When you switch to a new BlackBerry device, during setup, you will be prompted to enter your BlackBerry ID username
and password. It's important to use the same BlackBerry ID that you used on your previous device, since many of your apps
and settings are associated with your BlackBerry ID.
For instance, when you use your existing BlackBerry ID on your new device, you can reinstall apps that you downloaded on
your previous device from the BlackBerry World storefront, if a version of that app exists for your new device.
Find your BlackBerry ID on your old device
If you have previously created a BlackBerry ID and are switching to a new BlackBerry device, it's important to sign in using
your existing BlackBerry ID, as many of your apps and settings are associated with it.
1. On the home screen of your old device, click Options.
2. Depending on your device, do one of the following:
• Click Third Party Applications > BlackBerry ID.
41

User Guide Setup and basics
• Click Device > BlackBerry ID.
• Click BlackBerry ID.
How do I reset my lost or forgotten BlackBerry ID password?
You can have the instructions about resetting your BlackBerry ID password sent to the email address that you use as your
BlackBerry ID username. For security reasons, your BlackBerry ID password can't be reset for you.
Do one of the following:
• To reset your password on a computer, visit www.blackberry.com/blackberryid. Click Reset your password. Complete
the instructions on the screen.
• To reset your password on your BlackBerry device, when you are prompted to sign in with your BlackBerry ID, click
Forgot Password. Answer your security question and complete the instructions on the screen.
Once you have completed the steps above, you will receive a password reset email. If you complete the steps to reset your
password on a computer, the password reset email can only be viewed on a computer and isn't delivered to your device. If
you follow the steps to reset your password on your device, the password reset email will be delivered to your device.
Complete the instructions in the email to reset your BlackBerry ID password.
42
User Guide Phone and voice
Phone and voice
Phone
Phone icons
Incoming calls
Icon Description
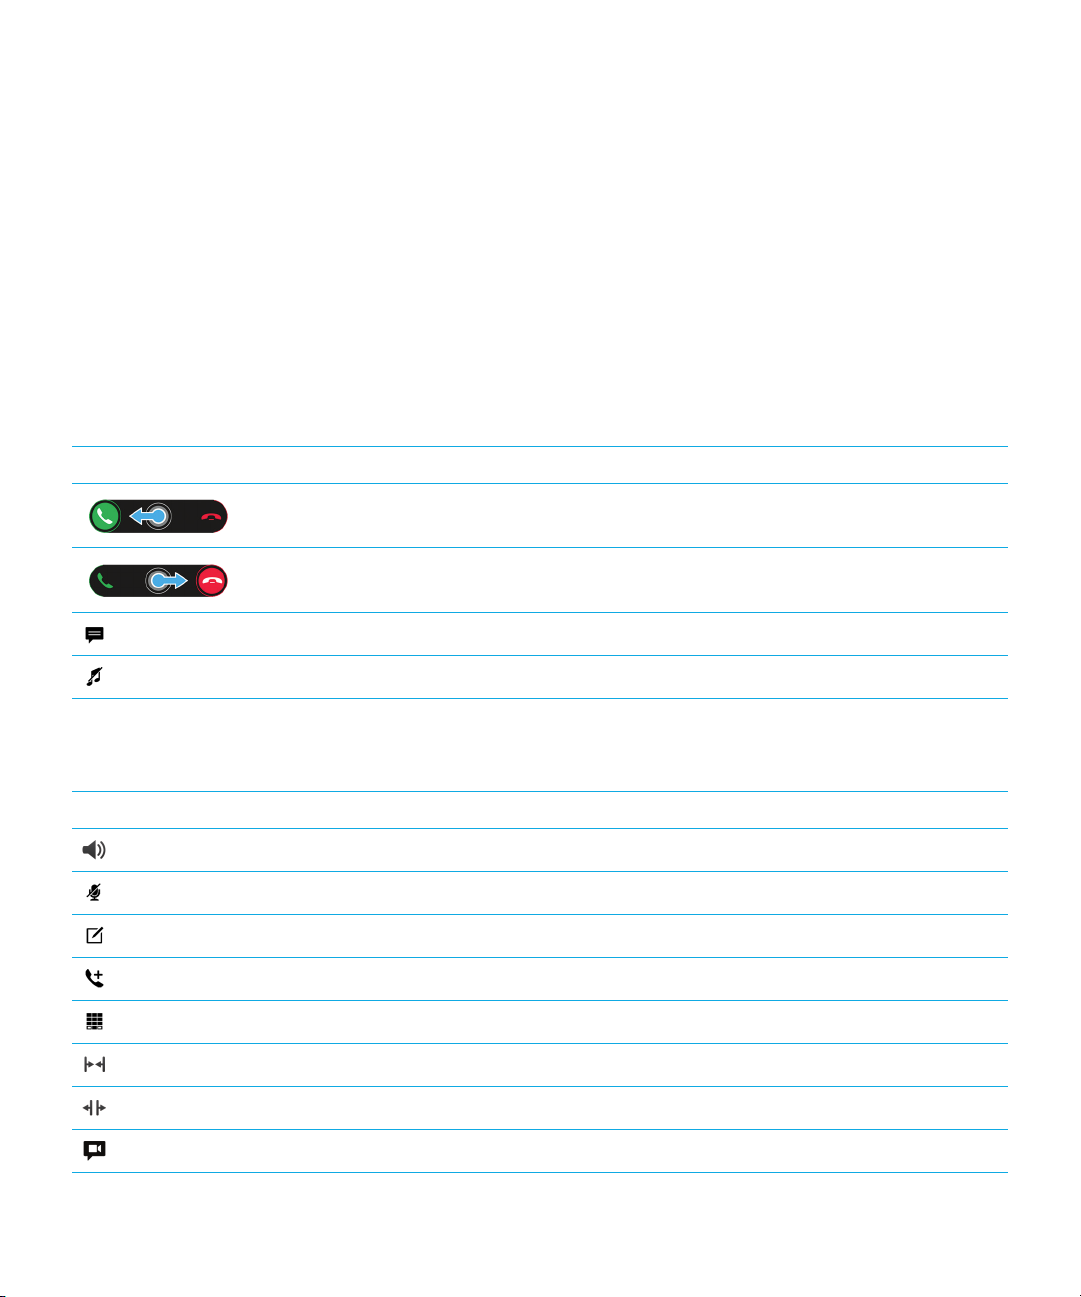
To answer a call, touch and hold the circle and slide your finger to the left.
To decline a call, touch and hold the circle and slide your finger to the right.
Send a message with the Reply Now feature.
During a call
Icon
Silence the ring tone.
Description
Turn on the speakerphone
Mute a call
Take notes during a call
Start a conference call
Show the dial pad
Merge calls to start a conference call
Split a conference call into multiple calls
Move a call to BBM Video
43

User Guide Phone and voice
Making and receiving calls
Make a call
1.
In the Phone app, tap .
2. Dial a number.
3. Tap Call.
Tip: To make a call on the home screen, type a contact name or phone number. Tap Call <name> or Call <number>.
Call a recent number or speed dial contact
1.
In the Phone app, tap .
2. Tap a name, number, or speed dial contact.
Tip: To send a text message to a recent number, beside the number, tap > .
To call a contact from your keyboard speed dial list, on the home screen, press and hold the key that you associated with
the contact.
Call someone from your contact list
1.
In the Phone app, tap .
2. Tap a contact.
3. If you have multiple phone numbers for a contact, tap the number that you want to call. For example, tap Home or
Mobile.
Answer or decline a call
Do one of the following:
• To answer a call, touch and hold the circle in the middle of the screen and slide your finger to the left. Release your
finger when the circle covers .
• To decline a call, touch and hold the circle in the middle of the screen and slide your finger to the right. Release your
finger when the circle covers .
Use Reply Now to send a message to a caller
You never have to excuse yourself from a meeting or conversation to answer the phone again. With the Reply Now feature,
you can send a caller a brief message instead of answering an incoming call. By default, if the caller is a BBM contact, the
44

User Guide Phone and voice
Reply Now message is sent as a BBM message. If the caller isn't a BBM contact, the Reply Now message is sent as a text
message. Depending on the recipient of the Reply Now message, additional text messaging charges might apply.
1.
When you receive an incoming call, tap or .
2. Do any of the following:
• To send one of the default Reply Now messages, tap a message.
• To compose a new message, tap Custom Message. Type a message and tap .
Silence the ring tone when you receive a call
If you receive a call while your sound or vibration notifications are turned on, you can quickly silence your ring tone and stop
your device from vibrating. When you silence the ring tone, you can still answer or decline the call.
When you receive an incoming call, tap .
Put a call on hold
While on a call, press and hold until Call Held appears on the screen.
Take notes during a call
While on a call, you can take notes that are saved as entries in BlackBerry Remember.
: You can turn on the speakerphone before taking notes, so that your hands are free to use the keyboard.
Tip
1.
While on a call, tap .
2. Type your notes and include information such as a title, due date, and tags.
3. Tap Save.
Answering calls automatically
You can set up your BlackBerry device to automatically answer calls when you have a Bluetooth headset connected, or
when you remove your device from a case or holster.
Automatically answer or end a call using a case or holster
1. In the Phone app, swipe down from the top of the screen.
2.
Tap > Holster.
3. Do any of the following:
• Turn on the Answer a Call by Removing Device From Holster switch.
• Turn on the End Call by Putting Device Back in Holster switch.
45

User Guide Phone and voice
Automatically answer a call when a Bluetooth headset is connected
1. In the Phone app, swipe down from the top of the screen.
2.
Tap > Bluetooth.
3. Turn on the Automatically Answer a Call When Connected to a Headset switch.
When you turn on this feature and you have a Bluetooth headset connected to your BlackBerry device, your calls are
automatically answered after 5 seconds.
Move a call from your headset to your device
When you have a headset connected to your BlackBerry device, incoming calls are automatically received on your headset.
You can manually move the call back to the device.
While on a call, tap Audio > Handset.
To move a call back to the headset, tap Audio > Headset.
Move a call to BBM Video
See who you're talking to by moving a call to BBM Video. To move a phone call to BBM Video, the person you're talking to
must have access to BBM Video as well. If you try to start a BBM Video chat with someone who isn't a BBM contact, you
are asked to add the person to BBM before you start your BBM Video chat.
While on a call, tap .
Switch between your work phone line and personal phone line
Some companies and organizations support two phone lines: one for personal use and one for work use. You can make
calls using different phone numbers, allowing you and your organization to distinguish between personal use and work use
of your device. You can also view recent calls for each phone line, and see which phone line is being called when you
receive an incoming call.
1.
In the Phone app, tap .
2. Tap Change Phone Line.
3. Tap a phone line.
4. Tap Select.
46

User Guide Phone and voice
Start a conference call
1. While on a call, make or answer another call.
2.
To merge the calls, tap .
Answer a second call while already on a call
1. If you're using the call waiting feature, when you receive a call while already on a call, you can do one of the following:
• To put the first call on hold and answer the second call, tap Hold Current Call. Touch and hold the circle in the
middle of the screen and slide your finger to the left. Release your finger when the circle covers .
• To end the first call and answer the second call, tap End Current Call. Touch and hold the circle in the middle of
the screen and slide your finger to the left. Release your finger when the circle covers
2.
If you put the first call on hold, to merge both calls and start a conference call, tap .
To add more people to the conference call, repeat steps 1 and 2.
Make another call while already on a call
.
When you make another call while you're already on a call, your first call is automatically put on hold.
1.
While on a call, tap .
2. Do any of the following:
• Tap a phone number, name, or speed dial contact.
• Tap . Tap a contact.
• Tap . Dial a number.
3.
To merge both calls and start a conference call, tap .
To add more people to the conference call, repeat steps 1 to 3.
Remove people from a conference call
1.
While in a conference call, to view the conference call participants, tap > .
2. Do one of the following:
• To remove a person from the conference call and hang up, tap .
• To remove a person from the conference call and keep them in a separate call, tap .
47

User Guide Phone and voice
Add a contact or number to your speed dial list
There are two different speed dial lists that you can add contacts or numbers to. You can add a total of 12 contacts or
numbers to the speed dial list at the top of the Calls screen. You can also add contacts or numbers to the keyboard speed
dial list, so that you can dial a number by pressing and holding a single key on your keyboard. By default, your voicemail
access number is included in your speed dial list.
1.
In the Phone app, tap or .
2. Touch and hold a contact or phone number.
3.
Tap .
Add a contact to your keyboard speed dial list
1. On the home screen, swipe down from the top of the screen.
2.
Tap Settings > Shortcuts and Speed Dial.
3. On the screen, tap the key that you want to associate with the contact.
4. Tap Speed Dial.
5. Tap the contact that you want to associate with the key on your keyboard.
To call a contact from your keyboard speed dial list, on the home screen, press and hold the key that you associated with
the contact.
Delete a contact or number from your speed dial list on the Calls screen
1.
In the Phone app, tap .
2. In your speed dial list, touch and hold a contact or number.
3.
Tap .
Delete a contact from your keyboard speed dial list
1. On the home screen, swipe down from the top of the screen.
2.
Tap Settings > Shortcuts and Speed Dial.
3. Touch and hold a speed dial contact.
4.
Tap .
48

User Guide Phone and voice
Hide your speed dial list on the Calls screen
1.
In the Phone app, tap .
2. Swipe down from the top of the screen.
3.
Tap .
Call waiting, call forwarding, and call blocking
How do I block calls?
When you block calls, you can stop all incoming or outgoing calls, and prevent all incoming or all outgoing calls when
roaming. Contact your service provider for more info on blocking specific phone numbers. Depending on your wireless
service provider, this feature might not be supported.
1. In the Phone app, swipe down from the top of the screen.
2.
Tap > Call Blocking.
3. Turn on any of the switches.
The first time that you turn on call blocking, you are prompted to create a password to lock your call blocking settings. To
change your call blocking password, complete steps 1 and 2, and tap .
Turn on or turn off call waiting
Depending on your wireless service provider, this feature might not be supported.
1. In the Phone app, swipe down from the top of the screen.
2.
Tap > Call Waiting.
3. Turn on or turn off Call Waiting.
Set up call forwarding
Depending on your wireless service provider, this feature might not be available.
1. In the Phone app, swipe down from the top of the screen.
2.
Tap > Call Forwarding.
3. Turn on any of the switches.
4. To change the number that your calls are forwarded to, tap the drop-down list under a switch and type a number.
49

User Guide Phone and voice
Phone options
Change your default Reply Now messages
You can select one of the three default Reply Now messages to send to a caller instead of answering an incoming call. You
can change the default messages or compose a new Reply Now message.
1. In the Phone app, swipe down from the top of the screen.
2.
Tap > Reply Now.
3. Tap the message you want to change.
4. Type a new Reply Now message.
To prevent the Reply Now icon from appearing when you receive an incoming call, turn off the Reply Now switch.
Show or hide your number on outgoing calls
Depending on your wireless service provider, this feature might not be supported.
1. In the Phone app, swipe down from the top of the screen.
2.
Tap > Show my Number.
3. Turn on the Allow My Number to Appear When Calling switch.
Adjust the bass and treble of your calls
1. In the Phone app, swipe down from the top of the screen.
2.
Tap > Call Audio.
Set a default area code or country code
You can use smart dialing to set a default area code and country code that is applied automatically to the phone numbers
that you call, so that you don't have to dial the country code or area code when you make a call within your own country or
area code.
1. In the Phone app, swipe down from the top of the screen.
2.
Tap > Smart Dialing.
• To change the default country code, tap Country Code. Tap a country.
• To change the default area code, in the Area Code field, type an area code.
50

User Guide Phone and voice
Tap any of the drop-down lists to change other smart dialing options.
Limit the phone numbers that you can call
When you set up and use fixed dialing numbers, you can only make calls and send text messages to the phone numbers
that you added to the fixed dialing numbers list. For example, if you give your BlackBerry device to your child to use, you
can limit the phone numbers that your child can call. To use fixed dialing numbers, your service provider must set up your
SIM card for this feature. Depending on your wireless service provider, this feature might not be supported.
1. In the Phone app, swipe down from the top of the screen.
2.
Tap > Fixed Dialing Numbers.
3. Turn on the Fixed Dialing Numbers switch.
4. Enter the SIM security code provided to you by your service provider.
5. Tap OK.
6. Tap Edit List.
7. Type a name and phone number.
View your call summary
If you're concerned about your wireless voice usage, you can monitor the time you have spent on the phone on the Call
Summary screen.
1. In the Phone app, swipe down from the top of the screen.
2.
Tap > Call Summary.
To reset the call times on your Call Summary screen, tap .
: To see the details of a specific call, in the Phone app, tap . Next to a contact name or phone number, tap >
Tip
.
Find your own phone number
1.
In the Phone app, tap .
2. Anywhere on the screen, touch and slide your finger down. Your phone number appears at the top of the screen.
: To include your own phone number in a message to someone, in an email, a BBM message, or a text message, type
Tip
mynumber followed by the space bar.
51

User Guide Phone and voice
Troubleshooting: Phone
I can’t put a call on hold to answer an incoming call
While on a call, if you answer an incoming call from a different app, your first call might be disconnected instead of being
put on hold. For example, while on a phone call, if you answer an incoming BBM Voice call, your current phone call ends.
A message appears on your device to notify you that answering another call will end your current call.
Notifications and ringtones
About notifications
Notification profiles
You can use the notification profiles on your BlackBerry device to control how you're alerted to new messages and phone
calls. By default, your device includes seven notification profiles, including Normal, Phone Calls Only, Vibrate Only, Silent,
Do Not Disturb, Meeting, and Bedside. Each profile has a default setting, but you can customize the settings and change
things like the volume level and ringtone. You can also add your own notification profiles and customize the settings.
Customized app notifications
You can set customized notification settings for apps within a specific profile. App-level customizations are set on a perprofile basis, meaning you can set different notification settings for the same app. App customizations override the settings
for notification profiles.
Contact-specific notifications
You can set contact-specific notifications that can override the notification settings for profiles and apps, depending on
how the notification settings are set up. The contact customizations can be set to override the settings for the notification
profiles and any customized app notification settings that you set, or the contact-specific notifications can follow the
settings.
52

User Guide Phone and voice
Level 1 alerts
You can also set Level 1 alerts for specific messages and receive custom notifications for these messages that override all
existing notification settings.
Edit your notification profiles
Tip: You can view descriptions of the default settings for each notification profile on the Notifications screen, under
Profiles.
1. On the home screen, swipe down from the top of the screen.
2.
Tap Settings > Notifications.
3. Under Profiles, tap the profile that you want to change.
4.
If necessary, to change the description of the profile, tap . Enter a short description of the profile.
5. Change the Sound, Vibrate, Notify During Calls, Instant Previews, or LED settings.
6. If necessary, to set customized notifications that override the settings for the notification profile for specific apps, tap
Customize App Notifications.
Add notification profiles to your device
In addition to customizing the default notification profiles on your BlackBerry device, you can also add your own profiles to
your device.
1. On the home screen, swipe down from the top of the screen.
2.
Tap Settings > Notifications.
3.
Tap .
4. In the New Profile field, enter a name for the profile.
5. Tap Create.
6. Change the Sound, Vibrate, Notify During Calls, Instant Previews, or LED settings.
7. If necessary, to set customized app notifications that override the settings for the notification profile, tap Customize
App Notifications
.
Add a notification profile to your quick settings
You can add notification profiles to the quick settings on your BlackBerry device so that you can quickly change your
profiles from your device home screen.
1. On the home screen, swipe down from the top of the screen.
53

User Guide Phone and voice
2.
Tap Settings > Notifications.
3.
Tap .
4. Tap to select the notification profiles that you want to add to your quick settings.
5.
To rearrange the order that the profiles are listed in, tap . Touch and hold a notification profile and drag it to
where you want it to appear in the list. Tap .
To select a notification profile, in your quick settings, tap . Scroll through your list of notification profiles and tap the
one that you would like to set.
Change your ringtone
Regardless of which notification profile is set on your BlackBerry device, you can change the ringtone to one of the default
ringtones included on your device or use a ringtone that you download.
Tip: Ringtones that were available only on devices running BlackBerry 7.1 or earlier are now available on your BlackBerry
10 device.
1. On the home screen, swipe down from the top of the screen.
2.
Tap Settings > Notifications.
3. In the Ringtone drop-down list, tap a ringtone.
To use a song as your ringtone, tap Browse Music.
Change the volume of your notifications
1. On the home screen, swipe down from the top of the screen.
2.
Tap Settings > Notifications.
3. To adjust the volume of your notifications, move the slider back and forth.
How do I turn off all sounds and ringtones except for calls?
1. On the home screen, swipe down from the top of the screen.
2.
Tap Settings > Notifications.
3. In the Active Profile drop-down list, tap Phone Calls Only.
: You can customize the notification settings for the Bedside profile. On the home screen, swipe down from the top of
Tip
the screen. Tap Settings > Notifications. Tap Bedside.
54

User Guide Phone and voice
Customize notifications for a contact
Notifications that you customize for contacts override the notification settings for profiles and apps. For example, if sound
is turned on for phone notifications for a contact but the sound is turned off for the phone, the phone still rings when the
contact calls you.
1. On the home screen, swipe down from the top of the screen.
2.
Tap Settings > Notifications.
3. At the bottom of the Notifications screen, tap Contact Notifications.
4.
Tap .
5. Tap a contact.
6. Do any of the following:
• Tap Phone Calls.
• Tap Email Messages.
• Tap BBM.
• Tap Text Messages.
• Tap Other Messaging, which includes apps such as Facebook, Twitter, LinkedIn, and more.
7. Do one of the following:
• Turn off the All Notifications switch.
• Change the Sound, Ringtone, Vibrate, LED, or Instant Previews settings.
Note: If you set any of the drop-down lists to Profile Setting, the sound, tone, vibrate, or LED settings reflect what is
set in the active profile. If you make any changes to the drop-down lists, these changes override the settings in the
active profile.
Contacts that you set customized notifications for are listed on the Contact Notifications screen.
Customize notifications for an app
When you set a customized notification for an app, you can use that customized notification as the default setting for that
app in all profiles. Customized app notifications override the notifications in profiles, but don't override the customized
notifications for contacts.
: The Silent profile overrides all other settings and the BlackBerry device remains quiet, even if you set customized
Note
notifications for an app.
1. On the home screen, swipe down from the top of the screen.
2.
Tap Settings > Notifications.
3. Tap a profile.
55

User Guide Phone and voice
4. Tap Customize App Notifications.
5. Tap an app.
6. Change the Sound, Ringtone, Override Profile Volume, Vibrate, LED, LED Color, or Hub Notification settings.
7.
To make the updated settings the default notification settings for the app in all of the notification profiles, tap .
Note: If Sound, Vibrate, or LED are turned off in a profile, these settings aren't affected by the default notification
settings that you set.
To return the notifications for the app to the current profile settings, tap .
Turn off all alerts
1. On the home screen, swipe down from the top of the screen.
2.
Tap Settings > Notifications.
3. In the Active Profile drop-down list, tap Do Not Disturb.
Change the notification settings for Level 1 alerts
You can create custom notifications for important messages. Level 1 notifications override the notification settings for all
profiles.
: To change the notification settings for Level 1 alerts, in the BlackBerry Priority Hub settings, you need to first add a
Note
rule. In the BlackBerry Hub, tap > . Tap Priority Hub > . Enter the rule details and select the Enable Level 1
Alert checkbox.
1. On the home screen, swipe down from the top of the screen.
2.
Tap Settings > Notifications.
3. At the bottom of the screen, tap Level 1 Settings.
4. Do any of the following:
• Turn on the Sound, LED, or Instant Previews switch.
• Change the Ringtone or Vibrate settings.
View and respond to Instant Previews
You can use the Instant Previews feature to view previews of incoming email messages, BBM messages, text messages
(SMS and MMS), and more from any application on your BlackBerry device.
When a preview appears at the top of the screen, do one of the following:
• To view the message in the BlackBerry Hub, tap the preview.
56

User Guide Phone and voice
• To dismiss the preview, tap .
• To ignore the preview, wait a few seconds until it disappears.
• To reply to a BBM message or text message without leaving the app that you're currently in, tap .
Turn off Instant Previews
For some notification profiles, by default, the Instant Previews feature is turned on.
1. On the home screen, swipe down from the top of the screen.
2.
Tap Settings > Notifications.
3. Tap a notification profile.
4. Turn off the Instant Previews switch.
Respond directly to Instant Previews
You can use the Instant Previews feature to reply to your BBM messages and text messages (SMS and MMS) without
leaving the app that you're currently in.
While you're responding to a preview, incoming messages outside of the current conversation aren't displayed as Instant
Previews notifications.
1.
To respond to Instant Previews, tap .
2. Press any key on the keyboard.
3. Type your message.
4.
Press .
About Lock Screen Notifications
You can use the Lock Screen Notifications feature to view the first few lines of your most recent email messages, BBM
messages, text messages, and more on your BlackBerry device without having to unlock it.
Turn off Lock Screen Notifications
By default, Lock Screen notifications are turned on.
1. On the home screen, swipe down from the top of the screen.
2.
Tap Settings > Security and Privacy > Lock Screen.
3. Turn off the Lock Screen Notifications switch.
57

User Guide Phone and voice
Set your screen to turn on for new notifications
You can set your BlackBerry device to turn on when you receive notifications.
1. On the home screen, swipe down from the top of the screen.
2.
Tap Settings > Security and Privacy > Lock Screen.
3. Turn on the Turn on Screen for New Notifications switch.
Set Lock Screen Notifications to only display the sender info
You can set your BlackBerry device to only display the sender information in Lock Screen Notifications and to hide the
subject and message content.
1. On the home screen, swipe down from the top of the screen.
2.
Tap Settings > Security and Privacy > Lock Screen.
3. Turn on the Show Sender Only switch.
Tip: To collapse the Lock Screen Notifications view so that only the notification icons are visible, swipe left or tap an icon.
Troubleshooting: Notifications and ringtones
If the notifications and ringtones on your BlackBerry device aren't functioning in the way that you expect them to, consult
the following troubleshooting topics.
My device doesn't ring or vibrate when I receive a call or message
Try the following actions:
• On the home screen, swipe down from the top of the screen. Verify that the Do Not Disturb profile isn't the active
profile.
• If you created a custom notification for a contact, verify that the Sound and the Vibration settings are turned on for the
contact.
• If you created app-specific notifications, in the app settings in the active profile, verify that the Sound and the Vibrate
settings are turned on.
My device doesn't display Instant Previews
If BlackBerry Balance is set up on your BlackBerry device, messages sent to accounts that are associated with your work
space aren't displayed as Instant Previews.
58

User Guide Phone and voice
My device doesn't display Lock Screen Notifications
If BlackBerry Balance is set up on your BlackBerry device, messages sent to accounts that are associated with your work
space aren't displayed as Lock Screen Notifications when your work space is locked.
Voicemail
Depending on your service provider, there are two different types of voicemail available on your BlackBerry device:
standard voicemail and a visual voicemail service.
With standard voicemail, you can set up your voicemail access number and password, so you can quickly call in to your
voicemail service from the Calls screen in the Phone app.
If you subscribe to a visual voicemail service, you can view a list of your voicemail messages, play your voicemail messages,
and change various voicemail settings from your BlackBerry device, without having to call in to your voicemail service.
Depending on the features your service provider supports, your voicemail messages can be automatically downloaded to
your device and you can pause, fast-forward, or rewind the voicemail message as you listen to it. You can also forward a
voicemail message, send a reply to the person who left you a voicemail message, or delete a voicemail message from within
the Phone app or the
Your service provider might automatically delete messages after a certain period of time. If you don't want a message to get
automatically deleted, you can save it to your device.
Depending on your country or region, a visual voicemail service might not be available. You need to subscribe to a visual
voicemail service to access the features. Contact your service provider to subscribe.
BlackBerry Hub.
Set up your voicemail
Depending on your wireless service provider, this feature might not be supported.
1. In the Phone app, swipe down from the top of the screen.
2.
Tap > Voicemail.
3. Type your voicemail access number and password.
After you have set up your voicemail, you can call your voicemail service from the Calls screen in the Phone app.
: If you don't know your voicemail access number or password, contact your wireless service provider.
Tip
59

User Guide Phone and voice
Using a visual voicemail service
Listen to a visual voicemail message
1. In the BlackBerry Hub or Phone app, tap a voicemail message.
2.
Tap .
Forward a visual voicemail message
1. In the BlackBerry Hub or Phone app, touch and hold a voicemail message.
2.
Tap .
Save a visual voicemail message
Your service provider's voicemail system might automatically delete messages after a certain period of time. If you don't
want a message to get automatically deleted, you can save it to your device.
1. In the BlackBerry Hub, or the Phone app, touch and hold a voicemail message.
2. Tap Save.
Change your visual voicemail greeting
Your voicemail greeting is the outgoing message that a caller hears before leaving a voicemail message. Depending on your
wireless service provider, this feature might not be supported.
1. In the Phone app, swipe down from the top of the screen.
2.
Tap .
Tap > Change Voicemail Greeting.
3.
4. In the Greeting drop-down list, do one of the following:
• To play your phone number as your voicemail greeting, tap Phone Number.
• To play your name as your voicemail greeting, tap Name.
• To record a custom voicemail greeting, tap Personal Message.
Change your visual voicemail password
Depending on your wireless service provider, this feature might not be supported.
60

User Guide Phone and voice
1. In the Phone app, swipe down from the top of the screen.
2.
Tap > .
3. Tap Change Password.
Prevent visual voicemail messages from downloading while you are
roaming
Depending on your wireless service provider, this feature might not be supported.
1. In the Phone app, swipe down from the top of the screen.
2.
Tap > .
3. Clear the International Roaming check box.
Deactivate visual voicemail on your device
If you deactivate your visual voicemail service on your BlackBerry device, you must contact your wireless service provider to
reactivate it. Depending on your wireless service provider, this feature might not be supported.
1. In the Phone app, swipe down from the top of the screen.
2.
Tap .
Tap > Deactivate.
3.
61

User Guide BlackBerry Hub and email
BlackBerry Hub and email
BlackBerry Hub and email
Staying connected with the BlackBerry Hub
Email
You can add practically any existing email account to your device—both work and web-based email.
Text messages (SMS/MMS)
If text messaging is a part of your wireless service plan, you can find and respond to your text messages in the
BlackBerry Hub.
Social networking
If you add a Facebook account to your device, you can receive and respond to notifications, update your status, and
send Facebook messages all from the BlackBerry Hub. If you add a Twitter account, you can compose tweets, stay
up-to-date on your mentions, and send direct messages. And if you add a LinkedIn account, you can accept
invitations to connect with business contacts, send messages to your connections, and update your LinkedIn status.
BBM and instant messaging
After you add instant messaging apps to your device, you can access your chats through the BlackBerry Hub.
Calls and voice mail
You can make calls directly from the BlackBerry Hub. The BlackBerry Hub shows you the calls that you made and
received, including any missed calls and voice mail messages.
Upcoming events
Without leaving the BlackBerry Hub, you can peek at upcoming meetings, events, and—if you add your Facebook
account—friends' birthdays.
Notifications
The BlackBerry Hub collects your notifications about new PIN messages, time zone changes, software updates,
third-party apps, and more. Your service provider might send you SIM Toolkit notifications that appear in the
BlackBerry Hub. Tapping on these notifications opens the SIM Toolkit app.
62

User Guide BlackBerry Hub and email
Keyboard shortcuts: BlackBerry Hub
In the list of messages
Action Shortcut
Compose a message Press C
Search the BlackBerry Hub Press S
Go to the next unread message in the list Press U
Move to the top of your list of messages and notifications Press T
Move to the bottom of your list of messages and notifications Press B
In a message
Action Shortcut
Reply to a message Press R
Reply all to a message Press L
Forward a message Press F
Flag a message Press W
File a message Press I
Setting up and managing accounts
You can add email accounts, social networking accounts (such as Facebook, Twitter, and LinkedIn), or even an Evernote
account to your device.
Set up email or other types of accounts on your device
1. On the home screen, swipe down from the top of the screen.
2.
Tap Settings > Accounts.
3.
If you already added an account to your device, tap to add another account.
63

User Guide BlackBerry Hub and email
Add an email account
1. On the Add Account screen, tap Email, Calendar and Contacts.
2. Enter the email address.
3. Tap Next.
4. Enter the password for the account.
5. Tap Next.
6. Change any additional settings (for example, the types of content to sync with your device).
7. Tap Done.
Add a social networking or Evernote account
You can add a Facebook, Twitter, LinkedIn, or Evernote account to your device. When you add an Evernote account to your
device, your Evernote notebooks are available in BlackBerry Remember.
1. On the Add Account screen, tap Facebook, Twitter, LinkedIn, or Evernote.
2. Enter your account information.
• If necessary, change any sync settings.
• If you're adding a Facebook account, to change when you're reminded about friends' birthdays, in the Birthday
Reminders drop-down list, tap a reminder option.
3. Tap Done. If necessary, tap Authorize.
Setting up work accounts
Add a work account supported by an EMM solution from BlackBerry
If your organization uses an EMM solution from BlackBerry, you can add your work account to your device and take
advantage of features like BlackBerry Balance. If your organization hasn't upgraded to BlackBerry Enterprise Service 10
and is using BlackBerry Enterprise Server 5 or earlier, you can still add your work account and have it use Microsoft
Exchange ActiveSync. For more information, contact your administrator.
Make sure you know the following from your administrator:
• Your username
• Your enterprise activation password
• Server name
1.
On the Add Account screen, tap > Work Account.
2. Enter the username, activation password, and server address for your account.
3. Tap Done.
64

User Guide BlackBerry Hub and email
After you add a work account, follow the prompts to set a work space password to use with BlackBerry Balance and to
enter your work network password.
Add an email account supported by Microsoft Exchange ActiveSync
Make sure you know the following from your administrator or your email service provider:
• Your username and work network password
• Server address
When you add an email account that's supported by Microsoft Exchange ActiveSync, the messages, calendar events,
contacts, tasks, and notes associated with the account are synced with your BlackBerry device.
1.
On the Add Account screen, tap > Microsoft Exchange ActiveSync.
2. Enter the username, email address, password, and server address for the account.
• To turn off push email, turn off the Push switch. To set how frequently your device checks for new messages, in
the Sync Interval drop-down list, tap an option.
• To use your organization's VPN, turn on the Use VPN switch.
• To change how far back in time your device syncs messages, in the Sync Timeframe drop-down list, tap an
option.
• To change how far back in time your device syncs calendar events, in the Calendar Sync Timeframe drop-down
list, tap an option.
3. Tap Next.
: When you flag an email message in your Microsoft Exchange ActiveSync account, it is also flagged in the Remember
Tip
app.
Add an IBM Notes Traveler email account
Make sure you know the following from your administrator or email service provider:
• Your username and work network password
• Server address
When you add an IBM Notes Traveler email account, the messages, calendar events, contacts, tasks, and notes associated
with the account are synced with your BlackBerry device.
1.
On the Add Account screen, tap > IBM Notes Traveler.
2. Enter the username, email address, password, and server address for the account.
• To turn off push email, turn off the Push switch. To set how frequently your device checks for new messages, in
the Sync Interval drop-down list, tap an option.
• To use your organization's VPN, turn on the Use VPN switch.
• To change how far back in time your device syncs messages, in the Sync Timeframe drop-down list, tap an
option.
65

User Guide BlackBerry Hub and email
• To change how far back in time your device syncs calendar events, in the Calendar Sync Timeframe drop-down
list, tap an option.
3. Tap Next.
Add an IMAP or POP email account
Make sure you know the following information from your administrator or email service provider:
• Messaging server type (POP or IMAP)
• Incoming and outgoing messaging server address
• Incoming and outgoing messaging server port numbers
• Incoming and outgoing messaging server SSL settings
Note: To increase the activation speed of IMAP email accounts, it is recommended that you enter the IMAP Path Prefix.
For more information, contact your administrator.
1.
On the Add Account screen, tap > IMAP or POP.
2. Enter the account information.
• To set how frequently your BlackBerry device checks for new messages (if push email isn't supported), in the
Sync Interval drop-down list, tap an option.
• To change the amount of time that messages can be retrieved on your device, in the Sync Timeframe drop-down
list, tap an option.
3. Tap Done.
Add a CalDAV or CardDAV account
Make sure you know the following information:
• Your username and password
• The email address associated with the account
• The server address for the account
You can add a CalDAV or CardDAV account to sync calendar events or contacts, respectively.
1.
In the Add Account screen, tap > CalDAV or CardDAV.
2. Enter the account information.
3. Tap Done.
Change account settings
You might want to change the settings for an account if you changed the password for the account, if you want to change
the display name for the account, or if you want to use different synchronization settings.
1. On the home screen, swipe down from the top of the screen.
66

User Guide BlackBerry Hub and email
2.
Tap Settings > Accounts.
3. Tap an account.
4. Make your changes.
5. Tap Save.
Remove an account from your device
To stop receiving messages and notifications for an account and to stop syncing calendar and contact info for that account,
you can remove the account from your BlackBerry device.
1. On the home screen, swipe down from the top of the screen.
2.
Tap Settings > Accounts.
3. Tap an account.
4.
Tap .
Troubleshooting: Setting up accounts
I can't add an email account
Try the following:
• Make sure that your email address and password have been typed correctly.
• Make sure that your device is connected to a mobile or Wi-Fi network.
•
Add the email account using advanced setup. On the home screen, swipe down from the top of the screen. Tap
Settings > Accounts > > . Tap the type of account that you want to add. You might need to get additional
information about your account from your administrator or email service provider.
• If you're trying to add a work account supported by an EMM solution from BlackBerry, make sure that you have an
activation password from your administrator.
• If you're trying to add an email account supported by Microsoft Exchange ActiveSync, contact your administrator or
email service provider to find out if you need to change any settings for the account.
I can't add a second social networking account
You can add only one Facebook account, one Twitter account, and one LinkedIn account to your BlackBerry device.
BlackBerry Hub message list icons
Icon
Description
Unread email
67

User Guide BlackBerry Hub and email
Icon Description
Read email
Meeting or event invitation
New Facebook notification
Email with attachment
Draft message
Email messages grouped by subject in a conversation thread
Unread text message (SMS)
Read text message
Text message with attachment (MMS)
Draft text message
New system notification
Message hasn't been sent yet
Message is being sent
Message has been sent
Message could not be sent
Viewing and searching messages
You can view all of your messages and notifications in the Hub view in the BlackBerry Hub. Or, you can view messages for a
specific account type or message type. You can search for a specific message, or customize your view so that you see only
the messages and notifications that are important to you.
Navigate your list of messages and notifications
In the BlackBerry Hub, touch and hold a date bar.
• To go to messages and notifications for the next day, tap .
• To go to messages and notifications for the previous day, tap .
• To go to the top of your list of messages and notifications, tap .
68

User Guide BlackBerry Hub and email
• To go to the bottom of your list of messages and notifications, tap .
View messages by account or message type
If you want to see messages only from a particular account (for example, your personal email account) or by a type (for
example, your text messages), you can filter them.
1.
In the BlackBerry Hub, tap .
2. Tap the type of messages that you want to see.
To see all of your messages again, tap > Hub.
View filed email
1. In the BlackBerry Hub, tap the drop-down list at the top of the screen.
2. Tap a folder.
Search for a message
1.
In the BlackBerry Hub, tap .
2. Type a search term.
To filter your search results by sender, date, subject, and more, tap .
Filter your search in the BlackBerry Hub
1.
In the BlackBerry Hub, tap .
2.
Leave the Search field empty. Tap .
3. Tap Priority, Unread, Flagged, Received, or Attachment.
4.
Tap again.
To see all of your messages again, tap Cancel at the top of the screen.
: You can also find your flagged messages in BlackBerry Remember, in the Flagged Messages task list.
Tip
Viewing important messages with the BlackBerry Priority Hub
With the BlackBerry Priority Hub feature, important messages are highlighted so that you can quickly find them in the
BlackBerry Hub.
69

User Guide BlackBerry Hub and email
To identify priority messages, your BlackBerry device looks at whether a message is flagged as important, whether the
sender is a frequent contact, and other criteria.
You can help your device learn which messages are important to you by changing the priority of a message. For example, if
a message is important to you but it's not included in the BlackBerry Priority Hub, you can add it.
View only your priority messages
In the BlackBerry Hub, do one of the following:
•
Tap > Priority Hub.
• If your Pinch Filter Criteria is set to Priority Messages, slide your fingers together to zoom in on your priority messages.
Tip: You can specify which messages are displayed when you zoom in. In the BlackBerry Hub, tap > > Display and
Actions. In the Pinch Filter Criteria drop-down list, select Priority Messages, Unread Messages, Flagged Messages, Draft
Messages, Meeting Invites, Sent Messages or Level 1 Messages.
Add a message to or remove a message from the BlackBerry Priority Hub
Adding messages to and removing messages from the BlackBerry Priority Hub helps your BlackBerry device learn which
messages to highlight as priority in the future.
1. In the BlackBerry Hub, touch and hold a message.
• To add a message to the BlackBerry Priority Hub, tap .
• To remove a message from the BlackBerry Priority Hub, tap .
2. In the dialog box, choose a reason why the message is or isn't important.
3. Tap OK.
Change the types of messages that are marked as priority
By default, if you start a conversation, if the sender of a message has the same last name as you, or if a message is marked
with high importance, then those messages are included in the BlackBerry Priority Hub. You can turn off each of these
settings.
1.
In the BlackBerry Hub, tap > > Priority Hub.
2. Turn off the Sender has the Same Last Name as Me, the Message Sent with High Importance, or the I Started the
Conversation switch.
Create a priority rule
You can create a rule so that messages that are sent from specific accounts, or with a specific subject, or with other
specific criteria are sent to your BlackBerry Priority Hub. You can also set a Level 1 alert for specific messages so that you
receive a custom notification when these messages are sent to you.
1.
Tap > > Priority Hub.
70

User Guide BlackBerry Hub and email
2.
Tap .
3. Do any of the following:
• To add a name to your rule, enter a name in the Filter Name field.
• To choose the account that the rule applies to, select an account in the Account drop-down list.
• To flag messages from a specific email address as priority, enter an email address in the From field.
• To flag messages sent to a specific email address as priority, enter an email address in the Sent to field.
• To flag messages with a specific subject as priority, enter a subject in the Subject field.
• To flag messages that are sent directly to you or that you are CCed on as priority, select the Sent Directly to Me or
the Cc: to Me checkbox.
• To flag messages with a specific importance as priority, in the Importance drop-down list, select an option.
• To set a Level 1 alert for your rule, select the Enable Level 1 Alert checkbox.
4. Tap Create.
Note: Level 1 alerts override the existing notification settings. When you set Level 1 alerts, you are notified of Level 1
messages by a custom ring tone. The BlackBerry Hub displays Level 1 messages in red. To change your settings for Level 1
alert notifications, tap Level 1 Alerts Notification Settings.
Turn off the BlackBerry Priority Hub
1.
In the BlackBerry Hub, tap > > Priority Hub.
2. Turn off the Priority Hub switch.
View attachments sent to you
You can quickly find and view the files sent to you and avoid searching through your messages.
In the BlackBerry Hub, do one of the following:
• To see all of the files that you received as attachments, tap .
• To view attatchments in a message, tap a message. Tap the attachment.
• To see attachments for a specific account, tap . Tap an account. Tap .
Download attachments in a message
You can download one file or multiple files that you receive as attachments in an email.
• In a message with one attachment or to download one attachment at a time, tap an attachment.
•
To download all the attachments in a message, tap .
Tap an attachment to view, share, or save a downloaded file.
71

User Guide BlackBerry Hub and email
Sort attachments
You can sort attachments by date, sender, name, type (for example, by pictures and documents), or account.
1.
In the list view in the BlackBerry Hub, tap .
2.
Tap > .
3. In the Sort drop-down list, tap a sort option.
Share or save your attachments
1.
In the list view in the BlackBerry Hub, tap .
2. Touch and hold an attachment.
3.
Tap .
4. When the download is complete, touch and hold the attachment.
• To share the attachment, tap .
• To save the attachment, tap .
Tip: To share or save multiple attachments, tap > . Select some attachments. Tap or .
Open a related email for an attachment
1.
In the list view in the BlackBerry Hub, tap .
2. Touch and hold an attachment.
3.
Tap .
Send email and messages from the BlackBerry Hub
From the BlackBerry Hub, you can send email, text messages, Facebook messages, direct Twitter messages, LinkedIn
messages, BBM messages, or other types of chat messages, depending on your wireless service plan and the accounts
that you added to your BlackBerry device. When you tap Compose, the BlackBerry Hub suggests message types based on
the messages you commonly compose.
1.
In the BlackBerry Hub, tap .
2. Tap a message type.
3. Add or choose a recipient for your message:
• For email, type a contact name or an email address in the To field. You can tap suggested contacts that appear
below the
72
To field to quickly add them to the message.

User Guide BlackBerry Hub and email
• For Facebook, Twitter, or LinkedIn messages, type a contact name in the To field.
• For text messages, type a contact name or a phone number.
• For BBM and other chat messages, select a contact from the list.
4. Type your message.
5. Tap Send or the Enter key.
Reply to or forward an email
In an email, do one of the following:
• To reply to the email, tap .
• To reply to all recipients of the email, tap .
• To forward the email, tap .
Tip: When you reply to an email, you have the option to delete the text in the original message. Tap > .
Attach a file to an email or text message
If your wireless service plan supports MMS messages, you can add an attachment to a text message.
1.
While composing an email or text message, tap .
2. Find the file.
3. Tap the file.
: When you send an email with a picture attachment, you can reduce the size of the message by reducing the size of
Tip
picture attachments. On the Image Size screen, tap a size. Tap Send.
Add a BCC recipient to an email
1.
While composing a message, tap > .
2. Type a contact name or email address.
Send an email or a meeting invitation when composing another message
When you compose an email, you can also send a meeting invitation to a recipient or send a separate email.
1. While composing a message, touch and hold a name in the To, CC or BCC field.
2. Do one of the following:
• To send a separate email to a recipient when replying to a message, tap .
73

User Guide BlackBerry Hub and email
• To send a meeting invitation to the recipient, tap .
• To add the recipient to your Contacts, tap .
Compose an email in plain text format
You can reduce the size of email messages or email threads by switching from HTML format to plain text format.
1.
In an email, tap .
2.
Tap .
Change text formatting in an email
Bold, italicize, and underline text; create ordered and bulleted lists; and change the font size and colors.
1.
While composing a message, tap .
2. Use the formatting toolbar to apply formatting to your text.
Forward a text message
1. In the BlackBerry Hub, touch and hold a text message.
2.
Tap .
Forward a PIN message as an email
You might want to archive the information that you send or receive in a PIN message. You can forward the message to
yourself or others as an email.
1. In the BlackBerry Hub, touch and hold a PIN message.
2.
Tap .
Managing messages
Stay organized by managing your messages in the BlackBerry Hub. You can file messages, flag important messages, or
save draft messages for later.
Delete a message
In the BlackBerry Hub, do any of the following:
74

User Guide BlackBerry Hub and email
• To delete a single message, touch and hold the message. Tap .
• To delete more than one message, touch and hold a message. Tap . Tap the other messages you want to delete.
Tap > .
• To delete all messages before a specific date, touch and hold the date bar. Messages that were sent or received before
that date are highlighted. Tap .
• To delete messages only from your device, but keep them on the messaging server, tap > > Display and
Actions. In the Delete On drop-down list, select Hub Only.
Filing email
You might not be able to file an email or create folders for an email, depending on the account that an email is in.
File an email
You can file your sent and received email messages.
1. In the BlackBerry Hub, touch and hold an email.
2.
Tap .
3. Tap a folder.
Add, rename, or delete an email folder
In the BlackBerry Hub, tap the drop-down list at the top of the screen.
• To add a folder, touch and hold the folder that you want to use as the parent folder. Tap . Type a name for the
folder. Tap OK.
• To rename a folder, touch and hold the folder. Tap . Type a new name for the folder. Tap OK.
• To delete a folder, touch and hold the folder. Tap .
Keep all email from a folder on your device
If you use a desktop email application like Microsoft Outlook to file email into folders, your BlackBerry device doesn't
automatically download copies of that email. You can have filed email readily available on your device by syncing an email
folder.
1. In the BlackBerry Hub, tap the banner at the top of the screen.
2. Touch and hold a folder.
3.
Tap .
75

User Guide BlackBerry Hub and email
Flag a message
When you flag messages, they appear in BlackBerry Remember, so that you can add due dates, tags, voice notes, and
other files to them.
1. In the BlackBerry Hub, touch and hold a message.
2.
Tap .
Manage your messages with BlackBerry Hub Instant Actions
BlackBerry Hub Instant Actions allow you to quickly triage messages, conversations, and events in the BlackBerry Hub. In
the list view, you can mark messages as read or unread, and file, flag, or delete messages. You can also accept or decline
meeting invitations without having to open them. If you make a mistake while managing messages, you can tap
cancel the last change.
Undo to
Use BlackBerry Hub Instant Actions
Depending on the message type and your BlackBerry Hub Instant Actions settings, the following actions are available:
• Calendar invitation: You can accept or decline a calendar invitation.
• BBM or text message (SMS and MMS): You can reply to or delete a BBM or text message.
• Email message: You can file, delete, or flag an email message.
1.
In the BlackBerry Hub, in the upper-right corner of the screen, tap .
2. Do any of the following:
• To delete a message, tap .
• To file a message, tap , and choose a folder.
• To flag a message, tap .
• To mark a message as read, tap .
• To reply to a text message or a BBM message, tap .
Customize BlackBerry Hub Instant Actions for email messages
By default, with BlackBerry Hub Instant Actions, you can file and delete your email messages. You can change your
settings for the actions that appear in the list view.
1.
In the BlackBerry Hub, tap > > Display and Actions.
2. Under Hub Instant Actions, do one of the following:
• In the Email Action 1 drop-down list, tap File or Flag.
• In the Email Action 2 drop-down list, tap File, Flag, or Delete.
76

User Guide BlackBerry Hub and email
Mark a message as read or unread
In the BlackBerry Hub, do one of the following:
• To mark a message as read, touch and hold the message. Tap .
• To mark a message as unread, touch and hold the message. Tap .
• To mark messages before a specific date as read, touch and hold the date bar. Tap .
Download or share a picture from an email
In a message, touch and hold an embedded picture.
• To save the picture, tap .
• To share the picture, tap .
• To set the picture as a contact picture, tap .
Save a draft email
1. While composing an email, tap Cancel.
2. In the dialog box, tap Save.
Securing your email
You can digitally sign or encrypt messages if you use a work email account that supports S/MIME or PGP protected
messages or IBM Notes email encryption on your BlackBerry device. Digitally signing or encrypting messages adds another
level of security to email messages that you send from your device.
Digital signatures are designed to help recipients verify the authenticity and integrity of messages that you send. With S/
MIME-protected messages, when you digitally sign a message using your private key, recipients use your public key to
verify that the message is from you and that the message hasn't been changed.
Encryption is designed to keep messages confidential. With S/MIME-protected messages, when you encrypt a message,
your device uses the recipient’s public key to encrypt the message. Recipients use their private key to decrypt the
message.
Even if your email account isn't supported by an EMM solution from BlackBerry, if it's supported by Microsoft Exchange
ActiveSync and your organization uses an LDAP directory, you can encrypt your messages using S/MIME.
If you use a work account that supports PGP protected messages, you can digitally sign, encrypt, or sign and encrypt
messages using PGP protection. You need to store the recipient's public key on your BlackBerry device to send encrypted
email messages. You need to store your private key on your device to send digitally signed email messages.
77

User Guide BlackBerry Hub and email
If your device is associated with a CRL or an OCSP server, when you add recipients to an encrypted message, your device
tries to retrieve a certificate status for each recipient. You are unable to send the message until certificate statuses are
received for all recipients. If certificates can't be found or are invalid, the recipients' names appear as red.
Set up S/MIME-protected messaging
You need to store a private key and certificate on your BlackBerry device to send digitally signed or encrypted email
messages using S/MIME-protected messaging. You can store a key and certificate by importing the files from a work email
message or a media card.
If you have a work email account that is supported by an EMM solution from BlackBerry and a personal Microsoft Exchange
ActiveSync account, when you import a certificate from the personal space on your device, you can store it in the keystore
in your work or personal space.
Your BlackBerry device supports keys and certificates in the following file formats and file name extensions:
• PEM (.pem, .cer)
• DER (.der, .cer)
• PFX (.pfx, .p12)
1. Open a work email message with a certificate attachment.
2.
Tap .
3. If necessary, enter the password.
4. Tap Import or Import All.
5.
Tap .
6.
In the BlackBerry Hub, tap > > Email Accounts.
7. Tap an account.
8. Tap Secure Email Settings.
9. If necessary, tap the S/MIME tab.
10. Turn on the S/MIME switch.
11. Under Signing Certificate, in the drop-down list, tap the certificate that you imported.
12. Under Encryption Certificate, in the drop-down list, tap the certificate that you imported.
Set up PGP protected messaging
If you use a work account that supports PGP protected messages, you can digitally sign, encrypt, or sign and encrypt
messages using PGP protection. You need to store the recipient's public key on your BlackBerry device to send encrypted
email messages. You need to store your private key on your device to send digitally signed email messages.
Your device supports keys in the following formats and file name extensions:
• PEM (.pem, .cer)
• ASC (.asc)
78

User Guide BlackBerry Hub and email
1. Open a work email message with a PGP key attachment.
2.
Tap .
3. Tap Import or Import All.
4. If necessary, enter the password.
5.
Tap .
6.
In the BlackBerry Hub, tap > > Email Accounts.
7. Tap an account.
8. Tap Secure Email Settings.
9. If necessary, tap the PGP tab.
10. Turn on the PGP switch.
11. Under PGP Signing Key, in the drop-down list, tap the key that you imported.
12. Under PGP Encryption Key, in the drop-down list, tap the key that you imported.
Turn on IBM Notes email encryption
A work account that supports IBM Notes email encryption must be added to your device.
1.
In the BlackBerry Hub, tap > > Email Accounts.
2. Tap an account.
3. Tap Secure Email Settings.
4. If necessary, tap the NNE tab.
5. Turn on the NNE switch.
Sign or encrypt a message
You must use a work email account that supports IBM Notes mail encryption to send an encrypted email message, or an
email account that supports S/MIME or PGP protected messages to send a signed or encrypted email message.
1. When you compose a message, slide your finger down on the screen.
2. In the drop-down list, tap a signing or an encryption option.
: If your BlackBerry device is associated with a CRL or an OCSP server, when you add recipients to an encrypted
Note
message, your device tries to retrieve a certificate status for each recipient. You are unable to send the message until
certificate statuses are received for all recipients. If certificates can't be found or are invalid, the recipients' names appear
as red.
79

User Guide BlackBerry Hub and email
Update secure email settings
Depending on your permissions, you can change the email security that is used for all the messages you send. For
example, if you use S/MIME to protect your messages, you can send clear-signed messages that any email application can
open, or opaque-signed messages that only email applications that support encryption can open.
1.
In the BlackBerry Hub, tap > > Email Accounts.
2. Tap an account.
3. Tap Secure Email Settings.
4. Do any of the following:
• To turn on S/MIME-protected messaging, tap the S/MIME tab. Turn on the S/MIME switch.
• To turn on NNE-protected messaging, if necessary, tap the NNE tab. Turn on the NNE switch.
• To change the preferred method of encoding to use for messages you send, select an option in the Default
Encoding
• To select your preferred method of encoding to use for replies or forwarded messages you send, select an option
in the Outgoing Message Encoding drop-down list.
• To send clear-signed messages, tap the S/MIME tab. Turn on the Send Clear-Text Signed Messages switch.
• To receive a warning message if there is a problem with a certificate, tap the S/MIME tab. Turn on the Warn
About Problems With My Certificates
• To turn on PGP protected messaging, tap the PGP tab. Turn on the PGP switch.
• To select a key pair to use for signing messages you send, select an option in the PGP Signing Key drop-down list.
• To select a key pair to use for encrypting messages you send, select an option in the PGP Encryption Key drop-
down list.
• To view PGP key details for a PGP key pair stored on your BlackBerry device, below either the PGP Signing Key or
the PGP Encryption Key drop-down lists, tap View PGP Key.
• To receive a warning message if there is a problem with a PGP key, tap the PGP tab. Turn on the Warn About
Problems With My PGP Keys switch.
drop-down list.
switch.
Configure your LDAP server settings
If your email account is supported by Microsoft Exchange ActiveSync, and your organization uses an LDAP directory, you
can configure your settings so that S/MIME certificates for users in the LDAP directory are available to you.
Make sure that you know the server name.
1. On the home screen, swipe down from the top of the screen.
2.
Tap Settings > Security and Privacy.
3. Tap LDAP Server.
4. In the Server Address field, enter the address of the LDAP server that your account is associated with.
80

User Guide BlackBerry Hub and email
• To set where the LDAP server starts to look for S/MIME certificate information, enter a base distinguished name in
the Search Base field.
• To specify the scope of an LDAP server search, in the Search Scope drop-down list, tap an option.
• To enable an authentication type, in the Authentication Type drop-down list, tap an option.
• If you enable the Simple authentication type, in the LDAP User ID and LDAP Password fields, enter your
username and password.
• To enable Transport Layer Security, turn on the Use Secure Connection switch.
• To select how long to wait for the LDAP server to respond, in the Timeout drop-down list, tap an option.
Secure email icons
Icon Description
The email is digitally signed.
The email is encrypted.
A message in the folder is digitally signed.
A message in the folder is encrypted.
The digital signature was successfully verified.
There is not enough information to verify the digital signature.
The digital signature failed verification.
A certificate is attached to the email.
Multiple certificates are attached to the email.
A PGP key is attached to the email.
The certificate chain is trusted or the certificate status is good.
There is an error with the certificate chain or the certificate status.
The certificate status is being determined.
The certificate chain is expired.
The certificate chain has been revoked.
81

User Guide BlackBerry Hub and email
Navigating the BlackBerry Hub
Peek at your messages in the BlackBerry Hub from anywhere
Whether you're on your home screen or using an application, you can peek at or open the BlackBerry Hub from anywhere
on the device.
1. From the bottom of the screen, slide your finger up just a little bit. The current view shrinks to show your notifications.
2. Slide your finger to the right to peek at the BlackBerry Hub.
• To fully open the BlackBerry Hub, continue sliding your finger to the right.
• To return to what you were doing, slide your finger back to the left and down.
Peek at your messages and notifications while you're composing or
viewing a message
In a message, slowly slide your finger from the left edge of the message to the right. Continue sliding to bring your list of
messages and notifications into view.
82

User Guide BlackBerry Hub and email
Jump to the next or previous message
1. In a message, slowly slide your finger from the left edge of the message to the right to peek at your list of messages.
2. While holding the message open, slide your finger up or down to highlight the next or previous message in the list.
3. To open the highlighted message, release your finger.
Check your upcoming events from the BlackBerry Hub
You can check your agenda in the BlackBerry Calendar app, but if you're already in the BlackBerry Hub, just stay where
you are.
At the top of your list of messages and notifications, where today's date appears, slowly drag down. Your upcoming events
start to appear. The more you drag, the more you see.
83

User Guide BlackBerry Hub and email
Create a meeting from an email
When you create a meeting or event from an email, your BlackBerry device populates the invitation with the subject line
from the email, and the recipients of the email become the invitees.
1.
In an email, tap > .
2. Enter any additional information for the meeting.
3. Tap Save.
Add a contact from the BlackBerry Hub
1. In the BlackBerry Hub, touch and hold a message.
2.
Tap .
• To add the contact to an existing contact entry (for example, to add a new email address for a contact), tap a
contact from the list.
• To add the contact as a new contact, tap .
3. Tap Save.
Refresh your list of messages
If you added an email account that doesn't support push messaging services, you can refresh the BlackBerry Hub to check
for new messages.
In the BlackBerry Hub, tap > .
84

User Guide BlackBerry Hub and email
Customizing BlackBerry Hub settings
You can customize a variety of settings in the BlackBerry Hub. For example, you can change your default email address or
calendar, or the order that your accounts appear in. You can also set an out-of-office reply using your BlackBerry device.
Set an out-of-office reply
Some email accounts might not support out-of-office replies.
1.
In the BlackBerry Hub, tap > > Email Accounts.
2. Tap an email account.
3. Turn on the Send Automatic Replies switch.
4. Do any of the following:
• To send out-of-office replies inside your organization, enter a message in the Reply with field.
• To specify a start time and end time to send out-of-office replies, turn on the Send Automatic Replies Between
Specific Dates
• To send out-of-office replies outside your organization, turn on the Send Automatic Replies Outside of the
Organization switch. If you want the message in your external out-of-office replies to be something different from
your internal out-of-office replies, enter a message in the
switch.
Reply with field.
Add a signature to an email account
1.
In the BlackBerry Hub, tap > > Email Accounts.
2. Tap an email account.
3. Turn on the Auto Signature switch.
4. Type your signature in the field.
Change your default email address or calendar
When you share something (for example, a picture or a website) by email or when you compose a new email, your
BlackBerry device sends the email from your default email address. When you add an event to your calendar or send a
meeting invitation, your device adds the event to your default calendar.
1. On the home screen, swipe down from the top of the screen.
2.
Tap Settings > Accounts.
3.
Tap .
• To change the default account that you send email from, in the Email Address drop-down list, tap an account.
85

User Guide BlackBerry Hub and email
• To change the default calendar that you add events to and send meeting invitations from, in the Calendar drop-
down list, tap a calendar.
Download only partial text in email
If you move frequently between a Wi-Fi coverage area or cellular coverage area, or if you're roaming, you can control how
much content in your email messages is downloaded while in a specific area of coverage. For example, when roaming, you
might choose to download just the subject of messages. While in an area of Wi-Fi coverage, you might choose to download
full messages.
1. On the home screen, swipe down from the top of the screen.
2.
Tap Settings > Accounts.
3. Tap an account.
4.
Tap > .
5. In the Roaming Data Control, the Cellular Data Control, or the Wi-Fi Data Control drop-down lists, select an option.
If you're in an area of coverage where downloading is restricted, you can choose to download the full email by tapping
Message truncated, download more. Additional charges might apply.
Change how messages are displayed in the BlackBerry Hub
Change whether the BlackBerry Hub shows your sent messages or filed messages, how you view message threads, and
how the date appears at the top of your list of messages and notifications. You can also change how the senders' names
are displayed, whether pictures are automatically downloaded, and more.
1.
In the BlackBerry Hub, tap > > Display and Actions.
2. Change your settings. For example, change any of the following settings:
• To view messages as conversation threads instead of single messages, in the Display Style drop-down list, tap
Conversation.
• To stop showing filed messages that have been read, turn off the Show Read Filed Emails switch.
• To stop showing sent messages, turn off the Show Sent Emails switch.
• To receive a notification when you move a message to a folder that isn't synced to your device, turn on the Notify
When Folder Isn't Synced
• To set the BlackBerry Hub to maintain the view you left it in when your device is inactive, turn off the Return to
Default View When Idle switch.
: When you change your Display Style to Conversation, one line of preview text appears in each email in your list view so
Tip
that you can quickly identify the email messages that you need to read in a particular conversation.
86
switch.

User Guide BlackBerry Hub and email
Color code your accounts
To help you distinguish between different types of accounts in the BlackBerry Hub, you can choose a color for each of your
accounts. The color appears on the left side in your list of messages.
1.
In the BlackBerry Hub, tap > > Hub Management.
2. Tap an account.
3. In the Account Color drop-down list, tap a color.
Restrict contacts in the BlackBerry Hub
If you don't want to receive messages from specific email accounts or contacts, you can restrict the messages from
appearing in the BlackBerry Hub.
1.
In the BlackBerry Hub, tap > > Recent Contact Management.
2. Tap a contact name to add it to your restricted contacts list.
To remove a contact from the restricted contacts list, on the Recent Contact Management screen, tap , and tap a
contact name.
Clear recent contact suggestions
By design, the BlackBerry Hub remembers the contacts that you frequently send messages to and suggests them to you
when you compose new messages. If you don't want contact suggestions to appear when you compose messages, you can
clear your recent contacts. Clearing your contact suggestions does not remove the contacts from your device.
1.
In the BlackBerry Hub, tap > > Recent Contact Management.
2. Tap Remove Recent Contacts.
Change the order of accounts in the BlackBerry Hub
You can change the order in which the BlackBerry Hub displays the accounts in the Account Tab. For example, you can
move your favorite accounts or the accounts that you use most frequently to the top of the list.
1.
In the BlackBerry Hub, tap > > Hub Management.
2.
Tap .
3. Touch and hold an account, then slide your finger up or down to change where the account appears in the list of
accounts in the Account Tab.
4.
To save your changes, tap .
87

User Guide BlackBerry Hub and email
Change which messages appear in the BlackBerry Hub
You can choose to hide messages for some accounts, so they don't appear in the Hub Tab in the BlackBerry Hub. Calendar
and contact syncing aren't impacted by these settings.
1.
In the BlackBerry Hub, tap > > Hub Management.
2. Tap an account.
3. In the Show in list, tap Show in Hub Only, Show in Separate Account Only or Show in Both.
Sync Microsoft Exchange contact folders
If you have an email account that is supported by Microsoft Exchange ActiveSync, you can choose which of your contact
folders sync to your BlackBerry device.
1. On the home screen, swipe down from the top of the screen.
2.
Tap Settings > Accounts.
3. Tap a Microsoft Exchange account.
4. Turn on the Sync Contacts switch.
5. Tap Edit Contact Folder Settings.
6. Do one of the following:
• To sync all of your contact folders, turn on the Sync All Contact Folders switch.
• To sync one or more of your contact folders, turn off the Sync All Contact Folders switch. Tap the folders that you
want to sync with your device.
7. Tap Save.
Change options for text messages
In the BlackBerry Hub, tap > > Text Messages.
• To receive a notification when your sent text messages are delivered or read, under SMS or MMS, turn on the Confirm
Delivery
• To allow other devices to see when you receive or read a text message with an attachment, under MMS, turn on the
Allow Delivery Confirmation switch or the Allow Read Confirmation switch.
• To block unwanted MMS messages, under MMS, turn on the Reject Anonymous Messages switch or the Reject
Advertisements switch.
• To stop receiving MMS messages while roaming, under MMS, in the Auto Retrieval Mode drop-down list, tap Home
Only.
• To disable word substitution, turn off the Enable Word Substitution switch.
• To only send text messages when you tap the send icon, turn off the Use Enter Key To Send switch.
88
switch or the Confirm Read switch.

User Guide BlackBerry Hub and email
• To change the background color of text message conversations, turn the Dark Background switch on or off.
Change advanced settings for text messages
With the advanced settings for SMS and MMS messages, you can allow special characters, change your routing
preference, and more.
1.
In the BlackBerry Hub, tap > > Text Messages > .
2. Make your changes.
3. Tap Save.
Turn off cell broadcast messages
Your service provider might send you cell broadcast messages when you're using your BlackBerry device in certain
geographical locations (for example, to tell you about local weather conditions). There is no charge associated with these
messages, but you can turn off them off if you'd rather not see them.
In the BlackBerry Hub, tap > > Cell Broadcast.
• To turn off all cell broadcast messages, turn off the Enable Cell Broadcast switch.
• To turn off messages from a specific channel, beside a channel, tap Remove.
Update your Facebook, Twitter, or LinkedIn status from the BlackBerry Hub
1.
In the BlackBerry Hub, tap .
2. Tap Facebook, Twitter, or LinkedIn.
3.
Tap .
4. Type your status.
5. Tap Post, Tweet, or Send.
Make a phone call from the BlackBerry Hub
1.
Tap > Calls.
2.
Tap .
89

User Guide BlackBerry Hub and email
About public warning messages
Public warning systems are used to send alert messages to users with enabled mobile devices. Public warning messages
are text messages that alert users of possible threats to safety in their area. Messages may include severe weather
warnings, missing child alerts, or national emergencies.
Depending on your wireless service provider, public warning messages don't contribute to data usage in your wireless
service plan. This feature might not be supported, depending on your region, service provider, and wireless network. For
more information, contact your service provider or administrator.
Unsubscribe from public warning messages
You might not be able to unsubscribe from some public warning messages, depending on your region and wireless
network.
1.
In the BlackBerry Hub, tap > > Emergency Alerts.
2. Turn off the switch beside a type of public warning.
Troubleshooting: BlackBerry Hub
I'm not receiving messages
Try the following:
• If you recently changed an account password, make sure that you update the password in the Accounts settings on
your BlackBerry device. On the home screen, swipe down from the top of the screen. Tap > Accounts. Tap an
account. Make your changes. Tap Save.
• Check your network connection settings to make sure that your device is connected to a Wi-Fi or mobile network. If
you're not in a wireless coverage area, you should receive messages when you return to a wireless coverage area.
• If you're connected to a mobile network, check that data services are turned on. On the home screen, swipe down from
the top of the screen. Tap > Networks and Connections > Mobile Network. Make sure the Data Services switch is
turned on.
I can only see email for the last 30 days
For some types of email accounts, by default, your BlackBerry device initially syncs email for the past 30 days. To change
this setting, on the home screen, swipe down from the top of the screen. Tap > Accounts. Tap the email account. Tap
. In the Sync Timeframe drop-down list, tap an option. Tap Save.
90

User Guide BlackBerry Hub and email
I can't find my work email in the BlackBerry Hub
If you added a work account to your BlackBerry device, your administrator might have turned on a policy that separates the
BlackBerry Hub into a work view, which contains your messages and notifications for only your work account, and a
personal view, which contains your messages and notifications for only your personal accounts.
To see the work view, in the BlackBerry Hub, tap > Switch To Work.
I can't see the recipients for a message
To see the other recipients of a message and the account that you received the message in, in the message, at the top-right
corner of the screen, tap the arrow.
I can't send or forward a text message
You might not be able to forward an SMS or MMS message if the content of the message includes copyright-protected
information.
If you use a work account that is supported by an EMM solution from BlackBerry, your administrator might not allow you to
send text messages, but you might still be able to receive text messages.
I can't attach a file to a text message
The file might be too large, or your wireless service plan might not support MMS messaging, which is required to attach files
to text messages. Contact your service provider for more information.
I can't find the BlackBerry Hub or the Text Messages icon
You might have removed the icons from your home screen. Try any of the following:
• Even though icons don't appear on your home screen, you can still access your messages directly from the BlackBerry
Hub. On the home screen, swipe right to open the BlackBerry Hub. To view only your text messages, tap > Text
Messages.
• You can download the icons from BlackBerry World. In BlackBerry World, search for Text Messaging Icon or
BlackBerry Hub Icon and download the icons.
91

User Guide BlackBerry Hub and email
joyn for BlackBerry 10 devices
About joyn
Do you have friends and contacts who aren't using a BlackBerry 10 device? If so, you can chat, call, send pictures, and
share videos with these contacts using joyn. If your wireless service provider supports joyn, within the Contacts app or the
Phone app, the icon appears beside contacts who are using joyn, so that you can easily find other users.
joyn for BlackBerry 10 might not be available on your device, depending on your wireless service provider.
For information about fees or conditions that might apply when using this application, contact your wireless service
provider.
Start a joyn chat
1.
In the Contacts app, or in the contact details view, tap beside a contact's name.
2. Do any of the following:
• Type your message.
• Tap an emoticon.
• To attach a picture or file, tap .
3. Tap Send.
: You can find, start, and reply to your joyn chats in the BlackBerry Hub.
Tip
Invite other joyn contacts to a chat
Have something you need to discuss with a group? You can chat with more than one person to help make decisions faster
and keep everyone informed.
1.
At the bottom of a joyn chat, tap > Create Group.
2. Tap + to add another contact. Repeat this step for each contact you want to add.
3. If needed, type a chat subject.
4. Type your message.
5. Tap Send.
92

User Guide BlackBerry Hub and email
Delete a joyn chat
On a chat screen, tap > .
Call a joyn contact
1.
In the Phone app, tap .
2.
Tap beside the contact you want to call.
3. If you have multiple phone numbers for a joyn contact, tap the number that you want to call.
Tip: During the call, tap to start a chat or a video share, or share a file.
Start a joyn video share
Before you can share a video or start chatting over video, you need to call a joyn contact. The contact must have a device
that supports video.
During a call, in the Phone app, tap .
: During the video share, tap to start a chat or share a file.
Tip
Send a file to a joyn contact
You can send different types of files to joyn contacts, including pictures, videos, and documents.
1.
During a one-on-one joyn chat or a phone call, tap and select a picture or file.
2. Tap Send.
Block a joyn contact
If you block a joyn contact, you won't receive any messages from that contact and file transfers are declined automatically.
Messages are filtered to the Blocked Messages folder in the joyn app, and read notifications are turned off.
1.
In the BlackBerry Hub, tap > .
2. Tap joyn.
3. Tap Blocked users.
93

User Guide BlackBerry Hub and email
4. Type the phone number or name of the joyn contact you want to block.
To unblock a contact, tap Unblock beside the contact's name.
Turn on joyn while roaming
Check with your wireless service provider to find out what roaming fees or charges might apply.
If you're travelling, you can keep using joyn while roaming.
1.
In the BlackBerry Hub, tap > .
2. Tap joyn.
3. Set the Enable joyn While Roaming switch to On.
94

User Guide Media
Media
Change the media volume
When music is playing, do any of the following:
• To increase the volume, press the Volume Up key on the side of your BlackBerry device.
• To decrease the volume, press the Volume Down key on the side of your device.
• To mute the volume, press the Mute key on the side of your device. To turn off mute, press the Mute key again.
• To select the type of speaker to play your music on, tap > Audio.
Note: Your media volume is separate from your notifications volume. Changing the volume while you listen to your music
won't change the volume of your notifications.
Supported audio and video file extensions, formats, and codecs
Depending on your BlackBerry device model and wireless network, some file extensions, formats, and codecs might not be
supported.
File extension
3GP H.263, H.264, MPEG-4 AAC, AMR
3G2 H.263, H.264, MPEG-4 AAC, AMR , QCELP
ASF WMV 9 WMA
AVI MJPEG, MPEG-4 MPEG-3
F4V V6 Sorenson Spark
ISMV (fragmented MP4) H.264, WMV9 AAC, WMA
M4V H.263, H.264, MPEG-4 AAC, MPEG-3, PCM
MKV H.264, MPEG-4 AAC, MPEG-3, PCM
MOV H.263, H.264, MJPEG, MPEG-4 AAC, AMR, QCELP
MP4 H.263, H.264, MPEG-4 AAC, AMR
Supported video codec(s) Supported audio codec(s)
95

User Guide Media
File extension Supported video codec(s) Supported audio codec(s)
MPEG H.263, H.264, MPEG-4 AAC, MPEG-3, PCM
WMV WMV 9 WMA
AAC
AMR
FLAC
M4A
MIDI
MKA
MP3
OGG
QCP
SPMID
WAV
WMA
For information about media file extensions and codecs for your device, visit Supported media.
—
—
—
—
—
—
—
—
—
—
—
—
AAC
AMR
FLAC, Vorbis
AAC
MIDI
AAC, MP3, PCM
MPEG-3
FLAC, Vorbis
QCELP
SP-MIDI
PCM, GSM
WMA 9, WMA 10
Troubleshooting: Media
I can't open a media file
Make sure that the file is in a format that your BlackBerry device supports.
Camera
Note: The Camera might not be available depending on your BlackBerry device model.
You can use the Camera on your device to take high-quality pictures and videos, and to capture that perfect moment, even
in adverse conditions. Time Shift mode makes it easy to take group pictures where everyone looks their best, and you can
96

User Guide Media
take panoramic pictures and capture the whole vista in one shot. Your device can also detect the lighting conditions and
suggest the best mode and setting to use, so you can focus on capturing the moment.
Camera icons
Icon Description
Switch between the front-facing and the rear-facing cameras.
Take a picture.
Record a video.
Turn on the flash while recording a video.
Stop recording a video.
Touch and hold anywhere on the screen to permanently lock the focus on that area of
the screen. Tap anywhere on the screen to unlock the focus.
Access more options like flash, shooting modes, settings, and more.
Taking pictures
Tip: In the Camera app, to quickly take a picture, press the Volume Up key or the Volume Down key. You can also use
these shortcuts to take a picture while recording a video.
Take a picture
Your BlackBerry device analyzes the current lighting conditions and suggests the scene or mode best suited to those
conditions. To accept the suggestion, tap the suggestion at the top of the screen.
1. Open the Camera app. To zoom in or zoom out, slide your fingers apart or together on the screen.
Note: Zoom only works in Normal and Stabilization shooting modes.
2. Tap the area of the screen that you want to focus on. You can focus on any part of the image on the screen, not just
the center of the screen.
3. When the focus box turns green, do any of the following:
• To take one picture, tap .
97

User Guide Media
• To take continuous pictures when you have Burst shooting mode turned on, touch and hold . The number of
pictures you took in Burst mode appears in the lower-left corner of the screen. The camera stops taking pictures
when you take your finger off of the icon.
Tip: You can turn on grid lines to help you center items in your picture or to make sure your picture is straight. To turn on
grid lines, in the Camera app, tap > Settings. Turn on the Display Grid Lines switch.
Turn on autofocus lock
You can use the autofocus lock on your BlackBerry device to take multiple pictures and videos without having to wait for
the focus to adjust between takes. When you lock the focus, the area of the screen that you selected remains in focus even
if you move your device or the image in the viewfinder changes.
Touch and hold the area on the screen that you want to lock the focus on. The icon appears in the focus box when the
focus is locked.
To unlock the autofocus lock feature, tap anywhere on the screen.
Turn off Face Detection
By default, the Face Detection feature on your BlackBerry device is turned on. When you take a picture and the camera
detects faces, the faces are automatically brought into focus.
1.
To turn off the Face Detection feature, in the Camera app, tap > Settings.
2. Turn off the Face Detection switch.
Set the timer to take a picture
In Normal and Time Shift modes, you can use the timer on your BlackBerry device to delay taking a picture for 3 seconds or
10 seconds. The timed delay allows you to get ready for the picture and even get into the shot yourself.
1.
In the Camera app, tap .
2. Do any of the following:
• To set the timer for 3 seconds, tap .
• To set the timer for 10 seconds, tap .
3.
Tap .
To turn off the timer, in the upper-left corner of the screen, tap or .
98

User Guide Media
Take a panoramic picture
The panoramic feature on your BlackBerry device takes multiple pictures and seamlessly combines them into one picture.
This shooting mode works well when you're trying to capture a breath-taking vista or a large group of people.
Note: Panorama mode can't be used with Burst or Time Shift mode.
1.
To turn on Panorama mode, in the Camera app, tap > .
2.
To take a panoramic picture, tap and pan in the direction of the image that you want to capture.
3. Slowly move your device until the solid box on the screen fills the box outline.
4. Keep moving your device until you have captured all of the image that you want to.
5.
Tap .
Important: When taking a panoramic picture, don't move your device too quickly when panning and keep your device
steady. A lot of movement will result in a low-quality panoramic picture.
Peek at the last picture or video that you took
You can peek at the last picture that you took or the video that you recorded to see if you captured what you wanted.
1. Touch and hold the thumbnail at the bottom of the screen.
2. Slide your finger up to expand the thumbnail.
• To return to the Camera app, lift your finger from the screen.
• To delete the picture or video, slide you finger to the right onto . When you reach the icon, remove your finger
and tap Cancel or Delete.
• To share the picture or video, slide your finger to the right onto . When you reach the icon, remove your finger
and tap Cancel or select a method of sharing.
Recording videos
1.
In the Camera app, tap .
2. Do any of the following:
• To zoom out or zoom in, slide your fingers together or apart on the screen.
• To turn on the flash, tap .
• To take a picture while recording a video, tap .
To stop recording, tap .
99

User Guide Media
Set the video size
You can set the video size for the rear-facing camera on your BlackBerry device, allowing you to take videos in different
conditions. For example, you can set the camera to record 720p at 60 fps to capture fast-moving objects.
1.
In the Camera app, tap > Settings.
2. Tap the Video Size (Rear Camera) drop-down list.
3. Tap an option.
Take a picture while recording a video
Using the Camera on your BlackBerry device, you can capture a still picture while recording a video at the same time. You
can take as many pictures as you like, without interrupting the video. Now you can capture the same event in two ways!
1.
In the Camera app, tap .
2.
While the video is recording, tap .
Using Time Shift mode
Time Shift mode lets you take a series of pictures at once so that you can pick the best one of the set. Did someone blink in
every shot, or cough just as you took the picture? You can fix that by swapping in different expressions for any person until
everybody is picture perfect. You can also save the Time Shift pictures you take and edit them later.
Take the best picture possible using Time Shift mode
1.
In the Camera app, tap > .
2.
To take the picture, tap . Hold the camera steady until the picture appears.
3. Do one of the following:
• Move the slider at the bottom of the screen back and forth until you find the best picture. Tap .
• To edit the picture later, tap .
• To delete the picture, tap .
Replace a person's expression using Time Shift mode
1.
In the Camera app, tap > .
2.
To take a picture, tap . Hold the camera steady until the picture appears.
100
 Loading...