


Installation and User’s
Guide
BlackBerry Wireless
Handheld
Beta Version
Single Band 1900 MHz
GSM/GPRS Networks
Internal evaluation only
Not for public distribution

Installation and Users Guide
Last revised 18/01/01
Part Number: Rev. 001 Alpha 1
At the time of printing, documentation complies with versions:
Operating System 2.0.13, Applications 2.0, and Desktop 2.0.
© 1999-2000 Research In Motion Limited. All rights reserved. RIM, the
RIM logo, Research In Motion, BlackBerry Wireless Handheld,
BlackBerry, BlackBerry Exchange Edition, the BlackBerry logo, the
envelope in motion symbol and Always On, Always Connected are
trademarks of Research In Motion Limited. RIM, Research In Motion Registered U.S. Patent and Trademark Office. Puma Technology, Inc.
Puma Technology, the Puma Technology logo, DSX Technology, the
DSX Technology logo, Intellisync, the Intellisync logo and Intellisync
Ready logo are trademarks of Puma Technology, Inc. that may be
registered in some jurisdictions.
Windows 95/98/2000, Exchange and Outlook are either trademarks or
registered trademarks of Microsoft Corporation. All other brands,
product names, company names, tradema rks and service marks used
herein are the property of their respective owners.
The BlackBerry Wireless Handheld is a Beta product that is still in
development and Research In Motion Limited does not warrant the
performance of the BlackBerry Wireless Handheld in any way.
RESEARCH IN MOTION LIMITED DISCLAIMS ANY IMP LIED WARRANTIES,
REPRESENTATIONS OR CONDITIONS, INCLUDING, WITHOUT
LIMITATION ANY WARRANTY OR CONDITION OF MERCHANTABILITY
OR FITNESS FOR A PARTICULAR PURPOSE
. All Beta Materials are
provided AS IS and it is the users responsibility to take prudent and
appropriate measures to back up data and otherwise protect against the
loss of data, damage to the integrity of files or damage to computer
processing resources. Appearance, functionality and quality of the
product will improve prior to general release.
While every effort has been made to ensure technical accuracy,
information in this document is subject to change without notice and
does not represent a commitment on the part of Research In Motion
Limited.

Warning: This document is for the use of licensed users only. Any
unauthorized copying, distribution or disclosure of information is a
violation of copyright laws.
For more information on BlackBerry, call:
Research In Motion Limited
295 Phillip Street, Waterloo, Ontario, Canada N2L 3W8
Tel. (519) 888-7465 Fax (519) 888-6906
www.rim.net
Printed In Canada

FCC compliance statement (USA)
This device complies with Part 15 of the FCC Rules. Operation is subject
to the following two conditions:
• This device may not cause harmful interference, and
• This device must accept any interference received, includi ng
interference that may cause undesired operation.
WARNING
This equipment has been tested and found to comply with the limits for
a Class B digital device, pursuant to Part 15 of the FCC Rules. These
limits are designed to provide reasonable protection against harmful
interfere nc e in a r es id en ti al ins t alla t io n. Th is e q uip m en t ge ne rat es , u s es
and can radiate radio frequency energy and, if not installed and used in
accordance with the manufacturers instructions, may cause interference
harmful to radio communications.
There is no guarantee, however, that interference will not occur in a
particular installation. If this equipment does cause harmful
interference to radio or television reception, w hich can be determined
by turning the equipment off and on, the user is encouraged to try to
correct the interference by one or more of the following measures:
Changes or modifications to this unit not expressly
approved by the party responsible for compliance could
void the user’s authority to operate this equipment.
• Reorient or relocate the receiving antenna.
• Increase the separation between the equipment and receiver.
• Connect the equipment into an outlet on a circuit different from
that to which the receiver is connected.
• Consult the dealer or an experienced radio/TV technician for
help.

Industry Canada Certification
This device complies with Industry Canada RSS 133, under
certification number TBD.
Class B compliance
This device complies with the Class B limits for radio noise emissions as
set out in the interference-causing equipmen t standard entitled Digital
Apparatus, ICES-003 of Industry Canada.

Import ant s afety informat i on
Please read these safety and operation instructions provided in this
manual before operating the BlackBerry Wireless Handheld, its
docking/charging cradle, or any other BlackBerry Wireless
Handheld charging units. Retain these instructions for future use.
ELECTRICAL SAFETY
This equipment is intended for use when supplied with power or
charging from the Docking/Charging Cradle ASY-02761-001 or
other associated charging units approved by RIM with North
American AC Adapter unit PWR-02908-003. Other usage will
invalidate any warranty provided with this apparatus and may be
dangerous.
ACCESSORIES
Use only those accessories approved by RIM. The use of any other
accessory types will invalidate any approval or warranty applicable
to the handheld and may be dangerous.
EXPOSURE TO RADIO FREQUENCY SIGNALS
Your wireless handheld portable device is a low power radio
transmitter and receiver. When it is ON, it receives and also sends
out radio frequency (RF) signals.
Your wireless handheld complies with Federal Communications
Commission (FCC) guidelines respecting safety levels of RF
exposure for handheld wireless devices, which in turn are
consistent with the following safety standards previously set by
both U.S. and international standards bodies:
• Institute of Electrical and Electronics Engineers (IEEE) C95.1
(1999)
• National Council on Radiation Protection and Measurements
(NCRP) Report 86 (1986)

• International Commission on Non-Ionizing Radiation
Protection (ICNIRP) (1996)
To maintain compliance with FCC RF exposure guidelines, use only
RIM supplied or approved accessories. When carrying the wireless
handheld while on, use the specific RIM holster that has been tested
for compliance. Use of non-RIM approved accessories may violate
FCC RF exposure guidelines.
ANTENNA CARE
Use only the supplied integral antenna. Unauthorized antenna,
modifications, or attachments could damage the ha ndheld an d may
violate FCC regulations.
DRIVING
Check the laws and regulations on the use of wireless devices in the
areas where you drive. Always obey them. Avoid using the
handheld in any environment requiring your full attention, such as
when driving a vehicle. If you need to use your handheld while
driving, have a passenger in the ve hicle use the han dheld for y ou, or
find a safe location to halt your vehicle prior to using the handheld
Do not use any charging unit as a means of storing your handheld
while in a vehicle.
RF signals may affect improperly installed or inadequately shielded
electronic systems in motor vehicles. Check with the manufacturer
or its representative regardi ng your vehi cle. You sh ould also cons ult
the manufacturer of any equipment that has been added to your
vehicle.
For Vehicles Equipped With An Air Bag
An air bag inflates with great force. DO NOT place objects,
including both installed or portable wireless equipment, in the area
over the air bag or in the air bag deployment area. If in-vehicle
wireless equipment is improperly installed and the air bag inflates,
serious injury could resu lt.

ELECTRONIC DEVICES
Most modern electronic equipment is shielded from RF signals.
However, certain electronic equipment may not be shielded against
the RF signals from your wireless handheld.
Pacemakers
Consult a physician or the manufacturer of your pacemaker if you
have any questions regarding the effect of RF signals on your
pacemaker. If you have a pacemake r, ensure that you ar e using the
handheld in accordance with the safety requirements associated
with your particular pacemaker, which may include the following:
• Always keep the handheld more than 20 cm (six inches) from
the pacemaker when the handheld is turned ON;
• Do not carry the handheld in a breast pocket;
• If the handheld has a voice option, use the ear opposite the
pacemaker for making and receiving calls to minimize the
potential for interference.
• If you have any reason to suspect that interference is taking
place, turn your handheld OFF immediately.
Hearing Aids
Some digital wireless devices may interfere with some hearing aids.
In the event of such interference, consult your service provider or
contact the manufacturer of your hearing a id to discuss alt ernativ es.
Other Medical Devices
If you use any other personal medical device, consult the
manufacturer of your device to determine if they are adequately
shielded from external RF energy. Your physician may be able to
assist you in obtaining this information.
Turn your handheld OFF in health care facilities when any
regulations posted in these areas instruct you to do so. Hospitals or

health care facili ti es may b e us ing equi pme nt t ha t cou ld be sensitive
to external RF energy.
Posted Facilities
Turn your handheld OFF in any facility where posted notices so
require.
AIRCRAFT
Federal Aviation Administration (FAA)/FCC regulations prohibit
using the radio of your handheld while in the air. Switch the radio
of your handheld OFF before boarding an aircraft. The effect of the
use of your handheld’s radio in an aircraft is unknown. Such use
may affect aircraft instrumentation, communication and
performance, may disrupt the network, may otherwise be
dangerous to the operation of the aircraft, and may be illegal. All
other applications of your handheld may be used in accordance
with airline regulations for electronic devices.
BLASTING AREAS
To avoid interfering with blasting operations, turn the wireless
feature of your handheld OFF when in a “blasting area” or in areas
posted: “Turn off two-way radio”. Obey all signs and instructions.
POTENTIALLY EXPLOSIVE ATMOSPHERES
Turn your handheld OFF when in any area with a potentially
explosive atmosphere and obey all signs and instructions. Sparks in
such areas could cau se an explosion or fire resulting in bodily injury
or even death.
Areas with a potentially explosive atmosphere are often, but not
always, clearly marked. They include fueling areas such as gasoline
stations; below deck on boats; fuel or chemical transfer or storage
facilities; vehicles usin g li que fied pe tr oleu m ga s (such as propane or
butane); areas where the air contains chemicals or particles, such as
grain, dust , or metal powde rs; and any oth er area where you would
normally be advised to turn off your vehicle engine.

ADDITIONAL SAFETY GUIDELINES
Battery: Discard the handheld properly. As the unit contains a
lithium battery, neither the handheld nor the lithium battery should
be disposed of in fire. Dispose of the handheld containing the
lithium battery in accordance with the laws and regulations in your
area governing disposal of such cell types.
Power source: The docking/charging cradle and any other charging
units should be operated only from the type of power source
indicated on the marking l abel. Refe r to th e operat ing instru ctions in
this manual for more information on the battery and power supply.
Do not overload wall outlets, extension cords, or integral
convenience receptacles as this may result in a risk of fire or electric
shock.
Liquids and foreign objects: Never push objects of any kind into
the BlackBerry Wireless Handheld or its cradle through openings as
they may short-out parts and this may result in a fire or electric
shock. Do not use the handheld or cradle near water (for example
near a bathtub, or a sink, in a wet basement, near a swimming pool,
etc.). Never spill liquid of any kind on the handheld or its docking/
charging cradle. Unplug the docking/charging cradle from the wall
before cleaning.
Care: Do not use liquid or aerosol cleaners. Clean only with a dry
cloth.
High heat: The handheld and any accessories should be situated
away from any heat sou rces, such as radia tors, h eat reg isters , stov es,
or other apparatus (including amplifiers) that produce heat.
Power Cord: Protect the power cord from being walked on or
pinched particularly at plugs, convenience receptacles, and the
point where they exit from the apparatus. Unplug this apparatus
during lightning storms or when used for long periods of time.

Service: Unplug the docking/charging cradle from the wall and
refer the handheld, d ocking/c har ging cra dle and any acce ssories for
service to qualified service personnel if:
• the power supply cord or plug is damaged
• liquid has been spilled or objects have fallen into the handh eld
or docking/charging cra dle
• the handheld, docking/charging cradle or accessory has been
exposed to rain or water
• the handheld, docking/charging cradle or accessory has been
dropped or damaged in any way
• the handheld, docking/charging cradle or accessory does not
operate normally by foll owing the instru ctions contai ned in this
manual
• the handheld, docking/char gin g cr adl e or access ory exhibits a
distinct change in performance.
All servicing should be undertaken by qualified service personnel.
WARNING
WARNING: To reduce the risk of fire or electric shock, do
not expose this apparatus to rain or moisture. Adjust only
those controls that are covered in this manual. An improper
adjustment of other controls may result in damage and will
often require extensive work by a qualified technician to
restore the handheld or docking/charging cradle to its
normal operation.
Failure to observe all safety instructions contained in this manual
will void the Limited Warranty, and may lead to suspension or
denial of services to the offender, or legal action, or both.

Welcome to your wirele ss
solution
BlackBerry is a mobile email solution that includes the BlackBerry
Wireless Handheld and docking/charging cradle, and desktop
software for use on a wireless data network.
Equipped with a 160x160 pi xel screen, rechargeable battery, flash
memory, “al ways on, always conn ected” wireless technology and
QWERTY keyboard design, the handheld provides users with the
ultimate palm-sized handheld for messaging and personal
information.
Get ready to experience the power of messaging with your
handheld us ing functions such as:
• Messages: Receive, read, reply to, compose, forward, save, file,
and delete email messages.
• Compose: Create and send messages to Internet email
addresses and to other handhelds.
• Saved Messages: Store messages for future viewing.
• Search Messages: Locate messages in seconds with the
powerful search tool.
• Address Book: Store your personal directory of contact
information, such as multiple phone and fax numbers, and
email addresses. Enter notes for individual contacts and search
the database to find specific contacts.
• Calendar: Keep track of appointments using one of the two
calendar views: Day or Month.
• MemoPad: Compose, edit, and delete notes, memos and lists.

14
Welcome to your wireless solution — About this guide
• Alarm: Set the alarm on the handheld to sound every day or on
weekdays only.
• Options: Customize th e way th e handh eld noti fies you o f new
messages; set the password; add, edit, and delete AutoText
entries; set the current date; program the automatic on/off
feature.
• Lock: Lock the handheld with a password security screen so
that only you can use it. (This function is only visible in the
Home screen after you have set a password.)
• Turn Wireless Off / Turn Wireless On: Turn th e handheld’s
radio off when it may interfere with other radio
communications, such as during a flight. Turn on the radio
again to send and receive messages.
• Power Off: Turn off the handheld at night or on weekends.
About this guide
This guide provides information for operating the handheld and for
installing the desktop software.
Note
Tip
Notes will appear in this format and will contain additional
information to help you perform the task being described.
Tips will appear in this format and will provide information
about performing tasks and offer different options to
perform tasks.
A summary, including a list of more tips, is included at the end of
each chapter.
Installation and User’s Guide

Welcome to your wireless solution — Other documentation available
Other documentation available
The Desktop Software Online Help offers online help to guide you
and answer your questions. In the desktop software, select Help
from any active window.
Contents of your package
Your package should contain the following:
• Handheld
• Cradle
• Holster
• This “Installation and User’s Guide”
If something from this package is missing or not working properly,
contact the point of purch ase.
System Requirements
The following components are required to install the BlackBerry
Desktop Software:
• Intel-compatible 486 or higher desktop computer with an
available seri al port
15
• Windows 95/98/2000 with 8 Mb of RAM
• Microsoft Exchange Client, Microsoft Outlook 97, Outlo ok 98 or
2000 (Workgroup installation), with an email account on a
Microsoft Exchange Server version 4.0 or higher, that is capable
of receiving email from the Internet
You have a Microsoft Exchange email account if:
• you will be running Microsoft Outlook as your email client an d,
Installation and User’s Guide

16
Welcome to your wireless solution — System Requirements
in Outlook, if you select Tools>Services, the dialog box contains a
list of services that includes Microsoft Exchange Server.
Installation and User’s Guide
1
Getting started
To start sending and receiving email, you will need to perform some
brief setup tasks on the handheld, namely inserting the SIM card,
charging the internal battery, turning on the radio, and ensuring
that the handheld is registered with the wireless network. You need
to set up your computer by installing the desktop software, and
connecting your handheld to your PC. Once setup is complete on
the handheld and the PC, you can check that your email redirection
is enabled, send and read a test message, and then configure your
handheld’s options.
18
Getting started — Before you begin
Before you begin
You should familiarize yourself with some of the handheld’s basic
features before sending and receiving email messages.
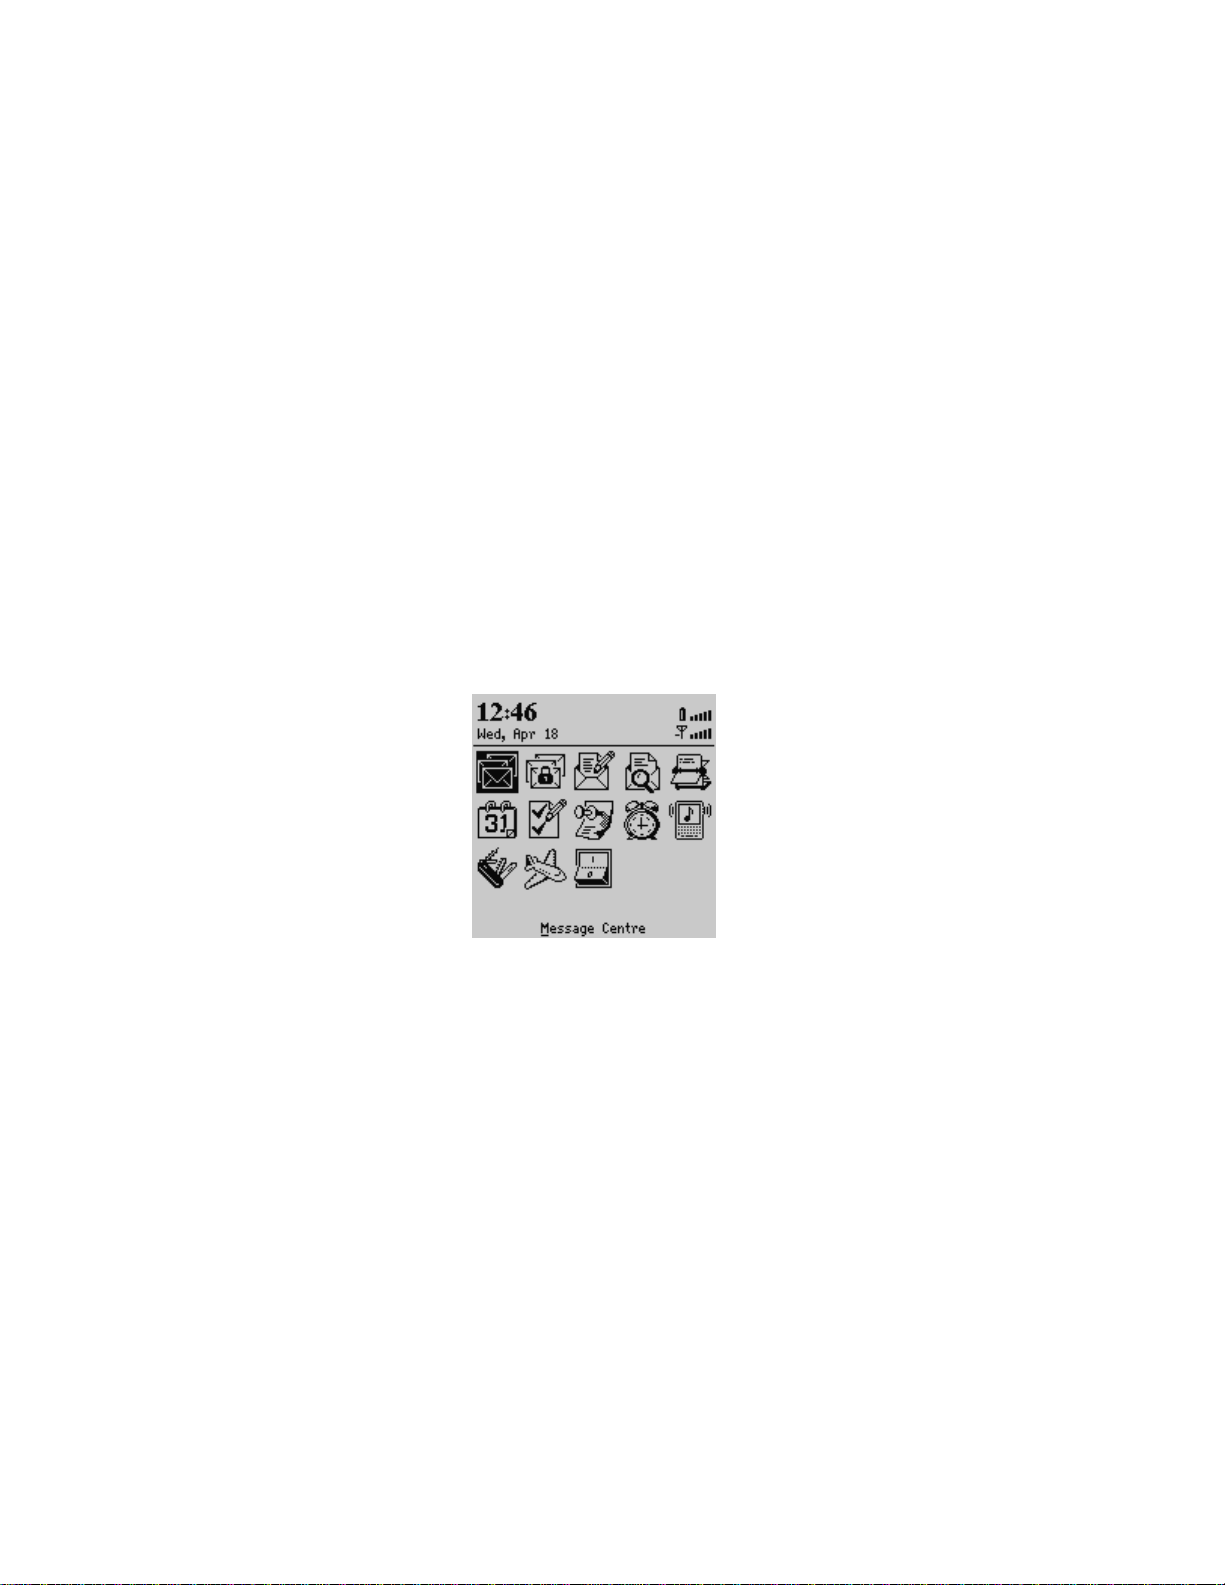
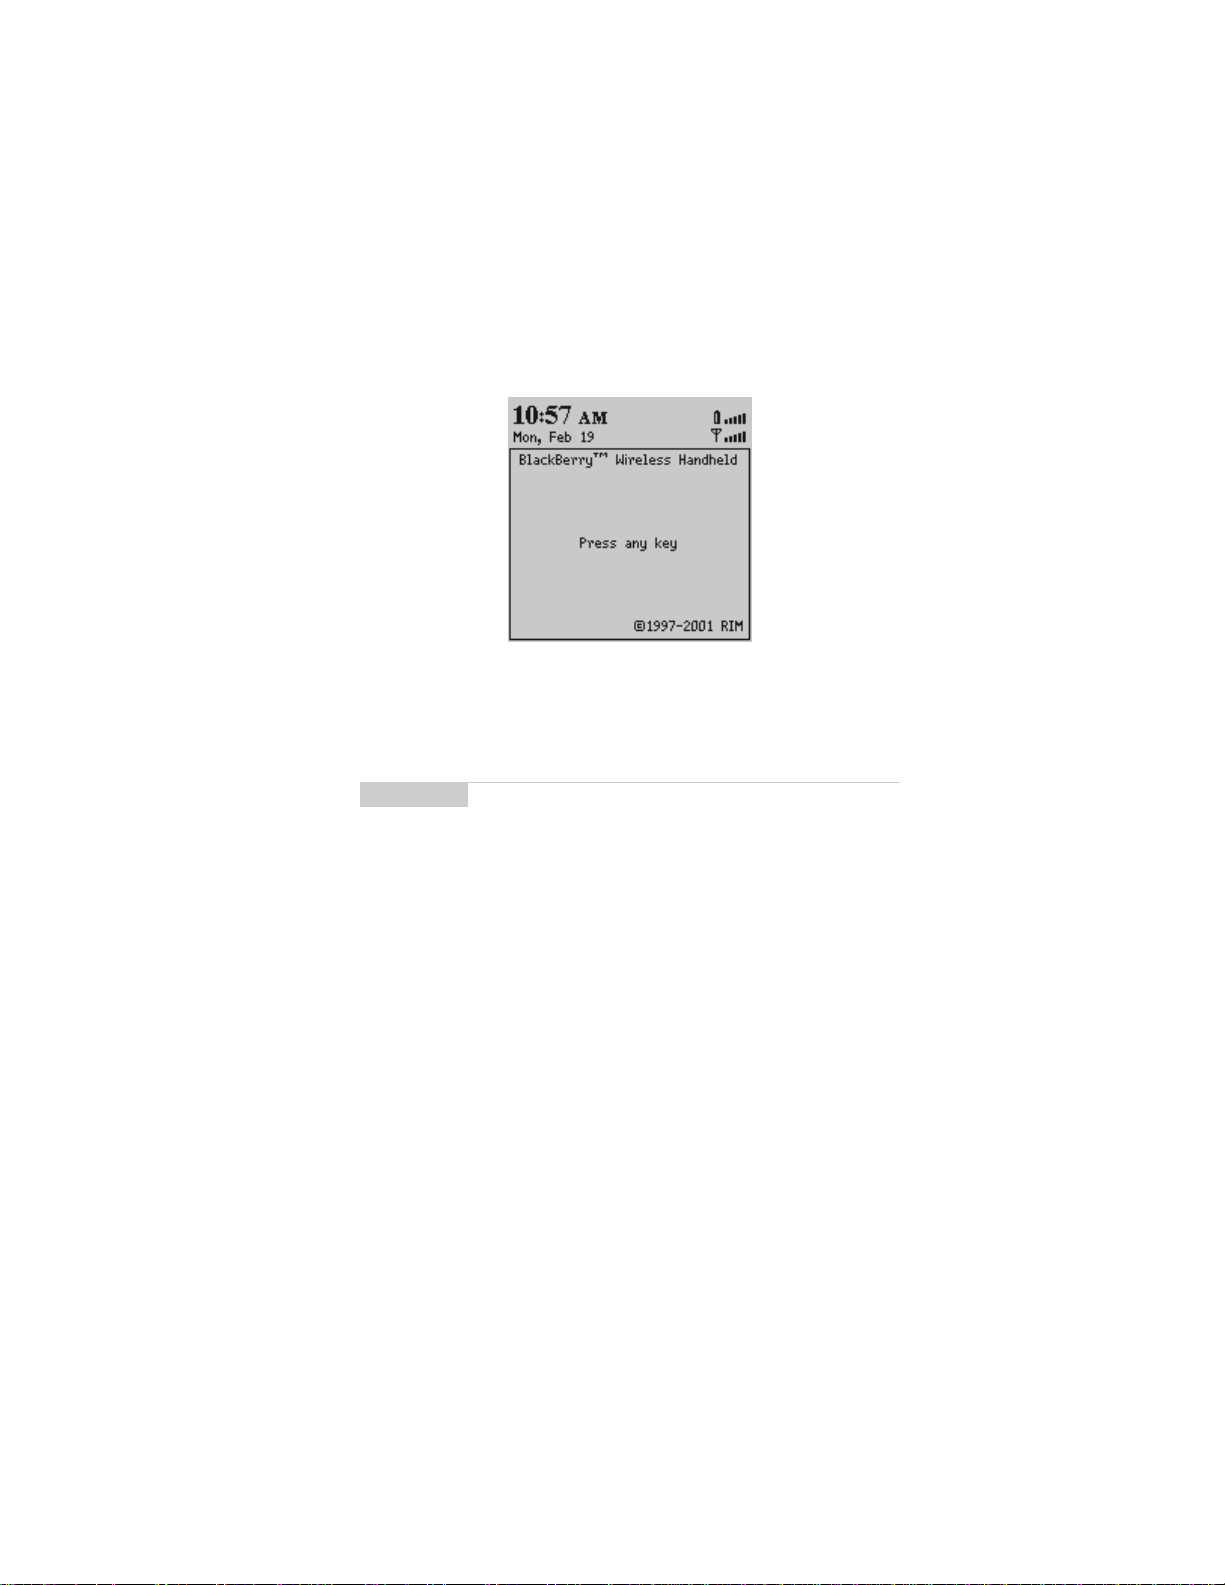
When you turn on your handheld, the Home screen appears. This
screen is your starting point for using the handheld’s functions. It
displays the date and time, the current signal strength, the battery
level of the handheld, and the function icons. The Home screen also
displays notification of any new messages or alarms.
You can return to the Home screen from most functions by pressing
ESC key.
the
Installing the desktop software
You must install the desktop software to send and receiv e email and
use the other desktop software tools.
1. Insert the CD into the appropriate drive. The Setup program
starts automatically.
2. Follow the instructions on your screen, using the default paths
and names recommended for the desktop softwa re.
Installation and User’s Guide

Getting started — Before you begin
When Setup is complete, you may choose to open the Readme file
and run the desktop software right away. After installation is
complete and you have restarted your PC, yo u will be prompted to
choose an email box profile fro m a drop-d own list . For more detail s,
see “Using the Desktop Software” on page 51.
About battery use and charging
The handheld is battery powered and you should familiarize
yourself with proper battery use and care. There is no external
battery required; your handheld is powered by an internal,
rechargeable battery. When you first receive your handheld you
must charge the internal lithium battery for the first time.
To connect the cradle to your PC
You will need to know how to connect the charging cradle to your
PC and how to use the cradle to charge the handheld’s internal
battery. When connecting the handheld to your PC, use only the
cradle supplied with your BlackBerry.
3. Insert the end of the cradle cable into a COM port on the back of
your PC.
4. Place the handheld in the cradle by aligning the connector port
on the bottom edge of the handheld with the connector prongs
of the cradle and press the handheld firmly into place.
19
To charge the internal battery for the first time
1. Connect the North Americal AC Adapter to the cradle’s serial
port connector as illustrated below .
Installation and User’s Guide

20
Getting started — Before you begin
2. Plug the cradle i nt o a w a ll outlet and make su re the handheld is
placed properly in the cradle. After a few seconds, the Home
screen should appear.
3. Allow the handheld to charge to full battery power before
using it. When the ha ndh eld is charging, the ba t tery ic on (in t he
top right corner of the Home screen) will change to a charging
icon. Once the handheld is fully charged, the battery icon will
replace the charging icon.
Note
Installation and User’s Guide
The cradle does not need to be connected to your PC for
charging to occur.

Getting started — Using the Handheld
Recharging the internal battery
Follow the same procedure as described above to recharge the
handheld’s battery when necessary. From an empty battery, a full
charge can be achieved in approximately 3 hours. It is not necessary
to drain the battery co mpletely before recharging.
Removing the handheld from the cradle
To remove the handheld from the charging cradle, brace the bottom
of the cradle with one hand and gently pull the handheld up and
out of the cradle.
21
Note
If the battery level becomes too low, the signal strength bars
(located in the top right corner of the Home screen, next to
the battery icon) will not appear. This signal indicates that it
is time to recharge the handheld. In this state, the handheld
will not function until the battery is recharged.
Using the Handheld
In the Home screen, you can select any of the handheld’s main
functions. Use the trackwheel to scroll through the icons. The name
of each function appears at the bottom of the screen. To select a
function, scroll to the appropriate icon and click the trackwheel.
You can also select a function by pressing the underlined character
in the function’s name. For example, press M for Messages.
To turn on the handheld
Press the silver key to turn on the handheld. The Home screen
appears, from which you can select any of the handheld’s main
functions.
Note
If the SIM card is not inserted, or not inserted properly, the
handheld will not function correctly. See page 22 for
information on inserting the SIM card.
Installation and User’s Guide

22
Getting started — Inserting the SIM card
To turn off the handheld
To turn off the handheld, press and hold the silver key.
Inserting the SIM card
Your Subscriber Identity Module (SIM) card, supplied by your
service provider, stores information about your service plan, phone
numbers, and messages. You must insert the SIM card into your
handheld before you can send and receive messages.
The SIM card fits into a holder that helps it slide into the handheld.
To insert the SIM card
1. If your handheld is currently on, press and hold the silver key
to turn off the hand held.
Note
2. Your SIM card may be attach ed to a larger, credit-card-sized
carrier. If so, carefully break the SIM card out of its carrier.
3. To remove t he SIM card holder fro m the handheld, pres s the
release tab on the bottom of the handheld to the right. The card
holder will slide partly out . Gen tly pu ll the S IM c ard holder out
the rest of the way to remove it fully.
4. To ensure proper placement, rest the holder on a flat surface
and place the SIM card on top of the holder with the notches
aligned, as shown in the following illustration. Both the SIM
card and the holder have a notch on the bottom-left side.
Installation and User’s Guide
To prevent damage to the memory on your SIM card,
always turn off the handheld before inserting or removing
the card. Be careful not to scratch or bend the card, or
expose it to static electricity or wet conditions while you are
inserting or removing it.

Getting started — Inserting the SIM card
5. Hold the hand held in o ne hand, wi th the keybo ard and sc reen
facing upward. Slide the SIM card (face up, in its holder) into
the handheld as shown in the illustration. It will click when
fully inserted.
23
6. Press the silver key to turn the handheld on. If necessary,
continue charging the battery.
Installation and User’s Guide
24
Getting started — Registering with the network
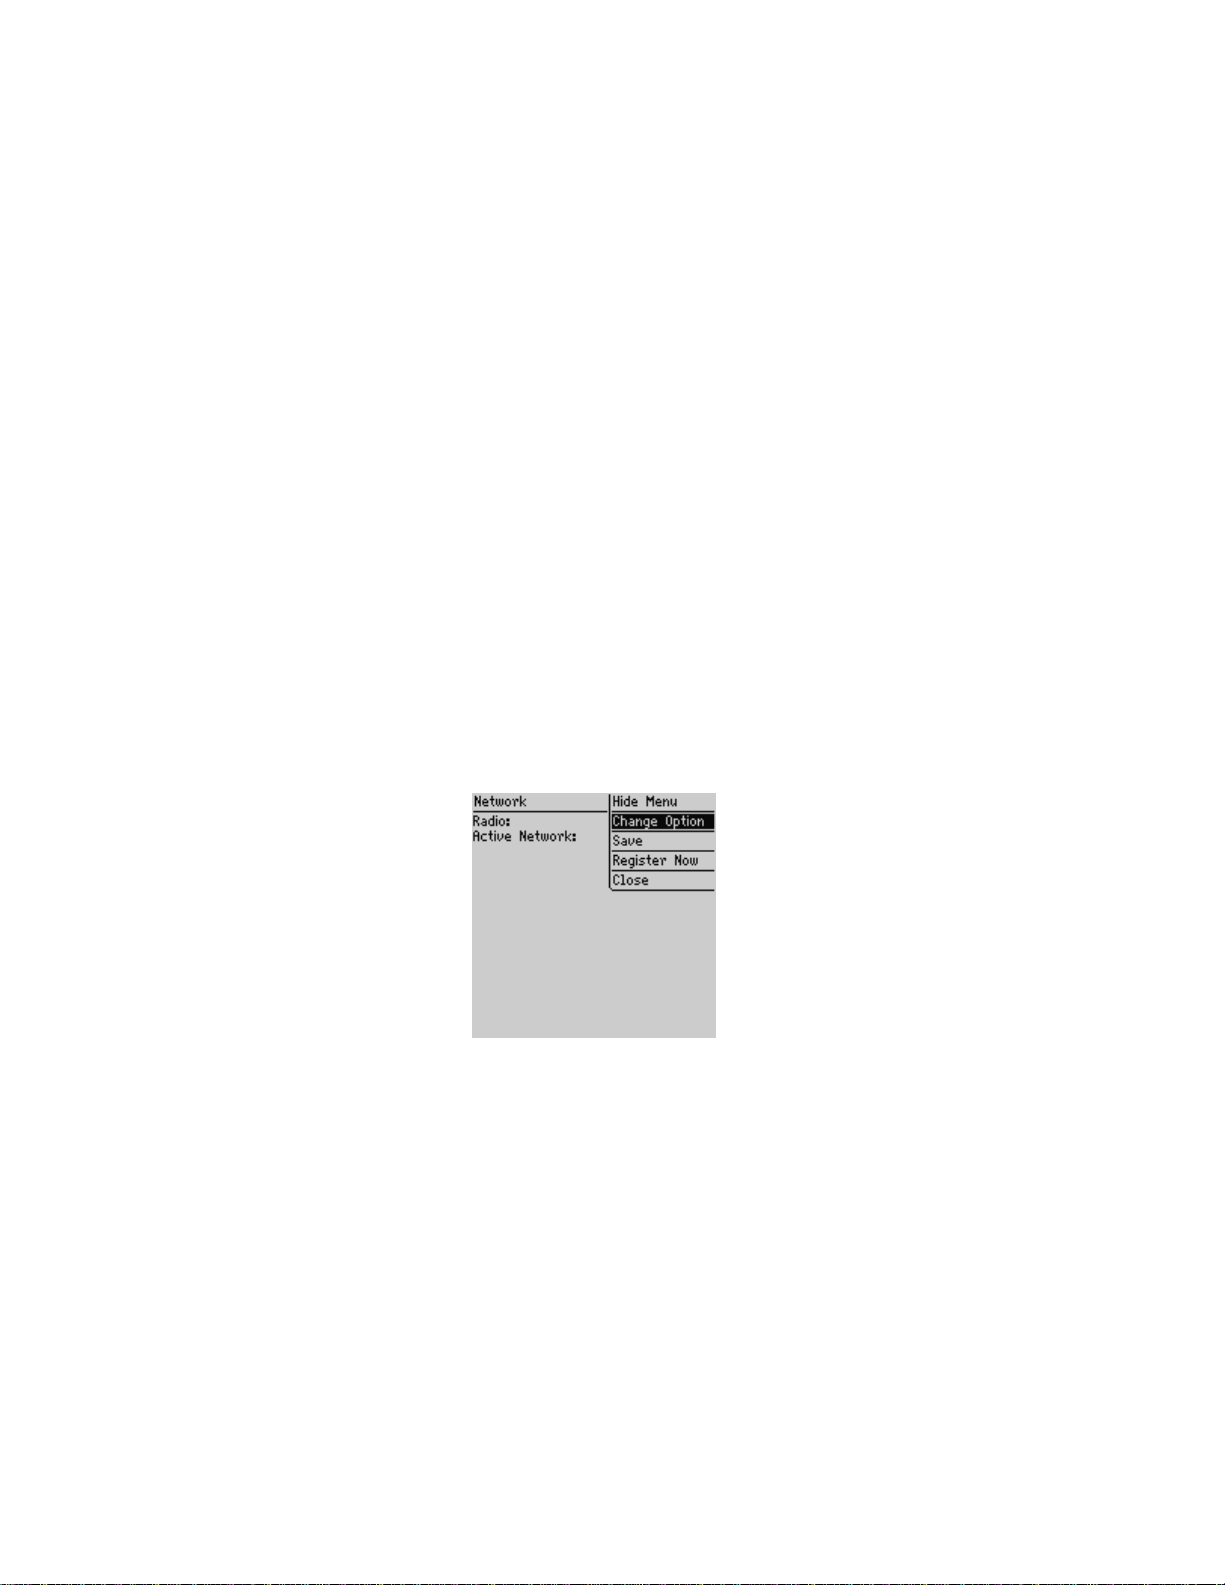
Registering with the network
After you turn on the wireless radio, a Registration message should
arrive. In the rare case th at t he Reg istra ti on mes sag e do es n ot a rr ive,
check the Home screen to ensure you are in coverage. (You are in
coverage if you have one or more bars beside the coverage indicator
in the top right corner of the Home screen.) Register your handheld
using this procedure.
1. In the Home screen, scroll to the Options icon and click. The
Device Options screen appears.
2. Scroll to Network and click. The Network screen appears.
Ensure that the Radio field is set t o On. Click to view the menu.
Scroll to Register now and click. A message confirms that the
registration message was sent. If you are in coverage, a
confirmation message should arrive within a few seconds.
3. Press the
Installation and User’s Guide
ESC key twice to return to the Home screen.

Getting started — Sending a test message
Sending a test message
Now that you have activated your handheld and completed the
installation, you are ready to begin sending and receiving email.
1. In the Home screen, scroll to the Compose icon and click. The
To: screen appears.
2. Click the trackwheel to view the menu; scroll to New Address
and click. The New Address screen appears.
3. Type your own name and email address using the trackwheel
to move from field to field.
25
Tip
In the Email field, press the SPACE key where the ‘@’ and ‘.’
punctuation should appear. The handheld will insert them
for you.
4. Click the trackwheel to view the menu. Select Save Address by
clicking again. You return to the To: screen with your own
email address selected.
Installation and User’s Guide

26
Getting started — Reading your test message
5. Click the trackwheel to view the menu. Select Use plus your
email address by clicking again.
6. Type a subject l ine such as “Test” and press
ENTER. Type your
message. When your message is complete, click the trackwheel
to view the menu. Select Send by clicking again. The Messages
screen appears.
If you are in coverag e (a s in dicat ed b y t he nu mber of bars beside the
antenna icon in the Home screen), a checkmark will appear beside
the message to show that your message was transmitted
successfully.
Note
If you are not within coverage, you do not need to cancel
sending your message. The handheld will automatically
send the message once you return to an area with sufficient
coverage.
Reading your test message
When you receive your test message, follow these steps to read it.
1. In the Home screen, scroll to the Message Centre icon and
click. The Messages screen appears.
Installation and User’s Guide

Getting started — Configuring handheld options
2. Scroll to the test messa ge’s header and click to view the menu.
Select Open by clicking again.
27
Tip
3. When the new message appears on your screen, scroll down to
read the entire message. Scroll up past the subject line to view
the recipient(s), sender, and time.
4. Press
To open messages quickly, scroll to and highlight the
message in the Messages screen and double-click the
trackwheel.
ESC to return to the Messages screen.
Configuring handheld options
Now that you have sent and received your first wireless email
message, you should configure some of the handheld’s basic
options.
Setting the date and time
1. In the Home screen, scroll to the Options icon and click. The
Device Options screen appears.
2. Scroll to Date/Time and click. The Date/Time screen appears.
Scroll to the fie ld you would like to set, then press the SPACE
key to scroll through your optio ns.
Installation and User’s Guide

28
Getting started — Configuring handheld options
3. Click the trackwheel to view the menu. Scroll to Save and click.
You return to the D evice Options screen.
Using password protection
Set a password for your handheld to ensure greater security. Once
the handheld is left idle for a specified amount of time, you will
need to type your password to use the handheld. You can also
manually activate the password security screen by selecting the
Lock function from the Home screen. You should lock your
handheld if you leave it unattended.
If you do not want the password security screen to appear, you
must disable your password in the Security screen.
Installation and User’s Guide
Getting started — Configuring handheld options
If you have entered information in the Owner screen of the Options
function, it will appear on the password security screen. We
recommend that you include your own (or your company’s) contact
information in case the handheld is lost.
29
Note
If an incorrect password is entered 10 times, all information
could be erased from the handheld for security reasons.
The handheld’s radio is turned off and the radio icon is
removed from the Home screen. You will need to reload the
applications before you can use your handheld again. You
should regularly back up any information from your
handheld that might not have originated on your PC. See
“Using the desktop software“ in this guide or the “B ackup
and Restore online help” for more information.
To enable password protection
You should set a password so that no one can use your handheld
without knowing the password.
1. In the Home screen, scroll to the Options icon and click. The
Device Options screen appears.
Installation and User’s Guide
30
Getting started — Configuring handheld options
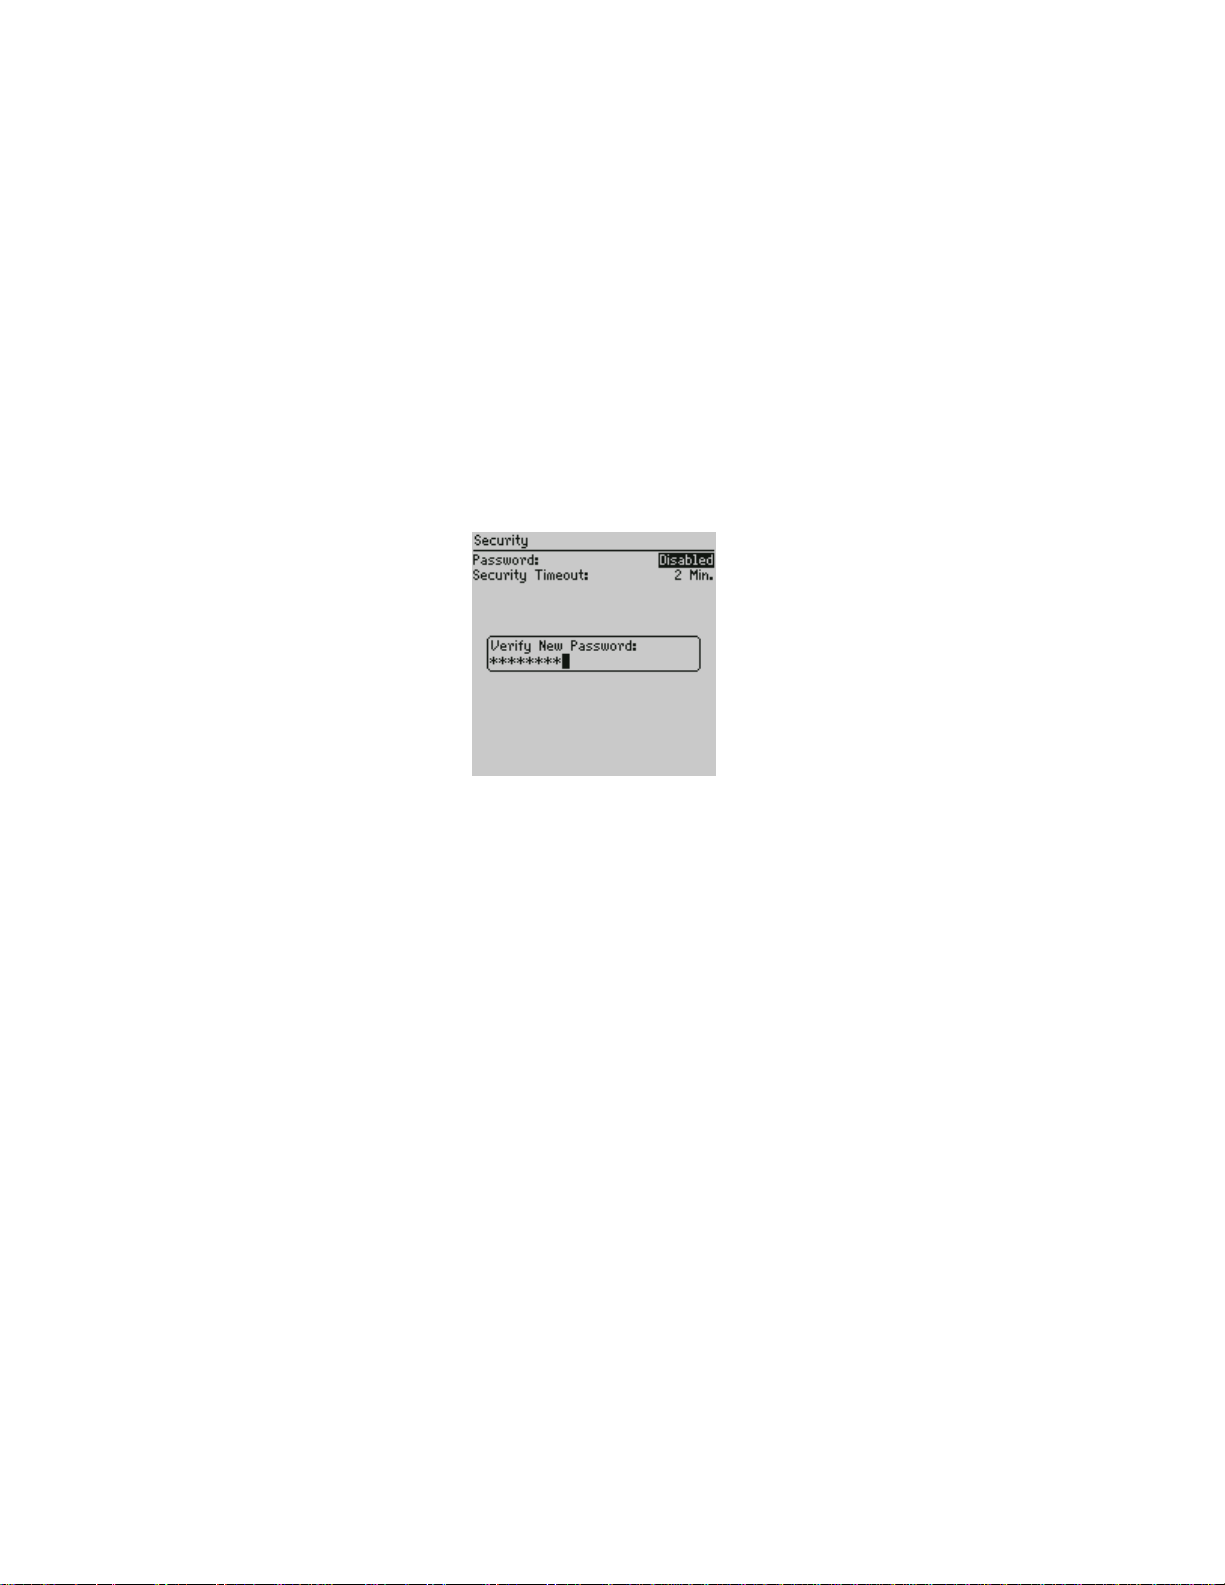
2. Scroll to Security and clic k. The Secu rity screen appears. In the
Password field, press the
SPACE key to enable the password. A
dialog box appears, prompting you to enter a password of at
least 4 characters. Press
ENTER when you are finished. You will
have to enter your password again for verification.
3. In the Security Timeout field, set how much idle time should
pass before the password security screen will appear. To do so,
press and hold the
settings. Release the
SPACE key to scroll through the timeout
SPACE key to set the field to your
preference.
4. Click the trackwheel to view th e me nu. Scroll to Save and click.
You return to the D evice Options screen.
Installation and User’s Guide

Getting started — Configuring handheld options
31
Note
The password security screen will show your contact
information (if you have entered it in the Owner screen) or it
will prompt you to Press any key. Type the first letter of
your password to gain access to the Enter Pa ssword dialog
box. Type the remaining letters of your password to resume
using the handheld.
Once you have enabled the password, you will need to
enter it to connect to the desktop software and to open the
security screen again.
If you turn off the handheld with the password security
screen enabled, you will need to enter the password once
you turn on the handheld again.
To lock the handheld
Once you have enabled your password in the Security screen, you
can lock the handheld whenever you like. A lock icon wil l appea r in
the Home screen.
1. In the Home screen, scroll to the Lock icon and click. The
password security screen appears.
2. To use your handh eld agai n, type you r passwor d and click the
trackwheel.
Note
The information you entered in the Owner screen of the
handheld options will appear on the password security
screen. If you did not enter any information, default
information appears. For more information on the Owner
screen, see page 151.
To change your password
Changing y our passwo rd occasio nally will help to pr ovide greate r
security.
Installation and User’s Guide

32
Getting started — Configuring handheld options
1. In the Home screen, scroll to the Options icon and click. The
Device Options screen appears.
2. Scroll to Security and click. A dialog box appears, asking you to
type your password. Once you do so, press
ENTER to open the
Security screen.
3. Click to view the menu. Scroll to Change Option and click. A
dialog box appears.
4. Enter a new password of at least four characters. Press
ENTER
when you are finished. You will have to enter your new
password again for verification.
5. Click the trackwheel to view th e me nu. Scroll to Save and click.
You return to the Device Options screen with your password
changed.
To disable password protection
Once you disable your password, the password security screen will
no longer appear. You will not need to enter your password to open
the Security screen or when connecting your handheld to your PC.
1. In the Home screen, scroll to the Options icon and click. The
Device Options screen appears.
2. Scroll to Security and click. A dialog box appears, asking you to
type your password. Once you do so, press
Security screen.
ENTER to open the
Installation and User’s Guide

Getting started — Configuring handheld options
3. While in the Password field of the Security screen, click to view
the menu. Scroll to Change Options and click. U ser the rolle r to
select Disabled and click.
4. Click the trackwheel to view th e me nu. Scroll to Save and click.
33
You return to the D evice Options screen.
Installation and User’s Guide

34
Getting started — Summary
Summary
In this chapter, you learned the steps that are required for email
redirection to occur. You can turn on the radio, register with the
network, install the desktop software on your PC, connect the
handheld to your PC, enable email redirection, and configure some
basic handheld options. Read on to learn more about using the
handheld.
Installation and User’s Guide

2
Getting to know your
handheld
This chapter will help you get acquainted with your handheld.
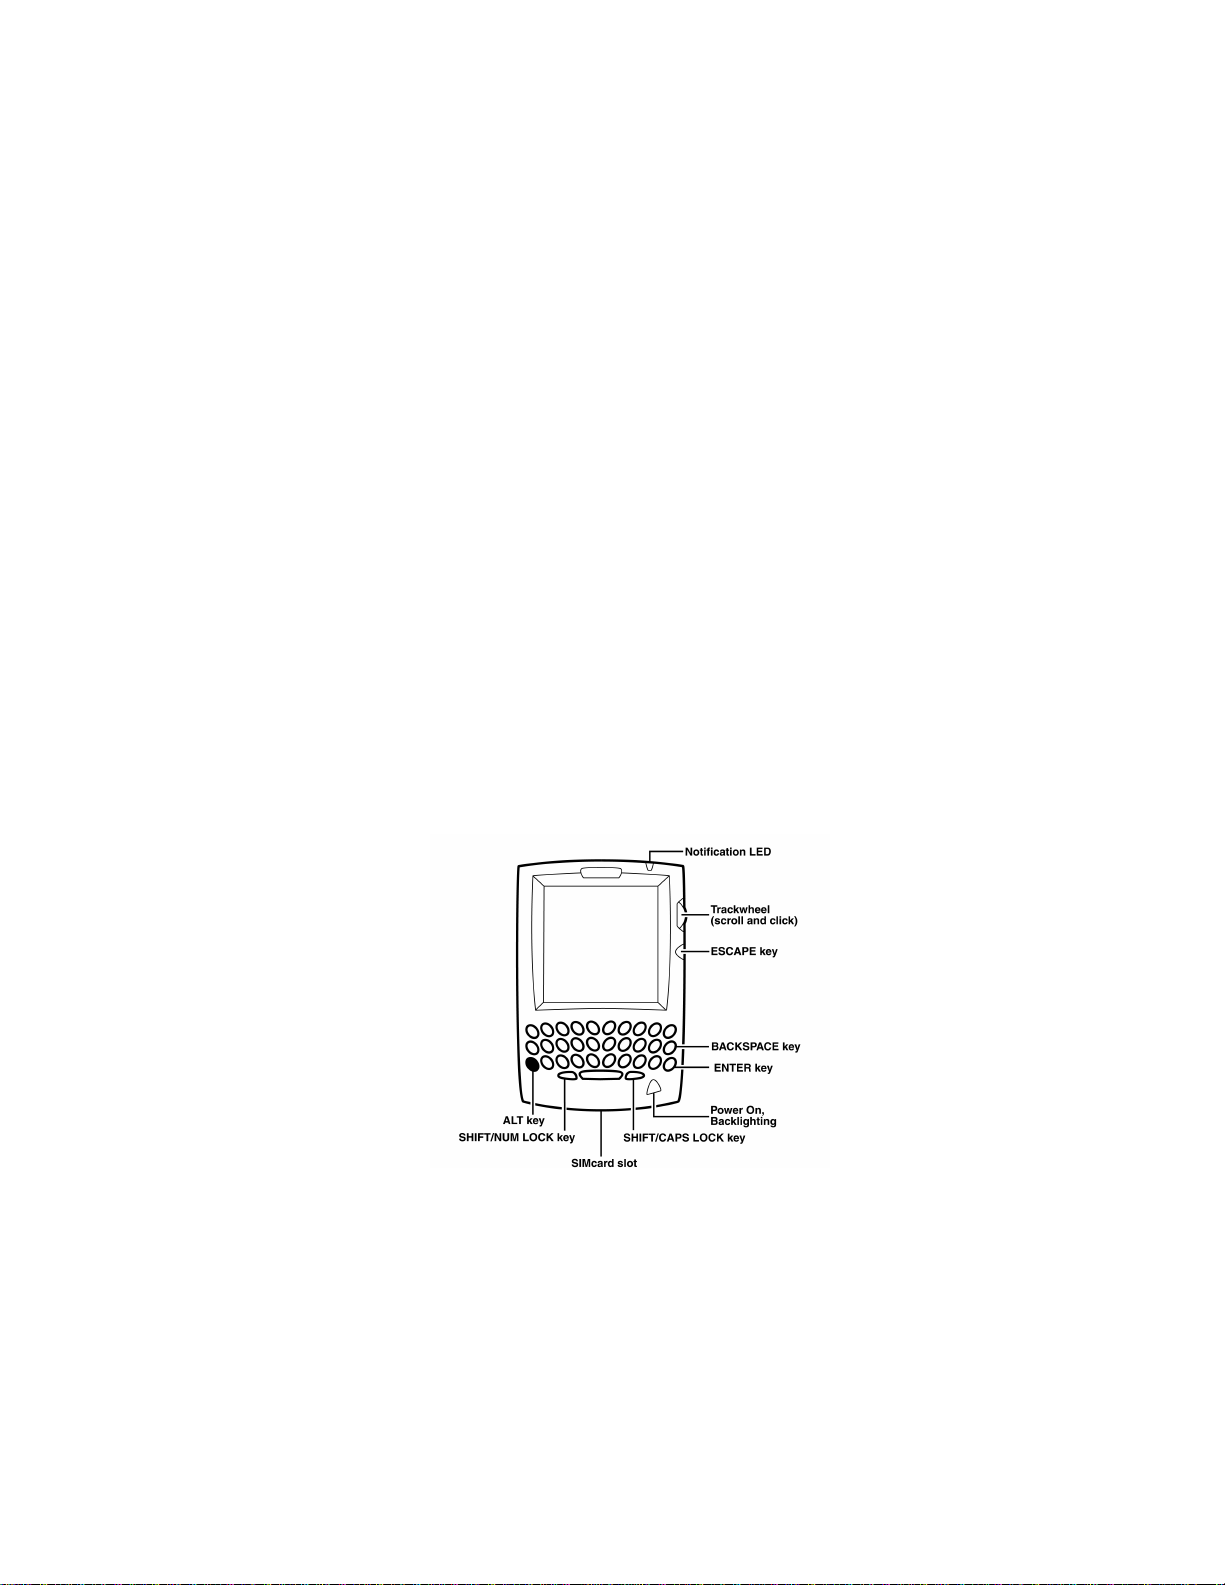
Handheld components
Here are some details on the handheld’s main components.
Keyboard and trackwheel
The handheld’s QWERTY keyboard provides access to all of the
regular alphabetic characters. Numeric characters, a symbols
library, punctuation, and special characters can all be generated
using the colo ure d
easy typing, hold the device in both hands and use your thumbs to
press the keys. Roll and click the handheld’s trackwheel for
navigation and selection.
A trackwheel that clicks
The trackwheel on the handheld has a unique feature for greater
usability and performance: it clicks. Pressing down on the
trackwheel with your thumb is comparable to the clicking fun ction
of your PC mouse. Click to open menus a nd to select func tions and
menu options.
ALT key in combination with the other keys. For

36
Getting to know your handheld — Handheld components
Keys and key combinations
The following chart describes special keyboard and trackwheel
combinations that will help you navigate, compose messages, and
configure options on the handheld.
Key Function
Turing the power on/off, activating
backlighting
SILVER KEY
TRACKWHEEL
• Press the silver key once to turn on the
handheld.
• When the handheld is on, press the silver
key once to activate backlighting. Press
again to turn off backlighting. (Backlighting
will turn off automatically if you do not
press any keys for 10 seconds.)
• Press and hold the silver key t o turn off the
handheld.
Scrolling and selecting
• Roll the trackwheel with your thumb to
scroll up and down through screen lines,
fields, and menu items.
• Click (press down) the trackwheel with your
thumb to open menus and select options,
similar to the click function of a mouse used
with your PC.
Installation and User’s Guide

Getting to know your handheld — Handheld components
Key Function
Typing ALT characters
37
ALT key
The coloured
ALT key activates the nume ric and
symbol characters. These characters are printed
in an alternate colour above the alphabetic keys.
• Press the
ALT key once to affect the next
character you type.
• Press and hold the
ALT key while you type to
affect all characters.
An ‘A’ icon appears in the top right corner of
your screen when the
ALT key is active.
Scrolling horizontally and changing options
• Hold the
ALT key while you roll the
trackwheel to move the cursor horizontally
across screen lines.
• Hold the
ALT key while you roll the
trackwheel to scroll through field options.
Installation and User’s Guide

38
Getting to know your handheld — Handheld components
Key Function
Capitalizing alphabetic characters
SHIFT key
• Press the
SHIFT key once to capitalize the
next character that you type.
• Press and hold the
SHIFT key while you type
so that all letters are capitalized.
• Press and hold the letter to capitalize it. This
feature only works when Key Rate is set to
Slow or Fast in the Options>Screen/
Keyboard screen.
An ‘up arrow’ icon appears in the top right
corner of your screen when the
SHIFT key is
activated.
Activating CAPs lock
• Press
ALT + CAP (RIGHT SHIFT) to activate caps
lock mode. Any key that you press will be
typed in upper case. Press SHIFT again to
return to lower case mode.
Typing the coloured ALT characters (activating
NUM lock mode)
• Press
ALT + NUM (LEFT SHIFT) to activate num
lock mode. Any key that you press in the
upper row will be typed in its numer ic fo rm.
SHIFT again to return to regular mode.
Press
Installation and User’s Guide

Getting to know your handheld — Handheld components
Key Function
Inserting carriage returns, selecting highlighted
items
39
ENTER key
BACKSPACE
key
• Press the
ENTER key to insert a regular
carriage return, moving your cursor to a
new line.
• Press the
ENTER key to select the highlighted
item. Instead of clicking the trackwheel to
select the item, you can press the ENTER key
to perform your task.
Deleting previous characters
• Press the
BACKSPACE key to move the cursor
backwards and delete characters to the left
of the cursor position.
Deleting characters ahead of cursor, deleting
messages
• Press the
DEL key to er ase characters to th e
right of the cursor position.
• Press the
DEL key while composing a
message to delete the selected character
only.
• Press the
DEL key in the Messages screen to
delete the selected message.
Installation and User’s Guide

40
Getting to know your handheld — Handheld components
Key Function
Escaping from screens/menus
• Press the
ESC key to return to the Home
screen from a function screen.
Escape key
(under
trackwheel)
• Press the
If you have changed a function option, you
will see a confirmation message such as:
ESC key to clos e a function menu .
“Save Settings? Save Cancel Discard.”
Inserting a space, scrolling through field
options
SPACE key
• Press the
SPACE key to insert a space
between characte rs while you type.
• Press the
SPACE key to insert the ‘@’ an d ‘.’
characters in email fields.
• Press the SPACE key to toggle through field
options.
Opening symbols library for extra characters
• Press
ALT+SPACE to open the Select Sy mbol
screen, from which you can insert the
symbol you need.
Symbols screen
As described in the Keys and key combinations chart, you can press
ALT+SPACE to open the Select Symbol screen. For instance, wh ile you
are composing a message, press
available for you to insert into your message.
ALT+SPACE to see the characters
Installation and User’s Guide

Getting to know your handheld — Handheld components
To select a symbol, either scroll to a symbol and click, or press the
alphabetic key under the desired symbol. You will return to your
message with the symbol inserted.
LCD screen
The LCD screen is your interface with functions such as composing
and reading messages, and appointments, viewing and editing
contact information, and custo mizin g device option s. It is compo sed
of the Home screen, function screens that are launched from the
Home screen, and menus within each function. Icons are used
throughout for message status, handheld status, and naviga tional
aid.
41
Backlighting
In low light conditions, you can increase the readability of the LCD
and keyboard by using the backlight ing feature .
Activate the backligh ting by pressing the silv er key once . It will sh ut
off automatically if yo u do not pres s any key s or use the tr ac kwhe el
for 10 seconds. Turn off the backlighting manually by pressing the
silver key ag ain.
Installation and User’s Guide

42
Getting to know your handheld — Handheld components
Function screens
The functions list appears on the Home screen. To open a function
screen, scroll to an icon and click the trackwheel (or, press the
underlined character in the funct ion name).
Home screen
Function menus
Menus provide a list of options for the function that you’ve selected.
You can open a function screen’s menu by clicking the trackwheel;
the menu appears on top and covers approximately half of the
screen’s width.
Installation and User’s Guide

Getting to know your handheld — Handheld components
Address Book function menu
Function icons
The following chart shows each function icon and describes the
corresponding function:
Icon Description
Receive, read, reply to, compose,
forward, save, file, and delete email
messages.
Messages
43
Compose
Search
Messages
Type and send messages to Internet
email addresses.
Locate messages in seconds with the
powerful search tool.
Installation and User’s Guide

44
Getting to know your handheld — Handheld components
Icon Description
Store your personal directory of contact
information, such as mul tiple phone and
Address
Book
fax numbers, as well as email addresses.
Use the search function to locate a
specific contact.
Keep track of appointments using one of
the two calendar views: Day or Month.
Calendar
Add, edit, and delete tasks and mark
tasks as complete.
Tasks
Set the alarm on the handheld to sound
on weekdays only or every day
(including Saturday and Sunday).
Alarm
Customize the way the handheld notifies
you of messages.
Options
MemoPad
Options
Installation and User’s Guide
Compose, edit, and delete important
notes and memos.
Set the password; customize Autotext;
set the date/time ; p rog r am th e auto m a tic
on/off feature.

Getting to know your handheld — Handheld components
Icon Description
Lock the handheld with a password
security screen so that only you can gain
access to it. This icon will appear on the
Lock
Home screen only if you have set a
password.
Turn the handheld’s radio off when it
/
Turn
Wireless
On/Turn
may interfere with other radio
communications, such as during flight.
You will not be able to send or receive
messages until you turn the radio on
again.
Wireless Off
Turn off the handheld whenever you
prefer not to receive email messages or
when you wish to conserve battery
Power Off
power. All queued messages will be
delivered to your handheld once you
turn it back on.
Handheld status icons
These icons appear on the handheld’s LCD screen to indicate
battery power, coverage levels, and keyboard modes.
45
Icon Description
Battery power indicator
Coverage strength indicator
Installation and User’s Guide

46
Getting to know your handheld — Handheld components
Icon Description
Charging indicator
ALT key mode is active
SHIFT key mode is active
NUM lock mode is active
Unread messages waiting
Message status icons
These icons appear on the handheld’s LCD screen to in dicate the
status of pending, sent, and received messages.
Icon Description
Message is being sent
Message has been sent out to the network
Message pending (will be sent later)
Unread message transmission error
Message returned, message transmission error
Installation and User’s Guide

Getting to know your handheld — Handheld components
Icon Description
New, unread message has been received
Message has been read
Status of message is high
Navigational icons
These icons appear on the handheld’s LCD screen to indicate
positions within fields, lists, menus, and screens.
Icon Description
Indicates the cursor position
You are at the bottom of a menu or screen; scroll
the trackwheel up to view more items.
You are at the top of a menu or screen; scroll the
trackwheel down to view more items.
47
Holster (belt clip)
A holster, equipped with a belt clip, accompanies the handheld.
While in the holster, the handheld is protected and wearable. You
can choose different forms of message not ification b ased on whe ther
the handheld is in or out of the holster.
When you receive a new message and remove the handheld from
the holster within five seconds, notification stops (based on how
you’ve set it) and the most recently received message will be open.
Installation and User’s Guide

48
Getting to know your handheld — Handheld components
If you pull the handheld out of the holster and quickly replace it,
notification stops but the message will remain marked unread.
“Setting message notification” on page 148 contains more
information on notification settings.
Cradle
The cradle provides a link between the handheld and your PC, so
that you may use the desk top softw are prov ided wi th you r packag e.
Chapter 3, “Using the desktop software” contains more information
on the cradle and the desktop software.
Data port
The data port on the bottom of the handheld fits into the prongs of
the cradle. You must connect the cradle to your PC to use the
desktop software (provided on the C D with your package).
The desktop software supports standard USB-to-serial port
converters. Chapter 3, “Using the desktop software”, contains more
information on installation procedures and serial connection.
Charger
The handheld is designed to operate for one week or more on a full
charge; exact battery life will depend on factors such as usage and
quality of coverage. The handheld contains an internal lithium cell.
The cradle provided with your handheld is also used to recharge
this cell.
Subscriber Identity Module (SIM) card
Your SIM card, supplied by your service provider, stores
information about your service plan, phone numbers, and
messages. You must insert your SIM card into your handheld before
you can send and receive messages. For details see, “Inserting the
SIM card” on page 22.
Installation and User’s Guide

Getting to know your handheld — Handheld components
Scrolling through settings
The handheld provides alternate methods of performing the same
action (e.g. using hotkeys instead of the trackwheel). In particular,
there are four ways to change the configurable options on your
handheld. These alternatives apply to all screens where you can
change options, such as in the Date/Time, New Address, or
AutoText screens.
• Use the menu. While in an option field, click to view the menu.
Select Open. Scroll to Change Options and click. A dialog box
appears where you can scroll through your options. Once you
reach the option you prefer, click the trackwheel. After setting
all of the options in the screen, click to view the menu. Scroll to
Save and click.
49
• Use
ALT + roll. Hold the ALT key while rolling the trackwheel to
scroll through the o ptions. Release the
ALT key onc e you reach
your desired setting.
• Use the keyboard. You c an press the letter or number which
represents your choice. For example, if you are in a Sort By
field in the Address Book Options, press the L key to sort by
Last Name.
• Use the
your options. Release the
SPACE key. You can use the SPACE key to scroll through
SPACE key once you have se t the fie ld
to your preference. This method is used throughout the guide.
Installation and User’s Guide

50
Getting to know your handheld — Summary and tips
Summary and tips
In this chapter, you learned about the various components and
features of the handheld.
Getting to know your handheld - Tips
• Press the first letter of an item in an options list, menu, or choice list to
jump directly to the item.
• Press
• Press and hold a letter to capitalize it (must have Options>Screen/
• Press
• Press ESC to select Cancel in a pop-up dialog box.
SPACE twice to insert a period while composing a mess age ( the
letter following the period will automatically be capitalized).
Keyboard>Key Rate enabled).
ALT and click the trackwheel to select an icon in the Home
screen. Roll the trackwheel to move the icon to anot her position, and
click the trackwheel to “drop” it into the new position.
Installation and User’s Guide

3
Using the desktop software
The “Gett ing Started“ chapter provided instructions for installing
the desktop software and connect the cradle to your PC. This
chapter shows you how to use the software to get the most from
your handheld.
The desktop software can synchronize messages, contacts, and
appointments, between your handheld and PC. You can also back
up any important information from the handheld to your PC, edit
the Address Book and AutoText files, restore data back to the
handheld, configure email redirection settings, and load new
applications onto the handheld, all using the desktop software’s
convenient Windows interface.
Note
You will find basic instructions in this chapter for using the
desktop software and its tools; you can find more detailed
information in the online help. From any window in the
desktop software, select Help to view procedures.
Backing up files from handheld to
the PC
Use the Backup and Restore tool to save any handheld files to your
PC or to restore previously-saved files back to your handheld. You
can also use it to customize the Address Book and AutoText files:
create new entries, edit existing entries, and delete the entries on
your PC.

52
Using the desktop software — Backing up files from handheld to the PC
You can also import your PC’s Address Book entries onto your
handheld.
Note
Before updating your handheld with new software using the
Application Loader, use the Backup and Restore tool to
save any important information from the handheld to your
PC.
See the online help topic “Advanced backup and restore”
for more information on editing AutoText and Address Book
entries.
To backup files from handheld to PC
1. Place your handheld in the cradle and connect it to your PC. In
the desktop manager, double-click Backup and Restore. The
Backup and Restore window appears.
2. To backup everything on your handheld, click Backup. The
Select file for Full Backup window appears. The default file
name will be Backup-today’s date.ipd. Select the location and
name of the file as desired and click Save. A dialog box will
chart the progress of the data transfer from the handheld to
your PC.
3. Once the information has been saved to your PC, you return to
the Backup and Restore window.
Note
You can backup specific databases to your PC by
performing an Advanced backup. See the online help topic
“Performing an Advanced backup” for more information.
To restore files back to the handheld
1. Place your handheld in the cradle and connect it to your PC. In
the desktop manager, double-click Backup and Restore. The
Backup and Restore window appears.
Installation and User’s Guide

Using the desktop software — Synchronizing email and PIM
2. To restore everything that was saved previously from your
handheld, click Restore. The Select file for Full Restore window
appears. Select the file name that contains the information you
want to restore and click Open. A dialog box will chart the
progress of the data transfer from the PC to your handheld.
3. Once the information is retrieved and organized, another
dialog box appears, warning you that you are replacing the
information currently stored in the listed databases of the
handheld.
4. Click Yes to continue. Once the information has been restored
to your handheld, you return to the Backup and Restore
window.
53
Note
You can restore specific databases to your handheld by
performing an Advanced restore. See the online help topic
“Performing an Advanced restore” for more information.
Synchronizing email and PIM
Use the IntellisyncTM tool to reconcile email messages and
synchronize your PIM applications. You can also update the
handheld’s date and time.
Note
See the “Intellisync online help” for complete instructions on
updating the handheld’s date and time, reconciling your
email and for specific information based on the PIM
application you use on your PC.
In the Intellisync window, click Auto start to specify settings
for automatic synchronization.
Installation and User’s Guide

54
Using the desktop software — Synchronizing email and PIM
To configure email reconciliation
Note
1. Place your handheld in the cradle and connect it to your PC. In
the desktop man ager, double-cli ck Intellisync. The Intellisync
window appears.
2. Click Configure email. The Email Configuration window
appears.
3. In the Folder content synchronization section, select the type
of action that you want to occur when you reconcile your email.
You can change the placement of your email messages on just
your handheld by selecting Import moves and deletes to
handheld only. Or you can choose to synchronize any moves
and deletes on either system by selecting Synchronize move s
and deletes.
Unless you want to specify any personal folders from which
email should be reconciled, the default settings in the Email
Configuration window should be suitable for email
reconciliation.
Note
If you select Synchronize moves and deletes, you need
to select which location should dominate if a message has
been moved or deleted on both the handheld and the
desktop.
4. In the Personal Folder section, you can select any personal
folders with which you want to synchronize. You can include
these personal folders if you want the email in those folders to
be synchronized with your handh eld as well .
5. Click OK to return to the Intellisync win dow.
Installation and User’s Guide

Using the desktop software — Synchronizing email and PIM
6. Once you have configured email reconciliation, ensure that the
check box next to Reconcile email is selected in the Intellisync
window. Click Synchronize now to perform the operation.
Ensuring email reconciliation performs as intended
To ensure that email reconciliation performs as intended, check for
the following conditions an d/o r se ttings.
• Email reconciliation transfers the structure of your desktop
folders to your handheld. Therefore, you must perform an
email reconciliation before you can file messages on your
handheld. Each time you create a new fo lder on your desktop,
you will have to perf orm an email reconciliation to transfer the
folder to your handheld.
• If you use the Application Loader tool and choose to remove
the current information from the handheld, you will need to
perform an email r econciliation to transfer the folders to your
handheld again. See the “Intellisync online help” for more
information.
• Check that you have set the Delete On field of the handheld’s
Message List Options to delete messages on the desktop and
the handheld.
55
To configure PIM synchronization
1. Place your handheld in the cradle and connect it to your PC. In
the desktop man ager, double-cli ck Intellisync. The Intellisync
window appears.
2. In the Intellisync window, click Configure PIM to customize
your PIM synchronization settings. The Handheld
Configuration window appears. Select a PIM application
(Address Book, Memopad or Calendar) and click Choose. The
Choose Translator window appears.
Installation and User’s Guide

56
Using the desktop software — Redirecting email
3. Select the PC program (c a lled t he “translator”) that you use and
click OK.
4. You can configure other options in these windows such as field
mapping, synchronization filters, and conflict resolution
settings, depending on the translator that you have selected.
See the “Intellisync online help” for more information.
5. Once you have configured all the PIM applications, ensure the
the check box next to Synchronize PIM is selected in the
Intellisync window. Click Synchronize now to perform the
operation.
Redirecting email
To check your email redirection settings
1. Place your handheld in the cradle and connect it to your PC. In
the desktop manager, double-click Redirector Settings. The
Redirector Settings window appears, organized into the
General, Filters, Security, and Advanced tabs.
2. In the General tab, you can select options for handheld
behaviour when in the cradle, set your auto signature, and turn
off email redirection.
3. In the Filters tab, you can view the default filte rs that have be en
set for redirecting email to your handheld. These defaults can
be disabled, enabled, or deleted.
• The CC Default filter sends only the message header to
your handhel d wh en you r ad dre ss app ears in th e CC field
of the message.
• The To and BCC Default filter forwards all messages to
Installation and User’s Guide

Using the desktop software — Redirecting email
your handheld when your address appears in the To or
BCC fields of the message.
57
Note
If the body of your messages isn’t being redirected from
your PC to the handheld, check to see how these
messages are addressed to you. If you are addressed in
the CC field of the message, the default filter will not
redirect the body of the message to you.
See the online help topic “Filters tab“ for more information.
4. In the Security tab, you can generate security keys for
encryption and decryption of your messages. Unless you
change the settings, you are prompted to generate a new key
when you insert your handheld into the cradle while the
desktop software is running.
5. In the Advanced tab, you can con trol the settings that affect the
email profile being used, specify the folder redirection settings,
and choose whether or not you want a copy of messages that
are sent from your handheld to be saved on your desktop.
6. Once you have specified all of your email redirection settings,
click OK.
To add a redirection filter
Filters help you manage your email by automatically performing
actions on received messages using filter settings (rules). Rules are
the sets of conditions and actions that make up a filter. Use the
following procedure to create a new redirection filter:
1. In the Filters tab of the Redi re ctor Sett i ngs wind ow, cl ic k New.
The Add Filter window appears.
2. In the Filter Name field, type a na me to describe the new filter.
Installation and User’s Guide

58
Using the desktop software — Redirecting email
3. The list of condit ions be low the filter name ca n be activ ated by
selecting the check box beside each field. Any email message
arriving at your desktop that meets the condition(s) will be
subject to this filter.
4. When you have selected the conditions that must be fulfilled
for this filter, decide whether the message will be forwarded to
the handheld, forwarded with Level 1 notification, forwarded
with only the header, or held at your PC.
Note
Creating a filter that forwards messages with Level 1
notification is equivalent to creating a filter that forwards
messages with high priority.
Messages that you receive with Level 1 notification will
appear in the Messages screen in bold text . O nce y ou read
the message and return to the Messages screen, the
message is no longer in bold text.
5. When you have set the conditions and acti ons, c lick OK. On t he
Filters tab you will see the new filter in the list.
Installation and User’s Guide

Using the desktop software — Summary
To rearrange the order of your filters, select the filter you’d like to
move and click the up or down arrow buttons.
59
Note
As each email message arrives at your PC, the first filter
listed is applied. Therefore, when adding a filter that is more
restrictive in nature than the defaults, ensure that it is
placed at the TOP of the filter list, so that it will be applied
first to the incoming messages.
If you have set rules on your desktop to move specific
messages to a different folder as soon as they arrive in your
Inbox, these messages will be forwarded to your handheld
only if you specify email redirection from that folder. You can
change the folders from which email is redirected in the
Advanced tab. See the “Redirector Settings” online help for
more information on folder redirection and the Advanced
tab.
Summary
In this chapter, you learned how to use the desktop software. You
can backup and restore information, synchronize email and PIM,
and redirect email.
Installation and User’s Guide

4
Composing and sending
email
In the previous chapters of this guide, you learned about your
handheld’s main components, and the general procedures required
for sending and reading messages, and the desktop software tools.
This chapter explains the different features that the handheld offers
for advanced composing and sending.
Sending one-time messages
This send option is a short-c ut method and the recipient’s address
NOT be saved in your Address Book.
will
1. In the Home screen, scroll to the Compose icon and click.
2. The To: screen appears. Scroll to [Use Once] and click t o view
the menu. Select Use Email and click.

62
Composing and sending email — Messages to multiple contacts
3. The One Time Email screen appears and you can type your
contact’s email address. Click the trackwheel to view the menu
and select Continue by clicking again.
4. Type a subject, press
message. When you are ready to send the message, click the
trackwheel to view the menu. Scroll to Send and click.
From the Messages screen you can view the sent message’s status.
ENTER and begin composing your
Messages to multiple contacts
You can send a message to more than one recipient and choose
whether recipients are addressed directly (To), carbon copied (Cc),
or blind carbon copied (Bcc). See the Address Book chapter for
information on adding contacts to your Address Book.
1. In the Home screen, scroll to the Compose icon and click.
2. In the To: screen (after selecting a main recipient and a send
method), click the trackwheel to view the menu. Click either
Add To, Add Cc, or Add Bcc. (In this example, we use Add Cc.)
Installation and User’s Guide

Composing and sending email — Customizing the auto signature
3. The Select Address screen appears, listing all of your contacts’
names. Scroll to a name (or type the first letters of your
contact’s name to start a search and then scroll to the name.)
Click the trackwh eel to view the menu, then scroll to Use and
click.
63
Note
If you’ve entered multiple addresses for the contact, you will
be shown a list of the addresses. Scroll to choose an
address and click.
4. You return to the To: screen where the additional recipient
appears in the list. Type your subject in the Subject field and
ENTER to begin composing your message.
press
5. When you have finished composing your message, click to
view the menu. Scroll to Send and click.
Customizing the auto signature
Once you install the desktop software, an auto signature is included
on all email messages sent from your handheld. You can customize
this text in the Redirector Settings tool of the desktop software. See
Installation and User’s Guide

64
Composing and sending email — Customizing the auto signature
the online help for more information on how to change the auto
signature.
Note
The auto signature is included only on messages which use
email as the send method.
To disable the auto signature, clear the text in the
Redirector Settings tool of the desktop software.
Receiving delivery confirmation
You can receive a confirmation when sending a message by email.
1. In the Home screen, scroll to the Compose icon and click.
2. Select the recipients of the message by following the standard
email message procedure (shown on page 25). In the Subject
field, type <confirm>, followed by your subjec t line.
Note
Installation and User’s Guide
You will have to use the Select Symbol screen (press
ALT+SPACE) to insert the angle brackets in the subject line.
See page 73 for more information.

Composing and sending email — Using AutoText
3. Type your message and then send it. When the message has
been delivered to the recipient’s handheld, you will receive a
new message indicating that your sent message has arrived.
Using AutoText
The handheld’s AutoText function automatically replaces certain
text that you type with pre-programmed text. You can increase ho w
quickly you compose messages by using AutoText. By configuring
the default AutoText entries and adding new ones to meet your
specific needs, AutoText will:
65
• automatically correct commonly misspelled words.
• automatically replace abbreviations and acronyms with
complete words.
• automatically enter commonly-used strings of words into a
message by typing only one keyword.
• automatically insert punctuation and symbols into your
message without using the
ALT key or symbols library.
Installation and User’s Guide

66
Composing and sending email — Using AutoText
Note
There are several shortcuts built into the AutoText function
for inserting macros into messages. These shortcuts
include inserting the time, date, etc. See page 68 for more
information on creating AutoText entries using macros.
How AutoText works
1. In the Home screen, scroll to the Compose icon and click.
2. While composing your message in the To: screen, type the text
‘hte’. The text ‘hte’ is a default AutoText entry that tells the
handheld to replace the text with the correctly spelled word
‘the’.
3. As soon as you press the SPACE key, the correct spelling
replaces the error.
Installation and User’s Guide

Composing and sending email — Using AutoText
To add a new AutoText entry
You may want to customize your AutoText database by adding
specific AutoText entries.
1. In the Home screen, scroll to the Options icon and click.
2. The Device Options screen appears. Scroll to AutoText and
click. The AutoText screen appears with a list of default
AutoText entries. Click to view the menu. Scroll to New Item
and click. You will be prompted with three fields: Replace (for
the keyword) and With (for the word or phrase that should
appear instead) and Using (for selecting either Specified case
or SmartCase).
67
3. Type the keyword in the Replace field and th e re placemen t text
in the With field. Press
ALT while you roll the trackwheel to
alternate between Use specified case (which will use the word
exactly as you’ve typed it) or Use SmartCase (which will
capitalize the word if begins a sentence). Click to choose the
casing structure. If you skip this field, SmartCase will be used
automatically.
Installation and User’s Guide

68
Composing and sending email — Using AutoText
4. Click the trackwheel to view the menu. Select Save Item by
clicking again.
You can test your new entry by typing the keyword while you
compose your message.
To add a new AutoText item using a macro
You can use AutoText macros to quickly enter standard items such
as dates, times, and owner informat ion.
1. In the Home screen, scroll to the Options icon and click. The
Device Options screen appears. Scroll to AutoText and click.
The AutoText screen appears with a list of default AutoText
entries. Click to view the menu. Scroll to New Item and click.
You will be prompted with three fields: Replace: (for the
keyword) and With: (for the w ord or ph rase that sh ould appear
instead) and Using: (for selecting either Specified case or the
SmartCase, the default).
2. For this example, enter a short form for the date in the Replace
field. Scroll to the With field and click to view the menu.
Installation and User’s Guide

Composing and sending email — Using AutoText
3. Scroll to Insert Macro and click. In the Insert Macro screen,
scroll to a macro (such as Short date) and click. The list of
macros includes: Short date, Long date, Short time, Long time,
Owner name, and Owner info.
4. Once the appropriate macro is in the With field, click the
trackwheel to view the menu. Scroll to Save Item and click.
The new AutoText entry will appear in the AutoText entries list in
alphabetical order. When you use this AutoText entry in a message
and press the
SPACE key, the corresponding macro is inserted into
your message.
69
To edit an AutoText entry
You may wish to change a pre-programmed AutoText entr y to suit
your needs.
1. In the Home screen, scroll to the Options icon and click.
2. The Device Options screen appears. Scroll to AutoText and
click. In the AutoText screen, scroll to the entry you would like
to edit. Click the trackw heel to view the menu. Scroll to Edit
Item and click.
Installation and User’s Guide

70
Composing and sending email — Using AutoText
3. The Edit AutoText screen appears. If you need to scroll
horizontally while you make your edits, press
roll the trackwheel. Make your changes to the current entry.
4. Click the trackwheel to view the menu. Scroll to Save Item and
click.
You will return to the AutoText screen where you can view your
changes.
ALT while you
To delete an AutoText entry
If you do not wish to keep an AutoText entry (either a default entry
or one that you’ve added), you can delete it.
1. In the Home screen, scroll to the Options icon and click.
2. The Device Options screen appears. Scroll to AutoText and
click. In the AutoText screen, scroll to the entry you would like
to delete. Click the trackwheel to view the menu. Scroll to
Delete Item and click.
3. A dialog box appears asking if you want to delete the entry.
Scroll to Delete and click.
You return to the AutoText screen and you can see that the entry is
no longer listed.
To perform an AutoText search
Rather than scrolling through your list of AutoText entries, you can
search to find an entry quickly.
1. In the Home screen, scroll to the Options icon and click.
Installation and User’s Guide

Composing and sending email — Automatic formatting
2. The Device Options screen appears. Scroll to AutoText and
click.
3. In the AutoText screen, type the first letter or first few letters of
the entry you would like to find. For this example, type the
letter ‘t’. The screen header will display the word Find,
followed by the letter ‘t’. The AutoText list will isolate all
entries beginning with the letter ‘t’.
4. Scroll to the desired entry or type additional letters to further
isolate entries.
5. Scroll to the correct entry, then click the tr ack whe el t o choose t o
edit or delete the entry.
Automatic formatting
The handheld’s built-in formatting capabilities extend beyond the
AutoText function to reduce your typing ti me.
Auto capitalization
As you compose a message, you do not have to worry about
pressing the
methods of performing capitalization for you.
SHIFT key to capitalize words — the handheld has two
71
• Begin typing; you will see that the first letter you type is
capitalized automatically and that every letter following a
period becomes capitalized too. The handh eld recognizes the
beginning of a new sentence and does the work for you. (To
stop the capitalization, press and hold the first character of a
sentence, and it will change to a lower-case letter.)
• If you want any othe r characters to be capitalized, pre ss and
hold the character key until it becomes capitalized. You must
have the Key Rate (Options>Screen/Keyboard>Open) option
Installation and User’s Guide

72
Composing and sending email — Automatic formatting
set to either Slow or Fast for this feature to work. See pag e 153
for details on the Screen/Keyboard options.
Auto punctuation
You can insert a period automatically at t he end of a sentence or
word by pressing the
be capitalized.
Email fields
You can type an email address in an Email field of the Address
Entry screen without pressing the
address; instead of pressing
press the
SPACE key to do so. When you press the SPACE key again , a
‘.’ character will be inserted.
To insert a blank space into the Email field, press BACKSPACE and
then press
SPACE again. A blank space appears in the field. The next
time you press the
Number fields
You can type numbers in the Work, Home, Mobile, Pa ger, and Fax
fields without pre ssing the
To type a number in one of these fields, simply press the associated
character key. For example, to display the number ‘4’, press the ‘R’
key. These fields support all numeric characters and the ‘-‘, ‘.’, ‘x’
and ‘)’ characters without pressing the
SPACE key twice. The next letter you type will
ALT key. Begin typing an email
ALT + L to in sert the ‘@’ sign, simply
SPACE key, the ‘@’ sign appears.
ALT key.
ALT key.
Number lock
You can activate number lock (num lock) mode to type numbers
without holding down the
Num lock mode is activated and you can enter numbers in any
screen. Press SHIFT or ALT again to turn off num lock mode.
Installation and User’s Guide
ALT key. Press ALT + NUM (left SHIFT).

Composing and sending email — Inserting symbols
Inserting symbols
You can enhance your messages by inserting symbols from the
handheld’s symbols library.
73
Note
You can insert symbols into screens other than To: (such as
the New Address, Edit Address, Search Messages, and
AutoText screens) by following steps 3-4, below.
1. In the Home screen, scroll to the Compose icon and click.
2. The To: screen appears. Begin composing a message by
following the standard email message procedure (as shown in
“Sending a test Message” in Chapter 1.
3. Press
ALT+SPACE to view the Select Symbol screen.
4. Use the trackwheel to scroll to the symbol that you would like
to insert into your message, then click to insert the symbol.
(You can also press the alpha ke y unde r the desired symbol.)
You return to your message in the To: screen and the symbol has
been inserted.
Installation and User’s Guide

74
Composing and sending email — Summary and tips
Tip
You can also insert international characters/characters with
accents into your messages. When composing a message
or entering text, press and hold a letter key while rolling the
trackwheel to scroll through international characters/
characters with accents. When the desired character
appears, release the letter key.
Summary and tips
In this chapter, you learned more about composing and sending
email. Not only have you learned about sending messages, but you
have also been introduced to ti me-sav in g fe atures such a s A ut oText .
In the next chapter you’ll learn more about receiving and reading
messages.
Composing and sending messages - Tips
• Press C to create a new message while in the Messages screen.
• Press
• Press
• Press
• Type the first letters of the name or the initials separated by a space to
• Press
• Press
• Press and hold a letter to capitalize it (works only with Key Rate
ALT and roll the trackwheel to scroll horizontally in any field
where you can enter or view text.
SPACE to insert the “@” and “.” characters in an Email field.
SPACE twice to insert a period while composing a mess age ( the
letter following the period will automatically be capitalized.)
find a specific contact in the To field.
ALT + CAP (RIGHT SHIFT) to turn on caps lock mode (press
SHIFT again to turn it off).
ALT + NUM (LEFT SHIFT) to turn on num lock mode (press SHIFT
again to turn it off).
enabled).
Installation and User’s Guide

Composing and sending email — Summary and tips
Composing and sending messages - Tips
AutoText
• While composing a message, press br + SPACE to enter an open angle
bracket.
• While composing a message, press ld +
date.
• While composing a message, press lt +
time.
• While composing a message, press rb +
bracket.
SPACE to enter the current
SPACE to enter the current
SPACE to enter a closed
75
Installation and User’s Guide

5
Receiving and reading email
In this chapter, you will learn about your options for received email
messages, how to receive more of a message, and how to wor k with
file and Address Book attachments.
Reading messages
When you receive a new message, the handheld will display visual
notification on the Home screen, and may provide other
notification, depending on how you have configured the handheld’s
options. Follow these steps to read a message.
1. In the Home screen, scroll to the Message Centre icon and
click. The Messages screen appears.
2. In the Messages screen, scroll to a message and click to view the
menu. Click Open.
Received message actions
Once you have read the email message, click the trackwheel to view
the menu. Select one of the following actions:
Mark Unopened — Marks the current message as unread.If you
synchronize the handheld with your desktop, the unread messages
on the handheld remain marked as unread on your desktop.
Reply — Sends a reply to the sender of the open message, without
including the original text.

78
Receiving and reading email — Reading messages
Reply with Text — Sends a reply to the send er of the open message.
The text of the original messag e appears below you r reply. All of t he
original message is sent, even if it was truncated on your handheld.
Reply to All — Sends a reply to all recipients of the message,
without including the origin al tex t.
Reply to All with Text — Sends a reply to all recipients and
includes the text of the original message as part of the reply.
Forward — Forwards the open message to another contact. If an
attachment is included with the message, it will be forwarded with
the message.
Select — Allows you to select text to be copied into a message.
These options are available only when you have your cursor in the
From or To field of the open message.
Copy — Allows you to copy a From line or Subject line which you
can paste into a message.
Compose Email — Opens the To screen, wh ere you can compose an
email message. The sender’s name appears in the To: field. If the
sender has multiple addresses, the Select Address screen appears
instead.
Show Qualified Address — Shows the full SMTP address of the
recipient or sender. This option is available only when you have
your cursor in the From or To field of the open message with the
“Friendly Name” showing.
Show Friendly Name — Shows the first and last name of the sender
or the recipient. This option is available only when you have your
cursor in the From or To field of the open message with the
Qualified Address showing.
Installation and User’s Guide

Receiving and reading email — Reading messages
Edit Address — Opens the Select Address screen where you can
choose an address to edit.
Add to Address Book — Adds the sender’s name and address to a
New Address Card, which you can complete with additional
information. This option is available only when you have your
cursor in the From field. See page 79 for more information on
adding contacts to your Address Book.
If the sender’s address is already in the Address Book, the menu
will contain these items instead of Add to Address Book.
Previous Item — Closes the current message and opens the
previous message.
Next Item — Closes the current message and opens the next
message.
Next Unread Item — Closes the current message and opens the next
unopened message.
Adding contacts to your address book
When you receive a new message from someone who is not
currently in your handheld’s address book, you can add the address
from the open message.
79
1. In the Home screen, scroll to the Message Centre icon and
click. The Messages screen appears.
2. Open a received message and scroll to the top. Place your
cursor in the From field and click to view the menu. Scroll to
Add to Address Book and click.
Installation and User’s Guide

80
Receiving and reading email — Reading messages
3. The new contact’s information will be shown in the
NewAddress Card screen. Add any information you would
like to include for this contact.
4. Click to view the menu. Scroll to Save Address and click.
The contact is added to your Address Book and you return to the
open message.
Installation and User’s Guide

Receiving and reading email — Summary and tips
Summary and tips
In this chapter, you learned about reading and receiving messages.
You can select received message options, retrieve long messages,
manage file attachments, open address book attachments, and add
attachments to your address book.
Receiving and reading messages - Tips
• Press ALT and roll the trackwheel to page up and down in the
Messages screen.
• Press M to go to the Messages screen while in the Home screen or
Saved Messages screen.
• Press V to go to the Saved Messages screen while in the Home
screen or Messages screen.
• Press T to go to the top of a list or open message.
• Press B to go to the bottom of a list or open message.
• Press
• Press
• Press G to return to the last cursor position if you choose to close a
• Press R when in a message to reply without text to the sender only.
• Press F when in a message to forward the message.
ALT and roll the trackwheel to scroll horizontally in any field
where you can enter or view text.
ENTER to page down in an open message.
message before you’ve finished reading.
81
Installation and User’s Guide

6
Managing m essages
Find out how you can organize, customize, and search your list of
messages more efficiently.
Filing messages
The first time you synchronize your handheld and PC, the names
and structure of the folders in your desktop email program are
imported onto the handheld. If you file a m essage on your handh eld
and then synchronize with your desktop, the messages are moved
and filed as you have specified. U ntil yo u can synch ronize, th e filing
feature will have limited functionality.
1. In the Home screen, scroll to the Message Centre icon and
click.
2. In the Messages screen, scroll to a message and click to view the
menu. Scroll to File Message and click.

84
Managing messages — Filing messages
3. In the File Message screen, select the folder in which you want
to store the message. Click to view the menu, then select File
Message and click again.
Press the
Installation and User’s Guide
ESC key to return to the Messages screen.
Note
You cannot create a new folder using your handheld.

Managing messages — Searching messages
Searching messages
Use the handheld’s search function to locate specific messages. You
can specify and save the terms of several searches and use them at
any time. You can also perform a one-time search. Two default
searches (Inbox and Outbox) are saved on the handheld.
85
Note
You can also search for messages while in the Messages
screen.
You do not need to complete all the fields in the Search
Messages screen. The more fields you complete, the more
narrow the search will be.
To perform an email search
1. In the Home screen, scroll to the Search Messages icon and
click.
2. The Search Messages screen appears. In the Name, Subject, or
Message fields, type the keywords for which you want to
search.
Note
3. In the In field, press the SPACE key to specify where you want
to search for the name that you’ve entered. Choose from these
If you forget an exact spelling, you can search for a name
stored in your Address Book while still in the Search
Messages function. Type the first few letters of the name.
With your cursor in the Name field, click the trackwheel to
view the menu. Scroll to Select Name and click to see all
close matches for the name. (Or click again and select
View All to see all names in your address book.) In the
Select Address screen, select the name for which you
would like to search. Click the trackwheel to view the menu.
Scroll to Use and click. You return to the
screen with your selected name in the Name field.
Search Messages
Installation and User’s Guide

86
Managing messages — Searching messages
fields: From Field, Any Address Field, To Field, Cc Field, or
Bcc Field.
4. Select the folder in which you want to search for messages. The
default is All Folders, but you can select a specific fold er. I n t he
Folder field, press the
SPACE key. The Select Folder screen
appears, listing the top level structure of your folders. Scroll to
the folder you want to use and click to view the menu. Scroll to
Select Folder and click.
5. Select the type s of messages that you want the results of the
search to show. In the Show field, press the
Installation and User’s Guide
ALT key and scroll

Managing messages — Searching messages
to select the type of messages to show. The default is to show all
sent and received messages. You can also view only the sent
messages or only the received messages.
6. After you have set the terms of your search, click the
trackwheel to view the menu.
7. To perform a one-time search without saving any of the terms
that you have specified, scroll to Search and click.
To save the terms of your search, scroll to Save Search and
click. The Save Search scre en appears. Type a name for your
search in the Title field. You may also type a shortcut key to be
associated wi th that search. Click t o view the menu. Scroll to
Save and click.
87
The results of your search are displayed in the Search screen.
Installation and User’s Guide

88
Managing messages — Searching messages
Note
Once you have saved a search and have specified a
shortcut key, you can use
carry out the search in the Messages screen.
When you enter text in the Subject or Message fields, the
Search Messages function will search for phrases
containing these characters in the subject line and the body
of your messages.
If you want to clear all the fields in your search and restate
your search terms, click to view the menu, scroll to New
Search and click. The fields in the Search Messages
screen are reset to the default values.
ALT + the hotkey (shortcut key) to
To edit a search
1. In the Home screen, scroll to the Search Messages icon and
click.
2. The Search Messages screen appears. Click the trackwheel to
view the menu. Scroll to Recall Search and click.
3. Your saved se arches are li sted. Sel ect the search that you want
to edit then click to view the menu. Scroll to Edit Search and
click.
Installation and User’s Guide

Managing messages — Searching messages
4. The Save Search screen appears. In this screen, you can change
any of the information in the fields. When your changes are
complete, click to view the menu. Scroll to Save and click.
The search results are displ ayed; t he sear ch name a ppears in the top,
right-hand co rner.
To edit a search once
1. In the Home screen, scroll to the Search Messages icon and
click.
2. The Search Messages screen appears. Click the trackwheel to
view the menu. Scroll to Recall Search and click.
89
3. Your saved se arches are li sted. Sel ect the search that you want
to edit then click to view the menu. Scroll to Select Search and
click.
Installation and User’s Guide

90
Managing messages — Searching messages
4. The details of the search you have selected are displayed and
you can edit any of the fields. Once you have made your
changes, click to view the menu. Scroll to Search and click.
The results are displayed in the Search screen.
Note
The changes you make to the search are not saved. If you
want to save your changes, select Save Search from the
menu. The Save Search screen appears. Click to view the
menu, scroll to Save and click.
To delete a search
1. In the Home screen, scroll to the Search Messages icon and
click.
2. The Search Messages screen appears. Click the trackwheel to
view the menu. Scroll to Recall Search and click.
3. Your saved se arches are li sted. Sel ect the search that you want
to delete then click to view the menu. Scroll to Delete Search
and click.
Installation and User’s Guide

Managing messages — Searching messages
You return to the Search Messages screen and you can see that the
search is no longer listed.
To search for the sender
When you have a received message selected in the Messages screen,
you can search for all messages received from that contact. This
feature is helpful if you want to search for all messages relating to a
new message that you have received.
1. In the Home screen, scroll to the Message Centre icon and
click.
91
2. Select a received messa ge from the contac t for whi ch you want
to search then click to view the menu. Scr oll to Search Sender
and click.
Installation and User’s Guide

92
Managing messages — Deleting messages
All messages from that sender are shown in the Search screen.
Deleting messages
Although the handheld has ample memory for storing messages,
you should delete unnecessary messages in order to manage the
message list more efficiently.
Note
If the handheld’s memory is full and you receive new
messages, the handheld will delete the oldest messages in
the Messages screen to accommodate new ones.
T o dele te a message from the Messages s creen
If you are in the Messages screen, you can delete a message without
opening it. This procedure also applies for deleting messages from
the Saved Messages screen.
1. In the Home screen, scroll to the Message Centre icon and
click.
2. In the Messages screen, scroll to the message that you want to
delete and click to view the menu. Scroll to Delete and click.
Installation and User’s Guide

Managing messages — Deleting messages
3. A dialog box appears, asking if you are sure you want to delete
the item. Click Delete.
You return to the Messages screen and you can see th at the me ssa ge
is no longer listed.
To delete multiple messages
You can delete all messages prior to a particular date by selecting a
date field.
1. In the Home screen, scroll to the Message Centre icon and
click. In the Messages screen, scroll to a date field.
93
2. With the da te field selected, clic k to view the menu. Scrol l to
Delete Prior and click.
Installation and User’s Guide

94
Managing messages — Resending a message
3. A dialog box appears, asking if you are sure you want to delete
all prior items. Click Delete.
You return to the Messages screen and you can see that the
messages are no longer listed.
Resending a message
If, for some reason, your message is not sent properly on the first
attempt, you can rese nd the message to the same re cipient. If you
want to send the me ssage to a differe nt recipie nt, you mus t use the
Forward Message or Edit Message options.
1. In the Home screen, scroll to the Message Centre icon and
click.
2. In the Messages screen, scroll to the message that you want to
resend and click to view the menu. Select Open by clicking
again.
3. The text of the message will appear. Click to view the menu.
Scroll to Resend and click.
Installation and User’s Guide

Managing messages — Marking a message as unopened
You return to the Messages screen and your message will be sent
again.
95
Note
If you are resending the message due to a failed
transmission, scroll to the top of the original message to find
out why the message was not sent properly. See the
desktop software online help for explanations of possible
error messages.
Marking a message as unopened
You can mark any m essage on the handheld unopened.
1. In the Home screen, scroll to the Message Centre icon and
click.
2. Scroll to an opened message. Click to view the menu. Scroll to
Mark Unopened and click.
Installation and User’s Guide

96
Managing messages — Marking all messages opened
The message will be marked unopened.
Note
You can also mark an ope n message unopened by click ing
to view the menu, scrolling to Mark Unopened
again.
You can use this procedure if you want to mark an
unopened message as opened. In the Messages sc reen,
select an unopened message. Click to view the menu.
Scroll to Mark Opened and click.
and clicking
Marking all messages opened
If you have many messages on your handheld which you have not
read but you have read them on your PC, you may wish to mark all
messages opened.
1. In the Home screen, scroll to the Message Centre icon and
click.
2. Scroll to the top of the list and select the date field.
3. Click to view the menu. Scroll to Mark Prior Opened and click.
Installation and User’s Guide

Managing messages — Summary and tips
All messages in the list will be marked as opened.
Summary and tips
In this chapter, you learned how to manage your messages more
effectively. Message management on the handheld is similar to
managing messages on your PC; you can file, search, or delete
messages at your convenience. In the next chapter you’ll discover
the various features of the handheld’s Address Book.
Managing messages - Tips
97
• Press ALT + I to view all Incoming m essages in the Mes sages scr een.
• Press
• Press
ALT + O to view Outgoing messages.
Press
ALT + a shortcut key to carry out a search in the M essages or
Saved Messages screens. You can specify the shortcut key.
DEL with a date field highlighted to delete all messages prior to
and including the selected date.
Installation and User’s Guide

7
Using the Address Book
The handheld contains an Address Book for storing various contact
information. The Address Book allows you to keep a customized
record of email addresses, mailing addresses, titles, and pager, fax,
business, and home phone numbers. It also stores personal
information about specific contacts in the form of notes.
Setting Address Book options
In your Address Book options, you ca n de cide how you want to sort
your addresses, whether or not you want confirmation of deleted
addresses, and whether or not you want to allow duplicate names.
1. In the Home screen, scroll to the Address Book icon and click.
2. In the Address Book screen, click to view the menu. Scroll to
Options and click.
3. The Address Book Options screen appears, displaying the
following options:
• Sort By: Select how you want to sort the addresses in your
Address Book. Your choices are First Name, Last Name,
Company. The default setting is First Name.
• Confirm Address Delete: Select whether or not you want
to confirm deleting Address Book entries. The default
setting is Yes.

100
Using the Address Book — Adding addresses
• Allow Duplicate Names: Select w hether or no t you want
to allow more than one entry for the same name. The
default setting is Yes.
4. Scroll to the f ield you would like to se t, then press the
SPACE
key to scroll through your options. Release the SPACE key once
you have set the option to your preference.
5. Click the trackwheel to view the menu. Scroll to Save Options
and click.
You return to the Address Book screen.
Note
Y ou can also open the Address Book Options screen from
the To: screen when composing a message.
Adding addresses
To add an individual contact’s information to the Address Book,
follow this procedure:
1. In the Home screen, scroll to the Address Book icon and click.
Installation and User’s Guide

Using the Address Book — Adding addresses
2. In the Address Book screen, click to view the menu. Scroll to
New Address and click.
101
3. Type your contact’s information and press
ENTER after each
field. To clear information from a field, click to view the menu,
scroll to Clear Field, and click.
4. To save your contact information, click to view the menu. Scroll
to Save Address and click.
Installation and User’s Guide

102
Using the Address Book — Adding addresses
Your new contact’s name will appear in alphabetical order in your
Address Book.
Note
You can enter up to three email addresses for the same
contact. To add more than one email address, scroll to the
contact’s name in the Address Book screen. Click to view
the menu, scroll to Edit Address and click. Click to view the
menu and select Add Email Address. An additional field
appears in the New Address screen whe re you are able to
add a second email address. When you compose a
message for a contact with multiple email addresses, you
will be prompted to select the address to use.
Address Book fields
The New Address screen has the following fields:
First: Type your contact’s first name. This field supports alpha-
numeric and symbol characters.
Last: Type your contact’s last name. This field supports alpha-
numeric and symbol characters.
Email: Type your contact’s email address. This field supports alpha-
numeric and symbol ch aracters. Press the
the ‘@’ sign; press the
Note
SPACE key again to in sert a ‘.’ (period).
If you continue to press space, you can continue to insert
periods. To insert a blank space, press the
and then the
SPACE key again.
Company: Type the name of the company for which your contact
works. This field supports alpha-numeric and symbol characters.
SPACE key once t o insert
BACKSPACE key
Title: Type your contact’s job title/position. This field supports
alpha-numeric and symbol characters.
Installation and User’s Guide

Using the Address Book — Adding addresses
Work: Type your contact’s business phone number. This field
supports numeric characters and the ‘–‘, ‘+’, ‘x’, ‘.’, ‘(‘, and ‘)’
characters without having to hold down the
ALT key.
Home: Type your contact’s home phone number. This field
supports numeric characters and the ‘–‘, ‘+’, ‘x’, ‘.’, ‘(‘, and ‘)’
characters without having to hold down the
ALT key.
Mobile: Type your contact’s mobile phone number. This field
supports numeric characters and the ‘–‘, ‘+’, ‘x’, ‘.’, ‘(‘, and ‘)’
characters without having to hold down the
ALT key.
Pager: Type your contact’s pager number. This field supports
numeric characters and the ‘–‘, ‘+’, ‘x’, ‘.’, ‘(‘, and ‘)’ characters
without having to hold down the
ALT key.
Fax: Type your contact’s fax number. This field supports numeric
characters and the ‘–‘, ‘+’, ‘x’, ‘.’, ‘(‘, and ‘)’ characters without
having to hold down the
ALT key.
Address1 and Address2: Type your contact’s street address. These
fields support alpha - num e ri c and symbol characte rs .
City: Type your contact’s city. This field supports alpha-numeric
and symbol characters.
103
State/Prov: Type your contact’s state, province, or equivalent. This
field supports alpha-numeric and symbol characters.
Zip/Postal Code: Type your contact’s zip code or postal code, or
equivalent. This field supports alpha-numeric and symbol
characters.
Country: Type your contact’s country. This field supports alpha-
numeric and symbol characters.
Installation and User’s Guide

104
Using the Address Book — Viewing addresses
Notes: Type any reference notes you would like to keep about your
contacts. This field supports alpha-numeric and symbol characters.
Press the
ENTER key for a new line.
User 1 to User 4: Type additional information for the contact. These
fields support alpha -nu m eric and symbol charact ers.
Note
You can change the name of a User-Definable field. Scroll
to the User-Definable field and click to view the menu.
Scroll to Change Field Name and click. A dialog appears
where you can rename the field by scrolling to the end of
the New Name line and pressing
current name. Type the field’s new name and click.
BACKSPACE to delete the
Viewing addresses
You can view the information for a specific contact in the form of an
on-screen business card.
1. In the Home screen, scroll to the Address Book icon and click.
2. In the Address Book screen, select the name of the contact
whose information you want to view. Click to view the menu.
Scroll to View Address and click.
3. A virtual business card appears listing all the information
you’ve entered for this contact.
Tip
To jump to a number or email field in the business card,
press the first letter of the field name. For example, if you
have entered a fax number and you press F in this screen,
you move to the Fax field.
Installation and User’s Guide

Using the Address Book — Editing addresses
Editing addresses
You can edit the information in a ny of th e fields of an address entry.
Some Address Book fields are limited to numeric characters and
only a few alpha characters.
1. In the Home screen, scroll to the Address Book icon and click.
2. In the Address Book screen, select the Address Book entry that
you want to edit and click to view the menu. Scroll to Edit
Address and click.
3. In the Edit Address screen, use the trackwheel to move from
field to field. Press the
through the text to make your edits.
4. When you have made all the changes to the address fields , c lic k
to view the menu. Select Save Address by clicking again.
ALT key as you roll to scroll horizontally
105
Note
In the New Address or Edit Address screens, you can clear
whole fields quickly. Scroll to the field you wish to clear and
click the trackwheel to view the menu. Scroll to Clear Field
and click.
Deleting addresses
You can delete old addresses from your Address Book to save
memory space.
1. In the Home screen, scroll to the Address Book icon and click.
2. In the Address Book screen, scroll to the contact that you want
to delete. Click to view the menu. Scroll to Delete Address and
click.
Installation and User’s Guide
 Loading...