


Apple E3235A, E3218A, E3220A, E3219A, E3238A User Manual
...Contacts
Draft
Add and use contact information on iPhone
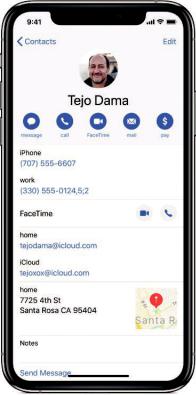
In the Contacts app  , you can view and edit your contacts lists from personal, business, and other accounts. You can also create contacts and set up a contact card with your own information.
Create a new contact. Tap  .
.
iPhone automatically suggests new contacts from messages you receive in Mail and invitations in Calendar, and from other apps. To turn this feature off, go to Settings  > Contacts > Siri & Search, then turn off Find Contacts in Other Apps.
Ask Siri. Say something like:
“Whatʼs my brotherʼs work address?”
“Sarah Castelblanco is my sister”
“Send a message to my sister”
Learn how to ask Siri
Allow calls or texts from a contact to override Do Not Disturb. Tap the contact, tap Edit, tap Ringtone or Text Tone, then turn on Emergency Bypass.
Find a contact. Tap the search field at theDrafttop of the contacts list, then enter your search. You can also search your contacts using Search (see Use iPhone to search for
content).
Quickly reach a contact. Tap one of the buttons under the contactʼs name to start a message, call, video call, or email. To change the default contact method (for a call, for example), touch and hold the call button, then tap a phone number.
If you use a third-party app to make video or audio calls, send messages, or send email, you may be able to set that app as the default.
Change how your contacts are sorted and displayed. Go to Settings  > Contacts.
Share a contact. Tap a contact, then tap Share Contact. See Share documents from apps on iPhone. Sharing a contact shares all the info from the contactʼs card.
Assign a photo to a contact. Tap a contact, tap Edit, then tap “add photo.” You can take a photo or add one from the Photos app.
Change a label. If a field has the wrong label, such as Home instead of Work, tap Edit. Then tap the label and choose one from the list, or tap Add Custom Label to create one of your own.
Add your friendsʼ social profiles. While viewing a contact, tap Edit, then tap “add social profile.”
Delete a contact. Go to the contactʼs card, then tap Edit. Scroll down, then tap Delete Contact.
Add your contact info on iPhone
In the Contacts app  , add your information to your contact card. iPhone uses your Apple ID to create your contact card, called My Card, but you may need to provide your contact information (such as name and address) to complete it.
Complete My Card. Open Contacts, tap My Card at the top of your contacts list, then tap Edit. Contacts suggests addresses and phone numbers to help you set up My Card.
If you donʼt see My Card, tap  , then enter your information. Next, go to Settings
  > Contacts > My Info, then tap your name in the Contacts list.
Edit My Card. In Contacts, tap My Card at the top of your contacts list, then tap Edit.
Create or edit your Medical ID. Go to My Card, tap Edit, then scroll down and tap Create Medical ID or Edit Medical ID.

Add contact accounts on iPhoneDraft
In the Contacts app  , add contacts from other accounts. Besides adding contacts individually, you can do any of the following:
Use your iCloud contacts: Go to Settings  > [your name] > iCloud, then turn on Contacts.
Use your Google contacts: Go to Settings  > Passwords & Accounts. Tap Google, sign in to your account, then turn on Contacts.
Add contacts from another account: Go to Settings  > Passwords & Accounts > Add Account. Choose an account, sign in to it, then turn on Contacts.
Access a Microsoft Exchange Global Address List: Go to Settings  > Passwords & Accounts. Tap Exchange, sign in to your Exchange account, then turn on Contacts.
Set up an LDAP or CardDAV account to access business or school directories: Go to Settings  > Passwords & Accounts > Add Account > Other. Tap Add LDAP Account or Add CardDAV Account, then enter the account information.
Sync contacts from your computer: In iTunes on your computer, tap Info in the device info pane, then select Sync Contacts. For information, see iTunes Help.
Import contacts from a SIM card (GSM): Go to Settings  > Contacts > Import SIM Contacts.
Import contacts from a vCard: Tap a .vcf attachment in an email or message.
Search a directory. Tap Groups, then tap the GAL, CardDAV, or LDAP directory you want to search. Tap Done, then enter your search. To save a personʼs info to your contacts, tap the personʼs name.
Show or hide a group. Tap Groups, then select the groups you want to see. This button appears only if you have more than one source of contacts.
Use Contacts from the Phone app on iPhone
In the Phone app on iPhone, you can call contacts and add recent callers to your Contacts.
Add a Favorite. Put VIP contacts in your Favorites list for quick dialing. Tap a Contact, then scroll down and tap Add to Favorites. Calls from these contacts bypass Do Not Disturb (see Set “Do Not Disturb during Bedtime” on iPhone).
Save the number you just dialed. In Phone, tap Keypad, enter a number, then tap Add Number. Tap Create New Contact, or tap Add to Existing Contact, then choose a contact.
;AA+'+#")"(4+)'<<"#+4%+9%(4')4-*+!+%E1-+*V%"&=%Y*(*+"Draft $V%"1*+%"&=% %+*P"%"-%"1*%+47B*)F >&=%O)*&"*%C*/%O-+"&("V%-)%"&=%:;;%"-%UP0$"0+2%O-+"&("V%"1*+%(1--$*%&%(-+"&("F
;64%&'4"+A1'<1(.+'(+"T4"(-1%(+%#+:'--)%A"*+!5%"1*%+47B*)%A-4#)*%(&''0+2%)*I40)*$ ;0&'0+2%&+%*P"*+$0-+V%0E1-+*%(&+%*+"*)%0"%5-)%A-4F%J1*+%*;0"0+2%&%(-+"&("#$%=1-+*%+47B*)V "&=% %"-%*+"*)%=&4$*$%0+%"1*%;0&'0+2%$*I4*+(*F%>&=%E&4$*%"-%*+"*)%&%"/-6$*(-+; =&4$*V%/10(1%0$%)*=)*$*+"*;%BA%&%(-77&F%>&=%J&0"%"-%$"-=%;0&'0+2%4+"0'%A-4%"&=%80&'%&2&0+V /10(1%0$%)*=)*$*+"*;%BA%&%$*70(-'-+F
N!-&*-,53!64.&*6$%.46.(*$%*!"#$%&
!+%"1*%O-+"&("$%&==% V%'0+.%(-+"&("%(&);$%5-)%"1*%$&7*%=*)$-+%0+%;055*)*+"%&((-4+"$%$- "1*A%&==*&)%-+'A%-+(*%0+%A-4)%:''%O-+"&("$%'0$"F%J1*+%A-4%1&D*%(-+"&("$%5)-7%74'"0='* $-4)(*$V%A-4%7021"%1&D*%74'"0='*%*+")0*$%5-)%"1*%$&7*%=*)$-+%0+%O-+"&("$F%>-%.**= )*;4+;&+"%(-+"&("$%5)-7%&==*&)0+2%0+%A-4)%:''%O-+"&("$%'0$"V%(-+"&("$%5)-7%;055*)*+" $-4)(*$%/0"1%"1*%$&7*%+&7*%&)*%'0+.*;%&+;%;0$='&A*;%&$%&%$0+2'*%/(;G;$2&5"(#05#F%J1*+ A-4%D0*/%&%4+050*;%(-+"&("V%"1*%"0"'*%,+050*;%!+5-%&==*&)$F
E1(>+)%(4')4-*+!5%"/-%*+")0*$%5-)%"1*%$&7*%=*)$-+%&)*+#"%'0+.*;%&4"-7&"0(&''AV%A-4%(&+ 4+05A%"1*7%7&+4&''AF%>&=%-+*%-5%"1*%(-+"&("$V%"&=%U;0"V%"&=%W0+.%O-+"&("$V%(1--$*%"1* -"1*)%(-+"&("%*+")A%"-%'0+.%"-V%"1*+%"&=%W0+.F
J1*+%A-4%'0+.%(-+"&("$%/0"1%;055*)*+"%50)$"%-)%'&$"%+&7*$V%"1*%+&7*$%-+%"1*%0+;0D0;4&' (&);$%;-+#"%(1&+2*V%B4"%-+'A%-+*%+&7*%&==*&)$%-+%"1*%4+050*;%(&);F%>-%(1--$*%/10(1 +&7*%&==*&)$%-+%"1*%4+050*;%(&);V%"&=%-+*%-5%"1*%'0+.*;%(&);$V%"&=%"1*%(-+"&("#$%+&7*%-+ "1&"%(&);V%"1*+%"&=%,$*%>10$%C&7*%3-)%,+050*;%O&);F
Note: When you link contacts, those contactsDraftarenʼt merged. If you change or add information in a unified contact, the changes are copied to each source account where that information already exists.

FaceTime
Draft
Make and answer FaceTime calls on iPhone
In the FaceTime app  , make video or audio calls to friends and family, whether theyʼre using an iOS device or a Mac. With the front-facing camera, you can talk face-to-face; switch to the rear camera to share what you see around you.
Note: FaceTime, or some FaceTime features, may not be available in all regions.
Set up FaceTime
d.Go to Settings  > FaceTime, then turn on FaceTime.
e.Enter your phone number, Apple ID, or email address to use with FaceTime, then set your caller ID.
Make a FaceTime call
With a Wi-Fi connection and an Apple ID, you can make and receive FaceTime calls (first sign in using your Apple ID, or create a new account). You can also make FaceTime calls over a cellular data connection, which may incur additional charges. To turn this feature off, go to Settings  > Cellular, then turn off FaceTime. For more information about cellular usage and settings, see View or change cellular settings on iPhone.

Ask Siri. Say something like: “Make a FaceTimeDraft call.”Learn how to ask Siri.
d.In FaceTime, tap  at the top right.
e.Type the name or number you want to call in the entry field at the top, then tap  to make a FaceTime audio call or
  to make a video call.
You can also tap  to open Contacts and start your call from there.
Tip: On models with 3D Touch, press a contact in your list of FaceTime calls to quickly call or send a message.
Leave a message
If no one answers your FaceTime call, do one of the following:
Tap Leave a Message.
Tap Cancel to cancel the call.
Tap Call Back to try calling back.
Start a FaceTime call from a Messages conversation
In a Messages conversation, you can start a FaceTime call with the person youʼre chatting with.
d.In the Messages conversation, tap the profile picture,  , or the name at the top of the conversation.
e.Tap FaceTime.
Call again
In your call history, tap the name or number.
Tap  to open the name or number in Contacts.
Receive a FaceTime call
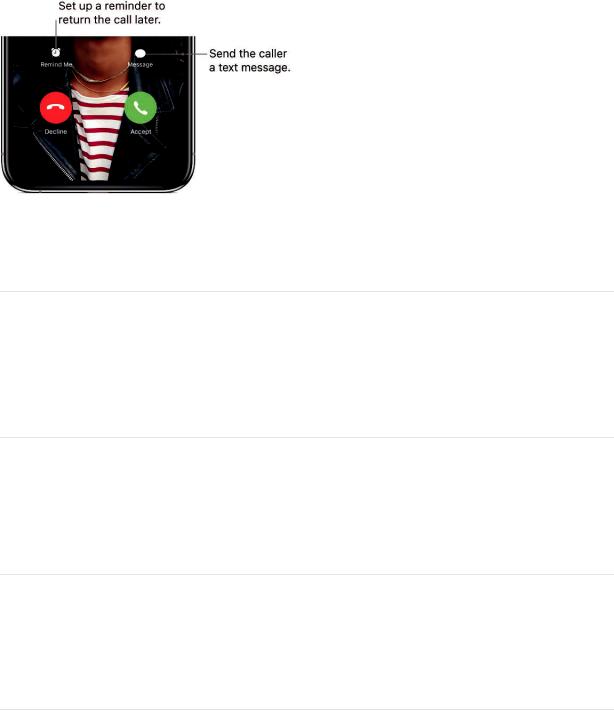
When a FaceTime call comes in, tap any of the following:
Accept: Take the call.
Decline: Decline the call.
Remind Me: Set a reminder to call back.
Message: Send a text message to the caller.
Draft
!5%A-4#)*%-+%&%)*24'&)%=1-+*%(&''%/1*+%&%3&(*>07*%(&''%(-7*$%0+V%0+$"*&;%-5%'55$8#V%A-4 $**%"1*%S(2&b&'55$8#%-="0-+V%/10(1%"*)70+&"*$%"1*%=)*D0-4$%(&''%&+;%(-++*("$%A-4%"-%"1* 0+(-70+2%(&''F
A4%4B&*X46&7!8&*6433(*$%*!"#$%&
84)0+2%&%(&''%0+%"1*%3&(*>07*%&==% V%A-4%(&+%4$*%-"1*)%&==$V%&+;%7-)*F%X-4%(&+%&'$- B'-(.%4+/&+"*;%(&''*)$%&+;%;*'*"*%&%(&''%5)-7%A-4)%(&''%10$"-)AF
,6<414'->+A6#1(.+'+)'<<
Z-%"-%"1*%o-7*%$()**+V%"1*+%"&=%&+%&==%0(-+%"-%-=*+%&+%&==F
X-4%(&+%$"0''%"&'.%/0"1%A-4)%5)0*+;V%B4"%A-4%(&+#"%$**%*&(1%-"1*)F%>-%)*"4)+%"-%"1*%D0;*-V%"&= "1*%2)**+%B&)%R-)%3&(*>07*%0(-+T%&"%"1*%"-=%-5%"1*%$()**+F
2""+&%#"+A6#1(.+'+D1A"%+)'<<
>-%$**%7-)*%;4)0+2%&%3&(*>07*%D0;*-%(&''V%)-"&"*%0E1-+*%"-%4$*%'&+;$(&=*%-)0*+"&"0-+F
!"#$%&>-%&D-0;%4+/&+"*;%-)0*+"&"0-+%(1&+2*$V%'-(.%"1*%0E1-+*%$()**+%-)0*+"&"0-+F%G** O1&+2*%-)%'-(.%"1*%0E1-+*%$()**+%-)0*+"&"0-+F
=<%)>+6(@'(4"A+)'<<"#-
X-4%(&+%B'-(.%D-0(*%(&''$V%3&(*>07*%(&''$V%&+;%"*P"%7*$$&2*$%5)-7%4+/&+"*;%(-+"&("$F
dF% Z-%"-%G*""0+2$% %m%3&(*>07*%m%N'-(.*;F
eF% >&=%:;;%C*/%&"%"1*%B-""-7%-5%"1*%'0$"F
fF% >&=%&%(-+"&("%A-4%/&+"%"-%B'-(.F
>-%4+B'-(.%&%(-+"&("%-)%=1-+*%+47B*)V%$/0=*%0"%"-%"1*%'*5"V%"1*+%"&=%,+B'-(.F
3-)%7-)*%0+5-)7&"0-+%&B-4"%B'-(.0+2%(&''$V%$**%"1*%:=='*%G4==-)"%&)"0('*%N'-(.%(&''$%&+; B'-(.%-)%50'"*)%7*$$&2*$%-+%A-4)%0E1-+*V%0E&;V%-)%0E-;%"-4(1F

Draft
Delete a call from call history
In FaceTime, swipe left over the call in your call history, then tap Delete.
Add camera effects in FaceTime calls on iPhone
(iPhone X and later) In a call using the FaceTime app  , become your favorite Animoji or Memoji character (created in Messages on iPhone X and later); use a built-in filter to look like a comic book or ink drawing version of yourself; and add stickers, labels, and shapes.
Become an Animoji or Memoji
(iPhone X and later) In Messages, you can create an Animoji or Memoji character to use in your FaceTime conversations. iPhone captures your movements, facial expressions, and voice, and conveys them through your character. (Your character imitates you even when you stick out your tongue!)
d.During a FaceTime call, tap  . (If you donʼt see
  , tap the screen.)
e.Tap  , then choose an Animoji or Memoji (swipe through the characters at the bottom, then tap one).
The other caller will hear what you say, but see your Animoji or Memoji doing the talking.
For information on how to create a Memoji, see Create your own Memoji.
Use a filter to change your appearance
d.During a call, tap the screen, then tap  . (If you donʼt see
  , tap the screen.)
e.Tap  to open the FaceTime filters.
f.Choose your appearance by tapping a filter at the bottom (swipe left or right to preview them).
Add stickers and labels
d.During a call, tap the screen, then tap  .
.
e.Tap Effects.
f.Tap  to add a label, or
  to add a shape.

Change FaceTime audio and videoDraftsettings on iPhone
You can change the audio and video settings in the FaceTime app  at any time during a call.
Change the settings
d.Tap the screen, then tap  .
.
e.Do any of the following:
Switch to the rear camera: Tap Flip (tap again to switch back to the front-facing camera).
Turn off your camera: Tap Camera Off (tap again to turn it back on).
Turn off the sound: Tap Mute (tap again to turn the sound back on).
Switch between mute and the speaker: Tap Speaker, then select Speaker or Mute.
Leave a FaceTime call or switch to Messages on iPhone
You can leave a call in the FaceTime app  at any time, or continue your conversation in Messages.
Leave a FaceTime call
Tap the screen, then tap  .
.
Switch to a Messages conversation
To continue your FaceTime conversation in Messages, tap the screen, tap  , then tap
  .
.
Files
Draft
View files and folders in Files on iPhone
In the Files app  , view and open your documents, images, and other files that are stored in iCloud Drive and in other cloud storage providers like Box and Dropbox.
View recent files and folders. Tap Recents at the bottom of the screen.
Browse files and folders. Tap Browse at the bottom of the screen, then tap an item below Locations, Favorites, or Tags. To open a folder, tap it. (For information about marking folders and files as favorites or adding tags, see Organize files in folders on iPhone.)
Open a file. Tap it. If you havenʼt installed the app that created the file, a preview of the file opens in Quick Look.
Change to list view or icon view. From an open location or folder, drag down from the center of the screen, then tap  .
.
Change how files and folders are sorted. From an open location or folder, drag down from the center of the screen, tap “Sorted by,” then choose an option: Name, Date, Size, or Tags.
Find a specific file or folder. Enter the name in the search field.

Hide the keyboard and see more resultsDrafton the screen: Tap Search.
Start a new search: Tap  in the search field.
Open a result: Tap it.
Add a cloud storage service. Download the app from the App Store, then open the app and follow the onscreen instructions. Open Files, tap Browse (at the bottom of the screen), tap More Locations (below Locations), then turn on the service.
Rearrange the Browse screen. Tap Browse at the bottom of the screen, tap Edit at the top of the screen, then do any of the following:
Hide a location: Turn it off.
Remove an item from the Favorites list: Tap  next to the item.
Delete a tag and remove it from all items: Tap  next to the tag.
Change the order of an item: Touch  , then drag it to a new position.
Organize files in folders on iPhone
In the Files app  , organize documents, images, and other files in folders.
Create a folder. Open a location or an existing folder, drag down from the center of the screen, then tap  . (If you donʼt see the New Folder button, you canʼt create a folder in that location.)
Copy, duplicate, rename, move, or delete a file or a folder. Touch and hold the file or folder, then choose an option.
To duplicate, move, or delete multiple files or folders, tap Select, tap your selections, then tap an option at the bottom of the screen.
Some options may not be available depending on whatʼs selected; for example, you canʼt delete an app library (a folder labeled with the app name).
Move a file or a folder with drag and drop. Touch and hold an item until it lifts up, then drag it to a different folder or location. As you drag,  appears wherever you can drop the item. To move multiple items, touch and hold an item, drag it slightly, then continue holding it while you tap additional items with another finger. To open a folder or location while touching and holding a selection, tap the folder or location with another finger.
Note: You canʼt move an app library (a folder labeled with the app name).
Share a file. Touch and hold the file, then tap Share to do things like send a copy of the file. On iCloud Drive, you can allow others to view or edit the file.

Tag a file or folder. Touch and hold the fileDraftor folder, tap Tags, then tap one or more tags. To remove a tag, tap it again. When finished, tap Done. To find tagged items, tap Browse,
then tap an item below Tags.
Mark a folder as a Favorite. Touch and hold the folder, then tap Favorite. To find Favorites, tap Browse. On the Browse screen, Favorites appear below Locations.
Use iCloud Drive on iPhone
Use the Files app  to store files in iCloud Drive, which you can access from your other devices as well as your iPhone. You can also invite others to view and edit files in iCloud Drive by sending them a link to a file—you donʼt need to send them a copy of the file.
iCloud Drive is built into the Files app on iOS devices (iOS 11 or later). You can also use iCloud Drive on Mac computers (OS X 10.10 or later) and PCs (iCloud for Windows 5 or later or Windows 7 or later). To access iCloud Drive, you must be signed in to iCloud using your Apple ID. Storage limits are subject to your iCloud storage plan.
Turn on iCloud Drive. Go to Settings  > [your name] > iCloud, then turn on iCloud Drive.
Choose which apps use iCloud Drive. Go to Settings  > [your name] > iCloud, then turn each of the listed apps on or off.
Open a file in another app. Touch and hold a file in iCloud Drive, tap Share, then choose an option.
Invite others to edit or view a file. Touch and hold a file in iCloud Drive, tap Share, tap  , then do one of the following:
Allow only the people you invite to view and edit the file: Tap a method for sending a link to the file, enter any other requested information, then send or post the invitation. People need an Apple ID to open the file.
Choose other permission and access options: Tap Share Options, make any access and permission changes, then tap Add People (at the top of the screen). Tap a method for sending a link to the file, enter any other requested information, then send or post the invitation.
Share Options allow you to grant access to:
Only people you invite: Only people who sign in to iCloud with an Apple ID can open the file.
Anyone with the link: Anyone who has the link can open the file.

You can also set what others can do: Draft
Can make changes: People can edit and print the shared file.
View only: People can view and print the shared file but not edit it.
When people edit a file, everyoneʼs changes are updated automatically.
If you donʼt see  , the document may be owned by someone else who shared it with you. Tap
  to see the ownerʼs name.
Important: When you share a file, the link to it includes its filename. Therefore, if the name or content of the file is confidential, be sure to ask recipients not to forward the link to anyone else.
Invite more people to view or edit a file. If youʼre the owner of a shared file whose access is set to “Only people you invite,” you can invite more people. Touch and hold the file, tap Share, tap  , then tap “Add People.” Tap a method for sending a link to the file, enter any other requested information, then send or post the invitation.
Note: If youʼre the owner of the shared file and you move it to another folder or location, the link is broken and people lose access to the file.
Send a link to more people. If your file access is set to “Anyone with the link,” you can give new people access to the file by sending them the file link. Touch and hold the file, tap Share, tap  , then tap Send Link. Tap a method for sending the link, enter any other requested information, then send or post the invitation.
Change access for everyone. If youʼre the owner of the file, you can change its access at any time, but anyone you shared the link with is affected. Touch and hold the file, tap Share, tap Share Options, then tap the access setting you want.
If you change the setting from “Anyone with the link” to “Only people you invite,” the original link no longer works for anyone. Only people who receive an invitation from you can open the file, and they must sign in to iCloud with an Apple ID.
Change permission for everyone. If youʼre the owner of a shared file with access set to “Only people you invite,” you can quickly change everyoneʼs permission. Touch and hold the file, tap Share, tap Share Options, then tap the permission setting you want.
Anyone who has the file open when you change the permission sees an alert. New settings take effect when they dismiss the alert.
Change permission or remove access for one participant. If youʼre the owner of a shared file with access set to “Only people you invite,” you can change the permission for an individual without affecting the permission of others. You can also remove their access to the file. Touch and hold the file, tap Share, tap  , tap the personʼs name, then tap an option.
24%:+-8'#1(.+'+$1<"*+!5%A-4#)*%"1*%-/+*)%-5%&%Draft$1&)*;%50'*V%A-4%(&+%$"-=%$1&)0+2%0"F%>-4(1 &+;%1-';%"1*%50'*V%"&=%G1&)*V%"&=% V%"1*+%"&=%G"-=%G1&)0+2F
:+A-+*%/1-%1&$%"1*%50'*%-=*+%/1*+%A-4%$"-=%$1&)0+2%$**$%&+%&'*)"F%>1*%50'*%('-$*$%/1*+ "1*%&'*)"%0$%;0$70$$*;V%&+;%"1*%50'*%0$%)*7-D*;%5)-7%"1*%=&)"0(0=&+"#$%0O'-4;%8)0D*F%>1*%'0+. "-%"1*%50'*%+-%'-+2*)%/-).$F%!5%A-4%'&"*)%$1&)*%"1*%50'*%&2&0+%&+;%$*"%"1*%&((*$$%"-%[:+A-+* /0"1%"1*%'0+.V\%"1*%-)020+&'%'0+.%/0''%/-).F%!5%"1*%&((*$$%0$%$*"%"-%[K+'A%=*-='*%A-4%0+D0"*V\ "1*%-)020+&'%'0+.%/0''%/-).%&2&0+%-+'A%5-)%=*-='*%A-4%)*0+D0"*%"-%$1&)*%"1*%50'*F
I$64.&*K)!&%-(*4%-*K48!39*K)$8*9$,)*!"#$%&
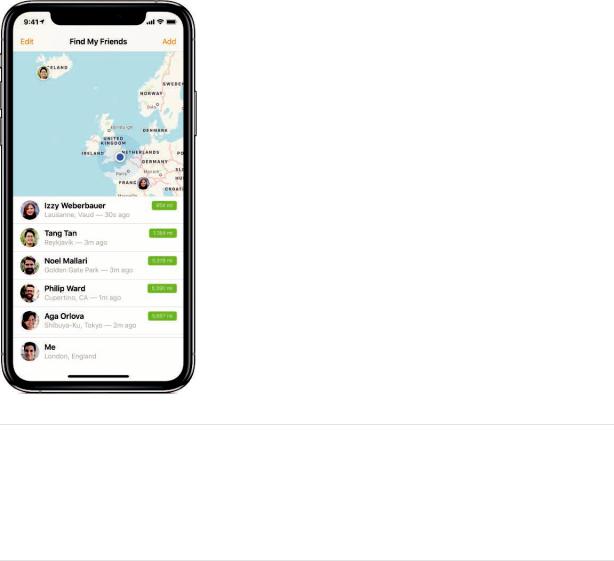
>1*%30+;%HA%3)0*+;$%&==% %0$%&%2)*&"%/&A%"-%50+;%=*-='*%/1-%&)*%07=-)"&+"%"-%A-4%&+; $1&)*%A-4)%'-(&"0-+%/0"1%"1*7F%3)0*+;$%&+;%5&70'A%7*7B*)$%/1-%4$*%0E1-+*V%0E&;V 0E-;%"-4(1V%-)%:=='*%J&"(1%G*)0*$%t%&+;%'&"*)%&+;%$1&)*%"1*0)%'-(&"0-+$%/0"1%A-4%&==*&) -+%&%7&=V%$-%A-4%(&+%I40(.'A%$**%/1*)*%"1*A%&)*F%X-4%(&+%$*"%+-"050(&"0-+$%"-%&'*)"%A-4 /1*+%5)0*+;$%-)%5&70'A%7*7B*)$%'*&D*%5)-7%-)%&))0D*%&"%D&)0-4$%'-(&"0-+$F
2"4+6:+<%)'41%(+-8'#1(.
dF% Z-%"-%G*""0+2$% %m%r."/*&(01$s%m%G1&)*%HA%W-(&"0-+V%"1*+%"4)+%-+%G1&)*%HA W-(&"0-+F
eF% >&=%3)-7V%"1*+%$*'*("%"1*%;*D0(*%A-4%/&+"%"-%$1&)*%A-4)%'-(&"0-+%5)-7F

Share your location with a friend |
Draft |
d.On iPhone, open Find Friends, then tap Add.
e.Do one of the following:
In the To field, type the name of a friend you want to share your location with (or tap  , and select a contact), then tap Send and choose how long you want to share your location.
Select a friend who appears in AirDrop and choose how long you want to share your location.
Your friend receives a notification that you want to share your location and can either accept or decline.
Set up notifications about a friendʼs arrival
d.Select a friend, then tap Notify Me.
e.Choose whether you want to be notified when a friend leaves from or arrives at a location.
f.Choose the friendʼs current location, or tap Other to create a new location for the notification.
You can ask Siri to locate a friend who has shared their location with you.
Ask Siri. Say something like: “Whereʼs Gordon?” Learn how to ask Siri.
Use the Find My iPhone app to locate your device
The Find My iPhone app  helps you locate and protect your lost or stolen iPhone, iPad, iPod touch, Apple Watch, AirPods, or Mac. If you lose your device, use the Find My iPhone app on another device, or use the Find My iPhone web app on any Mac or PC, to locate your device on a map, lock it remotely, play a sound, display a message, or erase all its data. Find My iPhone includes a feature called Activation Lock that prevents anyone else from activating and using your device, even if itʼs completely erased.
Important: To use these features, you need to set up and turn on Find My iPhone on each device (except AirPods) before itʼs lost. Also, your device must be able to connect to the Internet.

Set up Find My iPhone |
Draft |
d.Go to Settings  > [your name] > iCloud > Find My iPhone.
e.Turn on Find My iPhone.
f.To have your device send its last location prior to the battery running out, turn on Send Last Location.
Locate a device
d.On iPhone or another iOS device, open Find My iPhone.
Or on a computer, go to the Find My iPhone web app on iCloud.
e.Sign in with your Apple ID, then select the device you want to locate.
f.Tap Actions, then tap any of the following:
Play Sound: Play a sound at full volume for 2 minutes, even if the ringer is set to silent.
Lost Mode: Immediately lock your missing device with a passcode and display a custom message on the screen with a contact number. Find My iPhone tracks and reports the location of your device, so you can see where itʼs been.
When a device that supports Apple Pay is in Lost Mode, Find My iPhone attempts to suspend the ability to use Apple Pay, Express Transit cards, and student ID cards on the device. See Manage Apple Pay cards and activity on iPhone.
Erase your missing device: Protect your privacy by erasing all the information and media on your missing device and restoring it to its original factory settings. Activation Lock prevents anyone else from activating and using your device, even after you erase it with Find My iPhone. On models that support Apple Pay, erasing iPhone also removes the ability to use Apple Pay, Express Transit cards, and student ID cards on the device.
Ask Siri. Say something like: “Help me find my iPad” or “Play a sound on my iPod touch.” Learn how to ask Siri.
Before you sell or give away your iPhone, you should completely erase it in Settings
 , which removes Activation Lock. The next owner can then activate and use the device normally.
Draft
N&43.#
Q!&0*#&43.#*4%-*K!.%&((*!%K$)84.!$%*$%*!"#$%&
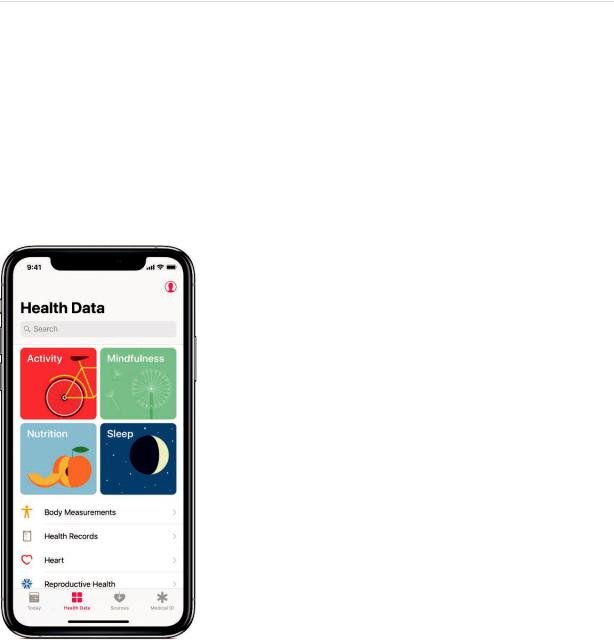
!+%"1*%o*&'"1%&==% V%50+;%1*&'"1%&+;%50"+*$$%0+5-)7&"0-+%&B-4"%A-4)$*'5%0+%-+*%='&(*F
\T:<%#"+48"+8"'<48+'(A+$14("--+)'4".%#1"-*+>&=%o*&'"1%8&"&V%"1*+%"&=%*&(1%-5%"1*%5-4) (&"*2-)0*$p:("0D0"AV%H0+;54'+*$$V%C4")0"0-+V%&+;%G'**=p5-)%0+")-;4("-)A%D0;*-$%&+; )*(-77*+;*;%&==$%"-%1*'=%A-4%2*"%$"&)"*;F
;AA+C%6#+:#%$1<"*+>&=% %"-%=)-D0;*%B&$0(%0+5-)7&"0-+V%$4(1%&$%A-4)%;&"*%-5%B0)"1%&+;%$*PV 5-)%$*""0+2%4=%1*&'"1%&+;%50"+*$$%&==$F
?1"@+'+-6&&'#C+%$+C%6#+A'1<C+:#%.#"--*+>&=%>-;&A%"-%$**%A-4)%$"&"$%5-)%"1*%;&AF%>- D0*/%A-4)%;&"&%5)-7%&+-"1*)%;&AV%"&=%&%;055*)*+"%;&"*%-+%"1*%(&'*+;&)F
I;J3B3KL+0E1-+*V%:=='*%J&"(1V%&+;%"1*%o*&'"1%&==%&)*+#"%7*;0(&'%;*D0(*$F%G**
!7=-)"&+"%$&5*"A%0+5-)7&"0-+%5-)%0E1-+*F
C$33&6.*#&43.#*4%-*K!.%&((*-4.4*$%*!"#$%&
>1*%o*&'"1%&==% %&4"-7&"0(&''A%(-4+"$%A-4)%$"*=$%&+;%/&'.0+2%&+;%)4++0+2%;0$"&+(*$F%>- 2&"1*)%&;;0"0-+&'%1*&'"1%&+;%50"+*$$%;&"&V%A-4%(&+%4$*%-"1*)%&==$%R$4(1%&$%+4")0"0-+%&+; 50"+*$$%&==$T%&+;%;*D0(*$%R$4(1%&$%B'--;%=)*$$4)*%7-+0"-)$V%/*021"%$(&'*$V%&+;%2'4(-$* 7-+0"-)$T%"1&"%&)*%(-7=&"0B'*%/0"1%o*&'"1F

Install third-party apps. Tap Health Data,Drafttap a category (such as Activity), then scroll down to Recommended Apps. Tap a recommended app to download it from the
App Store. After you install and set up the app, you can choose to share data with Health.
View your sleep history. If you set up Bedtime in the Clock app or a third-party app, Health displays your sleep history. To view your sleep history in Health, tap Health Data, then tap Sleep.
Collect data from Apple Watch. After you pair Apple Watch with your iPhone, data is automatically sent to Health. To view your move, exercise, and stand data and goals, tap Health Data, then tap Activity. To view heart rate data, tap Health Data, then tap Heart.
Collect data from another device. Follow the setup instructions for the device. If itʼs a Bluetooth device, you need to pair it with iPhone. See Connect Bluetooth devices to iPhone.
View and manage a data type. Tap Health Data, then tap the data type. For example, tap Activity, then tap Steps.
View your progress over time: Tap the D (day), W (week), M (month), or Y (year) tab.
Move a data type to the top of the Today screen: Turn on Add to Favorites.
Manually enter data: Tap  in the top-right corner of the screen.
Delete data: Tap Show All Data, swipe left on a data record, then tap Delete. To delete all data, tap Edit, then tap Delete All.
View apps and devices allowed to share data: Tap Data Sources & Access.
Search for a data type. Tap Health Data, then swipe down to reveal the search field.
Share health and fitness data on iPhone
Use the Health app  to share your health and fitness data among other apps and devices. For example, if you install a workout app, its exercise data can appear in the Health app. The workout app can also read and make use of data (such as your heart rate and weight) shared by other devices and apps.
Control the sharing of data. Tap Sources to see the apps and devices you allow to read or write data. To change your sharing options, tap the device or app.
Export all your health data. Tap Health Data, tap  , then tap Export Health Data. Your data is exported in XML format, a common format for sharing data between apps.

Create a Medical ID in Health onDraftiPhone
In the Health app  , supply critical medical and contact information for first responders and others who have physical access to your iPhone. They can tap Emergency, then tap Medical ID from the Lock screen to view your Medical ID without entering a passcode.
Set up your Medical ID. Tap Medical ID, then tap Create Medical ID.
Review or change your Medical ID. Tap Medical ID. To make changes, tap Edit.
3D Touch. To quickly view your Medical ID from the Home screen, press Health, then tap Medical ID. See 3D Touch.
Prevent viewing from the Lock screen. Tap Medical ID, tap Edit, then turn off Show When Locked.
View your Medical ID from the Lock screen. You can see how your Medical ID appears to emergency responders.
iPhone X and later: Press and hold the side button and either volume button until the sliders appear, then drag the slider for Medical ID. When youʼre finished, tap Done. The next time you unlock iPhone, your passcode is required to enable Face ID again.
Other models: Wake iPhone and press the Home button without using a finger set up in Touch ID. On the Lock screen, tap Emergency, then tap Medical ID.
Register as an organ donor in Health on iPhone
(U.S. only) In the Health app  , register to be an organ, eye, or tissue donor with Donate Life America. Your decision to donate is accessible to others in your Medical ID. (If you later change your decision, you can remove your registration.)
Learn about organ donation. Tap Medical ID, scroll down to Organ Donation, then tap Learn More for an overview of organ donation and Donate Life America.
Register with Donate Life America. Tap Medical ID, scroll down to Organ Donation, then tap Sign Up with Donate Life.
View or change your organ donor information. To view your information, tap Medical ID. To change your information, tap Edit, tap Edit Organ Donation, make your changes, then tap Update.
To add optional donation preferences, tap Medical ID, tap Edit, tap Edit Organ Donation, scroll to the bottom of the page, then tap Edit Donation Preferences. This takes you to your Donate Life America profile page, where you can opt in to research and education, and specify restrictions on certain organs.
Remove your registration. Tap Medical ID,Draftt p Edit, tap Edit Organ Donation, then tap Remove Me.
Get health records in Health on iPhone
The Health app  offers access to information from supported medical institutions about your allergies, conditions, immunizations, medications, lab results, procedures, vitals, and more.
When iPhone is locked with a passcode, Touch ID, or Face ID, all of the health data in the Health app—other than what you add to your Medical ID—is encrypted.
Get health records automatically. (U.S. only; beta)
Set up automatic downloads: Tap Health Data, tap Health Records, tap Get Started, then in the search field enter the name of an institution, such as a clinic or hospital you visited. To open a result, tap it. Next, enter the user name and password you use for the patient web portal of that healthcare institution, then follow the onscreen instructions.
Note: Your institution might not appear in this beta feature. Institutions are added frequently. See the Institutions that support health records on iPhone (beta) website.
Get health records from another institution: Tap Health Data, tap Health Records, then tap Add Account (near the bottom of the screen). When signing in to a new account, enter the user name and password you use for the patient web portal of that healthcare institution, then follow the onscreen instructions.
View your health records: Tap Health Data, then tap Health Records. To see all records for a category, such as Allergies or Conditions, tap the category. To see the records from a single institution, scroll down, then tap the name of the institution. To see more details, tap any section where you see  .
.

Draft
B/:#"1;c$-$&("#;G;50#;"(&:$##;(I:&G"*&-$0<#-&*$5"*2:%%Z-%"-%G*""0+2$% %m
%m
C-"050(&"0-+$%m%o*&'"1V%"1*+%(1--$*%-="0-+$F%G**%@0*/%&+;%)*$=-+;%"-%+-"050(&"0-+$%-+
0E1-+*F
L$<$#$&0(&;(:#;#/#;"(&0(2&;#:&*$5"*2:&G*"1&;9-"($%%>&=%o*&'"1%8&"&V%"&=%o*&'"1 Y*(-);$V%"&=%"1*%&((-4+"V%"&=%"1*%&((-4+"%&2&0+%&"%"1*%"-=%-5%"1*%+*P"%$()**+V%"1*+ "&=%Y*7-D*%:((-4+"F
B&:%#4+'+8"'<48+#")%#A*+!5%A-4%)*(*0D*%&%1*&'"1%)*(-);%50'*%"1)-421%&%7*$$&2*%0+%H&0'%-)
H*$$&2*$V%&%/*B$0"*%0+%G&5&)0V%-)%:0)8)-=V%"&=% V%"&=%:;;%"-%o*&'"1V%"1*+%"&=%G&D*F
[;$)&0(&;18"*#$2&-$0<#-&*$5"*2%%>&=%o*&'"1%8&"&V%"&=%o*&'"1%Y*(-);$V%$()-''%"-%"1* B-""-7%-5%"1*%$()**+V%"&=%O'0+0(&'%8-(47*+"$V%"&=%G1-/%:''%Y*(-);$V%"1*+%"&=%"1* )*(-);%A-4%/&+"%"-%D0*/F
4-0*$&0(&;18"*#$2&-$0<#-&*$5"*2%%J10'*%D0*/0+2%"1*%)*(-);V%"&=% V%"1*+%(1--$*%& $1&)0+2%-="0-+F
L$<$#$&0(&;18"*#$2&-$0<#-&*$5"*2%&J10'*%D0*/0+2%"1*%)*(-);V%$/0=*%0"%'*5"V%"1*+%"&= 8*'*"*F
Back up your Health data on iPhoneDraft
If you use iCloud (see Sign in with your Apple ID), your health and fitness information in the Health app  is stored automatically in iCloud. Your information gets encrypted as it goes between iCloud and your device and while itʼs stored in iCloud. In addition to using iCloud, or if you arenʼt using iCloud, you can back up your Health data by encrypting an iTunes backup. See Back up iPhone using iCloud.
Stop storing your Health data in iCloud. Go to Settings  > [your name] > iCloud, then turn off Health.
Home
Draft
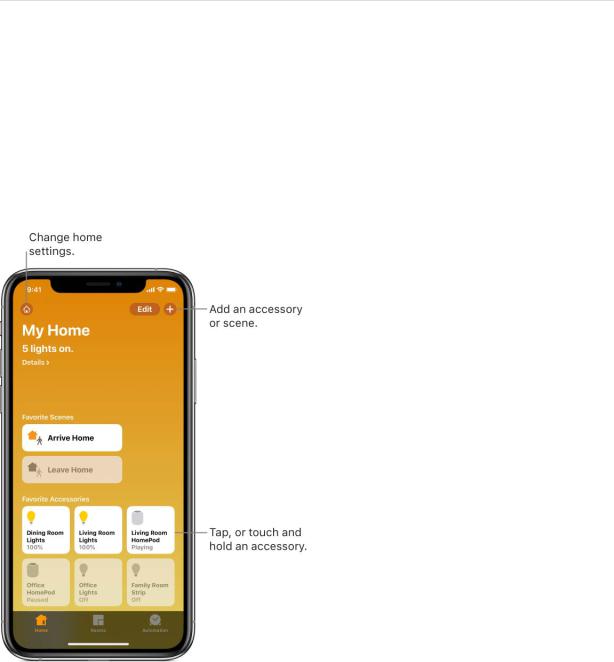
A look at Home on iPhone
The Home app  provides a secure way to control and automate HomeKit-enabled accessories, such as lights, locks, thermostats, window shades, smart plugs, and cameras. With Home, you can control any “Works with Apple HomeKit” accessory using iPhone.
After you set up your home and its rooms, you can control accessories individually, or use scenes to control multiple accessories with one command. For example, you might create a scene called “going to bed” that turns off the lights around the house, dims the lights in the room “master bedroom” to 30 percent, then locks the front door and lowers the thermostat.
You can schedule scenes to run automatically at certain times, or when you activate a particular accessory (for example, when you unlock the front door). This also allows you, and others you invite, to securely control your home while youʼre away. To control your home remotely, you must have an Apple TV (4th generation or later), HomePod, or iPad (with iOS 10.3 or later) that you leave at home.

Control lights, locks, and more withDraftHome on iPhone
The first time you open the Home app  , the setup assistant helps you create a home, where you can add accessories and define rooms. If youʼve already created a home using another HomeKit-enabled app, youʼll skip this step.
Add an accessory to Home
Before you add an accessory such as a light or camera, be sure that itʼs connected to a power source, is turned on, and is using your Wi-Fi network.
d.Tap the Home tab, then tap  .
.
e.Tap Add Accessory, then follow the onscreen instructions.
When you add an accessory, itʼs assigned to a default room, or a room you choose.
You may need to scan or enter an 8-digit HomeKit setup code found on the accessory itself (or its box or documentation). You can assign the accessory to a room, and give it a name. You use this name when controlling the accessory with Siri.
Assign an accessory to a room
d.Tap Rooms, tap  , then choose the room the accessory is currently assigned to. If itʼs not already assigned, look in Default Room.
e.Touch and hold the accessoryʼs button in the Home tab until the controls appear, then tap Settings.
f.Tap Room, then choose a room.
Control an accessory
Tap the Home tab, then tap the button for the accessory—a light, for example—to quickly turn the accessory on or off, or touch and hold the button until controls appear.
The available controls depend on the type of accessory it is. For example, with some lightbulbs, there are controls for changing colors. You can also control accessories using Control Center.
Organize rooms into zones
Group rooms together into a zone to easily control different areas of your home with Siri. For example, if you have a two-story home, you can assign the rooms on the first floor to a downstairs zone. Then you can say something to Siri like “Turn off the lights downstairs.”

d. Tap Rooms, then tap . |
Draft |
e.Tap Room Settings, then tap a room.
f.Tap Zone, then tap an existing zone, or tap Create New to add the room to a new zone.
Edit a room
You can change a roomʼs name and wallpaper, add the room to a zone, or remove the room. When you remove the room, the accessories assigned to it move to Default Room.
d.Tap Rooms, then tap  .
.
e.Tap Room Settings, then tap a room.
Edit accessories
To edit accessory settings, do any of the following:
Rename or edit an accessory: Touch and hold the accessoryʼs button in the Home tab until its controls appear, then tap Settings.
Make an accessory a favorite: Touch and hold an accessoryʼs button in the Home tab until its controls appear, tap Settings, then turn on “Include in Favorites.” You can access your favorite accessories from the Home tab.
To rearrange your favorites, tap the Home tab, tap Edit, then drag the buttons into the arrangement you want.
Change an accessoryʼs icon: Touch and hold an accessoryʼs button in the Home tab until its controls appear, then tap Settings. Tap the icon next to the accessoryʼs name, then select a new icon. If you donʼt get a choice of other icons, it means the icon canʼt be changed for this accessory.
Add more homes
If you have more than one physical space—a home and a small office, for example—you may want to create a home for each in the Home app.
d.Tap the Home tab, tap  , then tap Home Settings.
e.Tap Add Home, name the home, then tap Save.
f.To switch to another home, tap the Home tab, tap  , then tap the home you want.

Configure HomePod with HomeDrafton iPhone
You use the Home app  to add and edit alarms on HomePod and control many of its settings.
Use Home to add and edit HomePod alarms
Tap the Home tab, press the HomePod button (touch and hold it on models without 3D Touch), then tap Alarms and do any of the following:
Add an alarm: Tap  , then create the alarm.
Edit an alarm: Tap Edit, tap the alarm time, change the time, then tap Save.
Turn alarms on or off: Tap the switch next to an alarm.
Change HomePod settings
d.Tap the Home tab, then press the HomePod button (touch and hold it on models without 3D Touch).
e.Tap Settings, then configure the HomePod settings.
You can assign HomePod to a different room, create a stereo pair with two HomePod speakers in the same room, rename HomePod, or turn on accessibility features.
Create and use scenes in Home on iPhone
In the Home app  , you can create scenes that allow you to control multiple accessories at once. For example, you might define a “Reading” scene that adjusts the lights, closes the drapes, and adjusts the thermostat.

Create a scene |
Draft |
d.Tap the Home tab, tap  , then tap Add Scene.
e.Tap Custom, enter a name for the scene (such as “Dinner Party” or “Watching TV”), then tap Add Accessories.
f.Select the accessories you want this scene to include, then tap Done.
The first accessory you select determines the room the scene is assigned to. If you select your bedroom lamp, for example, the scene is assigned to your bedroom.
g.Set each accessory to the state you want it in when you run the scene.
For example, for the Reading scene, you could set the bedroom lights to 100 percent and the thermostat to 68 degrees.
Use scenes
Tap the Rooms tab, tap  , choose the room the scene is assigned to, then do one of the following:
Run a scene: Tap the scene.
Change a scene: Touch and hold a scene, then tap Settings.
You can change the sceneʼs name, test the scene, add or remove accessories, and include the scene in Favorites.
Favorite scenes appear in the Home tab.
Control your home using Siri on iPhone
In addition to using the Home app  , you can also use Siri to control your accessories and scenes. Here are some of the things you can say to Siri, depending on your accessories, and what you named them:
“Turn off the lights” or “Turn on the lights”
“Dim the lights” or “Set brightness to 55 percent”
“Is the hallway light on?”
“Set the temperature to 68 degrees”
“Did I lock the front door?”
“Close the garage door”

“Show me the entryway camera” |
Draft |
“What is the air quality indoors?”
If you set up rooms, scenes, or more than one home, you can say things like:
“Iʼm home” or “Iʼm leaving”
“Turn down the kitchen lights”
“Turn on the fan in the office”
“Set my reading scene”
“Turn off the lights in the Chicago house”
Control your home remotely with iPhone
In the Home app  , you can control your accessories even when youʼre away from home. To do so, you need a home hub, a device such as Apple TV (4th generation or later), a HomePod, or an iPad (with iOS 10.3 or later) that you leave at home. You must be signed in to iCloud using the same Apple ID on your home hub device and your iPhone.
d.Go to Settings  , tap [your name], then tap iCloud.
e.Turn on Home.
Automate a scene with Home on iPhone
In the Home app  , you can automate scenes based on the time of day, your location, the activation of a sensor, or the action of an accessory.
d.Tap the Automation tab.
e.Tap Create New Automation, then choose one of the following automation triggers:
When arriving or leaving a location: Tap People Arrive or People Leave, tap Location, then choose a location. Tap Time to specify when the automation works —during the day, at night, or at times that you set.
At a time of day: Tap A Time of Day Occurs, then choose when you want this automation to run.

If you choose Sunset or Sunrise, theDrafttime will vary as the season changes.
You can also set an automation to only occur after sunset, which is useful for turning on lights just when theyʼre needed.
When an accessory changes: Tap An Accessory is Controlled, select an accessory, then tap Next and follow the onscreen instructions.
You might use this, for example, to run a scene when you unlock the front door.
A sensor detects something: Tap A Sensor Detects Something, select an accessory, then tap Next and follow the onscreen instructions.
You might use this, for example, to turn on lights in a stairway when motion is detected nearby.
To disable an automation, tap the Automation tab, tap the automation, then turn off Enable This Automation.
If you have an Apple TV and youʼre signed in using the same Apple ID as your iPhone, it will be paired automatically and enabled for automation. To set up iPad for automation, see the Home chapter of iPad User Guide.
Allow others to control accessories in your home
In the Home app  , you can invite other people to control your smart accessories. To invite others to control your accessories, you and the people you invite need to be signed in to iCloud and have iOS 11.2.5 or later. You also need to be at your home or have a home hub set up in your home.
d.Tap the Home tab, then tap  .
.
e.Tap Invite.
If you have more than one home in the Home app, tap Home Settings, then tap a home.
f.Tap  to choose people from your contacts list, or enter their email addresses in the To field.
Your recipient gets a notification in the Home app on their iOS device. To let others control speakers and TV, tap Allow Speaker & TV Access.
 Loading...