


User Guide
English ( 3 – 12 )
Guía del usuario
Español ( 13 – 22 )
Guide d’utilisation
Français ( 23 – 33 )
Guida per l’uso
Italiano ( 34 – 43 )
Benutzerhandbuch
Deutsch ( 44 – 54 )
Appendix
English ( 55 )

2

User Guide (English)
Introduction
Box Contents
Concert Digital Piano |
Music Rest |
Sustain Pedal |
User Guide |
Power Adapter |
Safety & Warranty Manual |
|
|
Support |
|
For the latest information about this product (system requirements, compatibility information, etc.) and product registration, visit alesis.com.
For additional product support, visit alesis.com/support.
Setup
Music Rest
Step 1 |
Step 2 |
Detail |
Connection Diagram
Items not listed in Introduction > Box Contents are sold separately.
Sustain
Pedal
Power
Computer
Headphones
Speakers
3

Features
Top Panel
1.Power: This switch turns the piano’s power on or off. In order to save energy, the piano will automatically shut down after 30 minutes if it is not used.
2.Master Volume: This knob adjusts the master volume for the Line Output and Headphone Output. Note: The internal speakers will be muted if there are headphones plugged into the Headphone Output. If the internal speakers do not produce any sound, make sure the Master Volume knob is not set too low and that headphones are not plugged into the Headphone Output.
3.Split: Press this button to enter or exit Split Mode. Press the Split button and the Layer button at the same time to start Demo playback.
4.Layer: Press this button to enter or exit Layer Mode. Press the Layer button and the Split button at the same time to start Demo playback. Press and hold the Layer button and the Lesson button at the same time for 5 seconds to reset the Concert to its factory default settings.
5.Metronome: Press this button to turn the metronome on or off. Press the Metronome button and the Lesson button at the same time to enter Advanced Function Mode.
6.Lesson: Press this button to turn the Lesson Mode on or off. Press the Lesson button and the Metronome button at the same time to enter Advanced Function Mode. Press and hold the Lesson button and the Layer button at the same time for 5 seconds to reset the Concert to its factory default settings.
7.Voice Select: Press one of these buttons to select a preset voice. See Voices to learn more.
8.Reverb/Chorus: Press this button to turn the reverb and/or chorus effects on or off. See Advanced Functions > Effects to learn more.
Rear Panel
1.USB Port: Allows for transfer of MIDI data to a computer.
2.Sustain Pedal Input: Connect the included sustain pedal here.
3.Line Output: Connect external audio 
 equipment such as an amplifier, mixer, or
recorder. Use the R and L outputs for stereo output or just the L output for mono output.
4.Headphone Output: Connect stereo headphones with a 1/4” (6.35mm) stereo connector. When headphones are connected, the internal speakers will automatically turn off and sound will only be heard from the headphones.
5.Power Connector: Connect the included power adapter here.
Bottom Panel
1.Battery Compartment: Install 6 “D” batteries here to power the Concert digital keyboard if you are not using the power adapter.
1
4

Quick Start
Playing Demo Songs
The Concert Digital Piano features 2 demo songs.
To play the demo songs:
1.Press and release the Split and Layer buttons at the same time. The Concert Digital Piano will enter Demo Mode and play the demo songs in a continuous loop. The two button LEDs will flash during demo playback.
2.To exit Demo Mode, press and release the Split and Layer buttons again.
Playing Voice Demos
Each Voice on the panel is preset with a voice demo. Hold the Split and Layer buttons together, then press one of the Voice buttons to play a voice demo.
Voices
The Concert digital piano features 10 voices. Each of the 5 Voice buttons has an Original voice and a Variation voice to choose from:
Button No. |
Original / Variation Voice Name |
|
|
1 |
Piano / Bright Piano |
|
|
2 |
Electric Piano / Harpsichord |
|
|
3 |
Drawbar Organ / Church Organ |
|
|
4 |
Synth / Strings |
|
|
5 |
Bass / Clavi |
|
|
To choose one of the Original voices, press the corresponding Voice button. The button LED will be lit green. When you play the piano keys, the Original voice will sound.
To choose one of the Variation voices, press the corresponding Voice button twice (or once if this button’s Original Voice is currently selected). The button LED will be lit red. When you play the piano keys, the Variation voice will sound.
5
Layer Mode
Layer Mode allows for two different voices to be layered together for a fuller and richer sound.
To enable Layer Mode:
1.Press the Layer button to enter Layer Mode. The Layer button LED will be lit green.
2.Select the first voice by pressing one of the Voice buttons to choose between its Original or Variation voice.
3.Press the Layer button again. The Layer button LED will be lit red.
4.Select the second voice by pressing one of the Voice buttons to choose between its Original or Variation voice.
5.Press the Layer button again. The Layer button LED will be lit amber.
6.Play the keys to hear the two different voices layered together.
To disable Layer Mode, press the Layer button again.
Note: When you are selecting which voices will be layered, the first voice you select will be set as the Upper voice, and the second voice you select will be set as the Lower voice. See Advanced Functions > Voice Volume to learn how to adjust the levels of the Upper and Lower voices.
Split Mode
Split Mode allows you to split the 88 keys into two zones so that you can have two different voices for each of your hands. For example, you may want the Piano voice for your right hand, and the Bass voice for your left hand. When Split Mode is enabled, the left hand voice is referred to as the Split voice.
To enable Split Mode:
1.Select the voice you would like to be in the right-hand zone.
2.Press and hold the Split button, then press one of the Voice buttons to select the Split voice for the left-hand zone and then release the Split button to enter Split Mode. The Split button LED will be lit when Split Mode is enabled.
3.Play the keys and you will hear that the right-hand and left-hand zones will have different voices.
To disable Split Mode, press the Split button again. The Split button LED will turn off when Split Mode is disabled.
To set the key for where the split point between the right-hand voice and left-hand voice occurs, use the following procedure:
1.Press and hold the Split button, and then press the key where you would like the split to occur.
2.Release the Split button to confirm the new split point.
Note: When you are using Split Mode and Layer Mode at the same time, the right-hand zone of the split will play both layered voices, and the left-hand zone of the split will play the Split voice only.
Note: See the Advanced Functions section of this manual to learn how to adjust the level of the Split voice.
6

Advanced Functions
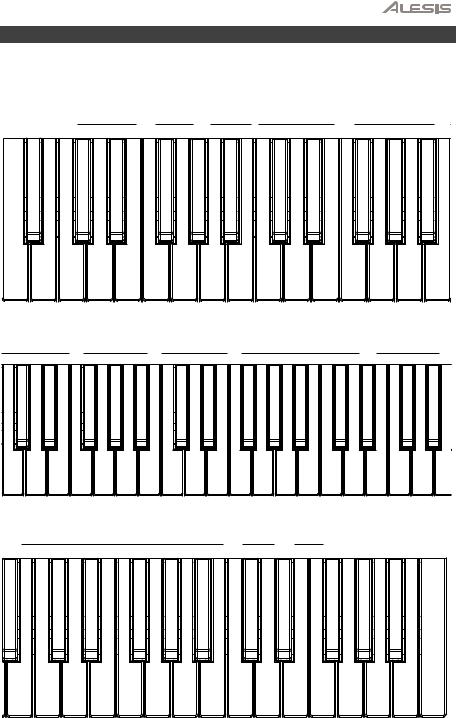
You can change more advanced settings by pressing and releasing the Metronome and Lesson buttons at the same time to enter Advanced Functions Mode. Use the keys that correspond to the graphics below to change your desired setting.
CLICK |
PEDAL |
|
TOUCH |
|
TRANSPOSE |
OCTAVE |
|
|
REVERB |
|
|
|
CHORUS |
|
|||||
|
RESONANCE |
OFF |
1 |
2 |
3 |
^ |
^ |
^ |
^ |
1 |
2 |
3 |
4 |
5 |
1 |
2 |
3 |
4 |
5 |
|
|
|
|||||||||||||||||
A-1 |
|
|
B-1 |
|
C0 |
|
D0 |
|
E0 |
|
F0 |
G0 |
|
A0 |
|
B0 |
C1 |
|
D1 |
|
E1 |
|
F1 |
G1 |
|
A1 |
|
B1 |
|
SPLIT VOLUME |
|
|
|
LOWER VOLUME |
|
|
UPPER VOLUME |
|
|
|
|
METRONOME |
|
|
|
METRONOME VOLUME |
|||||||||||||
1 |
2 |
3 |
4 |
5 |
|
1 |
2 |
3 |
4 |
5 |
1 |
2 |
3 |
4 |
5 |
0 |
2 |
3 |
4 |
5 |
6 |
7 |
8 |
9 |
1 |
2 |
3 |
4 |
5 |
C2 |
|
D2 |
|
E2 |
F2 |
|
G2 |
|
A2 |
|
B2 |
C3 |
D3 |
|
E3 |
F3 |
G3 |
|
A3 |
|
B3 |
C4 |
|
D4 |
E4 |
F4 |
|
G4 |
A4 |
|
|
|
|
|
|
TEMPO |
|
|
|
|
|
|
MIDI CH |
AUTO POWER OFF |
|
|
|
|
||
TAP |
^ |
^ |
0 |
1 |
2 |
3 |
4 |
5 |
6 |
7 |
8 |
9 |
^ |
^ |
ON |
OFF |
|
|
|
|
B4 |
C5 |
|
D5 |
|
E5 |
F5 |
|
G5 |
|
A5 |
|
B5 |
C6 |
D6 |
E6 |
F6 |
G6 |
A6 |
B6 |
C7 |
|
|
|
|
|
|
|
|
|
|
|
|
|
|
|
|
|
|
|
|
7 |

Voice Volume
You can set the volume of each voice in Layer and Split Mode by using Advanced Function Mode.
1.Press the Metronome and Lesson buttons at the same time to enter Advanced Function Mode. The two button LEDs will be lit.
2.Use the keys marked Upper Volume 1–5 to change the volume of the upper voice in Layer Mode. 1 is the lowest volume, and 5 is the highest volume.
3.Press both the Metronome and Lesson buttons again to exit Advanced Function Mode.
You can follow the above steps to set the volumes for the lower voice in the Layer Mode and the split voice in the Split Mode, using the Lower Volume 1–5 and Split Volume 1–5 keys respectively.
Setting the MIDI Channel
You can also set the MIDI channel for the USB-MIDI output by using Advanced Function Mode.
1.Press the Metronome and Lesson buttons at the same time to enter Advanced Function Mode. The two button LEDs will be lit.
2.Use the keys marked MIDI Ch + or MIDI Ch - to set the MIDI Out channel from Channels 1–16. Press both keys at the same time to restore the default channel setting to 1.
Note: Concert uses only one MIDI channel at a time, even if you are using Split Mode or Layer Mode.
3.Press both the Metronome and Lesson buttons again to exit Advanced Function Mode.
Setting the Click Tone
When the click tone is on, you will hear a click sound whenever you change a setting or parameter. You can turn the click tone on or off in Advanced Function Mode.
To turn the click tone on or off:
1.Press the Metronome and Lesson buttons at the same time to enter Advanced Function Mode. The two button LEDs will be lit.
2.Press the key marked Click to turn the tone on or off.
3.Press both the Metronome and Lesson buttons again to exit Advanced Function Mode.
Touch Sensitivity
The Concert Digital Piano is equipped with touch response for controlling volume level with your playing strength—just like an acoustic piano. That means the harder you play the keys, the more volume you’ll hear from the speakers. Turning this function off results in a fixed volume level, no matter how hard or soft you play the keys. There are 3 types of touch settings (Off, 1–3).
To set the touch sensitivity:
1.Press the Metronome and Lesson buttons at the same time to enter Advanced Function Mode. The two button LEDs will be lit.
2.Use the Touch keys to select an appropriate touch level.
Parameters |
Description |
|
|
OFF |
Fixed |
|
|
1 |
Soft |
|
|
2 |
Medium |
|
|
3 |
Hard |
|
|
3.Press both the Metronome and Lesson buttons to exit Advanced Function Mode.
8

Transpose
This function allows the overall pitch of the piano to be transposed up or down by a maximum of one octave in semitone increments.
To change the transposition:
1.Press the Metronome and Lesson buttons at the same time to enter Advanced Function Mode. The two button LEDs will be lit.
2.Use the keys marked Transpose + or Transpose – to set the transpose value. Press both keys together to reset the transposition back to the default value of 0.
3.Press both the Metronome and Lesson buttons again to exit Advanced Function Mode.
Metronome
The metronome feature provides a steady beat to aid in practicing at a consistent tempo. To turn the metronone on or off, press the Metronome button. When the metronome is in use, the Metronome button LED will flash along with the current tempo. The tempo of the metronome can be freely adjusted from 30 to 280 beats per minute.
To set the metronome tempo:
1.Press the METRONOME and LESSON buttons at the same time to enter the Advanced Function mode. The two button LEDs will be lit.
2.Use the keys marked TEMPO + or TEMPO – to adjust the tempo value. If you press both keys at the same time, the metronome will be restored to the default tempo of 120.
3.You can also use the keys marked TEMPO 0-9 to set the tempo value. You will need to press 3 keys total to enter the tempo value using these keys. For example, press 1, 2, 0 in sequence to enter a tempo value of 120, or press 0, 6, 4 in sequence to set a tempo value of 64.
Alternatively, you may tap the key marked TAP to get the desired tempo. The piano will start the Metronome sound at the speed of the last two presses.
4.Press both the Metronome and Lesson buttons again to exit Advanced Function Mode.
To set the metronome time signature:
1.Press the Metronome and Lesson buttons at the same time to enter Advanced Function Mode. The two button LEDs will be lit.
2.Use the keys marked Metronome 0–9 to set the time signature.
3.Press both the Metronome and Lesson buttons again to exit Advanced Function Mode.
To set the metronome volume level:
1.Press the Metronome and Lesson buttons at the same time to enter Advanced Function Mode. The two button LEDs will be lit.
2.Use the keys marked Metronome Volume 1–5 to set the metronome volume. 1 is the lowest volume, and 5 is the highest volume.
3.Press both the Metronome and Lesson buttons again to exit Advanced Function Mode.
9

Effects
With the Concert, you can add adjustable Reverb and/or Chorus effects to your sound.
To enable the effects:
1.Press the Reverb/Chorus button once to turn on the reverb effect. The button LED will be lit green when only the Reverb effect is enabled.
2.Press the Reverb/Chorus button again to turn off the reverb effect and turn on the chorus effect. The button LED will be lit red when only the Chorus effect is enabled.
3.Press the Reverb/Chorus button again to turn on both the reverb and chorus effects. The button LED will be lit amber when both effects are enabled.
4.Press the button again to turn off all effects. The LED will be off when no effects are enabled.
To adjust the reverb type:
1.Press the Metronome and Lesson buttons at the same time to enter Advanced Function Mode. The two button LEDs will be lit.
2.Use the keys marked Reverb 1–5 to select the desired reverb type.
Parameters |
Reverb Type |
1 |
Room |
2 |
Hall |
3 |
Church |
4 |
Delay |
5 |
Pan Delay |
3. Press both the Metronome and Lesson buttons again to exit Advanced Function Mode.
To adjust the chorus type:
1.Press the Metronome and Lesson buttons at the same time to enter Advanced Function Mode. The two button LEDs will be lit.
2.Use the keys marked Chorus 1–5 to select the desired chorus type.
Parameters |
Chorus Type |
1 |
Chorus 1 |
2 |
Chorus 2 |
3 |
Chorus 3 |
4 |
Flanger |
5 |
Rotary |
3.Press both the Metronome and Lesson buttons again to exit Advanced Function Mode.
10
Pedal Resonance
Pedal resonance is a function that simulates the reverberation of notes when pressing the sustain pedal on an acoustic piano. When you use the included sustain pedal with Pedal Resonance enabled, the Concert reproduces the rich harmonics and unique sound characteristics of an acoustic piano.
To turn Pedal Resonance on or off:
1.Press the Metronome and Lesson buttons at the same time to enter Advanced Function Mode. The two button LEDs will be lit.
2.Press the key marked Pedal Resonance to turn the function on or off.
3.Press both the Metronome and Lesson buttons again to exit Advanced Function Mode.
Note: When the Pedal Resonance is activated, the chorus effect will be automatically disabled.
Note: If you switch the Pedal Resonance on/off while performing, there may be a slight pause in the Concert’s signal output.
Lesson Mode
For instructional purposes, the Lesson Mode feature divides the 88 keys into two zones with the same pitch-range and voice. This enables both student and teacher to easily watch each other and play together without having to move away from the piano, take turns, or reach over each other.
To enable or disable Lesson Mode, press the Lesson button.
To select a voice for both zones in Lesson Mode, press one of the Voice buttons.
To change the split point in Lesson Mode, press and hold the Split button, press a key between C3 and C6, and then release the Split button. The default split point is E3.
To change the octave of the two zones in Lesson Mode:
1.While in Lesson Mode, press the Metronome and Lesson buttons at the same time to enter Advanced Function Mode. The two button LEDs will be lit.
2.Use the keys marked Octave + or Octave - to adjust the octave value. Press both keys at the same time to restore the default octave value to 0.
3.Press both the Metronome and Lesson buttons again to exit Advanced Function Mode.
Note: In Lesson Mode, Layer and Split Modes are automatically disabled.
Auto Power Off
In order to save energy, the Concert Digital Piano will automatically shut down after 30 minutes if it is not used.
To enable or disable the Auto Power Off function:
1.Press the Metronome and Lesson buttons at the same time to enter Advanced Function Mode. The button LEDs will be lit.
2.Use the keys marked Auto Power Off to enable or disable the Auto Power Off function.
3.Press both the Metronome and Lesson buttons again to exit Advanced Function Mode.
11

Restore Factory Default Settings
To restore your Recital to the factory default settings, press and hold the Layer and Lesson buttons for 5 seconds. The following parameters will be reset to their default values: Reverb, Chorus, Metronome Tempo, Metronome Time Signature, Metronome Volume, Upper Volume, Lower Volume, Split Volume, Split Point, MIDI Channel, Touch Sensitivity, and Auto Power Off.
Troubleshooting
Problem |
Possible Cause and Solution |
|
The speakers produce a |
|
|
pop sound whenever the |
This is normal and is no cause for alarm. |
|
power is turned on/off. |
|
|
|
|
|
|
Check if the master volume is set too low or if headphones are plugged into |
|
The speakers do not |
the Headphone Output. The speakers will be muted if there are |
|
headphones plugged into the Headphone Output. |
||
produce sound when the |
||
|
||
keys are played. |
If the issue is still occurring, press and hold the Layer and Lesson buttons |
|
|
||
|
for 5 seconds to factory reset the voice volume settings of the unit. |
|
|
|
|
The speakers are |
Using a mobile phone in close proximity to the Concert Digital Piano may |
|
producing noise or |
produce interference. To prevent this, turn off the mobile phone or keep it |
|
interference. |
away from the piano. |
|
|
|
|
Certain notes produce |
Make sure that the transpose value is set to 0. If that does not work, then |
|
press and hold the Layer and Lesson buttons for 5 seconds to restore the |
||
the wrong pitch. |
||
factory default settings. |
||
|
||
|
|
|
The notes sound weak or |
If the keyboard is being powered with batteries, make sure new batteries |
|
distorted. |
are installed. |
|
|
|
12

Guía del usuario (Español)
Introducción
Contenido de la caja
Piano Digital Concert |
Atril |
Sostenido Pedal |
Guía del usuario |
Adaptador de corriente |
Manual sobre la seguridad y garantía |
|
|
Soporte |
|
Para obtener la información más reciente acerca de este producto (requisitos de sistema, información de compatibilidad, etc.) y registrarlo, visite alesis.com.
Para obtener soporte adicional del producto, visite alesis.com/support.
Instalación
Atril
Paso 1 |
Paso 2 |
Detalle |
Diagrama de conexión
Los elementos que no se enumeran en Introducción > Contenido de la caja se venden por separado.
Sostenido
Pedal
Suministro
eléctrico
Ordenador
Auriculares
Altavoces
13

Características
Panel superior
1.Interruptor de encendido: Enciende y apaga el teclado. Para ahorrar energía, el piano se apagará automáticamente tras 30 minutos de inactividad.
2.Perilla de volumen maestro: Ajusta el volumen maestro de la Salida de línea y la Salida para auriculares.
Nota: Si los altavoces internos no emiten ningún sonido, compruebe si la perilla volumen maestro no tiene un ajuste demasiado bajo o si los auriculares están conectados a la Salida para auriculares. Los altavoces se silenciarán si se conectan auriculares a la Salida para auriculares.
3.Botón de división: Pulse este botón para entrar o salir del modo de división.
4.Layer: Pulse este botón para entrar y salir del modo de capas. Pulse el botón Layer y el botón Split al mismo tiempo para comenzar la reproducción de la demo. Mantenga pulsado el botón Layer y el botón Lesson al mismo tiempo durante 5 segundos para resetear el Concert a sus valores predeterminados de fábrica.
5.Botón de metrónomo: Pulse este botón para encender o apagar el metrónomo. Pulse el botón Metronome y el botón Lesson a la vez para entrar al modo de funciones avanzadas.
6.Botón de lección: Pulse este botón para activar o desactivar el modo de lección. Pulse el botón Lesson y el botón Metronome a la vez para entrar al modo de funciones avanzadas.
7.Botones de selección de voz: Pulse uno de estos botones para seleccionar una voz predefinida. Consulte Voces para aprender más.
8.Reverb/Chorus: Pulse este botón para encender o apagar los efectos de reverberación y coro. Consulte Funciones avanzadas > Efectos para aprender más.
Panel trasero
1.Puerto USB: Permite la transferencia de
datos MIDI al ordenador.
2.Entrada para pedal de sostenido:
Conecte aquí el pedal de sostenido incluido.
3.Salida de línea: Conecte aquí un equipo de audio externo, como por ejemplo un amplificador, un mezclador o una grabadora. Use las salidas R y L para obtener una salida estéreo o la salida L solamente para obtener una salida monoaural.
4.Salida para auriculares: Conecte auriculares estéreo con conector estéreo de 6,35 mm (1/4 pulg.). Cuando los auriculares se encuentran conectados, los altavoces internos se apagarán automáticamente y el sonido solo podrá escucharse desde los auriculares.
5.Conector de corriente: Conecte aquí el adaptador de corriente incluido.
Panel inferior
1.Compartimiento para pilas: Instale 6 baterías "D" aquí para alimentar el teclado digital Concert si no está utilizando el adaptador de corriente.
1
14

Inicio rápido
Cómo reproducir canciones demo
El piano digital Concert cuenta con dos canciones demo.
Cómo reproducir las canciones demo:
1.Pulse el botón Reverb y el botón Chorus al mismo tiempo. El piano digital Concert entrará al modo demo y reproducirá las canciones demo en un bucle continuo. Los LED de los dos botones parpadearán durante la reproducción de la demo.
2.Para salir del modo demo, pulse y suelte los botones Reverb y Chorus a la vez de nuevo.
Reproducción de demos de voz
Cada botón Voice en el panel viene con una demo de voz predefinida. Mantenga pulsados los botones Reverb y Chorus a la vez y luego pulse uno de los botones Voice para reproducir una demo de voz.
Voces
El piano digital Concert cuenta con 10 voces. Cada uno de los 5 botones Voice permite seleccionar una voz original y una variación de esa voz:
Nro. De
Nombre de la voz original/variación
botón
1Piano / Piano brillante
2Piano Eléctrico / Clavecín
3
Órgano con barra de armónicos / Órgano de iglesia
4Sintetizador / Cuerdas
5Bajo / Clavicordio
Para elegir una de las voces originales, pulse el botón Voice correspondiente. El LED del botón se iluminará de verde. Al tocar las teclas del piano, sonará la voz original.
Para elegir una de las variaciones de las voces, pulse el botón Voice correspondiente dos veces (una vez si la voz original de este botón está actualmente seleccionada). El LED del botón se iluminará de rojo. Al tocar las teclas del piano, sonará la variación de la voz.
15
Modo de capas
El modo de capas permite tocar dos voces diferentes en capas para lograr un sonido más completo y rico.
Para activar el modo de capas:
1.Pulse el botón Layer para activar el modo de capas. El LED del botón Layer se iluminará de verde.
2.Seleccione la primera voz pulsando uno de los botones Voice para elegir entre su voz original o la variación.
3.Presione el botón Layer otra vez. El LED del botón Layer se iluminará de rojo.
4.Seleccione la segunda voz pulsando uno de los botones Voice para elegir entre su voz original o la variación.
5.Presione el botón Layer otra vez. El LED del botón Layer se iluminará de ámbar.
6.Toque las teclas para escuchar las dos capas de voces diferentes superpuestas.
Para activar el bucle, presione el botón Layer otra vez.
Nota: Cuando seleccione las voces que conformarán las capas, la primera voz seleccionada pasará a ser la voz superior y la segunda voz que seleccione pasará a ser la voz inferior. Consulte Funciones avanzadas > Volumen de la voz para aprender a ajustar los niveles de las voces superior e inferior.
Modo de división
El modo de división le permite dividir las 88 teclas en dos zonas para que pueda tener dos voces diferentes para cada una de sus manos. Por ejemplo, puede tener la voz de piano para su mano derecha y la voz de bajo para su mano izquierda. Cuando el modo de división se encuentra activado, la voz asignada a la mano izquierda se denomina la voz de división.
Para activar el modo de división:
1.Seleccione la voz que desea para la zona de la mano derecha.
2.Mantenga pulsado el botón Split, luego pulse uno de los botones Voice a fin de seleccionar la voz de división para la zona de la mano izquierda y luego suelte el botón Split para ingresar al modo de división. El LED del botón Split se encenderá cuando se active el modo de división.
3.Toque las teclas y escuchará voces diferentes para la zona derecha y la zona izquierda.
Para desactivar el modo de división, pulse nuevamente el botón Split. El LED del botón Split se apagará cuando se desactive el modo de división.
Para definir la tecla que divide la zona de la mano izquierda de la zona de la mano derecha, use el siguiente procedimiento:
1.Mantenga pulsado el botón Split y luego pulse la tecla que desea como punto de división del teclado.
2.Suelte el botón Split para confirmar el nuevo punto de división.
Nota: Cuando está utilizando el modo de división y el modo de capas al mismo tiempo, la zona de la mano derecha de la división tocará las voces de ambas capas y la zona de la mano izquierda de la división tocará la voz de división solamente.
Nota: Consulte la sección Funciones avanzadas de este manual para aprender a ajustar el nivel de la voz de división.
16
Funciones avanzadas
Puede modificar más ajustes avanzados pulsando y soltando los botones Metronome y Lesson al mismo tiempo para entrar al modo de funciones avanzadas y luego usar las teclas que corresponden a los gráficos a continuación para modificar el ajuste deseado.
CLICK |
PEDAL |
|
TOUCH |
|
TRANSPOSE |
OCTAVE |
|
|
REVERB |
|
|
|
CHORUS |
|
|||||
|
RESONANCE |
OFF |
1 |
2 |
3 |
^ |
^ |
^ |
^ |
1 |
2 |
3 |
4 |
5 |
1 |
2 |
3 |
4 |
5 |
|
|
|
|||||||||||||||||
A-1 |
|
|
B-1 |
|
C0 |
|
D0 |
|
E0 |
|
F0 |
G0 |
|
A0 |
|
B0 |
|
C1 |
|
D1 |
|
E1 |
|
F1 |
G1 |
|
A1 |
|
B1 |
|
SPLIT VOLUME |
|
|
|
LOWER VOLUME |
|
|
UPPER VOLUME |
|
|
|
|
|
METRONOME |
|
|
|
METRONOME VOLUME |
|||||||||||||
1 |
2 |
3 |
4 |
5 |
|
1 |
2 |
3 |
4 |
5 |
1 |
2 |
3 |
4 |
5 |
|
0 |
2 |
3 |
4 |
5 |
6 |
7 |
8 |
9 |
1 |
2 |
3 |
4 |
5 |
C2 |
|
D2 |
|
E2 |
F2 |
|
G2 |
|
A2 |
|
B2 |
C3 |
D3 |
|
E3 |
F3 |
|
G3 |
|
A3 |
|
B3 |
C4 |
|
D4 |
E4 |
|
F4 |
G4 |
A4 |
|
|
|
|
|
|
TEMPO |
|
|
|
|
|
|
MIDI CH |
AUTO POWER OFF |
|
|
|
|
||
TAP |
^ |
^ |
0 |
1 |
2 |
3 |
4 |
5 |
6 |
7 |
8 |
9 |
^ |
^ |
ON |
OFF |
|
|
|
|
B4 |
C5 |
|
D5 |
|
E5 |
F5 |
|
G5 |
|
A5 |
|
B5 |
C6 |
D6 |
E6 |
F6 |
G6 |
A6 |
B6 |
C7 |
|
|
|
|
|
|
|
|
|
|
|
|
|
|
|
|
|
|
|
|
17 |
 Loading...