


QUICKSTART GUIDE
ENGLISH ( 3 – 10 )
GUÍA DE INICIO RÁPIDO
ESPAÑOL ( 11 – 19 )
GUIDE D'UTILISATION RAPIDE
FRANÇAIS ( 20 – 28 )
GUIDA RAPIDA
ITALIANO ( 29 – 37 )
SCHNELLSTART-ANLEITUNG
DEUTSCH ( 38 – 46 )

QUICKSTART GUIDE (ENGLISH)
INTRODUCTION
Fusing Akai Professional’s legendary MPC layout and workflow with the power of your computer, MPC Renaissance is an unrivaled instrument for music production. MPC Renaissance allows you to create music using classic hardware controls and an integrated pop-up display, while its exclusive MPC Software empowers you with unprecedented, expandable production capabilities on your Mac or PC.
BOX CONTENTS
• |
MPC Renaissance |
* The power adapter is in a white box stored in one of |
|
• |
Power adapter * |
||
the foam end-pieces that holds MPC Renaissance in |
|||
• |
USB cable |
||
place in the box. |
|||
• |
Software/driver DVD |
||
|
|||
• |
Quickstart Guide |
|
• Safety Instructions & Warranty Information booklet
SETUP DIAGRAM
MICROPHONE
POWER
USB MIDI KEYBOARD
MONITORS
(for main mix)
2 TK |
MONITORS |
EXTERNAL MIXER |
(for ASSIGNABLE OUT mix)
3
COMPUTER
Any items shown here but not mentioned in the BOX CONTENTS are sold separately.

SYSTEM REQUIREMENTS
Before proceeding, make sure your computer meets the following system requirements:
Windows:
•2 GHz Pentium® 4 or Celeron®-compatible CPU or faster (multicore CPU recommended)
•2 GB RAM (4 GB recommended)
•Windows 7 (32or 64-bit)
•DVD-ROM drive
Mac:
•2 GB RAM (4 GB recommended, if supported by your computer)
•Mac OS X 10.6 or later
•DVD-ROM drive
IMPORTANT!
1. INSTALL THE SOFTWARE & DRIVERS
Before connecting MPC Renaissance to your computer, follow these steps:
IMPORTANT: We highly recommend temporarily disabling your computer's anti-virus software. Some antivirus programs can slow down or interfere with the installation of the drivers. Remember to enable it again after the installation is done.
Windows:
1.Insert the included software DVD into your computer's DVD drive.
2.When the software setup "wizard" appears, click Next.
If you don't see this screen, open Computer, right-click the DVD, select Explore, and double-click the
.exe file.
3.Follow the on-screen instructions to install the software and drivers. (You will be asked to connect MPC Renaissance to your computer during the installation.)
Mac:
1.Insert the included software DVD into your computer's DVD drive.
2.Double-click the DVD icon.
3.Double-click the .pkg file.
4.Follow the on-screen instructions to install the software and drivers. (You will be asked to connect MPC Renaissance to your computer during the installation.)
2. CONNECT
Follow this sequence of steps whenever you use MPC Renaissance with your computer:
1.Connect MPC Renaissance to a power source.
2.Connect MPC Renaissance's COMPUTER USB PORT to a free USB port on your computer, using a standard USB cable.
3.Power on MPC Renaissance.
Windows users: The first time your computer detects MPC Renaissance as a connected device, you'll see some Found New Hardware dialog boxes. This just means MPC Renaissance is being recognized by your computer for the first time and is installing the appropriate drivers. Wait until these dialog boxes have disappeared before continuing.
4.Open the MPC software.
See the GET STARTED section of this manual for some quick instructions on how to use your MPC Renaissance with the MPC software!
4

MPC SOFTWARE OVERVIEW
Menu |
Tabs |
|
Workspace
Browser
Parameter Controls
Time/Tempo 
 Transport
 Master Level
This is just a broad overview of the MPC software's features. Virtually all of the software elements can be accessed and controlled by MPC Renaissance. Please also refer to the in-depth Reference Manual (in the Help menu). The Reference Manual contains a quick tutorial on how to get started making a song so you can use MPC's features right away – and more detailed information for experienced users.
•Menu: The software's menus.
•Tabs: Click these tabs to view the different parts of the software (e.g., Program Edit, Program Mixer, Track Mixer, etc.).
•Browser: The software's file browser. From here, you can load files by clicking and dragging with your mouse or by using the MPC Renaissance's controls.
•Workspace: The main area where you build and edit the different parts of your Project. Depending on what tab is selected, the Workspace will show the Sequence Grid, the Track Grid, a Song, or a sample waveform.
•Parameter Controls: This area below the Workspace contains the parameter controls for the current tab. Depending on what tab is selected, this space can show the Q-Link knob parameters, the pads their banks and samples, pad layers and their tuning, mixer controls for the Program or Tracks, etc.
•Time/Tempo: The current time and tempo information.
•Transport: Controls related to playback and recording, identical to the MPC Renaissance's transport controls.
•Master Level: The software's master output level and volume meter. Note that this level is independent of (and comes before) the MPC Renaissance's MAIN VOLUME knob.
5

GET STARTED
1. CONNECT, OPEN & CONFIGURE
1.Connect MPC Renaissance to a power source and to a USB port on your computer, as shown in the CONNECTION DIAGRAM.
2.Power on MPC Renaissance and open MPC software.
3.In the software, go to Edit f Preferences, and click the Audio & MIDI tab.
4.Click the Device pop-up menu, and select MPC Renaissance ASIO driver. Click OK. Make sure your MPC Renaissance's DIRECT MON knob is set at the COMP position (to monitor your computer's output).
Test your sound setting: Increase the volume of your speakers (connected to MPC Renaissance's STEREO OUT jacks), and click Test, next to the Device pop-up menu. You will hear a tone, indicating your sound is properly configured.
2. ASSIGN SAMPLES TO THE PADS
1.On MPC Renaissance, press BROWSER.
2.User the CURSOR BUTTONS and DATA DIAL to navigate the file structure on your computer, and find the samples you want to use with the MPC software.
3.You can press F3 (Play) to preview the sample before loading it, or you can press F2 (Auto) to enable Auto Preview (selecting a sample will preview it immediately).
4.Whenever you find a sample you want to use, hit the pad you want to assign it to (it will light up green), and press F6 (Open). The sound will be assigned to the pad as well as added to that Program for future use.
5.Repeat this process for additional pads. Hit those pads to hear your samples in action!
3. RECORD & PERFORM
1.Press MAIN to return to the Main mode.
2.Press OVERDUB to record-arm the Sequence. The light above the PLAY button will flash.
3.Press PLAY to start recording. You will hear the metronome count 4 beats before the recording starts.
4.The Sequence will start playing in a loop:
•Perform using the pads! Each note will be recorded in the Sequence. Even if you aren't playing exactly in time with the beat, the software's Time Correct feature (T.C.) will automatically "quantize" the notes so they are lined up in the Grid.
•You can erase notes by holding the ERASE button and pressing (or holding down) a pad whose notes you want to erase. As the audio pointer moves through the Sequence, any note from that pad will be erased.
•Tip: If you are a beginning performer, we recommend playing one pad at a time. The Sequence will keep looping, so there's no rush to record all the pads at once!
5.To stop recording, press STOP. To play back the Sequence without recording, simply press PLAY.
4. IMPORTANT!
To save your Project, press SHIFT + SAVE. Select where you want to save your file and enter a file name. We recommend leaving the Also save samples box checked, so you won't have to reload your samples when you want to open that Project. Save often so you don't lose any of your great work!
We highly recommend going through the Quick Start Tutorial in the MPC Reference Manual: In the software, go to the Help menu and select MPC Help. The Reference Manual PDF will appear. It contains:
•An easy-to-follow yet in-depth tutorial: This walkthrough will get you started using MPC's features quickly and easily.
•More details about software features: If you're already familiar with MPCs or digital audio workstations (DAWs) in general, you can dig deeper with the more advanced features.
•Trusted MPC workflow—with software: MPC Renaissance and the MPC software work together seamlessly, retaining the original MPCs' legendary workflow. You'll learn how to use your MPC Renaissance to control the MPC software for the most efficient, streamlined experience—producing or performing!
6
FEATURES
MPC Renaissance is hardware specifically designed to control the MPC software. This section describes all the hardware controls. For a complete explanation of the software, please see the MPC Reference Manual in the software in the Help menu.
TOP PANEL
|
|
|
|
|
|
|
|
|
1 |
|
|
|
|
|
|
47 |
|
|
|
|
|
|
|
|
|
|
43 |
44 |
45 |
46 |
|
|
|
|
|
|
|
|
|
|
|
|
|||||
11 11 |
11 |
11 |
|
|
|
|
|
|
|
|
|
|
|
|
|
13 14 |
24 |
25 26 |
12 |
2 2 |
2 2 2 2 27 |
19 20 |
21 22 |
23 |
|||||||
|
|
|
|
|
|
|
|
|
|
|
28 29 30 31 32 |
||||
8 |
8 |
|
8 |
8 |
10 |
10 |
10 |
10 |
16 |
18 |
7 |
|
|
||
|
|
|
|
|
|
|
|
|
|
|
4 |
|
|||
|
|
|
|
|
|
|
|
|
|
|
|
|
|
|
|
8 |
8 |
|
8 |
8 |
10 |
10 |
10 |
10 |
|
|
|
|
|
||
|
|
|
|
|
17 |
6 |
5 |
5 |
|||||||
|
|
|
|
|
|
|
|
|
|
|
|||||
8 |
8 |
|
8 |
8 |
|
|
|
|
|
|
42 |
|
|
3 |
|
|
|
|
|
|
10 |
10 |
10 |
10 |
|
|
|
||||
|
|
|
|
|
|
|
|
|
|
||||||
8 |
8 |
|
8 |
8 |
|
|
|
|
|
|
38 38 40 39 39 |
||||
|
|
|
|
|
10 |
10 |
10 |
10 |
|
|
|
|
|
||
|
9 |
|
41 |
15 |
|
|
|
|
|
|
36 37 35 33 34 |
||||
|
|
|
|
|
|
|
|
|
|
|
|
|
|||
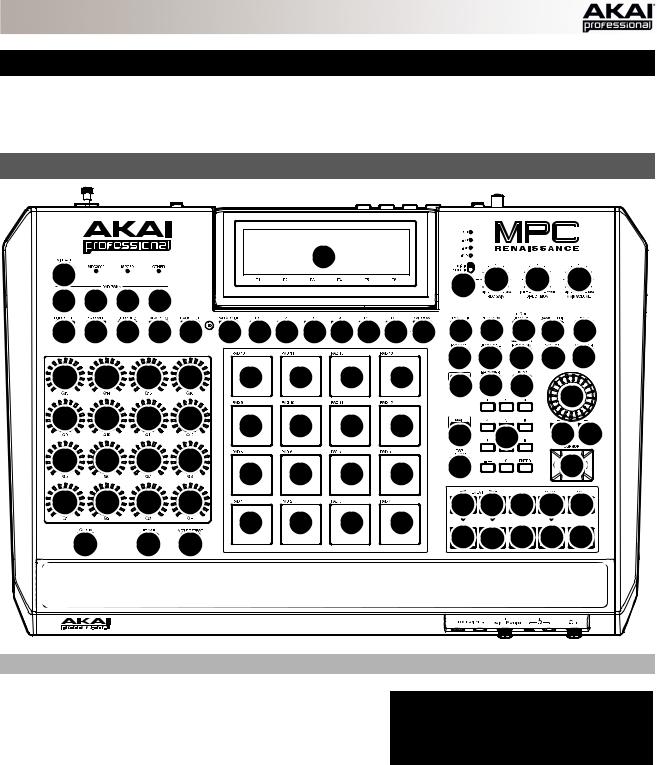
NAVIGATION / DATA ENTRY CONTROLS
1.DISPLAY – This LCD shows all the information
relevant to MPC Renaissance's current operation. Much of this information is also shown in the software. Use the CURSOR BUTTONS to navigate through the display, and use the DATA DIAL, and -/+ buttons to
adjust the currently selected setting/parameter. Use the MODE buttons to change what page is shown, and use the F-BUTTONS to change what tab is shown.
2.F-BUTTONS – Press one of these buttons to select its corresponding tab, shown above the button in the display.
3.CURSOR BUTTONS – Use these buttons to navigate through the fields of menus and options shown in the DISPLAY.
4.DATA DIAL – Use this dial to scroll through the available menu options or adjust the parameter values of the selected field in the DISPLAY.
5.-/+ – Press these buttons to increase/decrease the value of the selected field in the display.
6.NUMERIC KEYPAD – If the selected field in the DISPLAY is a number, use these numbered buttons as a standard numeric keypad to enter a value. Press the keypad's ENTER to enter it.
7.UNDO / REDO – Press this button to undo your last action. Hold down SHIFT and press this button to redo the last action you undid.
7

PAD / Q-LINK KNOB CONTROLS
8.Q-LINK KNOBS – Use these touch-sensitive knobs to adjust various parameters and settings. The LEDs surrounding each knob indicate the knob's current position.
9.Q-LINK TRIGGER – Hold this button down, then touch one of the Q-LINK KNOBS to make that knob's parameter's value jump to its minimum or maximum (depending on the Trig parameter in the software).
10.PADS – Use these pads to trigger drum hits or other samples in your software. The pads are velocitysensitive and pressure-sensitive, which makes them very responsive and intuitive to play.
11.PAD BANK BUTTONS – These 4 buttons switch among Pad Banks A – H. Between these 8 banks with 16 pads per bank, you can access up to 128 MIDI events using the pads.
12.PAD ASSIGN / PAD COPY – Press this button to assign a sample to a pad. In the display, the 4x4 grid that appears represents the 16 pads. Use the CURSOR BUTTONS to navigate through the grid, and use the DATA DIAL or -/+ buttons to select a Program (when the Program field is highlighted) or a sample (when a pad is highlighted).
Hold down SHIFT and press this button to copy the samples and parameters from one pad to another. Use the CURSOR BUTTONS to select the From Pad ("source") or To Pads ("destination") field and hit a pad to select it (you can copy to multiple pads). Use the F-BUTTONS to confirm or cancel the operation.
13.FULL LEVEL / HALF LEVEL – Press this button to activate/deactivate Full
|
Level. When activated, the pads always play back at a maximum velocity (127), |
103 |
111 |
119 |
127 |
|||
|
no matter how hard or soft you hit them. |
|
|
|
|
|
|
|
|
Hold down SHIFT and press this button to activate/deactivate Half Level. When |
|
|
|
|
|
|
|
|
71 |
|
79 |
|
87 |
|
95 |
|
|
activated, the pads always play back at half-velocity (63). |
|
|
|
||||
|
|
|
|
|
|
|
|
|
14. |
16 LEVEL – Press this button to activate/deactivate 16 Level. When activated, |
|
|
|
|
|
|
|
|
|
|
|
|
|
|
||
39 |
|
47 |
|
55 |
|
63 |
||
|
the last pad that was hit will be temporarily copied to all 16 pads. The pads will |
|
|
|
||||
|
now output the same note number as the initial pad, but a selectable parameter |
|
|
|
|
|
|
|
|
|
|
|
|
|
|
|
|
|
will be fixed at the values shown in the diagram on the right, regardless of how |
7 |
|
15 |
|
23 |
|
31 |
|
hard you hit them. The available parameters are velocity, tuning, filter, layer, |
|
|
|
||||
|
|
|
|
|
|
|
|
|
|
attack or decay. |
|
|
|
|
|
|
|
15.NOTE REPEAT / LATCH – Hold this button down and press a pad to retrigger that pad's sample at a rate based on the current Tempo and Time Correct settings (the available Time Correct settings will appear in the display, which you can select with the F-BUTTONS). Hold down SHIFT and press this button to latch the Note Repeat feature. When latched, the button does not need to be held down for Note Repeat to be activated. Press NOTE REPEAT once more to unlatch it.
MODE / VIEW CONTROLS
16.SHIFT – Hold this button down to access some buttons' secondary functions (indicated by orange writing).
17.MAIN / TRACK – Press this button to view the Main screen in the display and software. Hold down SHIFT and press this button to view the Track View screen in the display and software.
18.BROWSER / SAVE – Press this button to view the file browser in the display. Hold down SHIFT and press this button to save the current Project (including its samples, Programs, Sequences, and Songs).
19.PROG EDIT / Q-LINK – Press this button to view the Program Edit screen in the display and software. Hold down SHIFT and press this button to assign a parameter to a Q-LINK KNOB: use the CURSOR BUTTONS to select the desired Q-LINK KNOB, then use the DATA DIAL or -/+ buttons to select the desired parameter.
20.PROG MIX / TRACK MIX – Press this button to view the Program Mixer screen in the display and software. Hold down SHIFT and press this button to view the Track Mixer screen in the display and software.
21.SEQ EDIT / EFFECTS – Press this button to enter Sequence Edit mode. Hold down SHIFT and press this button to enter Effects mode, where you can assign the Q-LINK KNOBS to the parameters of the currently selected effect.
22.SAMPLE EDIT / SAMPLE REC – Press this button to view the Sample Edit screen in the display and software. Hold down SHIFT and press this button to view the Sample Record screen in the display and software.
23.SONG / OTHER – Press this button to view the Song screen in the display and software. Hold down SHIFT and press this button to enter Other mode, which allows you to set: the minimum number of taps for the TAP TEMPO button; pad threshold, sensitivity, and curve; the footswitches' messages; and the Program Change target.
24.STEP SEQ – Press this button to view the Step Sequence screen in the display and software.
25.NEXT SEQ – Press this button to view the Next Sequence screen in the display and software.
26.TRACK MUTE / PAD MUTE – Press this button to view the Track Mute screen in the display and software. Hold SHIFT and press this button to view the Pad Mute screen in the display and software.
8

27.WINDOW / FULL SCREEN – When this button is lit, it means the selected field in the display contains additional functions; press this button to access them. Use the F-BUTTONS, CURSOR BUTTONS, and DATA DIAL or -/+ buttons to execute (or cancel) these additional functions.
Hold SHIFT and press this button to switch between Full Screen and Half Screen modes. In Full Screen mode, the workspace occupies the whole screen. In Half Screen mode, the parameter controls (Q-Link knobs, pads, Sequence and Track information, Project Information, etc.) are shown underneath the workspace.
28.PROJECT / FOLDER 1 – Press this button to view only Project files in the File Browser. Hold down SHIFT and press this button to select the Browser's Folder 1 shortcut.
29.SEQUENCE / FOLDER 2 – Press this button to view only Sequence files in the File Browser. Hold down SHIFT and press this button to select the Browser's Folder 2 shortcut.
30.PROGRAM / FOLDER 3 – Press this button to view only Program files in the File Browser. Hold down SHIFT and press this button to select the Browser's Folder 3 shortcut.
31.SAMPLE / FOLDER 4 – Press this button to view only Sample files in the File Browser. Hold down SHIFT and press this button to select the Browser's Folder 4 shortcut.
32.NO FILTER / FOLDER 5 – Press this button to view all files in the File Browser. Hold down SHIFT and press this button to select the Browser's Folder 5 shortcut.
TRANSPORT / RECORDING CONTROLS
33.PLAY – Press this button to play the Sequence from the audio pointer's current position.
34.PLAY START – Press this button to play the Sequence from its start point.
35.STOP – Press this button to stop playback.
36.REC – Press this button to record-arm the Sequence. Press PLAY or PLAY START to start recording.
37.OVERDUB – Press this button to enable Overdub, which allows you to record note events in a Sequence without overwriting any previously recorded note events. You can enable Overdub either before or during recording.
38.< / > ( |< / >| ) – Use these buttons to move the audio pointer left/right, one step at a time. Hold LOCATE and press one of these buttons to move the audio pointer to the previous/next event in the Sequence Grid.
39.<< / >> (START/END) – Use these buttons to move the audio pointer left/right, one bar at a time. Hold LOCATE and press one of these buttons to move the audio pointer to the start or end of the Sequence Grid.
40.LOCATE – Hold this button down to activate the secondary functions of the < / > and << / >> buttons (i.e., |< / >| and START/END, respectively).
41.ERASE – As a Sequence is playing, hold this button down and press a pad to delete the note event for that pad at the current playback position. This is a quick way to delete note events from your Sequence without having to stop playback.
42.TAP TEMPO – Press this button in time with the desired tempo to enter a new tempo (in BPM) in the software.
I/O & LEVEL CONTROLS
43.MIC IN / PHONO IN SWITCH – Use this switch to select the MIC IN or PHONO IN jacks on the rear panel. If you are using a mic or other line-level audio source connected to the MIC IN jacks, select MIC IN. If you are using a phono-level device like a turntable connected to the PHONO IN jacks, select PHONO IN.
44.REC GAIN – Use this knob to adjust the gain of the incoming signal from the MIC IN or PHONO IN jacks on the rear panel. Monitor the recording level by viewing the level meter (LEDs) above the MIC/LINE / PHONO SWITCH.
45.DIRECT MON – Use this knob to adjust the balance between the INPUT and COMP signals in the headphones. The INPUT signal consists of the MIC IN or PHONO IN jacks – turn the knob all the way to INPUT for zerolatency direct monitoring. The COMP signal is the normal software playback. When not recording, we recommend turning this knob all the way to the COMP position.
46.MAIN VOLUME – Use this knob to adjust the volume level of the STEREO OUT jacks.
47.VINTAGE MODE – Press this to toggle through the available Vintage Modes. The MPC3000 and MPC60 settings emulate the sounds of those classic MPCs, while the OTHER setting emulates the sound of vintage sampling drum machines. When none of the LEDs are lit, Vintage Mode is off.
FRONT PANEL
1. FOOTSWITCH INPUTS – Connect optional 1/4" TS footswitches to these inputs.
2. |
MIX KNOB – Use this knob to adjust the balance |
1 |
1 |
2 |
3 |
3 |
4 |
|
between the MAIN and ASSIGN signals in your |
||||||
|
|
|
|
|
|
|
headphones. MAIN is a summed mono signal of the left and right STEREO OUTS. ASSIGN is a summed mono signal of ASSIGNABLE MIX OUTS 1 and 2.
3.HEADPHONES – Connect your headphones (not included) to one of these standard TRS outputs (1/8" or 1/4"). Use the MIX KNOB to determine what signal is heard in the headphones.
4.HEADPHONES VOLUME – Use this knob to adjust the headphone volume.
9

REAR PANEL
|
|
14 |
|
|
|
|
|
|
2 |
|
9 |
9 |
12 |
|
6 |
7 |
16 16 16 16 15 15 |
8 |
5 |
|
|
|
|
10 11 |
13 |
|
4 1 |
3 |
1.POWER INPUT – Connect a 12V DC – 2A power adapter (center pin positive) to this jack then into an electrical outlet.
2.POWER ADAPTER RESTRAINT – You can secure a power adapter cable to this restraint to prevent it from accidentally unplugging.
3.POWER SWITCH – Turns MPC Renaissance's power on/off.
4.COMPUTER USB PORT– Use the included USB cable to connect this port to an available USB port on your computer. This connection allows MPC Renaissance to send/receive MIDI data to/from the MPC software.
5.USB HUB OUTPUTS – You can connect additional USB devices (controllers, hard drives, etc.) to these powered USB ports. In addition to being an audio interface, these ports allow MPC Renaissance to function as a powered USB hub when it is powered on.
6.STEREO OUT – Connect these 1/4" TRS outputs to your speaker system (not included). The signal sent out of these outputs is the main mix. In the MPC software, you can set what is routed to these outputs in the Program Mixer tab, by selecting 1,2 as the OUT for one pad or multiple pads.
7.ASSIGNABLE MIX OUT – Connect these 1/4" TRS outputs to an external mixer (not included). The signal sent from these outputs is full-volume (0 dB). In the MPC software, you can set what is routed to these outputs in the Program Mixer tab, by selecting 3,4 as the OUT for one pad or multiple pads.
8.S/PDIF IN/OUT – Use standard RCA cables to connect these jacks to devices that can send/receive digital audio.
9.MIC IN – Connect an external sound source or microphone to these jacks using standard 1/4" TRS or XLR cables. Make sure to set the MIC/LINE SWITCH appropriately.
10.MIC/LINE SWITCH – Set this switch appropriately for the device you connected to the MIC IN jacks. If your sound source is a microphone, set it to MIC. If your sound source is a line-level device, like an external mixer or keyboard, set it to LINE.
11.PHANTOM POWER SWITCH – This switch activates and deactivates phantom power. When activated, phantom power supplies +48V to both MIC IN inputs. Please note that most dynamic microphones do not require phantom power, while most condenser microphones do. Consult your microphone's documentation to find out whether it needs phantom power.
12.PHONO IN – Connect these RCA inputs to an external sound source (e.g., a turntable, CD player, etc.). Make sure to set the PHONO/LINE SWITCH appropriately.
13.PHONO/LINE SWITCH – Flip this switch to the appropriate position, depending on the device connected to the AUX INPUTS. If you are using phono-level turntables, set this switch to "PHONO" to provide the additional amplification needed for phono-level signals. If using a line-level device, such as a CD player or sampler, set this switch to "LINE."
14.GROUND TERMINAL – If you connected a phono-level turntable to the PHONO IN jacks and are hearing a low hum or buzz, this could mean that the turntable is not grounded. If the turntable has a grounding wire, connect it to this terminal.
Note: Some turntables have a grounding wire built into the RCA connection and, therefore, nothing needs to be connected to the grounding terminal.
15.MIDI IN – Use a five-pin MIDI cable to connect the MIDI OUT of an optional external MIDI device to the MIDI IN of MPC Renaissance.
16.MIDI OUT – Use a five-pin MIDI cable to connect the MIDI OUT of MPC Renaissance to the MIDI IN of an optional external device.
SUPPORT & UPDATES
For additional information, technical support, and the most current versions of software, firmware, or drivers, please visit:
www.akaipro.com/mpcrenaissance
10
GUÍA DE INICIO RÁPIDO (ESPAÑOL)
INTRODUCCIÓN
Combinando la disposición y el flujo operativo del legendario MPC de Akai Professional con la potencia de su computadora, MPC Renaissance es un instrumento sin igual para la producción musical. MPC Renaissance le permite crear música usando controles de hardware clásicos y una pantalla emergente integrada, mientras su exclusivo software MPC pone en sus manos unas capacidades de producción sin precedentes y ampliables en su Mac o PC.
CONTENIDO DE LA CAJA
•MPC Renaissance
•Adaptador de alimentación *
•Cable USB
•DVD de software/drivers
•Guía de inicio rápido
•Folleto de instrucciones de seguridad e información sobre la garantía
* El adaptador de alimentación está en una caja blanca alojada en una de las piezas de espuma de los extremos que sostienen al MPC Renaissance en su sitio en la caja.
DIAGRAMA DE INSTALACIÓN
MICRÓFONO
SUMINISTRO
ELÉCTRICO
TECLADO MIDI USB
MONITORES
(para la mezcla principal)
2 TK |
MONITORES |
MEZCLADOR EXTERNO |
(para la mezcla de la SALIDA ASIGNABLE) |
11 |
COMPUTADORA
Todos los elementos que se muestran en la ilustración pero no se mencionan en CONTENIDO DE LA CAJA se venden por separado.

REQUISITOS DE SISTEMA
Antes de continuar, asegúrese de que su computadora cumpla los siguientes requisitos de sistema:
Windows:
•CPU Pentium® 4 de 2 GHz o compatible con Celeron® o más rápida (se recomienda CPU multinúcleo)
•2 GB de RAM (se recomienda 4 GB)
•Windows 7 (de 32 ó 64 bits)
•Lector de DVD-ROM
Mac:
•2 GB de RAM (se recomienda 4 GB si la soporta su computadora)
•Mac OS X 10.6 o posterior
•Lector de DVD-ROM
IMPORTANTE
1. INSTALACIÓN DEL SOFTWARE Y LOS DRIVERS
Antes de conectar el MPC Renaissance a su computadora, siga estos pasos:
IMPORTANTE: Recomendamos especialmente desactivar temporalmente el software antivirus de su computadora. Algunos programas antivirus pueden enlentecer o interferir con la instalación de los drivers. Recuerde activarlo nuevamente después de realizar la instalación.
Windows:
1.Inserte el DVD de software incluido en el lector de DVD de la computadora.
2.Cuando aparezca el "asistente" de instalación, haga clic en Next (Siguiente).
Si no ve esta pantalla, abra Computer (Mi PC), haga clic derecho en el DVD, seleccione Explore (Explorar) y haga doble clic en el archivo .exe.
3.Siga las instrucciones de la pantalla para instalar el software y los drivers. (El sistema le solicitará que conecte MPC Renaissance a la computadora durante el proceso de instalación.)
Mac:
1.Inserte el DVD de software incluido en el lector de DVD de la computadora.
2.Haga doble clic en el icono del DVD.
3.Haga doble clic en el archivo .pkg.
4.Siga las instrucciones de la pantalla para instalar el software y los drivers. (El sistema le solicitará que conecte MPC Renaissance a la computadora durante el proceso de instalación.)
2. CONEXIÓN
Siga esta secuencia de pasos toda vez que use MPC Renaissance con su computadora:
1.Conecte el MPC Renaissance a una fuente de alimentación eléctrica.
2.Conecte el PUERTO USB COMPUTER del MPC Renaissance a un puerto USB de la computadora, con un cable USB estándar.
3.Encienda el MPC Renaissance.
Usuarios de Windows: La primera vez que su computadora detecta el MPC Renaissance como dispositivo conectado, verá varios cuadros de diálogo Found New Hardware (Nuevo hardware encontrado). Esto significa simplemente que el MPC Renaissance está siendo reconocido por su computadora por primera vez y está instalando los drivers apropiados. Espere que estos cuadros de diálogo hayan desaparecido antes de continuar.
4.Abra el software MPC.
Consulte la sección PARA COMENZAR de este manual para conocer algunos instrucciones rápidas sobre cómo usar el MPC Renaissance con el software MPC.
12

DESCRIPCIÓN GENERAL DEL SOFTWARE MPC
Menú |
Pestañas |
|
Espacio de trabajo
Navegador |
|
|
|
Controles de |
|
|
|
|
|
|
parámetros |
|
|
|
Tiempo/Tempo 
 Transporte
 Nivel maestro
Ésta es solo una descripción general amplia de las características del software MPC. El MPC Renaissance puede acceder y controlar virtualmente todos los elementos del software. Consulte también el Manual de referencia con mayor profundidad (en el menú Help (Ayuda)). El Manual de referencia contiene un tutorial rápido sobre cómo comenzar a hacer un tema, de modo que pueda usar inmediatamente las características de MPC —así como información detallada para los usuarios más experimentados.
•Menú: Menús del software.
•Pestañas: Haga clic en estas pestañas para ver las distintas partes del software (por ej., Program Edit (Edición de programas), Program Mixer (Mezclador de programas), Track Mixer (Mezclador de pistas), etc.).
•Navegador: Navegador de archivos del software. Desde aquí, es posible cargar archivos haciendo clic y arrastrándolos con el mouse o usando los controles del MPC Renaissance.
•Espacio de trabajo: Área principal donde usted construye y edita las distintas partes de su proyecto. Según la pestaña que seleccione, aparece en el espacio de trabajo la Sequence Grid (Grilla de secuencia), la Track Grid (Grilla de pistas), Song (Tema) o la forma de onda de una muestra.
•Controles de parámetros: Esta área que está debajo del espacio de trabajo contiene los controles de parámetros correspondientes a la pestaña seleccionada. Según cuál sea la pestaña que seleccionó, este espacio puede mostrar los parámetros de perillas Q-Link, los pads, sus bancos y muestras, las capas de pads y su afinación, los controles del mezclador para el programa o las pistas, etc.
•Tiempo/Tempo: Información del tiempo y tempo actuales.
•Transporte: Controles relacionados con la reproducción y la grabación, idénticos a los controles de transporte del MPC Renaissance.
•Nivel maestro: Nivel de salida maestro y medidor de volumen del software. Tenga en cuenta que este nivel es independiente (y está antes) de la perilla MAIN VOLUME (Volumen principal) del MPC Renaissance.
13

PARA COMENZAR
1. CÓMO CONECTAR, ABRIR Y CONFIGURAR
1.Conecte el MPC Renaissance a una fuente de alimentación y a un puerto USB de su computadora, como se muestra en el DIAGRAMA DE CONEXIÓN.
2.Encienda el MPC Renaissance y abra el software MPC.
3.En el software, vaya a Edit f Preferences (Editar > Preferencias) y haga clic en la pestaña Audio & MIDI.
4.Haga clic en el menú emergente Device (Dispositivo) y seleccione MPC Renaissance ASIO driver (Driver ASIO de MPC Renaissance). Haga clic en OK (Aceptar). Asegúrese de que la perilla DIRECT MON (Monitoreo directo) de MPC Renaissance esté en la posición COMP (para monitorear la salida de su computadora.
Pruebe los ajustes de sonido: Aumente el volumen de sus altavoces (conectados a los conectores hembra STEREO OUT (Salida estéreo) del MPC Renaissance) y haga clic en Test (Prueba), junto al menú emergente Device. Oirá un tono, que indica que el sonido está configurado correctamente.
2. CÓMO ASIGNAR MUESTRAS A LOS PADS
1.En MPC Renaissance, pulse BROWSER (Navegador).
2.Use los BOTONES DE CURSOR y el CUADRANTE DE DATOS para navegar por la estructura de archivos de su computadora y encontrar las muestras que desea usar con el software MPC.
3.Puede pulsar F3 (Play) (Reproducir) para tener una presentación preliminar de la muestra antes de cargarla o F2 (Auto) para activar Auto Preview (Presentación preliminar automática) (al seleccionar una muestra se realiza la presentación automática inmediatamente).
4.Toda vez que encuentre una muestra que desea usar, toque el pad al que desea asignarla (se ilumina con luz verde) y pulse F6 (Open) (Abrir). El sonido se asigna al pad y también se agrega a ese programa para uso futuro.
5.Repita este proceso para los pads adicionales. ¡Toque esos pads para oír sus muestras en acción!
3. COMO GRABAR Y TOCAR
1.Pulse MAIN para volver al modo principal.
2.Pulse OVERDUB (Sobregrabar) para preparar la grabación de la secuencia. La luz que está arriba del botón PLAY (Reproducir) destella.
3.Pulse PLAY para comenzar a grabar. Oirá que el metrónomo cuenta 4 beats antes de comenzar la grabación.
4.La secuencia comienza a tocarse en un loop:
•¡Toque usando los pads! Cada nota se graba en la secuencia. Incluso si no está tocando exactamente en sincronismo con el beat, la característica Time Correct (T.C.) (Corrección de tiempo) del software "cuantizará" automáticamente las notas de modo que se alineen en la grilla.
•Puede borrar notas manteniendo pulsado el botón ERASE (Borrar) y pulsando (o manteniendo pulsado) el pad cuyas notas desea borrar. A medida que el puntero de audio se mueve por la secuencia, se borran todas las notas de ese pad.
•Consejo: Si es un ejecutante principiante, le recomendamos tocar un pad por vez. La secuencia continuará realizando el loop, de modo que no hay apuro de grabar todos los pads a la vez.
5.Para detener la grabación, pulse STOP (Parar). Para reproducir la secuencia sin grabarla, pulse solamente PLAY.
4. IMPORTANTE
Para guardar su proyecto, pulse SHIFT + SAVE (Función secundaria + Guardar). Seleccione donde desea guardar su archivo e ingrese un nombre de archivo. Recomendamos dejar seleccionada la casilla Also save samples (Guardar también muestras), de modo que no tenga que volver a cargar sus muestras cuando desee abrir el proyecto. Guarde con frecuencia a fin de no perder nada de su excelente trabajo.
Recomendamos especialmente leer el Tutorial de inicio rápido en el Manual de referencia de MPC: En el software, vaya al menú Help (Ayuda) y seleccione MPC Help (Ayuda de MPC). Aparece el PDF del Manual de referencia. Contiene lo siguiente:
•Un tutorial fácil de seguir pero suficientemente profundo: Esta recorrida le permitirá iniciarse en el uso de las características de MPC rápida y fácilmente.
•Más detalles acerca de las características del software: Si ya está familiarizado con los MPC o las estaciones de trabajo de audio digital (DAW) en general, puede profundizar con las características más avanzadas.
•Flujo operativo de MPC confiable —con software: El MPC Renaissance y el software MPC funcionan fluidamente juntos, reteniendo el legendario flujo operativo del MPC original. Aprenderá a usar su MPC Renaissance para controlar el software MPC a fin de lograr la experiencia más eficiente y dinámica —¡produciendo o ejecutando!
14

CARACTERÍSTICAS
El MPC Renaissance es un equipo diseñado específicamente para controlar el software MPC. En esta sección se describen todos los controles de hardware. Para una explicación completa del software, consulte el Manual de referencia de MPC en el menú Help del software.
PANEL SUPERIOR
|
|
|
|
|
|
|
|
|
1 |
|
|
|
|
|
|
47 |
|
|
|
|
|
|
|
|
|
|
43 |
44 |
45 |
46 |
|
|
|
|
|
|
|
|
|
|
|
|
|||||
11 11 |
11 |
11 |
|
|
|
|
|
|
|
|
|
|
|
|
|
13 14 |
24 |
25 26 |
12 |
2 2 |
2 2 2 2 27 |
19 20 |
21 22 |
23 |
|||||||
|
|
|
|
|
|
|
|
|
|
|
28 29 30 31 32 |
||||
8 |
8 |
|
8 |
8 |
10 |
10 |
10 |
10 |
16 |
18 |
7 |
|
|
||
|
|
|
|
|
|
|
|
|
|
|
4 |
|
|||
|
|
|
|
|
|
|
|
|
|
|
|
|
|
|
|
8 |
8 |
|
8 |
8 |
10 |
10 |
10 |
10 |
|
|
|
|
|
||
|
|
|
|
|
17 |
6 |
5 |
5 |
|||||||
|
|
|
|
|
|
|
|
|
|
|
|||||
8 |
8 |
|
8 |
8 |
|
|
|
|
|
|
42 |
|
|
3 |
|
|
|
|
|
|
10 |
10 |
10 |
10 |
|
|
|
||||
|
|
|
|
|
|
|
|
|
|
||||||
8 |
8 |
|
8 |
8 |
|
|
|
|
|
|
38 38 40 39 39 |
||||
|
|
|
|
|
10 |
10 |
10 |
10 |
|
|
|
|
|
||
|
9 |
|
41 |
15 |
|
|
|
|
|
|
36 37 35 33 34 |
||||
|
|
|
|
|
|
|
|
|
|
|
|
|
|||
CONTROLES DE NAVEGACIÓN / INGRESO DE DATOS
1.PANTALLA – Esta pantalla LCD muestra toda la información relevante para la operación actual del MPC Renaissance. Gran parte de esta información se muestra también en el software. Use los BOTONES DE CURSOR para navegar por la pantalla y los botones -/+ del CUADRANTE DE DATOS para ajustar el valor/parámetro seleccionado en ese momento. Use los botones MODE (Modo) para cambiar la página que se muestra y los botones F para cambiar la pestaña que se muestra.
2.BOTONES F – Pulse uno de estos botones para seleccionar su pestaña correspondiente, mostrada arriba del botón en la pantalla.
3.BOTONES DE CURSOR – Estos botones se usan para navegar por los campos de menús y opciones que se muestran en la PANTALLA.
4.CUADRANTE DE DATOS – Use este cuadrante para desplazarse por las opciones de menú disponibles o ajustar los valores de los parámetros del campo seleccionado en la PANTALLA.
5.-/+ – Pulse estos botones para aumentar o disminuir el valor del campo seleccionado en la pantalla.
6.TECLADO NUMÉRICO – Si el campo seleccionado en la PANTALLA es un número, use estos botones numerados como teclado numérico estándar para ingresar valores. Pulse ENTER del teclado para ingresarlo.
7.DESHACER / VOLVER A HACER – Pulse este botón para deshacer su última acción. Mantenga pulsado SHIFT y pulse este botón para volver a hacer la última acción que deshizo.
15
 Loading...