


HomeConnectTM Cable
Modem External
Getting Started Guide
http://www.3com.com/
Part No. 1.024.2369-00
Published January 2000
3Com Corporation 3800 Golf Rd.
Rolling Meadows, IL
60008
No part of this documentation may be reproduced in any form or by any means or used to make any derivative work (such as translation, transformation, or adaptation) without written permission from 3Com Corporation.
3Com Corporation reserves the right to revise this documentation and to make changes in content from time to time without obligation on the part of 3Com Corporation to provide notification of such revision or change.
3Com Corporation provides this documentation without warrantyof any kind, either implied or expressed, including, but not limited to, implied warranties of merchantability, and fitness for a particular purpose. 3Com may make improvements or changes in the product(s) and/or the program(s) described in this documentation at any time.
If there is any software on removable media described in this documentation, it is furnished under a license agreement included with the product as a separate document, in the hard copy documentation, or on the removable media in a directory file named LICENSE.TXT or !LICENSE.TXT. If you are unable to locate a copy, please contact 3Com and a copy will be provided to you.
UNITED STATES GOVERNMENT LEGEND
If you are a United States government agency, then this documentation and the software described herein are provided to you subject to the following:
All technical data and computer software are commercial in nature and developed solely at private expense. Software is delivered as “Commercial Computer Software” as defined in DFARS 252.227-7014 (June 1995) or as a “commercial item” as defined in FAR 2.101(a) and as such is provided with only such rights as are provided in 3Com’s standard commercial license for the Software. Technical data is provided with limited rights only as provided in DFAR 252.227-7015 (Nov 1995) or FAR 52.227-14 (June 1987), whichever is applicable. You agree not to remove or deface any portion of any legend provided on any licensed program or documentation contained in, or delivered to you in conjunction with, this User Guide.
Unless otherwise indicated, 3Com registered trademarks are registered in the United States and may or may not be registered in other countries.
Copyright © 2000 3Com Corporation. All rights reserved.
3Com, the 3Com logo, and HomeConnect are trademarks and EtherLink and Connections registered trademarks of 3Com Corporation.
Microsoft, Windows, and Windows NT are registered trademarks of Microsoft Corporation in the US and/or other countries.
All other company and product names may be trademarks of the respective companies with which they are associated.

CONTENTS
1 |
BEFORE YOU BEGIN |
|
|
|
|
|
Introduction |
3 |
|
|
|
|
Cable Modem Features 3 |
|
|
|
|
|
Contacting Your Local Cable Provider |
4 |
|
||
|
Preparing Your Workspace |
5 |
|
|
|
|
You Will Need These Items |
6 |
|
|
|
|
Supplied |
6 |
|
|
|
|
You will also need the following |
6 |
|
||
|
Configuring the TCP/IP Protocol 6 |
|
|
||
|
Configuring the TCP/IP Protocol on a Windows PC |
6 |
|||
|
Configuring the TCP/IP Protocol on a Macintosh PC |
9 |
|||
|
|
|
|||
2 HARDWARE AND SOFTWARE INSTALLATION |
|
||||
|
Connecting the Cable Modem to Your Computer 13 |
|
|||
|
Installing the Cable ConnectionsTM CD-ROM 14 |
|
|||
3 |
|
|
|
||
CABLE MODEM OPERATION |
|
|
|||
|
Interpreting Your Cable Modem’s LEDs |
17 |
|
||
|
LEDs on the Front of the Modem |
17 |
|
||
|
LED on the Back of the Modem |
18 |
|
||
Connectors and Switches on the Back of Your Cable
Modem 19
4CONFIGURING YOUR CABLE MODEM
5TROUBLESHOOTING AND SUPPORT RESOURCES
Troubleshooting 25 |
|
I cannot access my e-mail or Internet service. |
25 |
The Cable Status LED never stops blinking. |
26 |
All four of the LEDs on the front of my cable modem are lighted and blinking. 26

All of the LEDs on the front of my modem look right, but I still can't access the Internet. 26
The power on my modem goes on and off sporadically. The Link Status light never stops blinking. 27
Support Resources |
27 |
|
Internet FTP 27 |
|
|
World Wide Web |
27 |
|
90-Day Free Installation Support |
27 |
|
Technical Support Hotline 27 |
|
|
If You Are Still Having Problems |
28 |
|
If You Need to Return the Modem to Us 28
6 REGULATORY INFORMATION AND LIMITED WARRANTY
Manufacturer's Declaration of Conformity 29
Part 15 |
29 |
|
|
|
|
Caution to the User |
29 |
|
|
||
Performance Specifications |
29 |
|
|||
Export Notices |
29 |
|
|
|
|
License Agreement |
30 |
|
|
||
Industry Canada (IC) |
30 |
|
|
||
UL Listing/CUL Listing |
30 |
|
|
||
Radio and Television Interference |
31 |
||||
3Com Corporation Limited Warranty |
32 |
||||
Hardware |
32 |
|
|
|
|
Software |
32 |
|
|
|
|
Year 2000 Warranty |
33 |
|
|
||
Obtaining Warranty Service |
34 |
|
|||
WARRANTIES EXCLUSIVE |
34 |
|
|||
LIMITATION OF LIABILITY |
35 |
|
|||
Disclaimer |
35 |
|
|
|
|
Governing Law |
36 |
|
|
|
|

1 |
BEFORE YOU BEGIN |
|
Introduction
Congratulations! You have just purchased a modem featuring a pioneering new technology, making Internet access possible at speeds previously only imagined! This external cable modem is one part of a comprehensive communications system that utilizes the cable television network to deliver high-speed data to your computer. Data is requested and sent over the cable television network at burst rates of up to 38 megabits per second (Mbps)*. This chapter explains how to prepare your computer system for cable modem installation.
* Actual speeds will vary depending on computer hardware, applications, service offered by your Broadband Service Provider, and network traffic.
Cable Modem Features
■Cable line bandwidth allows user data rates of up to 38 megabits per second (Mbps)*, faster than 56K analog modems, ISDN, or ADSL
■Two-way design means that the cable modem sends and receives data over the cable line
■Plug and play operation ensures easy setup and installation
■DOCSIS-compliance ensures interoperability with cable suppliers
■3Com’s extensive technical support organization provides you with the quick answers you need to get up and running
* NOTE: Please note that the following factors affect the speeds you may experience: (1) your computer equipment and configuration, including the speed of your processor, the amount of RAM on your system, and your available

8 CHAPTER 1: BEFORE YOU BEGIN
hard disk space; (2) applications running simultaneously with the modem which use varying amounts of your computer’s resources; (3) the capacity of the Internet service you order from your provider; (4) changing network traffic levels depending when and where you go online.
Contacting Your Local Cable Provider
In order to use your cable modem, you need to set up an Internet access account with your local cable provider. Before contacting your cable provider to setup an account, have the following information handy:
■The modem’s serial number, model number, and Media Access Control (MAC) address. The serial number appears on the white bar code label on the back of the modem and consists of 10 characters preceded by the text “SN=”. In the following example label image, the serial number is 6LZ1377410. Your cable modem’s model number is 3CR29220. In the following example label image, the model number is 20-0591-000. The MAC address appears on the white bar code label on the back of the modem and consists of 12 characters preceded by the text “EA =”. In the following example label image, the MAC address is 00104B377410. Write all three of these numbers in the following blanks for future reference.
Serial number: SN= __________________
Model number: 3CR29220
MAC address: EA = __________________
You should now contact your local cable provider and verify the following:
■The cable service to your home supports two-way cable modem access. If your cable company does not provide

Preparing Your Workspace |
9 |
two-way service, this modem will not be able to communicate with your cable company’s Internet access service. You should immediately consult your cable company and place of purchase to determine the proper 3Com cable modem to use. You can also visit the following URL for additional information:
http://www.3com.com/cablemodem
■You have a cable line near your PC and it has been prepared for cable modem service. If you do not have a cable line in your home that supports two-way cable modem access, or if your current cable connection is not conveniently located near your computer, your cable provider can install one. If you use your current cable line for cable television access, your cable company can also install an additional line for use with your cable modem.
■Your cable provider has set up your cable Internet access account. Your cable provider will set up an Internet access account that will allow you to send and receive e-mail, access the World Wide Web, and receive other Internet services. This account must be set up before you can use your cable modem.
Preparing Your Workspace
■Position your computer so that it is located near your cable outlet.
■The cable modem should be located near your computer and the cable outlet. There should be plenty of room to guide the cables away from the modem without crimping them.
■Airflow around the modem should not be restricted.
■The temperature in the room where the cable modem will be operating should be between 0 and 40° C (32 and 104° F). Relative humidity should be between 5% and 95%, non-condensing.
■Familiarize yourself with all of the materials supplied with the modem. Please read these installation instructions thoroughly before installing the modem.
10 CHAPTER 1: BEFORE YOU BEGIN
CAUTION: Your cable provider will provide a cable connection. Do not attempt any rewiring without first contacting your cable provider.
You Will Need These Items
Supplied
■Cable modem
■Cable modem power supply
■RJ-45 network cable
■This Getting Started Guide
You will also need the following
■A PC running Windows® 95 operating system (or later) or a Macintosh® computer running System 7.5 (or later) with TCP/IP protocol installed (see the following two sections for more information on installing TCP/IP)
■An active two-way cable line
■An active Ethernet port, network interface card (NIC) installed in your computer, or USB network interface (Windows 98 or later only)
■An adjustable wrench for securing the cable line to the modem
Configuring the TCP/IP Protocol
NOTE: If you are using a Macintosh computer, turn to the instructions on page 9.
Configuring the TCP/IP Protocol on a Windows PC
You need to have an Ethernet Network Interface Card (NIC) or USB network interface and the TCP/IP communications protocol installed on your system before you install your
Configuring the TCP/IP Protocol |
11 |
cable modem. Follow these instructions to verify that TCP/IP is installed and configured correctly.
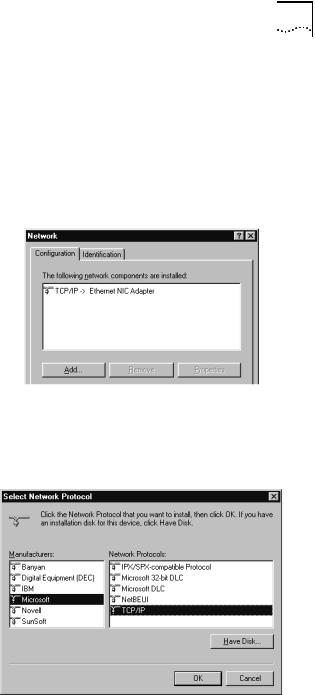
1Right-click the Network Neighborhood icon on your desktop and then click Properties.
2A list of installed network components appears. Look for an entry named “TCP/IP”. This entry may be followed by an arrow and a description of the NIC hardware device or USB network interface installed in your computer. If an entry
similar to this is present, go to step 9.
.
3If a similar entry is NOT present, click Add...
4Click Protocol, and then click Add...
5Click Microsoft in the "Manufacturers:" list and then click TCP/IP in the "Network Protocols:" list. Click OK.
6"TCP/IP" will appear in the list of installed network components. Click OK.
12 CHAPTER 1: BEFORE YOU BEGIN
7Windows will now ask you if you would like to restart your computer. It is very important that you click No.
8Right-click on the Network Neighborhood icon on your desktop then click Properties in the drop-down menu that appears.
9Double-click the entry in the "Configuration" menu named "TCP/IP". This entry may be followed by an arrow and a description of your NIC or dialup adapter.
10Click the “Advanced” tab and then make sure the box next to "Set this protocol to be the default protocol." is checked. If it is not, click the box to put a check in it. (If this option is grayed out, then TCP/IP is already the default protocol.)
11Click OK and then click OK again.
12Reboot your PC by clicking Windows Start, clicking Shut Down, clicking “Restart the computer?” and then clicking
Yes.
13When your desktop reappears, click the Windows Start button and then click Run.
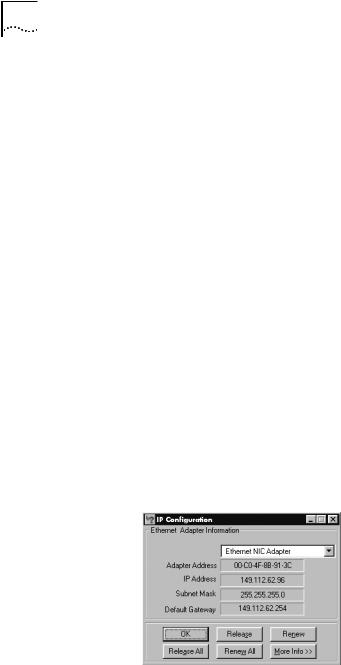
14When the “Run” screen appears, type winipcfg in the text field and click the OK button.
15The "IP Configuration" window will appear. Click the Release button. A line of zeros will appear in the "IP Address" and "Subnet Mask" fields.
16Click the Renew button. Numbers will replace the zeros. Click OK and turn to the next chapter, “Hardware and Software Installation”.
Configuring the TCP/IP Protocol |
13 |
NOTE: The numbers on your screen SHOULD be different than those shown in the preceding example.
Configuring the TCP/IP Protocol on a Macintosh PC
You need to make sure the TCP/IP communications protocol and an Ethernet device is installed on your system before you install your cable modem. Many Macintosh computers have Ethernet devices installed at the factory.
1Click the Apple icon in the upper left corner of the Finder. Scroll down to Control Panels, and click TCP/IP.
2Click Edit on the Finder (gray bar) at the top of the screen. Scroll down to the bottom of the menu and click User Mode.
3 Click the Advanced button then click OK.

14 CHAPTER 1: BEFORE YOU BEGIN
4Click the Up/Down selector arrows (to the right of “Connect Via”) and click "Using DHCP Server".
5Click the Options button. Then click the Active button.
NOTE: In some cases, the Load only when needed button will not appear. If it is visible, click the box. A check mark should appear in the box.
6Verify that the “Use 802.3” box is unchecked (circled in the following image). If there is a check mark in the box, click it
 Loading...