


 Loading...
11 Mbps Wireless LAN
PC Card User Guide
Fully featured wireless local area networking made simple
Version 2.0.3
http://www.3com.com/
http://support.3com.com/warrantyregistration/register.pl
Published December 2001
Version 2.0.3.1
3Com Corporation |
Copyright © 2001, 3Com Corporation. All rights reserved. No part of this documentation may be |
5400 Bayfront Plaza |
reproduced in any form or by any means or used to make any derivative work (such as translation, |
Santa Clara, California |
transformation, or adaptation) without written permission from 3Com Corporation. |
95052-8145 |
3Com Corporation reserves the right to revise this documentation and to make changes in content from |
|
|
|
time to time without obligation on the part of 3Com Corporation to provide notification of such revision or |
|
change. |
|
3Com Corporation provides this documentation without warranty, term, or condition of any kind, either |
|
implied or expressed, including, but not limited to, the implied warranties, terms or conditions of |
|
merchantability, satisfactory quality, and fitness for a particular purpose. 3Com may make improvements or |
|
changes in the product(s) and/or the program(s) described in this documentation at any time. |
|
If there is any software on removable media described in this documentation, it is furnished under a license |
|
agreement included with the product as a separate document, in the hard copy documentation, or on the |
|
removable media in a directory file named LICENSE.TXT or !LICENSE.TXT. If you are unable to locate a copy, |
|
please contact 3Com and a copy will be provided to you. |
|
UNITED STATES GOVERNMENT LEGEND |
|
If you are a United States government agency, then this documentation and the software described herein |
|
are provided to you subject to the following: |
|
All technical data and computer software are commercial in nature and developed solely at private expense. |
|
Software is delivered as “Commercial Computer Software” as defined in DFARS 252.227-7014 (June 1995) |
|
or as a “commercial item” as defined in FAR 2.101(a) and as such is provided with only such rights as are |
|
provided in 3Com’s standard commercial license for the Software. Technical data is provided with limited |
|
rights only as provided in DFAR 252.227-7015 (Nov 1995) or FAR 52.227-14 (June 1987), whichever is |
|
applicable. You agree not to remove or deface any portion of any legend provided on any licensed program |
|
or documentation contained in, or delivered to you in conjunction with, this User Guide. |
|
Unless otherwise indicated, 3Com registered trademarks are registered in the United States and may or may |
|
not be registered in other countries. |
|
3Com, AirConnect, and XJACK are registered trademarks and the 3Com logo is a trademark of |
|
3Com Corporation. |
|
Microsoft, Windows, and Windows NT are registered trademarks of Microsoft Corporation. Wi-Fi is a |
|
trademark of the Wireless Ethernet Compatibility Alliance. |
|
All other company and product names may be trademarks of the respective companies with which they are |
|
associated. |
|
EXPORT RESTRICTIONS: This product or software contains encryption code which may not be exported or |
|
transferred from the US or Canada without an approved US Department of Commerce export license. |

CONTENTS
1 INTRODUCTION
|
How Does a Wireless LAN Work? |
7 |
|
|||||
|
Network Association |
7 |
|
|
|
|||
|
Roaming |
7 |
|
|
|
|
|
|
|
Security |
7 |
|
|
|
|
|
|
|
Ad Hoc Networks |
7 |
|
|
|
|
||
|
Setting Up a 3Com Wireless LAN |
8 |
|
|||||
|
All Wireless Networks |
8 |
|
|
||||
|
Wired/Wireless Networks |
9 |
|
|
||||
|
Product Registration and Support |
9 |
|
|||||
|
|
|||||||
2 |
INSTALLING THE WIRELESS CLIENT |
|
||||||
|
Requirements |
11 |
|
|
|
|
|
|
|
Inserting the PC Card |
11 |
|
|
|
|
||
|
Using the XJACK Antenna |
|
12 |
|
|
|||
|
Installing the Software |
13 |
|
|
|
|
||
|
Windows Wizard Installation |
13 |
|
|
||||
|
Install Files |
13 |
|
|
|
|
|
|
|
Set Up the PC Card |
14 |
|
|
|
|||
|
Install Utilities |
14 |
|
|
|
|
|
|
|
Windows NT Installation with Networking Installed 14 |
|||||||
|
Installing Under Service Pack 4 |
15 |
|
|||||
|
Installing Under Service Pack 5 and Above |
15 |
||||||
|
Install Files |
15 |
|
|
|
|
|
|
|
Install CardWizard |
16 |
|
|
||||
|
Set Up the PC Card |
|
17 |
|
|
|||
|
Install Utilities 17 |
|
|
|
|
|||
|
Confirming the Installation |
|
18 |
|
|
|||
|
Custom Installation Options |
|
18 |
|
|
|||
|
WLAN Service Area |
18 |
|
|
|
|||
|
Security Settings |
18 |
|
|
|
|
||
|
Installing the Documentation |
19 |
|
|
||||
|
|
|
||||||
3 |
USING THE WIRELESS LAN |
|
|
|||||
|
About the 3Com Icon |
22 |
|
|
|
|
||
|
Interpreting Status Icons |
22 |
|
|
||||
|
Using the 3Com WLAN Configuration Utility |
25 |
||||||
|
Using 3Com Administrator Utilities |
26 |
|
|||||

4 SETTING THE WIRELESS CLIENT CONFIGURATION
|
Changing Network and Security Settings |
27 |
|
|
||||
|
Network Settings |
27 |
|
|
|
|
|
|
|
Security Settings |
28 |
|
|
|
|
|
|
|
40-bit Shared Key (Wi-Fi) Encryption Settings |
29 |
||||||
|
128-bit Shared Key (WiFi) Encryption Settings |
29 |
||||||
|
128-bit Dynamic Security Link Authentication |
30 |
||||||
|
128-bit Dynamic Security Link Settings |
30 |
|
|||||
|
Setting up Auto Network Connect |
31 |
|
|
|
|||
|
Setting up an Ad Hoc Network |
31 |
|
|
|
|
||
|
Starting an Ad Hoc Network Session |
31 |
|
|
||||
|
Joining an Ad Hoc Network Session |
32 |
|
|
||||
|
Ending an Ad Hoc Network Session |
32 |
|
|
||||
|
Changing Power, Traffic, and Address Settings |
33 |
|
|||||
|
Changing Your Password |
34 |
|
|
|
|
|
|
|
Running Diagnostics |
34 |
|
|
|
|
|
|
|
Viewing Configuration Information |
34 |
|
|
|
|||
|
|
|
|
|
|
|
||
5 |
TROUBLESHOOTING |
|
|
|
|
|
|
|
|
Diagnosing Problems |
37 |
|
|
|
|
|
|
|
Using the Tools Window |
39 |
|
|
|
|
|
|
|
Uninstalling the Card |
39 |
|
|
|
|
|
|
|
Uninstalling Software Utilities |
40 |
|
|
|
|
||
|
Updating PC Card Driver Software |
40 |
|
|
|
|||
|
Windows 95, Windows 98, and Windows 98 SE |
40 |
||||||
|
Windows Millenium Edition (Windows Me) |
41 |
|
|||||
|
Windows 2000 |
42 |
|
|
|
|
|
|
|
Windows NT 43 |
|
|
|
|
|
|
|
|
Upgrading PC Card Firmware |
44 |
|
|
|
|
||
A WINDOWS NT INSTALLATION WITHOUT NETWORKING INSTALLED
Installation Under Service Pack 4 |
45 |
|
Installation Under Service Pack 5 and Above 45 |
||
Install Files and Networking |
45 |
|
Install CardWizard |
47 |
|
Set Up the PC Card |
47 |
|
Install Utilities 48 |
|
|
B WINDOWS NT INSTALLATION WITH SOFTEX CARD EXECUTIVE
Install with Networking 49
Softex 2.8.2 and Above |
49 |
Older Softex Versions |
50 |
Install Without Networking |
52 |
Softex 2.8.2 and Above |
52 |
Older Softex Versions |
53 |

C TECHNICAL SUPPORT
Online Technical Services |
55 |
|
|
World Wide Web Site |
55 |
|
|
3Com Knowledgebase Web Services |
55 |
||
3Com FTP Site |
55 |
|
|
Support from Your Network Supplier |
56 |
||
Support from 3Com |
56 |
|
|
Returning Products for Repair 58 |
|
||
REGULATORY COMPLIANCE INFORMATION

INTRODUCTION
1
3Com wireless technology brings the benefits of a local area network (LAN) to your office without the restraints and expense of network wiring. If your office already has an Ethernet LAN, the 3Com 11 Mbps Wireless LAN can extend the network without adding more wires.
How Does a Wireless In a traditional LAN, computers communicate through wires. Instead of wires, a LAN Work? wireless LAN uses radio signals to communicate.
Network Association Computers that are equipped for wireless LAN communication are called wireless LAN clients. The wireless communication is called network association. Clients associate through one or more access points, which are wireless base stations that act as wireless hubs.
An access point can be connected to a wired network device such as an Ethernet hub, switch, or router to give clients access to the wired network where they can share files and printers and gain access to the Internet.
Roaming If the office space is large, you can set up multiple access points on the same network to increase coverage. When a wireless client begins to lose the signal
as it moves away from an access point, it can reassociate seamlessly with another access point. This is called roaming.
Security You can set up security to encrypt your wireless transmissions so that your data cannot be deciphered if it is intercepted, and to prevent access to the network by unauthorized clients.
Ad Hoc Networks Wireless clients can associate among themselves at close range without an access point by using ad hoc (temporary) networks. You may wish to set up an ad hoc network, for example, if a group is working away from the office, or if a group in the office needs to share files apart from the LAN.
8 CHAPTER 1: INTRODUCTION
Setting Up a 3Com The type of network you decide to set up depends on the size of your office and Wireless LAN whether or not you require connection to a wired LAN. You can also set up
security for each of the different types of networks. Your set up will probably resemble one or more of the following examples.
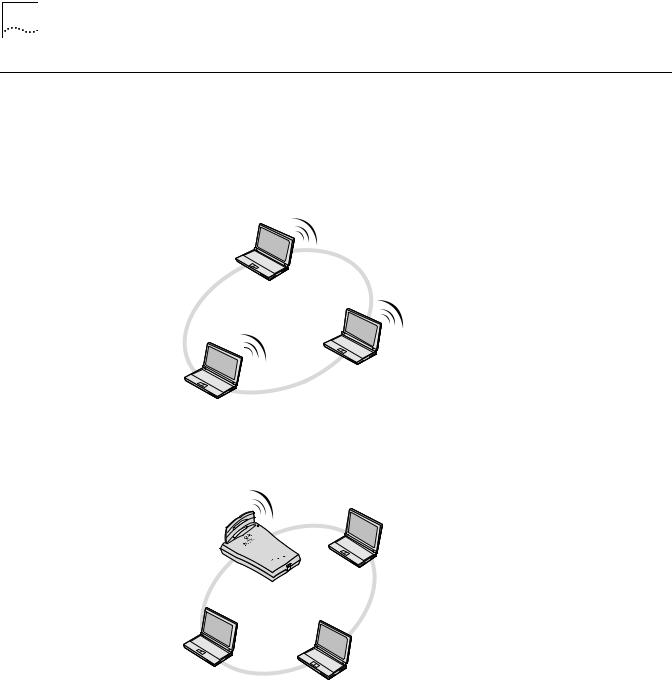
All Wireless Networks The simplest 3Com wireless LAN consists of several clients associating in an ad hoc network without an access point.
A simple configuration consists of one access point and several clients. The clients can associate with the wireless network anywhere within the coverage area of the access point. The access point is not connected to any other network segments.
For more complex requirements, you can configure several access points as separate networks at the same site. The access points use different network identifiers called wireless LAN service areas (WLAN service areas, also called
Extended Service Set Identities or ESSID). Clients can roam within the coverage areas of access points that have the same WLAN service areas. They cannot roam to the coverage areas of access points that are configured with different WLAN service areas.

Product Registration and Support |
9 |
Wired/Wireless An access point can be connected to a wired LAN with an Ethernet cable to create Networks a mixed wired/wireless network. In this configuration, the access point provides
the link between the wired network and wireless clients. Clients can move freely throughout the service area of the access point and remain associated with the larger network for services such as printing and Internet access.
Multiple access points can be connected to an existing LAN to provide complete wireless network coverage. Wireless clients can roam seamlessly between different access points with the same WLAN service areas and remain associated with the larger network.
Product Registration To register your product with 3Com, go to the following Web page: and Support
http://support.3com.com/warrantyregistration/frontpg.pl
For support information, see “Technical Support” and go to the following
Web page:
http://support.3com.com
INSTALLING THE WIRELESS CLIENT
2
|
Installing a wireless client consists of inserting the 3Com Wireless LAN PC Card |
|
|
with XJACK® Antenna in your computer and installing the software driver and |
|
|
utilities. If you have 3Com Administrator Utilities installed on a wireless client, you |
|
|
can manage access points or run a site survey. |
|
|
|
|
Requirements |
Before you start the installation, make sure that you have the following items: |
|
|
|
|
|
Operating System One of the following: |
|
|
n Windows 95 |
|
n
n
n
n
The 3Com wireless LAN PC Card runs under Windows 95 version B or higher. If you do not know which version of Windows 95 is installed on your computer, you can display it as follows:
In the Control Panel, double-click System to display the System Properties dialog box. Click the General Tab to display the Windows 95 version information. Version B (also known as OSR 2) is identified as 4.00.950b.
Windows 98
Windows Millennium Edition (Windows Me)
Windows NT with Service Pack 4 or above
Windows 2000
Web Browser |
Internet Explorer version 4 required. |
|
Internet Explorer version 5.5 recommended. |
|
You can download Internet Explorer from www.microsoft.com |
|
|
PC Card |
3Com 11 Mbps Wireless LAN PC Card with XJACK Antenna |
Installation Media One of the following 3Com CDs:
n
n
3Com End User Utilities CD, which comes with the PC Card and contains utilities for users.
3Com Administrator Utilities CD, which comes with the 3Com
11 Mbps Wireless LAN Access Point and contains utilities for users and tools for administrators.
Other
Requirements
nThe installation program may ask for the operating system installation media (usually a CD supplied with your computer) or for a path to the operating system files. If you have other networking software installed on your computer, the installation program may ask for its installation media.
Inserting the PC Card
1Turn on the computer.
2Insert the 3Com PC Card into the PC Card slot until it seats snugly.

12 CHAPTER 2: INSTALLING THE WIRELESS CLIENT
Arrows on the front of the card indicate the insertion point to the slot. Align the card properly before inserting it in the slot.
CAUTION: Forcing the card into the slot can damage the computer or the card.
|
|
|
|
|
|
|
|
|
|
|
|
|
|
|
|
|
|
|
|
|
|
|
|
|
|
|
|
|
|
|
|
Using the |
|
|
The XJACK antenna, which is attached to the end of the PC Card, has two |
||||
XJACK Antenna |
|
|
positions: extended and retracted. The antenna works like a ball-point pen--press |
||||
|
|
|
|
|
it to extend it, press it again to retract it. The antenna must be extended to make a |
||
|
|
|
|
|
network association. To prevent it from damage, the antenna should be retracted |
||
|
|
|
|
|
when not in use, when you are inserting the card in your computer, or when you |
||
|
|
|
|
|
are transporting the computer. |
||
|
|
|
|
|
CAUTION: Do not pull on the antenna to remove the card. |
||
|
|
|
|
|
|||
|
|
|
|
|
|
|
|
The figure at left below shows the PC Card installed with its antenna retracted.
The figure at right shows the antenna extended.
To get the best reception:
n
n
Clear the area around the antenna of items that could block radio transmission, such as metal objects, electronic devices, and cordless telephones.
Even a slight change in antenna orientation can affect the network association. If necessary, move your computer a few inches to find a better signal.

|
|
Installing the Software 13 |
|
|
|
Installing the |
Depending on how your computer is set up, the installation program may ask |
|
Software |
for the operating system installation media (usually a CD supplied with your |
|
|
computer) or for a path to the operating system files. If you have other networking |
|
|
software installed on your computer, the installation program may ask for the |
|
|
networking software installation media. Make sure that you have the appropriate |
|
|
installation CDs or that you know the appropriate paths before you begin |
|
|
installing the software. |
|
|
If you need help during the installation, see “Troubleshooting”. |
|
|
Follow the instructions for your operating system: |
|
|
For this Windows version: See this procedure: |
|
|
Windows 2000, Windows |
“Windows Wizard Installation” |
|
Millennium Edition |
|
|
(Windows Me), |
|
|
Windows 98, Windows 95 |
|
|
Windows NT |
“Windows NT Installation with Networking Installed” or |
|
|
“Windows NT Installation Without Networking Installed”. |
|
|
|
Windows Wizard |
Make sure that the computer is running and the PC Card is inserted. The driver |
|
Installation |
installation process starts automatically when the PC Card is inserted. |
|
Install Files
1Put the 3Com CD in the CD-ROM drive.
2In the Add New Hardware Wizard window, click Next.
3Respond to the instructions in the next windows:
a When the driver location is confirmed, click Next.
bVerify the driver name (3Com 3CRWE62092A Wireless LAN PC Card) and click Next.
The installation program copies files from the 3Com CD and Windows operating system.
This copying process may take a few moments, and the progress bar may seem to update slowly.
The installation may prompt for your operating system installation CD, for a path to the operating system, or for the installation CD of other installed networking software. If it does, remove the 3Com CD and insert the appropriate CD.
cWhen you are notified that the installation is complete, remove the CD and click Finish.
4 At the prompt to restart the computer, click Yes.

14 CHAPTER 2: INSTALLING THE WIRELESS CLIENT
Set Up the PC Card After the computer restarts, the 3Com 11 Mbps Wireless LAN Client Setup window opens, in which you specify the PC Card configuration.
1In the 3Com 11 Mbps Wireless LAN Client Setup window, select Typical and click Next.
Typical configures the PC Card with the following default values:
WLAN Service Area—Attach to any WLAN Service Area automatically
Security Setting—No security (Open system)
If you want to customize the PC Card configuration, for example, to add security, select Custom. See “Custom Installation Options” for details on custom settings. For the fastest installation, it is recommended that you use the typical settings.
You can customize the configuration later as described in “Setting the Wireless Client Configuration”.
2In the Summary window, review the PC Card setup. To install the software utilities, make sure that the Start client software installation when finished box is checked.
If you are reinstalling the PC Card and already have the software utilities installed, this box is unchecked.
3Click Finish to complete the PC Card setup and start the software utilities installation. The 3Com 11 Mbps Wireless LAN Setup program starts.
Install Utilities
1Read the Welcome page and click Next.
2Read the Software License Agreement and click Yes. (If you click No, the installation stops.)
3Select a destination folder for the software files and click Next.
4In the Setup Type window, select the type of installation for the software:
Typical—Installs the software and documentation.
Compact—Installs the software, but not documentation.
Custom—Allows you to choose the components to install.
5Follow the directions in the Select Program Folder window and click Next.
6In the Desktop Icon Option window, click Yes.
7In the Setup Complete window, click Finish.
8If you are prompted to restart your computer, do so.
This completes the basic installation. To confirm the installation, see “Confirming the Installation”.
Windows NT |
The following procedure is for installing the card software when networking is |
Installation with |
already installed on your computer. If networking is not already installed, see |
Networking Installed |
“Windows NT Installation Without Networking Installed”. |

Windows NT Installation with Networking Installed 15
Either CardWizard or Softex Card Executive (utilities that help Windows NT load and manage software) must be installed on your computer to use the PC Card. If the installation program does not detect one of the utilities, it asks whether you want to install CardWizard from the 3Com CD.
Internet Explorer version 4 is required to view help files. It is recommended that you install Internet Explorer version 5 or later.
Installing Under Service It is recommended that you upgrade to the latest service pack. If you are using Pack 4 Service Pack 4, you must install CardWizard before inserting the PC Card into
the computer. If you have Softex Card Executive installed, see “Windows NT Installation With Softex Card Executive” for more details. Otherwise, follow this procedure:
1Put the 3Com CD in the CD-ROM drive.
2If the 3Com 11 Mbps WLAN Menu appears, click Exit.
3From the Windows Start menu, select Start/Run.
4In the run dialog box, type the path to the CardWizard installer on the 3Com CD. For example: d:\cw\disk1\setup.exe
5Follow the prompts to install CardWizard.
At the prompt to restart, shut down the computer.
6Insert the PC Card, restart the computer, and continue with the installation. Refer to “Installing Under Service Pack 5 and Above” for detailed instructions.
Installing Under Service The installation procedure consists of installing files, installing CardWizard, setting Pack 5 and Above up the PC Card, and installing utilities.
Install Files
1Make sure that the computer is running and the PC Card is inserted.
2Put the 3Com CD in the CD-ROM drive.
If the 3Com 11 Mbps WLAN Menu appears, click Exit.
3From the Windows Start menu, select Settings/Control Panel.
4In the Control Panel, double-click Network.
5Click the Adapters tab.
6In the Adapters tab, click Add.
7In the Select Network Adapter window, click Have Disk.
8In the Insert Disk window, make sure that the correct path to your CD-ROM drive appears in the entry box (for example, d:) and click OK.
9In the Select OEM Option window, select 3Com 3CRWE62092A Wireless LAN PC Card and click OK.
10In the PC Card Setup window, accept the default settings and click OK.
The default settings work in most cases. However, you may need to specify values for your installation.
Wait while the files are copied.

16 CHAPTER 2: INSTALLING THE WIRELESS CLIENT
11In the Adapters tab, click Close.
12If the Microsoft TCP/IP Properties screen appears, enter the requested information for your network environment.
Refer to the Windows NT documentation for assistance. If you choose the DHCP server option, click Yes to the DHCP prompt. When you are finished entering the appropriate TCP/IP information, click OK.
13When prompted to restart the computer, click Yes.
Install CardWizard
If CardWizard was already installed before you began installing the PC Card, the installation skips this portion and proceeds directly to “Set Up the PC Card.”
1At the prompt to install CardWizard, click Yes.
If you click No and you do not have CardWizard installed, the installation stops.
2In the CardWizard window, click Next.
3In the CardWizard welcome page, click Next.
4Read the CardWizard Software License Agreement and click Yes.
5When prompted to remove the PC Card, eject the card and click Yes.
6In the Select Type of Platform window, select your computer type and click Next. If your computer type is not listed, select Other Notebook and click Next.
7Respond to the prompts to install CardWizard.
8When the CardWizard installation finishes, click the radio button to restart the computer and click Finish.
9Insert the PC Card.

Windows NT Installation with Networking Installed 17
Set Up the PC Card
After the computer restarts, the 3Com 11 Mbps Wireless LAN Client Setup window opens, in which you specify the PC Card configuration.
1In the 3Com 11 Mbps Wireless LAN Client Setup window, select Typical and click Next.
The Typical comfiguration sets up the PC Card with the following default values:
WLAN Service Area—Attach to any WLAN Service Area automatically
Security Setting—No security (Open system)
If you want to customize the PC Card configuration (to add security, for example), select Custom. See “Custom Installation Options” for details on custom settings. For the fastest installation, it is recommended that you use the Typical settings.
You can customize the configuration later as described in “Setting the Wireless Client Configuration”.
2In the Summary window, review the PC Card setup and click Finish.
3When prompted to run the Setup program, click OK.
4Run the Setup program:
a From the Windows Start menu, select Run.
bIn the Run dialog box, enter a path to the Setup program on the 3Com CD. For example, d:\srsetup.exe.
The 3Com 11 Mbps Wireless LAN Setup program starts.
Install Utilities
1Read the Welcome page and click Next.
2Read the Software License Agreement and click Yes. (If you click No, the installation stops.)
3Select a destination folder for the software files and click Next.
4In the Setup Type window, select the type of installation for the software:
Typical—Installs the software and documentation.
Compact—Installs the software but not documentation.
Custom—Allows you to choose the components to install.
5Follow the directions in the Select Program Folder window and click Next.
6In the Desktop Icon Option window, click Yes.
7In the next window, if the option to restart the computer appears, select it and click Finish.
If you had a service pack installed before setting up the PC Card, reinstall it and restart the computer.
This completes the basic installation. To confirm the installation, see “Confirming the Installation.”

18 CHAPTER 2: INSTALLING THE WIRELESS CLIENT
Confirming the |
When the PC Card and software are installed correctly, you will see the following |
Installation |
items after you restart the computer: |
n
n
PC Card LED is blinking.
3Com WLAN Launcher is running. This utility shows the status of your network association.
n
n
3Com icon is in the Windows system tray.
Shortcut icon to the 3Com WLAN Launcher is on your desktop (unless you specified no icon during the installation).
|
If you do not see the 3Com WLAN Launcher window, click the 3Com icon in the |
|
Windows system tray to display it. |
|
If the 3Com WLAN Launcher is not already running, you can start it by double |
|
clicking the shortcut on your desktop, or, from the Windows Start menu, select |
|
Start/Programs/3Com 11 Mbps Wireless LAN/3Com WLAN Launcher. |
|
For more information, see “Using the Wireless LAN”. |
|
|
Custom Installation |
If you want to set up a custom configuration during installation, when the |
Options |
installation program asks for the Setup Type, select Custom and click Next. |
|
You can change the WLAN Service Area and Security settings. |
WLAN Service Area |
Attach to any WLAN Service Area automatically—This option associates the client |
|
automatically to the WLAN service area with the best signal strength. |
|
Specify a WLAN Service Area—Select this option and enter the name of a WLAN |
|
service area. The name must match the name of the access point WLAN Service |
|
Area exactly. |
|
For more information on these settings, see “Changing Network and Security |
|
Settings”. |
Security Settings |
See “Changing Network and Security Settings”for information about Security. |

Installing the Documentation |
19 |
Installing the |
Documentation in PDF and HTML formats are supplied on the 3Com CD and are |
Documentation |
installed automatically during a typical installation. If you chose not to install |
|
documentation when you installed the PC Card and utilities, you can use |
|
Add/Remove Programs in the Control Panel to install it. |
1From the Windows Start menu, select Start/Settings/Control Panel.
2Double click Add/Remove Programs.
3In the next window, select 3Com 11 Mbps Wireless LAN and click Add/Remove.
4In the Install Shield Wizard window, click the Modify radio button and click Next.
5In the next window, check the boxes next to the documents that you want to install and click Next.
A dialog box containing a document file name appears.
6Insert the 3Com CD.
7Browse to the path on the CD that contains the file name indicated in the dialog box and click OK.
You need Acrobat Reader to read the documentation in PDF format and a Web browser to read the documentation in HTML format. The English versions of Acrobat Reader and the Internet Explorer Web browser are on the 3Com CD.
You can obtain versions of Acrobat Reader in languages other than English from the Adobe Web site at www.adobe.com.
You can obtain versions of Internet Explorer in languages other than English from the Microsoft Web site at www.microsoft.com.
Loading...