


 Loading...
Wireless LAN Mobility System
Wireless LAN Switch Manager
User’s Guide
3CRWXR10095A, 3CRWX120695A, 3CRWX440095A
http://www.3com.com/
Part No. DUA-WXM10-AAA01
Published June 2005
3Com Corporation 350 Campus Drive Marlborough, MA USA 01752-3064
Copyright © 2005, 3Com Corporation. All rights reserved. No part of this documentation may be reproduced in any form or by any means or used to make any derivative work (such as translation, transformation, or adaptation) without written permission from 3Com Corporation.
3Com Corporation reserves the right to revise this documentation and to make changes in content from time to time without obligation on the part of 3Com Corporation to provide notification of such revision or change.
3Com Corporation provides this documentation without warranty, term, or condition of any kind, either implied or expressed, including, but not limited to, the implied warranties, terms or conditions of merchantability, satisfactory quality, and fitness for a particular purpose. 3Com may make improvements or changes in the product(s) and/or the program(s) described in this documentation at any time.
If there is any software on removable media described in this documentation, it is furnished under a license agreement included with the product as a separate document, in the hard copy documentation, or on the removable media in a directory file named LICENSE.TXT or !LICENSE.TXT. If you are unable to locate a copy, please contact 3Com and a copy will be provided to you.
UNITED STATES GOVERNMENT LEGEND
If you are a United States government agency, then this documentation and the software described herein are provided to you subject to the following:
All technical data and computer software are commercial in nature and developed solely at private expense. Software is delivered as “Commercial Computer Software” as defined in DFARS 252.227-7014 (June 1995) or as a “commercial item” as defined in FAR 2.101(a) and as such is provided with only such rights as are provided in 3Com’s standard commercial license for the Software. Technical data is provided with limited rights only as provided in DFAR 252.227-7015 (Nov 1995) or FAR 52.227-14 (June 1987), whichever is applicable. You agree not to remove or deface any portion of any legend provided on any licensed program or documentation contained in, or delivered to you in conjunction with, this User Guide.
Unless otherwise indicated, 3Com registered trademarks are registered in the United States and may or may not be registered in other countries.
3Com is a registered trademark of 3Com Corporation. The 3Com logo is a trademark of 3Com Corporation.
Mobility Domain, Mobility Point, Mobility Profile, Mobility System, Mobility System Software, MP, MSS, and SentrySweep are trademarks of Trapeze Networks, Inc.
Intel and Pentium are registered trademarks of Intel Corporation. Microsoft, MS-DOS, Windows, Windows XP, and Windows NT are registered trademarks of Microsoft Corporation.
All other company and product names may be trademarks of the respective companies with which they are associated.
ENVIRONMENTAL STATEMENT
It is the policy of 3Com Corporation to be environmentally-friendly in all operations. To uphold our policy, we are committed to:
Establishing environmental performance standards that comply with national legislation and regulations.
Conserving energy, materials and natural resources in all operations.
Reducing the waste generated by all operations. Ensuring that all waste conforms to recognized environmental standards. Maximizing the recyclable and reusable content of all products.
Ensuring that all products can be recycled, reused and disposed of safely.
Ensuring that all products are labelled according to recognized environmental standards.
Improving our environmental record on a continual basis.
End of Life Statement
3Com processes allow for the recovery, reclamation and safe disposal of all end-of-life electronic components.
Regulated Materials Statement
3Com products do not contain any hazardous or ozone-depleting material.
Environmental Statement about the Documentation
The documentation for this product is printed on paper that comes from sustainable, managed forests; it is fully biodegradable and recyclable, and is completely chlorine-free. The varnish is environmentally-friendly, and the inks are vegetable-based with a low heavy-metal content.

CONTENTS
ABOUT THIS GUIDE
|
Conventions 9 |
|
|
|
|
|
|
|
Documentation |
10 |
|
|
|
|
|
|
Documentation Comments |
11 |
|
|
|
||
|
|
|
|
|
|
|
|
1 GETTING STARTED |
|
|
|
|
|
||
|
Hardware Requirements for 3WXM Client |
13 |
|
||||
|
Hardware Requirements for 3WXM Services |
14 |
|
||||
|
Software Requirements |
14 |
|
|
|
|
|
|
Preparing for Installation |
15 |
|
|
|
|
|
|
User Privileges |
15 |
|
|
|
|
|
|
Serial Number, License Key and Activation Key |
15 |
|||||
|
HP OpenView Network Node Manager |
16 |
|
||||
|
Resource Allocation |
16 |
|
|
|
|
|
|
3WXM Services Options |
16 |
|
|
|
||
|
Installing 3WXM |
18 |
|
|
|
|
|
|
Unpacking Files 18 |
|
|
|
|
|
|
|
Using the Installation Wizard |
18 |
|
|
|||
|
Start the 3WXM Services |
18 |
|
|
|||
|
Connect 3WXM Clients to 3WXM Services |
19 |
|||||
|
Configure 3WXM Services |
19 |
|
|
|||
|
3WXM Access Control 21 |
|
|
|
|||
|
3WXM Interface |
22 |
|
|
|
|
|
|
Display the Main Window |
22 |
|
|
|||
|
Using Menu Bar and Toolbars |
24 |
|
|
|||
|
Setting Preferences |
24 |
|
|
|
|
|
|
Easy Configuration Using Wizards 25 |
|
|
||||
|
View Topology |
25 |
|
|
|
|
|
|
Shortcut to Wizards and Editing Properties 26 |
|
|||||
|
Getting Help |
27 |
|
|
|
|
|

2PLANNING AND MANAGING YOUR WIRELESS NETWORK WITH
3WXM
Overview 29 |
|
|
|
|
|
|
|
Which Services To Provide? |
30 |
|
|
|
|||
Network Plan |
31 |
|
|
|
|
|
|
RF Coverage Area |
31 |
|
|
|
|
|
|
RF Auto-Tuning |
32 |
|
|
|
|
||
RF Auto-Tuning with Modelling |
32 |
|
|||||
RF Planning |
33 |
|
|
|
|
|
|
Which Planning Method Should I Use? |
33 |
||||||
Configuration |
35 |
|
|
|
|
|
|
Wireless Configuration |
36 |
|
|
|
|||
AAA Security Configuration |
38 |
|
|
||||
Authentication |
38 |
|
|
|
|
||
Authorization |
|
40 |
|
|
|
|
|
Accounting |
40 |
|
|
|
|
||
System and Administration Configuration |
40 |
||||||
Configure Basic WX Switch Properties |
41 |
||||||
Configure WX Switch Connection Information 42 |
|||||||
Configure Boot Information |
42 |
|
|||||
Equipment Installation |
42 |
|
|
|
|
||
Deployment |
43 |
|
|
|
|
|
|
Management and Monitoring |
44 |
|
|
||||
Network Status |
44 |
|
|
|
|
||
RF Monitoring |
45 |
|
|
|
|
|
|
Client Monitoring |
46 |
|
|
|
|
||
Rogue Detection |
46 |
|
|
|
|
||
Event Logging |
47 |
|
|
|
|
|
|
Verification |
47 |
|
|
|
|
|
|
Reporting |
47 |
|
|
|
|
|
|
RF Plan Optimization |
|
49 |
|
|
|
|
|

3 |
CONFIGURING WIRELESS SERVICES |
|
|||||||
|
Overview |
51 |
|
|
|
|
|
|
|
|
Configure Employee Access Services |
52 |
|
||||||
|
Task Table |
52 |
|
|
|
|
|
|
|
|
Step Summary |
56 |
|
|
|
|
|
||
|
Example: Configure Employee Access |
57 |
|
||||||
|
Create a Service Profile |
57 |
|
|
|
||||
|
Create a Radio Profile 59 |
|
|
|
|||||
|
Configure RADIUS Servers |
61 |
|
|
|||||
|
Specify Network Access Rules |
64 |
|
||||||
|
Set Up VLANs on WX Switches |
66 |
|
||||||
|
What’s Next? |
68 |
|
|
|
|
|
|
|
|
Configure Guest Access Services |
69 |
|
|
|||||
|
Task Table |
70 |
|
|
|
|
|
|
|
|
Step Summary |
71 |
|
|
|
|
|
||
|
Optional: Configure Mobility Profiles |
73 |
|
||||||
|
Configure Local Authentication |
74 |
|
|
|||||
|
What’s Next? |
76 |
|
|
|
|
|
|
|
|
Configure Voice over Wireless IP Service |
77 |
|
||||||
|
Task Table |
78 |
|
|
|
|
|
|
|
|
Step Summary |
81 |
|
|
|
|
|
||
|
Configure Local Authentication |
82 |
|
|
|||||
|
Configure Access Control Lists |
84 |
|
|
|||||
|
Example: Creating an ACL for SpectraLink Wireless Phones |
85 |
|||||||
|
Example: Creating an ACL for Avaya Wireless Phones 87 |
|
|||||||
|
What’s Next? |
90 |
|
|
|
|
|
|
|
4 |
|
|
|
|
|
||||
USING RF AUTO-TUNING |
|
|
|
|
|||||
|
Overview |
91 |
|
|
|
|
|
|
|
|
Place Your Equipment |
92 |
|
|
|
|
|||
|
Configure Initial WX Switch Connectivity |
92 |
|
||||||
|
Upload the WX Switch Configuration into a 3WXM Network Plan |
92 |
|||||||
|
Create a Service Profile |
94 |
|
|
|
|
|||
|
Create a Radio Profile and Map the Service Profile to It 95 |
|
|||||||
|
Create Your MAPs |
97 |
|
|
|
|
|
||
|
Apply a Radio Profile to Each Radio |
98 |
|
||||||
|
What’s Next? |
98 |
|
|
|
|
|
|
|

5 USING RF AUTO-TUNING WITH MODELLING
|
Overview |
99 |
|
|
|
|
|
Add Site Information |
100 |
|
|||
|
Insert RF Obstacles |
104 |
|
|||
|
Create Your RF Coverage Area 106 |
|||||
|
Create a Wiring Closet |
106 |
||||
|
Create Your RF Coverage Area 107 |
|||||
|
Add MAPs |
109 |
|
|
||
|
Associate MAPs to the Coverage Area 110 |
|||||
|
What’s Next? |
112 |
|
|
|
|
|
|
|
||||
6 USING RF PLANNING |
|
|||||
|
Overview |
113 |
|
|
|
|
|
Prepare the Floor Drawings |
114 |
||||
|
Define Site Information |
115 |
||||
|
Import a Floor Plan |
120 |
||||
|
Set the Scale |
121 |
|
|
||
|
Clean Layout |
122 |
|
|
||
|
Model RF Obstacles |
125 |
|
|||
|
Import a Site Survey |
127 |
|
|||
|
Plan RF Coverage |
127 |
|
|||
|
Add Wiring Closets |
127 |
||||
|
Create Coverage Areas |
129 |
||||
|
Compute and Place MAPs |
134 |
||||
|
Assign Channel Settings |
136 |
||||
|
Calculate Optimal Power |
138 |
||||
|
Display Coverage |
|
139 |
|
||
|
Generate a Work Order |
141 |
||||
|
Install the Equipment |
142 |
|
|||
|
What’s Next? |
142 |
|
|
|
|

7 MANAGING AND MONITORING YOUR NETWORK
|
Overview |
143 |
|
|
|
|
|
|
|
|
Deploy Your Configuration |
|
144 |
|
|
|
|
||
|
Perform Basic Administrative Tasks |
|
146 |
|
|
||||
|
Configuring WX Management Services |
146 |
|
||||||
|
Distributing Image and Configuration Files 147 |
|
|||||||
|
Using the Image Repository |
|
148 |
|
|
||||
|
Distributing System Images |
148 |
|
|
|||||
|
Distributing WX Configuration Files |
149 |
|
||||||
|
Saving Versions of Network Plans |
150 |
|
|
|||||
|
Importing or Exporting Switch Configuration Files |
151 |
|||||||
|
Monitoring Examples |
153 |
|
|
|
|
|
||
|
Monitor an Individual User |
153 |
|
|
|
||||
|
Find the User |
154 |
|
|
|
|
|
|
|
|
Place User on Watch List |
155 |
|
|
|||||
|
Locate the User |
155 |
|
|
|
|
|
||
|
Display User Activity |
|
157 |
|
|
|
|
||
|
View Long-Term User Statistics |
158 |
|
|
|||||
|
Monitor a Group of Users |
161 |
|
|
|
||||
|
Monitor a Rogue |
163 |
|
|
|
|
|
||
|
Configuring Countermeasures |
166 |
|
|
|||||
|
|
|
|
|
|||||
8 OPTIMIZING A NETWORK PLAN |
|
|
|
||||||
|
Overview |
169 |
|
|
|
|
|
|
|
|
Using RF Measurements from MAPs |
170 |
|
|
|||||
|
Using RF Measurements from an Ekahau Site Survey |
172 |
|||||||
|
Generating an Ekahau Site Survey Work Order |
173 |
|||||||
|
Importing RF Measurements from the Ekahau Site Survey 176 |
||||||||
|
Optimizing the RF Coverage Model |
179 |
|
|
|||||
|
Locating and Fixing Coverage Holes |
181 |
|
|
|||||
|
Displaying the RF Coverage Area |
181 |
|
|
|||||
|
Locking Down MAPs |
183 |
|
|
|
|
|||
|
Fixing a Coverage Hole |
184 |
|
|
|
|
|||
|
Computing and Placing New MAPs 184 |
|
|||||||
|
Replanning Your Network |
184 |
|
|
|
||||
|
What’s Next? 185 |
|
|
|
|
|
|
|
|

INDEX

ABOUT THIS GUIDE
This manual shows you how to plan, configure, deploy, and manage a
Mobility System wireless LAN (WLAN) using the 3Com Wireless LAN
Switch Manager (3WXM).
Read this manual if you are a network administrator or a person responsible for managing a WLAN.
If release notes are shipped with your product and the information there differs from the information in this guide, follow the instructions in the release notes.
Most user guides and release notes are available in Adobe Acrobat
Reader Portable Document Format (PDF) or HTML on the 3Com
World Wide Web site:
http://www.3com.com/
Conventions |
Table 1 and Table 2 list conventions that are used throughout this guide. |
||
|
Table 1 |
Notice Icons |
|
|
|
|
|
|
Icon |
Notice Type |
Description |
|
|
|
|
|
|
Information note |
Information that describes important features or |
|
|
|
instructions |
|
|
Caution |
Information that alerts you to potential loss of data or |
|
|
|
potential damage to an application, system, or device |
|
|
|
|

10 CHAPTER : ABOUT THIS GUIDE
This manual uses the following text and syntax conventions:
Table 2 Text Conventions
Convention |
Description |
|
|
Menu Name > |
Indicates a menu item that you select. For example, |
Command |
File > New indicates that you select New from the File |
|
menu. |
|
|
Monospace text |
Sets off command syntax or sample commands and system |
|
responses. |
|
|
Bold text |
Highlights commands that you enter or items you select. |
|
|
Italic text |
Designates command variables that you replace with |
|
appropriate values, or highlights publication titles or words |
|
requiring special emphasis. |
|
|
[ ] (square brackets) |
Enclose optional parameters in command syntax. |
|
|
{ } (curly brackets) |
Enclose mandatory parameters in command syntax. |
|
|
| (vertical bar) |
Separates mutually exclusive options in command syntax. |
|
|
Keyboard key names |
If you must press two or more keys simultaneously, the key |
|
names are linked with a plus sign (+). Example: |
|
Press Ctrl+Alt+Del |
|
|
Words in italics |
Italics are used to: |
|
n Emphasize a point. |
n
n
Denote a new term at the place where it is defined in the text.
Highlight an example string, such as a username or SSID.
Documentation |
The 3WXM documentation set includes the following documents. |
|
Wireless LAN Switch Manager (3WXM) Release Notes |
|
These notes provide information about the system software release, |
|
including new features and bug fixes. |
|
Wireless LAN Switch and Controller Release Notes |
|
These notes provide information about the system software release, |
|
including new features and bug fixes. |
|
Wireless LAN Switch and Controller Quick Start Guide |
|
This guide provides instructions for performing basic setup of secure |
|
(802.1X) and guest (WebAAA™) access, for configuring a Mobility |
|
Domain for roaming, and for accessing a sample network plan in |
|
3WXM for advanced configuration and management. |
Documentation Comments 11
Wireless LAN Switch Manager Reference Manual
This manual shows you how to plan, configure, deploy, and manage a
Mobility System wireless LAN (WLAN) using the 3Com Wireless LAN
Switch Manager (3WXM).
Wireless LAN Switch and Controller Installation and Basic
Configuration Guide
This guide provides instructions and specifications for installing a WX wireless switch in a Mobility System WLAN, and basic instructions for deploying a secure IEEE 802.11 wireless service.
Wireless LAN Switch and Controller Configuration Guide
|
This guide provides instructions for configuring and managing the |
|
system through the Mobility System Software (MSS) CLI. |
|
Wireless LAN Switch and Controller Command Reference |
|
This reference provides syntax information for all MSS commands |
|
supported on WX switches. |
|
|
Documentation |
Your suggestions are very important to us. They will help make our |
Comments |
documentation more useful to you. Please e-mail comments about this |
|
document to 3Com at: |
|
pddtechpubs_comments@3com.com |
|
Please include the following information when contacting us: |
|
Document title |
|
Document part number and revision (on the title page) |
|
Page number (if appropriate) |
Example:
Wireless LAN Switch and Controller Configuration Guide
Part number 730-9502-0071, Revision B
Page 25
Please note that we can only respond to comments and questions about 3Com product documentation at this e-mail address. Questions related to Technical Support or sales should be directed in the first instance to your network supplier.
12 CHAPTER : ABOUT THIS GUIDE

1 |
GETTING STARTED |
|
This chapter contains information about recommended system requirements you should meet for optimum 3WXM performance, installing 3WXM client and 3WXM Services software, and an introduction to using the 3WXM interface.
Hardware |
Table 3 shows the minimum and recommended requirements to run the |
||
Requirements for |
3WXM client in Windows. |
|
|
3WXM Client |
Table 3 Hardware Requirements for Running 3WXM Client in Windows |
||
|
|||
|
|
|
|
|
|
Minimum |
Recommended |
|
|
|
|
|
Processor |
Intel Pentium 4 2 GHz or |
Intel Pentium 4 3 GHz or |
|
|
equivalent |
equivalent |
|
|
|
|
|
RAM |
512 MB |
1 GB |
|
|
|
|
|
Hard drive space |
100 MB |
200 MB |
|
available |
|
|
|
|
|
|
|
Monitor resolution |
1024x768 pixels, 24-bit |
1600x1200 pixels, 32-bit |
|
|
color |
color |
|
|
|
|
|
CD-ROM drive |
CD-ROM or equivalent |
CD-ROM |
|
|
|
|
.

14 CHAPTER 1: GETTING STARTED
Hardware |
Table 4 shows the minimum and recommended requirements to run the |
||
Requirements for |
3WXM Services in Windows. |
|
|
3WXM Services |
|
|
|
|
Table 4 Hardware Requirements for Running 3WXM Services in Windows |
||
|
|
|
|
|
|
Minimum |
Recommended |
|
|
|
|
|
Processor |
Intel Pentium 4 2.4 GHz |
Intel Pentium 4 3.6 GHz |
|
|
or equivalent |
or equivalent |
|
|
|
|
|
RAM |
1 GB |
2 GB |
|
|
|
|
|
Hard drive space available |
1 GB |
2 GB |
|
|
|
|
|
Monitor resolution |
1024x768 pixels, 24-bit |
1600x1200 pixels, 32-bit |
|
|
color |
color |
|
|
|
|
|
CD-ROM drive |
CD-ROM or equivalent |
CD-ROM |
|
|
||
|
|
|
|
Software |
3WXM client and 3WXM Services are each supported on the following |
||
Requirements |
operating systems: |
|
|
Microsoft Windows Server 2003
Microsoft Windows XP with Service Pack 1 or higher
Microsoft Windows 2000 with Service Pack 4
You must use the English version of the operating system you select. Operating system versions in other languages are not supported with 3WXM.
The following additional software is required for certain 3WXM features:
HP OpenView Network Node Manager 6.4—Must be installed prior to 3WXM if you plan to use 3WXM in your HP OpenView environment.
Adobe Acrobat Reader 5.x or later (or plug-in)—For reading the
Wireless LAN Switch Manager Reference Manual and release notes.
Web browser (for example, Microsoft Internet Explorer 5.x or 6.x or Netscape Navigator 6.x or 7.x)—For displaying 3WXM Help, work orders and inventory reports.

Preparing for Installation |
15 |
Preparing for |
Before you install 3WXM, make sure you have the appropriate |
Installation |
administrative privileges on the system and a license key if required. If you |
|
plan to install the HP OpenView plug-in for 3WXM, which allows you to |
|
integrate 3WXM into an HP OpenView environment, make sure that HP |
|
OpenView is already installed. |
User Privileges |
Before you install 3WXM, make sure that you are logged in as a user who |
|
has permission to install software, or as an administrator. |
|
After you install 3WXM, you can configure 3WXM access privileges for |
|
the user accounts on the machine. Likewise, you can configure access |
|
privileges for 3WXM Services, if installed. Access privileges for the 3WXM |
|
client are completely independent of access privileges for 3WXM Services, |
|
and are configured separately. |
Serial Number, |
The serial number is generated automatically when the 3WXM software |
License Key and |
is installed. |
Activation Key |
The license key is included with your 3WXM software packaging. You will |
|
|
|
need a separate license key for each host on which you plan to run |
|
3WXM. The license supplied with 3WXM allows you to manage up to 10 |
|
wireless switches. If you plan to manage more wireless switches, you will |
|
also need an Unlimited Device license key (3CWXMUPA). You will need a |
|
separate Unlimited Device license key for each host on which you plan to |
|
run 3WXM to manage more than 10 devices. |
|
If you do not have a license key, you can run 3WXM for 30 days. Once |
|
this trial period is over you will need to purchase a license to continue |
|
running the 3WXM software. |
|
When you initially run the 3WXM software, it will ask if it is to be run as a |
|
trial or as a fully licensed version. In the latter case, it will then ask for the |
|
license key. The software will then display the serial number and ask for |
|
an activation key. |
|
To obtain an activation key, you must register the product with 3Com. If |
|
you press the Get Activation Key button, your web browser will be |
|
automatically launched at the correct pages for registering the product. |
|
Once registration is complete, your activation key will then be displayed |
|
and e-mailed to you. |

16 CHAPTER 1: GETTING STARTED
Once the activation key has been accepted, you may enter an Unlimited Device license key. This will require its own activation key, which can be obtained in the same manner.
If you are registering your product using the web browser on a different host, and you wish to register for the 30-day trial, then you will need to select 3CWXMA as the software that you are registering. If you have a license key, then you should select 3CWXM10A. This will register both the software and the license. The Unlimited Device license is registered as 3CWXMUPA.
HP OpenView If you want to integrate 3WXM into your HP OpenView environment, you Network Node have the option of installing the HP OpenView plug-in required to use
Manager Network Node Manager with 3Com products. Make sure that HP OpenView is already installed before installing 3WXM with the plug-in.
Resource Allocation Table 5 contains general recommended guidelines for hardware requirements and memory allocation based on the number of radios and WX switches your server will support. A larger number of WX switches implies more connections and data processing, and consequently, more CPU is required. A larger number of radios implies more data (including client sessions) which requires more RAM and storage.
Table 5 Recommended Server Hardware Allocation
Number of |
|
|
|
Radios |
1-25 WX Switches |
25-50 WX Switches |
50+ WX Switches |
|
|
|
|
1 – 1000 |
- 2.4 MHz P4 |
- 2.8 MHz P4 |
- 3.2 MHz Xeon |
|
- 500 MB RAM |
- 500 MB RAM |
- 1 GB RAM |
|
- 1 GB HD |
- 1 GB HD |
- 1 GB HD |
|
|
|
|
1000 – 2000 |
- 2.4 MHz P4 |
- 3.0 GHz P4 |
- 3.6 GHz Xeon |
|
- 1 GB RAM |
- 1 GB RAM |
- 2 GB RAM |
|
- 2 GB HD |
- 2 GB HD |
- 2 GB HD |
|
|
|
|
3WXM Services 3WXM Services can be installed either in standalone mode or shared Options mode. Standalone mode is when 3WXM client and 3WXM Services are
installed on one machine. Standalone mode is primarily used for trying out 3WXM, while shared mode is used in a working environment. In shared mode, the administrator sets up 3WXM Services on a single host (typically with more resources) and other hosts with the client 3WXM
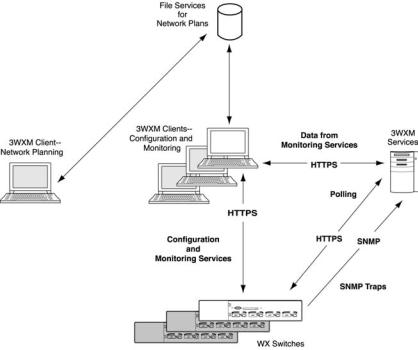
Preparing for Installation |
17 |
application share 3WXM Services to access network plans and monitoring information. See Figure 1.
Figure 1 3WXM Services in Shared Mode
During the 3WXM installation, you can select to install the 3WXM Services and 3WXM client, or the client only. If you select the option that installs 3WXM Services, the services are installed with default settings that are adequate for getting started.
Network plans are stored on the server. By default, only local access is allowed. Remote clients cannot access the server unless you enable remote access.
To learn more about RF monitoring and client monitoring, see “Managing and Monitoring Your Network” on page 143.

18 CHAPTER 1: GETTING STARTED
Installing 3WXM The same 3WXM install program installs either just the 3WXM client or both the 3WXM client and 3WXM Services.
This section contains information about the following topics:
“Unpacking Files” on page 18
“Using the Installation Wizard” on page 18
Unpacking Files To unpack files on Windows systems:
1Insert the 3WXM CD in the CD-ROM drive. If Autorun is enabled, wait briefly for the install program to start. For more information about using the installation wizard, see “Using the Installation Wizard” below.
If Autorun is disabled, follow these steps:
aIn Windows Explorer, navigate to your CD-ROM drive.
bIn the Windows\VM directory, double-click install.exe.
The Introduction page of the 3WXM installation wizard appears.
2Click Next to display the Choose Installation Type page of the installation wizard, and go to “Using the Installation Wizard”.
Using the Installation To use the Installation Wizard:
Wizard
1On the Choose Installation Type page, choose one of the following:
To install both the 3WXM server and the client, click the 3WXM Services icon.
To install only the 3WXM client, click the 3WXM client icon.
For detailed installation instructions, see “Installing 3WXM” in the
Wireless LAN Switch Manager Reference Manual.
Start the 3WXM Services
The 3WXM Services are automatically started when you install it on a
Windows system.

Installing 3WXM 19
Connect 3WXM Clients to 3WXM Services
To connect the client to Services:
1Select Start > Programs > 3Com > 3WXM > 3WXM. The 3WXM Services Connection wizard is displayed.
2Enter the IP address or fully-qualified hostname of the machine on which the service is installed.
If 3WXM Services is installed on the same machine as the one you are using to run 3WXM client, enter 127.0.0.1 as the IP address. This is a standard IP loopback address.
3Specify the service port, if different from the port number in the Service Port listbox.
The port number used by the monitoring service must not be used by another application on the machine where the monitoring service is installed. If the port number is used by another application, change the port number on the monitoring service. (See “Configure 3WXM Services” below.)
4Click Next to connect to the server.
5If the Certificate Check dialog is displayed, click Accept.
If you left the Open Network Plan option on the 3WXM Services Connection dialog selected, the server opens a new (blank) network plan.
Configure 3WXM Services
You can change the properties of 3WXM Services.
If a firewall is enabled on the host where you install 3WXM Services, 3WXM Services will not be able to communicate with 3WXM client or with WX switches unless the firewall is configured to allow through traffic for the SSL and SNMP ports (443 and 162 by default).
20 CHAPTER 1: GETTING STARTED
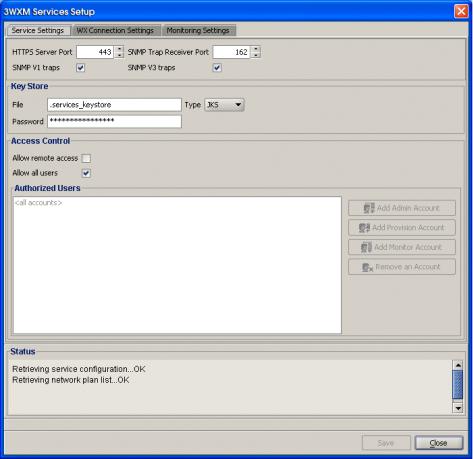
To configure 3WXM Services:
1Select Tools > 3WXM Services Setup dialog box from the 3WXM main tool bar. The 3WXM Services Setup wizard is displayed.
2You can optionally configure the following:
Select the arrow buttons to change the HTTPS Server Port, which is the port on which 3WXM Services listens for requests from 3WXM client.
Select the arrow buttons to change the SNMP Trap Receiver Port, which is the port on which SNMP traps are received. Also select the trap type (SNMPv1 or SNMPv3) you want 3WXM Services to receive from WX switches.
Installing 3WXM 21
On each switch in the network plan, you must enable notifications and configure 3WXM Services as a notification target (trap receiver).
3WXM Services does not start listening for SNMP notifications from switches until you save the network plan.
From the Key Store area of the window, specify security settings.
From the Access Control area, define user accounts. For more information about access control, see “3WXM Access Control” on page 21.
By default, a username and password are not required to access 3WXM Services from 3WXM client, but only local connections (connections from client to server on the same host) are allowed. To change these settings, use the Service Settings tab of the 3WXM Services Setup dialog.
To select monitoring settings:
All monitoring options are enabled by default. You do not need to enable them and you do not need to specify the switches you want to monitor. However, for 3WXM Services to receive trap data from WX switches, SNMP notifications must be enabled on the switches. (See “Deploy Your Configuration” on page 144.)
To start gathering data for monitoring, deploy your configuration to the network. For information about deploying your configuration, see “Deploy Your Configuration” on page 144.
3WXM Access Control You can create a user account with administrator, provision, or monitor privileges. See Table 6 for privilege definitions.
Table 6 User Privilege Levels
Privilege Level |
Access Control |
Configuration |
Monitoring |
Administrator |
yes |
yes |
yes |
|
|
|
|
Provision |
no |
yes |
yes |
|
|
|
|
Monitor |
no |
no |
yes |
|
|
|
|
To configure access control:
1Select Tools > 3WXM Services Setup from the 3WXM main tool bar. The 3WXM Services Setup window is displayed.
2In the Access Control area of the window, deselect Allow all users.

22 CHAPTER 1: GETTING STARTED
3Select Add Admin Account, Add Provision Account, or Add Monitor Account. A dialog box is displayed.
4Enter the account name and the password and click OK.
5To remove an account, click Remove Account.
3WXM Interface This section contains the following topics:
“Display the Main Window” on page 22
“Using Menu Bar and Toolbars” on page 24
“Setting Preferences” on page 24
“Easy Configuration Using Wizards” on page 25
“View Topology” on page 25
“Shortcut to Wizards and Editing Properties” on page 26
“Shortcut to Wizards and Editing Properties” on page 26
“Getting Help” on page 27
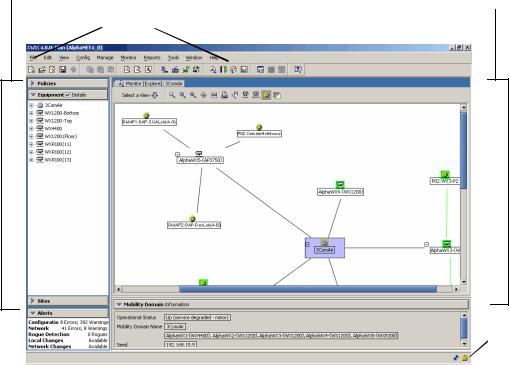
Display the Main When you open a network plan or create a network plan using the Window Network Planning wizard, 3WXM displays the Main window. The Main
window is divided into four panels (see Figure 2 on page 23):
1Organizer panel displays a network tree representing your WLAN’s devices and configurations on those devices. You can use it to navigate to Policy configurations, Equipment within your network, and network Sites.
When you select a device or configuration in the tree, the context-sensitive information about the device or configuration is displayed to the right in the Content and Information panels. Select the Details checkbox at the top of the Organizer panel to display detailed configuration information about items in the tree.
2Content panel displays context-sensitive information about the device or configuration selected from the tree in the Organizer panel. From the Content panel, view 3Com devices and their status, verify 3Com device configurations in the network plan and in the network, and display event logs and Rogue detection results.
3Alerts panel displays a summary of alerts, including network and configuration verification, Rogue detection, and local and network changes. Click on a summary to display details.
3WXM Interface 23
4Information panel displays information about an object you select from the navigation tree under the Organizer panel. The information is dependent upon the object selected.
The Network Activity icon displays statistics for management traffic between 3WXM and the WX switches in the network plan. You can click on the icon to display more details.
The Lock icon indicates whether the network plan has been locked. When you make changes to a network plan, 3WXM locks it on the server. The lock prevents other clients who open the network plan from modifying it while you are making changes. The network plan remains locked until you save your changes, after which the lock is released.
Figure 2 3WXM Main Window
Organizer panel |
Content panel |
Toolbar
|
|
|
|
|
|
Lock |
||
|
|
|
|
|
|
icon |
||
|
|
|
|
|
|
|
|
|
|
|
|
|
|
|
|
|
|
|
|
|
|
|
|
|
|
|
|
|
|
|
|
|
|
|
|
|
|
|
|
|
|
|
|
|
|
|
|
|
Object Details panel (hidden by default) |
|
|||
|
Alerts panel |
Network Activity icon |
|
|
||||
|
|
|||||||
|
|
|
|
|
|
|
|
|
24 CHAPTER 1: GETTING STARTED
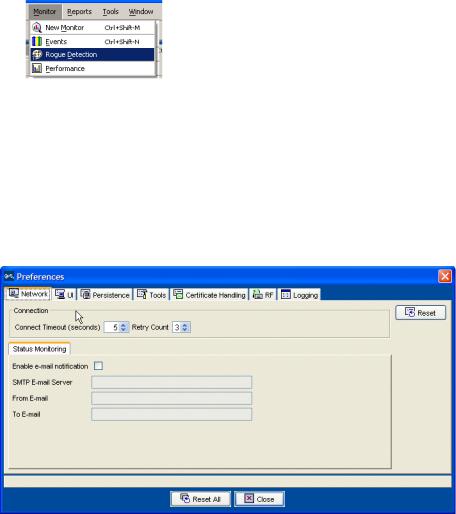
Using Menu Bar and The Main window and individual panels have a menu bar at the top to Toolbars select certain actions. Select an item from the menu bar, then select an
action from the dropdown menu. See Figure 3.
Figure 3 Menu Bar with Dropdown Menu
Setting Preferences You can set network and user interface preferences, as well as preferences for save interval and autosave, certificate handling, RF monitoring, and logging.
1Select Tools > Preferences from the 3WXM main tool bar. The Preferences wizard is displayed.
Figure 4 Preferences Wizard
2Select any of the tabs, make modifications in the fields, and select Reset All to reset preferences.
3WXM Interface 25
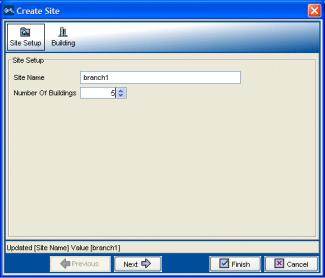
Easy Configuration Wizards help walk administrators through configuration steps. There are Using Wizards several wizards in the 3WXM application.
Enter the required fields and click Next at the bottom of the wizard to display the next step. Click Cancel to discard any changes made with the wizard. When you are done, click Finish to save changes.
You can right-click on many objects to display the Insert option. Select
Insert to create a new object that is a “child” of the selected object.
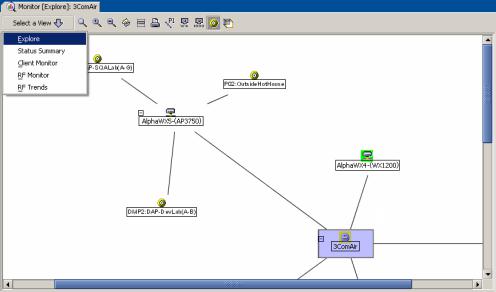
View Topology You can display a topology view of managed devices in your WLAN and their relationships to each other. You can also click on the devices in the topology view to display summary monitoring information about each one.
To display a topology view of your network:
1In the Equipment section of the Organizer panel, select a mobility domain or a WX switch.
2From the main 3WXM window, select Monitor > New Monitor.
3Select Explore from the drop-down list in the Monitor tab. The topology view of the selected object is displayed.
26 CHAPTER 1: GETTING STARTED
Shortcut to Wizards Shortcuts are built into the 3WXM interface to quickly access wizards and and Editing for editing properties for selected objects.
Properties
To use shortcuts:
1Right-click an object from the topology tree in the Organizer panel.
2Select one of the options displayed. You can select Edit to edit object properties, or Insert to display a wizard that assists you to create a new object.

3WXM Interface 27
Getting Help Click Help from the Main menu bar to access different types of help:
1Select Help > 3WXM Help to display HTML help about configuring and using 3WXM.
2Select Help > Licensing to view product licensing information, or to add an Unlimited Device license to the installation.
3Select Help > Report Problem to report a problem to 3Com Technical Support.
4Select Help > About 3WXM to display information about 3WXM and to display the Release Notes. You also can click Force GC (garbage collection) to free resources.
28 CHAPTER 1: GETTING STARTED

2 |
PLANNING AND MANAGING YOUR |
|
|
|
WIRELESS NETWORK WITH |
|
3WXM |
|
|
|
This chapter contains information about planning and managing your |
||||||||||||||
|
|
|
wireless network with 3WXM. Planning your wireless network is highly |
||||||||||||||
|
|
|
recommended because it not only helps you configure and deploy it, but |
||||||||||||||
|
|
|
also aids in scaling and monitoring your network. 3Com provides you |
||||||||||||||
|
|
|
with flexible tools to assist with network planning. |
|
|
|
|
|
|
||||||||
|
|
|
|
|
|
|
|
|
|
|
|
|
|
|
|
|
|
Overview |
You plan your wireless network to support the services you want to offer |
||||||||||||||||
|
|
|
your employees, guests, or customers. Figure 5 describes the process you |
||||||||||||||
|
|
|
will follow to establish services in your company or organization, |
||||||||||||||
|
|
|
beginning with determining the services you want to offer. Each step in |
||||||||||||||
|
|
|
the process is described in this chapter. |
|
|
|
|
|
|
||||||||
|
|
|
Figure 5 Process to Establish Wireless Services |
|
|
|
|
|
|
||||||||
|
|
|
|
|
|
|
|
|
|
|
|
|
|
|
|
|
|
|
|
|
Determine which |
|
|
Configure |
|
|
|
Plan for network |
|
|
|
Generate work |
|
||
START |
|
|
services to |
|
|
services |
|
|
|
equipment and |
|
|
|
order and install |
|
||
|
|
|
|
|
|
|
|
|
|||||||||
|
|
|
provide |
|
|
|
|
|
|
|
coverage |
|
|
|
equipment |
|
|
|
|
|
|
|
|
|
|
|
|
|
|
|
|
|
|
|
|
|
|
|
|
|
|
|
|
|
|
|
|
|
|
|
|
|
|
|
|
|
|
|
|
|
|
|
|
|
|
|
|
|
|
|
|
|
|
|
|
|
|
|
|
|
|
|
|
|
|
|
|
|
|
|
|
|
|
|
|
Optimize |
|
|
|
Monitor |
|
|
|
Deploy |
|
||
|
|
|
|
|
|
services |
|
|
|
services |
|
|
|
services |
|
||
|
|
|
|
|
|
|
|
|
|
|
|
|
|||||
|
|
|
|
|
|
|
|
|
|
|
|
|
|
|
|
|
|

30 CHAPTER 2: PLANNING AND MANAGING YOUR WIRELESS NETWORK WITH 3WXM
Which Services To A service is a concept (not a selectable item in the 3WXM interface) that Provide? represents a set of options you configure and deploy on your wireless
network.
You configure services to support the different levels of network access you need to provide. For example, a service configured to support employee access will have different options configured to provide greater access to the network. In contrast, a service configured for guest access typically restricts users to limited or no internal network access, but easily provides a gateway connection to the Internet.
A service can be fully isolated and independent of other services on the network (multi-hosted access is typically isolated), or you can reuse part of a service configuration for another service you want to provide. Each service has potential authentications (802.1X, web page, MAC address, or “last resort”) and potential encryptions (802.11i, WPA, WEP, or unencrypted).
The purpose of this section is to provide information about services that you can configure using 3WXM. Understanding the services you can configure with 3WXM is the first step in planning and configuring your network.
The first step you need to do when planning your wireless network is to determine which services your organization requires. The three common types of services are:
Employee access
Guest access
Voice over Wireless IP (VoWIP)
Employee access is typically secure, encrypted access to the wireless network. Guest access is access (possibly unencrypted) for visitors at your location. If you intend to resell services to other providers, you will need to provide multi-hosted access.
Determining the services you will need at the beginning of the planning process results in configuration data. The configuration data is used to create service profiles and AAA rules for each service. A service profile is a subset of a radio profile. A radio profile is a common set of configuration parameters that can be applied to many MAP radios.
See “Create a Service Profile” on page 94 for information about configuring services.
Loading...