


OPERATION MANUAL
© ZOOM Corporation
Reproduction of this manual, in whole or in part, by any means, is prohibited.
precautions safety and Usage
Usage and safety precautions
SAFETY PRECAUTIONS
In this manual, symbols are used to highlight warnings and cautions that you must read to prevent accidents.
The meanings of these symbols are as follows:
Something that could cause serious injury or death.
Something that could cause injury or damage to the equipment.
Other symbols
 Required (mandatory) actions
 Prohibited actions
Battery handling
 Install the batteries with the correct +/– orientation.
Use a specified battery type. Do not mix new and old batteries or different brands or types at the same time.
When not using the unit for an extended period of time, remove the batteries from the unit. If a battery leak should occur, wipe the battery compartment and the battery terminals carefully to remove all battery residue.
Connecting cables with input and output jacks
Always turn the power OFF for all equipment before connecting any cables.
Always disconnect all connection cables and the AC adapter before moving the unit.
Volume
 Do not use the product at a loud volume for a long time.
 Warning
Operation using an AC adapter
 Use only a ZOOM AD-17 AC adapter with this unit.
Do not use in ways that exceed the ratings of an outlet or wiring or with currents other than 100 V.
Before using this product in other countries (or regions) where the power voltage differs from AC 100 V, always consult with a store that handles ZOOM products and use a suitable AC adapter.
Operation using batteries
Use 4 conventional 1.5-volt AA batteries (alkaline or nickel-metal hydride).
 Read battery warning labels carefully.
Always close the battery compartment cover when using the unit.
Alterations
 Never open the case or attempt to modify the product.
 Precautions
Product handling
 Do not drop, bump or apply excessive force to the unit.
Be careful not to allow foreign objects or liquids to enter the unit.
Operating environment
 Do not use in extremely high or low temperatures.
 Do not use near heaters, stoves and other heat sources.
 Do not use in very high humidity or near splashing water.
 Do not use in places with excessive vibrations.
 Do not use in places with excessive dust or sand.
AC adapter handling
When disconnecting the AC adapter from an outlet, always pull the body of the adapter itself.
During lightning storms or when not using the unit for a long time, disconnect the power plug from the AC outlet.
Usage Precautions
Interference with other electrical equipment
In consideration of safety, the has been designed to minimize the emission of electromagnetic radiation from the device and to minimize external electromagnetic interference. However, equipment that is very susceptible to interference or that emits powerful electromagnetic waves could result in interference if placed nearby. If this occurs, place the
 and the other device farther apart.
With any type of electronic device that uses digital control, including the , electromagnetic interference could cause malfunction, corrupt or destroy data and result in other unexpected trouble. Always use caution.
Cleaning
Use a soft cloth to clean the panels of the unit if they become dirty. If necessary, use a damp cloth that has been wrung out well.
Never use abrasive cleansers, wax or solvents, including alcohol, benzene and paint thinner.
Malfunction
If the unit becomes broken or malfunctions, immediately disconnect the AC adapter, turn the power OFF and disconnect other cables. Contact the store where you bought the unit or Zoom service with the following information: product model, serial number and specific symptoms of failure or malfunction, along with your name, address and telephone number.
Copyrights
Except for personal use, unauthorized recording of copyrighted sources, including CDs, records, tapes, video products and broadcasts, is prohibited. Zoom Corporation does not bear any responsibility for consequences related to copyright law infringement.
•The SD 
 and
and  SDHC symbols are trademarks.
•Windows® and Windows Vista® are trademarks or registered trademarks of Microsoft®.
•Macintosh® and Mac OS® are trademarks or registered trademarks of Apple Inc.
•Steinberg and Cubase are trademarks or registered trademarks of Steinberg Media Technologies GmbH Inc.
•All other trademarks, product names and company names mentioned in this documentation are the property of their respective owners.
•All trademarks and registered trademarks mentioned in this manual are for identification purposes only and are not intended to infringe on the copyrights of their respective owners.
2
Introduction |
Please read through this manual carefully in order to understand the functions of the |
well |
After reading through this manual, please keep it along with the warranty in a safe place. |
|
|
|
so that you can use it happily for many years. |
|
Please note that some details might be changed without notice in order to improve the product.
Thank you very much for purchasing the ZOOM  , which we will refer to as the
  in this manual. The
 has the following features.
■■Multitrack recorder that can use up to 32 GB
SDHC cards
The can is an 8-track recorder that supports SDHC cards of up to 32 GB. After making linear PCM recordings (WAV format) at 16/24-bit and 44.1/48kHz sampling rate, you can transfer recorded files to your computer to use them in DAW software.
■■Hi-Speed USB 2.0 audio interface
You can use the and its various input and output jacks as a Hi-speed USB 2.0 audio interface that can handle 2 inputs and 2 outputs at up to 24-bit and 96 kHz. Its effects can even be used (at 44.1 kHz only) and it can also operate using USB bus power.
(See the Audio Interface Manual on the included SD card for details.)
■■DAW software control surface
The can be connected to a computer by USB cable and used as a control surface for DAW software. You can operate transport functions, including play, record and stop keys
and physically control onscreen faders. You can also assign various DAW functions to the F1–F5 function keys. (The assignable functions depend on the DAW software.)
(See the Audio Interface Manual on the included SD card for details.)
■■Handles a variety of input sources including guitars, microphones and line-level equipment
The has 2 input jacks that accept both XLR and standard phone connectors. Both can supply phantom power (24 or 48 V) and one can handle high-impedance input. In addition to highimpedance guitars and basses, the inputs can handle all types of sources, including dynamic and condenser microphones, synthesizers and other line level instruments. The built-in highperformance microphones are convenient for recording acoustic guitars and vocals.
(See “Connecting instruments” on P.21.)
■■Sampler with 8 pads and 8 voices
Use the sampler to assign sounds to each track (pad) and create loops. Play the pads in realtime, and combine loops to create performances for a complete song. By simply lining up drum loops from the included SD card, anyone can easily create professional-quality backing parts and basic tracks. The recorder and sampler work together seamlessly, so you can record audio on other tracks while listening to loop playback.
(See “Using the sampler to make songs” on P.60.)
Introduction
Confirmation of included items
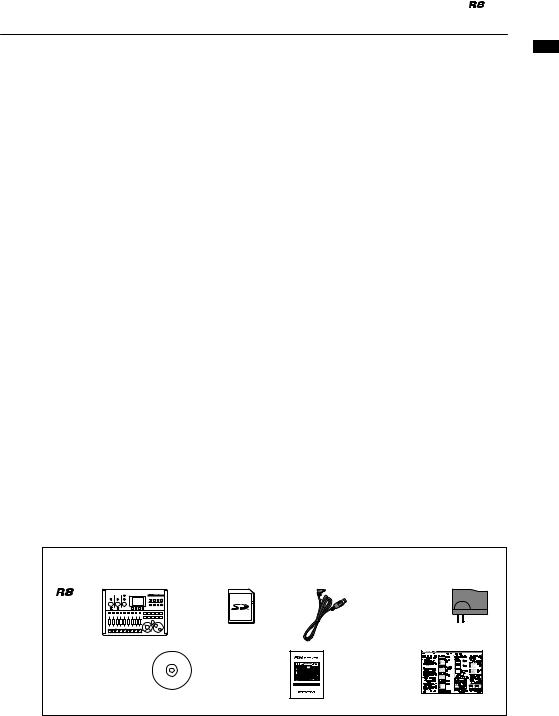
The package contains the following items. Please verify them.
unit |
SD card |
USB cable |
AC adapter |
|
|
|
(ZOOM AD-17) |
Cubase LE |
Operation manual |
Cubase LE |
|
Installation DVD |
(this document) |
Startup Guide |
|
|
|
|
|
|
|
|
Note: the Audio Interface Manual (PDF) is on the SD card. |
3

Contents
Contents
Usage and safety precautions . . 2 Introduction . . . . . . . . . . . 3
Confirmation of included items. . . . . 3
Contents . . . . . . . . .
Panel layout and functions Switch and key overview .
Display information . . . . . . . 9 Operation overview. . . . . . . 10
Connections. . . . . . . . . . . 12
SD card installation. . . . . . . 13 Powering the unit. . . . . . . . 14 Turning the power on and off . . 15 Setting the date and time
Recording and playback . . . . |
16 |
Recorder overview . . . . . . . . |
. 16 |
Preparations before recording . . . . |
17 |
Creating a new project . . . . . . . |
17 |
Changing the time signature . . . . . . |
18 |
Setting the tempo . . . . . . . . . . |
19 |
Using the metronome. . . . . . . . 20
Recording the first track . . . . . . . 21
Connecting instruments . . . . . . . 21 Adjusting the input gain . . . . . . . 22 Using insert effects . . . . . . . . 23 Adjusting the recording level. . . . . . 24
Selecting tracks for recording . . . . . 25
Recording. . . . . . . . . . . . 26 Re-recording. . . . . . . . . . . 26
Recording to a new file. . . . . . . 27 Playing back recordings . . . . . . . 27
Overdubbing . . . . . . . . . . . 28
Stereo recording (stereo link) . . . . . 29 Changing playback takes . . . . . . 30 Swapping two tracks . . . . . . . . 31 Re-recording part of a track
(punch-in/out). . . . . . . . . . . 31
Manual punch-in/out . . . . . . . . 32 Automatic punch-in/out . . . . . . . 33
Combining multiple tracks into
1–2 tracks (bouncing) . . . . . . . . 34 Locating to the desired part of a song . 36 Repeat playback of a specific section
(A-B repeat) . . . . . . . . . . . 38
Mixing . . . . . . . . . . . . |
. |
40 |
Mixing overview . . . . . . . . . |
|
. 40 |
Setting track level, EQ and pan. . . . |
|
42 |
Using send-return effects . . . . . |
. |
44 |
Using insert effects on tracks . . . . |
. |
45 |
Mixing down . . . . . . . . . . |
|
46 |
Using a mastering effect. . . . . . |
. |
46 |
Mixing down to the master track . . |
. |
47 |
Using the rhythm function . . |
. |
48 |
Overview of rhythm functions. . . . |
. |
48 |
Rhythm pattern selection . . . . . |
. |
49 |
Changing the playback pattern . . . |
. |
49 |
Changing the drum kit . . . . . . |
. |
49 |
Using the pads to play rhythm patterns |
|
. 50 |
Switching banks . . . . . . . . |
. |
50 |
Repeating sounds (drum rolls) . . . . |
|
. 50 |
Adjusting the pad sensitivity . . . . |
. |
49 |
Assigning rhythm patterns to tracks . . |
|
51 |
Creating a rhythm pattern. . . . . . |
|
52 |
Preparing to create a rhythm pattern. . . 52 |
||
Inputting a pattern in real-time . . . . |
. |
53 |
Step input of a rhythm pattern. . . . |
. |
54 |
Copying rhythm patterns . . . . . |
. |
55 |
Deleting rhythm patterns . . . . . |
. |
56 |
Renaming rhythm patterns . . . . . |
. |
57 |
Importing rhythm patterns from |
|
|
other projects. . . . . . . . . . . 58 Setting volume and stereo placement. . 59
4

Using the sampler . . . . . . . |
60 |
Using the sampler to make songs. . . 60 |
|
Using the sampler . . . . . . . . |
. 61 |
Assigning included drum loops to tracks |
63 |
Setting loops . . . . . . . . . . . |
64 |
Setting a track to loop . . . . . . . |
64 |
Setting the loop interval . . . . . . |
. 65 |
Playing the pads. . . . . . . . . . |
66 |
Setting the playback method. . . . . |
66 |
Set global quantization to |
|
control sound timing. . . . . . . . |
66 |
Changing the BPM of a track . . . . |
. 67 |
Changing audio tempo without |
|
changing pitch . . . . . . . . . . |
68 |
Trimming unnecessary parts of audio files 70 |
|
Setting fade-ins and fade-outs . . . . |
71 |
Using the track sequencer. . . . |
72 |
Track sequencer overview . . . . . |
. 72 |
Creating a sequence . . . . . . . |
. 73 |
Creating a sequence in real-time . . . |
. 73 |
Creating a sequence using step input . . |
74 |
Inserting and deleting beats . . . . . . . . . . . 76 |
|
Playing back a sequence . . . . . . |
78 |
Using effects . . . . . . . . . . |
80 |
Overview of effects. . . . . . . . . |
80 |
Selecting effect patches. . . . . . . |
83 |
Editing patches . . . . . . . . . . 84 |
|
Saving patches. . . . . . . . . . |
86 |
Importing patches from other projects . |
87 |
Changing patch names . . . . . . |
. 88 |
Using effects only for monitoring . . . |
89 |
Working with projects and
audio files . . . . . . . . . . . . 90
Projects and audio files . . . . . . . 90 Protecting a project . . . . . . . . 91 Selecting a project . . . . . . . . . 91 Viewing project and audio file information 92 Copying projects and audio files. . . . 93 Changing project and audio file names . 94 Deleting projects and audio files. . . . 95 Dividing audio files . . . . . . . . . 96 Setting the recording format (bit length) . 97 Setting the recording mode . . . . . 97 Sequential playback of projects . . . . 98 Loading audio files from other projects . 100
Using the USB connection. . . 102
USB function overview . . . . . . . 102 Exchanging data with a computer
(card reader). . . . . . . . . . . 103
Audio interface and
control surface functions . . . . . . 105
Other functions . . . . . . . . 108
Using the tuner. . . . . . . . . . 108 Adjusting the display . . . . . . . 109 Changing the SD card while
the power is on. . . . . . . . . . 110
Formatting an SD card . . . . . . . 111 Checking remaining card capacity . . 111 Setting the battery type . . . . . . 112 Setting phantom power voltage . . . 112 Using a footswitch . . . . . . . . 113 Checking the firmware version . . . . 114 Upgrading the firmware . . . . . . 114
Rhythm pattern list . . . . . . 116 Effect types and parameters . . 118 Effect patch list. . . . . . . . . 129 Error message list . . . . . . . 135 Troubleshooting . . . . . . . . 136 Specifications . . . . . . . . . 137
Index . . . . . . . . . . . . . . 138
Contents
5

functions and layout Panel
Panel layout and functions
|
|
|
|
|
|
|
|
Input section |
|
|
|
|
|
|
|
|
|
|
|
|
Display section |
|
|
|
Control section |
||||||||||||||||||||||||||||||||||||||||||||||||||
|
|
|
|
|
|
|
|
|
|
|
|
|
|
|
|
|
|
|
|
|
|
|
|
|
|
|
|
|
|
|
|
|
|
|
|
|
|
|
|
|
|
|
|
|
|
|
|
|
|
|
|
|
|
|
|
|
|
|
|
|
|
|
|
|
|
|
|
|
|
|
|
|
|
|
|
|
|
|
|
|
|
|
|
|
|
|
|
|
|
|
|
|
|
|
|
|
|
|
|
|
|
|
|
|
|
|
|
|
|
|
|
|
|
|
|
|
|
|
|
|
|
|
|
|
|
|
|
|
|
|
|
|
|
|
|
|
|
|
|
|
|
|
|
|
|
|
|
|
|
|
|
|
|
|
|
|
|
|
|
|
|
|
|
|
|
|
|
|
|
|
|
|
|
|
|
|
|
|
|
|
|
|
|
|
|
|
|
|
|
|
|
|
|
|
|
|
|
|
|
|
|
|
|
|
|
|
|
|
|
|
|
|
|
|
|
|
|
|
|
|
|
|
|
|
|
|
|
|
|
|
|
|
|
|
|
|
|
|
|
|
|
|
|
|
|
|
|
|
|
|
|
|
|
|
|
|
|
|
|
|
|
|
|
|
|
|
|
|
|
|
|
|
|
|
|
|
|
|
|
|
|
|
|
|
|
|
|
|
|
|
|
|
|
|
|
|
|
|
|
|
|
|
|
|
|
|
|
|
|
|
|
|
|
|
|
|
|
|
|
|
|
|
|
|
|
|
|
|
|
|
|
|
|
|
|
|
|
|
|
|
|
|
|
|
|
|
|
|
|
|
|
|
|
|
|
|
|
|
|
|
|
|
|
|
|
|
|
|
|
|
|
|
|
|
|
|
|
|
|
|
|
|
|
|
|
|
|
|
|
|
|
|
|
|
|
|
|
|
|
|
|
|
|
|
|
|
|
|
|
|
|
|
|
|
|
|
|
|
|
|
|
|
|
|
|
|
|
|
|
|
|
|
|
|
|
|
|
|
|
|
|
|
|
|
|
|
|
|
|
|
|
|
|
|
|
|
|
|
|
|
|
|
|
|
|
|
|
|
|
|
|
|
|
|
|
|
|
|
|
|
|
|
|
|
|
|
|
|
|
|
|
|
|
|
|
|
|
|
|
|
|
|
|
|
|
|
|
|
|
|
|
|
|
|
|
|
|
|
|
|
|
|
|
|
|
|
|
|
|
|
|
|
|
|
|
|
|
|
|
|
|
|
|
|
|
|
|
|
|
|
|
|
|
|
|
|
|
|
|
|
|
|
|
|
|
|
|
|
|
|
|
|
|
|
|
|
|
|
|
|
|
|
|
|
|
|
|
|
|
|
|
|
|
|
|
|
|
|
|
|
|
|
|
|
|
|
|
|
|
|
|
|
|
|
|
|
|
|
|
|
|
|
|
|
|
|
|
|
|
|
|
|
|
|
|
|
|
|
|
|
|
|
|
|
|
|
|
|
|
|
|
|
|
|
|
|
|
|
|
|
|
|
|
|
|
|
|
|
|
|
|
|
|
|
|
|
|
|
|
|
|
|
|
|
|
|
|
|
|
|
|
|
|
|
|
|
|
|
|
|
|
|
|
|
|
|
|
|
|
|
|
|
|
|
|
|
|
|
|
|
|
|
|
|
|
|
|
|
|
|
|
|
|
|
|
|
|
|
|
|
|
|
|
|
|
|
|
|
|
|
|
|
|
|
|
|
|
|
|
|
|
|
|
|
|
|
|
|
|
|
|
|
|
|
|
|
|
|
|
|
|
|
|
|
|
|
|
|
|
|
|
|
|
|
|
|
|
|
|
|
|
|
|
|
|
|
|
|
|
|
|
|
|
|
|
|
|
|
|
|
|
|
|
|
|
|
|
|
|
|
|
|
|
|
|
|
|
|
|
|
|
|
|
|
|
|
|
|
|
|
|
|
|
|
|
|
|
|
|
|
|
|
|
|
|
|
|
|
|
|
|
|
|
|
|
|
|
|
|
|
|
|
|
|
|
|
|
|
|
|
|
|
|
|
|
|
|
|
|
|
|
|
|
|
|
|
|
|
|
|
|
|
|
|
|
|
|
|
|
|
|
|
|
|
|
|
|
|
|
|
|
|
|
|
|
|
|
|
|
|
|
|
|
|
|
|
|
|
|
|
|
|
|
|
|
|
|
|
|
|
|
|
|
|
|
|
|
|
|
|
|
|
|
|
|
|
|
|
|
|
|
|
|
|
|
|
|
|
|
|
|
|
|
|
|
|
|
|
|
|
|
|
|
|
|
|
|
|
|
|
|
|
|
|
|
|
|
|
|
|
|
|
|
|
|
|
|
|
|
|
|
|
|
|
|
|
|
|
|
|
|
|
|
|
|
|
|
|
|
|
|
|
|
|
|
|
|
|
|
|
|
|
|
|
|
|
|
|
|
|
|
|
|
|
|
|
|
|
|
|
|
|
|
|
|
|
|
|
|
|
|
|
|
|
|
|
|
|
|
|
|
|
|
|
|
|
|
|
|
|
|
|
|
|
|
|
|
|
|
|
|
|
|
|
|
|
|
|
|
|
|
|
|
|
|
|
|
|
|
|
|
|
|
|
|
|
|
|
|
|
|
|
|
|
|
|
|
|
|
|
|
|
|
|
|
|
|
|
|
|
|
|
|
|
|
|
|
|
|
|
|
|
|
|
|
|
|
|
|
|
|
|
|
|
|
|
|
|
|
|
|
|
|
|
|
|
|
|
|
|
|
|
|
|
|
|
|
|
|
|
|
|
|
|
|
|
|
|
|
|
|
|
|
|
|
|
|
|
|
|
|
|
|
|
|
|
|
|
|
|
|
|
|
|
|
|
|
|
|
|
|
|
|
|
|
|
|
|
|
|
|
|
|
|
|
|
|
|
|
|
|
|
|
|
|
|
|
|
|
|
|
|
|
|
|
|
|
|
|
|
|
|
|
|
|
|
|
|
|
|
|
|
|
|
|
|
|
|
|
|
|
|
|
|
|
|
|
|
|
|
|
|
|
|
|
|
|
|
|
|
|
|
|
|
|
|
|
|
|
|
|
|
|
|
|
|
|
|
|
|
|
|
|
|
|
|
|
|
|
|
|
|
|
|
|
|
|
|
|
|
|
|
|
|
|
|
|
|
|
|
|
|
|
|
|
|
|
|
|
|
|
|
|
|
|
|
|
|
|
|
|
|
|
|
|
|
|
|
|
|
|
|
|
|
|
|
|
|
|
|
|
|
|
|
|
|
|
|
|
|
|
|
|
|
|
|
|
|
|
|
|
|
|
|
|
|
|
|
|
|
|
|
|
|
|
|
|
|
|
|
|
|
|
|
|
|
|
|
|
|
|
|
|
|
|
|
|
|
|
|
|
|
|
|
|
|
|
|
|
|
|
|
|
|
|
|
|
|
|
|
|
|
|
|
|
|
|
|
|
|
|
|
|
|
|
|
|
|
|
|
|
|
|
|
|
|
|
|
|
|
|
|
|
|
|
|
|
|
|
|
|
|
|
|
|
|
|
|
|
|
|
|
|
|
|
|
|
|
|
|
|
|
|
|
|
|
|
|
|
|
|
|
|
|
|
|
|
|
|
|
|
|
|
|
|
|
|
|
|
|
|
|
|
|
|
|
|
|
|
|
|
|
|
|
|
|
|
|
|
|
|
|
|
|
|
|
|
|
|
|
|
|
|
|
|
|
|
|
|
|
|
|
|
|
|
|
|
|
|
|
|
|
|
|
|
|
|
|
|
|
|
|
|
|
|
|
|
|
|
|
|
Built-in mic Fader section Transport section Built-in mic
Rear panel
PHONES control |
INPUT jacks |
POWER switch |
OUTPUT control |
|
PHONES jack |
CONTROL IN jack |
OUTPUT jack |
Right side panel
Bottom panel (not shown)
Battery compartment
SD card slot |
|
|
|
USB port |
|
|
|
||
|
|
|
6
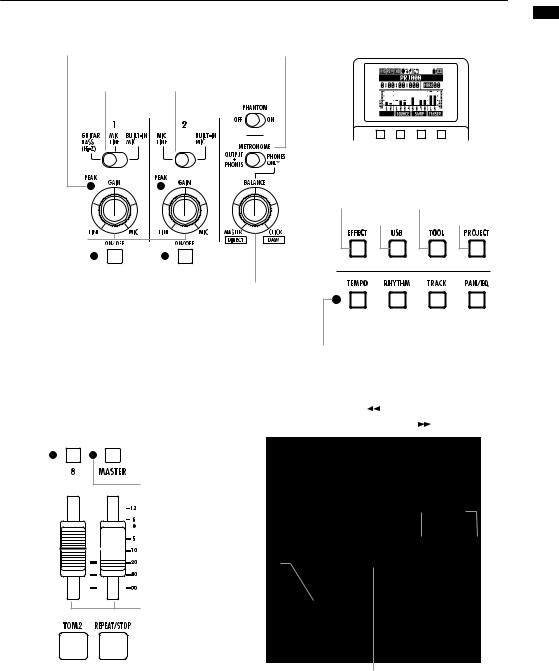
Input section |
|
|
|
Display section |
|
||
PEAK indicator |
|
METRONOME switch |
|
Display |
|
||
Input selection |
Input selection |
PHANTOM |
|
|
|
|
|
|
|
|
|
||||
switch 1 |
switch 2 |
switch |
|
|
|
|
|
|
|
|
|
|
|
|
|
|
|
|
|
|
|
|
|
|
|
|
|
|
|
|
|
|
|
|
|
|
|
Soft keys |
|
|
|
|
|
|
|
|
|
|
|
|
|
|
|
|
|
|
|
||
Control section |
|
|
|
|||
EFFECT key |
TOOL key |
|||||
|
USB key |
|
|
PROJECT key |
||
GAIN controls 1 & 2
|
|
|
|
|
|
BALANCE control |
|
|
|
|
|
|
|
|
|
ON/OFF key 1 |
ON/OFF key 2 |
|||
ON/OFF indicator |
|
|
|
|||
|
|
|
|
|
|
TEMPO key |
|
TRACK key |
|
||
|
RHYTHM key |
|
PAN/EQ key |
||
TEMPO indicator
|
Fader section |
|
|
Transport section |
|
|
|
|
|
|
|
|
|
|
|
|
|
|||||||||||||
|
|
|
|
Track indicator |
|
|
AUTO PUNCH I/O key |
|
|
|
MARKER |
|
|
key |
|
MARK/CLEAR key |
||||||||||||||
|
|
|
|
|
|
|
|
|
|
Status keys |
|
|
A-B REPEAT key |
|
|
MARKER |
|
key |
|
|||||||||||
|
|
|
|
|
|
|
|
|
|
|
|
|
||||||||||||||||||
|
|
|
|
|
|
|
|
|
|
|
|
|
|
|
|
|
|
|
|
|
|
|
|
|
|
|
|
|||
|
|
|
|
|
|
|
|
|
|
|
|
|
|
|
|
|
|
|
|
|
|
|
|
|
|
|||||
|
|
|
|
|
|
|
|
|
|
(1–8, MASTER) |
|
|
|
|
|
|
|
|
|
|
|
|
|
|
|
|
|
|
||
|
|
|
|
|
|
|
|
|
|
|
|
|
|
|
|
|
|
|
|
|
|
|
|
|
|
|
|
|
|
|
|
|
|
|
|
|
|
|
|
|
|
|
|
|
|
|
|
|
|
|
|
|
|
|
|
|
|
|
|
|
|
Master
indicator
|
|
|
|
|
|
|
|
|
|
|
|
|
|
|
|
|
|
|
|
|
|
|
|
|
|
|
|
|
|
|
|
|
|
|
|
|
|
REW key |
FF key |
STOP key |
|||
|
|
|
|
|
||||||
|
|
|
|
|
PLAY key |
REC key |
|
|
|
||||
|
|
|
|
|
|
|
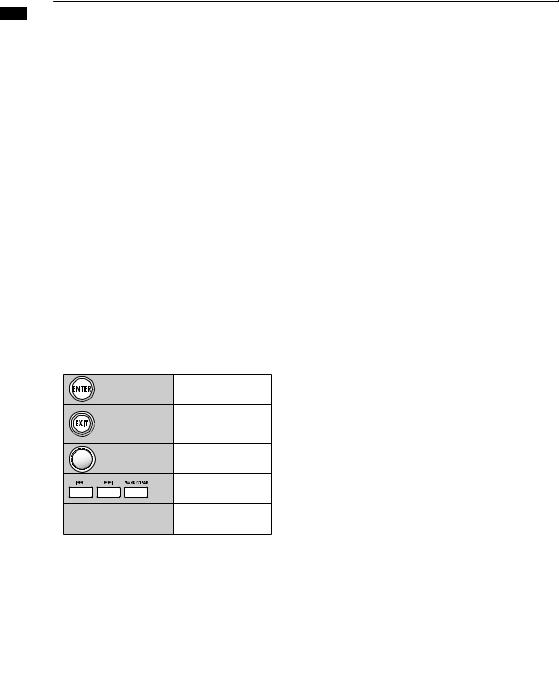
ENTER key
Faders
(1–8, MASTER)
|
|
|
REPEAT/STOP key |
|
|
EXIT key |
|
DIAL |
|
|
|
|
|
|
|||
Pad |
|
Cursor keys |
|
|
||||
|
|
|
||||||
functions and layout Panel
7
overview key and Switch
Switch and key overview
Here we explain how to use the keys and switches of the .
.
 Transport section
|
Functions only when tracks are in |
||
|
recording standby. |
|
|
REC key |
• Stopped: starts recording standby |
||
• Recording standby: ends standby |
|||
|
|||
|
• Playing: starts recording (manual |
||
|
punch-in/out) |
|
|
|
• Stopped: starts playback |
||
PLAY key |
• Recording standby: starts |
||
|
recording |
|
|
|
• During recording: stops recording |
||
STOP key |
• During playback: stops playback |
||
• Recording standby: stops |
|||
|
|||
|
transport |
|
|
FF key |
• When stopped or during playback: |
||
fast forwards |
|
||
|
|
||
|
• When stopped or during playback: |
||
|
rewinds |
|
|
|
• Hold STOP and press REW to |
||
REW key |
return to the top of the song. |
||
|
+ |
|
|
ENTER key |
• Confirm an item |
|
|
|
• Press to go back. |
|
|
EXIT key |
• Press and hold to return to the top |
||
|
screen. |
|
|
DIAL |
• Change numbers and move |
||
among menus. |
|
||
|
|
||
|
• Set, remove and move to marks |
||
|
• Set and cancel auto punch-in/out |
||
|
and A-B repeat |
|
|
Cursor appearance |
|
||
|
In manual |
On unit |
|
Manual indications |
|
||
Move in |
In explanations, the usable |
||
directions are shown with |
|||
menu |
dark lines. |
|
|
The cursors are used to move up, down, left and right to choose items. They are shown as above in the manual.
 Control section
|
|
EFFECT key |
• Set the insert and sendreturn |
|
|
effects |
|
|
|
|
|
|
|
|
|
|
|
USB key |
• Use the audio interface, control |
|
|
surface and card reader |
|
|
|
|
|
|
|
|
|
|
|
TOOL key |
• Make metronome, tuner, system |
|
|
and SD card settings |
|
|
|
|
|
|
|
|
|
PROJECT |
• Create, set up and work with |
||
|
|
PROJECT key |
|
|
|
projects |
|
|
|
|
|
|
|
|
|
|
|
TEMPO key |
• Set the tempo (the indicator |
|
|
flashes in time with the tempo) |
|
|
|
|
|
|
|
|
|
|
|
RHYTHM key |
• Play, create and set rhythm |
|
|
patterns |
|
|
|
|
|
|
|
|
|
|
|
TRACK key |
• Assign tracks and make settings |
|
|
||
|
|
|
|
|
|
|
|
|
|
PAN/EQ key |
• Access track mixer settings |
|
|
||
|
|
|
|
|
|
|
|
 Fader section
|
|
|
|
|
Change track status and |
|
|
|
|
|
TRACK 1–8 |
check with indicator |
|
|
|
|
|
Green: play |
• Unlit: mute |
|
|
|
|
|
status keys |
Red: record |
|
|
|
|
||||
|
|
|
|
|
Orange: loop track or rhythm |
|
|
|
|
|
|
pattern track playing back |
|
|
|
|
|
|
Change master track status |
|
|
|
|
|
MASTER |
and check with indicator |
|
|
|
|
|
status key |
• Green: play |
• Unlit: master |
|
|
|
|
|
• Red: mix down |
|
|
|
|
|
|
|
|
 Input section
|
|
Input selection |
• Set for the instrument or mic used |
|
|
switch 1 |
|
|
|
|
|
|
|
|
|
|
|
Input selection |
• Set for the instrument or mic used |
|
|
switch 2 |
|
|
|
|
|
|
|
|
|
|
|
PHANTOM switch |
• Phantom power ON/OFF |
|
|
|
|
|
|
|
• Set metronome output |
|
|
METRONOME switch |
When set to PHONES ONLY, |
|
|
BALANCE control adjusts the |
|
|
|
BALANCE control |
|
|
|
performance/metronome |
|
|
|
|
|
|
|
|
balance |
|
|
|
|
|
|
GAIN controls 1, 2 |
• Set input sensitivity |
|
|
• Indicator lights when input level |
|
|
|
PEAK indicators |
|
|
|
begins causing distortion |
|
|
|
|
|
|
|
|
|
|
|
ON/OFF key 1, 2 |
• Turn input ON/OFF |
|
|
• Indicator flashes when recording |
|
|
|
Indicators |
|
|
|
level begins causing distortion) |
|
|
|
|
|
|
|
|
|
8
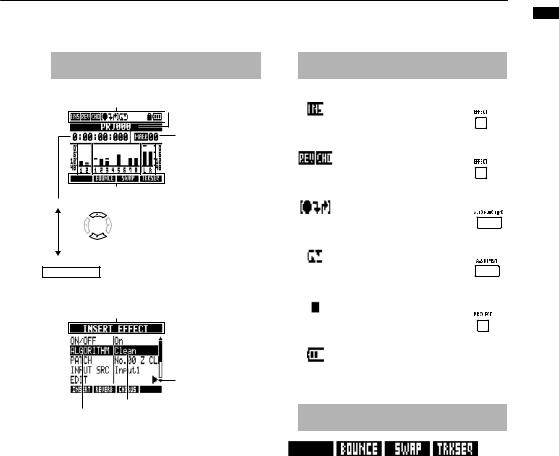
Display information
The display shows, for example, project data, connection and operation status as a recorder or a computer audio-interface, available functions and various menus.
 Display and screen information
Top Screen: Shows the current project
Icon display area

 Project name
Mark indicator & number

 Level meters (from left) Input 1, 2 level meters Track 1–8 level meters Master level meters
Soft keys
Hours: minutes: seconds: milliseconds
(Change with up/down keys) Bar–beat–tick
Menu screen: Shows an operation menu
Menu item or track number
Press ENTER key to open the next menu
 Use DIAL to select settings and values
  Select menu with up/down keys
 Icon display and settings
Insert effect icon |
(P.23, 45, 46, 80) |
||||||
Shown when insert effect enabled. |
|
|
|
|
|
|
|
|
To set: |
|
|
|
|
||
|
|
||||||
|
|
|
|
|
|
|
|
REVERB/CHORUS |
(P.44, 80, 82) |
||||||
send-return icons |
|
|
|
|
|
|
|
Shown when send-return effects |
To set: |
|
|
|
|
||
enabled. |
|
|
|
|
|||
|
|
|
|
|
|
|
|
AUTO PUNCH IN/OUT |
(P.33) |
||||||
icons |
|
|
|
|
|
|
|
Shown when auto punch-in/out |
|
|
|
|
|
|
|
enabled. |
To set: |
||||||
|
|
|
|
|
|
|
|
A-B REPEAT icon |
(P.38) |
||||||
Shown when A-B repeat enabled. |
|
|
|
|
|
|
|
|
To set: |
||||||
|
|
|
|
|
|
|
|
PROTECT icon |
(P.91) |
||||||
Shown when project protection |
|
|
|
|
|
|
|
enabled. |
|
|
|
|
|
|
|
|
To set: |
|
|
||||
|
|
||||||
|
|
|
|
|
|
|
|
Battery icon |
(P.14) |
||||||
Shown when using battery power |
|
|
|
|
|
|
|
(including remaining charge and |
|
|
|
|
|
|
|
when battery needs changed). (Not |
|
|
|
|
|
|
|
shown when running on USB.) |
|
|
|
|
|
|
|
|
|
|
|
|
|
|
|
 Soft keys
The functions of the soft keys appear at the bottom of the display. Press the key under the indication to use that function.
information Display
9

overview Operation
Operation overview
1. Recording preparations
Do the following before starting recording.
Preparing to record |
P.17 |
|
|
●● To start a new song, make a project first.
•Creating a new project (P.17)
●● Set the song's time signature and tempo.
•Setting the time signature (P.18)
•Setting the tempo (P.19)
●● Set the metronome to use as a guide when recording.
•Using the metronome (P.20)
2. Recording
Record an instrument, vocal or other sound source to each track. You can also assign audio file loops using the sampler function and rhythm
Recording the first track |
P.21 |
|
|
Record instruments and vocals to tracks in the project that you created.
●● Connect instruments and mics, and adjust the input sensitivity.
•Connecting instruments (P.21)
•Adjusting the input gain (P.22)
•Recording in stereo (stereo link) (P.29)
●● Select tracks to record on and record.
•Selecting tracks for recording (P.25)
•Recording (P.26)
●● You can use the following types of effects when recording.
•Using insert effects (P.23)
•Applying effects only for monitoring (P.89)
●● You can also redo part or all of a recording.
•Undoing the last action (UNDO/REDO) (P.26)
•Recording part of a song again (punching in/out) (P.32)
Using the sampler |
P.60 |
|
|
●● Assign audio files to tracks and set loops.
•Assigning included drum loops to tracks (P.63)
•Make loop settings (P.64)
Using rhythm functions |
P.48 |
|
|
●● Assign rhythm patterns to tracks.
•Assigning rhythm patterns to tracks (P.51)
10
patterns using the rhythm machine function to tracks, and arrange them in performance order using the track sequencer function.
Playback P.27
Playback instruments, vocals and other recorded sounds.
●● Play back from any position and loop any interval that you want
•Move to a point in a song (locate) (P.36)
•Repeat playback of a specific section (A-B repeat) (P.38)
●● Change a take (audio file assigned to
atrack).
•Changing playback takes (P.30)
Overdubbing P.28
While playing back the recorded track, you can record (overdub) additional instruments and vocals to other tracks.
Bouncing tracks |
P.34 |
|
|
●● If you run out of tracks, you can bounce them to reduce the number.
•Combining multiple tracks into 1-2 tracks (bouncing) (P.34)
Using sequencer functions |
P.72 |
|
|
●● Arrange loop tracks and rhythm pattern tracks in order to make performance data (sequence data) for one song.
•Creating sequence data (P.73)
•Playing back sequence data (P.78)
3. Mixing and mix down
After recording and preparing tracks, you can mix them and then make a stereo master track.
On the
Mixing |
P.40 |
|
|
Balance the tracks and set the effects used on them (mixing).
●● Adjust the balance of the tracks.
•Setting volume, EQ and pan (P.42)
●● You can apply the following types of effects to each track.
•Applying send-return effects (P.44)
•Using insert effects on tracks (P.45)
Mixing down to stereo |
P.46 |
|
|
You can rerecord multiple tracks as a final stereo master track (mix down).
●● When mixing down, you can apply the following types of effects.
•Applying mastering effects (P.46)
●● Mix down the song to stereo.
•Mixing down to master tracks (P.47)
On a computer
By connecting the unit to a computer using a USB cable, you can use it as an audio interface, control surface and card reader. Doing so, you can use DAW software, for example, to mix and master your tracks.
•Audio interface/control surface (P.105)
•Exchanging data with a computer
(card reader) (P.103)
Please see the Audio Interface Manual on the included SD card for information about the audio interface.
overview Operation
11
Connections
Connections
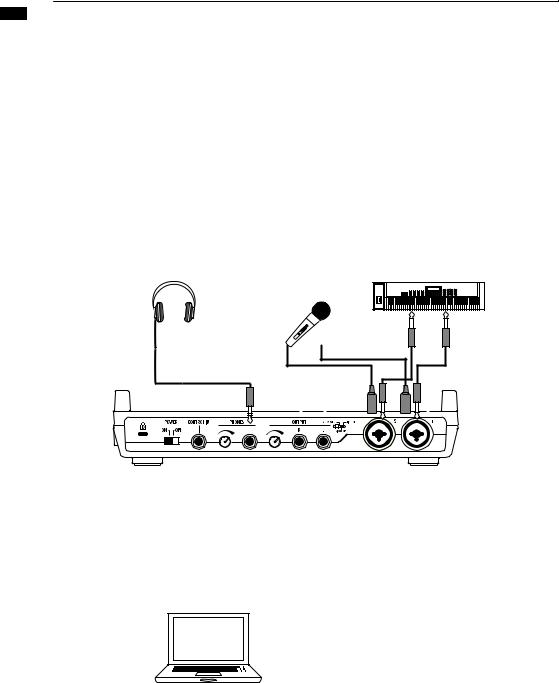
Refer to the illustration below to connect instruments, mics, other audio equipment and a computer, for example.
Outputs
Headphones
Stereo systems, speakers with built-in amplifiers, etc.
Inputs
Connect cables with XLR or phone plugs (mono/stereo, balanced/
unbalanced) to the INPUT jacks.
Microphones
•Connect a mic toINPUT 1 or 2.
•Set the input selection switch to
MIC LINE.
•Set the PHANTOM switch to ON to supply phantom power to a condenser mic.
Devices with stereo outputs When using a synthesizer, a CD
player or other stereo devices:
•Connect OUTPUT jack L to
INPUT 1 and R to INPUT 2.
•Set both input selection switches to MIC LINE.
Guitar/bass
To connect a passive electric guitar or bass directly:
•Connect it to INPUT 1.
•Set input selection switch 1 to
GUITAR BASS (Hi-Z).
Built-in microphones
Use the built-in mics on the left and right of the unit to record drums or a band performance, for example.
•Set both input selection switches (1 for left and2 for right) to BUILT-IN MIC.
|
|
|
|
|
|
|
|
|
Rear panel
FOOTSWITCH
Connect a ZOOM
FS01 footswitch (sold separately), and use it
to stop/start playback or punch-in/out, for example.
AC adapter Only use a ZOOM
AD-17 AC adapter, which is designed for use with this unit.
Right side panel
Computer USB port connections When connected to a computer, you
can transfer audio files with it, for
example. You can also use the as an audio interface and a control
surface for DAW software.
12
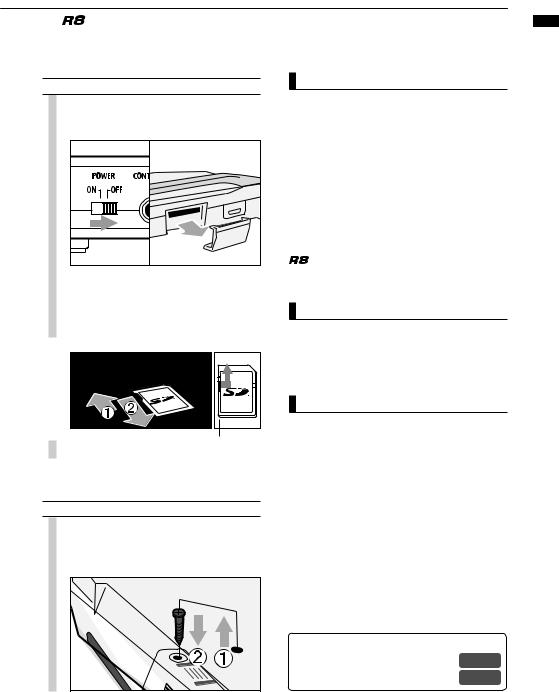
SD card installation
saves recording data and settings on SD cards.
To protect your data, turn the power off before inserting or ejecting a card. An SD card is necessary for recording.
Turn the power OFF and insert (ordinary use)
1Turn the POWER OFF and remove the SD card slot cover.
2Insert an SD card that is not writeprotected into the slot completely. To eject, push the card in first.
Unlock write-protection
NOTE
If you want to change the SD card while the power is ON, you must follow special procedures. (P.110)
When inserting or removing an SD card, always turn the power OFF. Doing so when the power is ON could cause recording data to be lost.
If you cannot insert a card into the slot, you might be trying to insert it in the wrong direction or upside down. Do not force the card. Try again with the correct orientation. Forcing the card in could break it.
format an SD card that was used with a or a digital camera, for example, in the
before using it.
If no SD card is inserted, the REC key will not function in Recorder Mode.
If a message appears
“No Card”: No SD card is detected. Make sure an SD card is inserted properly
“Card Protected”: The SD card is write-protected. Slide the lock switch away from the lock position to disable write-protection.
HINT
This unit can use 16 MB–2 GB SD cards and 4–32 GB SDHC cards.
You can find the most recent information about compatible SD cards on the ZOOM website. http://www.zoom.co.jp
Preventing SD card theft
Remove the screw near the slot, and screw it into the hole in the SD card cover.
Reference: |
|
Changing SD cards with the power on |
P.110 |
Formatting SD cards |
P.111 |
installation card SD
13
unit the Powering
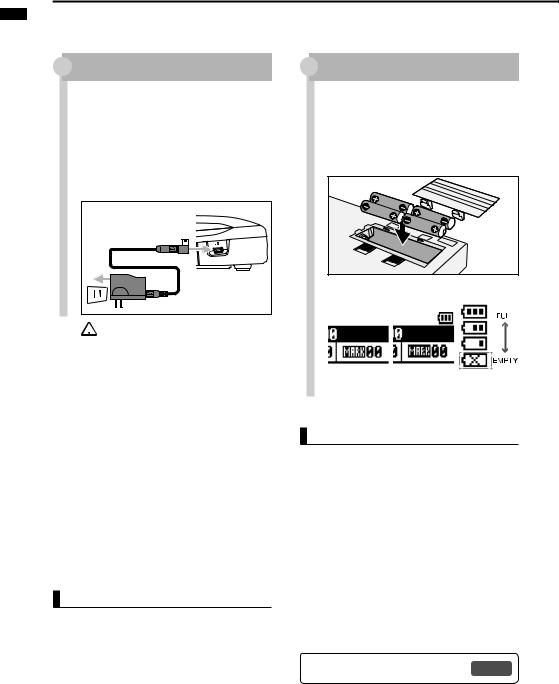
Powering the unit
Use the included AC Adapter or four AA batteries (sold separately) to power the unit.
Using ordinary power (included AC adapter)
1Turn the power OFF, and then plug the USB cable into the USB port on the right side of the unit.
2Connect the other end of the USB cable to the AC adapter and plug the adapter into a power outlet.
 Always use the included AC adapter


 (ZOOM AD-17), which is designed for use with the unit. Using any other adapter could damage the unit.
HINT
Power supply from USB
●● When used with a computer connected by a USB cable, the computer supplies power to the unit.
Using batteries
1Turn the power OFF and open the battery case cover on the bottom of the unit.
2Installcover. the batteries and close the
Battery indicator on screen |
Battery power |
|
No indicator |
Indicator on |
status |
|
||
AC adapter |
Batteries |
|
|
in use |
in use |
Batteries must be |
|
|
|
changed. |
|
|
|
Power will turn OFF. |
|
NOTE
●● Always turn the power OFF when you open or close the battery cover or connect or disconnect the AC adapter. Doing so when the power is ON might cause recording data to be lost.
●● The unit can use alkaline or NiMH batteries. The approximate operation time when using alkaline batteries is about 5.5 hours.
●● Replace the batteries when "Low Battery!" is shown. Turn the POWER switch to OFF immediately and install new batteries or connect the included AC adapter.
●● Set the battery type to increase the accuracy of the remaining battery charge indicator.
Reference: Setting the battery type |
P.112 |
14
Turning the power on & off/Setting the date & time
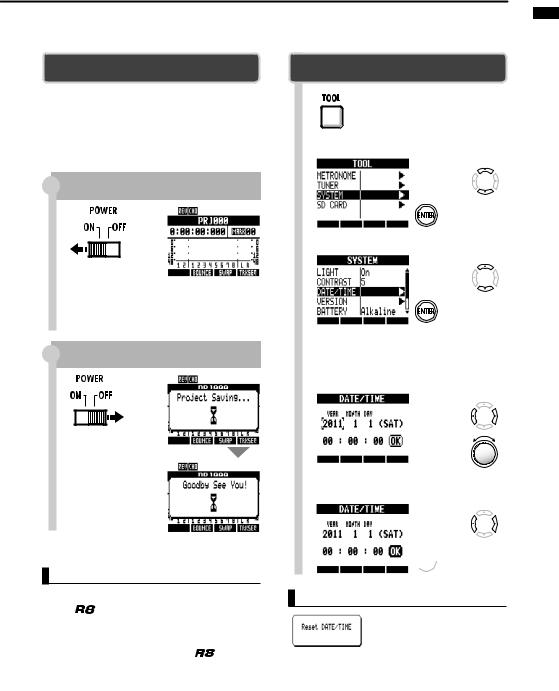
Follow these precautions for starting-up and shutting down the unit.
Follow these instruction to set the date and time for files and data.
Turning the power on and off
1)Make sure all the equipment is OFF.
2)Confirm that the power, the instruments and the monitoring system (or headphones) are correctly connected.
Turn the power ON to start the unit
1
Slide to ON
2In order, turn connected instruments and the monitoring system ON.
Turn the power OFF to shut down the unit
1
Slide to OFF
NOTE
●● |
the POWER ON, turn down |
|
|
PHONES and OUTPUT controls and |
|
|
volume on monitors and |
|
|
devices. |
|
●● If no power is supplied |
for more |
|
|
than a minute, the DATE/TIME setting will |
|
be reset to the default value.
Setting the date and time
TOOL > SYSTEM > DATE/TIME
1 |
Press |
|
2 |
Select SYSTEM. |
Change menu |
|
|
Press |
3 |
Select DATE/TIME. |
Change menu |
|
|
Press |
4Select the date and time units and set their values in order.
YEAR → MONTH → DAY → (hours) → (minutes) → (seconds)
Change unit
|
Change value |
5 Select OK. |
Move cursor |
 Press
Press
If this message appears
•The DATE/TIME setting has been set to its default value. Set the DATE/TIME again.
time & date the off/Setting & on power the Turning
15
playback and Recording
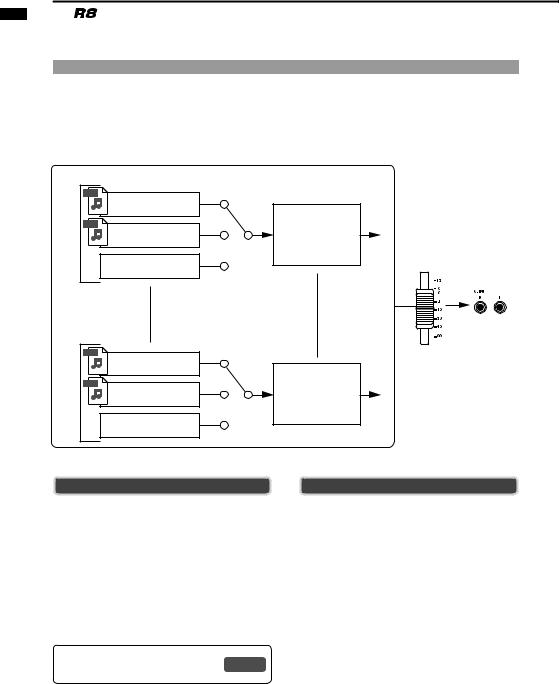
Recorder overview
The |
is an 8-track recorder that can record up to 2 tracks at the same time and play back up |
||
to 8 tracks at the same time. The following types of tracks are used. |
|||
|
|
|
|
|
Track type |
Function |
Reference |
Audio track |
|
Plays its audio file from beginning to end. |
– |
|
|
|
|
Loop track |
|
Plays part of an audio file repeatedly. |
Using the sampler function (P.60) |
|
|
|
|
Rhythm pattern track |
Plays a rhythm pattern. |
Using the rhythm function (P.48) |
|
|
|
|
|
Track 1 |
|
WAV |
|
Audio track |
|
WAV |
Track mixer |
Loop track |
|
|
MASTER |
Rhythm pattern track |
fader |
Track 8 |
|
WAV |
|
Audio track |
|
WAV |
Track mixer |
Loop track |
|
Rhythm pattern track |
|
Types of recording files
Depending on the recording destination track, the  creates the following types of audio files.
•Mono track: mono WAV file
•Stereo linked track: stereo WAV file
The file format depends on the project and bit length settings.
Reference: Changing the recording format
P.97
Types of playback files
Both mono and stereo WAV files can be assigned to audio and loop tracks. (A file cannot be assigned to a project, however, if its sampling rate is different from that of the project.)
Audio files created in DAW software can also be played by the .
.
There is no limit to the number of virtual tracks. Any audio file in the same project can be assigned to a track.
When a stereo file is assigned to a track, stereo link is turned on automatically.
16
Preparations before recording
With you can manage each song as a "project."
Before starting to record a new song, create a project first, and adjust the time signature (default: 4/4) and tempo (default: 120.0) as necessary.
You can also set the metronome as you wish to use as a guide during recording.
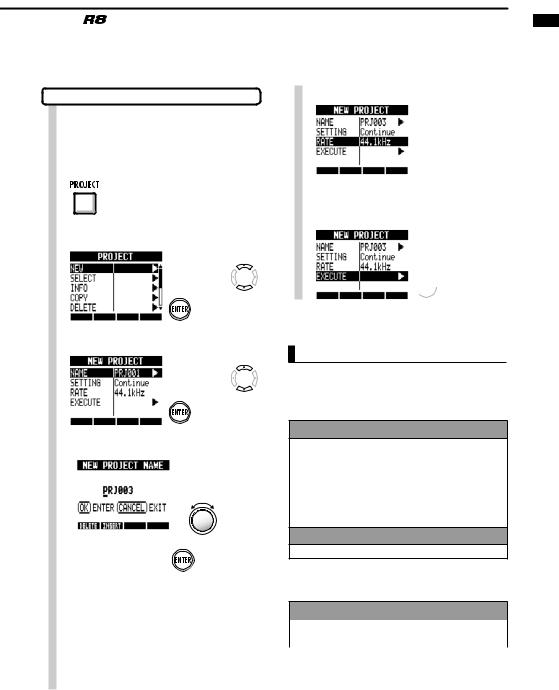
Creating a new project
the same settings as the previous project and set the sampling rate.
1 |
Press |
|
2 |
Select NEW. |
Change menu |
|
|
|
|
|
Press |
3 |
Select NAME. |
Change menu |
|
|
Press |
4 |
Change the name as needed. |
|
|
Move cursor |
|
|
|
Delete |
|
|
character |
|
|
Insert |
|
|
character |
|
|
character |
|
|
Press |
|
Set whether or not to continue using |
|
5 |
the previous settings. |
Change menu |
|
||
|
|
|
setting
6 |
Set the sampling rate. |
|
Change menu |
||
|
7 Select EXECUTE.
Change menu
 Press
Press
NOTE
●● You can continue to use the settings and values of the last project in the new one.
Settings carried over with Continue
BIT LENGTH settings
INSERT EFFECT settings
Send-return EFFECT settings
Track status (PLAY/MUTE/REC) settings
BOUNCE settings
Track parameter settings
METRONOME settings
Reset
Default settings are used for each item.
The RATE can also be set to a sampling rate that is suitable for DVD audio.
RATE: sampling rate settings
44.1 kHz |
Standard (default) |
48.0 kHz |
For DVD audio, etc. |
When set to 48 kHz, effects cannot be used.
playback and Recording
17
playback and Recording
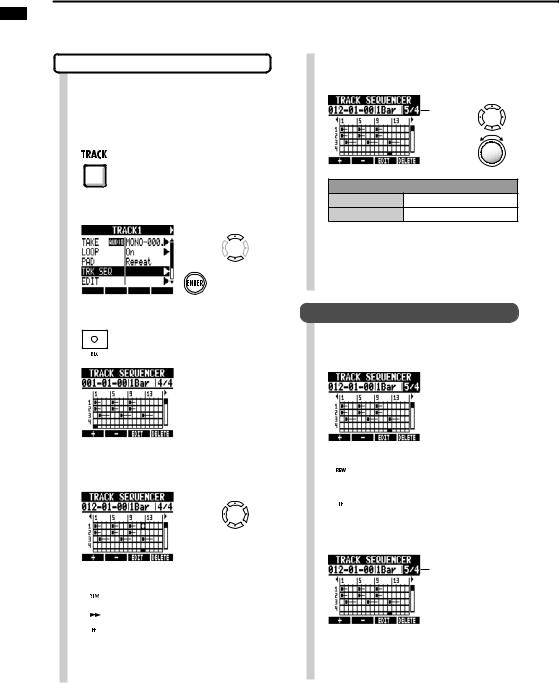
Changing the time signature
Use the track sequencer to set the time signature. The default is 4/4. Follow these steps to change to a different time signature.
1 |
Press |
|
|
|
|
2 |
Select TRK SEQ. |
Change menu |
|
|
Press |
3Start step input.
Press
4Move the cursor to where you want to change the time signature.
Move cursor
 Go back 1 step
 Go forward 1 step
cursor at the beginning to change the time signature for the whole song, or at the point where you want to change it in the middle of the song.
5Move to the time signature area and change the setting.
Move between areas
Highlighted
Change setting
Time signature options
Setting |
|
1/4–8/4 |
Default: 4/4 |
6Complete the setting.  Press
Press
Delete an inserted time signature
1Move the cursor to where you want to delete the time signature.
Move cursor
 Go back 1 step
 Go forward 1 step
2 |
Move to the time signature area |
|
Move between areas |
|
Highlighted |
3Press  beneath
  .
.
18
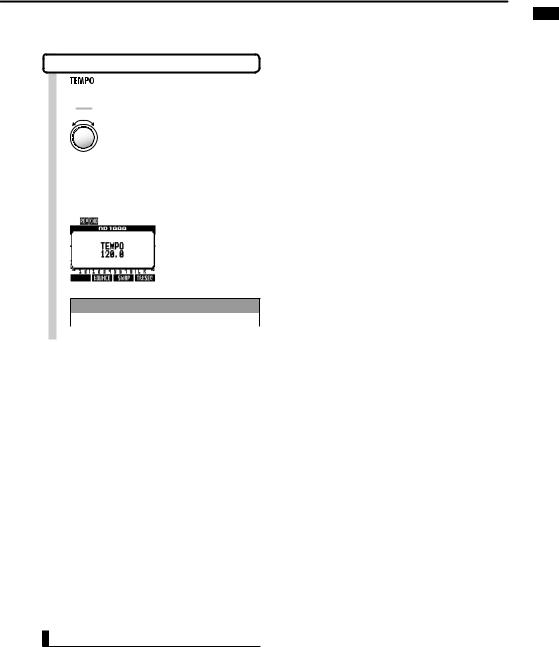
Setting the tempo
1  Press
Press
2 |
the dial to change the |
setting. |
OR
repeatedly and the average  tempo will be detected and set.
Tempo setting range
40.0–250.0 |
Default: 120.0 |
|
|
NOTE
●● The tempo setting is saved for each project.
playback and Recording
19
playback and Recording
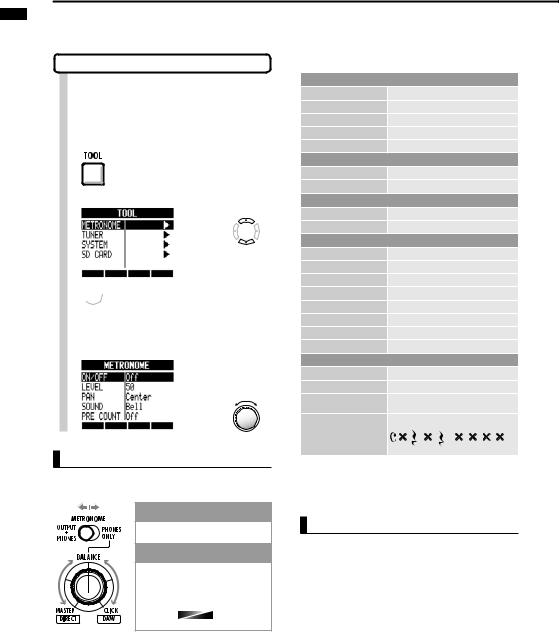
Using the metronome
You can change the volume, tone and stereo position of the metronome and use its pre-count function. You can also set it to only be heard through headphones.
1Press
2 Select METRONOME.
Change menu
 Press
Press
3Select each menu item and adjust the settings.
Change menu
Change setting
HINT
Use the METRONOME switch to change and adjust the metronome output.
OUTPUT + PHONES
The metronome sound is output through both OUTPUT and PHONES jacks.
PHONES ONLY
The metronome sound is output only through the PHONES jack.
Use the BALANCE knob to adjust the relative volumes of the MASTER fader signal and the metronome sound.
MASTER CLICK
(metronome)
Metronome settings are saved for each project. You can use the metronome even when playing back the master track.
Menu settings and setting values
ON/OFF: Set when operative
Settings |
|
|
|
|
|
|
|
|
Play Only |
During playback only |
|
||||||
Rec Only |
During recording only |
|
||||||
Play & Rec |
During both playback and recording |
|
||||||
Off (default) |
No metronome sound |
|
||||||
LEVEL: Set the volume |
|
|||||||
Setting range |
|
|
|
|
|
|
|
|
0–100 |
Default: 50 |
|
||||||
PAN: Set the stereo position |
|
|||||||
Setting range |
|
|
|
|
|
|
|
|
L100 – R100 |
Default: Center |
|
||||||
SOUND: Set the sound |
|
|||||||
Settings |
|
|
|
|
|
|
|
|
Bell (default) |
Click with bell accent |
|
||||||
Click |
Click sound only |
|
||||||
Stick |
Drum stick sound |
|
||||||
Cowbell |
Cowbell |
|
||||||
Hi-Q |
Synthesized click sound |
|
||||||
Track1 – Track8 |
TRACK 1–8 sound (mono) |
|
||||||
Track1/2 – Track7/8 |
TRACK 1/2–7/8 sound (stereo) |
|
||||||
PRE COUNT: Set the count-in length |
|
|||||||
Settings |
|
|
|
|
|
|
|
|
Off |
None (default) |
|
||||||
1–8 |
Enable pre-count sound for |
|
||||||
1–8 beats. |
|
|||||||
|
|
|||||||
Special |
|
|
|
|
|
|
|
|
|
|
|
|
|
|
|
|
|
|
|
|
|
|
|
|
|
|
|
|
|
|
|
|
|
|
|
NOTE
●● Be aware that if the metronome volume is set high, the accented beat of some sounds might become difficult to distinguish.
●● If a track with a rhythm pattern assigned to it is selected in the SOUND setting, no sound will be output.
●● The metronome follows the time signature used in the track sequencer.
20
Recording the first track
After preparation, ready the recorder and start recording the first track in a project that you have created. Connect an instrument, record it and play back the recording. You can also apply various effects (insert) during recording.
Connecting instruments
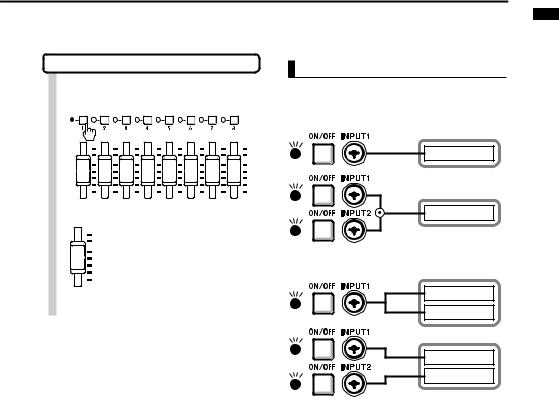
Connect a high impedance instrument to INPUT 1, and the set the input switch to GUITAR BASS (Hi-Z).
INPUT 1
Connect to INPUT 1
Connecting low impedance instruments
Connect a low impedance instrument to INPUT 1 or 2 and set its INPUT switch to MIC LINE.
Using phantom power
Connect a mic to an INPUT (1 or 2), and set that INPUT switch to MIC LINE. Then, set the
PHANTOM switch to ON.
INPUT 1, 2 


Supply phantom power to connected mics
Using the built-in mics
To use the left built-in mic set switch 1 to BUILT-IN MIC. To use the right built-in mic set switch 2 to BUILT-IN MIC.
Connect to INPUT 1 and/or 2
For a stereo instrument, connect its left output to Built-in mic signals on INPUT 1 and/or 2 INPUT 1 and its right output to INPUT 2.
NOTE
The total recordable time depends on the recording format and SD/SDHC card capacity. The table below shows times in hours and minutes.
Recording format |
|
|
SD/SDHC card capacity |
|
|
|
1 GB |
2 GB |
4 GB |
8 GB |
16 GB |
32 GB |
|
|
|
|
|
|
|
|
16-bit/44.1 kHz |
3:07 |
6:14 |
12:28 |
24:56 |
49:53 |
99:46 |
|
|
|
|
|
|
|
16-bit/48 kHz |
2:51 |
5:43 |
11:27 |
22:55 |
45:50 |
91:40 |
|
|
|
|
|
|
|
24-bit/44.1 kHz |
2:04 |
4:09 |
8:18 |
16:37 |
33:15 |
66:30 |
|
|
|
|
|
|
|
24-bit/48 kHz |
1:54 |
3:49 |
7:38 |
15:16 |
30:33 |
61:06 |
|
|
|
|
|
|
|
●● Times are estimates for mono (1-track) recording. Times are halved for stereo (2-track) recording.
●● The maximum continuous recording time, regardless of the number of recording tracks, is about 6 hours for 16-bit/44.1 kHz WAV format and about 4 hours for 24-bit/44.1 kHz WAV format.
playback and Recording
21
playback and Recording
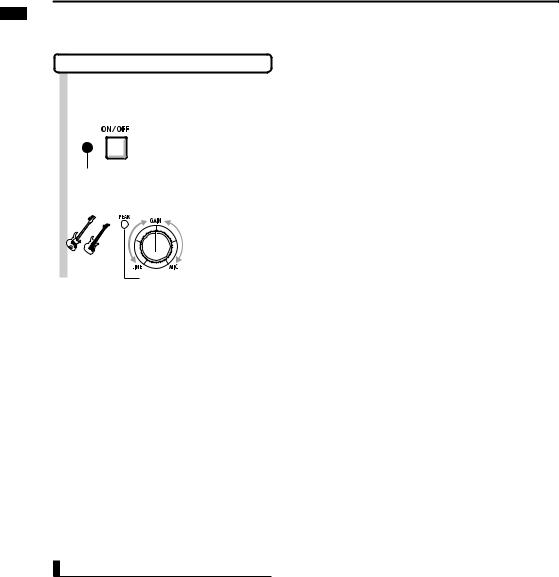
Adjusting the input gain
1Push the INPUT ON/OFF switch for the connected input to turn it on, lighting the indicator red.
When red, input is possible
2Adjust the input GAIN.
|
Adjust the |
|
input gain |
Make |
|
noise! |
Adjust so it does not light when |
|
maximum volume is input |
NOTE
●● The PEAK indicator turns red when the signal exceeds the maximum detectable level of 0 dB, resulting in input clipping.
●● If clipping happens, the recorded sound will be distorted, so you should reduce the recording level.
22

Using insert effects
1 |
|
Press |
|
2 |
Press |
below |
. |
3 |
Select ON/OFF and set it to ON. |
||
|
|
Change menu |
|
|
Change setting |
4 |
Select an algorithm and patch. |
Change menu |
Algorithm or patch
5Select INPUT SRC and then set the connected input.
Change menu
Set the input source
6Press to return to the top screen.
7Adjust the recording level.
0 dB
an insert effect, adjust the recording level so that the level meters do not touch the 0 dB mark and the input section ON/OFF switch indicators do not blink (see the following page).
NOTE
●● For more information about algorithms, patches and insert effects, see the "Guide to using effects" on P.80.
●● You can also use insert effects just for monitoring while recording the unaffected signals. (See "Using effects only for monitoring" on P.89.)
playback and Recording
23
playback and Recording
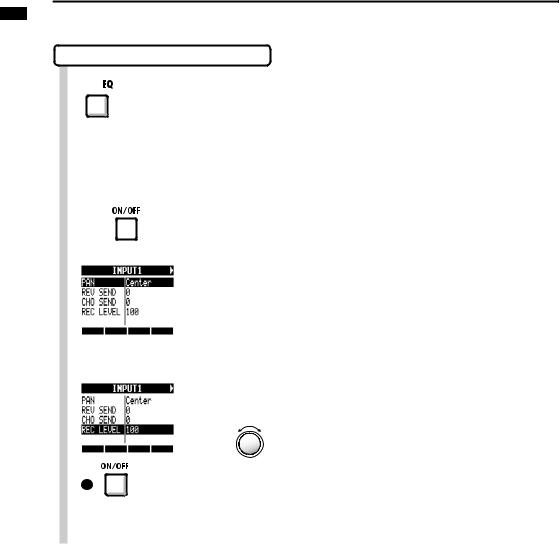
Adjusting the recording level
1 Press
Press
2Press  for an INPUT to adjust its recording level.
3Select REC LEVEL and adjust the recording level.
Change menu
Change
setting
Set the recording level so that the ON/ OFF switch indicator does not blink.
24
Selecting tracks for recording
1destination track until it lights red.
|
|
|
|
|
|
|
|
|
|
|
|
|
|
|
|
|
|
|
|
|
|
|
|
|
|
|
|
|
|
|
|
|
|
|
|
|
|
|
|
|
|
|
|
|
|
|
|
|
|
|
|
|
|
|
|
|
|
|
|
|
|
|
|
|
|
|
|
|
|
|
|
|
|
|
|
|
|
|
|
|
|
|
|
|
|
|
|
|
|
|
|
|
|
|
|
|
|
|
|
|
|
|
|
|
|
|
|
|
|
|
|
|
|
|
|
|
|
|
|
|
|
|
|
|
|
|
|
|
|
|
|
|
|
|
|
|
|
|
|
|
|
|
|
|
|
|
|
|
|
|
|
|
|
|
|
|
|
|
|
|
|
|
|
|
|
|
|
|
|
|
|
|
|
|
|
|
|
|
|
|
|
|
|
|
|
|
|
|
|
|
|
|
|
|
|
|
|
|
|
|
|
|
|
|
|
|
|
|
|
|
|
|
|
|
|
|
|
|
|
|
|
|
|
|
|
|
|
|
|
|
|
|
|
|
|
|
|
|
|
|
|
|
|
|
|
|
|
|
|
|
|
|
|
|
|
|
|
|
|
|
|
|
|
|
|
|
|
|
|
|
|
|
|
|
|
|
|
|
|
|
|
|
|
|
|
|
|
|
|
|
|
|
|
|
|
|
|
|
|
|
|
|
|
|
|
|
|
|
|
|
|
|
|
|
|
|
|
|
|
|
|
|
|
|
|
|
|
|
|
|
|
|
|
|
|
|
|
|
|
|
|
|
|
|
|
|
|
|
|
|
|
|
|
|
|
|
|
|
|
|
|
|
|
2 |
|
|
|
|
|
|
Set both the MASTER and |
||||||||||||||||||||
|
|
|
|
|
|
recording track faders to 0 dB |
|||||||||||||||||||||
|
|
|
|
|
|||||||||||||||||||||||
|
|
|
|
|
|
||||||||||||||||||||||
|
|
|
|
|
|
||||||||||||||||||||||
|
|
|
|
|
|
|
once, and then raise them to |
||||||||||||||||||||
|
|
|
|
|
|
|
|||||||||||||||||||||
|
|
|
|
|
|
|
|||||||||||||||||||||
|
|
|
|
|
|
|
|||||||||||||||||||||
|
|
|
|
|
|
|
|||||||||||||||||||||
|
|
|
|
|
|
|
|||||||||||||||||||||
|
|
|
|
|
|
|
|||||||||||||||||||||
|
|
|
|
|
|
|
|||||||||||||||||||||
|
|
|
|
|
|
|
|||||||||||||||||||||
|
|
|
|
|
|
|
adjust the monitoring volume of |
||||||||||||||||||||
|
|
|
|
|
|
|
the instrument being recorded. |
||||||||||||||||||||
NOTE
●● The relationship between inputs and tracks is as follows.
•When one track is selected
Recorder
Track
Recorder
Track
two/stereo tracks are selected
Recorder
Track
Track
Recorder
Odd track
Even track
playback and Recording
25
playback and Recording
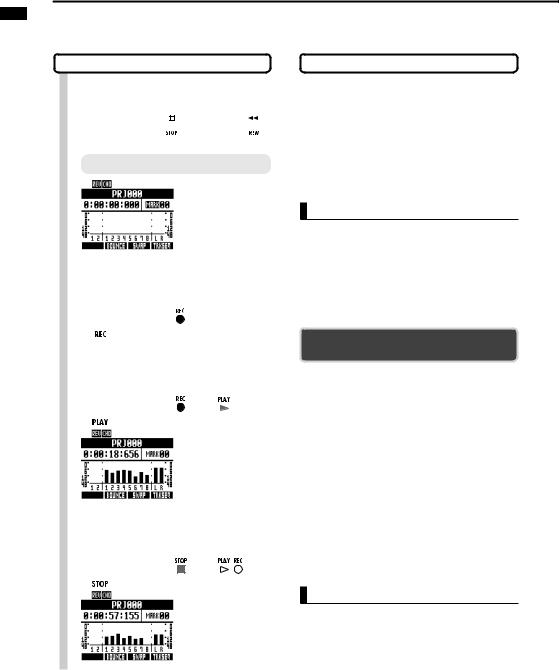
Recording
1Return to the beginning of the song (time counter).
Press and hold and press
 to return to the beginning.
Top screen
Counter at beginning of song (mark 00)
2 Arm the track for recording.  Press
Press
3 Start recording.
 Press
Press
green
Counter starts
4 Stop recording.
 Press
Press
green
Counter stops but does not return to beginning
Re-recording
If you record again on the same track, the previously recorded file will be overwritten. However, you can also use the UNDO function to erase the previous recording.
Moreover, you can also keep the previous file and record a second take in a separate file.
HINT
●● You can set whether when recording previous recordings are overwritten or saved and a new recording made. (See "Setting the recording mode" on P.97.)
Redoing the previous recording (UNDO and REDO functions)
use the UNDO and REDO functions to re-record. Use the UNDO function to erase the recording and restore the unit to the previous state.
You can also use REDO to cancel the UNDO operation.
 beneath
  to UNDO.
 beneath
  to REDO.
NOTE
●● The UNDO function only affects audio data recorded on a track.
●● UNDO can only be used to go back one recording step. Undoing more than one step is not possible.
26
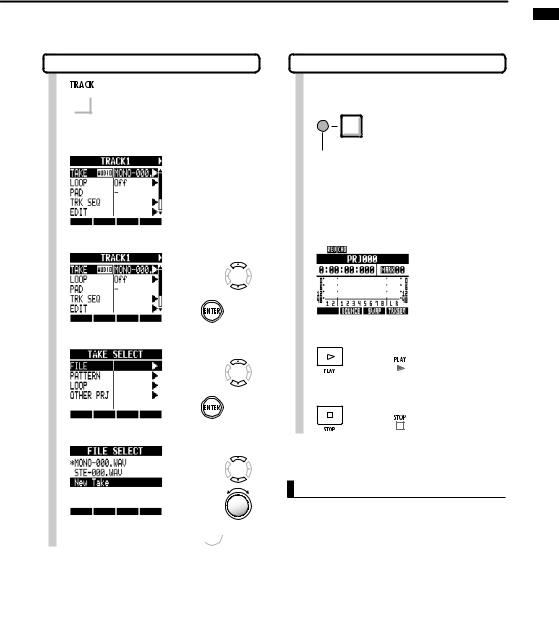
Recording to a new file
1  Press
Press
2Selectfile. the track for recording the new
Select track
3 |
Select TAKE. |
|
Change menu |
||
|
||
|
Press |
|
4 |
Select FILE. |
|
Change menu |
||
|
Press |
|
5 |
Select New Take. |
|
Select file |
||
|
 Press
Press
HINT
●● “TAKE” shows the file name. File names are assigned automatically in order starting with "MONO-000.WAV" (for a stereo track "STE-000.WAV") followed by "MONO-001. WAV", "MONO-002.WAV" and so on. File names can be changed as necessary. (See "Changing project and audio file names" on P.94.)
Playing back recordings
1Press the status key for the recording destination track until it lights green.
Playback track Press 1-2 times
until lit green
Ready to PLAY when green
2Return to the beginning of the song.
Press REW while pressing and holding STOP to return to the beginning.
3Start playback.
Press |
Lit green |
4Stop playback.
Press |
|
Lit green |
|
NOTE
●● When the REC MODE is set to Overwrite, the recorded audio file will be overwritten on the track. If you return to the beginning of the song and record, the previous recording will be overwritten, so be careful. When a track is ready to PLAY, the file on it will be played back.
HINT
●● You can change the playback file to a different take. ("Changing the playback take" on P.30.)
playback and Recording
27

playback and Recording
Overdubbing
After "Recording the first track," you can record (overdub) other instruments on other tracks while playing back the already recorded audio.
Playing an already recorded track
Press the status key for the track to playback 1–2 times until its indicator lights green.
Press for the track to playback until it lights green
Lit green: ready to PLAY
Overdubbing
After preparing the already recorded track for playback, follow the instructions in "Recording the first track" (P.21) from "Connecting instruments" to "Recording" to record other tracks.
HINT
●● If you want to record on a track that has already been recorded on, assign the recorded file to another track to make the target track empty. Refer to "Changing the playback take" (P.30).
●● You can also swap recorded tracks with unrecorded tracks. Refer to "Swapping two tracks" on (P.31).
●● To make a new recording on the same track used for the first recording, you must swap tracks.
●● To record to a new file, set the track to New Take. (Refer to "Recording to a new file" on P.27.)
Playing back all tracks
1Press the status keys for the tracks to playback 1–2 times until their indicators light green.
Press for the tracks to playback until they light green
Lit green: ready to PLAY
2Press and hold  and press
  to return to the beginning.
3 Press to start playback.
 green
green
4 Press to stop playback.
 green
green
NOTE
●● When you move files on tracks, confirm that tracks to be recorded on are set to “New Take” so that no files are assigned to them.
●● If there is a file assigned to a track, that recording will be overwritten by new recording.
●● When the REC MODE is set to Overwrite, the recorded audio file will be overwritten on the track. If you return to the beginning of the song and record, the previous recording will be overwritten, so be careful. When a track is ready to PLAY, the file on it will be played back.
28
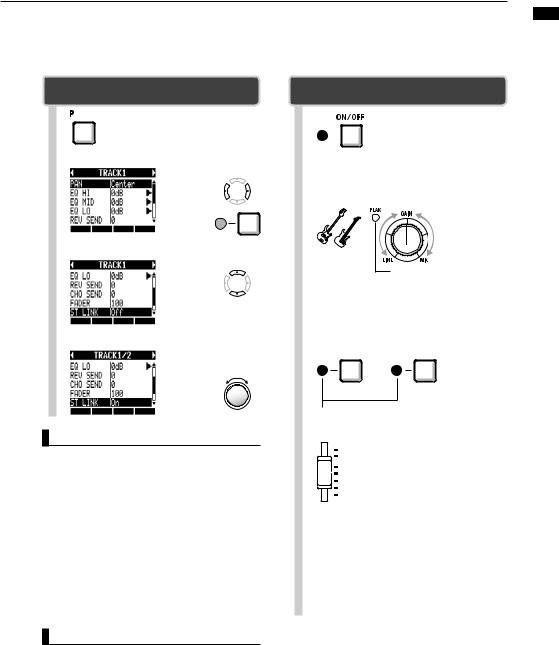
Stereo recording (stereo link)
Enable stereo links to treat two adjacent tracks (1/2, 3/4, 5/6 and 7/8) as stereo tracks.
When stereo link is set to ON, INPUT 1 and 2 can be used together for stereo input and recorded to a stereo track. When recording to a stereo track, a stereo WAV file is created.
Stereo link
PAN/EQ > ST LINK
 Press
Press
2 Select a track.
Select track
3 Select ST LINK.
Change menu
4Select On.
 Tracks with a stereo link are shown this way
On/Off
HINT
●● Stereo link changes the setting from two mono tracks to one stereo track.
●● Whatever track number you choose, an adjacent track will be linked. You cannot change these combinations.
●● To adjust the volume of a stereo track, use the odd number fader. The even number fader has no effect. Use the pan parameter to adjust their relative volume balance.
●● Stereo files can be assigned to stereo linked tracks. The left channel is on the odd track and the right is on the even track.
Stereo recording
ON/OFF switches to turn them on, lighting their indicators red.
2Adjust the input GAIN.
|
Adjust the |
Make |
input gain |
|
|
noise! |
Adjust so it does not light when |
|
maximum volume is input |
3Press a status key of the stereo linked tracks 1–2 times until both indicators light red.
|
Lit red: ready to record |
|||
4 |
|
|
|
Set the MASTER and recording |
|
|
|
track faders to 0 dB and then |
|
|
|
|
||
|
|
|
||
|
|
|
||
|
|
|
|
use them to adjust the moni- |
|
|
|
|
|
|
|
|
|
|
|
|
|
|
|
|
|
|
|
|
|
|
|
|
|
|
|
|
|
|
|
|
|
|
|
|
|
|
|
|
|
|
|
|
toring level of the instrument |
|
|
|
|
being recorded. |
5Follow the procedures in the "Recording" section (P.26) of "Recording the first track" to record.
●● The left channel is recorded on the odd track and the right on the even track.
NOTE
●● If stereo link is turned on for a track that has a mono file assigned to it, that file assignment will be canceled.
playback and Recording
29
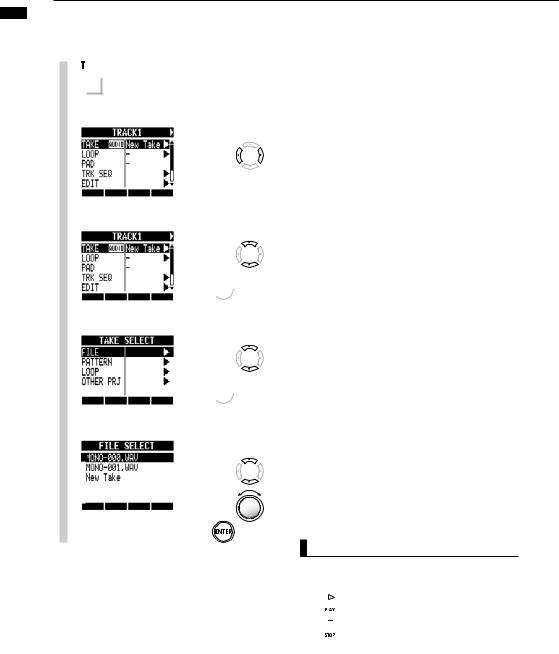
playback and Recording
Changing playback takes
You can assign audio files to tracks freely.
By recording multiple takes of vocals, guitar solos and other parts in different files, you can later select and use the best takes (as though using virtual tracks).
1
2
3
4
5
 Press
Press
Select the track to assign.
Select track
Select TAKE.
Change menu
 Press For an audio file, select FILE.
Change menu
 Press
Press
Select the audio file.
Select the file or pattern
NOTE
●● If you assign a stereo file to a mono track, stereo link is turned on automatically. For example, if mono files are assigned to tracks 1 and 2, the stereo file will be assigned to track 1 and the mono file on track 2 will become unassigned.
●● If you assign a mono file to a stereo track, stereo link will be turned off automatically.
HINT
●● You can also play the audio file being selected.
 Play
Play  Stop
Stop
●● Files that are already assigned to tracks have an * to the left of their names.
30
 Loading...