


 Loading...
Zebra® Z4Mplus/Z6Mplus™
Industrial/Commercial Printer
User Guide
Copyright © ZIH Corp.
This copyrighted guide and the label printers described herein are owned by Zebra Technologies. All rights are reserved. Unauthorized reproduction of the guide or the software in the label printer may result in imprisonment of up to one year and fines of up to $10,000 (17 U.S.C.506). Copyright violators may be subject to civil liability.
IBM® is a registered trademark of IBM Corporation.
Adobe® and Acrobat® are registered trademarks of Adobe Systems Incorporated.
Zebra®, Stripe®, ZPL®, ZebraNet®, ZebraLink®, and ZPL II® are registered trademarks of Zebra Technologies.
All other brand names, product names, or trademarks belong to their respective holders.
Customer Order # 13163L
Manufacturer Part # 13163LB Rev. 3

Contents
Contents . . . . . . . . . . . . . . . . . . . . . . . . . . . . . . . . . . . . . . . . . . . . . . . . . . . . . . . . . . i Proprietary Statement . . . . . . . . . . . . . . . . . . . . . . . . . . . . . . . . . . . . . . . . . . . . . . . v Declaration of Conformity . . . . . . . . . . . . . . . . . . . . . . . . . . . . . . . . . . . . . . . . . . vii Warranty Information . . . . . . . . . . . . . . . . . . . . . . . . . . . . . . . . . . . . . . . . . . . . . . . ix Preface . . . . . . . . . . . . . . . . . . . . . . . . . . . . . . . . . . . . . . . . . . . . . . . . . . . . . . . . . . xiii
Contacts . . . . . . . . . . . . . . . . . . . . . . . . . . . . . . . . . . . . . . . . . . . . . . . . . . . . . . . . . . . . . . xiv Support . . . . . . . . . . . . . . . . . . . . . . . . . . . . . . . . . . . . . . . . . . . . . . . . . . . . . . . . . . . . xiv Document Conventions. . . . . . . . . . . . . . . . . . . . . . . . . . . . . . . . . . . . . . . . . . . . . . . . . . . .xv Related Documents . . . . . . . . . . . . . . . . . . . . . . . . . . . . . . . . . . . . . . . . . . . . . . . . . . . . . xvi
1 • Introduction . . . . . . . . . . . . . . . . . . . . . . . . . . . . . . . . . . . . . . . . . . . . . . . . . . . . 1
External View . . . . . . . . . . . . . . . . . . . . . . . . . . . . . . . . . . . . . . . . . . . . . . . . . . . . . . . . . . . 2
Front Panel . . . . . . . . . . . . . . . . . . . . . . . . . . . . . . . . . . . . . . . . . . . . . . . . . . . . . . . . . . . . . 3
LCD Display Settings . . . . . . . . . . . . . . . . . . . . . . . . . . . . . . . . . . . . . . . . . . . . . . . . . . 4
Print Modes. . . . . . . . . . . . . . . . . . . . . . . . . . . . . . . . . . . . . . . . . . . . . . . . . . . . . . . . . . 5
Printer Media Compartment . . . . . . . . . . . . . . . . . . . . . . . . . . . . . . . . . . . . . . . . . . . . . . . . 6
13163L Rev. 3 5/20/2004 |
Z4Mplus/Z6Mplus User Guide |
i |


 Contents
2 • Printer Setup . . . . . . . . . . . . . . . . . . . . . . . . . . . . . . . . . . . . . . . . . . . . . . . . . . . 7
Before You Begin . . . . . . . . . . . . . . . . . . . . . . . . . . . . . . . . . . . . . . . . . . . . . . . . . . . . . . . . 8 Unpack and Inspect the Printer. . . . . . . . . . . . . . . . . . . . . . . . . . . . . . . . . . . . . . . . . . . . . . 9 Report Damage . . . . . . . . . . . . . . . . . . . . . . . . . . . . . . . . . . . . . . . . . . . . . . . . . . . . . . 9 Storage . . . . . . . . . . . . . . . . . . . . . . . . . . . . . . . . . . . . . . . . . . . . . . . . . . . . . . . . . . . . . 9 Select a Site for the Printer . . . . . . . . . . . . . . . . . . . . . . . . . . . . . . . . . . . . . . . . . . . . . . . . 10 Select a Surface . . . . . . . . . . . . . . . . . . . . . . . . . . . . . . . . . . . . . . . . . . . . . . . . . . . . . 10 Provide Proper Operating Conditions . . . . . . . . . . . . . . . . . . . . . . . . . . . . . . . . . . . . . 10 Allow Proper Space . . . . . . . . . . . . . . . . . . . . . . . . . . . . . . . . . . . . . . . . . . . . . . . . . . 10 Provide a Data Source . . . . . . . . . . . . . . . . . . . . . . . . . . . . . . . . . . . . . . . . . . . . . . . . 10 Connect the Printer to a Power Source . . . . . . . . . . . . . . . . . . . . . . . . . . . . . . . . . . . . . . .11 Power Cord Specifications . . . . . . . . . . . . . . . . . . . . . . . . . . . . . . . . . . . . . . . . . . . . . .11 Select a Communication Interface . . . . . . . . . . . . . . . . . . . . . . . . . . . . . . . . . . . . . . . . . . 13 Cable Requirements . . . . . . . . . . . . . . . . . . . . . . . . . . . . . . . . . . . . . . . . . . . . . . . . . . 14 Types of Media . . . . . . . . . . . . . . . . . . . . . . . . . . . . . . . . . . . . . . . . . . . . . . . . . . . . . . . . . 15 Selecting Media . . . . . . . . . . . . . . . . . . . . . . . . . . . . . . . . . . . . . . . . . . . . . . . . . . . . . 15 Non-Continuous Media . . . . . . . . . . . . . . . . . . . . . . . . . . . . . . . . . . . . . . . . . . . . . . . . 16 Continuous Media. . . . . . . . . . . . . . . . . . . . . . . . . . . . . . . . . . . . . . . . . . . . . . . . . . . . 16 Ribbon. . . . . . . . . . . . . . . . . . . . . . . . . . . . . . . . . . . . . . . . . . . . . . . . . . . . . . . . . . . . . . . . 17 When to Use Ribbon. . . . . . . . . . . . . . . . . . . . . . . . . . . . . . . . . . . . . . . . . . . . . . . . . . 17 Ribbon Width . . . . . . . . . . . . . . . . . . . . . . . . . . . . . . . . . . . . . . . . . . . . . . . . . . . . . . . 17 Coated Side of Ribbon . . . . . . . . . . . . . . . . . . . . . . . . . . . . . . . . . . . . . . . . . . . . . . . . 17
3 • Printer Operation . . . . . . . . . . . . . . . . . . . . . . . . . . . . . . . . . . . . . . . . . . . . . . . 21
Front Panel . . . . . . . . . . . . . . . . . . . . . . . . . . . . . . . . . . . . . . . . . . . . . . . . . . . . . . . . . . . . 22 Front Panel Keys . . . . . . . . . . . . . . . . . . . . . . . . . . . . . . . . . . . . . . . . . . . . . . . . . . . . 23 Front Panel Lights. . . . . . . . . . . . . . . . . . . . . . . . . . . . . . . . . . . . . . . . . . . . . . . . . . . . 24 Load Roll Media . . . . . . . . . . . . . . . . . . . . . . . . . . . . . . . . . . . . . . . . . . . . . . . . . . . . . . . . 25 Tear-Off Mode. . . . . . . . . . . . . . . . . . . . . . . . . . . . . . . . . . . . . . . . . . . . . . . . . . . . . . . 25 Cutter Mode . . . . . . . . . . . . . . . . . . . . . . . . . . . . . . . . . . . . . . . . . . . . . . . . . . . . . . . . 26 Peel-Off Mode. . . . . . . . . . . . . . . . . . . . . . . . . . . . . . . . . . . . . . . . . . . . . . . . . . . . . . . 28 Liner Take-Up Mode . . . . . . . . . . . . . . . . . . . . . . . . . . . . . . . . . . . . . . . . . . . . . . . . . . 30 Rewind/Peel-Off Mode . . . . . . . . . . . . . . . . . . . . . . . . . . . . . . . . . . . . . . . . . . . . . . . . 33 Rewind Mode . . . . . . . . . . . . . . . . . . . . . . . . . . . . . . . . . . . . . . . . . . . . . . . . . . . . . . . 35 Adjust Media Alignment for Rewind Option . . . . . . . . . . . . . . . . . . . . . . . . . . . . . . . . 37 Load Fanfold Media . . . . . . . . . . . . . . . . . . . . . . . . . . . . . . . . . . . . . . . . . . . . . . . . . . . . . 38 Load the Ribbon . . . . . . . . . . . . . . . . . . . . . . . . . . . . . . . . . . . . . . . . . . . . . . . . . . . . . . . . 40 Remove the Ribbon . . . . . . . . . . . . . . . . . . . . . . . . . . . . . . . . . . . . . . . . . . . . . . . . . . 41 Calibrate the Printer . . . . . . . . . . . . . . . . . . . . . . . . . . . . . . . . . . . . . . . . . . . . . . . . . . . . . 42 Auto Calibration . . . . . . . . . . . . . . . . . . . . . . . . . . . . . . . . . . . . . . . . . . . . . . . . . . . . . 42 Manual Calibration . . . . . . . . . . . . . . . . . . . . . . . . . . . . . . . . . . . . . . . . . . . . . . . . . . . 42 Print a Configuration Label . . . . . . . . . . . . . . . . . . . . . . . . . . . . . . . . . . . . . . . . . . . . . . . . 43
ii |
Z4Mplus/Z6Mplus User Guide |
13163L Rev. 3 5/20/2004 |

Contents 
Print a Network Configuration Label . . . . . . . . . . . . . . . . . . . . . . . . . . . . . . . . . . . . . . . . . 45
Adjust Printhead Pressure . . . . . . . . . . . . . . . . . . . . . . . . . . . . . . . . . . . . . . . . . . . . . . . . 46
Install Memory Card . . . . . . . . . . . . . . . . . . . . . . . . . . . . . . . . . . . . . . . . . . . . . . . . . . . . . 48
4 • Configuration . . . . . . . . . . . . . . . . . . . . . . . . . . . . . . . . . . . . . . . . . . . . . . . . . . 49
Overview . . . . . . . . . . . . . . . . . . . . . . . . . . . . . . . . . . . . . . . . . . . . . . . . . . . . . . . . . . . . . . 50
Enter Configuration Mode. . . . . . . . . . . . . . . . . . . . . . . . . . . . . . . . . . . . . . . . . . . . . . 50
Exit Configuration Mode . . . . . . . . . . . . . . . . . . . . . . . . . . . . . . . . . . . . . . . . . . . . . . . 51
Change Password-Protected Parameters . . . . . . . . . . . . . . . . . . . . . . . . . . . . . . . . . 52
Basic Configuration. . . . . . . . . . . . . . . . . . . . . . . . . . . . . . . . . . . . . . . . . . . . . . . . . . . . . . 53
Configuration and Calibration LCD Displays. . . . . . . . . . . . . . . . . . . . . . . . . . . . . . . . . . . 57
ZebraNet® Wired and Wireless Print Server LCD Displays . . . . . . . . . . . . . . . . . . . . 72
5 • Routine Care and Adjustments . . . . . . . . . . . . . . . . . . . . . . . . . . . . . . . . . . . 75
Cleaning Procedures . . . . . . . . . . . . . . . . . . . . . . . . . . . . . . . . . . . . . . . . . . . . . . . . . . . . 76
Clean the Exterior . . . . . . . . . . . . . . . . . . . . . . . . . . . . . . . . . . . . . . . . . . . . . . . . . . . . 76
Clean the Interior . . . . . . . . . . . . . . . . . . . . . . . . . . . . . . . . . . . . . . . . . . . . . . . . . . . . 76
Clean the Printhead and Platen Roller . . . . . . . . . . . . . . . . . . . . . . . . . . . . . . . . . . . . 77
Clean the Sensors . . . . . . . . . . . . . . . . . . . . . . . . . . . . . . . . . . . . . . . . . . . . . . . . . . . 79
Clean the Rewind Option . . . . . . . . . . . . . . . . . . . . . . . . . . . . . . . . . . . . . . . . . . . . . . 80
Clean the Peel-Off Assembly . . . . . . . . . . . . . . . . . . . . . . . . . . . . . . . . . . . . . . . . . . . 81
Clean the Cutter Module. . . . . . . . . . . . . . . . . . . . . . . . . . . . . . . . . . . . . . . . . . . . . . . 82
Lubrication . . . . . . . . . . . . . . . . . . . . . . . . . . . . . . . . . . . . . . . . . . . . . . . . . . . . . . . . . . . . 83
Fuse Replacement . . . . . . . . . . . . . . . . . . . . . . . . . . . . . . . . . . . . . . . . . . . . . . . . . . . . . . 83
Position the Label Sensor . . . . . . . . . . . . . . . . . . . . . . . . . . . . . . . . . . . . . . . . . . . . . . . . . 84
Adjust the Reflective Sensor. . . . . . . . . . . . . . . . . . . . . . . . . . . . . . . . . . . . . . . . . . . . 84
Select the Transmissive Sensor . . . . . . . . . . . . . . . . . . . . . . . . . . . . . . . . . . . . . . . . . 86
6 • Troubleshooting . . . . . . . . . . . . . . . . . . . . . . . . . . . . . . . . . . . . . . . . . . . . . . . |
87 |
LCD Error Conditions and Warnings. . . . . . . . . . . . . . . . . . . . . . . . . . . . . . . . . . . . . . . . . 88
Print Quality Problems . . . . . . . . . . . . . . . . . . . . . . . . . . . . . . . . . . . . . . . . . . . . . . . . . . . 91
Calibration Problems. . . . . . . . . . . . . . . . . . . . . . . . . . . . . . . . . . . . . . . . . . . . . . . . . . . . . 92
Communication Problems. . . . . . . . . . . . . . . . . . . . . . . . . . . . . . . . . . . . . . . . . . . . . . . . . 93
Miscellaneous . . . . . . . . . . . . . . . . . . . . . . . . . . . . . . . . . . . . . . . . . . . . . . . . . . . . . . . . . . 94
Printer Diagnostics . . . . . . . . . . . . . . . . . . . . . . . . . . . . . . . . . . . . . . . . . . . . . . . . . . . . . . 95
Power-On Self Test. . . . . . . . . . . . . . . . . . . . . . . . . . . . . . . . . . . . . . . . . . . . . . . . . . . 95
CANCEL Self Test . . . . . . . . . . . . . . . . . . . . . . . . . . . . . . . . . . . . . . . . . . . . . . . . . . . 96
PAUSE Self Test . . . . . . . . . . . . . . . . . . . . . . . . . . . . . . . . . . . . . . . . . . . . . . . . . . . . . 97
FEED Self Test . . . . . . . . . . . . . . . . . . . . . . . . . . . . . . . . . . . . . . . . . . . . . . . . . . . . . . 98
FEED and PAUSE Self Test . . . . . . . . . . . . . . . . . . . . . . . . . . . . . . . . . . . . . . . . . . . . 99
Communication Diagnostics Test . . . . . . . . . . . . . . . . . . . . . . . . . . . . . . . . . . . . . . . . 99
Loading Factory Defaults . . . . . . . . . . . . . . . . . . . . . . . . . . . . . . . . . . . . . . . . . . . . . . . . 100
13163L Rev. 3 5/20/2004 |
Z4Mplus/Z6Mplus User Guide |
iii |


 Contents
A • Data Connections . . . . . . . . . . . . . . . . . . . . . . . . . . . . . . . . . . . . . . . . . . . . . 101
Serial Data Port. . . . . . . . . . . . . . . . . . . . . . . . . . . . . . . . . . . . . . . . . . . . . . . . . . . . . . . . 102
Hardware Control Signal Descriptions . . . . . . . . . . . . . . . . . . . . . . . . . . . . . . . . . . . 102
RS-232 Serial Data Port . . . . . . . . . . . . . . . . . . . . . . . . . . . . . . . . . . . . . . . . . . . . . . 103
Parallel Data Port . . . . . . . . . . . . . . . . . . . . . . . . . . . . . . . . . . . . . . . . . . . . . . . . . . . . . . 107
Parallel Cabling Requirements . . . . . . . . . . . . . . . . . . . . . . . . . . . . . . . . . . . . . . . . . 107
Parallel Port Interconnections. . . . . . . . . . . . . . . . . . . . . . . . . . . . . . . . . . . . . . . . . . 107
B • Specifications . . . . . . . . . . . . . . . . . . . . . . . . . . . . . . . . . . . . . . . . . . . . . . . . 109
General Specifications . . . . . . . . . . . . . . . . . . . . . . . . . . . . . . . . . . . . . . . . . . . . . . . . . . .110
Printing Specifications. . . . . . . . . . . . . . . . . . . . . . . . . . . . . . . . . . . . . . . . . . . . . . . . . . . .111
Media Specifications . . . . . . . . . . . . . . . . . . . . . . . . . . . . . . . . . . . . . . . . . . . . . . . . . . . . .112
Ribbon Specifications . . . . . . . . . . . . . . . . . . . . . . . . . . . . . . . . . . . . . . . . . . . . . . . . . . . .113
Printer Options . . . . . . . . . . . . . . . . . . . . . . . . . . . . . . . . . . . . . . . . . . . . . . . . . . . . . . . . .114
Zebra Programming Language (ZPL II) Features. . . . . . . . . . . . . . . . . . . . . . . . . . . . . . .115
Supported Bar Codes . . . . . . . . . . . . . . . . . . . . . . . . . . . . . . . . . . . . . . . . . . . . . . . . . . . .116
Index . . . . . . . . . . . . . . . . . . . . . . . . . . . . . . . . . . . . . . . . . . . . . . . . . . . . . . . . . . . 117
iv |
Z4Mplus/Z6Mplus User Guide |
13163L Rev. 3 5/20/2004 |

Proprietary Statement
This manual contains proprietary information of Zebra Technologies Corporation and its subsidiaries (“Zebra Technologies”). It is intended solely for the information and use of parties operating and maintaining the equipment described herein. Such proprietary information may not be used, reproduced, or disclosed to any other parties for any other purpose without the expressed written permission of Zebra Technologies.
Product Improvements
Continuous improvement of products is a policy of Zebra Technologies. All specifications and designs are subject to change without notice.
FCC Compliance Statement
This device complies with Part 15 rules. Operation is subject to the following two conditions:
1.This device may not cause harmful interference, and
2.This device must accept any interference received, including interference that may cause undesired operation.
This equipment has been tested and found to comply with the limits for Class B Digital Devices, pursuant to Part 15 of the FCC Rules. These limits are designed to provide reasonable protection against harmful interference when the equipment is operated in a residential environment. This equipment generates, uses, and can radiate radio frequency energy and, if not installed and used in accordance with the product manuals, may cause harmful interference to radio communications. However, there is no guarantee that interference will not occur in a particular installation. If this equipment does cause harmful interference to radio or television reception, the user is encouraged to do one or more of the following measures:
•Reorient or relocate the receiving antenna.
•Increase the separation between the equipment and receiver.
•Connect the equipment into an outlet on a circuit different from that to which the receiver is connected.
•Consult the dealer or an experienced radio/TV technician for help.
13163L Rev. 3 5/20/2004 |
XiIIIPlus User Guide |
v |


 Proprietary Statement
The user is cautioned that any changes or modifications not expressly approved by Zebra Technologies could void the user’s authority to operate the equipment. To ensure compliance, this printer must be used with Shielded Communication Cables.
Canadian DOC Compliance Statement
This Class B digital apparatus complies with Canadian ICES-003.
Cet appareil numérique de la classe B est conforme à la norme NMB-003 du Canada.
Liability Disclaimer
Zebra Technologies takes steps to ensure that its published Engineering specifications and manuals are correct; however, errors do occur. Zebra Technologies reserves the right to correct any such errors and disclaims liability resulting therefrom.
Limitation of Liability
In no event shall Zebra Technologies or anyone else involved in the creation, production, or delivery of the accompanying product (including hardware and software) be liable for any damages whatsoever (including, without limitation, consequential damages including loss of business profits, business interruption, or loss of business information) arising out of the use of, the results of use of, or inability to use such product, even if Zebra Technologies has been advised of the possibility of such damages. Some jurisdictions do not allow the exclusion or limitation of incidental or consequential damages, so the above limitation or exclusion may not apply to you.
vi |
XiIIIPlus User Guide |
5/20/2004 13163L Rev. 3 |

Declaration of Conformity 
Declaration of Conformity
I have determined that the Zebra printers identified as the
Z4Mplus/Z6Mplus™-series
manufactured by:
Zebra Technologies Corporation
333 Corporate Woods Parkway
Vernon Hills, Illinois 60061-3109 U.S.A.
Have been shown to comply with the applicable technical standards of the FCC
For Home, Office, Commercial, and Industrial use
If no unauthorized change is made in the equipment, and if the equipment is properly maintained and operated.
13163L Rev. 3 5/20/2004 |
Z4Mplus/Z6Mplus User Guide |
vii |


 Declaration of Conformity
Notes • ___________________________________________________________________
__________________________________________________________________________
__________________________________________________________________________
__________________________________________________________________________
__________________________________________________________________________
__________________________________________________________________________
__________________________________________________________________________
__________________________________________________________________________
__________________________________________________________________________
__________________________________________________________________________
__________________________________________________________________________
__________________________________________________________________________
__________________________________________________________________________
__________________________________________________________________________
__________________________________________________________________________
__________________________________________________________________________
__________________________________________________________________________
__________________________________________________________________________
__________________________________________________________________________
To provide feedback on this document, please send your comments to techpubs@zebra.com, or write your comments on this page and fax to the following:
Fax: 1.847.821.1795 Attention: TechPubs — CTC
viii |
Z4Mplus/Z6Mplus User Guide |
13163L Rev. 3 5/20/2004 |
Warranty Information
Effective December 30, 2002
All new Zebra products are warranted by the manufacturer to be free from defect in material and workmanship.
Printers and Related Hardware Products
Proof of purchase or shipment date is required to validate the warranty period. The warranty becomes void if the equipment is modified, improperly installed or used, damaged by accident or neglect, or if any parts are improperly installed or replaced by the user.
Products returned must be packaged in the original or comparable packing and shipping container. In the event equipment is not so packaged, or if shipping damage is evident, it will not be accepted for service under warranty. Surface transportation charges for return to customers in the continental United States is paid by Zebra. Otherwise, Zebra pays CPT (carriage paid to) nearest airport; customer pays customs, duties, taxes, and freight from airport to destination. If Zebra determines that the product returned for warranty service or replacement is not defective as herein defined, the customer will pay all handling and transportation costs.
Printers
All printers (excluding printheads) are warranted against defect in material or workmanship for twelve (12) months from the purchase date.
Printheads
Since printhead wear is part of normal operation, the original printhead is covered by a limited warranty as indicated below. Warranty period begins on purchase date.
13163L Rev. 3 5/20/2004 |
Z4Mplus/Z6Mplus User Guide |
ix |


 Warranty Information
Printhead |
Warranty Period |
Bar code label and receipt printer printheads |
6 months |
Plastic card printer printheads |
12 months |
To qualify for this warranty, the printhead must be returned to the factory or to an authorized service center. Customers are not required to purchase Genuine Zebra Supplies (media and/or ribbons) for warranty qualification.
However, if it is determined that the use of inappropriate or inferior supplies has caused any defect in the printhead for which a warranty claim is made, the user is responsible for Zebra’s labor and material charges required to repair the defect. The warranty becomes void if the printhead is physically worn or damaged; also if it is determined that failure to follow the preventive maintenance schedule listed in the User Guide has caused defect in the thermal printhead for which a warranty claim is made.
Related Hardware Items
Products are warranted to be free of defects in material and workmanship from the date of purchase according to this chart:
Product |
Warranty Period |
Accessories |
1 month |
Batteries |
3 months |
|
|
Cables |
1 month |
Chargers/Power Supplies |
1 year |
|
|
Hardware Keys |
1 year |
|
|
Keyboard Display Units |
6 months |
Parts |
3 months |
|
|
Pocket Eye® |
1 year |
Software |
1 month |
ZebraNet® Print Servers |
3 years |
Defective product must be returned to Zebra for evaluation. In the event of notification of defect within the warranty period, Zebra will replace the defective item provided there had not been damage resulting from user abuse, modification, improper installation or use, or damage in shipping or by accident or neglect.
Supplies Products
Supplies are warranted to be free from defect in material and workmanship for a period of six (6) months for media and twelve (12) months for ribbon from the date of shipment by Zebra. This is provided the user has complied with storage guidelines, handling, and usage of the supplies in Zebra printers.
x |
Z4Mplus/Z6Mplus User Guide |
13163L Rev. 3 5/20/2004 |

Warranty Information 
Zebra’s sole obligation under these warranties is to furnish parts and labor for the repair or possible replacement of products found to be defective in material or workmanship during the warranty period. Zebra may in its discretion issue a credit for any such defective products in such amount as it deems reasonable.
Repair Services
Zebra repairs are warranted against defects in material and workmanship for 90 days from the date of repair by Zebra. This excludes printheads, which are warranted separately. This warranty does not cover normal wear and tear. This warranty becomes void if the item is modified, improperly installed or used, or damaged by accident, neglect, or abuse.
Warranty Exclusions & Conditions Statement
The warranties given above are the only warranties given to you. No other warranties, express or implied, are given. Zebra does not make any implied warranty of merchantability or fitness for a particular purpose in connection with its sale of products or services. While Zebra’s desire is to be responsive to your specific needs and questions, Zebra does not assume responsibility for any specific application to which any Products are applied, including, but not limited to, compatibility with other equipment. All statements, technical information, or recommendations relating to Zebra Products are based on tests believed to be reliable, but do not constitute a guaranty or warranty.
Zebra’s maximum liability for warranty claims is limited to the invoice price of the Product claimed defective. Zebra does not assume responsibility for delays in replacement or repair of products. Zebra shall not under any circumstances whatsoever be liable to you or any other party for loss or profits, lost data, diminution of goodwill, or any other special or consequential damages whatsoever with respect to any warranty claim made by you. Specifically for software, Zebra is not liable for any incidental or consequential damages caused by abuse or misapplication of the software or by its use in violation of the U.S. copyright law or international treaty. No salesperson, representative, or agent of Zebra is authorized to make any guaranty, warranty, or representation that contradicts the foregoing. Any waiver, alteration, addition, or modification to the foregoing warranties must be in writing and signed by an executive officer of Zebra to be valid.
Zebra Technologies
333 Corporate Woods Parkway Vernon Hills, IL 60061-3109 U.S.A.
Phone +1 847.634.6700 or +1 800.423.0442
Fax + 1 847.913.8766 |
www.zebra.com |
13163L Rev. 3 5/20/2004 |
Z4Mplus/Z6Mplus User Guide |
xi |


 Warranty Information
Notes • ___________________________________________________________________
__________________________________________________________________________
__________________________________________________________________________
__________________________________________________________________________
__________________________________________________________________________
__________________________________________________________________________
__________________________________________________________________________
__________________________________________________________________________
__________________________________________________________________________
__________________________________________________________________________
__________________________________________________________________________
__________________________________________________________________________
__________________________________________________________________________
__________________________________________________________________________
__________________________________________________________________________
__________________________________________________________________________
__________________________________________________________________________
__________________________________________________________________________
__________________________________________________________________________
To provide feedback on this document, please send your comments to techpubs@zebra.com, or write your comments on this page and fax to the following:
Fax: 1.847.821.1795 Attention: TechPubs — CTC
xii |
Z4Mplus/Z6Mplus User Guide |
13163L Rev. 3 5/20/2004 |

Preface
The Preface discusses the topics and illustrates standards that are used throughout this guide.
Contents
Contacts . . . . . . . . . . . . . . . . . . . . . . . . . . . . . . . . . . . . . . . . . . . . . . . . . . . . . . . . . . . . . . xiv Support . . . . . . . . . . . . . . . . . . . . . . . . . . . . . . . . . . . . . . . . . . . . . . . . . . . . . . . . . . . . xiv Document Conventions . . . . . . . . . . . . . . . . . . . . . . . . . . . . . . . . . . . . . . . . . . . . . . . . . . .xv Related Documents . . . . . . . . . . . . . . . . . . . . . . . . . . . . . . . . . . . . . . . . . . . . . . . . . . . . . xvi
13163L Rev. 3 5/20/2004 |
XiIIIPlus User Guide |
xiii |

Preface
Contacts
Contacts
You can contact Zebra Technologies Corporation, USA at any of the following: Visit us at: http://www.zebra.com
Our Mailing Address:
Zebra Technologies Corporation
333 Corporate Woods Parkway
Vernon Hills, Illinois 60061.3109 U.S.A Telephone: +1 847.634.6700 Facsimile: +1 847.913.8766
Zebra Technologies Europe Limited
Zebra House
The Valley Centre, Gordon Road
High Wycombe
Buckinghamshire HP13 6EQ, UK
Telephone: +44 (0)1494 472872
Facsimile: +44 (0)1494 450103
Support
You can contact Zebra support at any of the following:
Web address: www.zebra.com/SS/service_support.htm
Note • The Web address is case-sensitive.
US Phone Number: +1 847.913.2259
UK/International Phone Number: +44 (0) 1494 768289
xiv |
XiIIIPlus User Guide |
5/20/2004 13163L Rev. 3 |

Preface
Document Conventions
Document Conventions
The following conventions are used throughout this document to convey certain information:
Alternate Color (online only) Cross-references contain hot links to other sections in this guide. If you are viewing this guide online in .pdf format, you can click the cross-reference (blue text) to jump directly to its location.
Command Line Examples All command line examples appear in Courier New font. For example, you would type the following to get to the Post-Install scripts in the bin directory:
Ztools
Files and Directories All file names and directories appear in Courier New font. For example, the Zebra<version number>.tar file and the /root directory.
Cautions, Important, Note, and Example
Electrostatic Discharge Caution • Warns you of the potential for electrostatic discharge.
Electric Shock Caution • Warns you of a potential electric shock situation.
Caution • Warns you of a situation where excessive heat could cause a burn.
Caution • Advises you that failure to take or avoid a specific action could result in physical harm to you.
Caution • Advises you that failure to take or avoid a specific action could result in physical harm to the hardware.
Important • Advises you of information that is essential to complete a task.
Note • Indicates neutral or positive information that emphasizes or supplements important points of the main text.
Example • Provides an example, often a scenario, to better clarify a section of text.
Tools • Tells you what tools you need to complete a given task.
13163L Rev. 3 5/20/2004 |
XiIIIPlus User Guide |
xv |
Preface
Related Documents
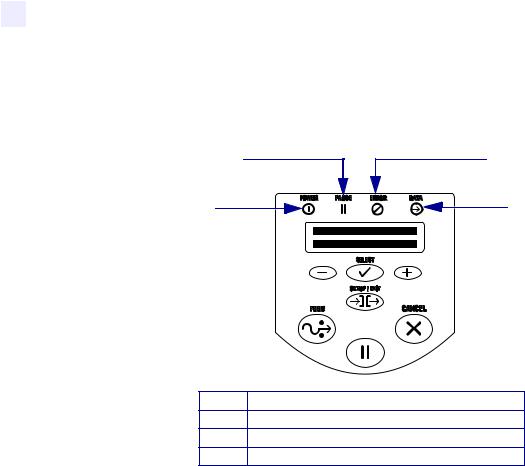
Illustration Callouts Callouts are used when an illustration contains information that needs to be labeled and described. A table that contains the labels and descriptions follows the illustration. Figure 1 provides an example.
Figure 1 • Example of an Illustration with Callouts
2 |
3 |
1 |
4 |
PAUSE
1 Power LED
2Pause LED
3Error LED
4Data LED
Related Documents
The following documents might be helpful references:
•ZPL II® Programming Guide Volume I (part number 45541L) and Volume II (part number 45542L).
•ZebraNet® Wireless Print Server User Guide (part number 13422L)
•ZebraNet 10/100 Print Server User and Reference Guide (part number 47619L-001)
•ZebraNet PrintServer II™ Installation and User Guide (part number 45537L).
•The Z4Mplus and Z6Mplus Maintenance Manual (Zebra part number 13358L) contains the information you need to maintain your printer.
xvi |
XiIIIPlus User Guide |
5/20/2004 13163L Rev. 3 |

1 
Introduction
This chapter shows the operational controls and location of major components needed in the loading of media and ribbon.
Contents
Front Panel. . . . . . . . . . . . . . . . . . . . . . . . . . . . . . . . . . . . . . . . . . . . . . . . . . . . . . . . . . . . . 3
LCD Display Settings . . . . . . . . . . . . . . . . . . . . . . . . . . . . . . . . . . . . . . . . . . . . . . . . . . . 4
Print Modes . . . . . . . . . . . . . . . . . . . . . . . . . . . . . . . . . . . . . . . . . . . . . . . . . . . . . . . . . . 5
Printer Media Compartment . . . . . . . . . . . . . . . . . . . . . . . . . . . . . . . . . . . . . . . . . . . . . . . . 6
13163L Rev. 3 5/20/2004 |
Z4Mplus/Z6Mplus User Guide |
1 |
Introduction
External View
External View
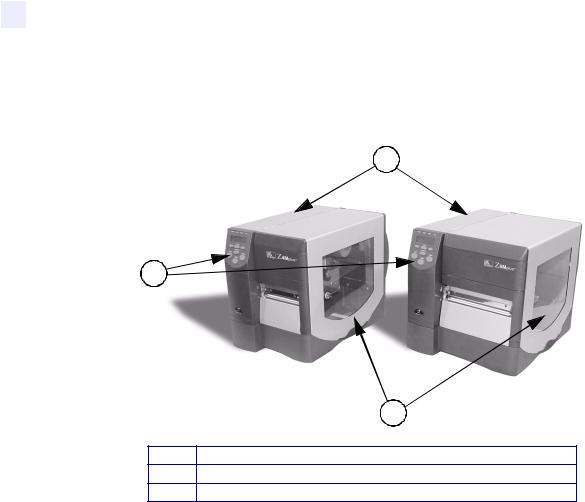
Figure 2 shows the outside of the printer.
Figure 2 • External View
1
2
3
1Electronics cover
2Front panel
3Media door
2 |
Z4Mplus/Z6Mplus User Guide |
13163L Rev. 3 5/20/2004 |
Introduction
Front Panel
Front Panel
The front panel keys and lights are shown in Figure 3.
Figure 3 • Front Panel Controls and LEDs
2
1
12
11
10 |
PAUSE |
9 |
|
1 Power LED
2Pause LED
3Error LED
4Data LED
5LCD
6PLUS (+) Key
7SETUP/EXIT Key
8CANCEL Key
9PAUSE Key
10 FEED Key
11 SELECT Key
12 MINUS (–) Key
3
4
5
6
7
8
13163L Rev. 3 5/20/2004 |
Z4Mplus/Z6Mplus User Guide |
3 |

Introduction
Front Panel
LCD Display Settings
Table 1 shows front panel LCD display settings that you may wish to adjust and what they mean. Refer to Basic Configuration on page 53 for more detailed information on each setting.
|
|
|
Table 1 • Front Panel LCD Display Settings |
|
|
||
LCD Display |
Meaning/Available Settings |
||
|
|
|
|
PRINTER |
READY |
Ready to print labels or to configure the printer. All printer self- |
|
|
|
|
tests have been performed successfully. |
|
|
||
DARKNESS |
The larger the number, the darker the print. The range is 0 to 30, |
||
|
|
|
with a default setting of 10. |
|
|
|
|
SPEED |
The print speed is given in inches per second. The larger the |
||
|
|
|
number, the faster the label prints. |
|
|
|
|
TEAR |
OFF |
Establishes the position of the media over the tear-off bar after |
|
|
|
|
printing. |
|
|
|
|
MODE |
Tear-Off (default setting), Peel-Off, Cutter, Rewind. For more |
||
|
|
|
details, see Table 2. |
|
|
|
|
MEDIA |
TYPE |
Non-continuous (default setting), Continuous |
|
|
|
|
|
SENSOR |
TYPE |
Web (default setting), Mark |
|
|
|
|
|
SENSOR |
SELECT |
Auto Select (default setting), Reflective, Transmissive |
|
|
|
|
|
METHOD |
Thermal transfer (default setting using a ribbon), |
||
|
|
|
Direct thermal (no ribbon) |
|
|
|
|
4 |
Z4Mplus/Z6Mplus User Guide |
13163L Rev. 3 5/20/2004 |

Introduction
Front Panel
Print Modes
You can view the current print mode on the LCD on the front panel of the printer. Refer to Configuration and Calibration LCD Displays on page 57 for more detailed information. Print modes should match the media and printer options chosen. Print mode choices are listed in Table 2.
Table 2 • Print Mode Options
Mode |
Printer Option |
Action |
|
|
|
Tear-Off Mode |
Use for most applications. |
Each label or strip of labels can be torn off |
(Default setting) |
|
after printing. |
Peel-Off Mode |
Use only if printer has the peel option. |
Liner material is peeled away from the label as it is printed. After the printed label is removed the next label prints.
Cutter Mode |
Use only if printer has a cutter option. |
Printer automatically cuts the label after it |
|
|
is printed. |
|
|
|
Rewind Mode |
Use only if printer has the rewind option. |
The media and/or liner are rewound onto a |
|
|
core as they are printed. |
|
|
|
13163L Rev. 3 5/20/2004 |
Z4Mplus/Z6Mplus User Guide |
5 |
Introduction
Printer Media Compartment
Printer Media Compartment
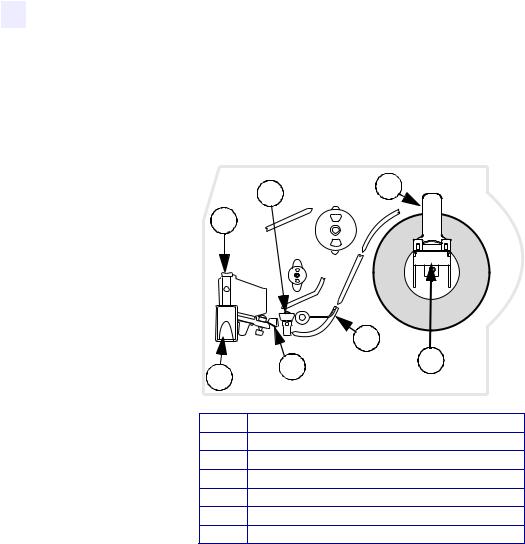
Figure 4 shows a simplified view of your printer. Depending on installed options, your printer may look slightly different.
Figure 4 • Media Compartment
2 |
3 |
|
1
|
|
5 |
7 |
6 |
4 |
|
||
|
|
1 Printhead Assembly
2Transmissive Sensor
3Label Supply Guide
4Label Supply Hanger
5Dancer
6Label Guide
7Printhead Open Lever
6 |
Z4Mplus/Z6Mplus User Guide |
13163L Rev. 3 5/20/2004 |

2 
Printer Setup
The chapter provides the tasks that you must complete and the issues that you must consider before you load and configure your printer.
Contents
Before You Begin . . . . . . . . . . . . . . . . . . . . . . . . . . . . . . . . . . . . . . . . . . . . . . . . . . . . . . . . 8 Unpack and Inspect the Printer . . . . . . . . . . . . . . . . . . . . . . . . . . . . . . . . . . . . . . . . . . . . . 9 Report Damage . . . . . . . . . . . . . . . . . . . . . . . . . . . . . . . . . . . . . . . . . . . . . . . . . . . . . . . 9 Storage. . . . . . . . . . . . . . . . . . . . . . . . . . . . . . . . . . . . . . . . . . . . . . . . . . . . . . . . . . . . . . 9 Select a Site for the Printer . . . . . . . . . . . . . . . . . . . . . . . . . . . . . . . . . . . . . . . . . . . . . . . 10 Select a Surface. . . . . . . . . . . . . . . . . . . . . . . . . . . . . . . . . . . . . . . . . . . . . . . . . . . . . . 10 Provide Proper Operating Conditions . . . . . . . . . . . . . . . . . . . . . . . . . . . . . . . . . . . . . 10 Allow Proper Space . . . . . . . . . . . . . . . . . . . . . . . . . . . . . . . . . . . . . . . . . . . . . . . . . . . 10 Provide a Data Source. . . . . . . . . . . . . . . . . . . . . . . . . . . . . . . . . . . . . . . . . . . . . . . . . 10 Connect the Printer to a Power Source . . . . . . . . . . . . . . . . . . . . . . . . . . . . . . . . . . . . . . 11 Power Cord Specifications . . . . . . . . . . . . . . . . . . . . . . . . . . . . . . . . . . . . . . . . . . . . . . 11 Select a Communication Interface . . . . . . . . . . . . . . . . . . . . . . . . . . . . . . . . . . . . . . . . . . 13 Types of Media. . . . . . . . . . . . . . . . . . . . . . . . . . . . . . . . . . . . . . . . . . . . . . . . . . . . . . . . . 15 Selecting Media . . . . . . . . . . . . . . . . . . . . . . . . . . . . . . . . . . . . . . . . . . . . . . . . . . . . . . 15 Non-Continuous Media . . . . . . . . . . . . . . . . . . . . . . . . . . . . . . . . . . . . . . . . . . . . . . . . 16 Continuous Media . . . . . . . . . . . . . . . . . . . . . . . . . . . . . . . . . . . . . . . . . . . . . . . . . . . . 16 Ribbon . . . . . . . . . . . . . . . . . . . . . . . . . . . . . . . . . . . . . . . . . . . . . . . . . . . . . . . . . . . . . . . 17 When to Use Ribbon . . . . . . . . . . . . . . . . . . . . . . . . . . . . . . . . . . . . . . . . . . . . . . . . . . 17 Ribbon Width . . . . . . . . . . . . . . . . . . . . . . . . . . . . . . . . . . . . . . . . . . . . . . . . . . . . . . . . 17 Coated Side of Ribbon. . . . . . . . . . . . . . . . . . . . . . . . . . . . . . . . . . . . . . . . . . . . . . . . . 17
13163L Rev. 3 5/20/2004 |
Z4Mplus/Z6Mplus User Guide |
7 |

Printer Setup
Before You Begin
Before You Begin
Review this checklist, and resolve any issues before you begin setting up your printer. When you are ready, continue with Printer Operation on page 21.
Unpack and Inspect Have you unpacked the printer and inspected it for damage? If you have not, see Unpack and Inspect the Printer on page 9.
Select a Site Have you selected an appropriate location for the printer? If you have not, see Select a Site for the Printer on page 10.
Attach Power Cord Do you have the correct power cord for your printer? If you are unsure, see Power Cord Specifications on page 11. To attach the power cord and connect the printer to a power source, see Connect the Printer to a Power Source on page 11.
Connect to a Data Source Have you determined how the printer will be connected to a data source (usually a computer)? For more information, see Select a Communication Interface on page 13.
Select Media Do you have the correct media for your application? If you are unsure, see Types of Media on page 15.
Select Ribbon Do you need to use ribbon, and is the appropriate ribbon available, if needed? If you are unsure, see Ribbon on page 17.
8 |
Z4Mplus/Z6Mplus User Guide |
13163L Rev. 3 5/20/2004 |

Printer Setup
Unpack and Inspect the Printer
Unpack and Inspect the Printer
•Check all exterior surfaces.
•Raise the media door, and inspect the media compartment.
•Save the carton and all packing material in case the printer needs to be shipped. Contact your authorized Zebra reseller for instructions.
Report Damage
If you discover shipping damage:
•Immediately notify the shipping company and file a damage report.
Important • Zebra Technologies Corporation is not responsible for any damage incurred during the shipment of the equipment and will not repair this damage under warranty
•Keep the carton and all packing material for inspection.
•Notify your local Zebra reseller.
Storage
If you are not placing the printer into operation immediately, repackage it using the original packing materials. The printer may be stored under the following conditions:
•Temperature: –40°F to 140°F (–40°C to 60°C)
•Relative humidity: 5% to 85%, non-condensing
13163L Rev. 3 5/20/2004 |
Z4Mplus/Z6Mplus User Guide |
9 |

Printer Setup
Select a Site for the Printer
Select a Site for the Printer
Consider the following when selecting an appropriate location for your printer.
Select a Surface
Select a solid, level surface of sufficient size and strength to accommodate the printer and other equipment (such as a computer), if necessary. The choices include a table, countertop, desk, or cart.
Provide Proper Operating Conditions
Because the printer was designed and is fabricated as an industrial-type unit, it functions satisfactorily in a location that conforms to specified environmental and electrical conditions, including a warehouse or factory floor. For more information on the required conditions, see
General Specifications on page 110.
Table 3 shows the temperature and relative humidity requirements for the printer when it is operating.
Table 3 • Operating Temperature and Humidity
Mode |
Temperature |
Relative Humidity |
|
|
|
Thermal Transfer |
41° to 104°F (5° to 40°C) |
20 to 85% non-condensing |
|
|
|
Direct Thermal |
32° to 104°F (0° to 40°C) |
20 to 85% non-condensing |
|
|
|
Allow Proper Space
The printer should have enough space around it for you to be able to open the media door. To allow for proper ventilation and cooling, leave open space on all sides of the printer.
Caution • Do not place any padding or cushioning material behind or under the printer because this restricts air flow and could cause the printer to overheat.
Provide a Data Source
If the printer will be located away from the data source, the selected site must provide the appropriate connections to that data source. For more information on the types of communication interfaces, see Select a Communication Interface on page 13.
10 |
Z4Mplus/Z6Mplus User Guide |
13163L Rev. 3 5/20/2004 |
Printer Setup
Connect the Printer to a Power Source
Connect the Printer to a Power Source
Electric Shock Caution • For personnel and equipment safety, always use an approved three-conductor power cord specific to the region or country intended for installation. This cord must use an IEC 320 female connector and the appropriate region-specific threeconductor grounded plug configuration.
To connect the printer to a power source, complete these steps:
1.Turn the printer power switch (located on the rear of the printer) to the Off (O) position.
2.Plug the power cord into the mating connector on the rear of the printer.
3.Plug the other end of the power cord into the power source.
Power Cord Specifications
Depending on how your printer was ordered, a power cord may or may not be included. The power cord used must meet your local electrical requirements. If a power cord is not included or if the one included is not suitable for your requirements, refer to the following guidelines.
Your power cord must meet these standards:
•The overall length must be less than 9.8 ft. (3.0 m).
•It must be rated for at least 5A, 250 VAC.
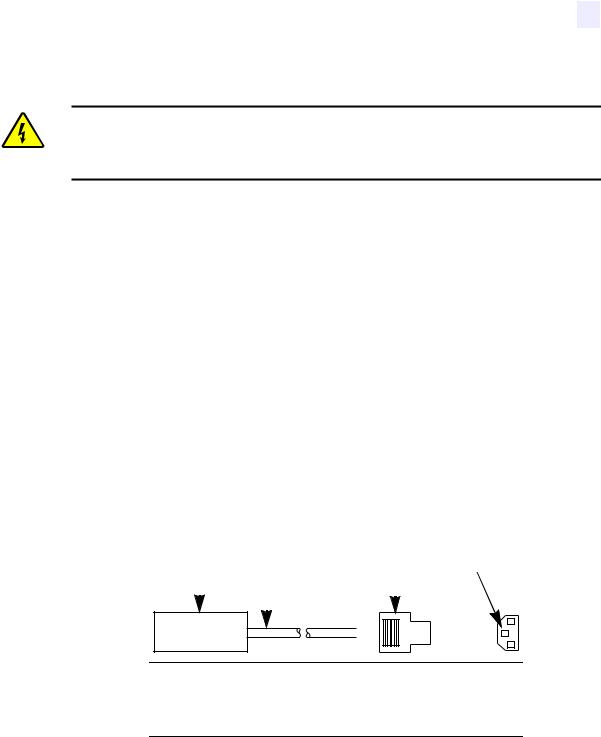
•The chassis ground (earth) must be connected to ensure safety and reduce electromagnetic interference. The ground connection is handled by the third wire (earth) in the power cord as shown in Figure 5.
Figure 5 • Power Cord Specifications
1 |
2 |
3 |
4 |
|
|
|||||
|
|
|
|
|
|
|
|
|
|
|
|
|
|
|
|
|
|
|
|
|
|
|
|
|
|
|
|
|
|
|
|
|
|
|
|
|
|
|
|
|
|
|
|
|
|
|
|
|
|
|
|
|
|
|
|
|
|
|
|
|
|
|
|
|
|
|
|
|
|
|
|
|
|
|
|
|
|
|
|
|
|
|
|
|
|
|
|
|
|
|
|
|
|
|
|
|
|
|
|
|
|
|
|
|
|
|
|
|
|
1AC power plug for your country
23-conductor HAR cable
3IEC 320 connector
4Neutral earth live in contact view
13163L Rev. 3 5/20/2004 |
Z4Mplus/Z6Mplus User Guide |
11 |

Printer Setup
Connect the Printer to a Power Source
•The AC power plug and IEC 320 connector must bear the certification mark of at least one of the known international safety organizations shown in Figure 6.
Figure 6 • International Safety Organization Marks
+
R
|
|
|
|
|
12 |
Z4Mplus/Z6Mplus User Guide |
13163L Rev. 3 5/20/2004 |
||
Loading...