


ET51
Enterprise Tablet
User Guide
for Microsoft® Windows®
10 IoT Enterprise
MN-003446-01 Rev. A

Copyright
ZEBRA and the stylized Zebra head are trademarks of Zebra Technologies Corporation, registered in many jurisdictions worldwide. All other trademarks are the property of their respective owners. ©2019 Zebra Technologies Corporation and/or its affiliates. All rights reserved.
COPYRIGHTS & TRADEMARKS: For complete copyright and trademark information, go to www.zebra.com/copyright.
WARRANTY: For complete warranty information, go to www.zebra.com/warranty.
END USER LICENSE AGREEMENT: For complete EULA information, go to www.zebra.com/eula.
Terms of Use
•Proprietary Statement
This manual contains proprietary information of Zebra Technologies Corporation and its subsidiaries (“Zebra Technologies”). It is intended solely for the information and use of parties operating and maintaining the equipment described herein. Such proprietary information may not be used, reproduced, or disclosed to any other parties for any other purpose without the express, written permission of Zebra Technologies.
•Product Improvements
Continuous improvement of products is a policy of Zebra Technologies. All specifications and designs are subject to change without notice.
•Liability Disclaimer
Zebra Technologies takes steps to ensure that its published Engineering specifications and manuals are correct; however, errors do occur. Zebra Technologies reserves the right to correct any such errors and disclaims liability resulting therefrom.
•Limitation of Liability
In no event shall Zebra Technologies or anyone else involved in the creation, production, or delivery of the accompanying product (including hardware and software) be liable for any damages whatsoever (including, without limitation, consequential damages including loss of business profits, business interruption, or loss of business information) arising out of the use of, the results of use of, or inability to use such product, even if Zebra Technologies has been advised of the possibility of such damages. Some jurisdictions do not allow the exclusion or limitation of incidental or consequential damages, so the above limitation or exclusion may not apply to you.
Revision History
Changes to the original guide are listed below:
Change |
Date |
Description |
-01 Rev A |
2/2019 |
Initial release |
|
|
|
|
|
|
|
|
|
2

About This Guide
Introduction
This guide provides information about using the tablet and accessories.
NOTE: Screens and windows pictured in this guide are samples and can differ from actual screens.
Configurations
This guide covers the following configurations:
Table 1 Configurations
Configuration |
Operating |
Radios |
Display |
Memory |
Data Capture |
|
System |
|
|
|
|
ET51AE |
Windows® 10 |
WLAN: |
8.4”color |
4 GB RAM/ |
Optional |
|
IoT |
802.11a/b/g/n/ac/d/h/i/w |
|
64 GB Flash |
SE4710 or |
|
Enterprise |
WPAN: Bluetooth |
|
|
SE4750 |
|
|
|
|
|
Expansion |
|
|
|
|
|
Backs |
|
|
|
|
|
|
3
About This Guide
Software Release Information
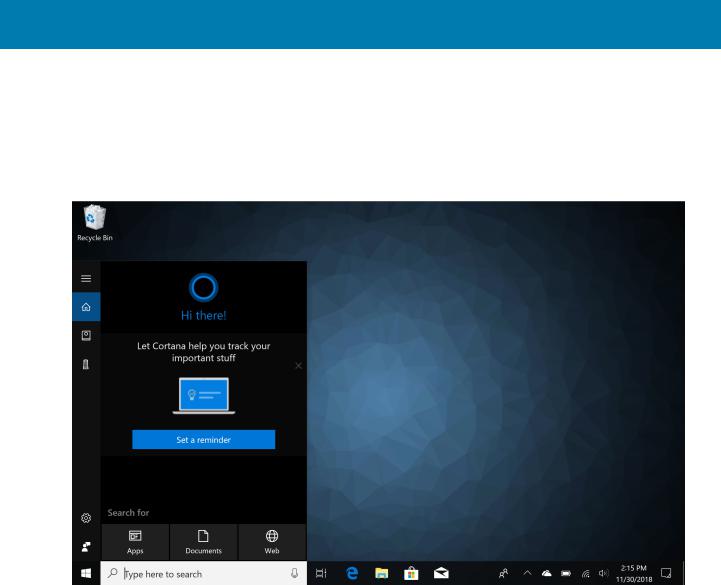
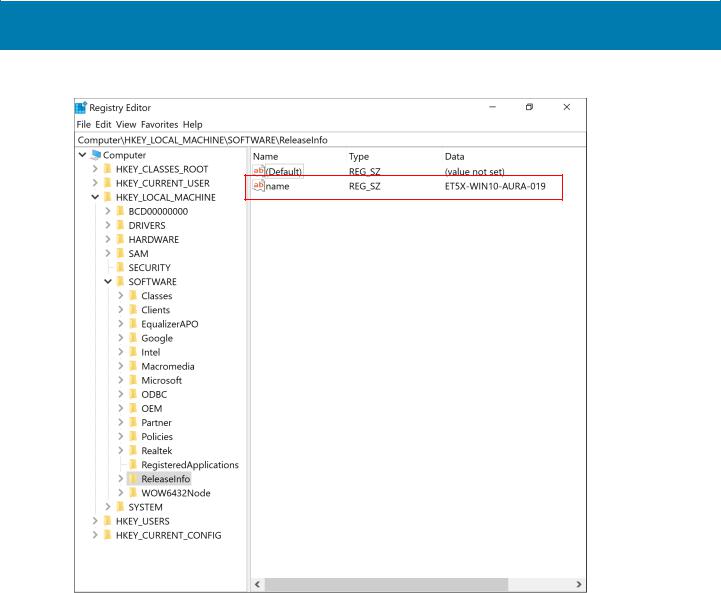
To check the software release information: 1. Touch the Cortana icon  .
.
Figure 1 Software Release Information
2.In the Search text box, type regedit.
3.Touch Run Command
4.Navigate to HKEY_LOCAL_MACHINE > SOFTWARE > ReleaseInfo. The version appears in the Data column.
4
About This Guide
Figure 2 Regedit Window
Chapter Descriptions
Topics covered in this guide are as follows:
•Getting Started provides information on getting the tablet up and running for the first time.
•Using the Tablet explains how to use the tablet. This includes instructions for powering on and resetting the tablet, entering and capturing data.
•Wireless explains how to perform Bluetooth functionality on the tablet.
•Data Capture explains how to capture data using the optional scanners.
•Accessories describes the accessories available for the tablet and how to use the accessories with the tablet.
•Maintenance and Troubleshooting includes instructions on cleaning and storing the tablet, and provides troubleshooting solutions for potential problems during tablet operation.
•Specifications includes a table listing the technical specifications for the tablet.
5

About This Guide
Notational Conventions
The following conventions are used in this document:
•“Device” or “tablet” refers to the Zebra ET51 tablet
•Bold text is used to highlight the following:
•Dialog box, window and screen names
•Drop-down list and list box names
•Check box and radio button names
•Icons on a screen
•Key names on a keypad
•Button names on a screen.
•Bullets (•) indicate:
•Action items
•Lists of alternatives
•Lists of required steps that are not necessarily sequential.
•Sequential lists (e.g., those that describe step-by-step procedures) appear as numbered lists.
Related Documents and Software
The following documents provide more information about the ET51 tablets.
•ET51/56 Quick Reference Guide, p/n MN-003332-xx
•ET51 Integrator Guide for Microsoft Windows 10, p/n MN-003456-xx
For the latest version of this guide and all guides, go to: http://www.zebra.com/support.
Service Information
If you have a problem with your equipment, contact Zebra Global Customer Support for your region. Contact information is available at: http://www.zebra.com/support.
When contacting support, please have the following information available:
•Serial number of the unit
•Model number or product name
•Software type and version number. See Software Release Information.
Zebra responds to calls by email, telephone or fax within the time limits set forth in support agreements.
If your problem cannot be solved by Zebra Customer Support, you may need to return your equipment for servicing and will be given specific directions. Zebra is not responsible for any damages incurred during shipment if the approved shipping container is not used. Shipping the units improperly can possibly void the warranty. Remove the SD Card from the device before shipping.
If you purchased your Zebra business product from a Zebra business partner, contact that business partner for support.
6

About This Guide
Provide Documentation Feedback
If you have comments, questions, or suggestions about this guide, send an email to EVM-Techdocs@zebra.com.
7

Table of Contents
Copyright ......................................................................................................................... |
2 |
Terms of Use .................................................................................................................. |
2 |
Revision History .............................................................................................................. |
2 |
About This Guide.......................................................................................................... |
3 |
Software Release Information ........................................................................................ |
4 |
Chapter Descriptions ...................................................................................................... |
5 |
Notational Conventions .................................................................................................. |
6 |
Service Information ......................................................................................................... |
6 |
Provide Documentation Feedback .................................................................................. |
7 |
Getting Started............................................................................................................ |
12 |
Introduction ................................................................................................................... |
12 |
Unpacking ..................................................................................................................... |
12 |
Features ....................................................................................................................... |
13 |
Getting Started .............................................................................................................. |
15 |
Installing a microSD Card ...................................................................................... |
16 |
Install the microSD card .................................................................................. |
16 |
Charging the Battery ............................................................................................. |
18 |
Turning Off the Device or Display ......................................................................... |
18 |
Turning on Airplane Mode ..................................................................................... |
19 |
Restarting the Device ............................................................................................ |
20 |
Performing a Cold Boot ......................................................................................... |
20 |
Battery Status and Battery Management .............................................................. |
20 |
Checking Power Pack Status .......................................................................... |
21 |
Battery Saving Tips ............................................................................................... |
23 |
Changing the Power Settings ......................................................................... |
23 |
Manually Changing the Display Brightness .................................................... |
23 |
Automatically Changing the Display Brightness ............................................. |
23 |
Adjusting the Volume ............................................................................................ |
23 |
Adjusting the Screen Orientation ........................................................................... |
23 |
8

Table of Contents
Using the Tablet.......................................................................................................... |
25 |
Introduction ................................................................................................................... |
25 |
Start Screen .................................................................................................................. |
25 |
Customizing the Start Screen ................................................................................ |
26 |
Moving Tiles .................................................................................................... |
26 |
Resizing Tiles .................................................................................................. |
26 |
Unpinning a Tile .............................................................................................. |
27 |
Pinning an App to the Start Screen ................................................................. |
27 |
Changing Start Screen Background ...................................................................... |
27 |
Action Center ................................................................................................................ |
28 |
Notifications ........................................................................................................... |
29 |
Customizing the Action Center .............................................................................. |
29 |
Tablet Modes and Interaction ....................................................................................... |
29 |
Configuring Tablet Mode ....................................................................................... |
29 |
Using the Multi-Touch Screen ............................................................................... |
30 |
Changing Touch Mode .......................................................................................... |
31 |
Using the Keyboard ............................................................................................... |
31 |
Changing the System Language ........................................................................... |
32 |
Using the Passive Stylus ....................................................................................... |
33 |
Using the Camera ................................................................................................. |
34 |
Reading NFC Cards ...................................................................................................... |
34 |
Taking a Screenshot ..................................................................................................... |
35 |
Wireless....................................................................................................................... |
36 |
Wireless Local Area Networks ...................................................................................... |
36 |
Connecting to a Wi-Fi Network .............................................................................. |
37 |
Viewing Network Information ................................................................................. |
38 |
Configuring Proxy Settings .................................................................................... |
38 |
Adding a Wi-Fi Network ......................................................................................... |
39 |
Bluetooth ....................................................................................................................... |
39 |
Adaptive Frequency Hopping ................................................................................ |
40 |
Security ................................................................................................................. |
40 |
Bluetooth Profiles .................................................................................................. |
41 |
Pairing with a Bluetooth Device ............................................................................. |
42 |
Unpairing a Bluetooth Device ................................................................................ |
42 |
Data Capture................................................................................................................ |
44 |
Expansion Back ............................................................................................................ |
44 |
RS507/RS507X Hands-Free Imager ............................................................................ |
44 |
RS6000 Bluetooth Ring Scanner .................................................................................. |
45 |
DS3678 Digital Scanner ................................................................................................ |
45 |
9

Table of Contents
Imaging ......................................................................................................................... |
45 |
Scanning Considerations .............................................................................................. |
46 |
Scanning with the SE4710 Expansion Back ................................................................. |
46 |
Scanning with SE4750 Expansion Back ....................................................................... |
47 |
Scanning with RS507/RS507X Hands-Free Imager ..................................................... |
48 |
Scanning with RS6000 Bluetooth Ring Scanner ........................................................... |
49 |
Scanning with the DS3608 USB Scanner or DS3678 Bluetooth Scanner .................... |
50 |
Pairing Bluetooth Scanners .......................................................................................... |
51 |
Place the RS507/RS507X or RS6000 in HID or SPP Mode ................................. |
52 |
Place the DS3678 in HID or SPP Mode ................................................................ |
52 |
Pair the Device with the Scanner .......................................................................... |
53 |
Connecting a USB Scanner .......................................................................................... |
54 |
Connecting Using Simple Serial Interface ............................................................. |
54 |
Connecting Using HID Mode ................................................................................. |
54 |
Accessories................................................................................................................. |
56 |
Introduction ................................................................................................................... |
56 |
Charge Only Cradle ..................................................................................................... |
58 |
Installing the Insert ................................................................................................ |
58 |
Charging the Device .............................................................................................. |
59 |
Communication and Charging Cradle .......................................................................... |
61 |
Installing the Insert ................................................................................................ |
62 |
Charging the Device .............................................................................................. |
62 |
Rugged Communication and Charging Cradle ............................................................ |
65 |
Charging the Device .............................................................................................. |
65 |
4-Slot Charge Only Cradle ........................................................................................... |
68 |
Insert Installation ................................................................................................... |
69 |
Insert Device into Slot ........................................................................................... |
69 |
Device without Rugged Frame ........................................................................ |
69 |
Device with Rugged Frame ............................................................................. |
70 |
Charging the Battery ............................................................................................. |
70 |
Rugged Charge Connector .......................................................................................... |
71 |
Power Pack .................................................................................................................. |
73 |
Charging the Power Pack ...................................................................................... |
74 |
Using Cradle ................................................................................................... |
74 |
Using the 4-Slot Battery Charger .................................................................... |
74 |
Charging the Power Pack ...................................................................................... |
74 |
Maintenance and Troubleshooting ........................................................................... |
76 |
Introduction ................................................................................................................... |
76 |
Maintaining the Device .................................................................................................. |
76 |
10
Table of Contents
Battery Safety Guidelines ............................................................................................. |
76 |
Cleaning Instructions .................................................................................................... |
77 |
Approved Cleanser Active Ingredients .................................................................. |
77 |
Harmful Ingredients ............................................................................................... |
77 |
Device Cleaning Instructions ................................................................................. |
78 |
Special Cleaning Notes ......................................................................................... |
78 |
Cleaning Materials Required ................................................................................. |
78 |
Cleaning Frequency .............................................................................................. |
78 |
Cleaning Battery Connectors ................................................................................ |
78 |
Cleaning Cradle Connectors ......................................................................................... |
79 |
Troubleshooting ........................................................................................................... |
80 |
Specifications.............................................................................................................. |
81 |
Technical Specifications ............................................................................................... |
81 |
Index............................................................................................................................. |
84 |
11

Getting Started
Introduction
This chapter explains how to set up the device for the first time.
Unpacking
Carefully remove all protective material from around the device and save the shipping container for later storage and shipping.
Verify that you received the following:
•Tablet with lithium polymer battery
•Quick Start Guide.
Inspect the equipment for damage. If you are missing any equipment or if you find any damaged equipment, contact the Zebra Support Center immediately. See Service Information for contact information.
12
Getting Started
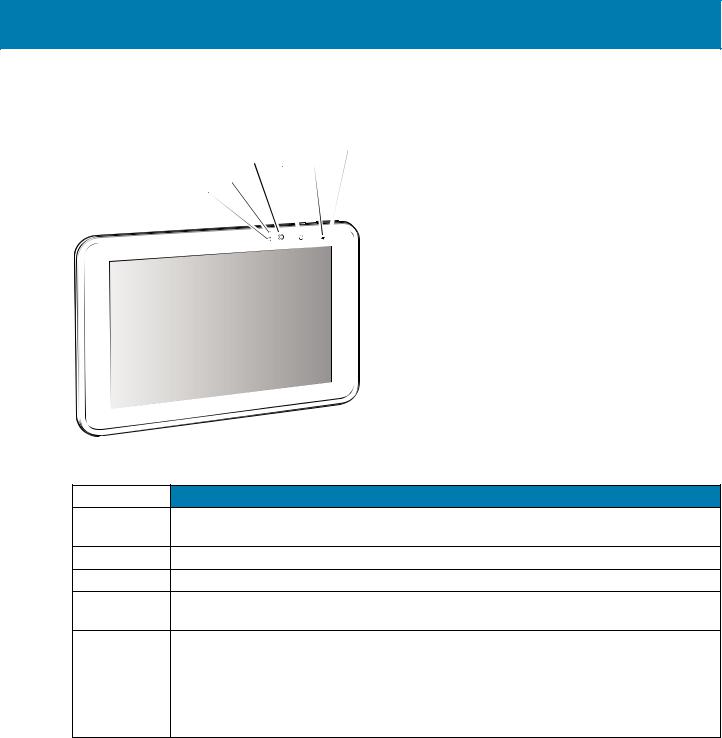
Features
Figure 1 Front View
2
3 4 5
1 2
Table 1 Front View
Item |
Description |
1Ambient Light Sensor - Recognizes the ambient light and adjusts the display brightness (if enabled).
2Dual Front-Facing Microphones - Use for voice communications for audio recordings.
3Front Facing Camera - Use for video conferencing or capturing images and video.
4Camera Indicator LED - Lights red when the camera is activated. Momentarily lights red when the device boots.
5Charging Indicator LED - Indicates charging status.
•OFF - device is not connected to charger.
•ORANGE - device is charging.
•GREEN - device is connected and fully charged.
•RED - charge error.
13
Getting Started
Figure 2 Back View
11
6
7 |
10 |
89
Table 2 Back View
Item |
Description |
6 |
Rear Camera - Auto-focus camera for capturing high resolution images and video. |
7Camera LED Flash - Provides illumination for the camera.
8Power Button - Push once to start the device; push it again to enable sleep mode. Push and hold it to shut down the tablet.
9Volume Key - Push the left side to reduce the volume. Press the right side to increase the volume.
10USB-C Interface - Provides for communications.
11Battery Cover
14
Getting Started
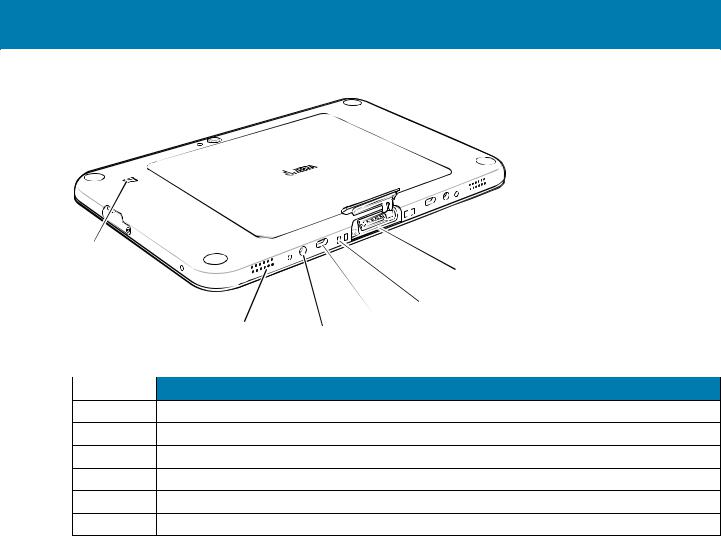
Figure 3 Bottom View
8.4” Version
12
|
|
|
17 |
|
|
|
16 |
|
13 |
15 |
|
|
14 |
||
|
|
|
|
Table 3 |
Bottom View |
|
|
|
|
|
|
Item |
|
|
Description |
|
|
|
|
12NFC Antenna Position - Use to read NFC cards.
13Stereo Speakers - Provides audio playback.
14Alignment Holes - Use to align tablet with cradle.
15Latching Slots - Insertion point for Communication and Charging cradle locks.
16Charging Pins - Contact point for cradle charging.
17Docking Connector - Interfaces with the cradle.
Getting Started
In order to start using the device for the first time:
•Install microSD card
•Charge the device
•Perform basic configuration.
15
Getting Started
Installing a microSD Card
To install a microSD card:
1.Press the Power button to turn off the device.
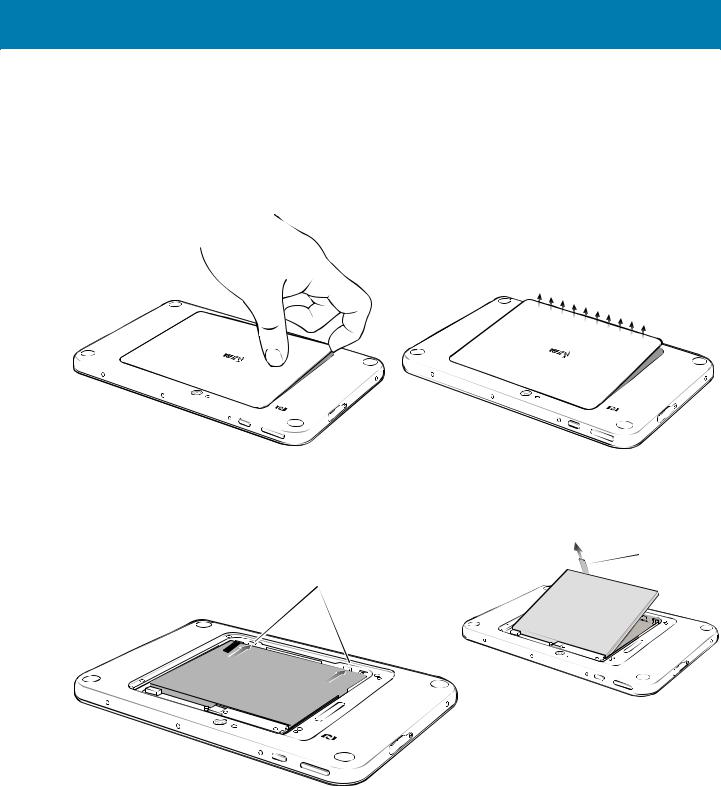
2.Lift the notched corner of the battery cover and carefully lift the battery cover off the device.
Figure 4 Lifting the Battery Cover
3.Carefully lift the battery cover off the device.
4.On the 8.4” version, push the two locking tabs up, then pull up on the tab to remove battery.
Figure 5 Removing the Battery
 Pull Tab
Locking Tabs
Install the microSD card
1. Insert the microSD card with contacts facing down.
16

Getting Started
Figure 6 Inserting microSD Card
2.Push the micro SD card in and ensure that it locks into place.
3.Replace the battery.
Figure 7 Inserting the Battery
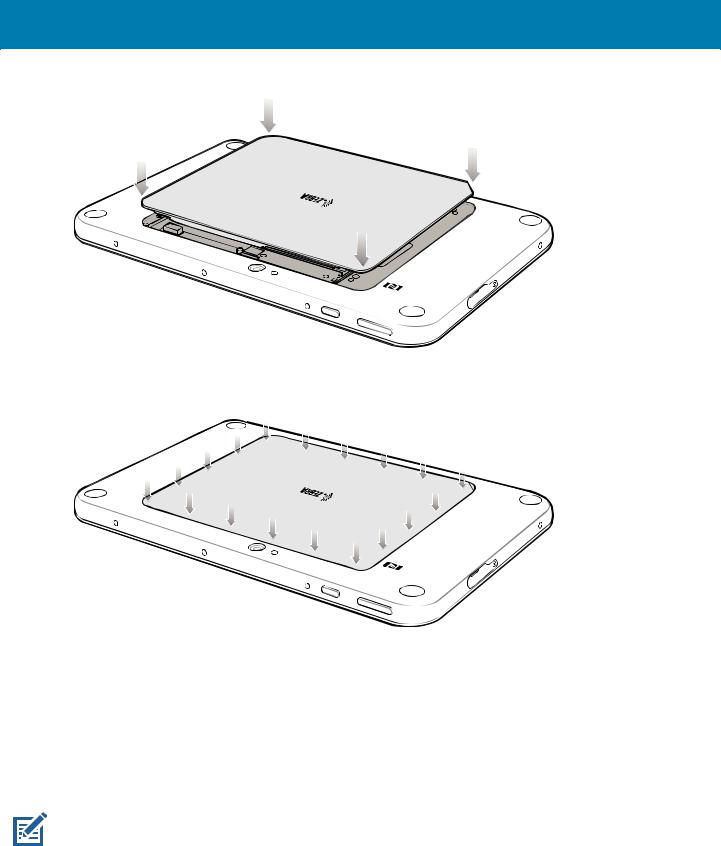
CAUTION: Be aware of the orientation of the battery cover. Failure to replace the battery cover properly may damage the battery cover.
4.Align the tabs on the underside of the cover with the slot around the battery well. Make sure that the notch on the battery cover is at the bottom left cover of the device.
17
Getting Started
Figure 8 Aligning the Battery Cover
5. Carefully press down around the edge of the cover. Make sure that the cover is seated properly.
Figure 9 Pressing Down on the Battery Cover
6. Press Power button to turn on the device.
Charging the Battery
Use one of the cradles to charge the main battery installed in the device. See the chapter Accessories for charging accessories. See Battery Status and Battery Management for additional details.
The 8.4” tablet main battery charges from fully depleted to 90% in approximately 2 hours and from fully depleted to 100% in approximately 3 hours.
The Charging indicator only illuminates when the tablet is connected to AC power.
Turning Off the Device or Display
To turn off the device:
1. Touch Power > Update and shutdown.
18
Getting Started
Alternatively:
1.Press and hold the power button until the message appears Slide to shut down your PC.
2.Swipe display downwards to turn off.
To turn off the display:
1. Press and release the power button.
Turning on Airplane Mode
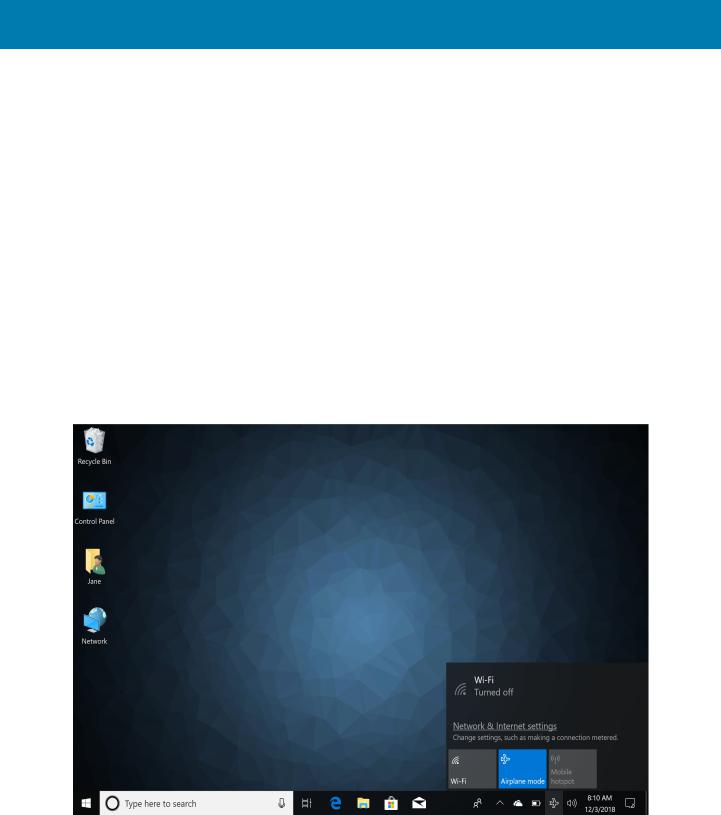
When Airplane mode is on, the Wi-Fi, Bluetooth, Global Navigation Satellite System (GNSS) and Near-field communication (NFC) radios are turned off. This is useful when traveling on an airplane or when you don’t need Wi-Fi or Bluetooth for a while. Airplane mode extends the amount of time before the battery needs recharging. To place the device in Airplane mode:
1.In the taskbar, touch the network icon  .
.
2.Touch the Airplane mode option. The option box turns blue and the airplane icon appears in the taskbar.
Figure 10 Airplane Mode
To turn on radios in Airplane Mode:
1.In the taskbar, touch the airplane icon.
2.Touch Wi-Fi option. The option box turns blue indicating that Wi-Fi is on.
19
Getting Started
Restarting the Device
If the device is running slow or some applications are not functioning properly, restart the device:
1.Touch Start  .
.
2.Touch Power  > Update and restart.
3.If software updates are pending, these install and then the device restarts.
Performing a Cold Boot
If the device does not respond to any input, perform a cold boot:
1.Press and hold the power button for at least 10 seconds. The device shuts down.
2.Press the Power button again to turn on the device.
Battery Status and Battery Management
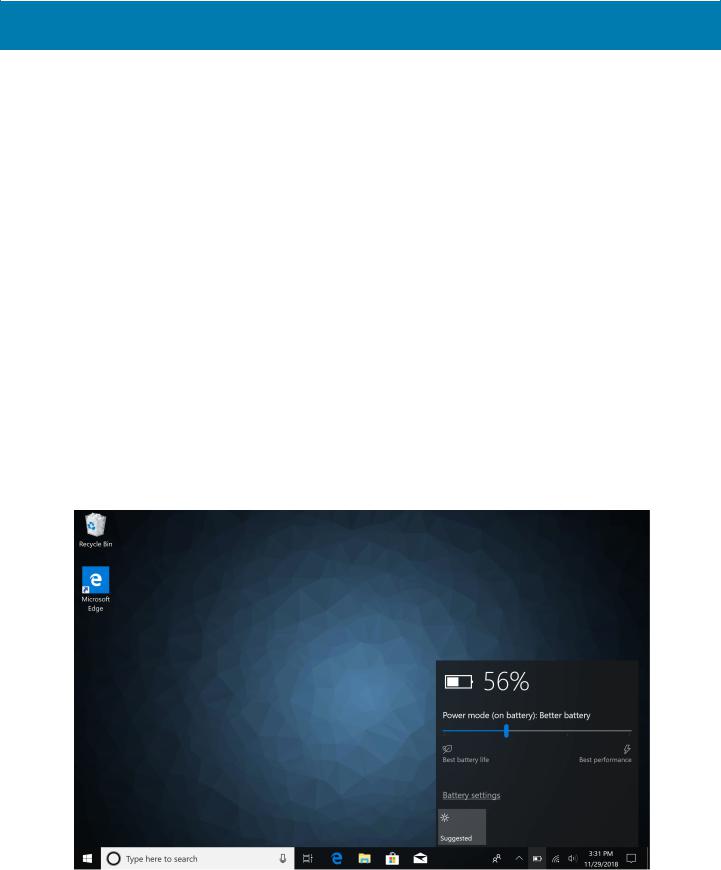
To check the charge level of the main battery:
•Battery status appears on the taskbar. Tap the battery icon to see the percentage remaining. See Accessories for information about charging cradles.
Figure 11 Battery Status
When a low battery warning displays, dock the device into a cradle. If you don’t recharge the battery, eventually, the device saves your work and shuts down.
20
Getting Started
Table 4 Battery Status
Icon |
Description |
|
Device is connected to external power and the main battery is fully charged. |
|
|
|
Device is connected to external power and the main battery is charging. |
|
|
|
Device is on battery power and the main battery is discharging. |
|
|
|
Device is on battery power and the main battery charge is low. |
|
|
|
Device is on battery power and the main battery charge is critically low. |
|
|
IMPORTANT: When the Power Pack is installed and charging the device main battery, the Battery Status icon does not indicate charging. This is normal behavior.
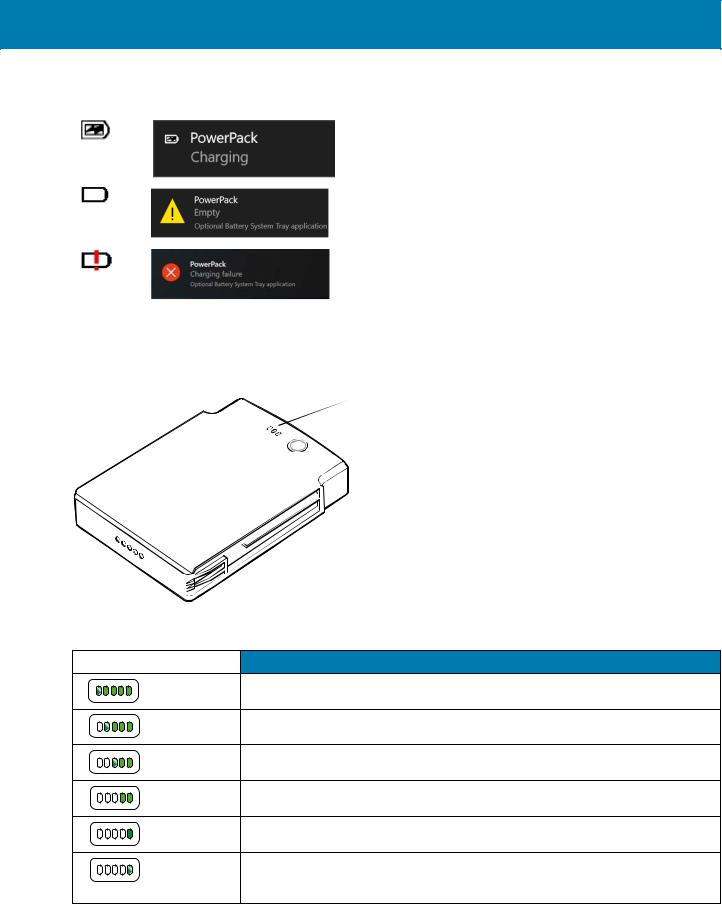
Checking Power Pack Status
The optional Power Pack provides additional power to charge the main battery.
Power Pack status appears on the desktop taskbar. See Accessories for information about power pack usage.
NOTE: The Power Pack Status icon appears when it issues a notification. To always display the icon, select  >
>
Customize. In the Notification Area Icons window, check the Always show all icons and notifications on the taskbar and then select OK.
Tap the Power Pack icon to see the status.
Table 5 Power Pack Status
Icon |
Message Box |
Description |
|
|
Power Pack is connected to the device. |
Power Pack is removed from to the device.
21
Getting Started
Table 5 Power Pack Status (Continued)
Icon |
Message Box |
Description |
|
|
Power Pack is connected to the device and the device is |
|
|
in the dock changing. |
|
|
|
|
|
Power Pack is fully discharged. |
|
|
|
|
|
Power Pack is experiencing charging failure. |
|
|
|
To view the Power Pack charge level:
1.Remove the Power Pack from the Expansion Back.
2.Press the Charge Status button. The Charge Status LEDs light to indicate the charge level.
 Charge Status LEDs

 Charge Status Button
Table 6 Power Pack Charge Status Indicators
Power Pack Indicators |
Description |
Charge level is 100%.
Charge level is 80%.
Change level is 60%.
Charge level is 40%.
Charge level is 20%.
Charge level is below 20%.
Blinking
22

Getting Started
Battery Saving Tips
•Set the device to turn off after a short period of non-use.
•Set the display to turn off or dim backlight.
•Turn off all wireless radio activity when not in use.
Changing the Power Settings
To set the device or display to turn off after a short period of non-use:
1.In the taskbar, touch the Action Center icon  .
.
2.Touch All Settings > System > Power and sleep.
3.Under Sleep, choose when you want the device/screen to go to sleep (on battery power and when plugged in).
Manually Changing the Display Brightness
To manually change the display brightness:
1.In the taskbar, touch Action Center icon  .
.
2.Touch All Settings > System > Display.
3.Under Change brightness, move the slider to adjust the brightness.
Automatically Changing the Display Brightness
To toggle automatic brightness:
1.In the taskbar, Action Center icon  .
.
2.Touch All Settings > System > Display.
3.Check the box to enable Change brightness automatically when lighting changes.
Adjusting the Volume
To adjust the volume:
•Use the volume-up /volume-down button on the top of the device, or
•Touch  on the taskbar and adjust the slider.
Adjusting the Screen Orientation
For optimal viewing experience, the screen orientation changes automatically to portrait or landscape depending on how you hold the device. You can disable automatic screen rotation and lock the screen in portrait or landscape mode.
NOTE: Some applications may not support automatic screen rotation and are designed to work only in one orientation.
To lock the screen orientation:
23

Getting Started
1.In the taskbar, touch Action Center icon  .
.
2.Touch All Settings > System > Display.
3.Rotate the screen to the desired orientation.
4.Under Rotation lock, slide the switch to the On.
24
Using the Tablet
Introduction
This chapter provides instructions on how to use some basic applications and key features.
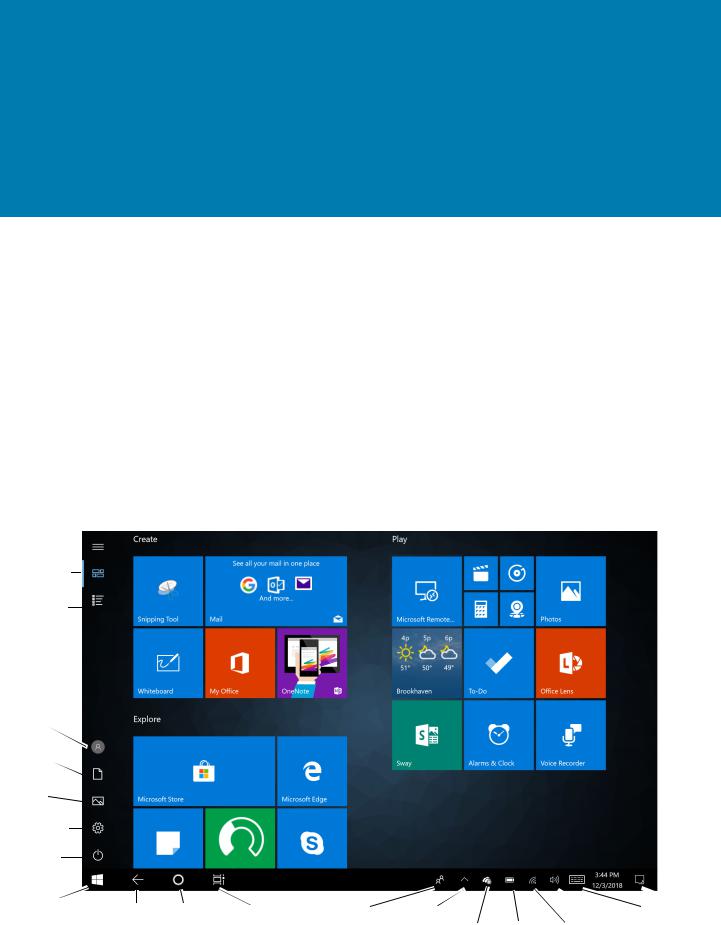
Start Screen
By default, the Start screen displays in Tablet mode. The tile-based interface allows direct access to recently used applications, emails, photos, contacts, and frequently viewed websites. You may pin favorite apps as tiles to customize the Start screen. See Customizing the Start Screen for information.
Live Tiles, such as news, sports, weather, social-networking sites, etc. update in real time.
Figure 12 Start Screen in Tablet Mode
Pinned
Tiles
All Apps
Users
Documents
Pictures
All
Settings
Power
Start
•
Action
 Center
Back Cortana Recent Apps |
Contacts More Settings |
Keyboard |
OneDrive Battery Network Sound
Pinned tiles - Places the Home screen in Tile view.
25

Using the Tablet
•All apps - Lists all applications alphabetically.
•Users - Opens user account window, locks screen or logs user off the device.
•Documents - Opens documents folder.
•Pictures - Opens pictures folder.
•Settings - Opens the Settings window.
•Power - Touch to place the device in sleep mode, shutdown or restart.
•Start - Access the Home screen from any window.
•Back - Displays the previous screen.
•Cortana - Opens voice activated search window.
•Recent Applications - Displays all open applications.
•Contacts - Use to pin contacts to the task bar.
•More Settings - Includes Bluetooth, Intel Graphics, and Windows Defender.
•OneDrive - Opens cloud-based file hosting app.
•Battery - Displays current battery status.
•Network - Opens network settings.
•Sound - Use to control audio volume level.
•Keyboard - Opens the virtual keyboard.
•Action Center - Provides easy access to some frequently used settings and notifications. Touch the icon to open the Action Center. The first row of setting option boxes display and any notifications. Touch Expand to view all setting option boxes. See Action Center for more information.
Customizing the Start Screen
Choose a background photo or pin a favorite app to the Start screen.
Moving Tiles
To move a tile to a different location on the Start screen:
1.Touch and hold a tile. The tiles float on the screen.
2.Drag the tile to a new location. Other tiles move as the floating tile move over them.
3.Lift finger and drop the tile and then touch the screen.
Resizing Tiles
To resize a tile:
1.Touch and hold the tile and then touch  .
.
2.Touch Resize > Small, Medium, Wide or Large.
26
 Loading...