


 Loading...
ZC100/300 Series
User Guide
P1094920-001
Copyright
© 2017 ZIH Corp. and/or its affiliates. All rights reserved. ZEBRA and the stylized Zebra head are trademarks of ZIH Corp., registered in many jurisdictions worldwide. All other trademarks are the property of their respective owners.
COPYRIGHTS & TRADEMARKS: For complete copyright and trademark information, go to: www.zebra.com/copyright
WARRANTY: For complete warranty information, go to: www.zebra.com/warranty
END USER LICENSE AGREEMENT: For complete EULA information, go to: www.zebra.com/eula
Terms of Use
Proprietary Statement This manual contains proprietary information of Zebra Technologies Corporation and its subsidiaries (“Zebra Technologies”). It is intended solely for the information and use of parties operating and maintaining the equipment described herein. Such proprietary information may not be used, reproduced, or disclosed to any other parties for any other purpose without the express, written permission of Zebra Technologies.
Product Improvements Continuous improvement of products is a policy of Zebra Technologies. All specifications and designs are subject to change without notice.
Liability Disclaimer Zebra Technologies takes steps to ensure that its published Engineering specifications and manuals are correct; however, errors do occur. Zebra Technologies reserves the right to correct any such errors and disclaims liability resulting therefrom.
Limitation of Liability In no event shall Zebra Technologies or anyone else involved in the creation, production, or delivery of the accompanying product (including hardware and software) be liable for any damages whatsoever (including, without limitation, consequential damages including loss of business profits, business interruption, or loss of business information) arising out of the use of, the results of use of, or inability to use such product, even if Zebra Technologies has been advised of the possibility of such damages. Some jurisdictions do not allow the exclusion or limitation of incidental or consequential damages, so the above limitation or exclusion may not apply to you.

Contents
Introduction. . . . . . . . . . . . . . . . . . . . . . . . . . . . . . . . . . . . . . . . . . . . . . . . . . . . . . . . . . . . . . . . . . . . . 1
About This Manual. . . . . . . . . . . . . . . . . . . . . . . . . . . . . . . . . . . . . . . . . . . . . . . . . . . . . . . . . . . . 1 About the Printer . . . . . . . . . . . . . . . . . . . . . . . . . . . . . . . . . . . . . . . . . . . . . . . . . . . . . . . . . . . . . 1 Features, Controls, and Indicators. . . . . . . . . . . . . . . . . . . . . . . . . . . . . . . . . . . . . . . . . . . . . . . . 2 LCD Menu Navigation . . . . . . . . . . . . . . . . . . . . . . . . . . . . . . . . . . . . . . . . . . . . . . . . . . . . . . . . . 4 Printer Ready Screen. . . . . . . . . . . . . . . . . . . . . . . . . . . . . . . . . . . . . . . . . . . . . . . . . . . . . . . 4 Printer Soft Keys. . . . . . . . . . . . . . . . . . . . . . . . . . . . . . . . . . . . . . . . . . . . . . . . . . . . . . . . . . . 4 Help Menu . . . . . . . . . . . . . . . . . . . . . . . . . . . . . . . . . . . . . . . . . . . . . . . . . . . . . . . . . . . . . . . 5 Info menu . . . . . . . . . . . . . . . . . . . . . . . . . . . . . . . . . . . . . . . . . . . . . . . . . . . . . . . . . . . . . . . . 6
Tools Menu. . . . . . . . . . . . . . . . . . . . . . . . . . . . . . . . . . . . . . . . . . . . . . . . . . . . . . . . . . . . . . . 6 Connection Status . . . . . . . . . . . . . . . . . . . . . . . . . . . . . . . . . . . . . . . . . . . . . . . . . . . . . . . . . . . . 7
Ethernet Connection. . . . . . . . . . . . . . . . . . . . . . . . . . . . . . . . . . . . . . . . . . . . . . . . . . . . . . . . 7 Bluetooth Connection. . . . . . . . . . . . . . . . . . . . . . . . . . . . . . . . . . . . . . . . . . . . . . . . . . . . . . . 7 Wi-Fi Connection . . . . . . . . . . . . . . . . . . . . . . . . . . . . . . . . . . . . . . . . . . . . . . . . . . . . . . . . . . 7
Setup . . . . . . . . . . . . . . . . . . . . . . . . . . . . . . . . . . . . . . . . . . . . . . . . . . . . . . . . . . . . . . . . . . . . . . . . . . 9
Unpacking . . . . . . . . . . . . . . . . . . . . . . . . . . . . . . . . . . . . . . . . . . . . . . . . . . . . . . . . . . . . . . . . . . 9
Connecting Power . . . . . . . . . . . . . . . . . . . . . . . . . . . . . . . . . . . . . . . . . . . . . . . . . . . . . . . . . . . . 9
Connecting USB . . . . . . . . . . . . . . . . . . . . . . . . . . . . . . . . . . . . . . . . . . . . . . . . . . . . . . . . . . . . 10
Connecting Ethernet . . . . . . . . . . . . . . . . . . . . . . . . . . . . . . . . . . . . . . . . . . . . . . . . . . . . . . . . . 10
Loading Ribbon . . . . . . . . . . . . . . . . . . . . . . . . . . . . . . . . . . . . . . . . . . . . . . . . . . . . . . . . . . . . . 11
Loading Cards . . . . . . . . . . . . . . . . . . . . . . . . . . . . . . . . . . . . . . . . . . . . . . . . . . . . . . . . . . . . . . 11
Printing a Sample Card . . . . . . . . . . . . . . . . . . . . . . . . . . . . . . . . . . . . . . . . . . . . . . . . . . . . . . . 12
Printing a Test Card. . . . . . . . . . . . . . . . . . . . . . . . . . . . . . . . . . . . . . . . . . . . . . . . . . . . . . . . . . 12
Installing the Driver . . . . . . . . . . . . . . . . . . . . . . . . . . . . . . . . . . . . . . . . . . . . . . . . . . . . . . . . . . 12
Manual Feed . . . . . . . . . . . . . . . . . . . . . . . . . . . . . . . . . . . . . . . . . . . . . . . . . . . . . . . . . . . . . . . 13
Retrieving a Rejected Card . . . . . . . . . . . . . . . . . . . . . . . . . . . . . . . . . . . . . . . . . . . . . . . . . . . . 13
Options . . . . . . . . . . . . . . . . . . . . . . . . . . . . . . . . . . . . . . . . . . . . . . . . . . . . . . . . . . . . . . . . . . . . . . . 15
Mag Encoder . . . . . . . . . . . . . . . . . . . . . . . . . . . . . . . . . . . . . . . . . . . . . . . . . . . . . . . . . . . . . . . 15
Magnetic Encoding Type . . . . . . . . . . . . . . . . . . . . . . . . . . . . . . . . . . . . . . . . . . . . . . . . . . . 15
i

Contents
Smart Card Encoder . . . . . . . . . . . . . . . . . . . . . . . . . . . . . . . . . . . . . . . . . . . . . . . . . . . . . . . . . 16
Contact Smart Cards . . . . . . . . . . . . . . . . . . . . . . . . . . . . . . . . . . . . . . . . . . . . . . . . . . . . . . 16
Contactless Smart Cards . . . . . . . . . . . . . . . . . . . . . . . . . . . . . . . . . . . . . . . . . . . . . . . . . . . 16
Contact Station. . . . . . . . . . . . . . . . . . . . . . . . . . . . . . . . . . . . . . . . . . . . . . . . . . . . . . . . . . . 16
Double-sided Printing. . . . . . . . . . . . . . . . . . . . . . . . . . . . . . . . . . . . . . . . . . . . . . . . . . . . . . . . . 17
Wi-Fi. . . . . . . . . . . . . . . . . . . . . . . . . . . . . . . . . . . . . . . . . . . . . . . . . . . . . . . . . . . . . . . . . . . . . . 17
Description . . . . . . . . . . . . . . . . . . . . . . . . . . . . . . . . . . . . . . . . . . . . . . . . . . . . . . . . . . . . . . 17
Cleaning. . . . . . . . . . . . . . . . . . . . . . . . . . . . . . . . . . . . . . . . . . . . . . . . . . . . . . . . . . . . . . . . . . . . . . . 19
Cleaning the Printer. . . . . . . . . . . . . . . . . . . . . . . . . . . . . . . . . . . . . . . . . . . . . . . . . . . . . . . . . . 19
From the LCD Menu. . . . . . . . . . . . . . . . . . . . . . . . . . . . . . . . . . . . . . . . . . . . . . . . . . . . . . . 19
From the Driver Software . . . . . . . . . . . . . . . . . . . . . . . . . . . . . . . . . . . . . . . . . . . . . . . . . . . 20
Cleaning the Printhead . . . . . . . . . . . . . . . . . . . . . . . . . . . . . . . . . . . . . . . . . . . . . . . . . . . . . . . 21
Cleaning the Mag Encoder . . . . . . . . . . . . . . . . . . . . . . . . . . . . . . . . . . . . . . . . . . . . . . . . . . . . 21
Cleaning Supplies . . . . . . . . . . . . . . . . . . . . . . . . . . . . . . . . . . . . . . . . . . . . . . . . . . . . . . . . . . . 21
Troubleshooting . . . . . . . . . . . . . . . . . . . . . . . . . . . . . . . . . . . . . . . . . . . . . . . . . . . . . . . . . . . . . . . . 23
LCD Warnings and Errors . . . . . . . . . . . . . . . . . . . . . . . . . . . . . . . . . . . . . . . . . . . . . . . . . . . . . 23 LED Warnings and Errors . . . . . . . . . . . . . . . . . . . . . . . . . . . . . . . . . . . . . . . . . . . . . . . . . . . . . 24 Clearing a Card Jam . . . . . . . . . . . . . . . . . . . . . . . . . . . . . . . . . . . . . . . . . . . . . . . . . . . . . . . . . 24 Identifying Job Quality Issues . . . . . . . . . . . . . . . . . . . . . . . . . . . . . . . . . . . . . . . . . . . . . . . . . . 25 Print Quality Issues. . . . . . . . . . . . . . . . . . . . . . . . . . . . . . . . . . . . . . . . . . . . . . . . . . . . . . . . 25 Replacing the Printhead. . . . . . . . . . . . . . . . . . . . . . . . . . . . . . . . . . . . . . . . . . . . . . . . . . . . . . . 26 Removal . . . . . . . . . . . . . . . . . . . . . . . . . . . . . . . . . . . . . . . . . . . . . . . . . . . . . . . . . . . . . . . . 26 Installation . . . . . . . . . . . . . . . . . . . . . . . . . . . . . . . . . . . . . . . . . . . . . . . . . . . . . . . . . . . . . . 26 Packing for Shipment. . . . . . . . . . . . . . . . . . . . . . . . . . . . . . . . . . . . . . . . . . . . . . . . . . . . . . . . . 28
ii

Introduction
About This Manual
This manual provides setup, cleaning, and basic troubleshooting instructions for the ZC100 and ZC300 Series printers, and their respective factory-installed options. Unless otherwise noted, instructions are identical for all printers.
About the Printer
The ZC100 and ZC300 series printers provide full color dye sublimation or monochrome thermal transfer printing on standard CR70 (2.051" x 3.303") and CR80 (2.125" x 3.375") PVC or PVC composite 10to 40-mil cards. The integrated card feeder and flipper minimizes printer size while maximizing performance. Zebra ZC Series ribbon cartridges have an integrated card cleaning roller for easy ribbon changing or replacement. A variety of options (some of which can be factory-installed or field-installed as upgrades) are available.
1
Introduction
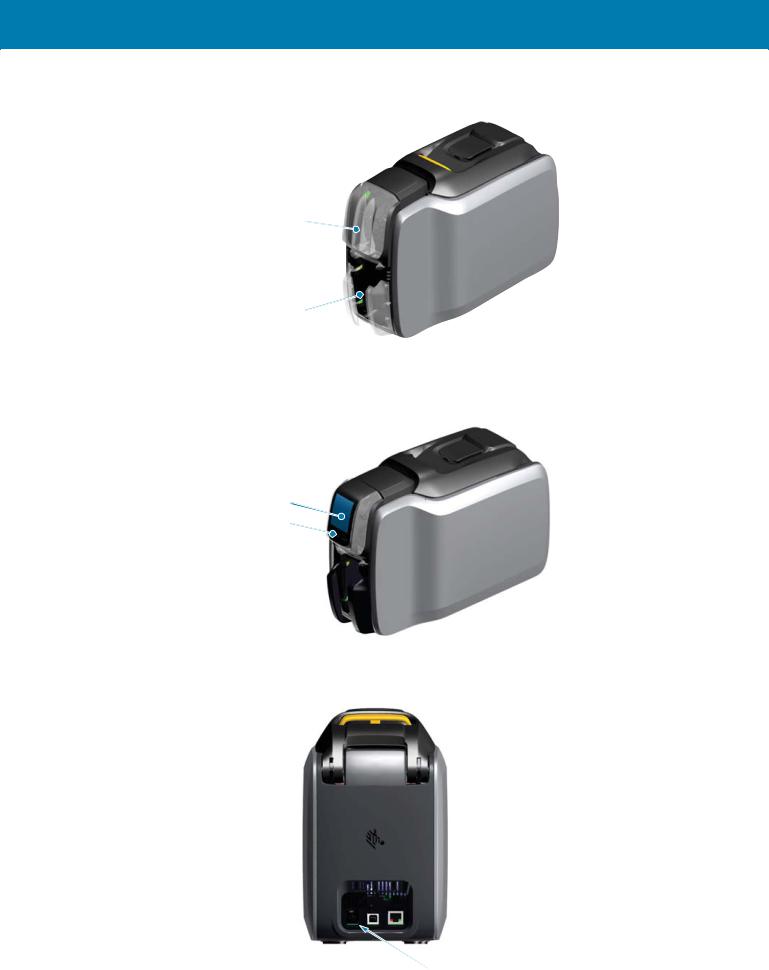
Features, Controls, and Indicators
Zebra=HEUDPrint3ULQW7RXFKTouch
,QSXWInput+RSSHUHopper
3RZHUPower%XWWRQButton Status/('Indicators,QWHUIDFH
Output Hopper
2XWSXW +RSSHU
LCD/&' Interface,QWHUIDFH (ZC300)=&
Printer Soft6RIW Keys.H\V (ZC300)=&
 Top7RS Cover&RYHU Release5HOHDVH
 10/100 Ethernet(WKHUQHW
 86%USB 2.0
3RZHUPower (100W)
2

Introduction
 3ULQWKHDGPrinthead
5LEERQRibbon &DUWULGJHCartridge
Zebra PrintTouch—This touch point uses NFC technology to provide key information about the printer; go to http://www.zebra.com/nfc for details.
LCD Interface—The ZC300 Series printers are equipped with a LCD interface to display menu items and errors, and three action buttons to enable menu choices.
Input Hopper—The ZC100 and ZC300 Series printers have a 100-card (30-mil) hopper capacity. Power Button—The power button houses a red and green LED to indicate the power status.
Status Indicators—The ZC100 and ZC300 Series printers are equipped with several indicators that displays printer status, ribbon status, and cleaning status.
Output Hopper—The ZC100 and ZC300 Series printers are equipped with a 100-card (30-mil) hopper capacity.
Top Cover Release—Open the top cover to load and remove printer ribbon, clear a card jam, install upgrades, and access the printhead for easy replacement.
Power—The ZC100 and ZC300 Series printers use a 100-watt power supply. Make sure to use the power supply that came with the printer.
USB 2.0—For direct connection to a PC.
10/100 Ethernet—Used to connect the printer to a network.
3

Introduction
LCD Menu Navigation
Printer Ready Screen
After successful startup, the printer will display the ready screen.
The printer ready screen displays the wired (Ethernet), Bluetooth, and wireless (Wi-Fi) status at the top; the current printer state in the center; and Help, Info, and Tools at the bottom.
Printer Soft Keys
There are three soft keys (buttons) that sit under the LCD and correspond to what is displayed in the lower portion of the screen. As the menus change, the function of the soft keys change. For example: At the Printer Ready screen, pressing the leftmost key will take you to the Help menu; once in the Help menu, the function of the keys change to navigation arrows.
Navigation arrows are used to cycle through the menu choices, return to the previous menu, and make the desired selection. For example: At the Help menu, the leftmost key corresponds to the left arrow which return you to the previous menu; the center key corresponds to the down arrow which is used to cycle through the menu choices; and the rightmost key corresponds to the right-facing chevron which is used to select the menu choice and go to the next menu.
4

Introduction
Help Menu
The Help menu offers brief animations to assist you with basic tasks. From the Help menu, use the soft keys to navigate through the different choices and press the rightmost key to select.
The Help menu displays the following:
•Loading cards
•Loading ribbon
•Printing demo card
•Cleaning printer
•Clearing card jam
•Clearing ribbon jam
•More help
If the topic you need isn’t listed in the help menu, select More help and a QR code will be displayed. Scan the QR code with your mobile device and you will be directed to the printer support page.
5
Introduction
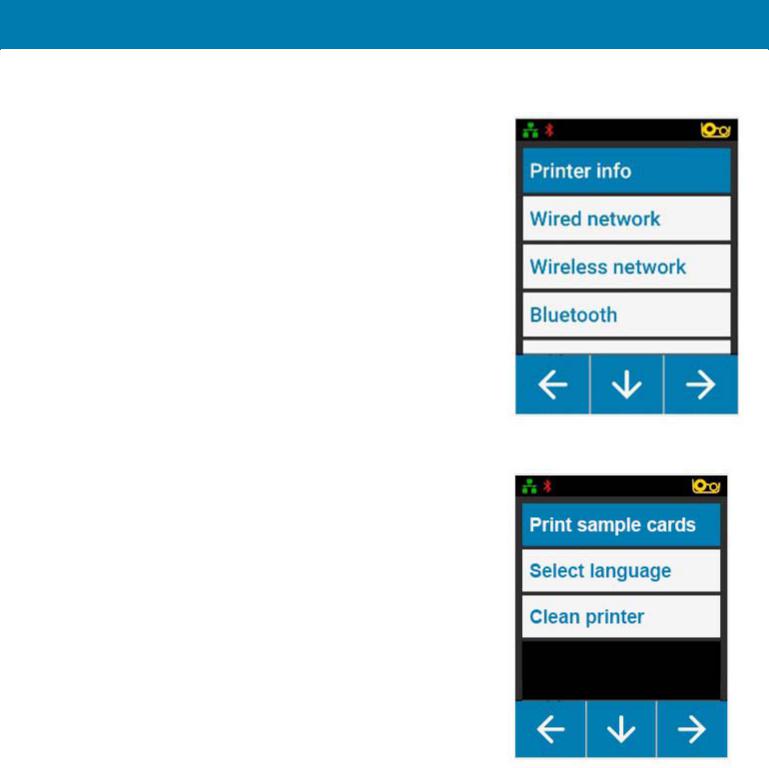
Info menu
The Info menu shows information on the condition and connection of the printer.
The Info menu displays the following:
•Printer info
•Wired network
•Wireless network
•Ribbon info
•Card count
•Installed options
Tools Menu
The Tools menu enables several basic functions to keep your printer working properly.
The Tools menu displays the following:
•Print sample cards
•Select language
•Clean printer
6
Introduction
Connection Status
The top of the LCD screen shows the connection status of Ethernet, Bluetooth, and Wi-Fi.
Ethernet Connection
Off |
Cable detected but No IP Address |
Cable detected with Network |
|
|
|
|
|
|
Bluetooth Connection
Off |
Paired but Not Connected |
Paired and Connected |
|
|
|
|
|
|
Wi-Fi Connection
Off |
No Connection |
Poor Connection |
Connected |
|
|
|
|
|
|
|
|
7
Loading...