


ZQ51-BUE000E-00
Table of contents
 Loading...
ZQ511/ZQ521
Mobile Printers
User Guide
P1106523-01EN

ZEBRA and the stylized Zebra head are trademarks of Zebra Technologies Corporation, registered in
many jurisdictions worldwide. All other trademarks are the property of their respective owners.
© 2020 Zebra Technologies Corporation and/or its affiliates. All rights reserved.
Information in this document is subject to change without notice. The software described in this document
is furnished under a license agreement or nondisclosure agreement. The software may be used or copied
only in accordance with the terms of those agreements.
For further information regarding legal and proprietary statements, please go to:
SOFTWARE:http://www.zebra.com/linkoslegal
COPYRIGHTS:http://www.zebra.com/copyright
WARRANTY:http://www.zebra.com/warranty
END USER LICENSE AGREEMENT: http://www.zebra.com/eula
Terms of Use
Proprietary Statement
This manual contains proprietary information of Zebra Technologies Corporation and its subsidiaries
(“Zebra Technologies”). It is intended solely for the information and use of parties operating and
maintaining the equipment described herein. Such proprietary information may not be used, reproduced,
or disclosed to any other parties for any other purpose without the express, written permission of Zebra
Technologies.
Product Improvements
Continuous improvement of products is a policy of Zebra Technologies. All specifications and designs are
subject to change without notice.
Liability Disclaimer
Zebra Technologies takes steps to ensure that its published Engineering specifications and manuals are
correct; however, errors do occur. Zebra Technologies reserves the right to correct any such errors and
disclaims liability resulting therefrom.
Limitation of Liability
In no event shall Zebra Technologies or anyone else involved in the creation, production, or delivery of the
accompanying product (including hardware and software) be liable for any damages whatsoever
(including, without limitation, consequential damages including loss of business profits, business
interruption, or loss of business information) arising out of the use of, the results of use of, or inability to
use such product, even if Zebra Technologies has been advised of the possibility of such damages. Some
jurisdictions do not allow the exclusion or limitation of incidental or consequential damages, so the above
limitation or exclusion may not apply to you.
“Made for iPod”, “Made for iPhone”, and “Made for iPad” mean that an electronic accessory has been
designed to connect specifically to iPod, iPhone, or iPad, respectively, and has been certified by the
developer to meet Apple performance standards. Apple is not responsible for the operation of this device
or its compliance with safety and regulatory standards. Please note that the use of this accessory with
iPod, iPhone, or iPad may affect wireless performance.
Bluetooth® is a registered trademark of the Bluetooth SIG.
© 1996–2009, QNX Software Systems GmbH & Co. KG. All rights reserved. Published under license by
QNX Software Systems Co.
2

Certified by:
54
IP
65
IP
MIL - STD
810
Publication Date
May 7, 2020
3

Contents
About This Document ........................................................................................................................... 8
Introduction ...................................................................................................................... 8
Configurations.................................................................................................................. 8
Related Documents and Software ................................................................................... 8
Service Information .......................................................................................................... 8
Feedback ......................................................................................................................... 9
Printer Overview ................................................................................................................................. 10
Unpacking and Inspection............................................................................................. 11
Reporting Damage......................................................................................................... 11
Technology.................................................................................................................... 12
PowerPrecision+ (PP+) Battery.............................................................................. 12
Printing Technology ....................................................................................................... 12
Product Information QR Code........................................................................................ 13
Made for iPhone (MFi) ................................................................................................... 13
Near Field Communication (NFC).................................................................................. 13
Thermal Shutdown ................................................................................................. 13
Radio-Frequency Identification (RFID)........................................................................... 14
Printer Features ............................................................................................................. 15
Using the Printer ................................................................................................................................. 17
Preparing the Battery for Use......................................................................................... 17
Installing/Removing Battery & Battery Tape Insulator ............................................ 17
Removing the Battery....................................................................................... 17
Removing the Battery Tape Insulator............................................................... 18
Battery Safety ......................................................................................................... 19
Charging the Battery............................................................................................... 21
AC Power Adapter ........................................................................................... 21
Vehicle Cradle ........................................................................................................ 22
Battery Eliminator/Battery Eliminator Vehicle Cradle ............................................. 22
4

Contents
4-Bay Power Station............................................................................................... 22
1-Slot Battery Charger (with US Type-A Line Cord)............................................... 23
Use Case: Home Office/Small Business.......................................................... 23
3-Slot Battery Charger/Dual 3-Slot Battery Charger (w/ US Type-A Line Cord) .... 25
Use Case: Settlement Room............................................................................ 25
Vehicle Adapter ...................................................................................................... 25
Use Case: Vehicle............................................................................................ 25
Loading Media ........................................................................................................ 26
Operator Controls........................................................................................................... 28
Printer Status Icons....................................................................................................... 29
Buttons.......................................................................................................................... 30
Power Up Sequences............................................................................................. 30
Run Time Sequences without LED Flashes ........................................................... 30
LEDs....................................................................................................................... 30
Alerts ...................................................................................................................... 31
Power Saving Features.................................................................................................. 31
Sleep Mode ............................................................................................................ 31
Adaptive Print Performance.................................................................................... 32
Draft Mode.............................................................................................................. 32
Verify That the Printer is Working .................................................................................. 32
Printing a Configuration Report .............................................................................. 32
Connecting the Printer ................................................................................................... 33
Cable Communication ............................................................................................ 33
Zebra Setup Utilities....................................................................................................... 34
Zebra Android Printer Setup Utility (for Link-OS Printers) ...................................... 35
Wireless Communications with Bluetooth..................................................................... 36
Bluetooth Networking Overview ............................................................................. 36
Bluetooth (BT) Security Modes ...................................................................................... 37
Bluetooth Minimum Security Modes ....................................................................... 38
WLAN Overview............................................................................................................. 39
Setting Up the Software ................................................................................................. 39
Designing Labels............................................................................................................ 40
Using Pre-Printed Receipt Media ........................................................................... 41
Black Mark Dimensions (Receipt Media)................................................................ 41
Label Areas ............................................................................................................ 41
Label Design Examples.......................................................................................... 42
Keep-Out Areas...................................................................................................... 43
Near Field Communication (NFC).................................................................................. 43
NFC Use Cases...................................................................................................... 44
Passive............................................................................................................. 44
Wearing the Printer ....................................................................................................... 45
Swivel Belt Clip....................................................................................................... 45
5

Contents
Shoulder Strap........................................................................................................ 46
Soft Case................................................................................................................ 46
Exoskeleton ............................................................................................................ 47
Preventive Maintenance................................................................................................ 48
Extending Battery Life ............................................................................................ 48
General Cleaning Instructions ................................................................................ 48
................................................................................................................................ 49
Troubleshooting .................................................................................................................................. 51
Front Control Panel........................................................................................................ 51
Printer Status Indicators................................................................................................. 51
Troubleshooting Topics................................................................................................. 52
No power ................................................................................................................ 52
Media does not feed ............................................................................................... 53
Poor or faded print.................................................................................................. 53
Partial or missing print ............................................................................................ 53
Garbled print........................................................................................................... 53
No print ................................................................................................................... 53
Reduced battery charge life.................................................................................... 53
flashing ................................................................................................................... 53
or flashing ............................................................................................................... 53
Communication error .............................................................................................. 54
Label binding .......................................................................................................... 54
Blank LCD screen................................................................................................... 54
No NFC Connectivity .............................................................................................. 54
Troubleshooting Tests.................................................................................................... 54
Printing a Configuration Report .............................................................................. 54
Communications Diagnostics ................................................................................. 55
Contacting Technical Support........................................................................................ 56
Specifications...................................................................................................................................... 57
Printing Specifications.................................................................................................... 57
Memory and Communications Specifications ................................................................ 57
Label Specifications ....................................................................................................... 58
CPCL Font and Bar Code Specifications and Commands............................................. 59
ZPL Font and Bar Code Specifications and Commands................................................ 60
Communication Port....................................................................................................... 61
USB ........................................................................................................................ 61
Physical, Environmental and Electrical Specifications................................................... 61
Accessories................................................................................................................... 64
6

Contents
Miscellaneous ..................................................................................................................................... 65
Serial Number and PCC Number Locations .................................................................. 65
Cables............................................................................................................................ 66
USB Cables ............................................................................................................ 66
Media Supplies.............................................................................................................. 68
Maintenance Supplies.................................................................................................... 68
Battery Disposal............................................................................................................ 69
Product Disposal............................................................................................................ 69
Alert Messages ............................................................................................................. 70
7

About This Document
Introduction
This guide provides information about using the ZQ511 and ZQ521 mobile printers and accessories.
Configurations
This guide covers the following configurations:
Configuration
ZQ511 LINK-OS 802.11ac/BT 4.1 Dual Color LCD 512 MB
ZQ521 LINK-OS 802.11ac/BT 4.1 Dual Color LCD 512 MB
Operating
System
Related Documents and Software
The following documents provide more information about the ZQ500 Series mobile printers.
• ZQ511/ZQ521 Quick Start Guide
For the latest version of this guide and all guides, go to http://www.zebra.com/support
Service Information
If you have a problem with your equipment, contact Zebra Global Customer Support for your region.
Contact information is available at http://www.zebra.com/support
When contacting support, please have the following information available:
• Serial number of the unit
• Model number or product name
• Software/firmware type or version number
Radios Display Memory
.
.
Zebra responds to calls by email, telephone or fax within the time limits set forth in support agreements.
8

About This Document
If your problem cannot be solved by Zebra Customer Support, you may need to return your equipment for
servicing and will be given specific directions. Zebra is not responsible for any damages incurred during
shipment if the approved shipping container is not used. Shipping the units improperly can possibly void
the warranty.
If you purchased your Zebra business product from a Zebra business partner, contact that business
partner for support.
9

Printer Overview
This user guide provides the information to operate the Zebra ZQ511 and ZQ521 printers. The printers use
some of the latest technologies such as an 802.11ac/Bluetooth 4.1 dual radio, a smart battery with
PowerPrecision+ functionality, Near Field Communication (NFC), a color LCD display and Made for
iPhone
as an iPhone or iPad to authenticate and connect over Bluetooth.
These printers use CPCL and ZPL programming languages to configure the printers and print properties,
label design, and communications. See the Zebra Programming Guide at
www.zebra.com/manuals
Software Resources and Utilities:
• ZebraNet Bridge Enterprise
• Zebra Setup Utility: single printer configuration, quick setup
®
(MFi). MFi printers provide Apple co-processor (MFi) support which allows an Apple device such
for more information.
TM
: printer configuration, fleet management
• Zebra Mobile Setup Utility: Android-based setup tool
• ZebraDesigner Pro v2: label design
• Zebra Designer Drivers: Windows
• OPOS Driver: Windows driver
• Multiplatform SDK
• Zebra Downloader
• Printer Profile Manager Enterprise (PPME). Theseutilities can be found on the Zebra website at
www.zebra.com/us/en/support-downloads
®
driver
.
10
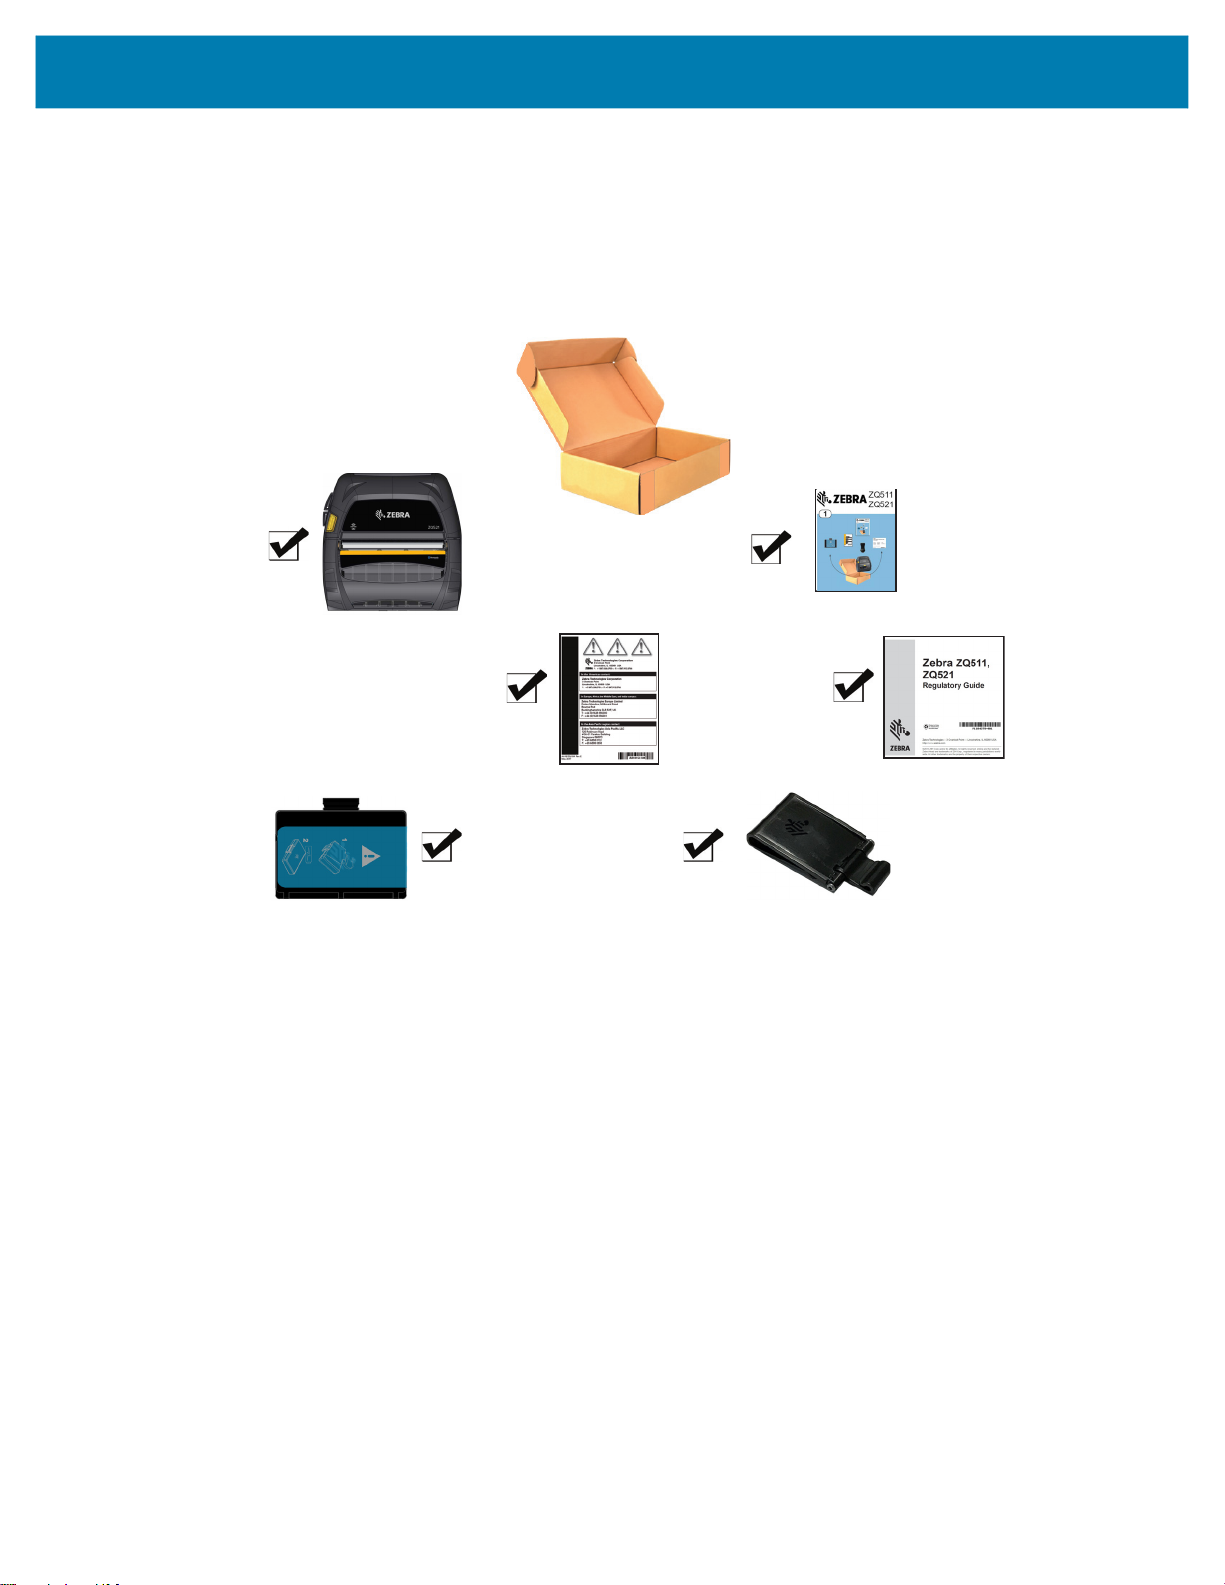
Unpacking and Inspection
In case shipping is required, save the carton and all packing material.
1. Open box and make sure it includes the following materials: Printer, Quick Start Guide, Regulatory
Guide, Safety Guide, battery, and belt clip.
Printer Overview
2. Check all exterior surfaces of the product components for damage.
3. Open the media cover (refer to Loading Media on page 26) and inspect the media compartment for
damage.
Reporting Damage
If you discover shipping damage:
• Immediately notify and file a damage report with the shipping company. Zebra Technologies
Corporation is not responsible for any damage incurred during shipment of the printer and will not cover
the repair of this damage under its warranty policy.
• Keep the carton and all packing material for inspection.
• Notify your authorized Zebra reseller.
11
Technology
The printers use several technologies made popular in other mobile printer product lines, as well as newer,
state-of-the-art technologies.
PowerPrecision+ (PP+) Battery
The printers use a 2-cell Li-ion battery pack with integrated intelligence and data storage capability
meeting PowerPrecision+ (PP+) functionality. This intelligent battery has the integrated technology
required to collect the detailed real-time battery metrics needed to maximize useful battery life and ensure
every battery is healthy and able to hold a full charge. In addition, technology inside the batteries tracks
and maintains the metrics required to provide real-time visibility into more meaningful battery statistics,
such as total cycle usage of the battery, whether the battery is old and should be retired or how long a
battery will take to fully charge.
Operating Temperature Charging Temperature Storage Temperature
-20°C to +50°C
(-4°F to 122°F)
IMPORTANT: The printers only function properly with genuine Zebra PP+ battery packs.
The printers also use an extended 4-cell smart battery with higher capacity and stronger security.
Printer Overview
0°C to +40°C
(32°F to 104°F)
-25°C to +60°C
(-13°F to 140°F)
The smart battery’s health has three states: Good, Replace, and Poor. The battery health factor
determines whether or not the printer can operate and what is communicated to the user via the display.
# of Charge Cycles Health Power-up Message
<300 GOOD None
≥ 300 but <550 REPLACE Battery Diminished Consider Replacing
≥ 550 but <600 REPLACE Warning-Battery Is Past Useful Life
≥ 600 POOR Replace Battery Shutting Down
a. Warning accompanied by one long beep.
b. Warning will flash on and off accompanied by beeping at a rate of once per second. After 30
seconds, the printer will shut down.
NOTE: Power down the printer before removing the battery to minimize the risk of corruption.
Printing Technology
The printers use the Direct Thermal method to print human readable text, graphics, and barcodes. It
incorporates a sophisticated print engine for optimal printing under all operational conditions. Direct
thermal printing uses heat to cause a chemical reaction on specially treated media. This reaction creates a
dark mark wherever a heated element on the printhead comes in contact with the media. Since the printing
elements are arranged very densely at 203 d.p.i. (dots per inch) horizontal and 200 d.p.i. vertical, highly
legible characters and graphic elements may be created a row at a time as the media is advanced past the
printhead. This technology has the advantage of simplicity, as there is no requirement for consumable
supplies such as ink or toner. However, since the media is sensitive to heat, it will gradually lose legibility
over long periods of time, especially if exposed to environments with relatively high temperatures or in
direct sunlight.
a
b
12
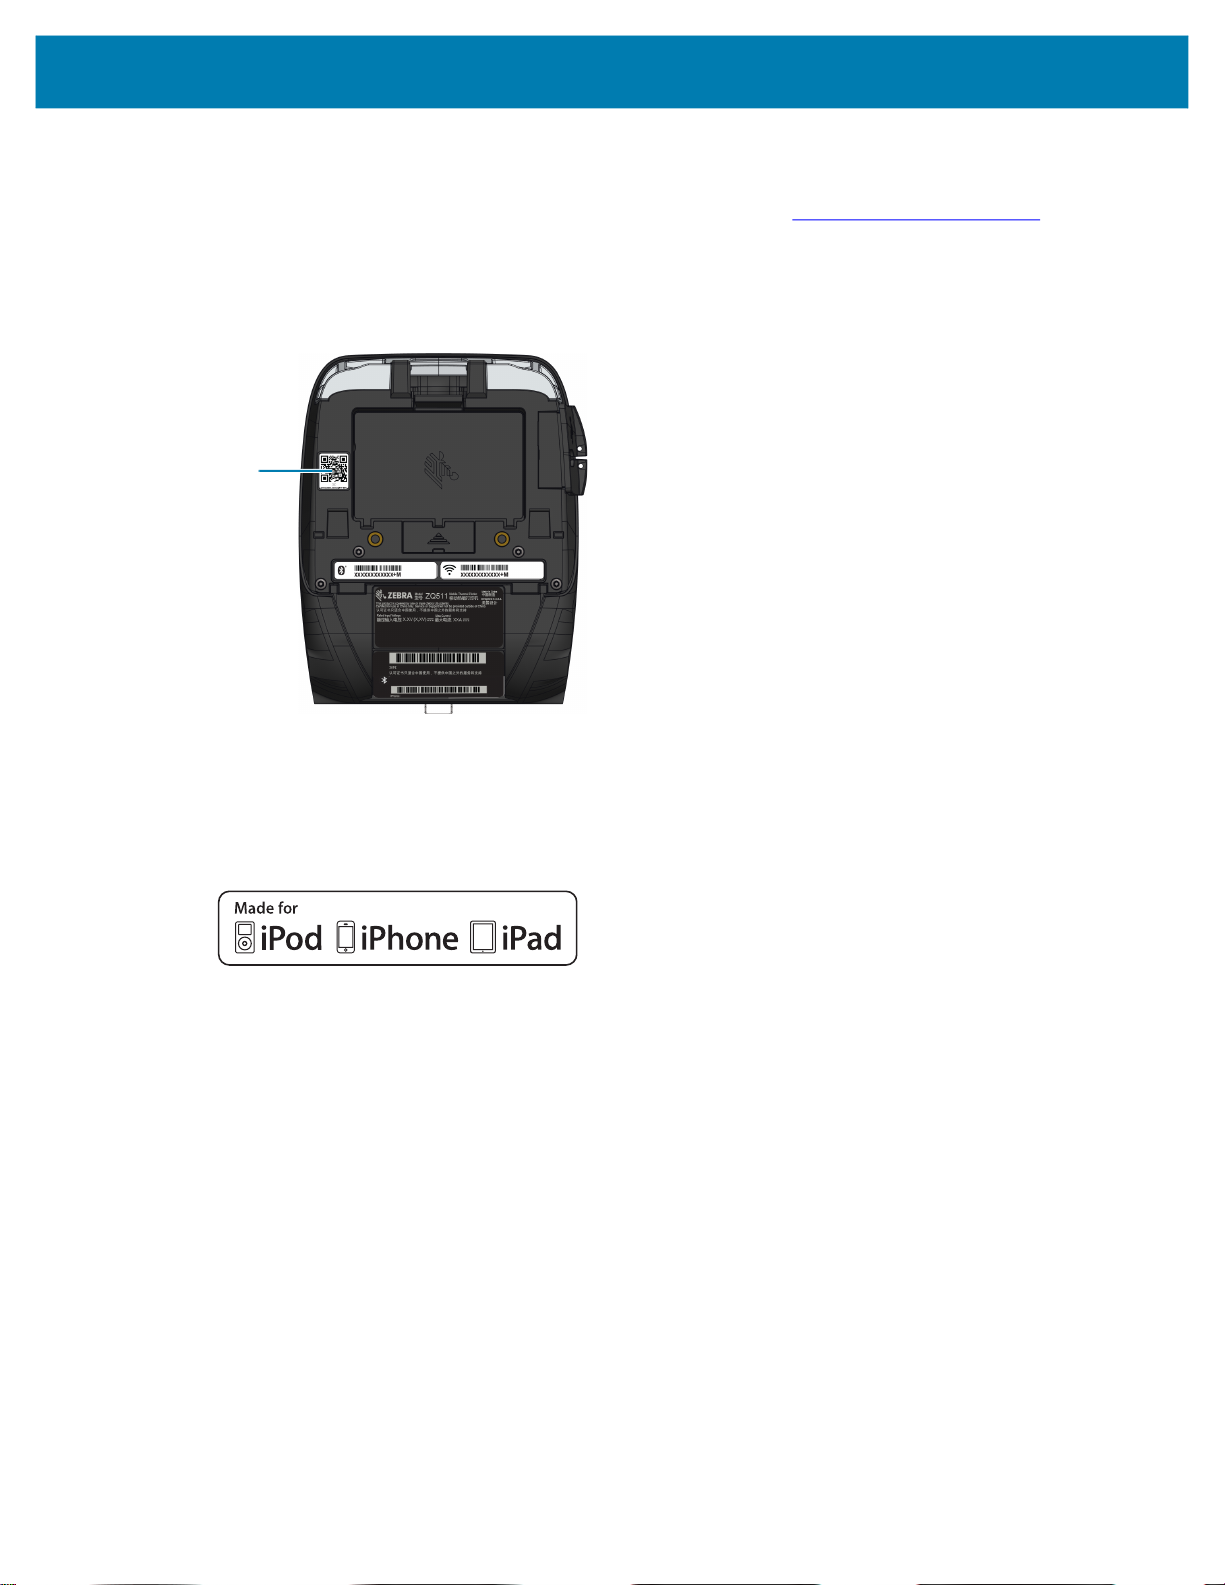
Product Information QR Code
The QR barcode includes human readable text URL, for example www.zebra.com/ZQ511-info, which links
the user to printer information and videos on topics such as buying supplies, features overview, loading
media, printing a configuration report, cleaning instructions, and accessory information.
Figure 1 QR Code (ZQ511 Shown)
Printer Overview
Made for iPhone (MFi)
The printers support communication with Apple devices running iOS 10 or later over a standalone
Bluetooth 4.1 radio and the BT4.1 radio included with the 802.11ac (dual) radio.
Near Field Communication (NFC)
The printers support a passive NFC tag which complies with the Android Standard Tag format since
Android devices are the most common found on the market today. The NFC tag is programmed from the
factory and supports Bluetooth pairing to enable a tablet, smartphone or mobile computer to automatically
pair with the printer via a Bluetooth connection (within the bounds of the security profile being used).
The NFC tag also supports app launching whereby an app developed either by Zebra or a third party will
launch on a NFC-enabled smartphone, tablet or mobile computer. Similarly, the NFC tag enables
launching to a web support page via a tablet, smartphone or mobile computer.
Thermal Shutdown
The printers have a thermal shutdown feature whereby the printer hardware will detect a printhead
over-temperature condition at 65°C (149°F). The printer automatically stops printing until the printhead
cools down to 60°C (140°F). Printing then recommences without a loss of label data or without any
degradation of print quality.
13

Printer Overview
Radio-Frequency Identification (RFID)
The printers are equipped with an RFID encoder/reader, which is integrated into the printer’s printhead
assembly. The printers encode (write) information on ultra-thin UHF RFID transponders that are
embedded in “smart” labels, tickets, and tags. The printers encode the information; verify proper encoding;
and print bar codes, graphics, and/or text on the label’s surface. The printers use Zebra’s extensive set of
RFID commands running under ZPL programming language.
The RFID transponder is sometimes called the RFID tag or an inlay. The transponder is usually made of
an antenna that is bonded to an integrated circuit (IC) chip. The IC chip contains the RF circuit, coders,
decoders, and memory. If you hold an RFID label up to the light, you can see the transponder’s antenna,
and you can feel a bump in the label where the IC chip is located. The printers can encode and verify EPC
(Electronic Product Code) Generation 2 Class 1 UHF passive RFID tags, in addition to printing human
readable text and conventional 1-D and 2-D barcode information on Zebra supplied RFID thermal transfer
media. EPC is a product numbering standard that can be used to identify a variety of items by using RFID
technology. EPC Generation 2 tags offer advantages over other tag types. The tag identification (TID)
memory in a Generation 2 tag includes the chip manufacturer and model number information, which can
be used to identify which optional features are present on the tag. These optional features include those
for data content and security.
Gen 2 tags typically have a 96-bit EPC identifier, which is different from the 64-bit identifiers common in
early EPC tags. The 96-bit EPC code links to an online database, providing a secure way of sharing
product-specific information along the supply chain. Gen 2 tags also support much larger data structures.
The size of user memory available (if any) varies by the model and manufacturer of the tag.
Encoding and printing of an RFID label usually are completed on the first try, but some failures may occur.
If you experience consistent encoding failures, it may signal a problem with the RFID tags, your label
formats, or with the transponder placement. If an RFID tag cannot be encoded, “VOID” will be printed on
the label. The printer then attempts to read/encode “n” labels before the next format is attempted, where
“n” is specified by the ZPL programming language “^RS” command. Acceptable values of “n” are 1 to 10
and the default is 3. After printing the defined number of voided RFID labels, the printer default is No
Action (Label format causing the error is dropped).
While the user doesn’t have control of where on the label the VOID is printed, they can control the length of
the image. The start of the VOID image is always at the program position (or F0 if a backward program
position). More information on the “^RS” command may be found in the RFID Programming Guide 3
available on www.zebra.com/manuals
RFID is an optional feature and is a factory-installed option only.
NOTE: Refer to www.zebra.com/warranty
.
for complete information on product warranties.
14

Printer Features
Figure 2 Overview of Features (ZQ511 Shown).
Printer Overview
10
4
1
9
1 Tear bar (Not present in Linerless. Scraper
present instead.)
2 Platen roller 7 DC input
3 Black bar sensor 8 USB port
4 Media support disks 9 Gap sensor
5 Printhead 10 Media cover
1
2
3
4
5
6
7
8
6 Latch release button
NOTE: Scanning the QR code with a mobile device will provide printer-specific information at
www.zebra.com/ZQ511-info
NOTE: Tapping the Zebra Print Touch ™ icon with a Near Field Communication (NFC) enabled mobile
device will provide instant access to printer-specific information. For more information about NFC and
Zebra products, go to http://www.zebra.com/nfc
Please see Zebra Multi-platform SDK for more information.
and www.zebra.com/ZQ521-info.
. Bluetooth pairing applications via NFC is also possible.
15
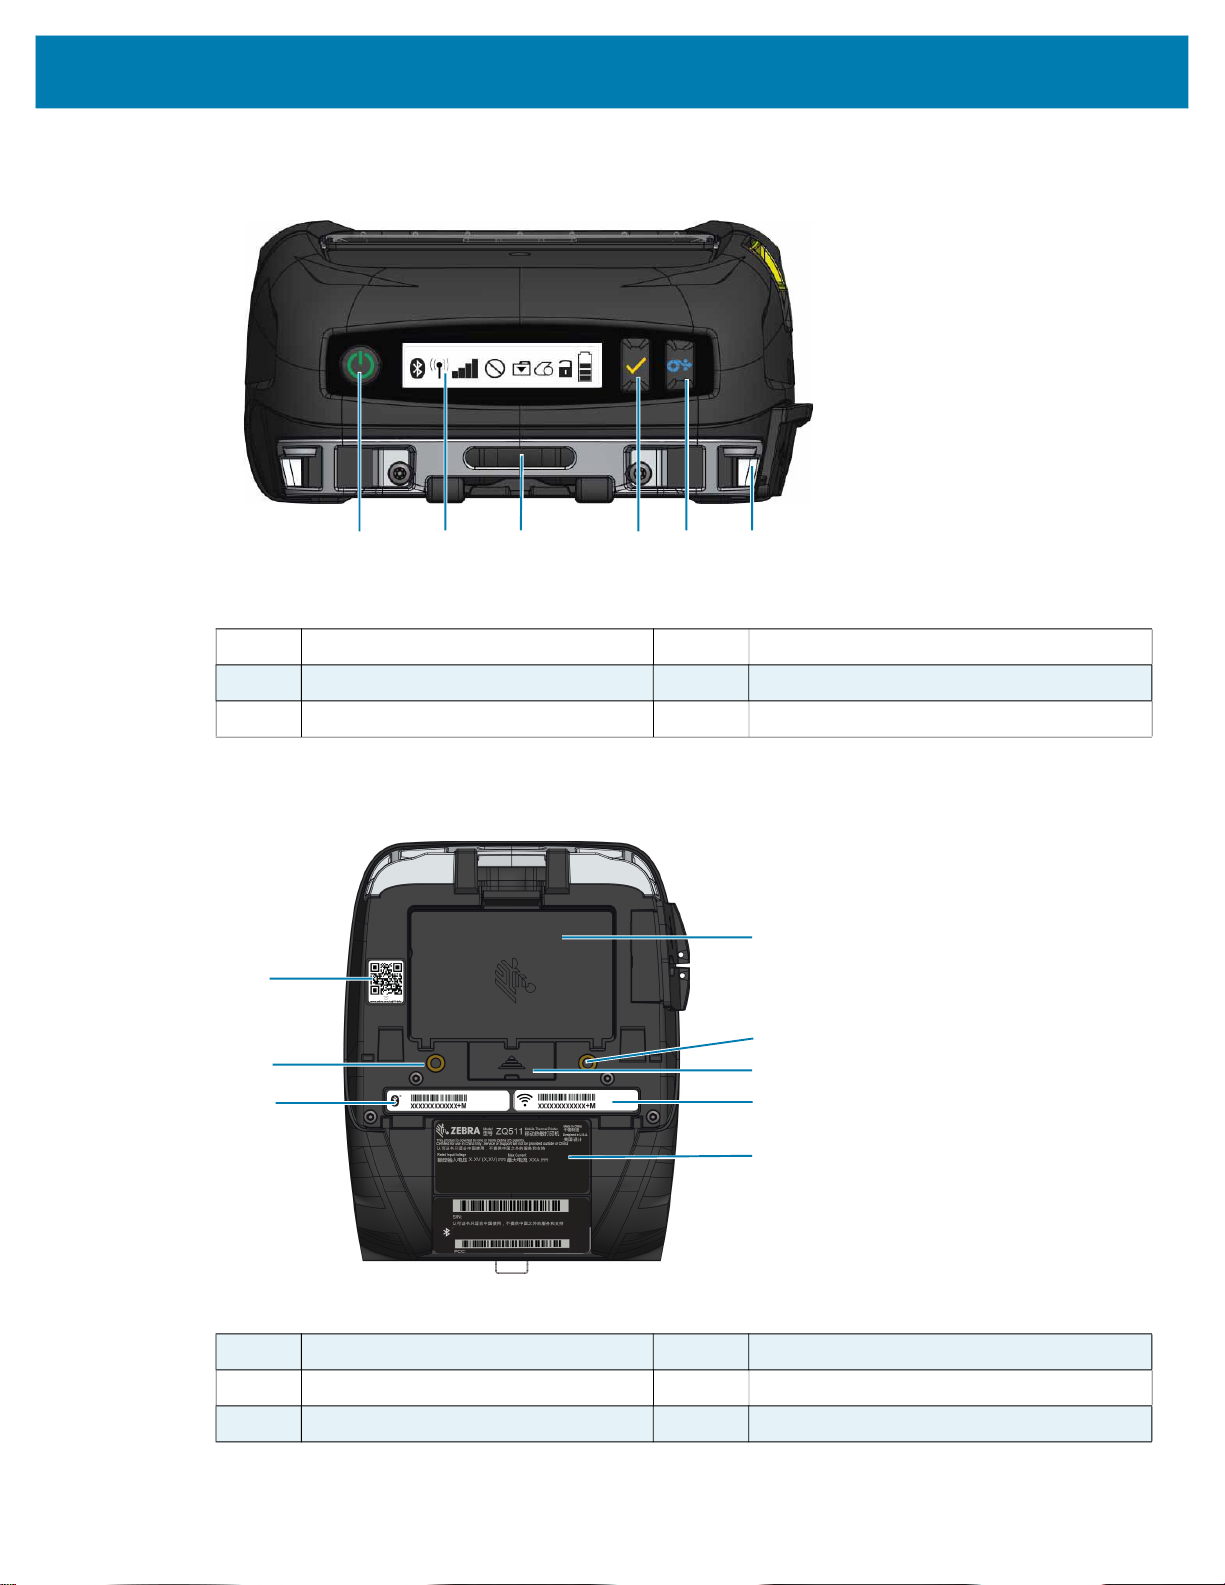
Figure 3 Printer Front Features
Printer Overview
11
11 Power button 14 Select button
12 Control panel 15 Paper feed button
13 Belt clip opening 16 Strap post
Figure 4 Printer Bottom Features
22
18
20
12
13
14
15
16
17
18
19
20
21
17 Battery 20 MAC address/Bluetooth ID
18 Mounting points 21 Serial labels
19 Docking contacts cover 22 QR code
16
Using the Printer
Preparing the Battery for Use
Installing/Removing Battery and Battery Tape Insulator
IMPORTANT: Batteries are shipped in sleep mode to preserve their maximum capacity while in storage
prior to initial use. The battery needs an initial charging to wake it up before using for the first time. (See
Charging the Battery on page 21.)
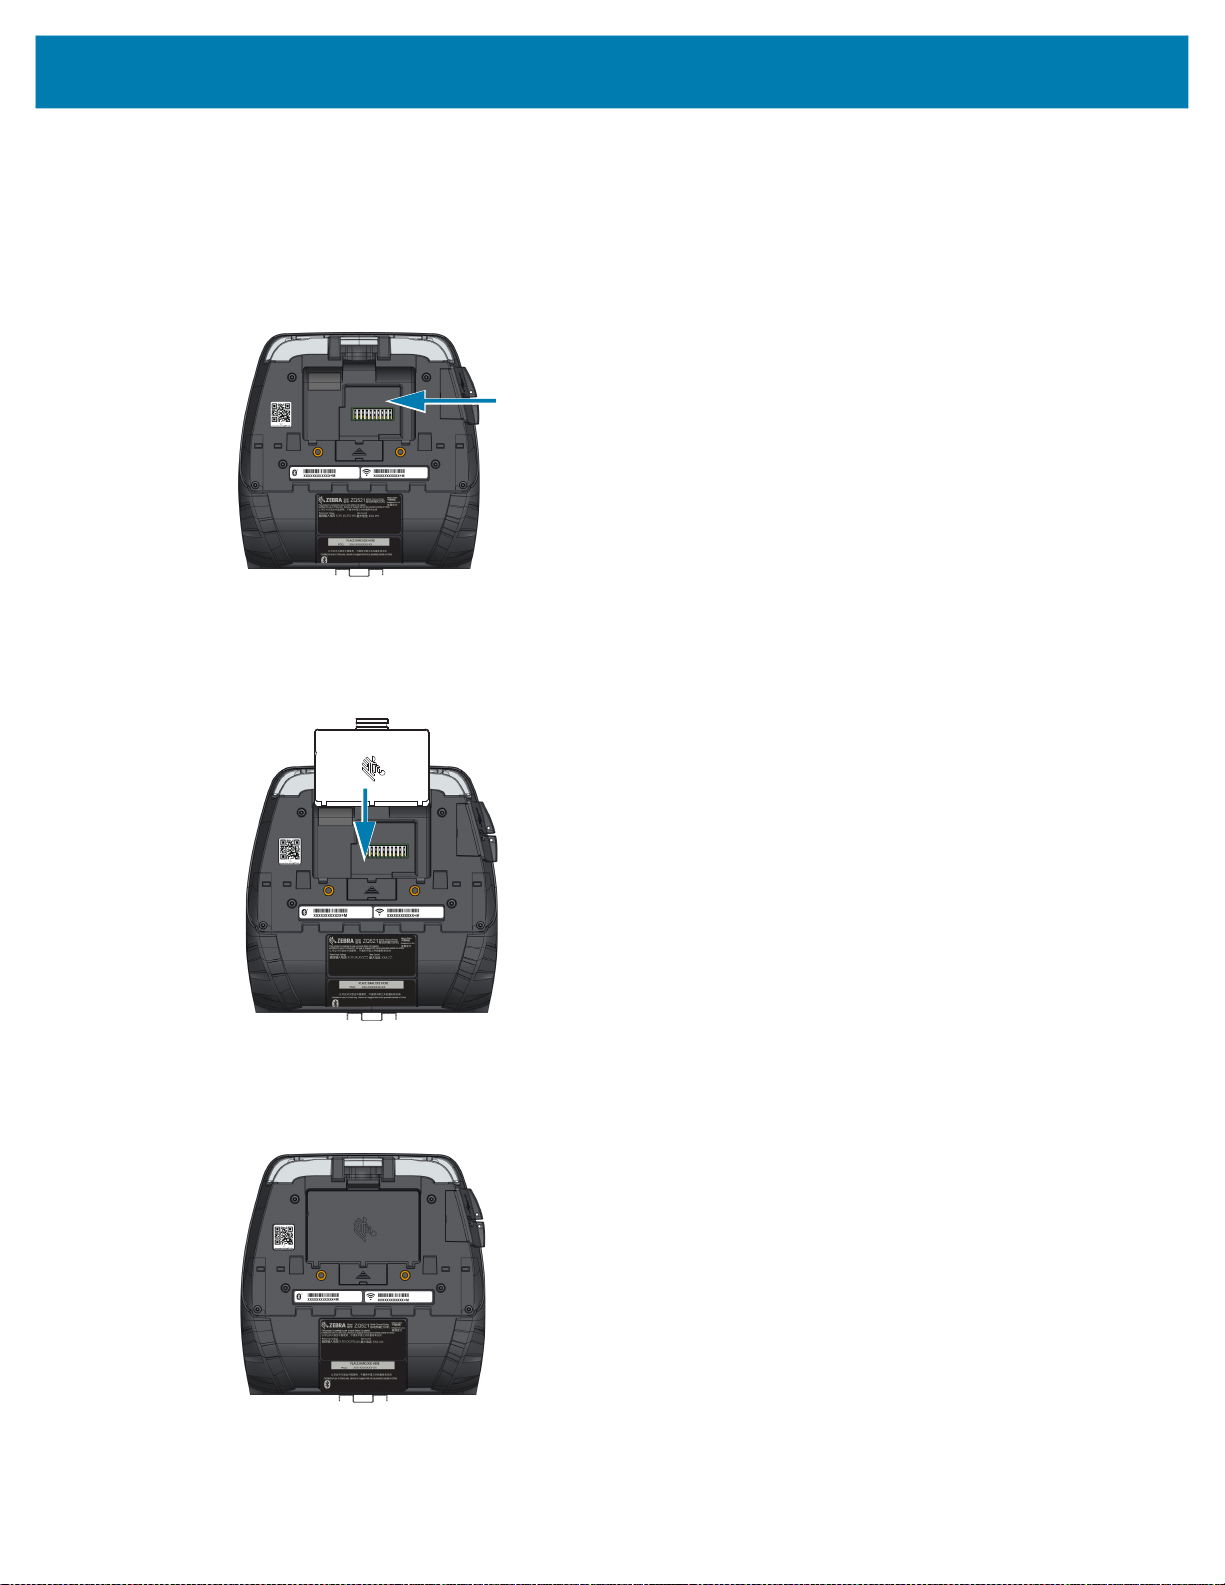
Removing the Battery
1. If a belt clip is present on the bottom of the printer, rotate it such that it provides clearance for the
battery.
2. Depress the latch on the battery pack (Figure 5).
Figure 5 Battery Latch
17

Using the Printer
Rotate the battery pack forward and lift it up and out of the battery well (Figure 6).
3.
Figure 6 Removing Battery
Removing the Battery Tape Insulator
CAUTION: The battery can explode, leak or catch fire if improperly charged or exposed to high
temperature. Do not disassemble, crush, puncture, short external contacts or dispose of in fire or water.
Charge on a Zebra approved Lithium-Ion charger only.
1. Pull up on the tape insulator tab located on the bottom of the battery pack.
2. Peel back the tape insulator and remove it from the top of the battery pack. Discard upon removal.
Figure 7 Removing Battery Tape Insulator
18

Battery Safety
CAUTION: Avoid accidental short circuiting of any battery. Allowing battery terminals to contact conductive
material will create a short circuit which could cause burns and other injuries or could start a fire.
IMPORTANT: Always refer to the Important Safety Information data sheet shipped with each printer and
the Technical Bulletin shipped with each battery pack. These documents detail procedures to ensure
maximum reliability and safety while using this printer.
IMPORTANT: Always dispose of used batteries properly. Refer to Product Disposal on page 69 for more
battery recycling information.
CAUTION: Use of any charger not approved specifically by Zebra for use with its batteries could cause
damage to the battery pack or the printer and will void the warranty.
CAUTION: Do not incinerate, disassemble, short circuit, or expose to temperatures higher than 65°C
(149°F).
Using the Printer
19
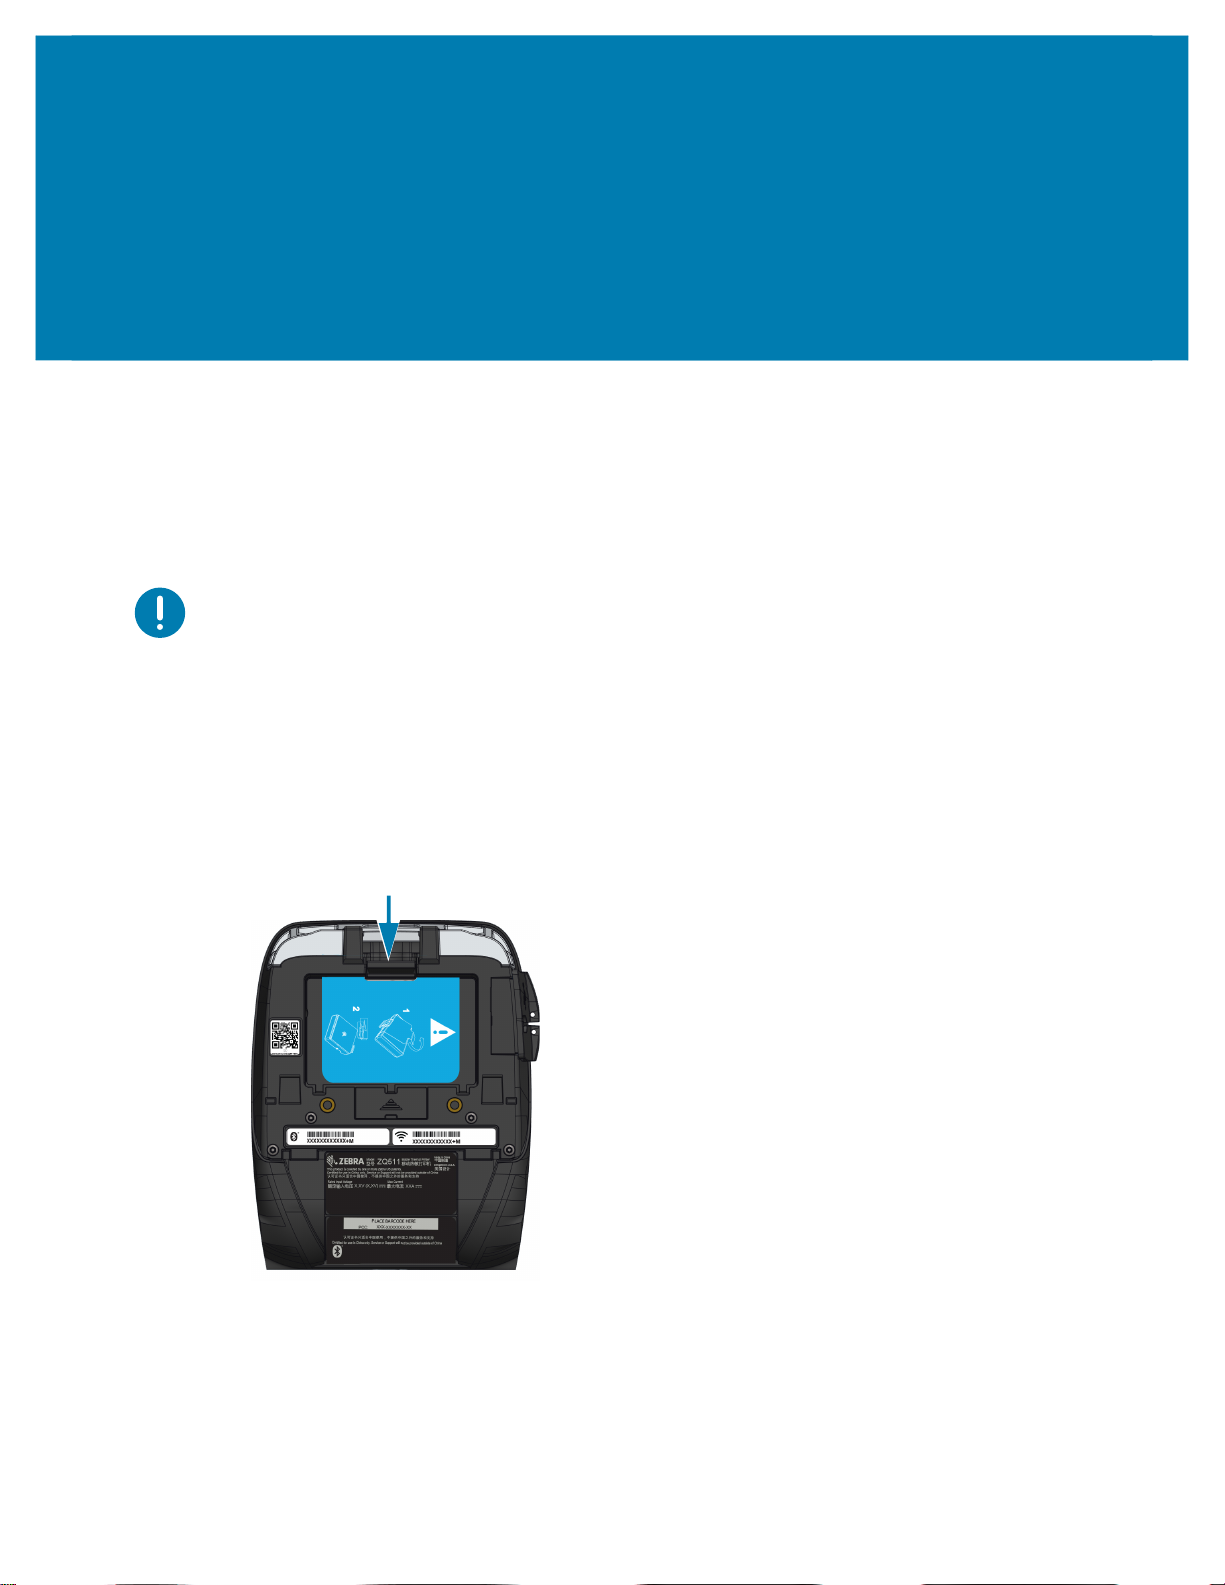
Installing the Battery
1. Locate the battery compartment on the bottom of the printer (Figure 8).
2. Swivel the belt clip (if present) to access the battery compartment.
Figure 8 Battery Compartment
3. Insert the battery into the printer as shown. (It is not possible to insert the pack in the incorrect
orientation.)
Using the Printer
Figure 9 Battery Insertion
4. Rotate the battery into the compartment until it locks in place and is sitting flush in the printer.
Figure 10 Battery Installed
20
Charging the Battery
CAUTION: Do not place any charger in locations where liquids or metallic objects may be dropped into the
charging bays.
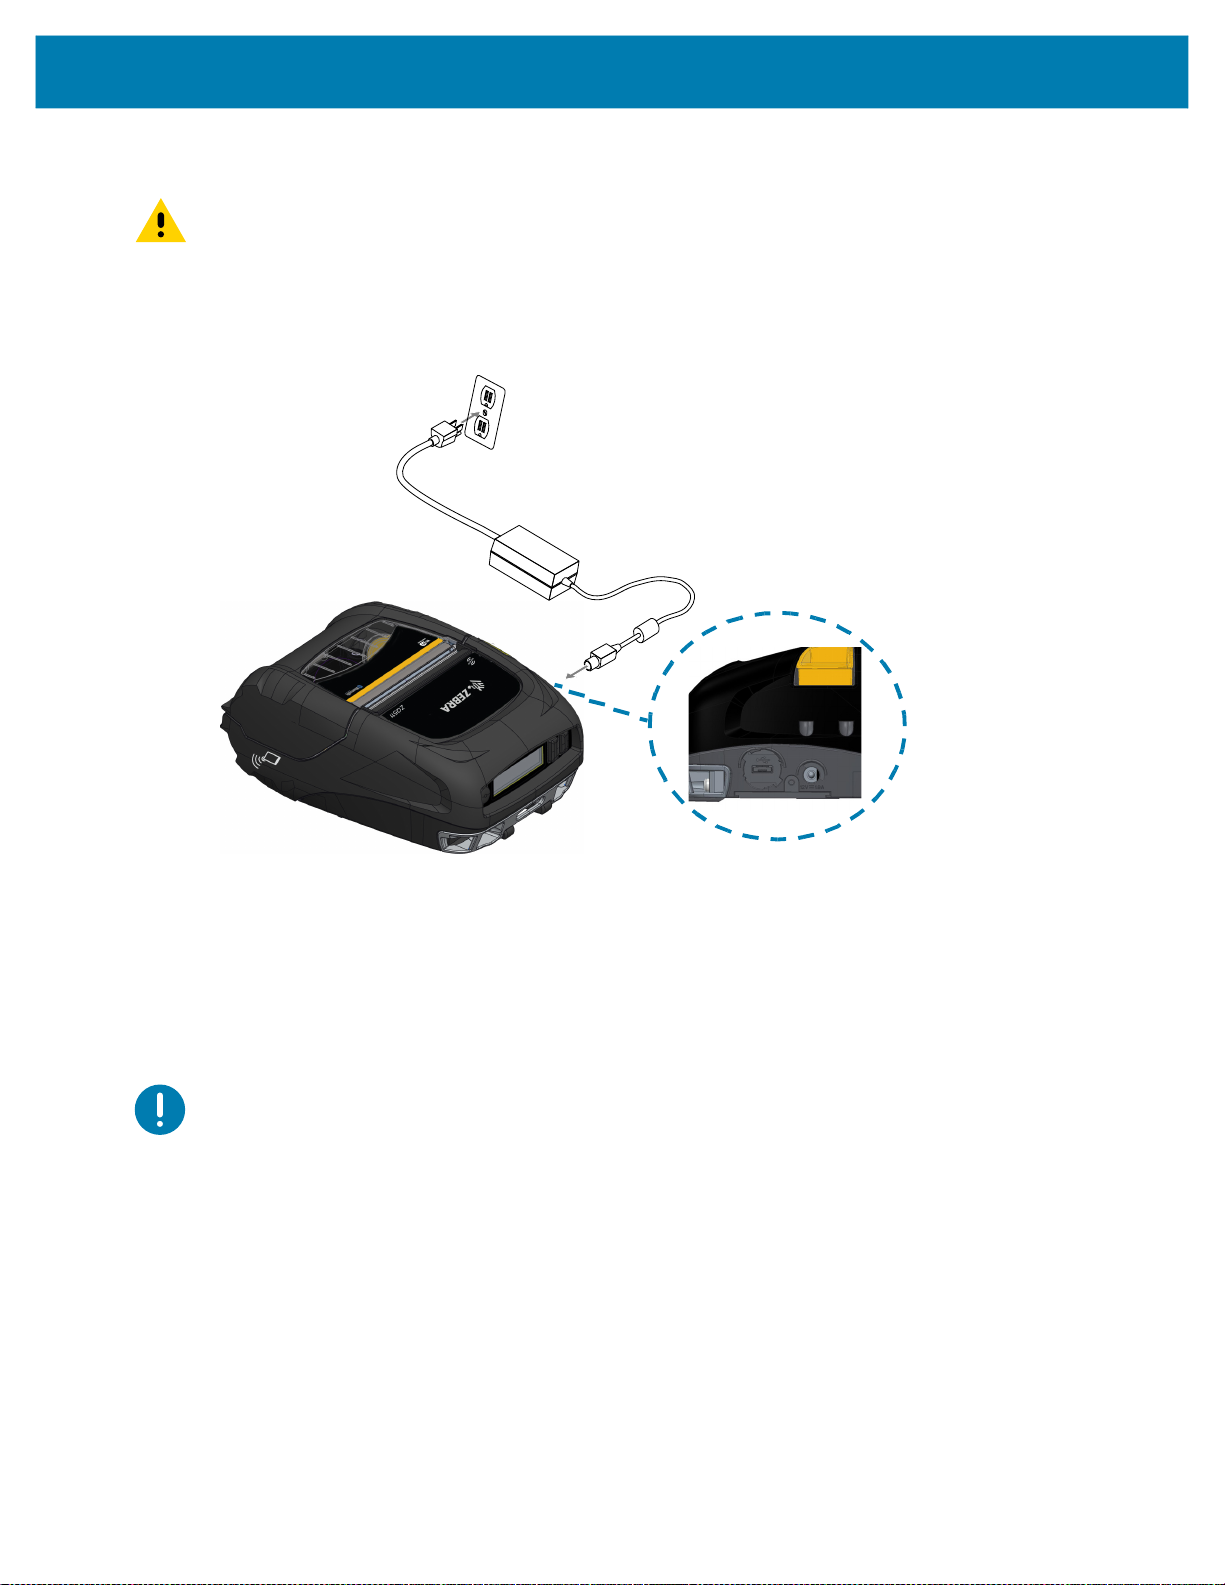
AC Power Adapter
Figure 11 AC Power Adapter Charging
AC Power Cord
(varies with
geographic location)
Using the Printer
AC Adapter
DC Input
1. Open the protective cover on the printer to expose the DC input charger jack.
2. Connect the appropriate AC power cord for your location to the adapter and then plug the power cord
into an AC receptacle.
3. Plug the barrel plug from the AC adapter into the charger jack on the printer.
4. The printer powers up and begins charging. The printer can be left on or turned off at this point.
Charging continues in either state.
IMPORTANT: While it is possible to charge the battery when using the printer, charge times will increase
under this condition.
21
Vehicle Cradle
The Vehicle Cradle provides a means to mount a printer in a vehicle while at the same time providing
charging power to the battery. The Vehicle Cradle features USB connectivity to allow the user to connect a
laptop or tablet to the cradle.
Figure 12 Vehicle Cradle
Using the Printer
Docking
Contacts
Docking the Printer Removing the Printer
Battery Eliminator/Battery Eliminator Vehicle Cradle
The Battery Eliminator Vehicle Cradle enables the user to mount a ZQ511 or ZQ521 printer in a vehicle
without the use of a battery.
4-Bay Power Station
The 4-Bay Power Station allows a total of four printers to be docked and charged. The Power Station
provides battery charging power while still maintaining all of the printer’s functionality.
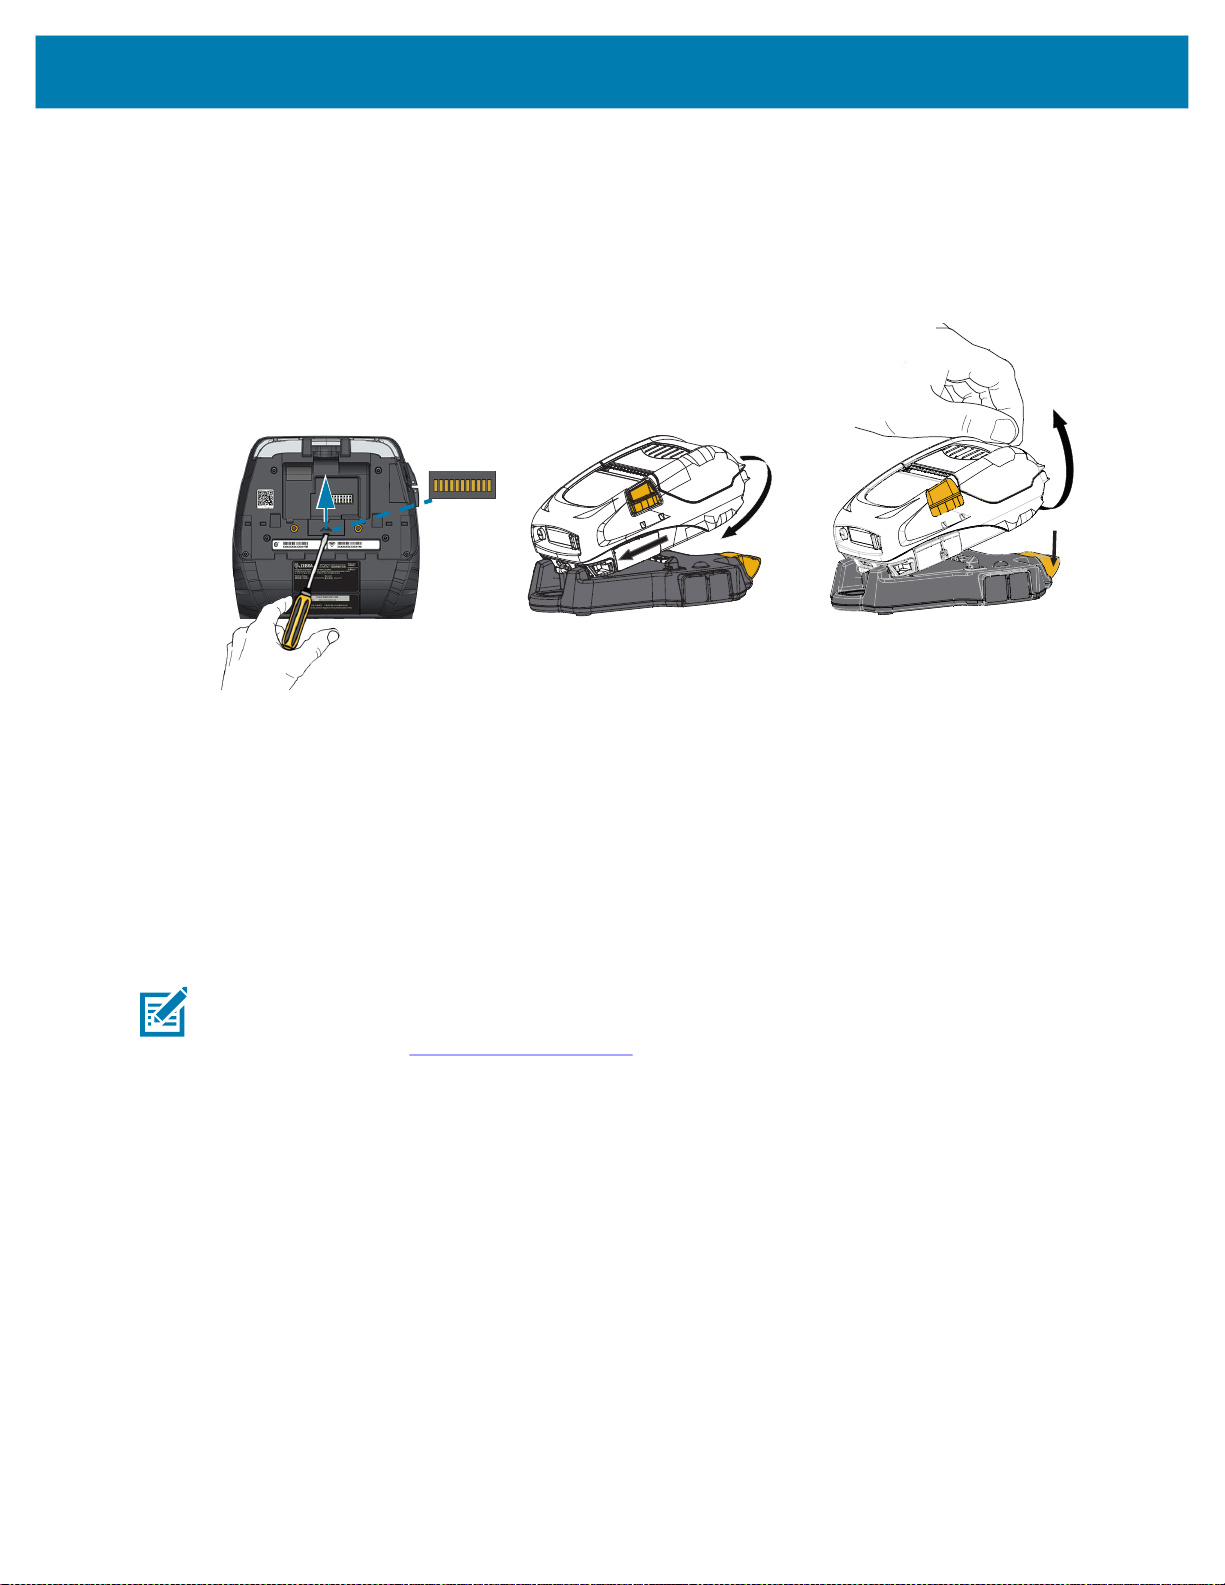
NOTE: For detailed information on accessories, refer to the ZQ500 Series VC User Guide, the ZQ500
Series 4-Bay Power Station User Guide, the Battery Eliminator User Guide, and the Battery Eliminator
Cradle User Guide at www.zebra.com/manuals
Before docking the printer on either the Vehicle Cradle or the 4-Bay Power Station, you must remove the
docking contacts cover located on the bottom of the printer. To remove the cover, first remove the battery,
and then use a small screwdriver or coin to detach the cover and expose the docking contacts.
.
22
Loading...