


 Loading...
ET5X
Enterprise Tablet
Integrator Guide for Windows 10
MN-002941-03
ET5X INTEGRATOR GUIDE FOR WINDOWS 10
MN-002941-03
Rev. A
December 2017

ii ET5X Integrator Guide for Windows 10
No part of this publication may be reproduced or used in any form, or by any electrical or mechanical means, without permission in writing from Zebra. This includes electronic or mechanical means, such as photocopying, recording, or information storage and retrieval systems. The material in this manual is subject to change without notice.
The software is provided strictly on an “as is” basis. All software, including firmware, furnished to the user is on a licensed basis. Zebra grants to the user a non-transferable and non-exclusive license to use each software or firmware program delivered hereunder (licensed program). Except as noted below, such license may not be assigned, sublicensed, or otherwise transferred by the user without prior written consent of Zebra. No right to copy a licensed program in whole or in part is granted, except as permitted under copyright law. The user shall not modify, merge, or incorporate any form or portion of a licensed program with other program material, create a derivative work from a licensed program, or use a licensed program in a network without written permission from Zebra. The user agrees to maintain Zebra’s copyright notice on the licensed programs delivered hereunder, and to include the same on any authorized copies it makes, in whole or in part. The user agrees not to decompile, disassemble, decode, or reverse engineer any licensed program delivered to the user or any portion thereof.
Zebra reserves the right to make changes to any software or product to improve reliability, function, or design.
Zebra does not assume any product liability arising out of, or in connection with, the application or use of any product, circuit, or application described herein.
No license is granted, either expressly or by implication, estoppel, or otherwise under any Zebra Technologies Corporation, intellectual property rights. An implied license only exists for equipment, circuits, and subsystems contained in Zebra products.

iii
Revision History
Changes to the original guide are listed below:
Change |
Date |
Description |
|
|
|
|
|
-01 |
Rev A |
3/2017 |
Initial release. |
|
|
|
|
-02 |
Rev. A |
7/2017 |
Update battery charge times, update Expansion Back installation procedures, add |
|
|
|
new power supply part numbers. |
|
|
|
|
-03 |
Rev.A |
12/2017 |
Remove reference to CCX V4 from specifications. Add Cold Boot procedure. |
|
|
|
|
|
|
|
|
|
|
|
|

iv ET5X Integrator Guide for Windows 10

TABLE OF CONTENTS
Revision History.................................................................................................................................... |
iii |
About This Guide |
|
Introduction ........................................................................................................................................... |
ix |
Documentation Set ......................................................................................................................... |
ix |
Configurations....................................................................................................................................... |
ix |
Chapter Descriptions ............................................................................................................................ |
x |
Notational Conventions......................................................................................................................... |
x |
Related Documents and Software ........................................................................................................ |
xi |
Service Information............................................................................................................................... |
xi |
Chapter 1: Getting Started |
|
Introduction .......................................................................................................................................... |
1-1 |
Unpacking ............................................................................................................................................ |
1-1 |
Getting Started ..................................................................................................................................... |
1-1 |
Installing a micro SIM Card (ET55 Only) ....................................................................................... |
1-1 |
Charging the ET5X ........................................................................................................................ |
1-5 |
Restarting the ET5X ............................................................................................................................ |
1-5 |
Performing a Cold Boot ....................................................................................................................... |
1-6 |
Chapter 2: Accessories |
|
Introduction .......................................................................................................................................... |
2-1 |
Charge Only Cradle ............................................................................................................................. |
2-4 |
Installing the Insert ......................................................................................................................... |
2-5 |
Charging the ET5X ........................................................................................................................ |
2-5 |
Communication and Charging Cradle .................................................................................................. |
2-8 |
Installing the Insert ......................................................................................................................... |
2-9 |
Charging the ET5X ........................................................................................................................ |
2-9 |
Rugged Communication and Charging Cradle .................................................................................... |
2-12 |
Charging the ET5X ........................................................................................................................ |
2-13 |
4-Slot Charge Only Cradle ................................................................................................................... |
2-16 |

vi ET5X Integrator Guide for Windows 10
Insert Installation ............................................................................................................................ |
2-16 |
Guide Installation ........................................................................................................................... |
2-17 |
Battery Charger Installation ........................................................................................................... |
2-19 |
Power Setup .................................................................................................................................. |
2-20 |
Insert Tablet into Slot ..................................................................................................................... |
2-20 |
ET5X without Rugged Frame ................................................................................................... |
2-20 |
ET5X with Rugged Frame ........................................................................................................ |
2-21 |
Charging th Battery ........................................................................................................................ |
2-22 |
6ORW %DWWHU\ &KDUJHU
Rugged Frame ..................................................................................................................................... |
2-26 |
Expansion Back ................................................................................................................................... |
2-29 |
Installation ...................................................................................................................................... |
2-29 |
Programming the SE4710/SE4750 Expansion Backs ................................................................... |
2-31 |
HID Keyboard Emulation Bar Code ............................................................................................... |
2-31 |
Replacement Hand Strap ............................................................................................................... |
2-31 |
Attaching the Stylus to the Expansion Back .................................................................................. |
2-35 |
Removal ......................................................................................................................................... |
2-36 |
Chapter 3: Software |
|
Introduction .......................................................................................................................................... |
3-1 |
Factory Reset ...................................................................................................................................... |
3-1 |
System Updates .................................................................................................................................. |
3-2 |
Creating Installation USB Thumb Drive ......................................................................................... |
3-2 |
Setup Using Communication Dock ................................................................................................ |
3-4 |
Setup Using a USB Hub ................................................................................................................ |
3-4 |
Updating the Operating System ..................................................................................................... |
3-5 |
Checking Versions ............................................................................................................................... |
3-9 |
Check ULPMC Version .................................................................................................................. |
3-9 |
Check BIOS Version ...................................................................................................................... |
3-10 |
Check Operating System Version .................................................................................................. |
3-10 |
Data Capture Application Development ............................................................................................... |
3-11 |
Application Installation ......................................................................................................................... |
3-11 |
Install from the Internet .................................................................................................................. |
3-11 |
Windows Store ............................................................................................................................... |
3-11 |
Chapter 4: Maintenance and Troubleshooting |
|
Introduction .......................................................................................................................................... |
4-1 |
Maintaining the ET5X .......................................................................................................................... |
4-1 |
Battery Safety Guidelines .................................................................................................................... |
4-1 |
Cleaning ............................................................................................................................................... |
4-2 |
Materials Required ......................................................................................................................... |
4-2 |
Cleaning the ET5X ......................................................................................................................... |
4-2 |
Housing .................................................................................................................................... |
4-2 |
Display ..................................................................................................................................... |
4-3 |
Power Connector ..................................................................................................................... |
4-3 |
Cleaning Cradle Connectors .......................................................................................................... |
4-3 |
Cleaning Expansion Back Connectors ........................................................................................... |
4-3 |
Cleaning Frequency ....................................................................................................................... |
4-4 |
Table of Contents |
vii |
|
|
Troubleshooting ................................................................................................................................... |
4-5 |
ET5X .............................................................................................................................................. |
4-5 |
Charge Only Cradle ....................................................................................................................... |
4-6 |
Communication and Charging Cradles .......................................................................................... |
4-6 |
Expansion Backs ........................................................................................................................... |
4-7 |
Appendix A: Specifications |
|
Technical Specifications ...................................................................................................................... |
A-1 |
ET5X .............................................................................................................................................. |
A-1 |
SE4710 Expansion Back Decode Range ............................................................................................ |
A-4 |
SE4750 Expansion Back Decode Range ............................................................................................ |
A-5 |
SE4750 SR Decode Ranges ......................................................................................................... |
A-5 |
SE4750 MR Decode Ranges ......................................................................................................... |
A-6 |
Accessory Specifications ..................................................................................................................... |
A-7 |
Charge Only Cradle ....................................................................................................................... |
A-7 |
Communication and Charging Cradle ............................................................................................ |
A-7 |
Rugged Communication and Charging Cradle .............................................................................. |
A-8 |
Expansion Backs ........................................................................................................................... |
A-8 |

viii ET5X Integrator Guide for Windows 10
ABOUT THIS GUIDE
Introduction
This guide provides information about configuring and setting up the ET5X and accessories.
NOTE Screens and windows pictured in this guide are samples and can differ from actual screens.
Documentation Set
The documentation set for the ET5X is divided into guides that provide information for specific user needs.
•ET5X Quick Reference Guide - describes how to get the ET5X tablet up and running.
•ET5X User Guide - describes how to use the ET5X tablet.
•ET5X Integrator Guide - describes how to setup, the ET5X and accessories.
Configurations
This guide covers the following configurations:
Configuration |
Operating |
Radios |
Display |
Memory |
Data Capture |
|
System |
||||||
|
|
|
|
|
||
ET50NE |
Windows® 10 Pro |
WLAN: 802.11a/b/g/n |
8” color |
4 GB RAM/ |
Optional SE4710 or |
|
|
|
WPAN: Bluetooth |
|
64 GB Flash |
SE4750 Expansion |
|
|
|
|
|
|
Backs |
|
|
|
|
|
|
|
|
ET55AE |
Windows® 10 Pro |
WLAN: 802.11a/b/g/n |
8” color |
4 GB RAM/ |
Optional SE4710 or |
|
|
|
WPAN: Bluetooth |
|
64 GB Flash |
SE4750 Expansion |
|
|
|
WWAN: NA - LTE |
|
|
Backs |
|
|
|
|
|
|
|
|
ET55RE |
Windows® 10 Pro |
WLAN: 802.11a/b/g/n |
8” color |
4 GB RAM/ |
Optional SE4710 or |
|
|
|
WPAN: Bluetooth |
|
64 GB Flash |
SE4750 Expansion |
|
|
|
WWAN: ROW - LTE |
|
|
Backs |
|
|
|
|
|
|
|

x ET5X Integrator Guide for Windows 10
Configuration |
Operating |
Radios |
Display |
Memory |
Data Capture |
|
System |
||||||
|
|
|
|
|
||
ET50NT |
Windows® 10 Pro |
WLAN: 802.11a/b/g/n |
10” color |
4 GB RAM/ |
Optional SE4710 or |
|
|
|
WPAN: Bluetooth |
|
64 GB Flash |
SE4750 Expansion |
|
|
|
|
|
|
Backs |
|
|
|
|
|
|
|
|
ET55AT |
Windows® 10 Pro |
WLAN: 802.11a/b/g/n |
10” color |
4 GB RAM/ |
Optional SE4710 or |
|
|
|
WPAN: Bluetooth |
|
64 GB Flash |
SE4750 Expansion |
|
|
|
WWAN: NA - LTE |
|
|
Backs |
|
|
|
|
|
|
|
|
ET55RT |
Windows® 10 Pro |
WLAN: 802.11a/b/g/n |
10” color |
4 GB RAM/ |
Optional SE4710 or |
|
|
|
WPAN: Bluetooth |
|
64 GB Flash |
SE4750 Expansion |
|
|
|
WWAN: ROW - LTE |
|
|
Backs |
|
|
|
|
|
|
|
Chapter Descriptions
Topics covered in this guide are as follows:
•Chapter 1, Getting Started, provides information on getting the tablet up and running for the first time.
•Chapter 2, Accessories, describes the accessories available for the tablet and how to use the accessories with the tablet.
•Chapter 3, Software, explains how to use the tablet. This includes instructions for powering on and resetting the tablet, entering and capturing data.
•Chapter 4, Maintenance and Troubleshooting, includes instructions on cleaning and storing the tablet, and provides troubleshooting solutions for potential problems during tablet operation.
•Appendix A, Specifications, includes a table listing the technical specifications for the tablet.
Notational Conventions
The following conventions are used in this document:
•“tablet” refers to the Zebra ET5X tablet.
•Italics are used to highlight the following:
•Chapters and sections in this guide
•Related documents
•Bold text is used to highlight the following:
•Dialog box, window and screen names
•Drop-down list and list box names
•Check box and radio button names
•Icons on a screen
•Key names on a keypad
•Button names on a screen.
•Bullets (•) indicate:
•Action items
•Lists of alternatives
•Lists of required steps that are not necessarily sequential.

About This Guide |
xi |
|
|
• Sequential lists (e.g., those that describe step-by-step procedures) appear as numbered lists.
Related Documents and Software
The following documents provide more information about the ET5X tablets.
•ET5X Quick Reference Guide, p/n MN001844Axx
•ET5X User Guide for Microsoft Windows 10, p/n MN-002940-xx
For the latest version of this guide and all guides, go to: http://www.zebra.com/support.
Service Information
If you have a problem with your equipment, contact Zebra Global Customer Support for your region. Contact information is available at: http://www.zebra.com/support.
When contacting support, please have the following information available:
•Serial number of the unit
•Model number or product name
•Software type and version number.
Zebra responds to calls by email, telephone or fax within the time limits set forth in support agreements.
If your problem cannot be solved by Zebra Customer Support, you may need to return your equipment for servicing and will be given specific directions. Zebra is not responsible for any damages incurred during shipment if the approved shipping container is not used. Shipping the units improperly can possibly void the warranty.
If you purchased your Zebra business product from a Zebra business partner, contact that business partner for support.

xii ET5X Integrator Guide for Windows 10

CHAPTER 1 GETTING STARTED
Introduction
This chapter explains how to set the device up for the first time.
Unpacking
Carefully remove all protective material from around the ET5X and save the shipping container for later storage and shipping.
Verify that you received all equipment listed below:
•Table with lithium-ion battery
•Quick Reference Guide.
Inspect the equipment for damage. If you are missing any equipment or if you find any damaged equipment, contact the Zebra Support Center immediately. See page xi for contact information.
Getting Started
In order to start using the ET5X for the first time:
•install the micro SIM Card (ET55 only)
•install microSD card (optional)
•start the ET5X
•configure the ET5X.
Installing a micro SIM Card (ET55 Only)
CAUTION Do not use nano to micro SIM card adapters.

1 - 2 ET5X Integrator Guide for Windows 10
To install a micro SIM card:
1.Press the Power button to turn off the ET55.
2.Lift the notched corner of the battery cover.
Figure 1-1 Removing the Battery Cover
3.Carefully lift the battery cover off the ET55.
4.On the 8” version, push the two locking tabs up, then pull up on the tab to remove battery.
On the 10” version, push the two locking tabs up (1), then, using index fingers, lift the battery up (2).
Pull Tab
Locking Tabs
8” Version
Figure 1-2 Removing the Battery - 8”

Getting Started 1 - 3
Locking Tabs
2. |
|
LIFT |
UP |
|
1. |
|
REL |
|
EA |
|
S |
|
E |
|
LO |
|
C |
|
KING |
1.RELEA 
 SELOCK
  ING
ING 
2.LIFTU P
10” Version
Figure 1-3 Removing the Battery - 10”
5.Insert the micro SIM card with contacts facing down.
8” Version |
10” Version |
Figure 1-4 Insert SIM Card
6.Push the SIM card in and ensure that it locks into place.
7.Replace the battery.
On the 10” version, ensure that the two battery latches engage.

1 - 4 ET5X Integrator Guide for Windows 10
Figure 1-5 Insert Battery
CAUTION Be aware of the orientation of the battery cover. Failure to replace the battery cover properly may damage the battery cover.
8.Align the tabs on the underside of the cover with the slot around the battery well. Make sure that the notch on the battery cover is at the bottom left cover of the ET5X.
Figure 1-6 Align Battery Cover
9.Carefully press down around the edge of the cover. Make sure that the cover is seated properly.

Getting Started 1 - 5
Figure 1-7 Press Down on Battery Cover
10. Press Power button to turn on the ET55.
Charging the ET5X
Use the one of the available accessories to charge the ET5X. See Chapter 2, Accessories for charging accessories.
The 8” tablet main battery charges from fully depleted to 90% in approximately 2.5 hours and from fully depleted to 100% in approximately 3.5 hours.
The 10” tablet main battery charges from fully depleted to 90% in approximately three hours and from fully depleted to 100% in approximately four hours.
NOTE The Charging indicator only illuminates when the ET5X is connected to AC power.
Table 1-1 Charging Indicator
LED |
Indication |
|
|
Off |
ET5X is not in cradle. ET5X is not seated properly. Cradle is not powered. |
|
|
Orange |
ET5X is charging. |
|
|
Green |
Charging complete. |
|
Note: When the battery is initially inserted in the ET5X. |
|
|
Red |
Error in charging; check placement of the ET5X. |
|
|
Restarting the ET5X
If the ET5X is running slow or some applications are not functioning properly, reset the device:
1.Touch  .
.
2.Touch  > Reset.

1 - 6 ET5X Integrator Guide for Windows 10
3.The device restarts.
Performing a Cold Boot
If the ET5X does not respond to any input, perform a cold boot:
1.Press and hold the power button for at least 10 seconds. The ET5X shuts down.
2.Press the Power button to turn on the device.
CHAPTER 2 ACCESSORIES
Introduction
The ET5X accessories provide a variety of product support capabilities. Table 2-1 lists the accessories available.
Table 2-1 ET5X Accessories
Accessory |
Part Number |
Description |
|
|
|
Cradles |
|
|
|
|
|
Charge Only Cradle |
CRD-ET5X-1SCG1 |
Charges the ET5X main battery and optional Power |
|
|
Pack installed in the Expansion Back. Requires |
|
|
power supply PWR-BGA12V50W0WW, DC line |
|
|
cord CBL-DC-388A1-01 and country-specific AC |
|
|
line cord. |
|
|
|
Communication and |
CRD-ET5X-1SCOM1 |
Charges the ET5X main battery and optional Power |
Charging Cradle |
|
Pack installed in the Expansion Back. Requires |
|
|
power supply PWR-BGA12V50W0WW, DC line |
|
|
cord CBL-DC-388A1-01 and country-specific AC |
|
|
line cord. |
|
|
|
Rugged Communication and |
CRD-ET5X-1SCOM1R |
Charges the ET5X main battery and optional Power |
Charging Cradle |
|
Pack installed in the Expansion Back. Supports |
|
|
ET5X with rugged frame and rugged IO Adapter. |
|
|
Requires PWR-BGA12V50W0WW, DC line cord |
|
|
CBL-DC-388A1-01 and country-specific AC line |
|
|
cord. |
|
|
|
Chargers |
|
|
|
|
|
Power Supply |
PWR-BGA12V108W0WW |
Provides power to the 4-Slot Charge Only Cradle. |
|
|
|
Power Supply |
PWR-BGA12V50W0WW |
Provides power to the Charge Only Cradle, the |
|
|
Communication and Charging Cradles, the 4-Slot |
|
|
Battery Charger, and Rugged Charge Connector. |
|
|
|

2 - 2 ET5X Integrator Guide for Windows 10
Table 2-1 ET5X Accessories
Accessory |
Part Number |
Description |
|
|
|
6ORW %DWWHU\ &KDUJHU |
6$& (7 ; 33. |
&KDUJHUV XS WR IRXU 3RZHU 3DFNV 5HTXLUHV SRZHU |
|
|
VXSSO\ 3:5 %*$ 9 : :: '& /LQH FRUG |
|
|
&%/ '& $ DQG FRXQWU\ VSHFLILF $& OLQH |
|
|
FRUG |
|
|
|
5XJJHG &KDUJH &RQQHFWRU |
&+* (7 ; &%/ |
&KDUJHV WKH (7 ; PDLQ EDWWHU\ DQG RSWLRQDO |
|
|
3RZHU 3DFN LQVWDOOHG LQ WKH ([SDQVLRQ %DFN |
|
|
5HTXLUHV SRZHU VXSSO\ 3:5 %*$ 9 : :: |
|
|
'& /LQH &RUG &%/ '& $ DQG |
|
|
FRXQWU\ VSHFLILF $& OLQH FRUG |
|
|
|
Miscellaneous |
|
|
|
|
|
Replacement 8” Internal |
BTRY-ET5X-8IN1-01 |
Replacement battery for 8” tablet. |
Battery |
|
|
|
|
|
Replacement 10” Internal |
BTRY-ET5X-10IN1-01 |
Replacement battery for 10” tablet. |
Battery |
|
|
|
|
|
Replacement 8” Battery |
KT-ET5X-8BTDR1-01 |
Replacement battery cover for 8” tablet. |
Cover |
|
|
|
|
|
Replacement 10” Battery |
KT-ET5X-10BTDR1-01 |
Replacement battery cover for 10” tablet. |
Cover |
|
|
|
|
|
8” Rugged Frame with IO |
SG-ET5X-8RCSE1-02 |
Add extra protection for the 8” tablet and IO Adapter |
Adapter |
|
for connection to the Rugged Communication and |
|
|
Charging Cradle. |
|
|
|
10” Rugged Frame with IO |
SG-ET5X-10RCSE1-01 |
Add extra protection for the 10” tablet and IO |
Adapter |
|
Adapter for connection to the Rugged |
|
|
Communication and Charging Cradle. |
|
|
|
Replacement Rugged IO |
SG-ET5X-RGIO1-01 |
Replacement rugged IO connector for the Rugged |
Connector |
|
Frames. |
|
|
|
8” SE4750 Expansion Back |
ZBK-ET5X-8SCN5-01 |
Provides data capture using the SE4750 scan |
|
|
engine, rotating hand strap and slot for optional |
|
|
Power Pack. |
|
|
|
8” SE4710 Expansion Back |
ZBK-ET5X-8SCN1-01 |
Provides data capture using the SE4710 scan |
|
|
engine, rotating hand strap and slot for optional |
|
|
Power Pack. |
|
|
|
8” Expansion Back |
ZBK-ET5X-8RH1-01 |
Provides rotating hand strap and slot for optional |
|
|
Power Pack. |
|
|
|
10” SE4750 Expansion Back |
ZBK-ET5X-10SCN5-01 |
Provides data capture using the SE4750 scan |
|
|
engine, rotating hand strap and slot for optional |
|
|
Power Pack. |
|
|
|
10” SE4710 Expansion Back |
ZBK-ET5X-10SCN1-01 |
Provides data capture using the SE4710 scan |
|
|
engine, rotating hand strap and slot for optional |
|
|
Power Pack. |
|
|
|

|
|
|
Accessories 2 - 3 |
|
|
|
|
|
|
|
Table 2-1 ET5X Accessories |
|
|
|
|
|
|
|
|
|
Accessory |
Part Number |
Description |
|
|
|
|
|
|
|
10” Expansion Back |
ZBK-ET5X-10RH1-01 |
Provides rotating hand strap and slot for optional |
|
|
|
|
Power Pack. |
|
|
|
|
|
|
|
Power Pack |
BTRY-ET5X-PRPK1-01 |
Provides additional power for charging the ET5X |
|
|
|
|
battery using an Expansion Back. |
|
|
|
|
|
|
|
Active Stylus |
KT-ET5X-ASTY1-01 |
Provides easy writing, drawing, and navigation and |
|
|
|
|
accuracy with the thin tip and hovering capabilities. |
|
|
|
|
|
|
|
Replacement Expansion |
SG-ET5X-RHTP1-01 |
Replacement hands strap for Expansion Backs. |
|
|
Back Hand Strap |
|
|
|
|
|
|
|
|
|
Coiled Stylus Tether |
SG-ET5X-SLTETR-01 |
Secures a stylus to the hand strap on the Expansion |
|
|
|
|
Backs. |
|
|
|
|
|
|
|
10” Screen Protector |
KT-ET5X-10SCRN1-01 |
Provides additional screen protection for 10” tablet |
|
|
|
|
(5-pack). |
|
|
|
|
|
|
|
8” Screen Protector |
KT-ET5X-8SCRN1-01 |
Provides additional screen protection for 8” tablet |
|
|
|
|
(5-pack). |
|
|
|
|
|
|
|
10” Screen Protector |
KT-ET5X-8SCRN1-01 |
Provides additional screen protection for 10” tablet |
|
|
(Rugged Frame) |
|
with Rugged Frame (5-pack). |
|
|
|
|
|
|
|
8” Screen Protector (Rugged |
KT-ET5X-10SCRN1-02 |
Provides additional screen protection for 8” tablet |
|
|
Frame) |
|
with Rugged Frame (5-pack). |
|
|
|
|
|
|
|
8” Operations Case |
SG-ET5X-8HLST-01 |
Provides carrying solution for 8” tablet. |
|
|
|
|
|
|
|
10” Operations Case |
SG-ET5X-10HLST-01 |
Provides carrying solution for 10” tablet. |
|
|
|
|
|
|
|
Universal Shoulder Strap |
58-40000-007R |
Use with the 8” Operations Case and D-clips to |
|
|
|
|
carry tablet on shoulder. |
|
|
|
|
|
|

2 - 4 ET5X Integrator Guide for Windows 10
Charge Only Cradle
CAUTION Ensure that you follow the guidelines for battery safety described in Battery Safety Guidelines on page 4-1.
This section describes how to use a Charge Only Cradle with the ET5X. The Charge Only Cradle ships with an insert that must be installed when inserting an ET5X without the protective boot installed.
The Charge Only Cradle:
•Provides power for operating the ET5X.
•Charges the ET5X’s battery and optional Power Pack installed in an Expansion Back.
Guide Pins |
Charging Pins |
Small Insert |
Tall Insert |
Figure 2-1 Charge Only Cradle - Front View
Power Input
Figure 2-2 Charge Only Cradle - Rear View

Accessories 2 - 5
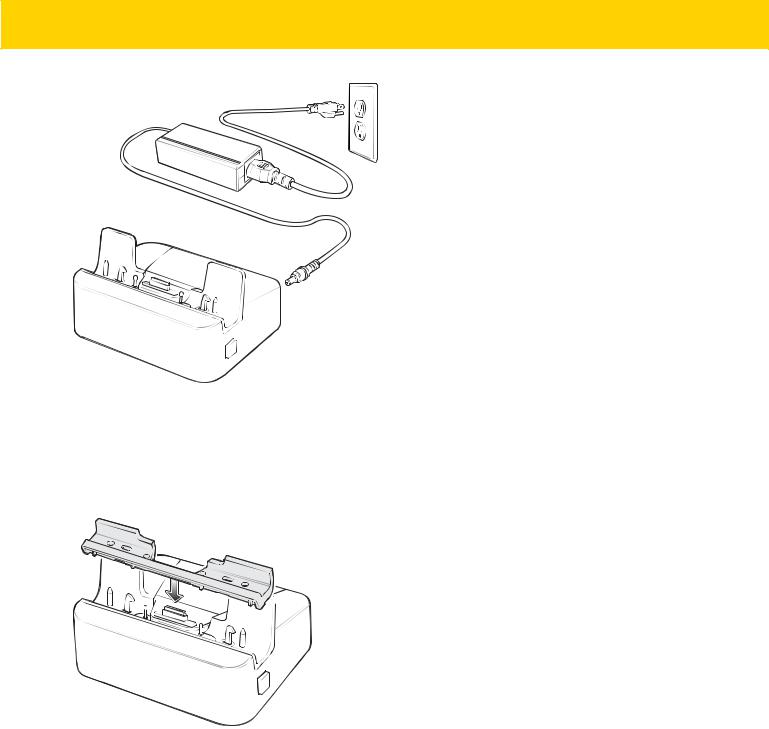
Figure 2-3 Charge Only Cradle - Setup
Installing the Insert
The insert must be installed onto the cradle when docking an ET5X without a protective boot.
1.Align the insert over the pins.
Figure 2-4 Align Insert with Cradle
2.Press the insert down until it seats flush in the cradle.
Charging the ET5X
To charge the ET5X in the Charge Only Cradle:
1.Align the ET5X with the alignment pins on the cradle.
2.Insert the ET5X into the cradle.

2 - 6 ET5X Integrator Guide for Windows 10
Figure 2-5 Insert ET5X into Charge Only Cradle
3.The ET5X Charging LED indicates charging.
4.To remove the ET5X from the Charge Only Cradle, hold the cradle down with one hand and lift the ET5X.
Figure 2-6 Remove ET5X from Charge Only Cradle

Accessories 2 - 7
Charge batteries in ambient temperatures from 0°C to 40°C (32°F to 104°F) as reported by the battery. Charging is intelligently controlled by the charger. To accomplish this, for small periods of time, the charger alternately enables and disables battery charging to keep the battery at acceptable temperatures.
The ET5X’s amber charge LED shows the status of the battery charging in the ET5X. See Table 1-1 on page 1-5 for charging status indications.
The 8” tablet main battery charges from fully depleted to 90% in approximately 2.5 hours and from fully depleted to 100% in approximately 3.5 hours.
The 10” tablet main battery charges from fully depleted to 90% in approximately three hours and from fully depleted to 100% in approximately four hours.
NOTE The Charging indicator only illuminates when the ET5X is connected to AC power.
Table 2-2 Charging Indicator
LED |
Indication |
|
|
Off |
ET5X is not in cradle. ET5X is not seated properly. Cradle is not powered. |
|
|
Orange |
ET5X is charging. |
|
|
Green |
Charging complete. |
|
|
Red |
Error in charging; check placement of the ET5X. |
|
|

2 - 8 ET5X Integrator Guide for Windows 10
Communication and Charging Cradle
CAUTION Ensure that you follow the guidelines for battery safety described in Battery Safety Guidelines on page 4-1.
This section describes how to use a Communication and Charing Cradle with the ET5X.
The Communication and Charging cradle:
•Provides power for operating the ET5X.
•Provides ports for connecting USB devices to the tablet, video output and connection to a LAN.
•Charges the ET5X’s battery and optional Power Pack installed in an Expansion Back.
Docking
Connector
Guide Pins Charging |
Locking |
Release |
Short Insert |
Tall Insert |
Pins |
Latches |
Button |
|
|
|
|
Figure 2-7 Communication and Charging Cradle - Front View
Power Input USB 3.0 Ports HDMI Port LAN (RJ45) Port
Figure 2-8 Communication and Charging Cradle - Rear View
Accessories 2 - 9
Figure 2-9 Communication and Charging Cradle - Setup
Installing the Insert
The insert must be installed onto the cradle when docking an ET5X without a protective boot.
1.Align the insert over the pins.
Figure 2-10 Align Insert with Cradle
2.Press the insert down until it seats flush in the cradle.
Charging the ET5X
To charge the ET5X in the Communication and Charging Cradle:
1.Open the bottom access door and hold it to the back of the tablet.
2.Align the ET5X with the alignment pins on the cradle.
3.Insert the ET5X into the cradle. Note that the Communication and Charging Cradles contains a locking mechanism that locks the ET5X to the cradle.
Loading...