


 Loading...
L10 Platform for the XSLATE™ and XPAD™ Tablets
Models iX101L1 and iX10101L2
User Guide
© 2003–2018 Xplore Technologies Corporation of America. All rights reserved.
This document contains information protected by copyright. No part of this document may be reproduced in any form without written consent from Xplore Technologies®corporation.
The information in this document is provided “as is” and is subject to change without notice. Xplore Technologies is not liable for errors or omissions in this document.
Xplore, Motion by Xplore, View Anywhere, and QuickNav are trademarks or registered trademarks of Xplore Technologies Corporation of America in the U.S.A. and other countries.
Acrobat is a registered trademark of Adobe Systems Incorporated.
Bluetooth is a registered trademark owned by the Bluetooth SIG, Inc., U.S.A. and licensed to Xplore Technologies Corporation of America.
Intel, Intel Atom, Core, vPro, and Centrino are trademarks or registered trademarks of Intel Corporation or its subsidiaries in the United States and other countries.
Android, Google, Google Play, and other marks are trademarks or registered trademarks of Google Inc. in the United States and/or other countries.
Windows, Windows Journal, and Skype and other marks are trademarks or registered trademarks of Microsoft Corporation.
Corning and Gorilla Glass are registered trademarks of Corning Incorporated.
Qualcomm, Gobi, and Gobi 5000 are trademarks or registered trademarks of Qualcomm Incorporated.
Wi-Fi is a registered trademark of the Wi-Fi Alliance.
Kensington and MicroSaver are registered trademarks of the Kensington Technology Group.
HDMI, the HDMI logo, and High-Definition Multimedia Interface are trademarks of HDMI Licensing LLC in the United States and other countries.
This product incorporates copy protection technology that is protected by U.S. and foreign patents, including patent numbers 5,315,448 and 6,836,549, and other intellectual property rights. The use of the Macrovision copy protection technology in the product must be authorized by Rovi Corporation. Reverse engineering or disassembly is prohibited.
Xplore Technologies Corporation of America has made every effort to identify trademarked properties and owners on this page. All brands and product names used in this document are for identification purposes only and may be trademarks or registered trademarks of their respective companies.
The warranties for Xplore and Motion by Xplore products are set forth in the express limited warranty statements accompanying such products. Nothing in this document constitutes an additional warranty.
The Xplore and Motion by Xplore products and services may be covered by one or more patent-protected inventions. Additional patents may also be pending. For more information, see this site: https://www.xploretech.com/us/patents.
Models iX101L1 and iX10101L2
PN 176037
Revision Date: July 2018
The end user may access only one language version of the operating system.
L'utilisateur final ne peut accéder qu'à une seule version linguistique du système d'exploitation.
Der Endbenutzer darf nur auf eine Sprachversion des Betriebssystems zugreifen.
De eindgebruiker heeft slechts toegang tot één taalversie van het besturingssysteem.
L'utente finale può accedere a una sola lingua del sistema operativo.
El usuario final sólo podrá acceder a una versión de idioma del sistema operativo.
Loppukäyttäjä voi käyttää vain yhtä käyttöjärjestelmän kieliversiota.
Användaren har endast tillgång till en språkversion av operativsystemet.
Slutbrugeren har kun adgang til ét af operativsystemets sprogversioner.
Sluttbruker kan aksessere kun én av operativsystemets språkversjoner.
O utilizador final pode alcançar somente uma versão de língua do sistema de exploração.
O usuário final pode acessar apenas uma versão de idioma do sistema operacional.
ii |
7/25/18 |
Table of Contents
Chapter 1 Getting Started . . . . . . . . . . . . . . . . . . . . . 1
L10 Platform. . . . . . . . . . . . . . . . . . . . . . . . . . . . . . . . . . . . . . . . . . . . . . . . . . . . . . 1
Key Features Overview . . . . . . . . . . . . . . . . . . . . . . . . . . . . . . . . . . . . . . . . . . . . 1
Optional Features . . . . . . . . . . . . . . . . . . . . . . . . . . . . . . . . . . . . . . . . . . . . . . . . . 2
Overview of the XSLATE L10 Tablet PC. . . . . . . . . . . . . . . . . . . . . . . . . . . . . . 3
Front of the XSLATE L10 . . . . . . . . . . . . . . . . . . . . . . . . . . . . . . . . . . . . . . . . . . . . . . . . . . . . . . 3
Back of the XSLATE L10 . . . . . . . . . . . . . . . . . . . . . . . . . . . . . . . . . . . . . . . . . . . . . . . . . . . . . . 4
Right Side of the XSLATE L10 . . . . . . . . . . . . . . . . . . . . . . . . . . . . . . . . . . . . . . . . . . . . . . . . . 5
Left Side of the XSLATE L10 . . . . . . . . . . . . . . . . . . . . . . . . . . . . . . . . . . . . . . . . . . . . . . . . . . . 5
Bottom Side of XSLATE and XPAD Tablets . . . . . . . . . . . . . . . . . . . . . . . . . . . . . . . . . . . . . 6
Pens for the L10 Tablets . . . . . . . . . . . . . . . . . . . . . . . . . . . . . . . . . . . . . . . . . . . 6
Capacitive Pens . . . . . . . . . . . . . . . . . . . . . . . . . . . . . . . . . . . . . . . . . . . . . . . . . . . . . . . . . . . . . . 6 Active Digitizer Pens . . . . . . . . . . . . . . . . . . . . . . . . . . . . . . . . . . . . . . . . . . . . . . . . . . . . . . . . . 6
Overview of the XPAD L10 Tablet . . . . . . . . . . . . . . . . . . . . . . . . . . . . . . . . . . 7
Front of the XPAD L10 . . . . . . . . . . . . . . . . . . . . . . . . . . . . . . . . . . . . . . . . . . . . . . . . . . . . . . . . 7 Back of the XPAD L10. . . . . . . . . . . . . . . . . . . . . . . . . . . . . . . . . . . . . . . . . . . . . . . . . . . . . . . . . 8 Left Side of the XPAD L10. . . . . . . . . . . . . . . . . . . . . . . . . . . . . . . . . . . . . . . . . . . . . . . . . . . . . 8 Top Side of the XPAD L10. . . . . . . . . . . . . . . . . . . . . . . . . . . . . . . . . . . . . . . . . . . . . . . . . . . . . 9
Preparing the L10 Tablet for First Use . . . . . . . . . . . . . . . . . . . . . . . . . . . . . . 9
Inserting a SIM Card . . . . . . . . . . . . . . . . . . . . . . . . . . . . . . . . . . . . . . . . . . . . . . . . . . . . . . . . . . 9 Powering Up the Tablet . . . . . . . . . . . . . . . . . . . . . . . . . . . . . . . . . . . . . . . . . . . . . . . . . . . . . 10
Optional Setup Tasks. . . . . . . . . . . . . . . . . . . . . . . . . . . . . . . . . . . . . . . . . . . . . 11
Backing Up Files and Creating a Recovery Drive. . . . . . . . . . . . . . . . . . . . . . . . . . . . . . 11 Attaching the Pen Tether . . . . . . . . . . . . . . . . . . . . . . . . . . . . . . . . . . . . . . . . . . . . . . . . . . . . 11 Connecting the Tablet to an External Monitor . . . . . . . . . . . . . . . . . . . . . . . . . . . . . . . . 11
For More Information . . . . . . . . . . . . . . . . . . . . . . . . . . . . . . . . . . . . . . . . . . . . 12
Chapter 2 Using Your L10 Tablet . . . . . . . . . . . . . . 13
Using the Battery . . . . . . . . . . . . . . . . . . . . . . . . . . . . . . . . . . . . . . . . . . . . . . . . 14
Checking Battery Power . . . . . . . . . . . . . . . . . . . . . . . . . . . . . . . . . . . . . . . . . . . . . . . . . . . . . 14 In Windows . . . . . . . . . . . . . . . . . . . . . . . . . . . . . . . . . . . . . . . . . . . . . . . . . . . . . . . . . . . . . . 14 On the Battery . . . . . . . . . . . . . . . . . . . . . . . . . . . . . . . . . . . . . . . . . . . . . . . . . . . . . . . . . . . 15 Optimizing Battery Life or Performance . . . . . . . . . . . . . . . . . . . . . . . . . . . . . . . . . . . . . . 15 Removing and Replacing the Battery. . . . . . . . . . . . . . . . . . . . . . . . . . . . . . . . . . . . . . . . . 16 Removing the Battery . . . . . . . . . . . . . . . . . . . . . . . . . . . . . . . . . . . . . . . . . . . . . . . . . . . . 16 Replacing the Battery. . . . . . . . . . . . . . . . . . . . . . . . . . . . . . . . . . . . . . . . . . . . . . . . . . . . . 16 Hot Swapping the Battery . . . . . . . . . . . . . . . . . . . . . . . . . . . . . . . . . . . . . . . . . . . . . . . . 16 Long-term Battery Storage . . . . . . . . . . . . . . . . . . . . . . . . . . . . . . . . . . . . . . . . . . . . . . . . . . 17 Battery and Power Management Tips . . . . . . . . . . . . . . . . . . . . . . . . . . . . . . . . . . . . . . . . 17 Tips for Saving Battery Power . . . . . . . . . . . . . . . . . . . . . . . . . . . . . . . . . . . . . . . . . . . . . 17 Conditioning the Battery . . . . . . . . . . . . . . . . . . . . . . . . . . . . . . . . . . . . . . . . . . . . . . . . . . . . 17 Disposing of Used Batteries. . . . . . . . . . . . . . . . . . . . . . . . . . . . . . . . . . . . . . . . . . . . . . . . . . 17
Managing Wireless Connections . . . . . . . . . . . . . . . . . . . . . . . . . . . . . . . . . . 18
Temporarily Switching Off Wireless Devices . . . . . . . . . . . . . . . . . . . . . . . . . . . . . . . . . . 18
Connecting to a Wi-Fi Network . . . . . . . . . . . . . . . . . . . . . . . . . . . . . . . . . . . . 19
Table of Contents |
iii |
Connecting to Bluetooth Devices . . . . . . . . . . . . . . . . . . . . . . . . . . . . . . . . . .21
Connecting to a Mobile Broadband Network . . . . . . . . . . . . . . . . . . . . . . .22
Inserting a SIM Card . . . . . . . . . . . . . . . . . . . . . . . . . . . . . . . . . . . . . . . . . . . . . . . . . . . . . . . . . 22 Setting Up Mobile Broadband. . . . . . . . . . . . . . . . . . . . . . . . . . . . . . . . . . . . . . . . . . . . . . . . 23 Switching to a Second Broadband Provider. . . . . . . . . . . . . . . . . . . . . . . . . . . . . . . . . . . 24 Managing Cellular Connections . . . . . . . . . . . . . . . . . . . . . . . . . . . . . . . . . . . . . . . . . . . . . . 24
Using Global Navigation Satellite System (GNSS) . . . . . . . . . . . . . . . . . . .25
Enabling Location Services. . . . . . . . . . . . . . . . . . . . . . . . . . . . . . . . . . . . . . . . . . . . . . . . . . . 25
Know Your Tablet. . . . . . . . . . . . . . . . . . . . . . . . . . . . . . . . . . . . . . . . . . . . . . . . .26
PC Information . . . . . . . . . . . . . . . . . . . . . . . . . . . . . . . . . . . . . . . . . . . . . . . . . . . . . . . . . . . . . . 26
Documentation (online) . . . . . . . . . . . . . . . . . . . . . . . . . . . . . . . . . . . . . . . . . . . . . . . . . . . . . 26
Support (online) . . . . . . . . . . . . . . . . . . . . . . . . . . . . . . . . . . . . . . . . . . . . . . . . . . . . . . . . . . . . . 26
Accessories (online). . . . . . . . . . . . . . . . . . . . . . . . . . . . . . . . . . . . . . . . . . . . . . . . . . . . . . . . . . 26
Using Sleep Mode . . . . . . . . . . . . . . . . . . . . . . . . . . . . . . . . . . . . . . . . . . . . . . . .27
Using the XPAD Function Buttons . . . . . . . . . . . . . . . . . . . . . . . . . . . . . . . . .28
Configuring the Function Buttons. . . . . . . . . . . . . . . . . . . . . . . . . . . . . . . . . . . . . . . . . . . . 28
Using the Cameras. . . . . . . . . . . . . . . . . . . . . . . . . . . . . . . . . . . . . . . . . . . . . . . .30
Front Camera. . . . . . . . . . . . . . . . . . . . . . . . . . . . . . . . . . . . . . . . . . . . . . . . . . . . . . . . . . . . . . . . 30 Rear Camera. . . . . . . . . . . . . . . . . . . . . . . . . . . . . . . . . . . . . . . . . . . . . . . . . . . . . . . . . . . . . . . . . 30 Putting the Camera Icon on Your Taskbar . . . . . . . . . . . . . . . . . . . . . . . . . . . . . . . . . . . . 30
Using the Built-in Microphones . . . . . . . . . . . . . . . . . . . . . . . . . . . . . . . . . . . .31
Using Integrated Optional Features. . . . . . . . . . . . . . . . . . . . . . . . . . . . . . . .32
Using the Barcode Scanner (XPAD Only). . . . . . . . . . . . . . . . . . . . . . . . . . . . . . . . . . . . . . 32
Using the RFID/NFC Reader . . . . . . . . . . . . . . . . . . . . . . . . . . . . . . . . . . . . . . . . . . . . . . . . . . 33
Using the Fingerprint Reader . . . . . . . . . . . . . . . . . . . . . . . . . . . . . . . . . . . . . .35
Setting Up a PIN . . . . . . . . . . . . . . . . . . . . . . . . . . . . . . . . . . . . . . . . . . . . . . . . . . . . . . . . . . . . . 35 Setting Up the Fingerprint Reader. . . . . . . . . . . . . . . . . . . . . . . . . . . . . . . . . . . . . . . . . . . . 35 Logging In with Your Fingerprint. . . . . . . . . . . . . . . . . . . . . . . . . . . . . . . . . . . . . . . . . . . . . 36
Using the SD Card Reader . . . . . . . . . . . . . . . . . . . . . . . . . . . . . . . . . . . . . . . . .37
Inserting an SD Card . . . . . . . . . . . . . . . . . . . . . . . . . . . . . . . . . . . . . . . . . . . . . . . . . . . . . . . . . 37 Removing an SD card . . . . . . . . . . . . . . . . . . . . . . . . . . . . . . . . . . . . . . . . . . . . . . . . . . . . . . . . 37
Locating Your Serial Number . . . . . . . . . . . . . . . . . . . . . . . . . . . . . . . . . . . . .37
Backing Up Your Files . . . . . . . . . . . . . . . . . . . . . . . . . . . . . . . . . . . . . . . . . . . .38
Scheduling Backups with File History. . . . . . . . . . . . . . . . . . . . . . . . . . . . . . . . . . . . . . . . . 38
Restoring Backups with File History . . . . . . . . . . . . . . . . . . . . . . . . . . . . . . . . . . . . . . . . . . 39
Restoring Your System . . . . . . . . . . . . . . . . . . . . . . . . . . . . . . . . . . . . . . . . . . .39
Chapter 3 Caring for the L10 Tablet . . . . . . . . . . . 41
General Care . . . . . . . . . . . . . . . . . . . . . . . . . . . . . . . . . . . . . . . . . . . . . . . . . . . . .41 Caring for the Display . . . . . . . . . . . . . . . . . . . . . . . . . . . . . . . . . . . . . . . . . . . . .41 Caring for the Pen . . . . . . . . . . . . . . . . . . . . . . . . . . . . . . . . . . . . . . . . . . . . . . . .42 Cleaning the Fingerprint Reader . . . . . . . . . . . . . . . . . . . . . . . . . . . . . . . . . . .42 Conditioning the Battery. . . . . . . . . . . . . . . . . . . . . . . . . . . . . . . . . . . . . . . . . .42 Traveling with Your L10 Tablet PC . . . . . . . . . . . . . . . . . . . . . . . . . . . . . . . . .43
iv |
Table of Contents |
Chapter 4 Troubleshooting and FAQs . . . . . . . . . 45
Battery and Power Issues . . . . . . . . . . . . . . . . . . . . . . . . . . . . . . . . . . . . . . . . . 45
Shutting Down Issues . . . . . . . . . . . . . . . . . . . . . . . . . . . . . . . . . . . . . . . . . . . . 46
Display Issues. . . . . . . . . . . . . . . . . . . . . . . . . . . . . . . . . . . . . . . . . . . . . . . . . . . . 47
Pen Issues . . . . . . . . . . . . . . . . . . . . . . . . . . . . . . . . . . . . . . . . . . . . . . . . . . . . . . . 48
Keyboard Issues . . . . . . . . . . . . . . . . . . . . . . . . . . . . . . . . . . . . . . . . . . . . . . . . . 49
Network Issues. . . . . . . . . . . . . . . . . . . . . . . . . . . . . . . . . . . . . . . . . . . . . . . . . . . 49
Ethernet Issues . . . . . . . . . . . . . . . . . . . . . . . . . . . . . . . . . . . . . . . . . . . . . . . . . . . . . . . . . . . . . . 50
Wi-Fi Issues . . . . . . . . . . . . . . . . . . . . . . . . . . . . . . . . . . . . . . . . . . . . . . . . . . . . . . . . . . . . . . . . . 50
Bluetooth Issues. . . . . . . . . . . . . . . . . . . . . . . . . . . . . . . . . . . . . . . . . . . . . . . . . . . . . . . . . . . . . 50
Bluetooth Tips . . . . . . . . . . . . . . . . . . . . . . . . . . . . . . . . . . . . . . . . . . . . . . . . . . . . . . . . . . . 50
Mobile Broadband Issues . . . . . . . . . . . . . . . . . . . . . . . . . . . . . . . . . . . . . . . . . . . . . . . . . . . 50
Audio Issues . . . . . . . . . . . . . . . . . . . . . . . . . . . . . . . . . . . . . . . . . . . . . . . . . . . . . 51
System Issues . . . . . . . . . . . . . . . . . . . . . . . . . . . . . . . . . . . . . . . . . . . . . . . . . . . . 51
Frequently Asked Questions . . . . . . . . . . . . . . . . . . . . . . . . . . . . . . . . . . . . . . 52
Table of Contents |
v |
vi |
Table of Contents |
Getting Started |
1 |
L10 Platform
There are three models in the L10 Platform. Each is different from the other two as follows:
•XPAD™ L10 is distinguished by its integrated hard handle. The handle has space for an integrated barcode reader option, two programmable buttons and a front facing speaker.
•XSLATE™ L10 has no handle but is otherwise like the XPAD.
•XBOOK™ L10 is the same as the XSLATE, but includes a companion keyboard and a kickstrap (combination of a kickstand and a hand strap).
Important: All Windows features that are documented in this user guide are based on the interface of the Windows 10 release, version 1803.
For important information about care of the tablet and its components, see the Safety and Regulatory Guide.
Key Features Overview
The L10 platform by Xplore™ Technologies is a rugged tablet that provides a range of computing power and a variety of integrated features to support any mobile work flow.
The L10 Platform supports these features:
•Available with one of these processors: Intel Pentium®, Intel® Core™ 8th Gen i5 or i7.
•4, 8, or 16 GB of system memory (RAM) depending on CPU
•Intel® HD 505 Graphics or UHD 605 Graphics, depending on CPU
•10.1”wide viewing angle display with WUXGA resolution (1920 x 1200); 500 Nit brightness standard, option for 1000 Nit View Anywhere® display for viewing in bright sunlight.
•Capacitive display with 10-point touch input standard
•Corning® Gorilla® Glass 3 for increased display damage resistance
•Integrated 13 MP rear camera and 2 MP front camera
•Solid-state drive with capacities from 64 GB up to 1 TB
•Two USB 3.0 ports, one USB Type-C port and a micro-SDHC card slot
•Dual Nano SIM (4FF) port
•9-Axis MEMS sensor (Accelerometer, eCompass, Gyroscope) and ambient light sensor
•Hot-swappable battery, 36 Whr standard battery or 98 Whr long-life battery packs
•Integrated 802.11a/g/n/ac Wi-Fi® and Bluetooth® 4.2 and NFC
•TCG Trusted Platform Module (TPM) 2.0 for hardware-based security
•Area fingerprint reader is standard for added security
•Windows® 10, Pro 64-bit operating system
Chapter 1 Getting Started |
L10 Platform 1 |
Optional Features
The following features are optional and must be ordered with the tablet at the time of purchase:
•Integrated Sierra Wireless EM7565 WWAN+GNSS module or u-blox GNSS+SBAS only module
•A high-performance barcode scanner is available and is integrated into the handle of the XPAD L10 tablet‘. See Using the Barcode Scanner (XPAD Only) on page 32.
•Integrated, active Wacom-digitizer display that provides precision pen input and hover features
•Integrated pass-through antenna with five ports for MIMO WLAN, MIMO WWAN, and GNSS (GPS)
•Integrated HDMI Input through a full-sized HDMI connector interface
•RS232 true serial port with DB9 serial port interface adapter
•External Smart Card reader Common Access Card (CAC)
•Integrated high-frequency (HF) RFID/NFC
•External module for long-range UHF RFID Reader (AEI)
2 Optional Features |
Chapter 1 Getting Started |
Overview of the XSLATE L10 Tablet PC
The photos show the location of the external features on the XSLATE™ L10 Tablet PC. Most of these features are on the XPAD™ Tablet PC in the same place, except where noted in the photos of the XPAD tablet
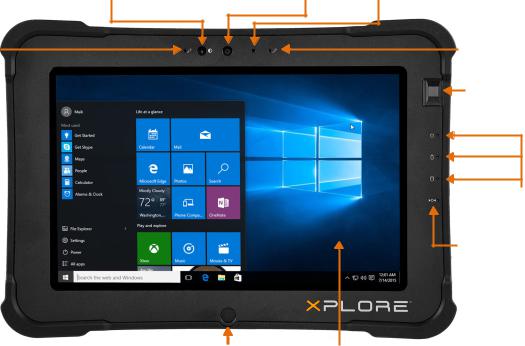
Front of the XSLATE L10
Ambient light |
Front |
Camera |
sensor |
camera |
indicator |
Microphones |
|
Microphones |
|
|
Fingerprint |
|
|
reader |
|
|
System status |
|
|
Battery status |
|
|
SSD Activity |
|
|
Indicator |
|
|
LEDs |
|
|
Kill |
|
|
switch |
|
Home button |
Touchscreen |
|
|
|
Microphones |
Two digital microphones make up the microphone array facing forward |
|
|
|
|
Ambient Light Sensor |
Detects the amount of ambient light, and Windows adjusts the screen brightness |
|
(ALS) |
|
|
|
|
|
Front camera |
An FHD resolution camera primarily for taking pictures or video of the tablet user |
|
|
|
|
Camera indicator |
Is illuminated when either the frontor rear-facing camera is active |
|
|
|
|
Fingerprint reader |
Can read your fingerprint to let you log in |
|
|
|
|
System status LED |
Indicates the current power state of the tablet |
|
|
|
|
Battery status LED |
Indicates the charging status of the battery and also lets you know when your |
|
|
battery is getting very low |
|
|
|
|
SSD activity LED |
Indicates when the solid state drive (SSD) is accessed to read or write data |
|
|
|
|
Kill switch |
Immediately powers off the device if it becomes unresponsive. Any unsaved data |
|
|
will be lost. Insert a stylus tip or straighten a paper clip and insert the protruding |
|
|
end into the hole to press the recessed button. |
|
|
|
|
Touchscreen |
The standard means for interacting with the operating system and software |
|
|
|
|
Home Button |
A physical button that performs the same function as the Start button; displays start |
|
|
screen or wakes up your tablet from sleep |
|
|
|
|
Chapter 1 Getting Started |
Overview of the XSLATE L10 Tablet PC 3 |
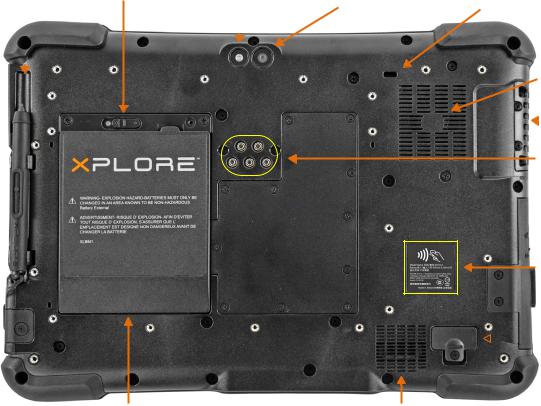
Back of the XSLATE L10
Pen holder |
Battery latch |
Camera light 13 megapixel |
Kensington |
||
and pen |
|
|
camera |
lock slot |
|
|
|
|
|
|
|
|
|
|
|
|
|
Fan intake
Fan  exhaust
Antenna pass-through
ports (optional)
RFID/NFC
(optional)
Expansion
 port cover
Battery |
Speaker |
|
|
Pen holder and pen |
Holds the short pen when pen is not in use |
|
|
Battery latch |
Releases the battery latch when you slide the latch to the left |
|
|
Camera light |
Functions as both a flash for the rear camera as well as a torch light |
|
|
Rear camera |
13 megapixel camera |
|
|
Kensington lock slot |
Provides a metal-reinforced hole for use with a cable and lock to secure |
|
the tablet |
|
|
Fan intake |
Where ambient air is pulled in by the fan; Do not block or cover |
|
|
Fan exhaust |
Where heated air is exhausted by the fan; Do not block or cover |
|
|
Expansion port cover |
Door that is removed when connecting certain Xplore accessories to |
|
the tablet |
|
|
Speaker |
Outputs sound when no headset or external speakers are in use |
|
|
Battery |
Hot-swappable battery that powers the tablet when it is not plugged in |
|
or docked |
|
|
Pass-through antenna ports |
These integrated ports connect to the vehicle antenna to provide |
(optional) |
MIMO WLAN, MIMO WWAN, and GNSS (GPS) access. This feature must |
|
be ordered when purchased. It is factory installed. |
|
|
4 Overview of the XSLATE L10 Tablet PC |
Chapter 1 Getting Started |
Right Side of the XSLATE L10
|
Volume |
|
Power input |
control |
Power button |
|
|
|
|
|
|
|
|
|
|
|
|
|
Secure Attention |
|
Ethernet |
jack |
Sequence (SAS) Multifunction port |
||
|
|
|
|
|
Power input |
Connection for the external power adapter |
|||
|
|
|
|
|
Ethernet jack |
RJ45 port for LAN connectivity |
|||
|
|
|
|
|
Volume control |
Turns sound volume up and down |
|||
|
|
|
|
|
Power button |
Turns on the tablet; press to enter and exit sleep mode when tablet is on. |
|||
|
|
|
|
|
SAS button |
Round button; equivalent to pressing Ctrl+Alt+Del in Windows; also wakes up the |
|||
|
tablet from sleep mode |
|||
|
|
|
|
|
Multifunction port |
Optional factory configurable port that can function as a serial port or HDMI-in |
|||
|
|
|
|
|
Left Side of the XSLATE L10
Fan |
Memory |
|
Headset |
exhaust |
card slot |
2 x USB 3.1 |
jack |
Locking Door |
|
USB |
|
||
|
|
|
|
|
type-C |
|
|
port |
Fan exhaust |
Allows air flow |
|
|
Memory card slot |
Reads and writes micro-SD cards |
|
|
USB type-C port |
Provides access to USB 3.1 and DisplayPort output through a USB type-C |
|
connector |
|
|
USB 3.1 Gen1 ports |
Two USB type-A connectors for devices, such as a mouse, keyboard or external |
|
storage; compatible with USB 2.0 |
|
|
Headset jack |
3.5 mm audio connector supports stereo output and mono microphone input |
|
|
Locking door |
When the locking door that covers the ports on the L10 is shipped, it is locked |
|
and shows green. Slide the lock to reveal red and it opens. |
|
|
Chapter 1 Getting Started |
Overview of the XSLATE L10 Tablet PC 5 |

Bottom Side of XSLATE and XPAD Tablets
Docking connectors
Docking connectors |
Connectors that interface to Xplore docks |
|
|
Pens for the L10 Tablets
All L10 tablets support touch input with your finger. In addition, a pen or stylus is provided with your tablet, and is compatible with the screen configuration that you order. Many people use a pen for more convenience or precision. The pen is particularly effective for precise data entry and navigation.
The XSLATE and XBOOK come with short pens that fit into the pen holder on these devices. The XPAD includes a longer, thicker pen. If you want a longer pen for the XSLATE or XBOOK, a handle accessory can be ordered with the longer pen.
Capacitive Pens
Capacitive pens work with the tablet’s touchscreen and are sometimes called passive pens. The short capacitive pen does not need a battery. The long capacitive pen uses a AAAA battery. These two pens do not require a pen digitizer in the tablet. They work with the tablet’s touchscreen directly.
Short Capacitive Pen |
Long Capacitive ePen w/battery |
Active Digitizer Pens
If the L10 tablet is ordered with an active Wacom digitizer built in to the screen, you will receive one of the two pens pictured below. These Wacom-compatible pens allow for a large range of pressure sensitivity, tilt detection and hover capability. Hover lets you see where the pen is pointing before the tip touches the display. These pens are frequently called active pens
Short Active Digitizer Pen |
Long Active Digitizer Pen |
You can order additional active or capacitive pens from the L10 Accessories web page. Scroll down and tap to open the Input Devices section. You can order the Stylus Tip Kit for active pens from the Input section of the Accessories site.
6 Pens for the L10 Tablets |
Chapter 1 Getting Started |
Overview of the XPAD L10 Tablet
The following photos show the locations the external features on the XPAD® L10 Tablet PC.
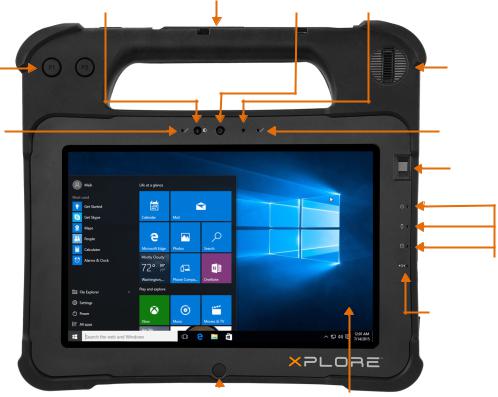
Note: In these photos, the light gray text indicates a feature that is described for the XSLATE L10 and is the same on the XPAD L10. See page 3 to page 5 for the XSLATE overview. The blue text indicates that the feature is available only on the XPAD or is located in a different place on the XPAD tablet.
Front of the XPAD L10
Ambient light |
Pen holder |
Front |
Camera |
sensor |
|
camera |
indicator |
Programmable |
|
|
Speaker |
function buttons |
|
|
|
|
|
|
|
Microphones |
|
|
Microphones |
|
|
|
Fingerprint |
|
|
|
reader |
|
|
|
System status |
|
|
|
Battery status |
|
|
|
SSD activity |
|
|
|
Indicator |
|
|
|
LEDs |
|
lights |
|
Kill switch |
|
Home |
|
button |
Touchscreen display |
|
|
|||
|
|
|
|
|
Function button P1 |
Default setup: Tap to open the Know Your Tablet application. Press and hold to open the |
|||
|
Microsoft OneNote |
|
||
|
|
|
|
|
Function button P2 |
Default setup: Tap to display the Pictures folder. Press and hold to open Tablet PC |
|||
|
Settings |
|
||
|
|
|
|
|
Pen holder |
Holds the long pen when not in use |
|
||
|
|
|
|
|
Speaker |
Provides sound when no headset or external speakers are in use |
|||
|
|
|
|
|
Chapter 1 Getting Started |
Overview of the XPAD L10 Tablet 7 |

Back of the XPAD L10
Tether post |
Camera light |
13 megapixel camera |
|
for pen |
|
||
|
|
|
|
Battery latch
Kensington lock slot
Fan intake  Fan output
Antenna pass-through
ports (optional)
RFID/NFC
(optional)
Expansion port cover
Battery
Tether post for pen |
Secures the pen to the tablet via tether |
|
|
|
|
|
|
Left Side of the XPAD L10 |
|
|
|
Barcode scanner |
Fan |
Memory |
Two USB Headset |
card slot |
3.1 ports jack |
||
USB Type-C
Barcode scanner |
Optical interface for reading barcodes |
|
|
8 Overview of the XPAD L10 Tablet |
Chapter 1 Getting Started |
Top Side of the XPAD L10
Pen Holder |
Barcode scanner |
button |
Barcode scanner |
Press to activate the barcode scanner (if installed) |
button |
|
|
|
Pen Holder |
Holds the long pen when not in use |
|
|
Preparing the L10 Tablet for First Use
This section has steps for setting up the L10 platform for the first use
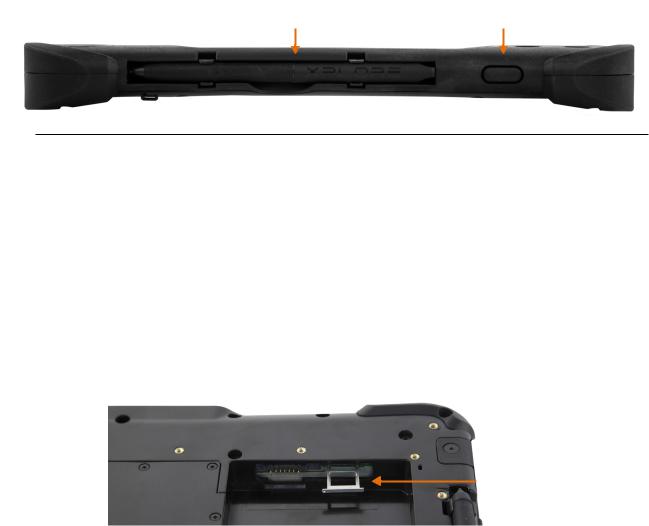
Inserting a SIM Card
If your L10 tablet is enabled with Wireless Wide Area Networking (WWAN), you need an activated SIM card in the SIM card holder to access the cellular data network. The SIM holder is located in the battery bay of the L10 and can hold one or two Nano SIMs (4FF).
SIM card holder
The L10 supports two SIM cards and switching between SIMs is done within Windows. Most people will need only one SIM. To add or change a SIM, follow these instructions:
1.Shut down and turn off the tablet.
2.Remove the battery if it is in the tablet.
3.Pull out the SIM holder shown above.
4.Put your SIM card into the slot with the contacts facing down ensuring the notched edge on the card aligns with the notched edge in the holder.
5.Then put the frame back into its port and return the battery to its bay.
See also Inserting a SIM Card on page 22
Chapter 1 Getting Started |
Preparing the L10 Tablet for First Use 9 |
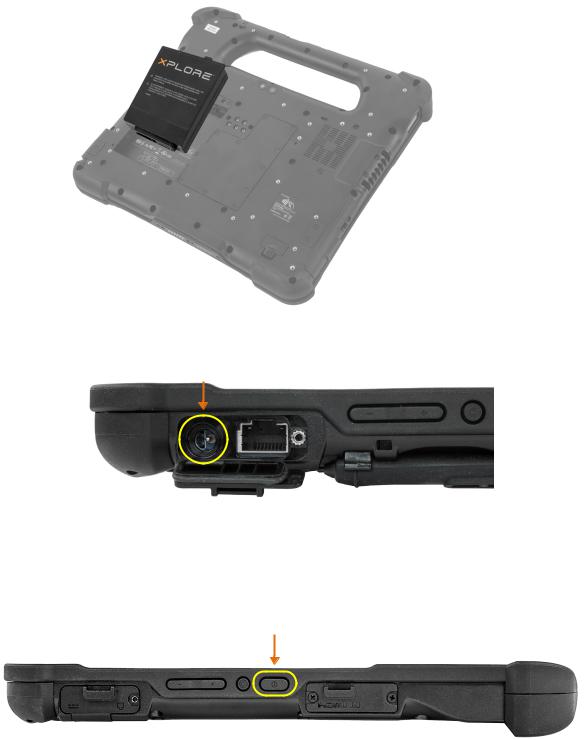
Powering Up the Tablet
1.Remove the battery from the packaging and insert the battery into the back of the tablet until it clicks securely into place
2.Apply external power by opening the port door located at the bottom of the right side of the L10 to expose the power adapter port. Plug in the AC adapter
Power adapter port
3.Plug the power cord into an outlet.
The battery charging indicator on the front of the L10 tablet blinks green to indicate that the battery is charging. It is solid green when fully charged
4.Press and release the oval Power button in the center of the right side of the tablet to turn it on.
Power button
5.Keep the tablet on AC power until the battery is fully charged. However, you don’t have to wait until the tablet is fully charged to turn it on. The L10 will charge while you use it.
10 Preparing the L10 Tablet for First Use |
Chapter 1 Getting Started |
Optional Setup Tasks
Backing Up Files and Creating a Recovery Drive
After setting up the L10 the way you like it and installing applications, create a recovery drive on an external USB drive. A recovery drive lets you start your tablet and access recovery and troubleshooting tools if you encounter any issues with your Windows installation.
For more information, see Backing Up Your Files on page 38 and Restoring Your System on page 39.
Attaching the Pen Tether
The pen comes with a tether so that you can attach it to your tablet to avoid misplacing it
1.Slip one end of the tether through the hole at the end of the pen, and pull the pen through the loop until it is tight.
2.Slip the other end of the tether through the attach point on the tablet, then pull the pen through the loop until it is tight.
Connecting the Tablet to an External Monitor
There is no dedicated port for an external monitor on the L10 tablet. The tablet has a USB Type-C connector which includes a DisplayPort output capability. You need a dongle that supports USB Type-C DisplayPort and converts it to the port necessary to attach the external monitor, which can have one or more of the following ports: HDMI, DVI, DisplayPort, or VGA.
For instance, to connect a monitor with an HDMI port to your tablet, you need a USB Type-C DisplayPort to HDMI output dongle
Note: Some dongles use USB to Video conversion and these use software to enable the external display over USB interface. Care must be taken to ensure the USB Type-C dongle specifically supports USB Type-C DisplayPort input. Look for a dongle that states it is plug-n-play and that no software or drivers are required.
Chapter 1 Getting Started |
Optional Setup Tasks 11 |
For More Information
The Know Your Tablet application is on the desktop and the Windows Start screen of the tablet.
Note: If you don’t have access to a particular feature or setting on your Tablet PC, contact your system administrator for additional information.
This user guide describes the full set of features and provides instructions for common tasks. The following three chapters of this user guide includes:
•Chapter 2, Using Your L10 Tablet on page 13:
Provides instructions for basic tasks including how to customize your tablet to fit the way you work.
•Chapter 3, Caring for the L10 Tablet on page 41:
Provides suggestions for the care and maintenance of your Tablet PC.
•Chapter 4, Troubleshooting and FAQs on page 45:
Provides answers for common issues you might encounter as you use your tablet.
You can find other useful information on the Xplore Technologies web site:
•Support
•Documentation (Available in several languages)
•L10 Overview
•Free Training Videos
•Knowledge Base
•Accessories
12 For More Information |
Chapter 1 Getting Started |
Using Your L10 Tablet |
2 |
This chapter highlights critical and some advanced features of the Xplore® L10 Tablet PC. These links below let you click and go to that part of this chapter.
• |
Using the Battery |
on page 14 |
|
|
• |
Checking Battery Power |
on page 14 |
|
• Removing and Replacing the Battery |
on page 16 |
|
|
• Hot Swapping the Battery |
on page 16 |
|
|
• Long-term Battery Storage |
on page 17 |
|
|
• Battery and Power Management Tips |
on page 17 |
|
• |
Managing Wireless Connections |
on page 18 |
|
|
• Temporarily Switching Off Wireless Devices |
on page 18 |
|
• Connecting to a Wi-Fi Network |
on page 19 |
||
• Connecting to Bluetooth Devices |
on page 21 |
||
• Connecting to a Mobile Broadband Network |
on page 22 |
||
|
• Inserting a SIM Card |
on page 22 |
|
|
• Setting Up Mobile Broadband |
on page 23 |
|
|
• Switching to a Second Broadband Provider |
on page 24 |
|
|
• |
Managing Cellular Connections |
on page 24 |
• Using Global Navigation Satellite System (GNSS) |
on page 25 |
||
• |
Know Your Tablet |
on page 26 |
|
• |
Using Sleep Mode |
on page 27 |
|
• Using the XPAD Function Buttons |
on page 28 |
||
• |
Using the Cameras |
on page 30 |
|
• Using the Built-in Microphones |
on page 31 |
||
• Using Integrated Optional Features |
on page 32 |
||
|
• Using the Barcode Scanner (XPAD Only) |
on page 32 |
|
|
• Using the RFID/NFC Reader |
on page 33 |
|
• Using the Fingerprint Reader |
on page 35 |
||
• Using the SD Card Reader |
on page 37 |
||
• Locating Your Serial Number |
on page 37 |
||
• Backing Up Your Files |
on page 38 |
||
• |
Restoring Your System |
on page 39 |
|
Chapter 2 Using Your L10 Tablet |
13 |
Using the Battery
The Xplore® L10 tablet includes a high-capacity Lithium-ion battery that fits into the back of the unit. Battery life varies by configuration, applications in use, which features are used, and the operating conditions. The maximum battery capacity decreases with time and use
Danger: To avoid personal injury, handle the battery with care. Don’t open, puncture, short, or expose it to fire or water. For example, don’t leave the battery in a closed car in hot weather for an extended time. For more information, see the Safety and Regulatory Guide.
Checking Battery Power
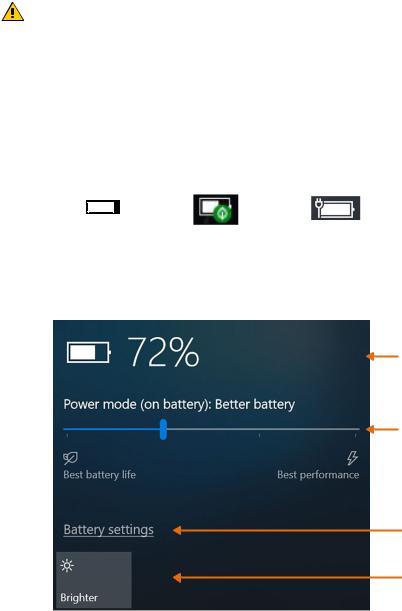
In Windows
The battery icon changes appearance on the taskbar to show the status of the battery: by displaying the approximate charge remaining, by indicating the battery saver mode (green flame), and by showing whether the battery is charging (plug).
|
|
|
|
|
Current battery |
Battery saver |
Plugged in |
||
|
charge |
|
and charging |
|
1. In the notification area of the taskbar, tap the Battery icon to display the remaining charge. The power mode slider shows the trade off between battery life and tablet performance
Shows the percentage of power remaining.
Tap the slider to set the power mode.
Tap to see the Battery
Overview menu.
Tap to set the brightness of the screen.
This power menu lets you access other battery settings and set brightness options.
2.Tap Battery Settings to display the Battery Overview menu and set the battery saver options, other battery options, and access to other menus, including the Settings > System > Display menu.
3.Tap the Brightness tile on the bottom left of this menu to set the brightness levels.
4.Press and hold this brightness tile until you see an option for more settings. This option brings up the Display menu.
14 Using the Battery |
Chapter 2 Using Your L10 Tablet |
Loading...