


ZM400/ZM600
Industrial/Commercial Printer
User Guide
© 2007 ZIH Corp. The copyrights in this manual and the software and/or firmware in the label printer described therein are owned by ZIH Corp. Unauthorized reproduction of this manual or the software and/or firmware in the label printer may result in imprisonment of up to one year and fines of up to $10,000
(17 U.S.C.506). Copyright violators may be subject to civil liability.
This product may contain ZPL®, ZPL II®, and ZebraLink™ programs; Element Energy Equalizer® Circuit; E3®; and Monotype Imaging fonts. Software © ZIH Corp. All rights reserved worldwide.
ZebraLink and all product names and numbers are trademarks, and Zebra, the Zebra logo, ZPL, ZPL II, Element Energy Equalizer Circuit, and E3 Circuit are registered trademarks of ZIH Corp. All rights reserved worldwide.
All other brand names, product names, or trademarks belong to their respective holders. For additional trademark information, please see “Trademarks” on the product CD.
Proprietary Statement This manual contains proprietary information of Zebra Technologies Corporation and its subsidiaries (“Zebra Technologies”). It is intended solely for the information and use of parties operating and maintaining the equipment described herein. Such proprietary information may not be used, reproduced, or disclosed to any other parties for any other purpose without the express, written permission of Zebra Technologies Corporation.
Product Improvements Continuous improvement of products is a policy of Zebra Technologies Corporation. All specifications and designs are subject to change without notice.
Liability Disclaimer Zebra Technologies Corporation takes steps to ensure that its published Engineering specifications and manuals are correct; however, errors do occur. Zebra Technologies Corporation reserves the right to correct any such errors and disclaims liability resulting therefrom.
Limitation of Liability In no event shall Zebra Technologies Corporation or anyone else involved in the creation, production, or delivery of the accompanying product (including hardware and software) be liable for any damages whatsoever (including, without limitation, consequential damages including loss of business profits, business interruption, or loss of business information) arising out of the use of, the results of use of, or inability to use such product, even if Zebra Technologies Corporation has been advised of the possibility of such damages. Some jurisdictions do not allow the exclusion or limitation of incidental or consequential damages, so the above limitation or exclusion may not apply to you.
Part Number: 79695L-001 Rev. A

Declaration of Conformity iii
Declaration of Conformity
I have determined that the Zebra printers identified as the
ZM™ Series
Z4M, Z6M, Z4Mplus, Z6Mplus, R4Mplus, ZM400, ZM600
manufactured by:
Zebra Technologies Corporation
333 Corporate Woods Parkway
Vernon Hills, Illinois 60061-3109 U.S.A.
Have been shown to comply with the applicable technical standards of the FCC
For Home, Office, Commercial, and Industrial use
If no unauthorized change is made in the equipment, and if the equipment is properly maintained and operated.
3/27/07 |
ZM400/ZM600 User Guide |
79695L-001 Rev. A |

ivCompliance Information
Compliance Information
Compliance Information
FCC Compliance Statement
This device complies with Part 15 rules. Operation is subject to the following two conditions:
1.This device may not cause harmful interference, and
2.This device must accept any interference received, including interference that may cause undesired operation.
The user is cautioned that any changes or modifications not expressly approved by Zebra Technologies Corporation could void the user’s authority to operate the equipment. To ensure compliance, this printer must be used with Shielded Communication Cables.
FCC Rules and Regulations for Data Cables
Zebra printers comply with FCC Rules and Regulations, Part 15 for Class B Equipment using fully shielded, 6.5 ft. (2 m) data cables. Use of unshielded cables may increase radiation above the Class B limits.
Canadian DOC Compliance Statement
This Class B digital apparatus complies with Canadian ICES-003.
Cet appareil numérique de la classe B est conforme à la norme NMB-003 du Canada.
79695L-001 Rev. A |
ZM400/ZM600 User Guide |
3/27/07 |

Contents
Declaration of Conformity . . . . . . . . . . . . . . . . . . . . . . . . . . . . . . . . . . . . . . . . . . . iii
Compliance Information . . . . . . . . . . . . . . . . . . . . . . . . . . . . . . . . . . . . . . . . . . . . . . . . . . . iv
About This Document . . . . . . . . . . . . . . . . . . . . . . . . . . . . . . . . . . . . . . . . . . . . . . . 1
Who Should Use This Document . . . . . . . . . . . . . . . . . . . . . . . . . . . . . . . . . . . . . . . . . . . . 2
How This Document Is Organized . . . . . . . . . . . . . . . . . . . . . . . . . . . . . . . . . . . . . . . . . . . 2
Contacts . . . . . . . . . . . . . . . . . . . . . . . . . . . . . . . . . . . . . . . . . . . . . . . . . . . . . . . . . . . . . . . 3
Web Site . . . . . . . . . . . . . . . . . . . . . . . . . . . . . . . . . . . . . . . . . . . . . . . . . . . . . . . . . . . . 3
The Americas . . . . . . . . . . . . . . . . . . . . . . . . . . . . . . . . . . . . . . . . . . . . . . . . . . . . . . . . 3
Europe, Africa, Middle East, and India . . . . . . . . . . . . . . . . . . . . . . . . . . . . . . . . . . . . . 3
Asia Pacific . . . . . . . . . . . . . . . . . . . . . . . . . . . . . . . . . . . . . . . . . . . . . . . . . . . . . . . . . . 3
Document Conventions. . . . . . . . . . . . . . . . . . . . . . . . . . . . . . . . . . . . . . . . . . . . . . . . . . . . 4
1 • Introduction . . . . . . . . . . . . . . . . . . . . . . . . . . . . . . . . . . . . . . . . . . . . . . . . . . . . 7
External View . . . . . . . . . . . . . . . . . . . . . . . . . . . . . . . . . . . . . . . . . . . . . . . . . . . . . . . . . . . 8
Printer Media Compartment . . . . . . . . . . . . . . . . . . . . . . . . . . . . . . . . . . . . . . . . . . . . . . . . 9
Control Panel . . . . . . . . . . . . . . . . . . . . . . . . . . . . . . . . . . . . . . . . . . . . . . . . . . . . . . . . . . 10
Control Panel Buttons. . . . . . . . . . . . . . . . . . . . . . . . . . . . . . . . . . . . . . . . . . . . . . . . . .11
Control Panel Lights . . . . . . . . . . . . . . . . . . . . . . . . . . . . . . . . . . . . . . . . . . . . . . . . . . 12
Printer Language Modes. . . . . . . . . . . . . . . . . . . . . . . . . . . . . . . . . . . . . . . . . . . . . . . . . . 13
Firmware Downloads . . . . . . . . . . . . . . . . . . . . . . . . . . . . . . . . . . . . . . . . . . . . . . . . . 13
Additional Printer Language Information . . . . . . . . . . . . . . . . . . . . . . . . . . . . . . . . . . 13
3/27/07 |
ZM400/ZM600 User Guide |
79695L-001 Rev. A |

vi Contents
2 • Printer Setup . . . . . . . . . . . . . . . . . . . . . . . . . . . . . . . . . . . . . . . . . . . . . . . . . . 15
Before You Begin . . . . . . . . . . . . . . . . . . . . . . . . . . . . . . . . . . . . . . . . . . . . . . . . . . . . . . . 16 Handling the Printer . . . . . . . . . . . . . . . . . . . . . . . . . . . . . . . . . . . . . . . . . . . . . . . . . . . . . 17 Unpack and Inspect the Printer . . . . . . . . . . . . . . . . . . . . . . . . . . . . . . . . . . . . . . . . . 17 Store the Printer . . . . . . . . . . . . . . . . . . . . . . . . . . . . . . . . . . . . . . . . . . . . . . . . . . . . . 17 Ship the Printer . . . . . . . . . . . . . . . . . . . . . . . . . . . . . . . . . . . . . . . . . . . . . . . . . . . . . . 17 Select a Site for the Printer . . . . . . . . . . . . . . . . . . . . . . . . . . . . . . . . . . . . . . . . . . . . . . . . 18 Select a Surface . . . . . . . . . . . . . . . . . . . . . . . . . . . . . . . . . . . . . . . . . . . . . . . . . . . . . 18 Provide Proper Operating Conditions . . . . . . . . . . . . . . . . . . . . . . . . . . . . . . . . . . . . . 18 Allow Proper Space . . . . . . . . . . . . . . . . . . . . . . . . . . . . . . . . . . . . . . . . . . . . . . . . . . 18 Provide a Data Source . . . . . . . . . . . . . . . . . . . . . . . . . . . . . . . . . . . . . . . . . . . . . . . . 18 Provide a Power Source . . . . . . . . . . . . . . . . . . . . . . . . . . . . . . . . . . . . . . . . . . . . . . . 18 Select a Data Communication Interface . . . . . . . . . . . . . . . . . . . . . . . . . . . . . . . . . . . . . . 19 Data Cables and Wireless Cards . . . . . . . . . . . . . . . . . . . . . . . . . . . . . . . . . . . . . . . . 20 Connect the Printer to the Computer or Network . . . . . . . . . . . . . . . . . . . . . . . . . . . . 20 Connect the Printer to a Power Source . . . . . . . . . . . . . . . . . . . . . . . . . . . . . . . . . . . . . . 23 Power Cord Specifications . . . . . . . . . . . . . . . . . . . . . . . . . . . . . . . . . . . . . . . . . . . . . 24 Types of Media . . . . . . . . . . . . . . . . . . . . . . . . . . . . . . . . . . . . . . . . . . . . . . . . . . . . . . . . . 25 Ribbon Overview. . . . . . . . . . . . . . . . . . . . . . . . . . . . . . . . . . . . . . . . . . . . . . . . . . . . . . . . 27 When to Use Ribbon. . . . . . . . . . . . . . . . . . . . . . . . . . . . . . . . . . . . . . . . . . . . . . . . . . 27 Coated Side of Ribbon . . . . . . . . . . . . . . . . . . . . . . . . . . . . . . . . . . . . . . . . . . . . . . . . 27
3 • Operations . . . . . . . . . . . . . . . . . . . . . . . . . . . . . . . . . . . . . . . . . . . . . . . . . . . . 29
Print Modes and Printer Options. . . . . . . . . . . . . . . . . . . . . . . . . . . . . . . . . . . . . . . . . . . . 30
Print Mode Descriptions and Printer Requirements . . . . . . . . . . . . . . . . . . . . . . . . . . 30
Media Paths . . . . . . . . . . . . . . . . . . . . . . . . . . . . . . . . . . . . . . . . . . . . . . . . . . . . . . . . 31
Load Media . . . . . . . . . . . . . . . . . . . . . . . . . . . . . . . . . . . . . . . . . . . . . . . . . . . . . . . . . . . . 33
Beginning Steps for all Print Modes and Printer Options . . . . . . . . . . . . . . . . . . . . . . 33
Additional Steps for Tear-Off Mode. . . . . . . . . . . . . . . . . . . . . . . . . . . . . . . . . . . . . . . 36
Additional Steps for Peel-Off Mode (with or without Liner Take-Up). . . . . . . . . . . . . . 37
Additional Steps for Cutter or Delayed Cut Mode . . . . . . . . . . . . . . . . . . . . . . . . . . . . 42
Additional Steps for Rewind Mode . . . . . . . . . . . . . . . . . . . . . . . . . . . . . . . . . . . . . . . 43
Load Ribbon . . . . . . . . . . . . . . . . . . . . . . . . . . . . . . . . . . . . . . . . . . . . . . . . . . . . . . . . . . . 47
Remove Used Ribbon. . . . . . . . . . . . . . . . . . . . . . . . . . . . . . . . . . . . . . . . . . . . . . . . . 51
Calibrate the Printer . . . . . . . . . . . . . . . . . . . . . . . . . . . . . . . . . . . . . . . . . . . . . . . . . . . . . 52
Auto Calibration . . . . . . . . . . . . . . . . . . . . . . . . . . . . . . . . . . . . . . . . . . . . . . . . . . . . . 52
Manual Calibration . . . . . . . . . . . . . . . . . . . . . . . . . . . . . . . . . . . . . . . . . . . . . . . . . . . 52
Adjust Printhead Pressure . . . . . . . . . . . . . . . . . . . . . . . . . . . . . . . . . . . . . . . . . . . . . . . . 53
79695L-001 Rev. A |
ZM400/ZM600 User Guide |
3/27/07 |

Contents vii
4 • Configuration . . . . . . . . . . . . . . . . . . . . . . . . . . . . . . . . . . . . . . . . . . . . . . . . . . 55
Setup Mode. . . . . . . . . . . . . . . . . . . . . . . . . . . . . . . . . . . . . . . . . . . . . . . . . . . . . . . . . . . . 56
Enter Setup Mode. . . . . . . . . . . . . . . . . . . . . . . . . . . . . . . . . . . . . . . . . . . . . . . . . . . . 56
Exit Setup Mode . . . . . . . . . . . . . . . . . . . . . . . . . . . . . . . . . . . . . . . . . . . . . . . . . . . . . 57
Change Password-Protected Parameters . . . . . . . . . . . . . . . . . . . . . . . . . . . . . . . . . . . . 58
Default Password Value . . . . . . . . . . . . . . . . . . . . . . . . . . . . . . . . . . . . . . . . . . . . . . . 58
Disable the Password Protection Feature . . . . . . . . . . . . . . . . . . . . . . . . . . . . . . . . . 58
Print a Configuration Label . . . . . . . . . . . . . . . . . . . . . . . . . . . . . . . . . . . . . . . . . . . . . . . . 59
Print a Network Configuration Label . . . . . . . . . . . . . . . . . . . . . . . . . . . . . . . . . . . . . . . . . 60
Control Panel Parameters. . . . . . . . . . . . . . . . . . . . . . . . . . . . . . . . . . . . . . . . . . . . . . . . . 61
How to View or Modify Parameters . . . . . . . . . . . . . . . . . . . . . . . . . . . . . . . . . . . . . . 61
Additional Parameters . . . . . . . . . . . . . . . . . . . . . . . . . . . . . . . . . . . . . . . . . . . . . . . . 61
Standard Printer Parameters . . . . . . . . . . . . . . . . . . . . . . . . . . . . . . . . . . . . . . . . . . . 62
5 • Routine Maintenance . . . . . . . . . . . . . . . . . . . . . . . . . . . . . . . . . . . . . . . . . . . |
87 |
Replacing Printer Components . . . . . . . . . . . . . . . . . . . . . . . . . . . . . . . . . . . . . . . . . . . . . 88 Ordering Replacement Parts . . . . . . . . . . . . . . . . . . . . . . . . . . . . . . . . . . . . . . . . . . . 88 Recycling Printer Components . . . . . . . . . . . . . . . . . . . . . . . . . . . . . . . . . . . . . . . . . . 88 Lubrication . . . . . . . . . . . . . . . . . . . . . . . . . . . . . . . . . . . . . . . . . . . . . . . . . . . . . . . . . . . . 88 Cleaning Schedule and Procedures . . . . . . . . . . . . . . . . . . . . . . . . . . . . . . . . . . . . . . . . . 89 Clean the Exterior . . . . . . . . . . . . . . . . . . . . . . . . . . . . . . . . . . . . . . . . . . . . . . . . . . . . 89 Clean the Printhead and Platen Roller . . . . . . . . . . . . . . . . . . . . . . . . . . . . . . . . . . . . 90 Clean the Media Compartment and Sensors . . . . . . . . . . . . . . . . . . . . . . . . . . . . . . . 93 Clean the Cutter Module. . . . . . . . . . . . . . . . . . . . . . . . . . . . . . . . . . . . . . . . . . . . . . . 94 Routine Maintenance for the Rewind Option . . . . . . . . . . . . . . . . . . . . . . . . . . . . . . . . . . 96 Remove Printed Labels or Liner from the Rewind Spindle . . . . . . . . . . . . . . . . . . . . . 96 Adjust Media Alignment for Rewind Option . . . . . . . . . . . . . . . . . . . . . . . . . . . . . . . . 98
6 • Troubleshooting . . . . . . . . . . . . . . . . . . . . . . . . . . . . . . . . . . . . . . . . . . . . . . . |
99 |
Troubleshooting Checklists . . . . . . . . . . . . . . . . . . . . . . . . . . . . . . . . . . . . . . . . . . . . . . . 100
LCD Error Messages . . . . . . . . . . . . . . . . . . . . . . . . . . . . . . . . . . . . . . . . . . . . . . . . . . . 101
Print Quality Problems . . . . . . . . . . . . . . . . . . . . . . . . . . . . . . . . . . . . . . . . . . . . . . . . . . 105
Calibration Problems. . . . . . . . . . . . . . . . . . . . . . . . . . . . . . . . . . . . . . . . . . . . . . . . . . . . 108
Communications Problems . . . . . . . . . . . . . . . . . . . . . . . . . . . . . . . . . . . . . . . . . . . . . . . 109
Ribbon Problems . . . . . . . . . . . . . . . . . . . . . . . . . . . . . . . . . . . . . . . . . . . . . . . . . . . . . . .110
Miscellaneous Printer Problems . . . . . . . . . . . . . . . . . . . . . . . . . . . . . . . . . . . . . . . . . . . .111
3/27/07 |
ZM400/ZM600 User Guide |
79695L-001 Rev. A |

viii Contents
Printer Diagnostics . . . . . . . . . . . . . . . . . . . . . . . . . . . . . . . . . . . . . . . . . . . . . . . . . . . . . .113
Power-On Self Test. . . . . . . . . . . . . . . . . . . . . . . . . . . . . . . . . . . . . . . . . . . . . . . . . . .113
CANCEL Self Test . . . . . . . . . . . . . . . . . . . . . . . . . . . . . . . . . . . . . . . . . . . . . . . . . . .114
PAUSE Self Test . . . . . . . . . . . . . . . . . . . . . . . . . . . . . . . . . . . . . . . . . . . . . . . . . . . . .115
FEED Self Test . . . . . . . . . . . . . . . . . . . . . . . . . . . . . . . . . . . . . . . . . . . . . . . . . . . . . .116
FEED and PAUSE Self Test . . . . . . . . . . . . . . . . . . . . . . . . . . . . . . . . . . . . . . . . . . . .119
Communications Diagnostics Test . . . . . . . . . . . . . . . . . . . . . . . . . . . . . . . . . . . . . . 120
Sensor Profile . . . . . . . . . . . . . . . . . . . . . . . . . . . . . . . . . . . . . . . . . . . . . . . . . . . . . . 121
7 • Specifications . . . . . . . . . . . . . . . . . . . . . . . . . . . . . . . . . . . . . . . . . . . . . . . . |
123 |
General Specifications . . . . . . . . . . . . . . . . . . . . . . . . . . . . . . . . . . . . . . . . . . . . . . . . . . 124
Agency Approvals . . . . . . . . . . . . . . . . . . . . . . . . . . . . . . . . . . . . . . . . . . . . . . . . . . . . . . 125
Printing Specifications. . . . . . . . . . . . . . . . . . . . . . . . . . . . . . . . . . . . . . . . . . . . . . . . . . . 126
Media Specifications . . . . . . . . . . . . . . . . . . . . . . . . . . . . . . . . . . . . . . . . . . . . . . . . . . . . 128
Ribbon Specifications . . . . . . . . . . . . . . . . . . . . . . . . . . . . . . . . . . . . . . . . . . . . . . . . . . . 129
Printer Options . . . . . . . . . . . . . . . . . . . . . . . . . . . . . . . . . . . . . . . . . . . . . . . . . . . . . . . . 130
Index . . . . . . . . . . . . . . . . . . . . . . . . . . . . . . . . . . . . . . . . . . . . . . . . . . . . . . . . . . . 131
79695L-001 Rev. A |
ZM400/ZM600 User Guide |
3/27/07 |

About This Document
This section provides you with contact information, document structure and organization, and additional reference documents.
Contents
Who Should Use This Document. . . . . . . . . . . . . . . . . . . . . . . . . . . . . . . . . . . . . . . . . . . . 2
How This Document Is Organized . . . . . . . . . . . . . . . . . . . . . . . . . . . . . . . . . . . . . . . . . . . 2
Contacts . . . . . . . . . . . . . . . . . . . . . . . . . . . . . . . . . . . . . . . . . . . . . . . . . . . . . . . . . . . . . . . 3
Document Conventions . . . . . . . . . . . . . . . . . . . . . . . . . . . . . . . . . . . . . . . . . . . . . . . . . . . 4
3/27/07 |
ZM400/ZM600 User Guide |
79695L-001 Rev. A |

2About This Document
Who Should Use This Document
Who Should Use This Document
This User Guide is intended for use by any person who needs to operate or to troubleshoot problems with the printer.
How This Document Is Organized
The User Guide is set up as follows:
Section |
Description |
|
|
Introduction on page 7 |
This section shows the operational controls and |
|
location of major components used when loading |
|
media. |
|
|
Printer Setup on page 15 |
This section provides the tasks that you must |
|
complete and the issues that you must consider |
|
before you load and configure your printer. |
|
|
Operations on page 29 |
This section provides the procedures for loading |
|
and calibrating the printer. |
|
|
Configuration on page 55 |
This section describes the control panel parameters |
|
that are used to configure the printer for operation. |
|
|
Routine Maintenance on page 87 |
This section provides routine cleaning and |
|
maintenance procedures. |
|
|
Troubleshooting on page 99 |
This section provides information about errors that |
|
you might need to troubleshoot. Assorted |
|
diagnostic tests are included. |
|
|
Specifications on page 123 |
This section provides the features of and |
|
specifications for the printer. |
|
|
79695L-001 Rev. A |
ZM400/ZM600 User Guide |
3/27/07 |
About This Document 3
Contacts
Contacts
You can contact Zebra Technologies Corporation at the following:
Web Site
http://www.zebra.com
Technical Support via the Internet is available 24 hours per day, 365 days per year. Go to http://www.zebra.com/support.
The Americas
Regional Headquarters |
Technical Support |
Customer Service Dept. |
|
|
|
Zebra Technologies International, |
T: +1 847 913 2259 |
For printers, parts, media, and ribbon, |
LLC |
F: +1 847 913 2578 |
please call your distributor, or |
333 Corporate Woods Parkway |
Hardware: hwtsamerica@zebra.com |
contact us. |
Vernon Hills, Illinois 60061.3109 |
Software: swtsamerica@zebra.com |
T: +1 866 230 9494 |
U.S.A |
|
E: VHCustServ@zebra.com |
T: +1 847 793 2600 |
|
|
Toll-free +1 800 423 0422 |
|
|
F: +1 847 913 8766 |
|
|
|
|
|
Europe, Africa, Middle East, and India
Regional Headquarters |
Technical Support |
Internal Sales Dept. |
|
|
|
|
|
Zebra Technologies Europe Limited |
T: +44 (0) 1494 768298 |
For printers, parts, media, and ribbon, |
|
Zebra House |
F: +44 (0) 1494 768210 |
please call your distributor, or |
|
The Valley Centre, Gordon Road |
Germany: Tsgermany@zebra.com |
contact us. |
|
High Wycombe |
France: Tsfrance@zebra.com |
T: +44 (0) 1494 768316 |
|
Buckinghamshire HP13 6EQ, UK |
Spain/Portugal: Tsspain@zebra.com |
F: +44 (0) 1494 768244 |
|
T: +44 |
(0)1494 472872 |
All other areas: Tseurope@zebra.com |
E: mseurope@zebra.com |
F: +44 |
(0) 1494 450103 |
|
|
|
|
|
|
Asia Pacific
Regional Headquarters |
Technical Support |
Customer Service |
|
|
|
Zebra Technologies Asia Pacific, LLC |
T: +65 6858 0722 |
For printers, parts, media, and ribbon, |
16 New Industrial Road |
F: +65 6885 0838 |
please call your distributor, or |
#05-03 Hudson TechnoCentre |
E: tsasiapacific@zebra.com |
contact us. |
Singapore 536204 |
|
T: +65 6858 0722 |
T: +65 6858 0722 |
|
F: +65 6885 0837 |
F: +65 6885 0838 |
|
|
|
|
|
3/27/07 |
ZM400/ZM600 User Guide |
79695L-001 Rev. A |

4About This Document
Document Conventions
Document Conventions
The following conventions are used throughout this document to convey certain information.
Alternate Color (online only) Cross-references contain hot links to other sections in this guide. If you are viewing this guide online in .pdf format, you can click the cross-reference (blue text) to jump directly to its location.
LCD Display Examples Text from a printer’s Liquid Crystal Display (LCD) appears in
Bubbledot ICG font.
Command Line Examples Command line examples appear in Courier New font. For example, type ZTools to get to the Post-Install scripts in the bin directory.
Files and Directories File names and directories appear in Courier New font. For example, the Zebra<version number>.tar file and the /root directory.
Icons Used
Caution • Warns you of the potential for electrostatic discharge.
Caution • Warns you of a potential electric shock situation.
Caution • Warns you of a situation where excessive heat could cause a burn.
Caution • Advises you that failure to take or avoid a specific action could result in physical harm to you.
Caution • (No icon) Advises you that failure to take or avoid a specific action could result in physical harm to the hardware.
Important • Advises you of information that is essential to complete a task.
Note • Indicates neutral or positive information that emphasizes or supplements important points of the main text.
Example • Provides an example, often a scenario, to better clarify a section of text.
79695L-001 Rev. A |
ZM400/ZM600 User Guide |
3/27/07 |

About This Document 5
Document Conventions
Illustration Callouts Callouts are used when an illustration contains information that needs to be labeled and described. A table that contains the labels and descriptions follows the graphic. Figure 1 provides an example.
Figure 1 • Sample Figure with Callouts
1 |
2 |
1FEED button
2CANCEL button
3/27/07 |
ZM400/ZM600 User Guide |
79695L-001 Rev. A |

6About This Document
Document Conventions
Notes • ___________________________________________________________________
__________________________________________________________________________
__________________________________________________________________________
__________________________________________________________________________
__________________________________________________________________________
__________________________________________________________________________
__________________________________________________________________________
__________________________________________________________________________
__________________________________________________________________________
__________________________________________________________________________
79695L-001 Rev. A |
ZM400/ZM600 User Guide |
3/27/07 |

1 
Introduction
This section shows the operational controls and location of major components used when loading media.
Contents
External View . . . . . . . . . . . . . . . . . . . . . . . . . . . . . . . . . . . . . . . . . . . . . . . . . . . . . . . . . . . 8
Printer Media Compartment . . . . . . . . . . . . . . . . . . . . . . . . . . . . . . . . . . . . . . . . . . . . . . . . 9
Control Panel . . . . . . . . . . . . . . . . . . . . . . . . . . . . . . . . . . . . . . . . . . . . . . . . . . . . . . . . . . 10
Control Panel Buttons . . . . . . . . . . . . . . . . . . . . . . . . . . . . . . . . . . . . . . . . . . . . . . . . . 11
Control Panel Lights. . . . . . . . . . . . . . . . . . . . . . . . . . . . . . . . . . . . . . . . . . . . . . . . . . . 12
Printer Language Modes . . . . . . . . . . . . . . . . . . . . . . . . . . . . . . . . . . . . . . . . . . . . . . . . . 13
3/27/07 |
ZM400/ZM600 User Guide |
79695L-001 Rev. A |

8Introduction
External View
External View
Figure 2 and Figure 3 show the components and connections on the outside of the printer.
Figure 2 • Front of Printer
2
1
1Control panel
2Media door
Figure 3 • Rear of Printer
|
3 |
|
4 |
|
5 |
|
6 |
1 |
7 |
|
|
2 |
8 |
1 |
Power switch (O = off, I = on) |
|
5 |
Serial port |
2 |
AC power connector |
|
6 |
Internal wired print server port (Ethernet) |
3 |
Wireless print server card slot (Ethernet) |
|
7 |
USB port |
4 |
Wireless card ejector button |
|
8 |
Parallel port |
79695L-001 Rev. A |
ZM400/ZM600 User Guide |
3/27/07 |

Introduction 9
Printer Media Compartment
Printer Media Compartment
Figure 4 shows the components inside the media compartment of your printer. Depending on installed options, your printer may look slightly different.
Note • For optimal printing quality and proper printer performance across our product line, Zebra strongly recommends the use of genuine Zebra™ supplies as part of the total solution. Specifically, the ZM400 and ZM600 are designed to work only with genuine Zebra™ printheads, thus maximizing safety and print quality.
Figure 4 • Printer Components
 3
3
2
1
1Printhead assembly
2Control panel
3Media door
4Media supply guide
5Media supply hanger
4  5
5
|
6 |
|
7 |
9 |
8 |
|
6Ribbon take-up spindle
7Ribbon supply spindle
8Dancer assembly
9Printhead release latch
3/27/07 |
ZM400/ZM600 User Guide |
79695L-001 Rev. A |
10Introduction
Control Panel
Control Panel
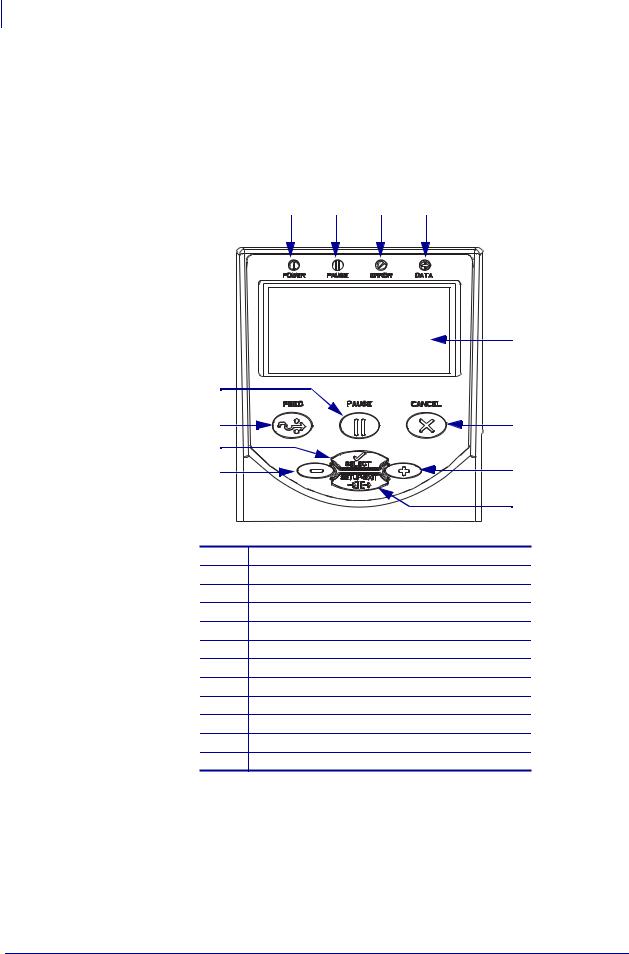
The control panel contains the lights that indicate basic operation and the buttons that you may need to press during basic operation. The control panel buttons and lights are labeled in Figure 5. Descriptions for each are located in Table 1 and Table 2.
Figure 5 • Control Panel
1 |
2 |
3 |
4 |
|
5 |
12 |
|
11 |
6 |
10 |
|
9 |
7 |
|
8 |
1Power LED
2Pause LED
3Error LED
4Data LED
5LCD
6CANCEL button
7PLUS (+) button
8SETUP/EXIT button
9MINUS (–) button
10 SELECT button
11 FEED button
12 PAUSE button
79695L-001 Rev. A |
ZM400/ZM600 User Guide |
3/27/07 |

Introduction 11
Control Panel
Control Panel Buttons
|
Table 1 • Control Panel Buttons |
|
|
Button |
Function |
|
|
FEED |
Forces the printer to feed one blank label each time the button is pressed. |
|
• Printer not printing: one blank label immediately feeds. |
|
• Printing: one blank label feeds after the current batch of labels is complete. |
|
|
PAUSE |
Starts and stops the printing process. |
|
• Printer not printing: no printing occurs. (Press PAUSE again to resume printing.) |
|
• Printing: printing stops after the current label is complete. |
|
|
CANCEL |
Cancels print jobs when the printer is paused. |
|
• Printer not printing: the next stored label format does not print. |
|
• Printing: current label completes printing, and the next label format is cancelled. |
|
Press and hold for several seconds to cancel all print jobs in memory. |
|
|
SETUP/EXIT |
Enters and exits the configuration mode. |
|
|
SELECT |
Toggles the function of PLUS (+) and MINUS (–) between the Scroll and Change |
|
Modes. |
|
• Press once to use PLUS (+) and MINUS (–) to change the values of the selection. |
|
• Press again to use PLUS (+) and MINUS (–) to scroll through the menu items. |
|
|
PLUS (+) |
Scrolls to the next selection. |
(scroll mode) |
|
|
|
PLUS (+) |
• Increases the value. |
(change mode) |
• Performs the action on the bottom right of the LCD. |
|
|
MINUS (–) |
Scrolls to the previous selection. |
(scroll mode) |
|
|
|
MINUS (–) |
• Decreases the value. |
(change mode) |
• Moves to the next available digit in a number. |
|
• Performs the action on the bottom left of the LCD. |
|
|
3/27/07 |
ZM400/ZM600 User Guide |
79695L-001 Rev. A |

12Introduction
Control Panel
Control Panel Lights
|
|
Table 2 • Control Panel Lights |
|
|
|
|
|
Light |
Status |
|
Indication |
|
|
|
|
POWER |
Off |
|
The printer is off, or no power is applied. |
|
|
|
|
|
On |
|
The printer is on. |
|
|
|
|
PAUSE |
Off |
|
Normal printer operation. |
|
|
|
|
|
On |
|
The printer has stopped all printing operations. |
|
|
|
|
|
Flashing |
|
The Pause light flashes when initializing FLASH memory and in |
|
|
|
Peel-Off Mode when the label is available. |
|
|
|
|
ERROR |
Off |
|
Normal printer operation (no errors). |
|
|
|
|
|
On |
|
An error condition is preventing printing. This includes MEDIA |
|
|
|
OUT and RIBBON OUT errors. |
|
|
|
|
|
Flashing |
|
An error condition exists, but printing is allowed to continue. This |
|
|
|
includes RIBBON IN warning, HEAD UNDER TEMP warning, |
|
|
|
and HEAD OVER TEMP error. |
|
|
|
|
DATA |
Off |
|
Normal printer operation (no data being received or processed). |
|
|
|
|
|
One flash |
|
CANCEL was pressed and a format is successfully cancelled. |
|
|
|
|
|
Slow flashing |
|
The printer cannot accept more data from the host. |
|
|
|
|
|
Fast flashing |
|
The printer is receiving data. |
|
|
|
|
|
On |
|
A partial format has been received and no subsequent data activity. |
|
|
|
|
79695L-001 Rev. A |
ZM400/ZM600 User Guide |
3/27/07 |
Introduction 13
Printer Language Modes
Printer Language Modes
Depending on how your printer was ordered, it came from the factory with firmware that operates in or allows you to use certain commands for one of the following printer languages:
•Zebra Programming Language (ZPL®)
•Eltron® Programming Language (EPL™)
Firmware Downloads
You may download firmware to the printer at any time to change from one printer language to another. For the latest firmware versions and instructions for downloading them, go to http://www.zebra.com/firmware.
Note • When the printer changes from one printer language to another, error messages may appear on the LCD, and some control panel lights may activate in error mode. You may ignore these error messages and lights. When the firmware download is complete, reboot the printer and then load printer defaults to return the printer to Operating mode.
Additional Printer Language Information
The following manuals contain specific information about the different printer language modes. Copies of these manuals are on the CD that came with your printer and at http://www.zebra.com/manuals.
•ZPL II® Programming Guide
•EPL2™ Programming Guide
3/27/07 |
ZM400/ZM600 User Guide |
79695L-001 Rev. A |

14Introduction
Printer Language Modes
Notes • ___________________________________________________________________
__________________________________________________________________________
__________________________________________________________________________
__________________________________________________________________________
__________________________________________________________________________
__________________________________________________________________________
__________________________________________________________________________
__________________________________________________________________________
__________________________________________________________________________
__________________________________________________________________________
79695L-001 Rev. A |
ZM400/ZM600 User Guide |
3/27/07 |

2 
Printer Setup
This section provides the tasks that you must complete and the issues that you must consider before you load and configure your printer.
Contents
Before You Begin . . . . . . . . . . . . . . . . . . . . . . . . . . . . . . . . . . . . . . . . . . . . . . . . . . . . . . . 16 Handling the Printer . . . . . . . . . . . . . . . . . . . . . . . . . . . . . . . . . . . . . . . . . . . . . . . . . . . . . 17 Unpack and Inspect the Printer . . . . . . . . . . . . . . . . . . . . . . . . . . . . . . . . . . . . . . . . . . 17 Store the Printer . . . . . . . . . . . . . . . . . . . . . . . . . . . . . . . . . . . . . . . . . . . . . . . . . . . . . . 17 Ship the Printer . . . . . . . . . . . . . . . . . . . . . . . . . . . . . . . . . . . . . . . . . . . . . . . . . . . . . . 17 Select a Site for the Printer . . . . . . . . . . . . . . . . . . . . . . . . . . . . . . . . . . . . . . . . . . . . . . . 18 Select a Surface. . . . . . . . . . . . . . . . . . . . . . . . . . . . . . . . . . . . . . . . . . . . . . . . . . . . . . 18 Provide Proper Operating Conditions . . . . . . . . . . . . . . . . . . . . . . . . . . . . . . . . . . . . . 18 Allow Proper Space . . . . . . . . . . . . . . . . . . . . . . . . . . . . . . . . . . . . . . . . . . . . . . . . . . . 18 Provide a Data Source. . . . . . . . . . . . . . . . . . . . . . . . . . . . . . . . . . . . . . . . . . . . . . . . . 18 Provide a Power Source . . . . . . . . . . . . . . . . . . . . . . . . . . . . . . . . . . . . . . . . . . . . . . . 18 Select a Data Communication Interface. . . . . . . . . . . . . . . . . . . . . . . . . . . . . . . . . . . . . . 19 Data Cables and Wireless Cards. . . . . . . . . . . . . . . . . . . . . . . . . . . . . . . . . . . . . . . . . 20 Connect the Printer to the Computer or Network. . . . . . . . . . . . . . . . . . . . . . . . . . . . . 20 Connect the Printer to a Power Source . . . . . . . . . . . . . . . . . . . . . . . . . . . . . . . . . . . . . . 23 Power Cord Specifications . . . . . . . . . . . . . . . . . . . . . . . . . . . . . . . . . . . . . . . . . . . . . . 24 Types of Media. . . . . . . . . . . . . . . . . . . . . . . . . . . . . . . . . . . . . . . . . . . . . . . . . . . . . . . . . 25 Ribbon Overview . . . . . . . . . . . . . . . . . . . . . . . . . . . . . . . . . . . . . . . . . . . . . . . . . . . . . . . 27 When to Use Ribbon . . . . . . . . . . . . . . . . . . . . . . . . . . . . . . . . . . . . . . . . . . . . . . . . . . 27 Coated Side of Ribbon. . . . . . . . . . . . . . . . . . . . . . . . . . . . . . . . . . . . . . . . . . . . . . . . . 27
3/27/07 |
ZM400/ZM600 User Guide |
79695L-001 Rev. A |

16Printer Setup
Before You Begin
Before You Begin
Review this checklist, and resolve any issues before you set up or use your printer.
Unpack and Inspect the Printer Have you unpacked the printer and inspected it for damage? If you have not, see Unpack and Inspect the Printer on page 17.
Select a Site Have you selected an appropriate location for the printer? If you have not, see Select a Site for the Printer on page 18.
Connect to a Data Source Have you determined how the printer will connect to a data source (usually a computer)? For more information, see Select a Data Communication Interface on page 19.
Attach a Power Cord Do you have the correct power cord for your printer? If you are unsure, see Power Cord Specifications on page 24. To attach the power cord and connect the printer to a power source, see Connect the Printer to a Power Source on page 23.
Select Media Do you have the correct media for your application? If you are unsure, see Types of Media on page 25.
Select Ribbon Do you need to use ribbon, and is the appropriate ribbon available, if needed? If you are unsure, see Ribbon Overview on page 27.
79695L-001 Rev. A |
ZM400/ZM600 User Guide |
3/27/07 |

Printer Setup 17
Handling the Printer
Handling the Printer
This section describes how to handle your printer.
Unpack and Inspect the Printer
When you receive the printer, immediately unpack it and inspect for shipping damage.
•Save all packing materials.
•Check all exterior surfaces for damage.
•Raise the media door, and inspect the media compartment for damage to components.
If you discover shipping damage upon inspection:
•Immediately notify the shipping company and file a damage report.
•Keep all packaging material for shipping company inspection.
•Notify your authorized Zebra reseller
Important • Zebra Technologies Corporation is not responsible for any damage incurred during the shipment of the equipment and will not repair this damage under warranty.
Store the Printer
If you are not placing the printer into immediate operation, repackage it using the original packing materials. You may store the printer under the conditions shown in Table 3.
Table 3 • Storage Temperature and Humidity
Temperature |
Relative Humidity |
|
|
–40°F to 140°F (–40° to 60°C) |
5% to 85% non-condensing |
|
|
Ship the Printer
If you must ship the printer:
•Turn off (O) the printer, and disconnect all cables.
•Remove any media, ribbon, or loose objects from the printer interior.
•Close the printhead.
•Carefully pack the printer into the original container or a suitable alternate container to avoid damage during transit. A shipping container can be purchased from Zebra if the original packaging has been lost or destroyed.
3/27/07 |
ZM400/ZM600 User Guide |
79695L-001 Rev. A |

18Printer Setup
Select a Site for the Printer
Select a Site for the Printer
Consider the following when selecting an appropriate location for your printer.
Select a Surface
Select a solid, level surface of sufficient size and strength to accommodate the printer and other equipment (such as a computer), if necessary. The choices include a table, countertop, desk, or cart. For the printer’s weight and dimensions, see General Specifications on page 124.
Provide Proper Operating Conditions
This printer is designed to function in a wide range of environmental and electrical conditions, including a warehouse or factory floor. For more information on the required conditions, see
General Specifications on page 124.
Table 4 shows the temperature and relative humidity requirements for the printer when it is operating.
Table 4 • Operating Temperature and Humidity
Mode |
Temperature |
Relative Humidity |
|
|
|
Thermal Transfer |
40° to 104°F (5° to 40°C) |
20 to 85% non-condensing. |
|
|
|
Direct Thermal |
32° to 104°F (0° to 40°C) |
20 to 85% non-condensing |
|
|
|
Allow Proper Space
The printer should have enough space around it for you to be able to open the media door. To allow for proper ventilation and cooling, leave open space on all sides of the printer.
Caution • Do not place any padding or cushioning material behind or under the printer because this restricts air flow and could cause the printer to overheat.
Provide a Data Source
If the printer will be located away from the data source (such as a computer), the selected site must provide the appropriate connections to that data source. For more information on the types of communication interfaces and their limitations, see Select a Data Communication Interface on page 19.
Provide a Power Source
Place the printer within a short distance of a power outlet that is easily accessible.
79695L-001 Rev. A |
ZM400/ZM600 User Guide |
3/27/07 |

Printer Setup 19
Select a Data Communication Interface
Select a Data Communication Interface
Table 5 provides basic information about data communication interfaces that you can use to connect your printer to a computer. You may send label formats to the printer through any data communication interface that is available. Select an interface that is supported by both your printer and your computer or your Local Area Network (LAN).
Table 5 • Characteristics of the Data Communication Interfaces
|
Standard or |
|
Interface |
Optional on |
Characteristics |
|
Printer |
|
|
|
|
RS-232 Serial |
Standard |
• Maximum cable length of 50 ft (15.24 m). |
|
|
• You may need to change printer parameters to match the host |
|
|
computer. |
|
|
• You need to use a null-modem adaptor to connect to the printer |
|
|
if using a standard modem cable. |
|
|
|
IEEE 1284 |
Standard |
• Maximum cable length of 10 ft (3 m). |
Bidirectional Parallel |
|
• Recommended cable length of 6 ft (1.83 m). |
|
|
• No printer parameter changes required to match the host |
|
|
computer. |
|
|
|
USB |
Standard |
• Maximum cable length of 16.4 ft (5 m). |
|
|
• No printer parameter changes required to match the host |
|
|
computer. |
|
|
|
Internal wired |
Optional |
• Can print to the printer from any computer on your LAN. |
Ethernet print server |
|
• Can communicate with the printer through the printer’s web |
|
|
pages. |
|
|
• Computer must be equipped with an Ethernet board. |
|
|
• The printer must be configured to use your LAN. |
|
|
|
Wireless Ethernet |
Optional |
• Can print to the printer from any computer on your Wireless |
print server |
|
Local Area Network (WLAN). |
|
|
• Can communicate with the printer through the printer’s web |
|
|
pages. |
|
|
• Computer must be equipped with an Ethernet board. |
|
|
• The printer must be configured to use your WLAN. |
|
|
|
3/27/07 |
ZM400/ZM600 User Guide |
79695L-001 Rev. A |
20Printer Setup
Select a Data Communication Interface
Data Cables and Wireless Cards
You must supply all data cables or wireless cards for your application.
Data Cables Ethernet cables do not require shielding, but all other data cables must be fully shielded and fitted with metal or metallized connector shells. Unshielded data cables may increase radiated emissions above the regulated limits.
To minimize electrical noise pickup in the cable:
•Keep data cables as short as possible.
•Do not bundle the data cables tightly with the power cords.
•Do not tie the data cables to power wire conduits.
Wireless Cards For supported wireless cards, refer to the ZebraNet Wireless Print Server and Wireless Plus Print Server User Guide. A copy of the manual is available at http://www.zebra.com/manuals or on the user CD that came with your printer.
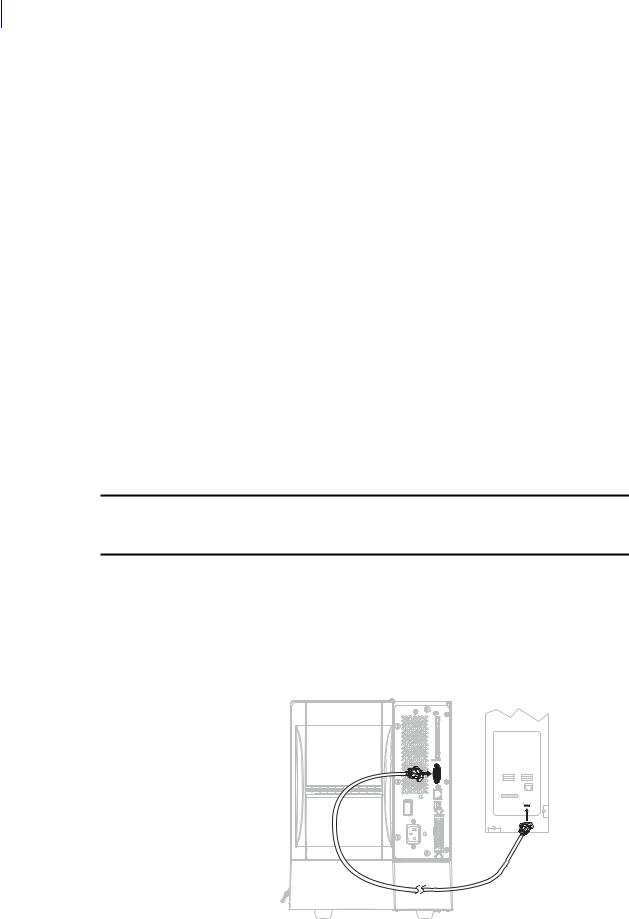
Connect the Printer to the Computer or Network
Table 6 shows how to connect the different types of data cables to your printer and computer. The connectors on the back of your computer may be in different locations than on the sample computer shown in this section. For another view of the connectors on the printer, see Figure 3 on page 8.
Caution • Ensure that the printer power is off (O) before connecting data communications cables. Connecting a data communications cable while the power is on (I) may damage the printer.
Table 6 • Connecting the Printer to a Computer or Network
|
Interface |
Connection and Configuration |
||||||||
|
|
|
|
|
|
|
|
|
|
|
|
RS-232 Serial |
The baud rate, number of data and stop bits, the parity, and the |
||||||||
|
|
XON/XOFF or DTR control must match those of the host computer. See |
||||||||
|
|
Control Panel Parameters on page 61 to view or change these parameters. |
||||||||
|
|
|
|
|
|
|
|
|
|
|
|
|
|
|
|
|
|
|
|
|
|
|
|
|
|
|
|
|
|
|
|
|
|
|
|
|
|
|
|
|
|
|
|
|
|
|
|
|
|
|
|
|
|
|
|
|
|
|
|
|
|
|
|
|
|
|
|
|
|
|
|
|
|
|
|
|
|
|
|
|
|
|
|
|
|
|
|
|
|
|
|
|
|
|
|
|
|
|
|
|
|
|
|
|
|
|
|
|
|
|
|
|
|
|
|
|
|
|
|
|
|
|
|
|
|
|
|
|
|
|
|
|
|
|
|
|
|
|
|
|
|
|
|
|
|
|
|
|
|
|
|
|
|
|
|
|
|
|
|
|
|
|
|
|
|
|
|
|
|
|
|
|
|
|
|
|
|
|
|
|
|
|
|
|
|
|
79695L-001 Rev. A |
ZM400/ZM600 User Guide |
3/27/07 |

Printer Setup 21
Select a Data Communication Interface
Table 6 • Connecting the Printer to a Computer or Network (Continued)
Interface |
Connection and Configuration |
IEEE 1284 No additional configuration is necessary.
Bidirectional
Parallel
|
|
|
|
|
|
|
|
|
|
|
|
|
|
|
|
|
|
|
|
|
|
|
|
|
|
|
|
|
|
|
|
|
|
|
|
|
|
|
|
|
|
|
|
|
|
|
|
|
|
|
|
|
|
|
|
|
|
|
|
|
|
|
|
|
|
|
|
|
|
|
|
|
|
|
|
|
|
|
|
|
|
|
|
|
|
|
|
|
|
|
|
|
|
|
|
|
|
|
|
|
|
|
|
|
|
|
|
|
|
|
|
|
|
|
|
|
|
|
|
|
|
|
|
|
|
|
|
|
|
|
|
|
|
|
|
|
|
|
|
|
|
|
|
|
|
|
|
|
|
|
|
|
|
|
|
|
|
|
|
|
|
|
|
|
|
|
|
|
|
|
|
|
|
|
|
|
|
|
|
|
|
|
|
|
|
|
|
|
|
|
|
|
|
|
|
|
|
|
|
|
|
|
|
|
|
|
|
USB |
No additional configuration is necessary. |
||||||||||||||||||||||||
|
Caution • Be careful not to plug the USB cable into the wired Ethernet |
||||||||||||||||||||||||
|
print server connector on the printer because doing so will damage the |
||||||||||||||||||||||||
|
connector. |
||||||||||||||||||||||||
|
|
|
|
|
|
|
|
|
|
|
|
|
|
|
|
|
|
|
|
|
|
|
|
|
|
|
|
|
|
|
|
|
|
|
|
|
|
|
|
|
|
|
|
|
|
|
|
|
|
|
|
|
|
|
|
|
|
|
|
|
|
|
|
|
|
|
|
|
|
|
|
|
|
|
|
|
|
|
|
|
|
|
|
|
|
|
|
|
|
|
|
|
|
|
|
|
|
|
|
|
|
|
|
|
|
|
|
|
|
|
|
|
|
|
|
|
|
|
|
|
|
|
|
|
|
|
|
|
|
|
|
|
|
|
|
|
|
|
|
|
|
|
|
|
|
|
|
|
|
|
|
|
|
|
|
|
|
|
|
|
|
|
|
|
|
|
|
|
|
|
|
|
|
|
|
|
|
|
|
|
|
|
|
|
|
|
|
|
|
|
|
|
|
|
|
|
|
|
|
|
|
|
|
|
|
|
|
|
|
|
|
|
|
|
|
|
|
|
|
|
|
|
|
|
|
|
|
|
|
|
|
|
|
|
|
|
|
|
|
|
|
|
|
|
|
|
|
|
|
|
|
|
|
|
|
|
|
|
|
|
|
|
|
|
|
|
|
|
|
|
|
|
|
|
|
|
|
|
|
|
|
|
|
|
|
|
|
|
|
|
|
|
|
|
|
|
|
|
|
|
|
|
|
|
|
|
|
|
|
|
|
|
|
|
|
|
|
|
|
|
|
|
|
|
|
|
|
|
|
|
|
|
|
|
|
|
|
3/27/07 |
ZM400/ZM600 User Guide |
79695L-001 Rev. A |

22Printer Setup
Select a Data Communication Interface
Table 6 • Connecting the Printer to a Computer or Network (Continued)
Interface |
Connection and Configuration |
||||||||
|
|
|
|
|
|
|
|
|
|
Internal wired |
Refer to the ZebraNet 10/100 Print Server User and Reference Guide for |
||||||||
Ethernet print |
configuration instructions. A copy of this manual is available at |
||||||||
server |
http://www.zebra.com/manuals or on the user CD that came with your |
||||||||
|
printer. |
||||||||
|
|
|
|
|
|
|
|
|
|
|
|
|
|
|
|
|
|
|
|
|
|
|
|
|
|
|
|
|
|
|
|
|
|
|
|
|
|
|
|
|
|
|
|
|
|
|
|
|
|
|
|
|
|
|
|
|
|
|
|
|
|
|
|
|
|
|
|
|
|
|
|
|
|
|
|
|
|
|
|
|
|
|
|
|
|
|
|
|
|
|
|
|
|
|
|
|
|
|
|
|
|
|
|
|
|
|
|
|
|
|
|
|
|
|
|
|
|
|
|
Wireless |
Refer to the ZebraNet Wireless Print Server and Wireless Plus Print |
Ethernet print |
Server User Guide for configuration instructions. A copy of this manual is |
server |
available at http://www.zebra.com/manuals or on the user CD that came |
|
with your printer. |
79695L-001 Rev. A |
ZM400/ZM600 User Guide |
3/27/07 |
 Loading...