


ZQ630
Mobile Printer
User Guide
P1102928-002
January 2019

Contents
Proprietary Statements....................................................... |
6 |
Document Conventions...................................................... |
8 |
Introduction to the ZQ630 printer...................................... |
9 |
Unpacking and Inspection................................................................ |
10 |
Reporting Damage........................................................................... |
10 |
ZQ630 Technology............................................................................ |
10 |
PowerPrecision+ (PP+) Battery ................................................ |
11 |
Printing Technology.......................................................................... |
12 |
QR Code........................................................................................... |
12 |
Made for iPhone (MFi)...................................................................... |
13 |
Near Field Communication (NFC).................................................... |
13 |
Color LCD Display............................................................................ |
13 |
Radio-Frequency Identification (RFID)............................................. |
13 |
RFID Calibration............................................................................... |
15 |
ZQ630 Overview................................................................ |
16 |
Getting Ready to Print...................................................... |
18 |
Battery.............................................................................................. |
18 |
Removing the Battery....................................................................... |
18 |
Removing the Battery Tape Insulator................................................ |
19 |
Installing the Battery......................................................................... |
20 |
Battery Safety................................................................................... |
21 |
Charger Safety................................................................................. |
21 |
AC Power Adapter ........................................................................... |
22 |
2 |
|
ZQ630 User Guide |
|
Ethernet and Charging Cradle.......................................................... |
23 |
LED Status Indicator......................................................................... |
23 |
Printer Operation with Cradle........................................................... |
24 |
1-Slot Battery Charger ..................................................................... |
25 |
Charging Status Indicators............................................................... |
25 |
3-Slot Battery Charger ..................................................................... |
26 |
Loading the Media in the ZQ630 Printer........................................... |
27 |
Loading Media Procedure................................................................ |
27 |
Loading Media in Peel-off Mode ...................................................... |
29 |
Operator Controls............................................................................. |
30 |
Standard Control Panel.................................................................... |
30 |
Normal Boot-up LED Behavior......................................................... |
30 |
Sleep Mode LED Behavior............................................................... |
31 |
Shutdown Behavior.......................................................................... |
31 |
Power LED Ring Behavior................................................................ |
32 |
LCD Control Panel............................................................................ |
33 |
Status Bar Icons............................................................................... |
34 |
Home Menu Screen ......................................................................... |
36 |
Home Screen Icons and Parameters............................................... |
38 |
Alert Messages................................................................................. |
38 |
Buttons............................................................................................. |
39 |
Power-Up Sequences....................................................................... |
39 |
Runtime Sequences without LED Flashes....................................... |
40 |
Sleep Mode...................................................................................... |
40 |
Adaptive Print Performance.............................................................. |
41 |
Draft Mode........................................................................................ |
41 |
Verify the Printer is Working............................................................. |
42 |
Printing a Configuration Label.......................................................... |
42 |
Connecting the Printer...................................................................... |
42 |
Cable Communication...................................................................... |
43 |
RS-232C Communications............................................................... |
43 |
USB Communications...................................................................... |
43 |
Providing Strain Relief for Communications Cable........................... |
44 |
Zebra Setup Utilities......................................................................... |
45 |
Zebra Android Printer Setup Utility (for Link-OS Printers)................ |
45 |
Wireless Communications with Bluetooth........................................ |
46 |
3 |
|
ZQ630 User Guide |
|
Bluetooth Networking Overview....................................................... |
46 |
Bluetooth Security Modes................................................................. |
47 |
Bluetooth Minimum Security Modes................................................. |
48 |
WLAN Overview............................................................................... |
49 |
Setting Up the Software.................................................................... |
50 |
Designing Labels.............................................................................. |
50 |
Using Pre-Printed Receipt Media..................................................... |
52 |
Black Mark Dimensions (Receipt Media).......................................... |
52 |
Label Areas....................................................................................... |
52 |
Label Design Examples.................................................................... |
53 |
Keep-Out Areas................................................................................ |
54 |
Near Field Communication (NFC).................................................... |
54 |
NFC Use Cases................................................................................ |
55 |
Wearing the Printer........................................................................... |
56 |
Swivel Belt Clip................................................................................. |
56 |
Adjustable Shoulder Strap................................................................ |
57 |
Soft Case.......................................................................................... |
58 |
Hand Strap....................................................................................... |
59 |
Hard Case........................................................................................ |
60 |
Waist Holster.................................................................................... |
61 |
Preventive Maintenance................................................................... |
62 |
Extending Battery Life...................................................................... |
62 |
General Cleaning Instructions.......................................................... |
62 |
LCD Control Panel Indicators........................................................... |
64 |
Troubleshooting Topics..................................................................... |
66 |
Troubleshooting Tests....................................................................... |
68 |
Printing a Configuration Label.......................................................... |
68 |
Communications Diagnostics........................................................... |
68 |
Specifications.................................................................... |
73 |
Printing Specifications...................................................................... |
73 |
Memory and Communications Specifications................................... |
73 |
Label Specifications.......................................................................... |
74 |
Physical, Environmental and Electrical Specifications..................... |
74 |
CPCL Font and Bar Code Specifications and Commands............... |
74 |
ZPL Font and Bar Code Specifications and Command.................... |
76 |
Communication Ports....................................................................... |
77 |
4 |
|
ZQ630 User Guide |
|
ZQ630 Dimensions........................................................................... |
79 |
ZQ630 Mounting Hole Dimensions................................................... |
80 |
ZQ630 Accessories.......................................................................... |
81 |
Appendix A........................................................................ |
83 |
Interface Cables (RS-232 Cables).................................................... |
83 |
USB Cables...................................................................................... |
84 |
Appendix B........................................................................ |
85 |
Media Supplies................................................................................. |
85 |
Appendix C........................................................................ |
85 |
Maintenance Supplies...................................................................... |
85 |
Appendix D........................................................................ |
86 |
Appendix E...................................................................... |
107 |
Appendix F....................................................................... |
108 |
Battery Disposal............................................................................. |
108 |
Product Disposal............................................................................ |
108 |
Appendix G...................................................................... |
109 |
Using Zebra.com............................................................................ |
109 |
Appendix H....................................................................... |
111 |
Product Support.............................................................................. |
111 |
5
ZQ630 User Guide

Copyright
© 2018 ZIH Corp and/or its affiliates. All rights reserved. ZEBRA and the stylized Zebra head are trademarks of ZIH Corp., registered in many jurisdictions worldwide. All other trademarks are the property of their respective owners.
COPYRIGHTS AND TRADEMARKS: For complete copyright and trademark information, go to www.zebra.com/copyright WARRANTY: For complete warranty information, go to www.zebra.com/warranty
END USER LICENSE AGREEMENT: For complete EULA information, go to www.zebra.com/eula
Terms of Use
Proprietary Statement: This manual contains proprietary information of Zebra Technologies Corporation and its subsidiaries (“Zebra Technologies”). It is intended solely for the information and use of parties operating and maintaining the equipment described herein. Such proprietary information may not be used, reproduced, or disclosed to any other parties for any other purpose without the express, written permission of Zebra Technologies.
Product Improvements: Continuous improvement of products is a policy of Zebra
Technologies. All specifications and designs are subject to change without notice.
Liability Disclaimer: Zebra Technologies takes steps to ensure that its published
Engineering specifications and manuals are correct; however, errors do occur. Zebra
Technologies reserves the right to correct any such errors and disclaims liability resulting therefrom.
Limitation of Liability: In no event shall Zebra Technologies or anyone else involved in the creation, production, or delivery of the accompanying product (including hardware and software) be liable for any damages whatsoever (including, without limitation, consequential damages including loss of business profits, business interruption, or loss of business information) arising out of the use of, the results of use of, or inability to use such product, even if Zebra Technologies has been advised of the possibility of such damages. Some jurisdictions do not allow the exclusion or limitation of incidental or consequential damages, so the above limitation or exclusion may not apply to you.
6
ZQ630 User Guide

Monotype®, Intellifont® and UFST® are trademarks of Monotype Imaging, Inc. registered in the United
States Patent and Trademark Office and may be registered in certain jurisdictions. Andy™, CG Palacio™, CG Century Schoolbook™, CG Triumvirate™, CG Times™, Monotype Kai™, Monotype Mincho™ and Monotype Sung™ are trademarks of Monotype Imaging, Inc. and may be registered in some jurisdictions. HY Gothic Hangul™ is a trademark of Hanyang Systems, Inc. Angsana™ is a trademark of Unity Progress Company (UPC) Limited. Andale®, Arial®, Book Antiqua®, Corsiva®, Gill Sans®, Sorts® and Times New Roman® are trademarks of The Monotype Corporation registered in the
United States Patent and Trademark Office and may be registered in certain jurisdictions.
Century Gothic™, Bookman Old Style™ and Century Schoolbook™ are trademarks of The Monotype
Corporation and may be registered in certain jurisdictions.
HGPGothicB is a trademark of the Ricoh company, Ltd. and may be registered in some jurisdictions.
Univers™ is a trademark of Heidelberger Druckmaschinen AG, which may be registered in certain jurisdictions, exclusively licensed through Linotype Library GmbH, a wholly owned subsidiary of Heidelberger Druckmaschinen AG.
Futura® is a trademark of Bauer Types SA registered in the United States Patent and Trademark
Office and may be registered in some jurisdictions.
TrueType® is a trademark of Apple Computer, Inc. registered in the United States Patent and
Trademark Office and may be registered in certain jurisdictions.
All other product names are the property of their respective owners.
“Made for iPod”, “Made for iPhone”, and “Made for iPad” mean that an electronic accessory has been designed to connect specifically to iPod, iPhone, or iPad, respectively, and has been certified by the developer to meet Apple performance standards. Apple is not responsible for the operation of this device or its compliance with safety and regulatory standards. Please note that the use of this accessory with iPod, iPhone, or iPad may affect wireless performance.
Bluetooth® is a registered trademark of the Bluetooth SIG.
© 1996–2009, QNX Software Systems GmbH & Co. KG. All rights reserved. Published under license by QNX Software Systems Co.
All other brand names, product names, or trademarks belong to their respective holders. ©2018 ZIH Corp.
Works with:
Certified by:
IP 43
7
ZQ630 User Guide
Document Conventions
The following graphic icons are used throughout the documentation set. These icons and their associated meanings are described below.
 Caution • Warns you of the potential for electrostatic discharge.
 Caution • Warns you of a potential electric shock situation.
Caution • Warns you of a situation where excessive heat could cause a burn
Caution • Advises you that failure to take or avoid a specific action could result in physical harm to you.
Caution • Advises you that failure to take or avoid a specific action could result in physical harm to the hardware.
Important • Advises you of information that is essential to complete a task.
Note • Indicates neutral or positive information that emphasizes or supplements important points of the main text.
8
ZQ630 User Guide
Introduction to the ZQ630 printer
Thank you for choosing our Zebra® ZQ630 Mobile Printer. You will find these rugged printers will become a productive and efficient addition to your workplace thanks to their innovative design and state of the art features. Zebra Technologies is the leader in industrial printers with world-class support for all of your bar code printers, software, and supplies. This user’s guide gives you the information you will need to operate the ZQ630 printer. They use some of the latest technologies such as an 802.11ac/Bluetooth 4.1 dual radio, optional RFID capability, a smart battery with PowerPrecision+ functionality, Near Field Communication (NFC), a color LCD display and Made for iPhone® (MFi). MFi printers provide Apple co-processor (MFi) support which allows an Apple
device such as an iPhone or iPad® to authenticate and connect over Bluetooth®.
These printers use CPCL, ZPL and EPL programming languages. To create and print labels using these languages, refer to the Programming Guide for CPCL (p/n P1073699-001), ZPL (p/n P1012728-010) and EPL (p/n 14245L-002). See Appendix H for instructions on how to access manuals on zebra.com.
ZQ630 Software Utilities:
•ZebraNet Bridge Enterprise™: printer configuration, fleet management
•Zebra Setup Utility: single printer configuration, quick setup
•Zebra Mobile Setup Utility: Android-based setup tool
•ZebraDesigner Pro v2: label design
•Zebra Designer Drivers: Windows® driver
•OPOS Driver: Windows driver
•Multiplatform SDK
•Zebra Downloader
•Printer Profile Manager Enterprise (PPME)
(These utilities can be found on the Zebra website at http://www.zebra.com/us/en/support-downloads.html. See Appendix G.)
9
ZQ630 User Guide
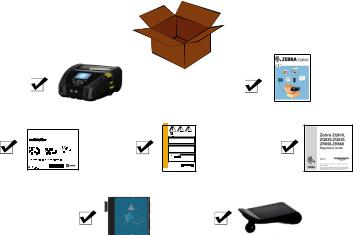
Unpacking and Inspection
•Check all exterior surfaces for damage.
•Open the media cover (refer to “Loading the Media” in the Getting Ready to Print section) and inspect the media compartment for
damage.
In case shipping is required, save the carton and all packing material.
Printer |
|
QSG |
ZEBRA PRODUCT REGISTRATION CARD |
|
|
Registrazionevia internet |
|
|
Registration |
Safety |
Regulatory |
Card |
Guide |
Guide |
|
Battery |
Belt Clip |
Reporting Damage
If you discover shipping damage:
•Immediately notify and file a damage report with the shipping company. Zebra Technologies Corporation is not responsible for any damage incurred during shipment of the printer and will not cover the repair of this damage under its warranty policy.
•Keep the carton and all packing material for inspection.
•Notify your authorized Zebra re-seller.
ZQ630 Technology
The ZQ630 printer use several technologies made popular in other Zebra Mobile Printer product lines, as well as newer, state-of-the- art technologies.
10
ZQ630 User Guide
PowerPrecision+ (PP+) Battery 
The ZQ630 printer uses a 4-cell Li-Ion battery pack with integrated intelligence and data storage capability meeting PowerPrecision+ (PP+) functionality. This intelligent battery has the integrated technology required to collect the detailed realtime battery metrics needed to maximize useful battery life and ensure every battery is healthy and able to hold a full charge. In addition, technology inside the batteries tracks and maintains the metrics required to provide real-time visibility into more meaningful battery statistics, such
as total cycle usage of the battery, whether the battery is old and should be retired or how long a battery will take to fully charge.
Operating Temperature |
Charging Temperature |
Storage Temperature |
|
|
-20˚C to +50˚C |
0˚C to +40˚C |
-25˚C to +65˚C |
|
(-4˚F to 122˚F) |
(32˚F to 104˚F) |
(-13˚F to 149˚F) |
|
|
|
|
|
|
|
|
The ZQ630 printer will only function properly with genuine Zebra smart battery packs.
The smart battery’s health has three states: GOOD, REPLACE, and POOR. The battery health factor determines whether or not the printer can operate and what is communicated to the user via the display.
# of Charge Cycles |
Health |
Power-up Message |
<300 |
GOOD |
None |
≥300 but <550 |
REPLACE |
“Battery Diminished |
|
|
Consider Replacing” * |
≥550 but <600 |
REPLACE |
“Warning-Battery Is Past |
|
|
Useful Life” * |
≥600 |
POOR |
“Replace Battery Shutting |
|
|
Down” ** |
* Warning accompanied by one long beep.
** Warning will flash on and off accompanied by beeping at a rate of once per second. After 30 seconds the printer will shut down.
Note • Power down the printer before removing the battery to minimize the risk of corruption.
11
ZQ630 User Guide
Printing Technology
The ZQ630 printer uses the Direct Thermal method to print human readable text, graphics and barcodes. It incorporates a sophisticated print engine for optimal printing under all operational conditions. Direct thermal printing uses heat to cause a chemical reaction on specially treated media. This reaction creates a dark mark wherever a heated element on the printhead comes in contact with the media. Since the printing elements are arranged very densely at 203 d.p.i. (dots per inch) horizontal and 200 d.p.i. vertical, highly legible characters and graphic elements may
be created a row at a time as the media is advanced past the printhead. This technology has the advantage of simplicity, as there is no requirement for consumable supplies such as ink or toner. However, since the media is sensitive to heat, it will gradually
lose legibility over long periods of time, especially if exposed to environments with relatively high temperatures or in direct sunlight.
QR Code
The QR barcode includes human readable text URL, for example www.zebra.com/zq630-info, which links the user to printer information and short videos on topics such as buying supplies, features overview, loading media, printing a configuration report, cleaning instructions, and accessory information.
Figure 1 • QR Code
QR Code 
12
ZQ630 User Guide

Made for iPhone (MFi)
ZQ630 printer supports communication with Apple devices running iOS 10 or later over a standalone Bluetooth 4.1 radio and the BT4.1 radio included with the 802.11ac (dual) radio.
Near Field Communication (NFC)
The ZQ630 printer supports a passive NFC tag which complies with the “Android Standard Tag format” since Android devices are the most common found on the market today. The NFC tag is programmed from the factory and supports Bluetooth pairing to enable a tablet, smartphone or terminal to automatically pair with the printer via a Bluetooth connection (within the bounds of the security profile being used).
The NFC tag also supports app launching whereby an app developed either by Zebra or a third party will launch on a NFCenabled smartphone, tablet or terminal. Similarly, the NFC tag enables launching to a web support page via a tablet, smartphone or terminal.
Color LCD Display
The ZQ630 printer features a color, non-touch LCD display which supports a 288x240 pixel viewable area. The user will be able
to view the display in both room light and night time conditions. The display is capable of displaying colored text as well as color images. In order to save power, the display will dim after a configurable timeout.
Radio-Frequency Identification (RFID)
The ZQ630 printer is equipped with an RFID encoder/reader, which is integrated into the printer’s printhead assembly. The ZQ630 encodes (writes) information on ultra-thin UHF RFID transponders that are embedded in “smart” labels, tickets, and tags. The printer encodes the information; verifies proper encoding; and prints bar codes, graphics, and/or text on the label’s surface. The ZQ630 printer uses Zebra’s extensive set of RFID commands running under ZPL programming language.
13
ZQ630 User Guide

The RFID transponder is sometimes called the RFID tag or an inlay. The transponder is usually made of an antenna that is bonded to an integrated circuit (IC) chip. The IC chip contains the RF circuit, coders, decoders, and memory. If you hold an RFID label up to the light, you can see the transponder’s antenna, and you can feel a bump in the label where the IC chip is located. The ZQ630 can encode and verify EPC (Electronic Product Code) Generation 2 Class 1 UHF passive RFID tags, in addition to printing human readable text and conventional 1 and 2-D barcode information on Zebra supplied RFID thermal transfer media. EPC is a product numbering standard that can be used to identify a variety of items by using RFID technology. EPC Generation
2 tags offer advantages over other tag types. The tag identification
(TID) memory in a Generation 2 tag includes the chip manufacturer and model number information, which can be used to identify which optional features are present on the tag. These optional features include those for data content and security.
Gen 2 tags typically have a 96-bit EPC identifier, which is different from the 64-bit identifiers common in early EPC tags. The 96-bit EPC code links to an online database, providing a secure way of sharing productspecific information along the supply chain. Gen 2 tags also support much larger data structures. The size of user memory available (if any) varies by the model and manufacturer of the tag.
Encoding and printing of an RFID label usually are completed on the first try, but some failures may occur. If you experience consistent encoding failures, it may signal a problem with the RFID tags, your label formats, or with the transponder placement. If an RFID tag cannot be encoded, “VOID” will be printed on the label. The printer then attempts to read/encode “n” labels before the next format is attempted, where
“n” is specified by the ZPL programming language “^RS” command.
Acceptable values of “n” are 1 to 10 and the default is 3. After printing the defined number of voided RFID labels, the printer default is No
Action (Label format causing the error is dropped).
While the user doesn’t have control of where on the label the VOID is printed, they can control the length of the image. The start of the VOID image is always at the program position (or F0 if a backward program position). More information on the “^RS” command may be found in the
RFID Programming Guide 3 available on zebra.com.
Please refer to Appendix D for details on RFID menu options.
Note • RFID is an optional feature on the ZQ630 and is a factoryinstalled option only.
14
ZQ630 User Guide

RFID Calibration
RFID calibration sets communication parameters for your tag type. This procedure should be done after the printer has been calibrated for the media (length and gap settings), typically a label length calibration. During the RFID calibration process, the printer moves the media, calibrates the RFID tag position, and determines the optimal settings for the RFID media being used.
These settings include the programming position, the read/write power level to use. To restore the printer’s default programming position
at any time, use the “restore” option in the rfid.tag.calibrate SGD command.
Do not remove any labels or tag from the liner (label backing or ‘web’). This allows the printer to determine RFID settings which do not encode adjacent tags.
Always do a Label Length Calibration and RFID Calibration when you change media type. It should not be necessary when simply replacing an empty roll of the same media.
Before beginning, load RFID media into the printer and perform the label length calibration.
1.Press the Feed button  once to advance one label.
2.Press the Home button  . Navigate to the RFID menu button and press the ‘OK’ button on the keypad.
3.Use the ‘Left’ and ‘Right’ arrows on the keypad to browse to
the ‘RFID CALIBRATE’ procedure. Press the ‘OK’ button on the keypad.
4.The printer will slowly feed a label while adjusting the location and RFID read/write communication settings for your chosen RFID tag/ label. The printer will feed an additional label in some cases when calibration has completed successfully with the display message reading: READY.
5.Remove the excess media. Media calibration has finished and you are ready to print.
15
ZQ630 User Guide
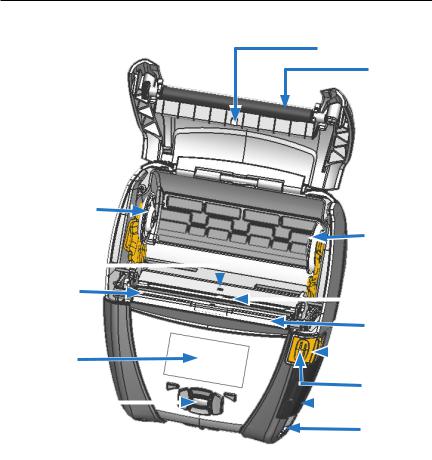
ZQ630 Overview
Figure 2 • Overview of Features
2
1
13 
|
3 |
|
|
|
|
|
|
|
|
|
||
|
|
|
|
|
|
3 |
||||||
|
5 |
|
|
|
|
|
|
|
|
|
|
|
|
|
|
|
|
|
|
|
|
|
|
|
|
|
4 |
|
|
|
|
|
|
|
|
|
|
12 |
|
|
|
|
|
|
|
|
|
|
|
||
|
|
|
|
|
|
|
|
|
|
|||
|
|
|
|
|
|
7 |
||||||
|
11 |
|
|
|
|
|
|
|
|
|
6 |
|
|
|
|
|
|
|
|
||||||
|
|
|
|
|
|
|
|
|
|
|
|
|
|
|
|
|
|
|
8 |
||||||
|
9 |
|
|
|
|
|
|
19 |
||||
|
|
|
|
|
|
|||||||
|
|
|
|
|
|
10 |
||||||
1. |
Platen Roller |
14. |
Belt Clip |
|||||||||
2. |
Back Side Sensor |
15. |
Battery |
|||||||||
3. |
Media Support Disks |
16. |
DC Input |
|||||||||
4. |
Tear Bar |
17. |
MAC Address Label |
|||||||||
5. |
Front Side Sensor |
18. |
Docking Contacts |
|||||||||
6. |
Peeler Lever |
19. |
USB/RS-232 Comm Ports |
|||||||||
7. |
Peeler Bail |
20. |
Print Touch (NFC) Icon |
|||||||||
8.Latch Release Lever
9.Key Pad
10.Strap Post
11.Status Screen
12.Printhead
13.Media Cover
16
ZQ630 User Guide

14
 15
15
16
17 18
www.zebra.com/zq630-info
Note • Scanning the QR code with a smartphone will provide printerspecific information at www.zebra.com/zq630-info.
Note • Tapping the Zebra Print Touch™ icon with a Near Field
Communication (NFC) enabled smartphone will provide instant access to printer-specific information. For more information about
NFC and Zebra products, go to http://www.zebra.com/nfc. Bluetooth pairing applications via NFC is also possible. Please see Zebra Multi platform SDK for more information.
20
17
ZQ630 User Guide
Getting Ready to Print
Battery
Installing/Removing Battery & Battery Tape Insulator
Important • Batteries are shipped in sleep mode to preserve their maximum capacity while in storage prior to initial use. Plug in the AC adapter (see page 22) or insert the battery into the 1-Slot Battery Charger (see page 25) or 3-Slot Battery Charger (see page 29) to wake it up before using for the first time.
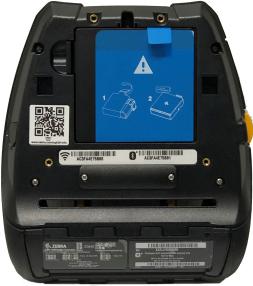
Removing the Battery
1. If a belt clip is present on the bottom of the printer, rotate it such that it provides clearance for the battery or remove altogether.
2.Depress the latch on the battery pack (where indicated).
3.Rotate the pack away from the battery well. Lift the battery up and out of the printer.
18
ZQ630 User Guide
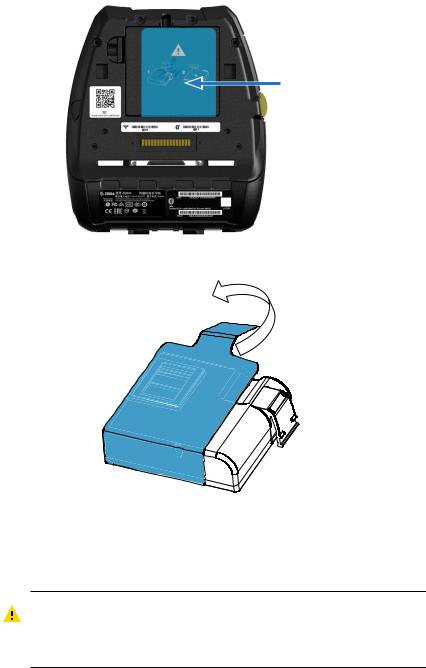
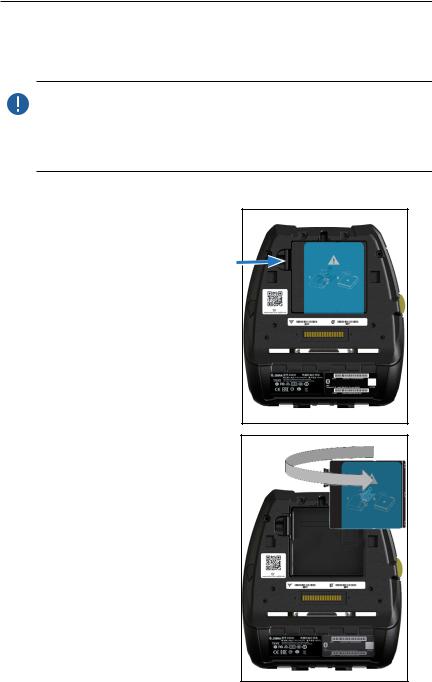
Removing the Battery Tape Insulator
Battery Tape
Insulator
1. Pull up on the tape insulator tab located on the bottom of the battery pack.
2. Peel back the tape insulator and remove it from the top of the battery pack. Discard upon removal.
Caution • Battery can explode, leak or catch fire if improperly charged or exposed to high temperature. Do not disassemble, crush, puncture, short external contacts or dispose in fire or water. Charge on a Zebra approved Lithium-Ion charger only.
19
ZQ630 User Guide
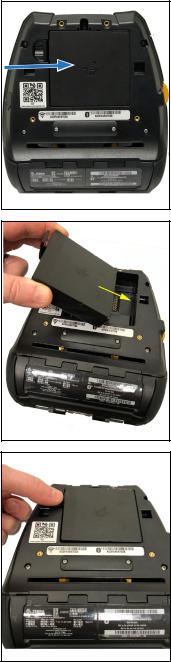
Installing the Battery
1.Locate the battery compartment on the bottom of the printer (where indicated).
2.Swivel the belt clip (if present) to access the battery compartment or remove altogether.
3.Insert the battery into the printer as shown. (It is not possible to insert the pack in the incorrect orientation.)
4. Rock the battery into the compartment as shown until it locks in place.
20
ZQ630 User Guide
Battery Safety
Caution • Avoid accidental short circuiting of any battery. Allowing battery terminals to contact conductive material will create a short circuit which could cause burns and other injuries or could start a fire.
Important • Always refer to the Important Safety Information data sheet shipped with each printer and the Technical Bulletin shipped with each battery pack. These documents detail procedures to ensure maximum reliability and safety while using this printer.
Important • Always dispose of used batteries properly. Refer to Appendix E for more battery recycling information.
Caution • Use of any charger not approved specifically by Zebra for use with its batteries could cause damage to the battery pack or the printer and will void the warranty.
Caution • Do not incinerate, disassemble, short circuit, or expose to temperatures higher than 65oC (149oF).
Charger Safety
Do not place any charger in locations where liquids or metallic objects may be dropped into the charging bays.
21
ZQ630 User Guide
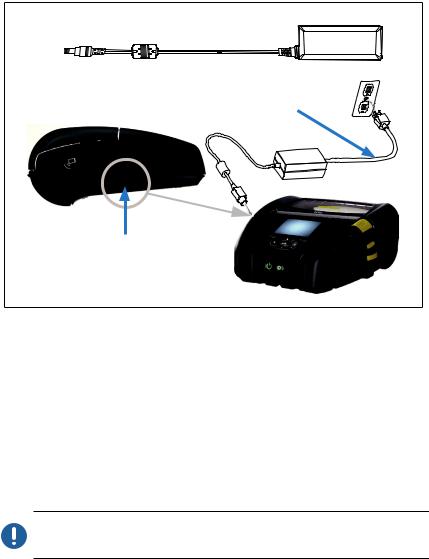
AC Power Adapter
(p/n P1031365-024 with US Type-A Line Cord)
Figure 3 • AC Power Adapter Charging
AC Adapter
AC Power Cord
(varies with geographic location)
DC Input
•Open the protective cover on the printer to expose the DC input charger jack.
•Connect the appropriate AC power cord for your location to the adapter and then plug the power cord into an AC receptacle.
•Plug the barrel plug from the AC adapter into the charger jack on the printer.
•The printer will power up and begin charging. The printer can be left on or turned off at this point. Charging will continue in either state.
Important • While it’s possible to charge the battery when using the printer, charge times will increase under this condition.
22
ZQ630 User Guide

Ethernet and Charging Cradle
The ethernet cradle is an expansion base intended for use with the ZQ630 printer. The cradle provides charging power to the docked printer as well as providing a standard 10/100 Mb/s Ethernet port for communication to the printer. The cradle also supplies battery charging power to the docked printer and acts as a supplementary power source.
The cradle features two LED’s to indicate the status of the cradle: Solid green to indicate when power is provided to the input of the cradle; and blinking green to indicate Ethernet activity. The cradle allows the user to dock the printer easily and remove it with the push of a button. The printer will remain operable while docked, i.e. display is viewable, charge LED status is viewable, and printer controls and data entry are available. The printer will still print while docked and the user will be able to replace the media as well.
LED Status Indicator
|
LED Status |
Indication |
|
|
|
|
Solid Green |
Power On |
|
|
|
|
Blinking Green |
Ethernet Activity |
|
|
|
|
|
|
Note • Remove the docking contacts cover on the bottom of the printer before docking the printer in the cradle.
Note • Clean the docking contacts with a Zebra cleaning pen to remove any residue left behind by the label.
23
ZQ630 User Guide
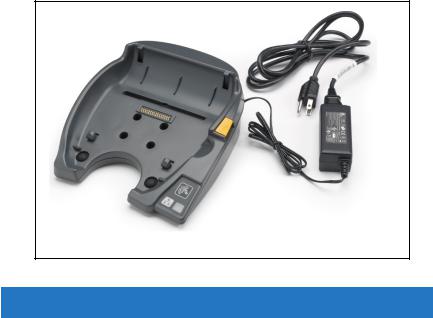
Figure 4 • Ethernet Cradle
Height |
Width |
Length |
|
|
|
66.2 mm (2.6 in.) |
200.6 mm (7.89 in.) |
219.61 mm (8.64 in.) |
|
|
|
Printer Operation with Cradle
•ZQ630 printer will charge when placed in the cradle.
•Docking the printer in the cradle will automatically turn the printer on to ensure it is available to be managed remotely.
•When the printer detects input power from the cradle, and the presence of a live Ethernet link, it will automatically connect to the Ethernet network.
•The 802.11ac radio will be turned off when the Ethernet link is active. It will turn back on if the Ethernet link is no longer active.
•For printers with a Bluetooth radio, this interface will remain active while the printer is in the cradle.
•The serial and USB ports will remain active while the printer is in the cradle.
•The DC input barrel jack connector cannot be used while the printer is in the cradle. The DC barrel jack should be plugged directly into the cradle instead.
24
ZQ630 User Guide

 Note • The printer provides over voltage protection such that no damage occurs when voltages from 0-36V are applied at the DC Power jack. Upon application of voltage greater than 36V, the DC line fuse will permanently open to reduce fire hazard. The battery is only charged when 12VDC is applied using the Zebra AC adapter.
1-Slot Battery Charger
(p/n SAC-MPP-1BCHGUS1-01SA with US Type-A Line Cord)
Use Case: Home Office/Small Business
The 1-Slot Battery Charger provides the user with a single, spare battery charging solution. Similar to the 3-Slot Battery Charger, the single charger will charge a 4-cell battery within six (6) hours.
Figure 5 • 1-Slot Battery Charger
LED Indicator
25
ZQ630 User Guide
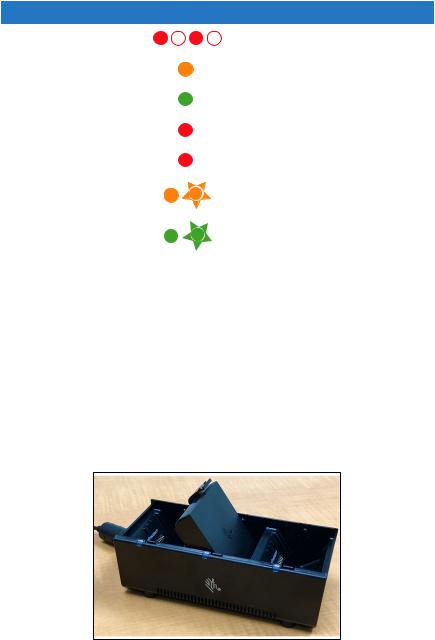
Charging Status Indicators
Both the 3-slot and 1-slot battery chargers use an LED indicator located next to each slot to indicate the charge state in either green, red, or amber as detailed below.
Mode |
Charging Indication |
Description |
|
|
|
Charge Fault |
|
Fast blinking red |
|
|
|
Charging |
|
Solid amber |
(Healthy) |
|
|
|
|
|
Charge Done |
|
Solid green |
(Healthy) |
|
|
|
|
|
Charging |
|
Solid red |
(Unhealthy) |
|
|
|
|
|
Charging Done |
|
Solid red |
(Unhealthy) |
|
|
|
|
|
Best Battery |
|
Alternates between solid and |
(Charging) |
|
bright bursts of amber |
|
|
|
Best Battery |
|
Alternates between solid and |
(Charge Done) |
|
bright bursts of green |
|
|
|
3-Slot Battery Charger
(p/n SAC-MPP-3BCHGUS1-01) Dual 3-Slot Battery Charger (p/n
SAC-MPP-6BCHUS1-01) w/ US Type-A Line Cord
Use Case: Settlement Room
The 3-Slot Battery Charger is a charging system for use with the 2-cell lithium-ion batteries used in the ZQ630 printer. The 3-slot charger is capable of charging three 4-cell batteries simultaneously within six (6) hours. It can either be used as a standalone charger or mounted on a 5-slot share cradle.
Figure 6 • 3-Slot Battery Charger
26
ZQ630 User Guide
Note • For detailed information on the 1-Slot, 3-Slot Battery Charger and 3-Slot Dual Pack Charger, refer to the P1096323101, P1096767-101 and P1097966-101 Quick Start Guides at https://www.zebra.com/us/en/support-downloads.html
Loading the Media in the ZQ630 Printer
You can operate ZQ630 printer in one of two different modes: TearOff or Peel-Off. Tear-Off mode allows you to tear off each label (or a strip of labels) after it is printed. In Peel-Off mode, the backing material is peeled away from the label as it is printed. When printing batches, after you remove the label, the next one is printed.
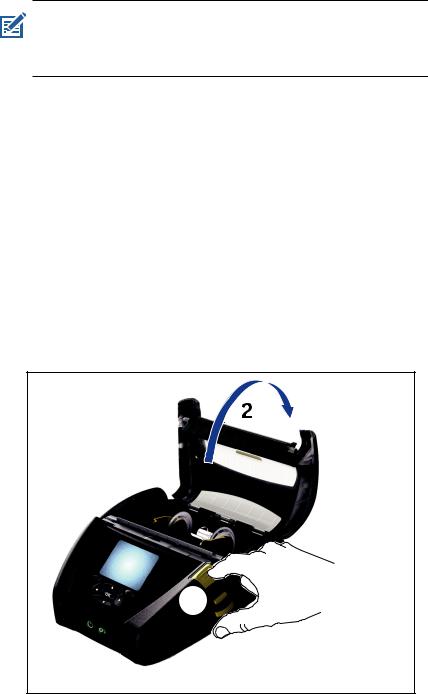
Loading Media Procedure
1. Open the printer (Refer to Figure 7).
•Press the Media Cover Button on the side of the printer as shown in “1” below. The Media Cover will open automatically.
•Rotate the Media Cover back completely as shown in “2”, exposing the media compartment and adjustable media supports.
Figure 7 • Opening the Printer
1 
27
ZQ630 User Guide
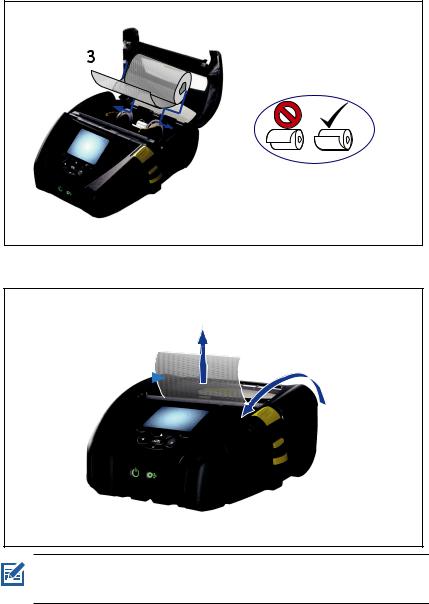
2.Pull the media supports apart. Insert the roll of media (in the orientation shown) between the supports and let the supports secure the media in place. The supports will adjust themselves to the width of the media, and the media roll should be able to spin freely on the supports.
Figure 8 • Loading Media
3.If you plan to use the printer in tear-off mode, close the media cover as shown below.
Pull Media out of |
4 |
Close Media |
|
Printer |
|
|
Cover |
|
|
||
 Note • Please refer to the Programming Guide (P1012728-010) for information on changing the setting to adjust the media feed length via a Set-Get-Do (SGD).
28
ZQ630 User Guide
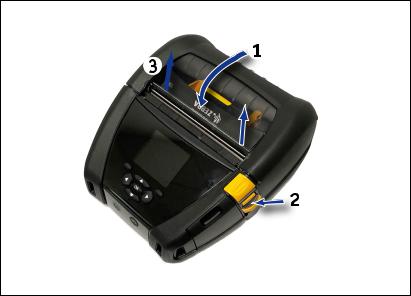
Loading Media in Peel-off Mode
•If you plan to use the printer in the peel-off mode, peel a few labels off of the media and load the media as previously described.
•Press down on the latch release lever to open the media cover and load the media as shown in Figures 7 and 8.
•Close the media cover as shown in (1) in Figure 9.
•Push the peeler lever up (2) and lock it in place to release the peeler bail into the “up” position (3).
•The media will feed between the peeler bail and platen.
Figure 9 • Activating Peeler Bar
4
•Turn on the printer or press the Feed button on the front of the printer if the printer is already on. The printer will advance the media to the next label, if printing labels. If you are printing on journal media, the printer will advance a short strip of media.
To disengage the peeler bail, press the button on the peeler lever and press down on the peeler button to lock it in place in its original home position.
29
ZQ630 User Guide

Operator Controls
The ZQ630 printer comes equipped with a keypad control panel and a color LCD graphical user interface. The standard control panel is illustrated in Figure 10. The LCD interface allows easy display and selection of many printer functions as detailed on following pages.
Standard Control Panel
The standard control panel has multiple control buttons and two multipurpose indicators.
•The Power Button (Fig. 10) turns the printer on and off. It also puts the printer in Sleep Mode and wakes it from sleep.
•The Media Feed Button (Fig. 10) advances a length of media which is determined by the type of media being used. Label media will be advanced to the next gap or bar sense marker. Journal (plain) media will be advanced by a length determined by the printer’s software.
•Four Way Navigation Buttons (Fig. 12) allow the user to scroll between functions on the LCD user space. (The Navigation Buttons do not apply to the Status Bar and Navigation Bar.)
•Enter Button allows the user to select the desired function highlighted on the LCD interface and is indicated by the word “OK”.
•Two software defined function keys (Fig. 12) allow the user to select a function listed on the navigation bar
Figure 10 • Control Panel
Power Button
Press to turn unit on. There will be approximately a 20 second boot up time.
Press for 3 sec. to turn unit off.
Feed Button
Press to advance a blank label or a software-determined length of journal media.
30
ZQ630 User Guide
 Loading...