


 Loading...

SPECIAL MESSAGE SECTION
PRODUCT SAFETY MARKINGS: Yamaha electronic products may have either labels similar to the graphics shown below or molded/stamped facsimiles of these graphics on the enclosure. The explanation of these graphics appears on this page. Please observe all cautions indicated on this page and those indicated on the safety instruction section.
SEE BOTTOM OF ENCLOSURE OR LOWER FRONT PANEL FOR GRAPHIC SYMBOL MARKINGS
The exclamation point within the equilateral triangle is intended to alert the user to the presence of important operating and maintenance (servicing) instructions in the literature accompanying the product.
The lightning flash with arrowhead symbol within the equilateral triangle is intended to alert the user to the presence of uninsulated “dangerous voltage” within the product’s enclosure that may be of sufficient magnitude to constitute a risk of electrical shock.
IMPORTANT NOTICE: All Yamaha electronic products are tested and approved by an independent safety testing laboratory in order that you may be sure that when it is properly installed and used in its normal and customary manner, all foreseeable risks have been eliminated. DO NOT modify this unit or commission others to do so unless specifically authorized by Yamaha. Product performance and/or safety standards may be diminished. Claims filed under the expressed warranty may be denied if the unit is/has been modified. Implied warranties may also be affected.
SPECIFICATIONS SUBJECT TO CHANGE: The information contained in this manual is believed to be correct at the time of printing. However, Yamaha reserves the right to change or modify any of the specifications without notice or obligation to update existing units.
ENVIRONMENTAL ISSUES: Yamaha strives to produce products that are both user safe and environmentally friendly. We sincerely believe that our products and the production methods used to produce them, meet these goals. In keeping with both the letter and the spirit of the law, we want you to be aware of the following:
Battery Notice: This product MAY contain a small nonrechargeable battery which (if applicable) is soldered in place. The average life span of this type of battery is approximately five years. When replacement becomes neccessary, contact a qualified service representative to perform the replacement.
Warning: Do not attempt to recharge, disassemble, or incinerate this type of battery. Keep all batteries away from children. Dispose of used batteries promptly and as regulated by applicable laws. Note: In some areas, the servicer is required by law to return the defective parts. However, you do have the option of having the servicer dispose of these parts for you.
Disposal Notice: Should this product become damaged beyond repair, or for some reason its useful life is considered to be at an end, please observe all local, state, and federal regulations that relate to the disposal of products that contain lead, batteries, plastics, etc.
NOTICE: Service charges incurred due to lack of knowledge relating to how a function or effect works (when the unit is operating as designed) are not covered by the manufacturer’s warranty, and are therefore the owners responsibility. Please study this manual carefully and consult your dealer before requesting service.
NAME PLATE LOCATION: The graphic below indicates the location of the name plate. The model number, serial number, power requirements, etc., are located on this plate. You should record the model number, serial number, and the date of purchase in the spaces provided below and retain this manual as a permanent record of your purchase.
HS
YAMAHA CORPORATION MADE IN JAPAN
PATENTS
Model ________________________________________
Serial No. _____________________________________
Purchase Date __________________________________
92-469 1 

IMPORTANT SAFETY INSTRUCTIONS
WARNING — When using any electrical or electronic product, basic precautions should always be followed. These precautions include, but are not limited to, the following:
1.
2.
3.
4.
5. Do not use this apparatus near water.
6. Clean only with dry cloth.
7.
8. Do not install near any heat sources such as radiators, heat registers, stoves, or other apparatus (including amplifiers) that produce heat.
9. Do not defeat the safety purpose of the polarized or grounding-type plug. A polarized plug has two blades with one wider than the other. A grounding type plug has two blades and a third grounding prong. The wide blade or the third prong are provided for your safety. If the provided plug does not fit into your outlet, consult an electrician for replacement of the obsolete outlet.
10. Protect the power cord from being walked on or pinched particularly at plugs, convenience receptacles, and the point where they exit from the apparatus.
11. Only use attachments/accessories specified by the manufacturer.
12. Use only with the cart, stand, tripod, bracket, or table specified by the manufacturer, or sold with the apparatus. When a cart is used, use caution when moving the cart/apparatus combination to avoid injury from tip-over.
13. Unplug this apparatus during lightning storms or when unused for long periods of time.
14. Refer all servicing to qualified service personnel. Servicing is required when the apparatus has been damaged in any way, such as power-supply cord or plug is damaged, liquid has been spilled or objects have fallen into the apparatus, the apparatus has been exposed to rain or moisture, does not operate normally, or has been dropped.
15. This product shall not be exposed to dripping or splashing and that no objects filled with liquids, such as vases, shall be placed on the apparatus.
16. Do not put burning items, such as candles, on the apparatus.
17. Do not place this product or any other objects on the power cord or place it in a position where anyone could walk on, trip over, or roll anything over power or connecting cords of any kind. The use of an extension cord is not recommended! If you must use an extension cord, the minimum wire size for a 25’ cord (or less) is 18 AWG. NOTE: The smaller the AWG number, the larger the current handling capacity. For longer extension cords, consult a local electrician.
18. WARNING — To reduce the risk of fire or electric shock, do not expose this apparatus to rain or moisture.
19. Care should be taken that objects do not fall and liquids are not spilled into the enclosure through any openings that may exist.
20. This product, either alone or in combination with an amplifier and headphones or speaker/s, may be capable of producing sound levels that could cause permanent hearing loss. DO NOT operate for a long period of time at a high volume level or at a level that is uncomfortable. If you experience any hearing loss or ringing in the ears, you should consult an audiologist. IMPORTANT: The louder the sound, the shorter the time period before damage occurs.
21. Some Yamaha products may have benches and/or accessory mounting fixtures that are either supplied as a part or the product or as optional accessories. Some of these items are designed to be dealer assembled or installed. Please make sure that benches are stable and any optional fixtures (where applicable) are well secured BEFORE using. Benches supplied by Yamaha are designed for seating only. No other uses are recommended.
22. This product shall be connected to a MAINS socket outlet with a protective earthing connection.
23. This product has a power switch for shutting off all system. The switch is located on the Power Supply Unit nearby the entrance of the AC cord. Note that the switch on the Controller does not shutdown all system.
24. Make sure that the plug of the Power Supply Unit’s power cable can easily be disconnected from the AC outlet as a measure of precaution.
Battery
–Danger of explosion if battery incorrectly replaced. Replace only with the same type.
Outlets for Speakers
–Connect speakers of 1A or less of totals. Do not connect other products except speakers.
–Consult Yamaha service technician when using the outlets outside the purchased area.
92-469-DK 2 PLEASE KEEP THIS MANUAL

IMPORTANT NOTICE FOR THE UNITED KINGDOM
Connecting the Plug and Cord
IMPORTANT: The wires in mains lead are coloured in accordance with the following code:
GREEN-AND-YELLOW BLUE
BROWN
As the colours of the wires in the mains lead of this apparatus may not correspond with the coloured markings identifying the terminals in your plug, proceed as follows:
The wire which is coloured GREEN and YELLOW must be connected to the terminal in the plug which is marked by the letter E or by the safety earth symbol or coloured GREEN and YELLOW.
The wire which is coloured BLUE must be connected to the terminal which is marked with the letter N or coloured BLACK.
The wire which is coloured BROWN must be connected to the terminal which is marked with the letter L or coloured RED.
CAUTION—Use of controls or adjustments or performance of procedures other than those specified herein may result in hazardous radiation exposure.
ATTENTION—L’utilisation de commandes ou de réglages, ou l’exécution de procédures, autres que celles qui sont spécifiées ici peuvent conduire à une exposition à des rayonnements dangereux.
VORSICHT—Die Verwendung von Bedienungselementen oder Einstellungen, oder die Anwendung von Verfahren, die nicht in dieser Anleitung angegeben sind, kann zu gefährlicher Freisetzung von Strahlung fü hren.
PRECAUCIÓN—El emplo de controles o ajustes o la realización de procedimientos distintos a los especificados en este manual podrá resultar en una peligrosa exposición a la radiación.
ATTENZIONE—L’uso di comandi o di regolazioni o l’esecuzione di procedimenti diversi da quelli specificati in questo manuale possono causare l’esposizione pericolosa alle radiazioni.
Laite on liitettävä suojamaadoituskoskettimilla varustettuun pistorasiaan.
Apparatet må tilkoples jordet stikkontakt.
Apparaten skall anslutas till jordat uttag.
The control unit is classified as a Class 1 laser product. One of the labels below is located on the inside of the CD drive unit.
L’unité de commande est classée produit laser de Classe 1. Une des étiquettes ci-dessous ou une étiquette similaire se trouve à l’intérieur du lecteur de CD.
Die Steuereinheit ist als ein Lasergerät der Klasse 1 eingestuft. Eins der nachstehend abgebildeten Etiketts bzw. ein Etikett ähnlichen Inhalts befindet sich im Inneren des CD-Laufwerks.
La unidad de control está clasificada como producto láser de Clase 1. Una de las etiquetas siguientes o similar está situada en el interior de la unidad de disco CD.
L’unità di controllo è classificata come prodotto laser di Classe 1. Una delle etichette seguenti o simile è situata all’interno dell’unità CD.
CLASS 1 LASER PRODUCT CLASS 1 LASER PRODUCT LASER KLASSE 1
LASER KLASSE 1 LUOKAN 1 LASERLAITE KLASS 1 LASER APPARAT
APAREIL A LASER DE CLASSE 1 EN60825
Laser Diode Properties
*Material: GaAIAs
*Wavelength: 790 nm
*Laser Output Power at the lens of the Laser Pick Up Unit: max. 0.2 mW
Propriétés de la diode à semi-conducteur
*Matériau : GaAlAs
*Longueur d’ondes : 790 nm
*Puissance de sortie laser à la lentille du capteur laser : 0.2 mW max.
Eigenschaften der Laserdiode
*Werkstoff: GaAlAs
*Wellenlänge: 790 nm
*Laserausgangsleistung an Abtasterlinse: 0.2 mW max.
Propiedades del diodo láser
*Material: GaAIAs
*Longitud de onda: 790 nm
*Potencia de salida láser en el objetivo de la unidad Laser Pick Up: máx. 0.2 mW
Proprietà del diodo laser
*Materiale: GaAlAs
*Lunghezza d’onda: 790 nm
*Potenza di uscita del laser alla lente della testina del laser: max. 0.2 mW
Information for Users on Collection and Disposal of Old Equipment and used Batteries
These symbols on the products, packaging, and/or accompanying documents mean that used electrical and electronic products and batteries should not be mixed with general household waste.
For proper treatment, recovery and recycling of old products and used batteries, please take them to applicable collection points, in accordance with your national legislation and the Directives 2002/96/EC and 2006/66/EC.
By disposing of these products and batteries correctly, you will help to save valuable resources and prevent any potential negative effects on human health and the environment which could otherwise arise from inappropriate waste handling.
For more information about collection and recycling of old products and batteries, please contact your local municipality, your waste disposal service or the point of sale where you purchased the items.
[For business users in the European Union]
If you wish to discard electrical and electronic equipment, please contact your dealer or supplier for further information.
[Information on Disposal in other Countries outside the European Union]
These symbols are only valid in the European Union. If you wish to discard these items, please contact your local authorities or dealer and ask for the correct method of disposal.
Note for the battery symbol (bottom two symbol examples):
This symbol might be used in combination with a chemical symbol. In this case it complies with the requirement set by the Directive for the chemical involved.
Information concernant la Collecte et le Traitement des piles usagées et des déchets d’équipements électriques et électroniques
Les symboles sur les produits, l’emballage et/ou les documents joints signifient que les produits électriques ou électroniques usagés ainsi que les piles ne doivent pas être mélangés avec les déchets domestiques habituels. Pour un traitement, une récupération et un recyclage appropriés des déchets d’équipements électriques et
électroniques et des piles usagées, veuillez les déposer aux points de collecte prévus à cet effet, conformément à la réglementation nationale et aux Directives 2002/96/EC et 2006/66/EC.
En vous débarrassant correctement des déchets d’équipements électriques et électroniques et des piles usagées, vous contribuerez à la sauvegarde de précieuses ressources et à la prévention de potentiels effets négatifs sur la santé humaine qui pourraient advenir lors d’un traitement inapproprié des déchets.
Pour plus d’informations à propos de la collecte et du recyclage des déchets d’équipements électriques et électroniques et des piles usagées, veuillez contacter votre municipalité, votre service de traitement des déchets ou le point de vente où vous avez acheté les produits.
[Pour les professionnels dans l’Union Européenne]
Si vous souhaitez vous débarrasser des déchets d’équipements électriques et électroniques veuillez contacter votre vendeur ou fournisseur pour plus d’informations.
[Information sur le traitement dans d’autres pays en dehors de l’Union Européenne]
Ces symboles sont seulement valables dans l’Union Européenne. Si vous souhaitez vous débarrasser de déchets d’équipements électriques et électroniques ou de piles usagées, veuillez contacter les autorités locales ou votre fournisseur et demander la méthode de traitement appropriée.
Note pour le symbole « pile » (deux exemples de symbole ci-dessous) :
Ce symbole peut être utilisé en combinaison avec un symbole chimique. Dans ce cas il respecte les exigences établies par la Directive pour le produit chimique en question.

Verbraucherinformation zur Sammlung und Entsorgung alter Elektrogeräte und benutzterBatterien
Befinden sich diese Symbole auf den Produkten, der Verpackung und/oder beiliegenden Unterlagen, so sollten benutzte elektrische Geräte und Batterien nicht mit dem normalen Haushaltsabfall entsorgt werden.
In Übereinstimmung mit Ihren nationalen Bestimmungen und den Richtlinien 2002/96/EC und 2006/66/EC, bringen Sie alte Geräte und benutzte Batterien bitte zur fachgerechten Entsorgung, Wiederaufbereitung und Wiederverwendung zu den entsprechenden Sammelstellen.
Durch die fachgerechte Entsorgung der Elektrogeräte und Batterien helfen Sie, wertvolle Ressourcen zu schützen und verhindern mögliche negative Auswirkungen auf die menschliche Gesundheit und die Umwelt, die andernfalls durch unsachgerechte Müllentsorgung auftreten könnten.
Für weitere Informationen zum Sammeln und Wiederaufbereiten alter Elektrogeräte und Batterien, kontaktieren Sie bitte Ihre örtliche Stadtoder Gemeindeverwaltung, Ihren Abfallentsorgungsdienst oder die Verkaufsstelle der Artikel.
[Information für geschäftliche Anwender in der Europäischen Union]
Wenn Sie Elektrogeräte ausrangieren möchten, kontaktieren Sie bitte Ihren Händler oder Zulieferer für weitere Informationen.
[Entsorgungsinformation für Länder außerhalb der Europäischen Union]
Diese Symbole gelten nur innerhalb der Europäischen Union. Wenn Sie solche Artikel ausrangieren möchten, kontaktieren Sie bitte Ihre örtlichen Behörden oder Ihren Händler und fragen Sie nach der sachgerechten Entsorgungsmethode.
Anmerkung zum Batteriesymbol (untere zwei Symbolbeispiele):
Dieses Symbol kann auch in Kombination mit einem chemischen Symbol verwendet werden. In diesem Fall entspricht dies den Anforderungen der Direktive zur Verwendung chemischer Stoffe.
Información para Usuarios sobre Recolección y Disposición de Equipamiento Viejo y Baterías usadas
Estos símbolos en los productos, embalaje, y/o documentación que se acompañe significan que los productos electrónicos y eléctricos usados y las baterías usadas no deben ser mezclados con desechos hogareños corrientes. Para el tratamiento, recuperación y reciclado apropiado de los productos viejos y las baterías usadas, por favor llévelos a puntos de recolección aplicables, de acuerdo a su legislación nacional y las directivas 2002/96/EC y 2006/ 66/EC.
Al disponer de estos productos y baterías correctamente, ayudará a ahorrar recursos valiosos y a prevenir cualquier potencial efecto negativo sobre la salud humana y el medio ambiente, el cual podría surgir de un inapropiado manejo de los desechos.
Para mayor información sobre recolección y reciclado de productos viejos y baterías, por favor contacte a su municipio local, su servicio de gestión de residuos o el punto de venta en el cual usted adquirió los artículos.
[Para usuarios de negocios en la Unión Europea]
Si usted desea deshacerse de equipamiento eléctrico y electrónico, por favor contacte a su vendedor o proveedor para mayor información.
[Información sobre la Disposición en otros países fuera de la Unión Europea]
Estos símbolos sólo son válidos en la Unión Europea. Si desea deshacerse de estos artículos, por favor contacte a sus autoridades locales y pregunte por el método correcto de disposición.
Nota sobre el símbolo de la batería (ejemplos de dos símbolos de la parte inferior)
Este símbolo podría ser utilizado en combinación con un símbolo químico. En este caso el mismo obedece a un requerimiento dispuesto por la Directiva para el elemento químico involucrado.
Informazioni per gli utenti sulla raccolta e lo smaltimento di vecchia attrezzatura e batterie usate
Questi simboli sui prodotti, sull’imballaggio, e/o sui documenti che li accompagnano significano che i prodotti e le batterie elettriche e elettroniche non dovrebbero essere mischiati con i rifiuti domestici generici.
Per il trattamento, recupero e riciclaggio appropriati di vecchi prodotti e batterie usate, li porti, prego, ai punti di raccolta appropriati, in accordo con la Sua legislazione nazionale e le direttive 2002/96/CE e 2006/66/CE.
Smaltendo correttamente questi prodotti e batterie, Lei aiuterà a salvare risorse preziose e a prevenire alcuni potenziali effetti negativi sulla salute umana e l’ambiente, che altrimenti potrebbero sorgere dal trattamento improprio dei rifiuti.
Per ulteriori informazioni sulla raccolta e il riciclaggio di vecchi prodotti e batterie, prego contatti la Sua amministrazione comunale locale, il Suo servizio di smaltimento dei rifiuti o il punto vendita dove Lei ha acquistato gli articoli.
[Per utenti imprenditori dell’Unione europea]
Se Lei desidera disfarsi di attrezzatura elettrica ed elettronica, prego contatti il Suo rivenditore o fornitore per ulteriori informazioni.
[Informazioni sullo smaltimento negli altri Paesi al di fuori dell’Unione europea]
Questi simboli sono validi solamente nell’Unione europea. Se Lei desidera disfarsi di questi articoli, prego contatti le Sue autorità locali o il rivenditore e richieda la corretta modalità di smaltimento.
Noti per il simbolo della batteria (sul fondo due esempi di simbolo):
È probabile che questo simbolo sia usato in combinazione con un simbolo chimico. In questo caso è conforme al requisito stabilito dalla direttiva per gli elementi chimici contenuti.
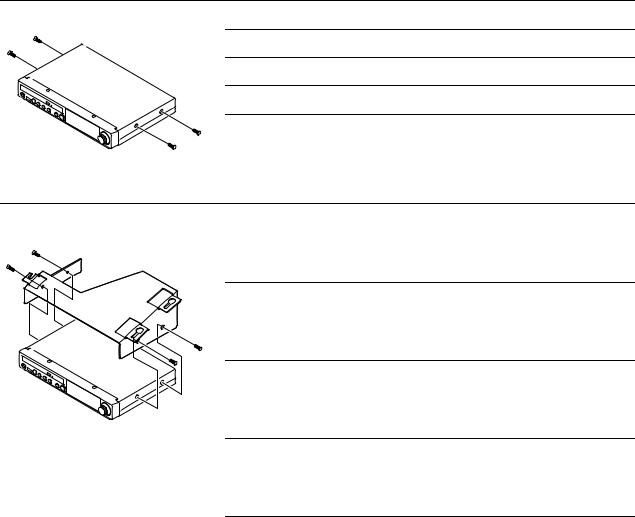
Mounting the Control Unit to the Grand Piano Installation du boîtier de commande sur un piano à queue Montage der Steuereinheit des Flugels
Montaje de la Unidad de control en el Gran Piano Installazione dell’unità di controllo al Pianoforte a coda
(1) |
Remove the four screws from the sides of the control unit. |
|
Retirer les quatre vis sur les côtés du boîtier de commande. |
Entfernen Sie die vier Schrauben an den Seiten der Steuereinheit.
Quite los cuatro tornillos laterales de la unidad de control.
Togliere le quattro viti sui lati dell’unità di controllo.
(2) |
Place the metal suspension bracket, supplied with the Disklavier grand |
|
model, over the control unit, then secure the metal suspension bracket to |
|
the control unit using the four screws (4 10) supplied with the |
Disklavier.
Placez la platine de fixation de suspension en métal, fournie avec le modèle Grand Disklavier, au-dessus du boîtier de commande, puis fixez la platine de fixation de suspension en métal au boîtier de commande en utilisant les quatre vis (4 10) fournies avec le Disklavier.
Platzieren Sie die mit dem Disklavier-Spitzenflugel mitgelieferte Metalltraverse uber der Steuereinheit und fixieren Sie die Metalltraverse mit den vier mit dem Disklavier mitgelieferten Schrauben (4 10) an der Steuereinheit.
Coloque el soporte metálico de suspensión suministrado con el modelo de gran piano Disklavier en la unidad de control, luego fije el soporte metálico de suspensión utilizando los cuatro tornillos (4 10) suministrados con el Disklavier.
Posizionare il supporto di sospensione in metallo, fornito in dotazione con il modello per pianoforte a coda, sull’unità di controllo, quindi fissare il supporto di sospensione in metallo all’unità di controllo utilizzando le quattro viti (4 10) fornite in dotazione con il Disklavier.
(3) |
|
|
|
|
|
|
|
|
|
|
|
|
|
|
|
|
|
|
|
|
|
|
|
|
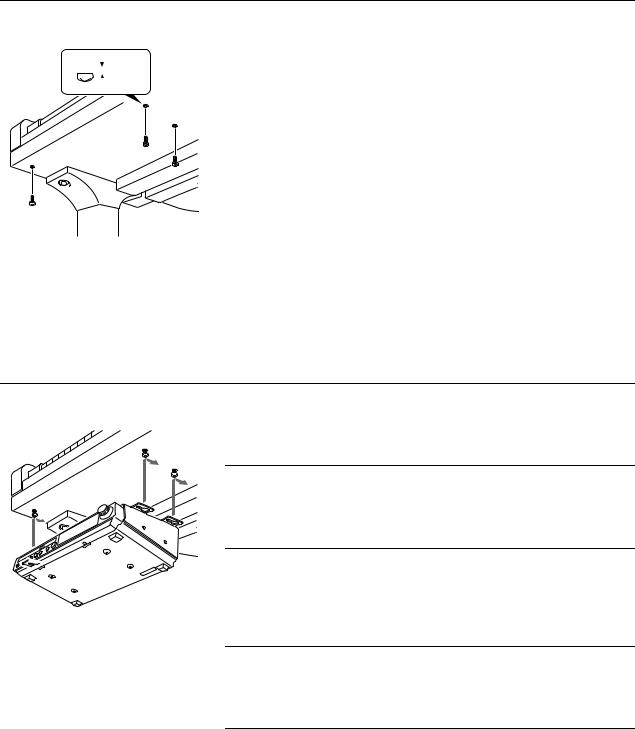
Insert the three restraining screws (5 12) into the marked nuts |
|
|
|
|
|
|
|
|
|
|
|
|
|
|
|
|
|
|
|
|
|
|
|
|
|
underneath the bass side key bed, then tighten the screws, leaving a gap |
|
|
|
|
|
|
|
|
|
|
|
|
|
|
|
|
|
|
|
|
|
|
|
|
|
of about 5 mm between head of the screw and piano body. |
|
|
|
|
|
|
|
|
|
|
|
|
|
|
|
|
|
|
|
|
|
|
|
|
5 mm |
|
|
|
|
|
|
|
|
|
|
|
|
|
|
|
|
|
|
|
|
|
|
|
|
|
Introduire les trois vis de fixation (5 12) dans les écrous marqués sous |
|
|
|
|
|
|
|
|
|
|
|
|
|
|
|
|
|
|
|
|
|
|
|
|
|
||
|
|
|
|
|
|
|
|
|
|
|
|
|
|
|
|
|
|
|
|
|
|
|
|
|
le clavier du côtés de la basse, puis serrer les vis en laissant un espace |
|
|
|
|
|
|
|
|
|
|
|
|
|
|
|
|
|
|
|
|
|
|
|
|
|
d’environ 5 mm entre la tête de la vis et le corps du piano. |
|
|
|
|
|
|
|
|
|
|
|
|
|
|
|
|
|
|
|
|
|
|
|
|
|
|
|
|
|
|
|
|
|
|
|
|
|
|
|
|
|
|
|
|
|
|
|
|
|
|
|
Setzen Sie die drei Halteschrauben (5 12) in die markierten Muttern |
|
|
|
|
|
|
|
|
|
|
|
|
|
|
|
|
|
|
|
|
|
|
|
|
|
|
|
|
|
|
|
|
|
|
|
|
|
|
|
|
|
|
|
|
|
|
|
|
|
|
|
unterhalb des Bassseiten-Stuhlrahmens ein und ziehen Sie dann die |
|
|
|
|
|
|
|
|
|
|
|
|
|
|
|
|
|
|
|
|
|
|
|
|
|
Schrauben fest, indem Sie zwischen dem Schraubenkopf und dem |
|
|
|
|
|
|
|
|
|
|
|
|
|
|
|
|
|
|
|
|
|
|
|
|
|
Klavierkorper einen Zwischenraum von ca. 5 mm lassen. |
|
|
|
|
|
|
|
|
|
|
|
|
|
|
|
|
|
|
|
|
|
|
|
|
|
|
|
|
|
|
|
|
|
|
|
|
|
|
|
|
|
|
|
|
|
|
|
|
|
|
|
Coloque los tres tornillos de retención (5 12) en las tuercas marcadas |
|
|
|
|
|
|
|
|
|
|
|
|
|
|
|
|
|
|
|
|
|
|
|
|
|
debajo del asiento del teclado del lado de bajo, luego apriete los tornillos |
|
|
|
|
|
|
|
|
|
|
|
|
|
|
|
|
|
|
|
|
|
|
|
|
|
|
|
|
|
|
|
|
|
|
|
|
|
|
|
|
|
|
|
|
|
|
|
|
|
|
|
dejando un espacio de unos 5 mm entre la cabeza del tornillo y el cuerpo |
|
|
|
|
|
|
|
|
|
|
|
|
|
|
|
|
|
|
|
|
|
|
|
|
|
del piano. |
|
|
|
|
|
|
|
|
|
|
|
|
|
|
|
|
|
|
|
|
|
|
|
|
|
|
|
|
|
|
|
|
|
|
|
|
|
|
|
|
|
|
|
|
|
|
|
|
|
|
|
Inserire le tre viti di fissaggio (5 12) nei dadi segnati al di sotto della |
|
|
|
|
|
|
|
|
|
|
|
|
|
|
|
|
|
|
|
|
|
|
|
|
|
tastiera sul lato dei bassi, quindi serrare le viti, lasciando uno spazio di |
|
|
|
|
|
|
|
|
|
|
|
|
|
|
|
|
|
|
|
|
|
|
|
|
|
circa 5 mm tra la testa della vite e il corpo del pianoforte. |
(4) |
Fit the “slots” of the metal suspension bracket containing the control unit |
|
to the screws mentioned in step (3). |
|
After mounting the control unit, push the control unit back as far as it |
|
will go and then tighten the three screws to secure the bracket. |
|
Glisser les « fentes » du support métallique contenant le boîtier de |
|
commande sur les vis mentionnées à l’étape (3). |
|
Après avoir installé le boîtier de commande, l’enfoncer jusqu’à |
|
l’extrémité et serrer les trois vis pour fixer le support. |
|
Passen Sie die „Schlitze“ der die Steuereinheit enthaltenden |
|
Metalltraverse an die unter (3) erwahnten Schrauben an. |
|
Drucken Sie nach Montage der Steuereinheit die Steuereinheit so weit |
|
zuruck wie moglich und ziehen Sie dann die drei Schrauben fest, um die |
|
Traverse zu fixieren. |
|
Fije las “ranuras” del soporte metálico de suspensión que contiene la |
|
unidad de control a los tornillos mencionados en el paso (3). |
|
Después de montar la unidad de control, empújela hacia atrás hasta el |
|
tope y luego fíjela con los tres tornillos para bloquear el soporte. |
|
Adattare le “scanalature” del supporto metallico contenente l’unità di |
|
controllo alle viti menzionate nel punto (3). |
|
Dopo aver installato l’unità di controllo, spingerla fino in fondo, quindi |
|
serrare le tre viti per fissare il supporto. |

(5) |
Connect the cables extending from the piano to the appropriate |
|
connectors/jacks on the rear panel of the control unit. |
• Coaxial cable: to the TO PIANO connectors
• Speaker cord*: to the OUTPUT jacks
* Only for models supplied with the monitor speakers.
Connectez les câbles sortant du piano aux connecteurs ou aux prises appropriées sur le panneau arrière de l’unité de commande.
• Câble coaxial : aux connecteurs TO PIANO
• Cordon de haut-parleur*: aux prises OUTPUT
* Uniquement pour les modèles fournis avec les haut-parleurs de contrôle.
Schliesen Sie die vom Klavier ausgehenden Kabel an den geeigneten
Anschlussen/Buchsen an der Ruckseite der Steuereinheit an.
•Koaxialkabel: an den TO-PIANO-Anschlussen
•Lautsprecherkabel*: an den OUTPUT-Buchsen
* Nur bei mit Monitorlautsprechern gelieferten Modellen.
Conecte los cables que salen del piano a los conectores/tomas apropiados del panel trasero de la unidad de control.
•Cable coaxial: al los conectores TO PIANO
•Cable de los altavoces*: a las tomas OUTPUT
* Solamente para los modelos suministrados con los altavoces monitores.
Collegare i cavi dal pianoforte agli appositi connettori/jack sul pannello posteriore dell’unità di controllo.
•Cavo coassiale: ai connettori TO PIANO
•Cavo altoparlante*: alle prese OUTPUT
* Solo per i modelli dotati di altoparlanti monitor.
Notes:
1)Handle the metal suspension bracket and the control unit carefully to avoid scratches. 2)Screws;
For suspension bracket installation: Flat head (4 10) 4 For control unit suspension: Bind head (5 12) 3
3)When mounted correctly, the control unit is angled approximately 18° above horizontal.
Remarques :
1)Manipuler soigneusement le support métallique et le boîtier de commande pour éviter les rayures. 2)Vis de fixation ;
Pour l’installation de la platine de fixation de suspension : Tête plate (4 10) 4 Pour la suspension du unité de commande : Tête de grippage (5 12) 3
3)Lorsqu’il est monté correctement, le boîtier de commande est incliné d’environ 18° sur l’horizontale.
Hinweise:
1)Handhaben Sie die Metalltraverse und die Steuereinheit mit Vorsicht, um Kratzer zu vermeiden. 2)Schrauben;
Zur Installation der Metalltraverse: Flachkopfschraube (4 10) 4 Fur die Traverse der Steuereinheit: Halbrundschraube (5 12) 3
3)Bei ordnungsgemaser Montage befindet sich die Steuereinheit in einem Winkel von 18°uber der Horizontalen.
Notas:
1)Manipule con cuidado el soporte metálico de suspensión y la unidad de control para evitar ralladuras. 2)Tornillos;
Para la instalación del soporte de suspensión: Cabeza plana (4 10) 4 Para la suspensión de la unidad de control: Cabeza fijadora (5 12) 3
3)Cuando está montada correctamente, la unidad de control queda angulada aproximadamente unos 18º respecto a la posición horizontal.
Note:
1)Maneggiare con cautela il supporto metallico e l’unità di controllo per evitare graffi. 2)Viti;
Per l’installazione del supporto di sospensione: A testa piatta (4 10) 4 Per la sospensione dell’unità di controllo: A testa cieca (5 12) 3
3)Se montata correttamente, l’unità di controllo è inclinata con un angolo di circa 18° rispetto al piano orizzontale.
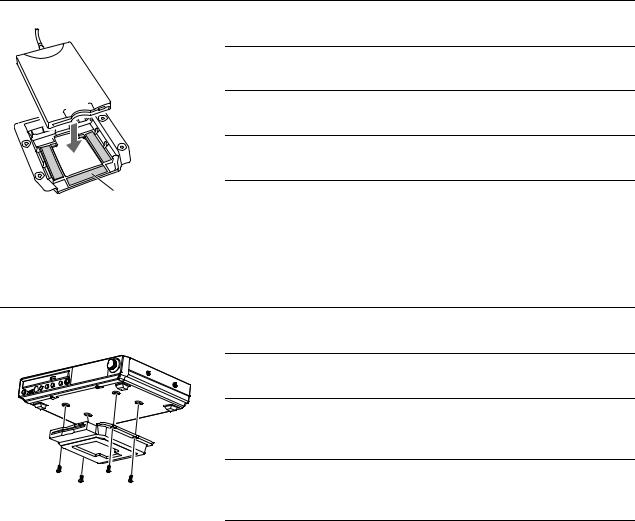
Mounting an Optional USB Floppy Disk Drive to the Grand Piano Installation d’unité de disquette USB optionnelle sur le piano à queue Montage eines optionalen USB-Diskettenlaufwerks am Flugel Montaje de una unidad de disco floppy USB opcional en el gran piano Installazione di unità Floppy Disk USB opzionale sul pianoforte a coda
(1)
Adhesive tape
Ruban adhésif
Klebeband
Cinta adhesiva
Nastro adesivo
Remove the backing papers from the adhesive tape inside the case, and fit the floppy disk drive into the case.
Enlevez les papiers arrière du ruban adhésif à l’intérieur du boîtier et insérez l’unité de disquette dans le boîtier.
Entfernen Sie die Papierstreifen vom Klebeband im Gehause und setzen Sie das Diskettenlaufwerk in das Gehause ein.
Quite el papel trasero de la cinta adhesiva dentro de la caja y coloque la unidad de disco floppy en la caja.
Togliere il foglio protettivo dal nastro adesivo all’interno della scatola e inserire l’unità floppy disk nella scatola.
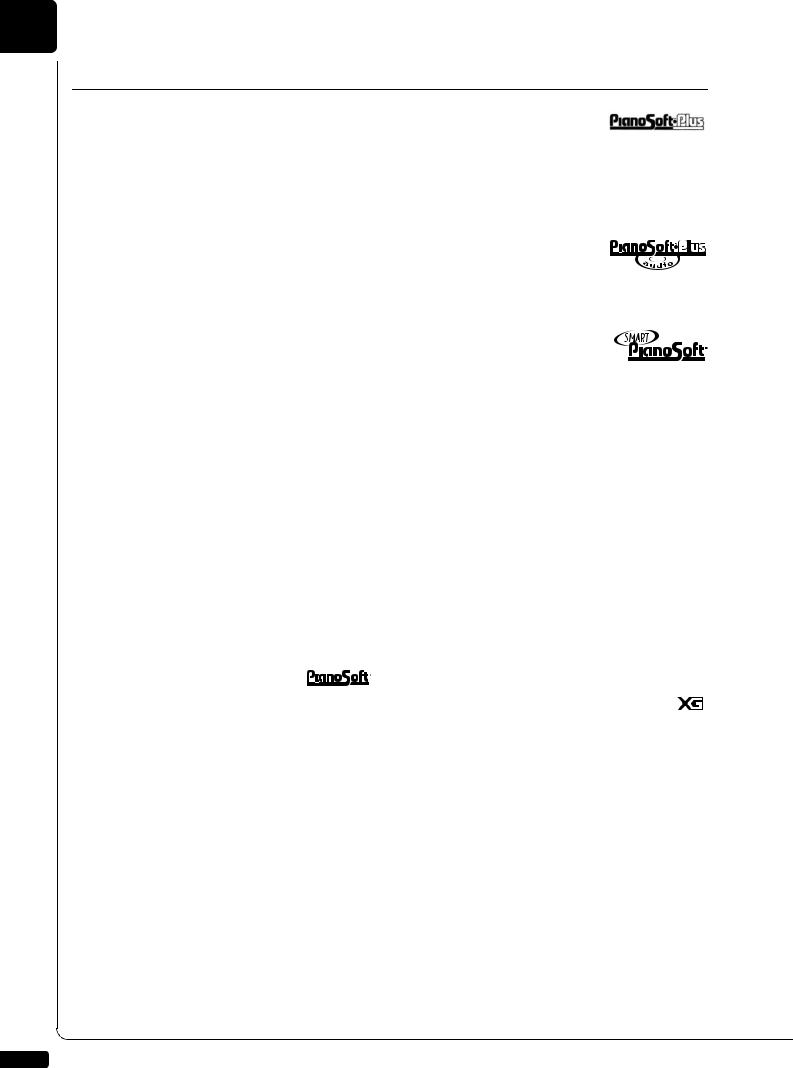
(2) |
Attach the drive and case assembly to the bottom of the control unit, |
|
using the four screws (3 6) supplied with the Disklavier. |
|
Fixez l’ensemble de lecteur et de boîtier au fond de l’unité de commande |
|
en utilisant les quatre vis (3 6) fournies avec le Disklavier. |
|
Bringen Sie das Laufwerk und die Gehausebaugruppe mittels der vier |
|
mit dem Disklavier mitgelieferten Schrauben (3 6) an der Unterseite |
|
der Steuereinheit an. |
|
Fije el conjunto de la unidad y la caja en la parte inferior de la unidad de |
|
control por medio de los cuatro tornillos (3 6) suministrados con el |
|
Disklavier. |
|
Fissare il gruppo lettore e scatola al fondo dell’unità di controllo |
|
utilizzando le quattro viti (3 6) in dotazione con il Disklavier. |

(3)
USB cable
Connect the USB cable extending from the drive to the USB port on the rear panel of the control unit.
Raccordez le câble USB sortant du lecteur au port USB sur le panneau arrière de l’unité de commande.
Schliesen Sie das vom Laufwerk ausgehende USB-Kabel am USB-Port an der Ruckseite der Steuereinheit an.
Conecte el cable USB que sale de la unidad al puerto USB del panel trasero de la unidad de control.
Câble USB |
Collegare il cavo USB dal lettore alla porta USB sul pannello posteriore |
USB-Kabel |
dell’unità di controllo. |
Cable USB |
|
Cavo USB |
|
Notes:
1)The case is supplied with the USB floppy disk drive.
2)Use the screws (3 6) supplied with the Disklavier when attaching.
Remarques :
1)Le boîtier est fourni avec l’unité de disquette USB.
2)Utilisez les vis de fixation (3 6) fournies avec le Disklavier au moment de faire la fixation.
Hinweise:
1)Das Gehause wird mit dem USB-Diskettenlaufwerk mitgeliefert.
2)Verwenden Sie zum Anbringen die mit dem Disklavier mitgelieferten Schrauben (3 6).
Notas:
1)La caja se suministra con la unidad de disco floppy USB.
2)Utilice los tornillos (3 6) suministrados con el Disklavier para su fijación.
Note:
1)La scatola è fornita con l’unità floppy disk USB.
2)Per il fissaggio, utilizzare le viti (3 6) fornite in dotazione con il Disklavier.

English
Operation manual

Welcome to the Yamaha DisklavierTM!
Thank you for purchasing the Yamaha Disklavier piano!
The Disklavier is a fascinating instrument that integrates a classic Yamaha acoustic piano with innovative electronics to suit your entertainment, educational, and creative needs, while retaining the tone, touch and long-term value that have long made Yamaha pianos the world’s finest.
Before using your Disklavier piano, please read this manual thoroughly and retain it for future reference.
■ Notes on Source Code Distribution
For three years after the factory shipment, you may request from Yamaha the source code for any portions of the product which are licensed under the GNU General Public License by writing to the following address:
1480 Ryoke, Kakegawa, Shizuoka, 436-0038, JAPAN
Piano Division, Yamaha Corporation
The source code will be provided at no charge; however, we may require you to reimburse Yamaha for the cost of delivering the source code to you.
The source code download is also available on the following website: http://www.global.yamaha.com/download/disklavier_e3/
•Note that we shall bear no responsibility whatsoever for any damage arising from changes (additions/ deletions) made to the software for this product by a third party other than Yamaha (or party authorized by Yamaha).
•Note that re-use of source code released to the public domain by Yamaha is unguaranteed, and Yamaha shall not bear any responsibility whatsoever for the source code.
■ Trademarks & Copyrights
•The contents of this operation manual and the copyrights thereof are under exclusive ownership by Yamaha Corporation.
•Yamaha, Disklavier, Silent, PianoSoft, PianoSoft·Plus, and PianoSoft·PlusAudio are trademarks of Yamaha Corporation.
•SmartKey, CueTIME, and You Are The Artist are trademarks of Yamaha Corporation or Yamaha Corporation of America.
•Disklavier E3 software, Copyright © 2008 Yamaha Corporation.
•This contains programs licensed under the GNU General Public License, GNU Lesser General Public License, the BSD Copyright, the Artistic License, and the others.
•This product includes software developed by the OpenSSL Project for use in the OpenSSL Toolkit. (http://www.openssl.org/)
•Windows is a registered trademark of Microsoft Corporation in the United States and other countries.
•Macintosh and Mac OS are trademarks of Apple Inc., registered in the U.S. and other countries.
•The company names and product names in this operation manual are the trademarks or registered trademarks of their respective companies.
English
i

Important Precautions
Read the following before operating the Disklavier.
■ Warnings
•Do not locate the Disklavier in a place subject to excessive heat, low temperatures, or direct sunlight. This could be a fire hazard and may damage the finish and internal parts.
•Excessive humidity or dust can lead to fire or electric shock.
•Connect the plug on the Disklavier power cable to a compatible AC outlet. Failure to do so will present a fire and electric shock hazard. If the power cable plug is not compatible with your AC outlet, consult your dealer.
•Do not plug several devices into the same AC outlet. This can overload the AC outlet, and lead to fire and electric shock hazard. It may also affect the performance of some devices.
•Do not place heavy objects on the power cable. A damaged power cable is a potential fire and electric shock hazard. If the power cable runs under a carpet, make sure heavy objects, including the Disklavier, are not placed on top of the cable.
•If the power cable is damaged (i.e. cut or a bare wire is exposed), ask your dealer for a replacement. Using the Disklavier in this condition is a fire and shock hazard.
•When disconnecting the power cable from an AC outlet, always pull from the plug. Never pull the cable. Damaging the cable in this way is a potential fire and electric shock hazard.
•The cover of the unit should be removed only by qualified service technicians.
•Do not place liquid containers such as vases, potted plants, glasses, cosmetic bottles, medicines, etc., on top of the Disklavier.
•Do not try to modify the Disklavier, as this could lead to fire or electric shock hazard.
•When moving the Disklavier to another location, turn off the power, remove the power plug from the AC outlet, and remove all cables connected to external devices.
■ Cautions
•Turn off all audio devices when connecting to the Disklavier. Refer to the user’s guide for each device. Use the correct cables and connect as specified.
•Set the volume level on all the devices to minimum before applying power.
•Do not play the Disklavier at a high volume for extended periods; you may damage your hearing. This is especially important when using headphones. If you think your hearing ability is impaired, consult your doctor.
•If the Disklavier is worked extremely hard —that is, prolonged playback of very “busy” songs — the Disklavier’s thermal relay may trip. The thermal relay will automatically reset when the Disklavier has cooled down.
•If you notice any abnormality — such as smoke, odor, or noise — turn off the Disklavier immediately, and remove the power plug from the AC outlet. Consult your dealer for repair.
•If a foreign object or water gets inside the Disklavier turn it off immediately, and remove the power plug from the AC outlet. Consult your dealer.
•If you plan not to use the Disklavier for a long period of time (such as when you are on vacation), disconnect the electrical mains.
•Always remove the power plug from the AC outlet before cleaning the Disklavier. Leaving the power plug connected presents a risk of electric shock.
•Do not use benzene, thinner, cleaning detergent, or a chemical cloth to clean the Disklavier.
•Do not place metal objects with rubber feet on top of the Disklavier. The color and finish of the Disklavier can be damaged.
•Do not place heavy objects on the Disklavier. Doing so can damage the Disklavier.
•Use a soft, dry cloth to clean the Disklavier. However, if you discover a stain, carefully use a soft damp cloth to remove it.
ii

■ Interference
•The Disklavier uses high-frequency digital circuits that may cause interference to radios and TVs placed close to it. If interference does occur, relocate the affected equipment.
■ Handling Batteries
The remote control of this unit is powered by dry batteries. Improper use or misuse of the dry batteries can cause the dry batteries to heat up, leak electrolyte or burst which in turn may result in a fire, damage to equipment and/or nearby objects or in burns, injury or other bodily harm. Read through and familiarize yourself with the following safety precautions prior to use to ensure correct usage.
•Do not directly touch the chemicals (electrolyte) which have leaked from dry batteries.
1.If electrolyte from dry batteries has made contact with your eyes, rinse your eyes thoroughly with clean water and seek medical treatment from a physician immediately.
2.If electrolyte from dry batteries has touched your skin or clothing, rinse it off immediately with clean water.
3.If electrolyte from dry batteries has found its way inside your mouth, gargle immediately and consult a physician.
•Do not install the dry batteries with the “+” and “–” poles reversed. Misaligning the poles of dry batteries can lead the dry batteries to be charged or shorted or it can cause them to heat up, leak electrolyte or burst which in turn may result in a fire, damage to nearby objects or in burns, injury or other bodily harm.
•Use only the designated batteries. Do not use used batteries with unused batteries or different types of batteries together. This can cause them to heat up, leak electrolyte or burst which in turn may result in a fire or in burns, injury or other bodily harm. Replace all the dry batteries at the same time. Do not use new and old dry batteries together. Do not use different types of batteries (alkaline and manganese batteries, batteries made by different manufacturers or different battery products made by the same manufacturer) together: this can cause them to heat up, ignite or leak electrolyte.
•When the battery-powered unit is not going to be used for a prolonged period of time, remove the dry batteries from the unit. Otherwise the batteries will run down and their electrolyte may leak, resulting in damage to the unit.
•Remove spent batteries immediately from equipment. Otherwise, batteries will overdischarge, causing them to heat up, leak electrolyte or burst which in turn may result in damage to nearby objects or in burns, injury or other bodily harm.
•Dispose of batteries in accordance with the applicable regulations and ordinances.
•The batteries shall not be exposed to excessive heat such as sunshine, fire or the like.
Please keep this manual for future reference.
English
iii

Table of Contents
Chapter 1 |
Introduction |
|
Features ................................................................. |
|
1 |
Items Supplied with the Disklavier ......................... |
1 |
|
Names of Parts and Their Functions...................... |
2 |
|
Basic Disklavier Terminology ................................. |
8 |
|
Chapter 2 |
Getting Started |
|
Connecting the Control Unit ................................... |
9 |
|
Connecting the AC Power Cable ........................... |
9 |
|
Using the Remote Control.................................... |
10 |
|
Turning On the Disklavier..................................... |
11 |
|
Setting the Internal Calendar ............................... |
12 |
|
Turning Off the Disklavier (Standby Mode) .......... |
15 |
|
Shutting Down the Disklavier ............................... |
15 |
|
Compatible Media Format for the Removable |
|
|
Media ................................................................... |
|
15 |
Compatible File Format........................................ |
16 |
|
Basic Precautions for Using CDs ......................... |
16 |
|
Chapter 3 |
Basic Song Playback |
|
Types of Playable Software ................................. |
17 |
|
Selecting Medium and Their Contents ................. |
18 |
|
Using the Number Keypad ................................... |
20 |
|
Starting Playback ................................................. |
20 |
|
Stopping Playback ............................................... |
22 |
|
Pausing Playback................................................. |
22 |
|
Fast Preview & Review ........................................ |
23 |
|
Fast Forward & Reverse ...................................... |
24 |
|
Searching a Specific Section of a Song ............... |
25 |
|
Listening to the DisklavierRadio........................... |
26 |
|
Adjusting the Volume ........................................... |
27 |
|
Chapter 4 |
Advanced Song Playback |
|
Changing the Playback Tempo ............................ |
28 |
|
Playing Back Songs in a Different Key |
|
|
(Transposition) ..................................................... |
|
28 |
Repeating Song Playback.................................... |
29 |
|
Repeating a Specific Section of a Song |
|
|
(A-B Repeat) ........................................................ |
|
30 |
Playing Back Only the Desired Piano Part........... |
31 |
|
Adjusting the Volume Balance among the |
|
|
Keyboard Playing, Ensemble Sound, and |
|
|
Software Playback ............................................... |
32 |
|
Adjusting the Pitch of Audio ................................. |
34 |
|
Adjusting the L/R Balance of Audio...................... |
35 |
|
Using the Timer Play ........................................... |
36 |
|
Skipping the Blank Part at the Beginning of a |
|
|
Song .................................................................... |
|
39 |
Video Synchronized Playback............................. |
40 |
|
Adding Disklavier Accompaniment to Commercial |
||
CD Songs (PianoSmart™ Playback)................... |
41 |
|
SmartKey™ Playback ......................................... |
41 |
|
Chapter 5 |
Advanced Piano Playing |
|
Playing the Disklavier along with the Internal |
|
|
Metronome .......................................................... |
|
43 |
Playing the Disklavier with an Ensemble Voice... |
44 |
|
Chapter 6 |
The Silent Piano™ Function |
|
What is the Silent Piano™ Function?.................. |
46 |
|
Quiet Mode and Headphone Mode ..................... |
46 |
|
Playing the Digital Piano (Quiet Mode) ............... |
47 |
|
Using the Headphones (Headphone Mode)........ |
48 |
|
Adjusting the Volume in the Quiet Mode ............. |
49 |
|
Adjusting the Volume in the Headphone Mode ... |
49 |
|
Selecting the Voice in the Quiet/Headphone |
|
|
Mode ................................................................... |
|
50 |
Applying the Reverb Effect to the Digital |
|
|
Piano ................................................................... |
|
51 |
Inactivating the Key Movement during |
|
|
Playback.............................................................. |
|
52 |
Chapter 7 |
Basic Recording |
|
Recording a New Song ....................................... |
53 |
|
Titling a Song at the Start of Recording .............. |
54 |
|
Chapter 8 |
Advanced Recording |
|
Recording with the Internal Metronome .............. |
56 |
|
Recording the Left and Right Parts Separately ... |
58 |
|
Recording the Left and Right Parts Together |
|
|
(Setting a Split Point)........................................... |
60 |
|
Re-Recording One Part....................................... |
62 |
|
Changing the Default Tempo .............................. |
63 |
|
Video Synchronized Recording ........................... |
65 |
|
CD Synchronized Recording ............................... |
69 |
|
Chapter 9 |
Media Management |
|
Managing Albums................................................ |
70 |
|
Making Copies of Albums.................................... |
70 |
|
Deleting Albums .................................................. |
72 |
|
iv

Creating a New Album ......................................... |
73 |
Renaming an Album ............................................ |
74 |
Rearranging the Order of Albums ........................ |
75 |
Managing Songs .................................................. |
76 |
Making Copies of Songs ...................................... |
77 |
Deleting Songs..................................................... |
78 |
Renaming a Song ................................................ |
79 |
Rearranging the Order of Songs.......................... |
80 |
Converting Song Format...................................... |
81 |
Changing the Counter Display ............................. |
82 |
Converting MIDI Data to a Standard Form |
|
(Strip XP) ............................................................. |
83 |
Managing Playlists ............................................... |
84 |
Adding Songs/Albums to the Playlist ................... |
85 |
Deleting a Playlist ................................................ |
86 |
Creating a New Playlist........................................ |
87 |
Renaming a Playlist ............................................. |
88 |
Managing Media .................................................. |
89 |
Making Copies of the Entire Contents in a |
|
Medium ................................................................ |
90 |
Deleting the Entire Contents in a Medium ........... |
91 |
Copying Song File from a Personal Computer to |
|
the Disklavier ....................................................... |
92 |
Refreshing the Contents in [FromToPC].............. |
96 |
Formatting the Floppy Disk (Optional) ................. |
97 |
Making Backups of Songs ................................... |
98 |
Restoring the Backups......................................... |
99 |
Chapter 10 Internet Direct Connection |
|
(IDC) |
|
What is Internet Direct Connection (IDC)?......... |
101 |
Obtaining an ID and Password for the IDC Service |
|
(IDC Registration) .............................................. |
101 |
Connecting the Disklavier to the Internet ........... |
101 |
Accessing the Internet ....................................... |
103 |
Checking Your Account Information .................. |
104 |
Updating the Disklavier Using the Internet......... |
105 |
Setting the Disklavier for the Internet |
|
Connection......................................................... |
107 |
Initializing Internet Settings ................................ |
108 |
Chapter 11 Enhancing the Disklavier by |
|
Hooking Up Other Devices |
|
Hooking Up Audio Equipment............................ |
109 |
Setting the Disklavier for Audio Data |
|
Reception/Transmission .................................... |
110 |
Hooking Up MIDI Devices ................................. |
112 |
|
|
Setting the Disklavier for MIDI Data |
|
|
|
Reception .......................................................... |
113 |
|
|
Setting the Disklavier for MIDI Data |
|
English |
|
Transmission |
115 |
||
|
|||
Setting the Disklavier for Keyboard Playing |
|
|
|
|
|
||
Data Transmission |
116 |
|
|
|
Chapter 12 Other Settings |
|
Tuning the Tone Generator |
|
(TG Master Tune).............................................. |
118 |
Assigning Frequently-used Functions to the |
|
Number Keypad on the Remote Control ........... |
119 |
Setting the Passcode to Prevent Unauthorized |
|
Access............................................................... |
122 |
Adjusting the Brightness of the Display............. |
124 |
Switching the Languages for the Screen .......... |
125 |
Resetting the Disklavier .................................... |
126 |
Diagnosing the Disklavier |
|
(Maintenance Mode) ......................................... |
128 |
Updating the Disklavier ..................................... |
129 |
Chapter 13 |
Internal Tone Generator |
|
|
Voices |
|
Internal GM/XG Tone Generator Basic Voice |
|
|
List..................................................................... |
|
131 |
Internal TG3 Tone Generator Basic Voice |
|
|
List..................................................................... |
|
134 |
Chapter 14 |
Troubleshooting .................. |
136 |
Chapter 15 |
Error Messages ................... |
139 |
Chapter 16 |
Glossary................................. |
140 |
Chapter 17 |
Specifications |
|
General Specifications ...................................... |
143 |
|
Function & Controls........................................... |
144 |
|
Appendix |
Software License Notice.... |
A-1 |
|
MIDI Data Format.............. |
A-21 |
MIDI IMPLEMENTATION CHART
v

Chapter1 Introduction
Features
The Disklavier E3 offers the valuable features that open up your musical possibility to explore. Here are brief explanations of such features:
Advanced Features for Your Listening Pleasure
•Special music CDs, contain over 17 hours of fantastic music, let you start listening on the day the Disklavier E3 arrives at your home.
•DisklavierRadio; you can listen to over 11 music channel by streaming broadcasts over the Internet.
•Yamaha’s innovative Silent Piano™ function lets you listen to songs or play the piano more quietly than on the acoustic piano, or privately at any time*.
Convenient Recording Features to Preserve Your Musical Memories
•Total 128 megabytes of internal memory comes with the Disklavier E3 to preserve your valuable data.
•Connecting external USB devices to the Disklavier E3 allows you to record your performance directly onto them, or even make backups of your valuable data in the internal memory.
•Video synchronization features offer great listening experience with sights. You can see as well as hear performances with perfectly synchronized audio and video.
•Your valuable music data on the floppy disk can be played back with the optional floppy disk drive (UDFD01).
Simple and Easy-to-use Features Enhancing Your Performance
•The remote control, with clear and logical layout of buttons, lets you quickly enjoy the features of the Disklavier E3.
•The display on the front panel employs an organic electro-luminescent display which makes it brighter and more easily readable than ever.
* Only for models equipped with the Silent Piano™ function.
Items Supplied with the Disklavier
Check that the following items are supplied with your Disklavier:
• |
1 Control unit |
• |
1 |
Stereo headphones*3 |
|
• 1 Control unit suspension bracket*1 |
• 2 Sample PianoSoft CD software |
||||
• |
4 |
Screws for control unit suspension bracket |
• |
1 |
Operation manual |
|
installation (4 10)*1 |
• |
1 |
PianoSoft CD song list |
|
|
|
|
|||
• |
3 |
Screws for control unit suspension (5 12)*1 |
• |
1 |
Music book “50 greats for the Piano” |
|
|
|
|||
• |
4 |
Screws for optional USB floppy disk drive |
*1 |
Only for grand pianos |
|
|
installation (3 6)*1 |
*2 |
Only for models supplied with the monitor speakers |
||
• |
2 |
Monitor speakers*2 |
*3 |
Only for models equipped with the Silent Piano™ function |
|
•1 Monitor speaker installation kit*2
•2 Speaker cords*2
•1 Remote control
•2 Batteries for remote control
English
1
Chapter
1 Introduction
Names of Parts and Their Functions
■ Control Unit — Front Panel
4 |
5 |
1 2 3 6 7 8 9 10
1 [ON/OFF] button 
Turns on or shuts down the Disklavier. Press once to turn it on, and once again to shut it down.
2 USB port
Used to connect a USB flash memory, etc.
3 |
Remote control sensor |
When using the remote control, point it toward this sensor.
4 CD drive
Insert a PianoSoft·PlusAudio or other audio or audio/MIDI CD here.
5CD eject button
Used to open the CD drive.
6[PLAY/PAUSE] button ( pages 20 and 22)
Used to start and pause playback.
7[STOP] button ( page 22)
Used to stop playback and recording.
8[RECORD] button ( page 53)
Used to engage the record standby mode before recording starts.
9 |
[SELECT] button |
Used to select media.
11 12
10 Cursor/[ENTER] buttons
Cursor: Used to select options and parameters.
Press this button inclining slightly upward/downward/left/ right.
[ENTER]: Used to execute the selection.
Press straight the center of this button.
11 Display
Shows various information.
12 Dial
Used to adjust the volume, and to set parameter values.
2

Chapter
Introduction 1
■ Control Unit — Rear Panel
1 |
2 |
3 |
4 |
5 |
6 |
English
7 8 9 10 11
1 |
USB TO DEVICE port |
10 |
MIDI OUT terminal |
|
Used to connect a USB flash memory, an optional |
Used to connect external MIDI equipment for |
|||
USB floppy disk drive, etc. |
outputting MIDI data. |
|||
2 |
LAN port |
11 |
MIDI IN terminal |
|
Used to connect to the Internet. |
Used to connect external MIDI equipment for |
|||
3 |
OUTPUT jacks |
inputting MIDI data. |
||
* Only for models supplied with the monitor speakers. |
||||
Used to connect the speaker cord from the monitor |
||||
|
|
|||
speakers.* |
|
|
||
4 |
ANALOG MIDI IN jacks |
|
|
|
Used to connect the audio equipment such as an |
|
|
||
external CD changer. |
|
|
||
5 |
OMNI (SYNC) OUT jacks |
|
|
|
Used to connect the microphone/line input of a |
|
|
||
camcorder. |
|
|
||
6 |
OMNI (SYNC) IN jacks |
|
|
|
Used to connect the audio output of a camcorder.
7  TO PIANO connectors
Used to connect the piano.
8  DC-IN 12V connector
Used to connect to the power supply unit.
9  USB TO HOST port
Used to connect the USB cable from a computer.
3

Chapter
1 Introduction
■ Remote Control
1 |
13 |
2 |
14 |
|
15 |
|
16 |
3 |
17 |
|
|
4 |
18 |
5 |
19 |
|
20 |
6 |
21 |
7 |
|
|
22 |
8 |
|
9 |
23 |
|
24 |
10 |
25 |
|
26 |
11 |
|
12 |
|
|
27 |
1 |
[ON/STANDBY] button |
5 |
[RECORD] button ( page 53) |
Turns on the Disklavier or puts it in the standby |
Used to engage the record standby mode before |
||
mode. |
|
recording starts. |
|
2 |
Number keypad |
6 |
[PLAY] button ( page 20) |
Used for direct album/song selection and to enter a |
Used to start playback. |
||
start time for song playback. |
7 |
[REVERSE]/[FORWARD] buttons |
|
|
|
||
3 |
[SYSTEM] button |
Used to access the system menu.
4 |
[VOICE] button ( page 44) |
Used to access the voice function.
In the play mode: used to fast preview and review. In the pause mode: used to fast forward and reverse.
8 |
Cursor buttons |
Used to select options and parameters.
4

9 |
[BACK] button |
Used to cancel the selection, and return to the previous screen.
10[VOLUME] buttons ( page 27)
Used to adjust the volume.
[–] lowers the volume, [+] raises the volume.
11[TEMPO] buttons
Used to change the playback tempo.
[–] decreases the tempo, [+] increases the tempo, and [0] resets the tempo to 00.
12[TRANSPOSE] buttons
Used to transpose song playback.
[–] transposes down, [+] transposes up, and [0] resets the transposition value to 00.
13[INTERNET] button
Used to access the Internet menu.
14 [SEARCH] button
Used to access the search function.
15 |
[SETUP] button |
Used to access the setup menu.
16 [METRONOME] button
Used to access the metronome function.
17 |
[REPEAT] button |
Used to select one of the repeat modes: ALL, RPT, RND, or OFF.
18 |
[A-B] button |
Used to enter A and B points for the A-B repeat mode.
19 [PART SELECT] buttons
For L/R and ensemble songs, these buttons are used to choose which part will play: left-hand part, right-hand part, or both parts.
They are also used to select a part for recording.
Chapter
Introduction 1
20[PAUSE] button ( page 22)
Used to pause playback.
21[STOP] button ( page 22)
Used to stop playback and recording.
22[ENTER] button
Used to execute the selection.
Used to access the function menu. |
English |
|
23 |
[FUNC.] button |
|
|
|
|
|
|
|
24[SELECT] button
Used to select media.
25[+/YES]/[–/NO] buttons
Used to select parameters, adjust setting values, and execute or cancel the selected functions.
26 [BALANCE] button
Used to adjust the TG, audio and voice balance.
27 |
Color buttons |
Green: Used to execute the shortcut assigned to the number keypad.
Yellow: Used to switch character types when titling albums and songs.
Red: Used to switch the Disklavier to the acoustic mode*.
Blue: Used to switch the Disklavier to the quiet mode*.
*Only for grand pianos equipped with the Silent Piano™ function.
5

Chapter
1 Introduction
■ Monitor Speaker*
LOW |
HIGH |
1 |
LINE |
2 |
1 |
LOW/HIGH volume controls |
Adjust the base/treble sound volume.
2 |
Power indicator |
Lights up while the speaker is turned on.
1 |
2 |
3 |
3 |
LINE1/2 volume controls |
Adjust the sound volume for each line input.
Note: For normal use, turn down the LINE2 volume completely, and turn up the LINE1 volume at the three o’clock position.
* Only for models supplied with the monitor speakers.
6

Chapter
Introduction 1
■ Silent Piano™ Control Box*
(Grand piano)
|
|
|
|
|
|
|
|
|
|
English |
|
|
|
|
|
|
|
|
|
|
|
|
|
|
|
|
|
|
|
|
|
|
|
1 |
2 |
|
3 |
4 |
|||||
|
|
|
||||||||
1 |
[VOLUME] knob / [QUIET] switch |
|
|
|
3 |
PHONES jacks |
|
|||
|
|
|
|
|||||||
Used to adjust the volume of the headphones while |
|
Used to connect the headphones. You can use two |
|
|||||||
in the headphone mode. Pushing this switch |
|
headphones simultaneously. |
|
|||||||
activates the quiet mode. |
|
|
|
4 |
[REVERB] knob |
|
||||
|
|
|
|
|
|
|
||||
2 |
[QUIET] indicator |
|
|
|
|
Used to adjust the amount of reverb. |
|
|||
Lights up while the quiet mode is activated.
(Upright piano)
1 2 3
1 |
[REVERB] knob |
3 |
[VOLUME] knob |
Used to adjust the amount of reverb. |
Used to adjust the volume of the headphones while |
||
2 |
PHONES jacks |
in the headphone mode. |
|
|
|
||
Used to connect the headphones. You can use two headphones simultaneously.
* Only for models equipped with the Silent Piano™ function
7
Chapter
1 Introduction
Basic Disklavier Terminology
The following is a list of several basic Disklavier words that you may need to know before proceeding with operational procedures in this manual. For additional Disklavier terminology, see the glossary provided in Chapter 16.
Ensemble Song
PianoSoft·Plus
PianoSoft·Plus software contains prerecorded ensemble songs featuring
instrumental accompaniment that can be played back on the Disklavier. See your Disklavier dealer for a PianoSoft catalog.
An ensemble song contains the same leftand right-hand parts as an L/R song, and extra tracks that are played by the internal XG tone generator. Accompanying tracks can include acoustic bass, drums, strings, vibes, etc.
PianoSoft·PlusAudio
CD software made by Yamaha containing audio and MIDI
signals for playing back on the Disklavier.
Internal Flash Memory
The Disklavier has a total of 128 megabytes of internal flash memory that allow you to store song data without a floppy disk.
L/R Song
In a L/R song, the left-hand piano part is stored on track 1 (L) and the right-hand piano part is stored on track 2 (R). During playback you can cancel either part, and practice that part yourself. When recording an L/R song, you can record the two parts simultaneously or separately.
MIDI
An acronym for Musical Instrument Digital Interface. MIDI allows electronic musical instruments to communicate with each other.
PianoSoft
The PianoSoft Disk Collection is a
library of prerecorded song disks made by Yamaha for use with the Disklavier series. Many titles are available, and among the many musical styles included are classical, jazz, and popular. The disk includes songs for listening enjoyment, piano study disks for the piano student, and accompaniment disks for vocal and instrumental practice. PianoSoft is sometimes used as a generic term for PianoSoft and PianoSoft·Plus.
SmartPianoSoft
Software made by Yamaha containing MIDI signals for
playing back along with standard audio CDs.
Song
A “song” usually means a short piece of music with lyrics. However, in the Disklavier manuals the term “song” is used to refer to any piece of music.
Tone Generator
An electronic device that generates instrument voices. The Disklavier has an internal XG tone generator that can produce nearly 700 instrumental and percussion voices.
Voice
The sounds produced by a tone generator expressing various instruments.
XG
Yamaha XG is an extension of the GM (General MIDI) format. With greater polyphony, more voice, and effects, it improves song
compatibility between MIDI devices. When a song in the Yamaha XG format is played on another XG compatible tone generator or synthesizer, it will play and sound as the original composer/creator intended.
8
Loading...