


 Loading...
PERSONAL AMPLIFIER
AP-U70
PERSONAL SOUND PROCESSOR
DP-U50
U C A
USB 
PC 
AUX1 
AUX2 
DSP |
M U T E |
SET UP MANUAL
MANUEL DE CONFIGURATION
The owner’s manual for this model consists of two volumes, “SET UP MANUAL” and
“OPERATION MANUAL” .
Le manuel d'utilisation pour ce modèle se compose de deux volumes, le “MANUEL DE CONFIGURATION” et le “MANUEL D’UTILISATION” .
*This manual uses terms utilized by the English operating system as shown on the computer monitor. If the operating system you are using is in another language, please replace the English terms with the terms used in your computer’s operating system.
*Ce manuel utilise des termes employés par les systèmes d’exploitation en langue anglaise tels qu’ils apparaîssent sur le moniteur d’un ordinateur. Si votre système d’exploitation utilise une autre langue, veuillez remplacer la terminologie anglaise par celle qu’il utilise.

FEATURES
cThis unit brings high-quality audio to your computer.
cThe USB interface allows remote control of this unit from your computer, using the supplied Application Software, plus various audio I/O options.
cIdeal for use with computer games, internet music, CD-ROM, DVD, multimedia software, and more.
cYamaha’s Near-Field Cinema DSP (Digital Sound field Processing) technology provides live music performance and movie theater surround sound. The sound effect of DSP is also available for headphone listening.
cSophisticated Virtual 3D technology reproduces multichannel sources such as Dolby Digital* and DTS** providing a realistic surround effect with just two speakers.
cThis unit is compatible with the following audio signals received via a USB connection: multi-channel (two, four and six channels) audio, high quality digital audio of 24 bits/48 kHz and Dolby Digital-encoded signals. (Some operating systems and software programs do not support this feature.)
* 
Manufactured under license from Dolby Laboratories. “Dolby”, “Pro Logic” and the double-D symbol are trademarks of Dolby Laboratories. Confidential Unpublished Works. q1992–1997 Dolby Laboratories, Inc. All rights reserved.
** 
Manufactured under license from Digital Theater Systems, Inc. US Pat. No. 5,451,942 and other world-wide patents issued and pending. “DTS”, “DTS Digital Surround”, are trademarks of Digital Theater Systems, Inc. Copyright 1996 Digital Theater Systems, Inc. All Rights Reserved.
CONTENTS
GETTING STARTED |
|
|
GETTING |
|
|
|
|
Unpacking ........................................... |
2 |
|
|
Battery installation ............................. |
2 |
|
STARTED |
Battery replacement |
2 |
|
|
|
|
||
Remote control operation range ....... |
2 |
|
|
|
|
|
|
|
|
|
|
CONNECTIONS |
8 |
|
CONNECTIONS |
Plugging in this unit ........................... |
|
||
Terminals and their functions ........... |
3 |
|
|
Connecting your computer ................ |
4 |
|
|
Connecting audio equipment ............ |
5 |
|
|
Connecting speakers ......................... |
6 |
|
|
|
|
|
|
|
|
|
|
INSTALLING USB DRIVER AND |
|
ANDDRIVERUSBINSTALLING SOFTWAREAPPLICATION |
|
APPLICATION SOFTWARE |
|
|
|
Preparations before installation ........ |
9 |
|
|
System requirements ......................... |
9 |
|
|
Installing the software ...................... |
10 |
|
|
Microsoft Windows 98/98SE |
|
|
|
or Windows Me ............................................... |
10 |
|
|
Microsoft Windows 2000 Professional ......... |
13 |
|
|
Macintosh computer ...................................... |
16 |
|
|
|
|
|
|
|
|
|
|
APPENDIX |
|
|
APPENDIX |
|
|
|
|
Troubleshooting ......................... |
18 |
|
|
|
|
|
|
English
E-1

GETTING STARTED
Unpacking |
Battery installation |
After unpacking, check that the following items are supplied.
c Remote control
POWER
USB
PC
AUX1
AUX2
HALL |
JAZZ |
CHURCH |
GAME |
MOVIE |
LIVE |
VDD |
TEST |
ON/OFF |
A |
B |
C |
MUTE |
VOLUME |
|
cCD-ROM
The CD-ROM contains the Application Software and online help for controlling this unit from your computer.
cBatteries (AA, R6, UM-3 type)
c USB cable
Since the remote control will be used for many of this unit’s control operations, you should begin by installing the
supplied batteries. |
1 |
3

 2
2
1 Turn the remote control over and remove the battery compartment cover by sliding it in the direction of the arrow.
2 Insert the batteries (AA, R6, UM-3 type) according to the polarity markings on the inside of the battery compartment.
3 Close the battery compartment cover.
Battery replacement
If you notice that the remote control must be used closer to the main unit, the batteries are weak. Replace both batteries with new ones.
Notes
cUse AA, R6, UM-3 batteries.
cBe sure the polarities are correct. (See the illustration inside the battery compartment.)
cRemove the batteries if the remote control is not to be used for an extended period of time.
cIf the batteries leak, dispose of them immediately. Avoid touching the leaked material and avoid contact with clothing, etc. Clean the battery compartment thoroughly before installing new batteries.
Remote control operation range
USB
PC
AUX1
AUX2
|
VIRTUAL |
|
VOL |
DSP |
M U T E |
Remote control sensor
Within approximately 6 m (19.7 feet)
30 |
° |
° |
30 |
||
|
|
Notes
cThe area between the remote control and the main unit must be clear of large obstacles.
cDo not expose the remote control sensor to strong lighting, in particular, an inverter type fluorescent lamp; otherwise, the remote control may not work properly. If necessary, position the main unit away from direct lighting.
E-2

CONNECTIONS |
|
|
|
|
|
|
|
CONNECTIONS |
|
|
|
|
|
|
|
|
|
|
|
|
|
|
|
|
Never plug in this unit and other equipment until |
|
|
|
|
Note |
|
|
||
all connections are completed. |
Also, refer to the owner’s manual for other equipment in the |
|||
1. Make connections between this unit and other |
system. |
|||
components by following the procedure below. |
|
|
|
|
2.After all connections are finished, check that the connection cords are correctly connected.
3.After all connections are completed, plug in this unit and other equipment.
Use commercially available connection cords (except the supplied USB cable).
The color of this unit’s inputs/outputs and connection cords to be used for connecting to them are as follows:
White |
Audio connection cord (analog/stereo), left |
L |
L |
Red |
Audio connection cord (analog/stereo), right |
R |
R |
Black |
Audio connection cord (analog/monaural) |
|
|
Orange |
Coaxial digital connection cord |
|
|
CONNECTIONS
Terminals and their functions
1ANALOG inputs
These connectors are used to connect to the analog outputs of a PC sound card, CD player, MD recorder, tape deck, etc.
2SUBWOOFER OUTPUT
This connector can be connected to an optional subwoofer, such as the Yamaha YST-SW45, for enhanced bass performance.
1
2
3
|
4 |
|
[AP-U70] |
ANALOG |
|
R L |
REC |
|
OUT |
PC IN |
|
AUX 1 |
[DP-U50] |
IN |
AUX 2
IN PRE
OUT
|
REC |
SUB |
OUT |
WOOFER |
OUTPUT |
|
R L
|
|
|
DIGITAL |
|
|
USB |
|
|
|
IN |
5 |
|
|
COAX |
|
|
|
PC |
|
SPEAKERS |
|
OPT |
|
|
|
IN |
|
6Ω MIN. |
|
|
|
/SPEAKER |
|
|
|
– |
+ |
AUX 1 |
|
|
|
OPT IN |
6 |
L |
|
|
|
MAIN |
|
OPT |
|
|
|
OUT |
|
R |
|
|
|
MAINS |
|
|
|
3SPEAKERS outputs [AP-U70 only]
These connectors are used to connect a pair of speakers, such as the Yamaha NS-U30.
4REC OUT [AP-U70 only]
These connectors are used to connect to the analog inputs of an MD recorder or tape deck.
4PRE OUT [DP-U50 only]
These connectors are used to connect to the analog inputs (INPUT etc.) of speakers incorporated with an amplifier, or a power amplifier. The level of signals outputted from the PRE OUT varies by the use of the volume control on the front panel or the VOLUME keys on the remote control.
5PC inputs & output (DIGITAL)
USB: If your computer has a USB port, connect it to this |
|
|
unit, using the supplied USB cable, for remote control of |
|
|
this unit from your computer. |
|
|
PC COAX IN/OPT IN: These coaxial and optical |
|
|
connectors are used to connect to the digital outputs of a |
|
|
PC sound card, DVD-Video decoder board, etc. |
English |
|
6Optical input & output (DIGITAL) |
||
|
||
AUX 1 OPT IN: This connector is used to connect to an |
|
|
optical output of a CD player, MD recorder, etc. |
|
|
OPT OUT: This connector is used to connect to an optical |
|
|
input of an MD recorder, a DAT deck, etc. |
E-3 |
|
|

CONNECTIONS
Connecting your computer
Audio from your computer can be fed to this unit using any of the following connectors: USB, DIGITAL PC COAX IN, DIGITAL PC OPT IN, or ANALOG PC IN. If you use all of these connectors for connection, you can select the connector(s) to use on this unit’s front panel or the remote control.
Connecting to the USB port (1)
If your computer has a USB port, connect it to this unit’s USB terminal using the supplied USB cable, as shown below.
A single USB connection is all that’s required to listen to audio from your computer on this unit, feed audio from an external source connected to this unit to your computer, and control this unit remotely from your computer, using the supplied Application Software.
If your computer doesn’t have a USB port, you can still connect it to this unit using the analog or digital input, but in this case you cannot use this unit’s Application Software.
Note
Connect the USB cable when installing the USB driver software
on your computer. Refer to the section “ INSTALLING USB
DRIVER AND APPLICATION SOFTWARE”.
Connecting to analog inputs (2)
Connect the analog audio outputs on your computer or a
PC sound card to this unit’s ANALOG PC IN.
Use a commercially available pin-plug connection cord for connection, and be careful not to mix up the left and right connections.
Connecting to digital inputs (3)
To play DVD-Video discs encoded with Dolby Digital or
DTS, your computer must have a DVD-ROM drive and DVD-Video decoder board, which should be connected to this unit via the DIGITAL PC COAX IN or DIGITAL PC OPT
IN.
Use a commercially available pin-plug cord for connecting to the DIGITAL PC COAX IN, and use a commercially available optical fiber cable for connecting to the DIGITAL
PC OPT IN.
Note
The DIGITAL PC OPT IN has priority over the DIGITAL PC COAX IN, so if you connect to both inputs, the signal received at the DIGITAL PC OPT IN is used.
Protective Caps
When connecting to an optical connector, remove its protective cap first. When an optical connector is not being used, replace its cap to prevent dust entering the connector.
|
|
ANALOG |
|
R |
L |
|
PC IN |
|
|
AUX 1 |
|
|
IN |
L |
|
|
|
|
AUX 2 |
|
|
IN |
R |
|
REC |
|
SUB |
OUT |
|
WOOFER |
OUTPUT |
|
|
|
R L
DIGITAL
USB
COAX
IN
PC
OPT
IN
AUX 1
OPT IN
OPT
OUT
2
1
3
3
: Indicates the direction of signals.
LINE OUT |
|
|
L |
|
|
R |
|
|
USB |
|
|
DIGITAL |
DIGITAL |
|
OUT |
||
OUT |
||
(coaxial) |
||
(optical) |
||
|
E-4

CONNECTIONS
Connecting audio equipment
The following illustrations show how to connect a CD player, MD recorder, etc. using both analog and digital connections. However, it’s not necessary to make both connections.
Audio connections
c Be careful not to mix up the left and right connections.
c[AP-U70 only]
If you wish to record analog sound signals inputted to this unit, connect the analog inputs of a tape deck or MD recorder to this unit’s REC OUT OUTPUT.
LINE OUT
CD player |
R |
|
L |
||
|
|
ANALOG |
|
R |
L |
|
|
R |
|
PC IN |
L |
|
|
||
AUX 1 |
|
|
IN |
|
|
AUX 2 |
L |
|
IN |
||
|
R 
|
REC |
|
SUB |
OUT |
|
WOOFER |
OUTPUT |
|
|
|
|
|
R |
L |
L
DIGITAL
R
USB
LINE IN (REC) R L
Tape deck |
R |
or MD recorder |
L |
LINE OUT (PLAY)
: [AP-U70 only]
Notes
cConnecting a turntable
A turntable cannot be connected to this unit directly. Use a commercially available phono equalizer amplifier to connect a turntable to this unit, or connect a turntable incorporated with a phono equalizer amplifier.
c[AP-U70 only]
The REC OUT OUTPUT and DIGITAL OPT OUT can be used at the same time since they output signals independently.
Digital connections
If you wish to record digital sound signals inputted to this unit, connect the optical digital input of an MD recorder or a DAT deck to this unit’s DIGITAL OPT OUT.
DIGITAL OUT
(optical)
CD player
DIGITAL
|
|
USB |
|
|
COAX |
|
|
IN |
|
|
PC |
SPEAKERS |
|
OPT |
|
|
IN |
6Ω MIN. |
|
|
/SPEAKER |
|
|
– |
+ |
AUX 1 |
|
|
OPT IN |
L |
|
|
MAIN |
|
OPT |
|
|
OUT |
R |
|
|
DIGITAL IN
(optical)
MD recorder
Notes
cWhen playing an ordinary CD on this unit following playback of a CD or an LD encoded with DTS, some operations, such as resetting the input selector keys, may be required.
cEven if connected to this unit with a digital connection, some CD, LD, and DVD players may make this unit fail to decode DTS or produce noise. This is because certain digital output data processing by such a player results in DTS-encoded data errors that cause playback failure although the same data processing may cause only a slight change in volume or in frequency response in normal digital sound.
cWhen an error occurs in the player’s digital output data during playback of an LD or CD encoded with DTS, playback may be disrupted. If this occurs, stop playback and repower the player.
cWhen digital sound signals from the computer are played, errors in WAVE signals, etc. may occur resulting in noise or a playback failure.
CONNECTIONS
English
E-5
CONNECTIONS
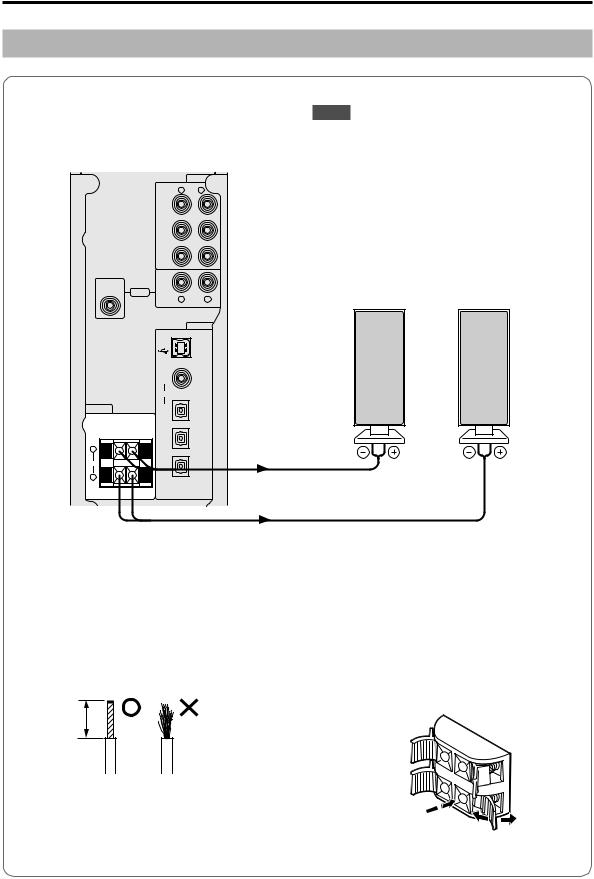
Connecting speakers
[AP-U70 only]
Connect this unit to your speakers with speaker cables with a proper gauge (keep them as short as possible).
|
|
|
ANALOG |
|
|
R |
L |
|
|
PC IN |
|
|
|
AUX 1 |
|
|
|
IN |
|
|
|
AUX 2 |
|
|
|
IN |
|
|
|
REC |
|
SUB |
|
OUT |
|
WOOFER |
OUTPUT |
|
|
|
|
|
|
|
|
R |
L |
|
|
|
DIGITAL |
|
|
USB |
|
|
|
COAX |
|
|
|
IN |
|
|
|
PC |
|
SPEAKERS |
|
OPT |
|
|
|
IN |
|
6Ω MIN. |
|
|
|
/SPEAKER |
|
|
|
– |
+ |
AUX 1 |
|
|
|
OPT IN |
|
L |
|
|
|
MAIN |
|
OPT |
|
|
|
OUT |
|
R |
|
|
|
Notes
cUse speakers which do not have a built-in amplifier.
cUse speakers whose impedance is 6Ω or more.
cConnect the left speaker to the left speaker connector on this unit and the right speaker to the right speaker connector.
cMake sure that the + and – polarity markings of the speaker cables are observed and set correctly. If these cables are reversed, the sound will be unnatural and lack bass.
Left speaker |
Right speaker |
Speaker Cables
Strip 10 mm of insulation off the end of each speaker cable, and then twist the bare wires to prevent lose strands, which can cause short circuits.
10 mm
How to connect:
1 Press and hold the speaker connector levers.
2 Insert the bare ends of the speaker cables into the terminal holes.
3 Then release the levers.
*Try pulling gently on each cable to make sure that it is secure.

E-6
CONNECTIONS
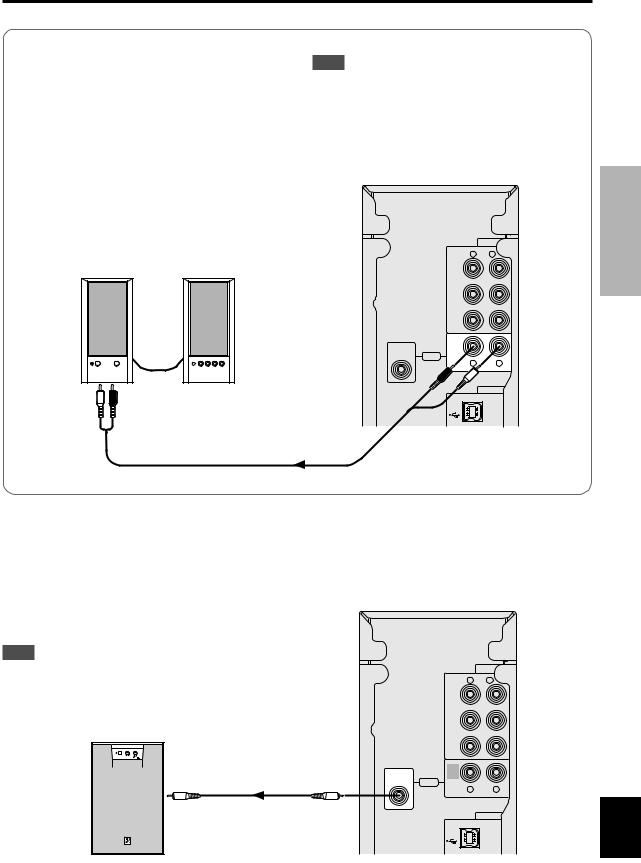
[DP-U50 only]
To reproduce sound signals inputted to this unit over speakers, connect this unit to speakers with a built-in amplifier, a mini-component system, etc., or connect this unit to speakers by using an external power amplifier.
Connect the analog inputs of speakers with a built-in amplifier, etc. to this unit’s PRE OUT using a commercially available analog pin-plug cord or a pin (stereo)-to-mini
(stereo) plug cord.
Note
The level of signals outputted from the PRE OUT varies by the use of the volume control on the front panel or the VOLUME keys on the remote control. So, it is recommended to adjust the speaker output level on this unit or the remote control, and fix the volume of speakers with a built-in amplifier, etc. at a certain level.
Speakers with a built-in |
|
|
ANALOG |
|
|
R |
L |
||
|
|
|
||
amplifier |
|
PC IN |
|
|
|
|
|
|
|
Left |
Right |
|
|
|
|
|
|
AUX 1 |
|
|
|
|
IN |
|
|
|
|
AUX 2 |
|
|
|
|
IN |
|
|
|
|
PRE |
|
|
SUB |
|
OUT |
|
|
WOOFER |
OUTPUT |
|
|
|
|
|
|
|
|
|
|
R |
L |
|
|
R |
L |
|
|
R INPUT |
|
|
DIGITAL |
L |
|
|
|
|
USB
Adding a subwoofer
Bass performance can be extended by connecting a subwoofer to this unit’s SUBWOOFER OUTPUT using a commercially available audio pin-plug cord.
The use of a subwoofer is also suitable for reproducing the effects of sound field programs.
Note
The SUBWOOFER OUTPUT is a line-level output. Use a subwoofer which has its own built-in power amplifier, such as the Yamaha YST-SW45.
LINE IN
ANALOG
R L
|
PC IN |
|
AUX 1 |
|
IN |
|
AUX 2 |
|
IN |
|
REC |
SUB |
OUT |
WOOFER |
OUTPUT |
|
R L
DIGITAL
USB
Subwoofer
CONNECTIONS
English
E-7

CONNECTIONS
Recommended Speaker Placement
For best performance, place the left and right speakers on either side of your computer monitor, as shown below, and position them so that their fronts are flush with the monitor screen. To get the best from the sound field programs and surround effects, the left and right speakers and the listener should be positioned so as to form a triangle with a 3:4 ratio, so if, for example, the speakers are 60 cm (23.5”) apart, the listener should be 80 cm (31.5”) away from each speaker.
If your system includes a subwoofer (YST-SW45, etc.), place it on the floor.
Recommended listening position
3
Left speaker |
Right speaker |
4
Note
Use magnetically shielded speakers and subwoofer. Using nonmagnetically shielded speakers near the computer monitor may impair picture color or damage the monitor.
Plugging in this unit
After completing all connections, plug the AC power |
|
|
|
|
||||
cord into a household AC outlet. |
|
|
|
|
||||
|
|
|
|
|
|
|
||
Note |
|
|
|
AC outlet |
||||
Unplug the AC power cord from the AC outlet if this unit is not |
||||||||
|
|
|
|
|||||
to be used for a long period of time. |
|
|
|
|
||||
|
|
|
|
|
|
|
|
|
|
|
|
|
|
|
|
|
|
|
|
|
|
|
|
|
|
|
|
|
|
|
|
|
|
|
|
|
|
|
|
|
|
|
|
|
|
|
|
|
|
|
|
|
|
(U.S.A. model)
E-8
INSTALLING USB DRIVER AND APPLICATIONINSTALLING USB DRIVERSOFTWAREAND APPLICATION SOFTWARE
When connecting this unit and your computer with the USB cable and controlling this unit from the computer, you must install the following software on your computer.
USB driver software: Necessary for this unit to communicate with your computer .......... Use the software originally supplied with the OS (Operating System) running on your computer
Application Software: Used to control this unit from a computer .......... Download from the supplied CD-ROM
Online help : Instructions for using the Application
......... Access from the supplied CD-ROM
This section explains how to install the software. The installation method differs from the OS running on your computer.
Refer to the instructions suitable for your OS below.
Preparations before installation
cMake sure that the USB cable is not connected to this unit and that your computer is not activated.
cMake sure that your computer meets the system requirements listed below.
If your computer does not meet the system requirements, you can use the computer as an input source by connecting it to the analog or digital input(s) of this unit. In that case, however, the supplied Application Software cannot be used.
cYou may be requested to insert your OS’s CD-ROM during the installation, so please have it ready before commencing.
cThe installing method may differ from the instructions below depending on the operating environment of your computer. In such a case, follow the instructions shown on the monitor. If you still have any question, inquire at the manufacturer of your computer or a computer dealer.
System requirements
Your computer must meet the following system requirements to use the supplied Application Software.
Microsoft Windows 98/98SE, Windows Me or
Windows 2000 Professional
Operating System
Microsoft Windows 98/98SE, Windows Me or Windows
2000 Professional
Computer
A computer with a USB port as a standard equipment and
preinstalled with the above OS.
Windows is a registered trademark of Microsoft Corporation in
the United States and/or other countries.
Macintosh
Operating System
Mac OS 9.0.4 or greater (USB Driver 1.4 or greater)
Computer
Macintosh computer with a USB port as a standard equipment
Macintosh is a trademark of Apple Computer, Inc., registered in
the U.S. and other countries.
AND DRIVER USB INSTALLING SOFTWARE APPLICATION
English
E-9

INSTALLING USB DRIVER AND APPLICATION SOFTWARE
Installing the software
Microsoft Windows 98/98SE or Windows Me
mInstalling and checking the USB driver
1Turn on your computer and, if it’s not running already, start Windows 98/98SE or Windows Me.
2Plug the AC power cord of this unit into the AC outlet.
This unit can be on or in standby mode when installing the driver.
3Connect this unit to a USB port on the computer using the supplied USB cable.
Windows automatically detects this unit and installs the necessary driver software. Make operations as indicated in the dialog box. You may be requested to insert your Windows OS CD-ROM.
*The installation may take a longer time depending on the system environment. After the installation dialog box disappears, wait several minutes.
Check that the USB driver has been installed successfully
by following the procedure below.
4 Click the Windows “Start” button and select
“Settings”, and then “Control Panel”.
The Control Panel window appears.
5 Double-click the “System” icon.
The System Properties window appears.
6 Click the “Device Manager” tab.
The Device Manager window appears.
7 Click the “View devices by type” option button.
8 Click the “+” symbol next to “Sound, video and game controllers,” and make sure that “USB Audio Device” appears in the list, as shown.
*The screen image is for Windows 98SE.
*When using Windows Me, “?” may be shown at the head of “USB Copmposite Device” in green. This means the USB driver has been installed with the Generic ID supplied with the operating system. (This is not an error message.)
9 Click the “+” symbol next to “Human Interface
Devices”, and make sure that “HID-compliant consumer control device” and “USB Human Interface Device” appear in the list, as shown.
* The screen image is for Windows 98SE.
10 Click the “+” symbol next to “Universal Serial
Bus controllers” and make sure that “USB Composite Device” appears in the list, as shown.
* The screen image is for Windows 98SE.
Notes
cThe device list on your computer may differ to that shown here.
cIf “!” or “?” is shown at the head of the device name, check the followings:
*The USB cable is firmly connected.
*The AC power cord of this unit is plugged into an AC outlet.
cIf the driver has not been successfully installed, disconnect the USB cable and connect it again. Then try to install the driver again. If installation still fails, restart Windows and try again.
E-10

INSTALLING USB DRIVER AND APPLICATION SOFTWARE
Make the following settings on your computer after the installation of the driver is finished.
Setting of Audio and Audio CD
[Windows 98/98SE only]
*Terminate all the activated applications.
*When using Windows 98SE, restart Windows, first.
1Click the Windows “Start” button and select “Settings”, and then “Control Panel”.
2Double-click the “Multimedia” icon.
3Click the “Audio” tab and select “USB Audio Device” at “Preferred device” of “Playback”.
*Usually, this setting is automatically made.
*If “USB Audio Device” does not appear, restart Windows.
4Click the “CD Music” tab and select the CD-ROM drive for playing audio CDs.
5Click the check box of “Enable digital CD audio for this CD-ROM device” to enter the check mark.
*It may happen that the check box cannot be clicked because some CD-ROM drives cannot be used for playing audio CDs.
6Click “OK” and close the “Multimedia” setting panel.
7Restart Windows.
Note
When using two or more drives, you must make the above setting
for each drive.
Checking the Audio setting
[Windows Me only]
1 Click the Windows Me “Start” button and select
“Settings”, and then “Control Panel”.
2 Double-click the “Sounds and Multimedia” icon.
3 Click the “Audio” tab and select “USB Audio
Device” at “Preferred device” of “Sound Playback”.
*Usually, this setting is automatically made.
*If “USB Audio Device” does not appear, restart Windows.
Checking sound output and adjusting volume
[Windows 98/98SE and Windows Me]
|
USB |
USB |
|
PC |
|
|
AUX1 |
|
|
AUX2 |
|
VIRTUAL |
|
Display |
VOL |
|
|
DSP M U T E |
|
|
Volume control
 Power switch
|
|
|
|
|
|
SOFTWAREAPPLICATION |
ANDDRIVERUSBINSTALLING |
1 |
|
|
|
|
|
||
Make the following operations on the front panel of |
|
||||||
this unit.
a) Press the power switch to turn on this unit. (Some messages are shown on the display.)
b) Press the USB input selector key.
c) Use the volume control to adjust the volume. (Set the control to about “30”.)
2 Adjust the volume on the computer as follows.
a)Double-click the speaker icon on the task tray, or select “Start”, “Programs”, “Accessories”, “Entertainment” in this order and click “Volume Control”.
(The volume adjustment window appears.)
b)Adjust the volume by dragging the “Volume” slider. Set the slider between the center and max. positions.
*Do not enter the check mark in the “Mute” check box. If entered, sound output will stop.
3 Click the Windows “Start” button and select
“Settings”, and then “Control Panel”.
4 Double-click the “Sounds” (or “Sounds and
Multimedia”) icon.
5 Click the “Sounds” tab.
6 Check that the sound is output normally by outputting “Default sound”, etc. from “Events” (or “Sound Events”).
|
|
English |
|
* |
If no sound is heard, restart Windows and check again. |
||
|
E-11

INSTALLING USB DRIVER AND APPLICATION SOFTWARE
Next, install the Application Software and Online Help
from the supplied CD-ROM.
m Installing the Application Software
*Terminate all the activated applications (including virus checkers) on the computer first.
1Insert the CD-ROM into the CD-ROM or DVD-ROM drive.
If the Windows Autorun feature is turned on, the installation start-up screen appears automatically.
2Continue with the installation as prompted.
If the Windows Autorun feature is not turned on
Display the contents of the CD-ROM by using “My Computer” etc., and double-click on “Readme.txt.”. The installation method is described in this file.
mUsing the Application Software and Online Help
This section explains how to start the Application Software
and view the online help.
1 Click the Windows “Start” button and select
“Programs”, “YAMAHA AP-U70 (or DP-U50)”, “APU70 (or DP-U50)” in this order.
The Application Software starts.
2 To view the online help, click the Windows “Start” button and select “Programs”, “YAMAHA AP-U70 (or DP-U50)”, “Help” in this order.
The online help, which explains how to use the Application Software, starts.
Note
Never disconnect the USB cable while starting up the Application Software. If disconnected, the computer may hang.
m Uninstalling the Application Software
This section explains how to uninstall the Application Software.
1 Terminate the Application Software and online help.
2 Click the Windows “Start” button and select
“Settings”, and then “Control Panel”.
The Control Panel window appears.
3 Double-click the “Add/Remove Programs” icon.
The “Add/Remove Programs Properties” window appears.
4 Select “YAMAHA AP-U70 (or DP-U50) Application” in the software list.
“YAMAHA AP-U70 (or DP-U50) Application” is highlighted.
5 Click the “Add/Remove Programs” button and continue as prompted.
E-12

INSTALLING USB DRIVER AND APPLICATION SOFTWARE
Microsoft Windows 2000 Professional
mInstalling and checking the USB driver
1Turn on your computer and, if it’s not running already, start Windows 2000 Professional, and log in with Administrator.
2Plug the AC power cord of this unit into the AC outlet.
This unit can be on or in the standby mode when installing the driver.
3Connect this unit to a USB port on the computer using the supplied USB cable.
Windows automatically detects this unit and installs the necessary driver software.
*The installation may take a longer time depending on the system environment. After the dialog box for installation disappears, wait several minutes.
Check that the USB driver has been installed successfully
by following the procedure below.
4 Click the Windows “Start” button and select
“Settings”, and then “Control Panel”.
The Control Panel window appears.
5 Double-click the “System” icon.
The System Properties window appears.
6 Select the “Hardware” tab, and click the “Device
Manager”.
The Device Manager window appears.
7 Select the “View” tab, and click the “Devices by type” option button.
8 Click the “+” symbol next to “Sound, video and game controllers,” and make sure that “USB Audio Device” appears in the list, as shown.
9 Click the “+” symbol next to “Human Interface
Devices”, and make sure that “HID-compliant consumer control device” and “USB Human Interface Device” appear in the list, as shown.
10 Click the “+” symbol next to “Universal Serial
Bus controllers” and make sure that “USB Composite Device” appears in the list, as shown.
Notes
cThe device list on your computer may differ to that shown here.
cIf “!” or “?” is shown at the head of the device name, check the followings:
*The USB cable is firmly connected.
*The AC power cord of this unit is plugged into an AC outlet.
cIf the driver has not been successfully installed, disconnect the USB cable and connect it again. Then try to install the driver again. If installation still fails, restart Windows and try again.
AND DRIVER USB INSTALLING SOFTWARE APPLICATION
English
E-13
Loading...