

USER MANUAL (EN)


CONTENT
SAFETY INFORMATION
Electrical Safety, Antenna, Pixelfault.................................................... 4
Power Supply, Case of Service ............................................................5
Application, USB / MicroSD, Insert Batteries........................................6
Recycling Information ........................................................................7
EU- Declaration of Conformity ..........................................................7
FIRST STEPS
Ports & Keys .........................................................................................8
Remote Control.....................................................................................9
Initial Installation, Power Supply, Antenna, Audio/Videoinput ............10
Main Functions.................................................................................... 11
Getting Started ..................................................................................12
Daily Operation
Program List, Favorites List, EPG ......................................................13
Instant Recording, Reminder, Timerlist ..............................................14
Main Menu, Picture Settings, Sound Settings, Time Settings ............15
Functions, Subtitle, Lock.....................................................................16
Seeking Sender, Program Editor........................................................ 17
Signal Source...................................................................................... 18
English
Multimedia Player .............................................................................19
Trouble Shooting ..............................................................................20
Warranty ............................................................................................21
Energy Use ........................................................................................21
3

SAFETY INFORMATION
English
User Manual
All the safety and operating instructions should be read before the product is operated.
Retain instructions - The safety and operating instructions should be retained for future refe-
All warnings on the product and in the operating instructions should be adhered to.
All operating and use instructions should be followed.
Antenna
The digital TV Tuner is connected with an antenna.
If you want to connect or disconnect the antenna, please switch off the device beforehand.
If you use the device in conjunction with an outdoor antenna, make sure that it is earthed
If you stop using the device for a long time, unplug the antenna cable.
An outdoor antenna should not be installed near power lines or other circuits. When attaching
Pixelfault
The following defined pixel faults (bright dot, dark dot, line defects and difference in light intensity)
describes the maximal permitted faults, which are excluded in warranty.
Bright Dot ≤ 3
Dark Dot ≤ 6
Bright + Dark Dot ≤ 6
Operation and Installation
Do not place the device on an unstable surface. The device could be damaged or persons
This device should not be positioned near moisture and water.
This product should be moved gently in a TV shelf with rollers. Jerky stops, uneven surfaces
The device must be placed at least 8 cm away from the wall.
The device must be placed at least 10 cm to the side and at least 20 cm to the ceiling / shelf
The lightning flash with an arrowhead symbol within an equilateral triangle is intended to alert the user of the presence of un-insulated "dangerous voltage" within
the product's enclosure that may be of sufficient magnitude to constitute a risk of
electric shock to persons.
The exclamation point within an equilateral triangle is intended to alert the user of
the presence of important operating and maintenance (servicing) instructions in the
literature accompanying the appliance.
This device complies with part 15 of the FCC rules.
rence.
according to the regulations.
such antennas, extreme care should be taken, as contact with such cables can be fatal.
injured. Any fixings should only be installed according to the manufacturer's information or
obtained from the manufacturer.
could cause the car to overturn.
arch.
4

SAFETY INFORMATION
Never operate the device permanently in 4: 3 mode. This could result in damage to the
screen during prolonged use.
Do not increase the volume when a quiet passage is being played. This could cause damage
to the speakers when there is a loud passage.
The openings of the housing are used for ventilation, so that the device does not overheat.
These must always be kept free.
The device should not be located near sources of heat, such as Stoves, heaters are positio-
ned.
Cigarette smoking can penetrate the screen and cause visible contamination on the screen.
Damage caused by cigarette smoke is not remedied as part of the warranty.
Power Supply
The device can only be operated with the voltage described on the back. If you do not know
the voltage, please ask an electrician.
To avoid overload, do not operate too many other devices at the same outlet.
Be sure to install power cables so that no one can trip over them.
The cable is sheathed and insulates the electricity. Please do not place any objects on the
cable, as this may result in loss of the protective function. Avoid heavy loads on the cable,
especially on sockets and plugs.
If you want to remove the plug from the socket, always pull on the plug and not on the cable.
Otherwise the cable could break.
If you stop using the device for a long time, be sure to unplug the power cord.
To protect the unit during a thunderstorm or when left unattended for an extended period of
time, disconnect the power plug from the power outlet and the antenna cable from the aerial
socket. This prevents damage due to lightning strikes.
Do not overload electrical outlets, extension cords or other wiring, as this may result in fire or
electric shock.
No objects may be introduced into the openings of the device, as in some places electricity
flows and the contact may cause fire or electric shock.
Never remove the cover - there are no internal parts that can be repaired by the user.
Operate the device only with the included power adapter.
English
Service Event
Never carry out repairs yourself, always leave this to qualified personnel. Contact the repair service
for the following errors:
If the power cord is broken.
If objects have fallen into the device or if the device has come into contact with liquids or
penetrated the device.
If the device does not work despite proper use. Change only the settings described here.
If the device has been dropped and if the product has power fluctuations.
Use only original spare parts. Incorrect replacement parts can adversely affect the performan-
ce and operational safety of the device.
5
SAFETY INFORMATION
Application
Reception of digital programs via antenna (DVB-T / T2).
Play supported video, picture and music files.
Connection of compatible mass storage devices.
USB Port / MicroSD
The TV may take some time to fully read and run the storage device. Do not remove the storage
device until all recordings or playbacks have finished.
English
The USB ports on this device are not suitable for charging devices with built-in rechargeable batteries
(such as mobile phones, tablet computers, MP3 players, etc.). Observe the information on the rating
plate regarding the maximum current output of the USB ports.
Notes:
USB 2.0 mass storage up to 500 GB and MicroSD cards up to 32 GB are supported. Higher
capacity storage devices can be used, but compatibility with the TV can not be guaranteed
under all circumstances.
A variety of different USB storage devices are currently being sold, and some may not meet
the specifications for USB mass storage devices. If your USB storage device is not recognized by the TV, please try another USB storage device.
If a USB device is no longer detected, please perform a disk diagnostics with your computer
or reformat the USB memory device.
USB devices that consume more than 500mA (0.5A) of power will violate the USB specificati-
ons and may not work properly with the TV.
Always back up all data from the memory before connecting it to the TV.
Recording HD broadcasts requires a sufficiently fast USB storage device.
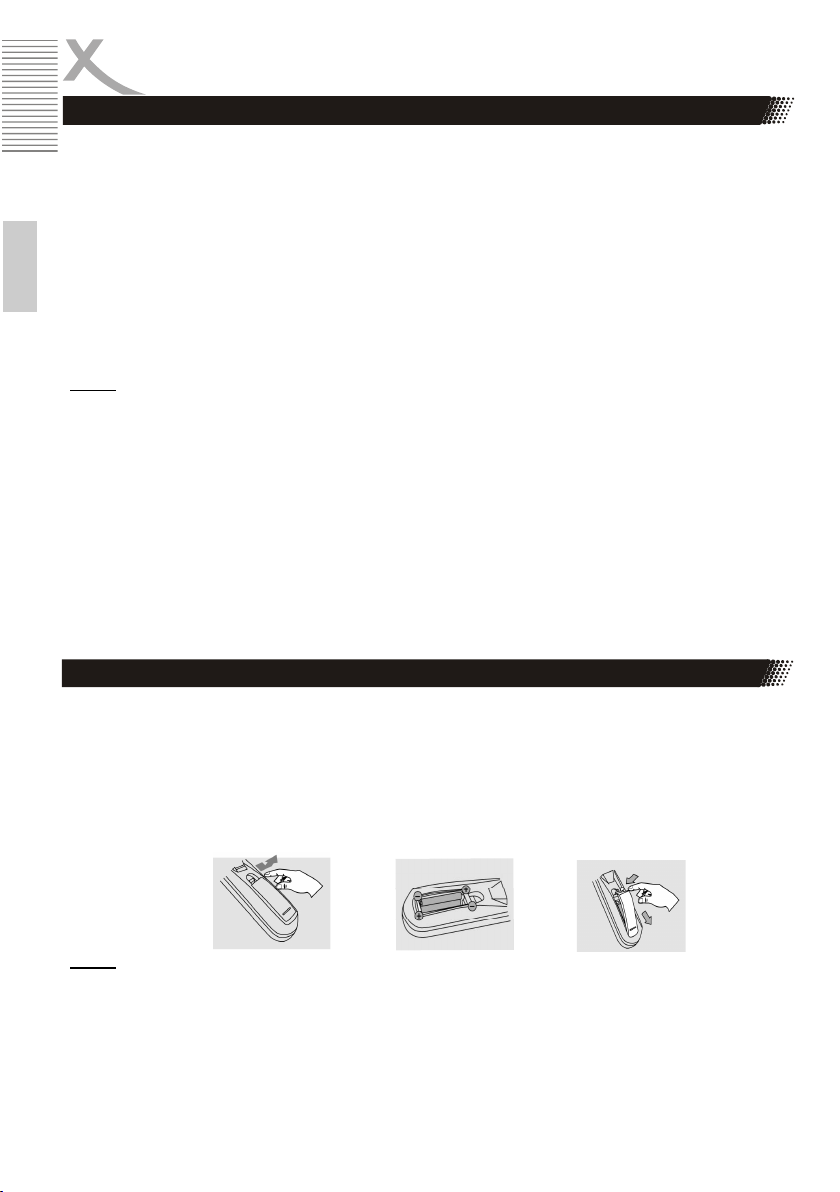
Insert Batteries
1. Open the battery compartment on the lower back of the remote control.
2. Insert the batteries in the compartment. Please pay attention to the correct polarity (+/-) when
inserting the battery.
3. Slide the battery door back on (Figure).
4. Always point the remote control at the sensor field (IR) of the device.
5. The distance to the device should not exceed 5 meters and the operating angle should not
exceed 60 °.
Notes:
Remove and replace old batteries. These could leak and damage the remote control. Remo-
ve the batteries from the remote control if you are not going to use the device for a long time.
Remove leaking battery fluid with a cloth. Avoid skin contact with the fluid. If the battery or
battery fluid is swallowed, seek medical attention immediately. In case of skin / eye contact,
wash out the skin / eyes and consult a doctor.
6
RECYCLING INFORMATION
Recycling of Electronic Devices
This product is designed and manufactured with high quality materials and components
which can be recycled and reused. This symbol means that electrical and electronic
equipment, at their end-of-life, should be disposed of separately from your household
waste. Please, dispose of this equipment at your local community waste collection/
recycling centre. In the European Union there are separate collection systems for used
electrical and electronic product. Please, help us to conserve the environment we live
in!
Recycling of Paper and Carton
The material recycling symbol on the carton and user manual denotes that they are
recyclable. Dispose them not with the normal household waste.
Recycling of Plastic Parts
The material recycling symbol on the plastic parts denotes that they are recyclable. Do
not dispose them in household waste.
Green Dot
The “Grüne Punkt” denotes that the MAS Elektronik AG pays a duty to the “Society for
Waste Prevention and Secondary Resource Generation”.
Batteries
Every consumer is legally obliged to return batteries to a collection point in his community or in commerce so that they can be disposed of in an environmentally friendly manner. Please do not dispose of batteries with household waste.
English
EU-Declaration of Conformity
With the CE mark declares XORO, a registered trademark of the MAS Elektronik AG
that the device meets the guidelines 2014/53/EU.
The full text of the EU Declaration of Conformity is available under the following
Internet address: http://www.xoro.de/downloads/
Package Contents
The following components are included:
TV
Remote control and batteries
User manual
Power adapter and car power adapter
AV cable
Extensible DVB-T2 telescopic antenna
If any of these items is missing, please contact your dealer as soon as possible. Keep the original
packaging in the event the unit needs to be returned to the dealer.
7
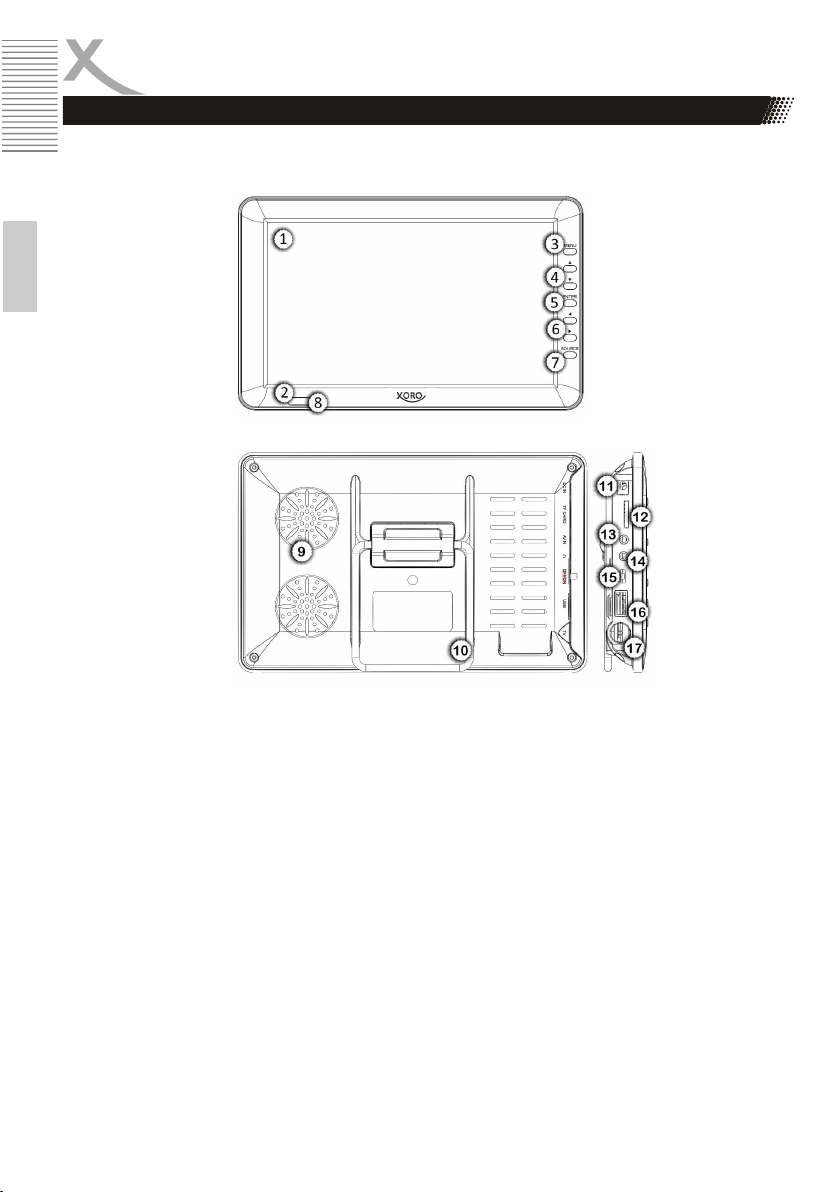
Ports & Keys
Front view
English
Back view
FIRST STEPS
1 Display
2 Status LED Blinking Red device is charging
3 MENU Opens main menu
4 ▲/▼ Toggles a channel up / down, navigates up / down
5 ENTER OK /Confirm
6 / Decrease / increase volume, navigate left / right
7 SOURCE Button to switch the signal source
8 Remote sensor
9 Speaker
10 Stand
11 DC IN Connection for the power supply
12 TF CARD MicroSD card slot
13 AV IN Analog audio / video input (requires supplied adapter cable)
14 Earphone jack
15 OFF/ON Power switch
16 USB USB 2.0 port
17 TV IEC antenna connection
8
Red LED on device is fully charged
Green LED on device is in operating mode

Remote Control
FIRST STEPS
STANDBY To standby / switch on the device
PVR Starts an instant recording
MUTE Mute
SOURCE Choose source
1-9 Number keys
+ / - Increase / decrease the volume
USB Opens Mediaplayer/recordings
SUB Subtitle menu
EPG Open electronic program overview
AUDIO Audiomenu
MENU Opens main menu
EXIT Back
OK Confirm
▲/▼ Navigation up/down, channel next/previous
/ Navigation left/right,
Volume control
FAV Opens favorites
INFO Opens channel information
Red Key / Red function key, title backward
Green Key Green function key
Yellow Key Yellow function key
Blue Taste / Blue function key, title forward
MIX / Teletext display transparent, spool backward
TV/RADIO / TV/Radio switch,
Start / pause playback
REVEAL/ Spool forward
INDEX Teletext display index / overview
TEXT / Stop teletext / playback or recording
HOLD / Pause teletext search / repeat
English
Note:
The TV / RADIO button is only active if the device has also found radio stations during
station search. Currently no radio program is broadcast on DVB-T and DVB-T2! Therefore, the button may not have any function for this reason!
Always point the remote control towards the built-in remote control diode (8) so that the
remote control signals can be transmitted. If necessary, change the inclination of the
device to improve the remote control signals.
9

FIRST STEPS
Installation
Make sure that the device is switched off and disconnected from the mains during installation. Only
when all connections have been made, switch on the device via the mains switch.
Power Supply
Use only the supplied AC adapter to power and charge the TV. Observe the information on the rating
plate of the power supply unit.
English
Notes:
The power supply provides a stabilized DC voltage. Operating with an unstabilized voltage
can damage the device. Only the included power supply ensures safe operation and compliance with all regulations and standards.
It is possible to use the TV with the power adapter connected. The device will simultaneously
charge the built-in battery during use.
Connect to the Antenna
The TV receiver is suitable for digital free-to-air TV (DVB-T / T2). Connect the cable of your antenna
system or the antenna supplied with the antenna input (TV) of the device. In order to activate the
integrated amplification of the supplied antenna, you must activate the 5V supply voltage for the antenna input (page 17)
PayTV transmitter and transmitter of the multithek (HbbTV) are not decodable with the device!
Headphone
You can connect a headphone or an external hi-fi system at the headphone output (adapter cable
required). When using the connection, the internal loudspeakers of the device are switched off automatically.
Analog Audio / Video Input
The device has an analog audio / video input to use external devices such as DVD players or video
cameras on the device. Use the supplied AV adapter cable to connect to external devices. After connecting, use the SOURCE button and select the "AV" source to switch to the audio / video input.
USB port / MicroSD
The device has a USB 2.0 port, as well as a MicroSD card slot for the integrated recording function or
the media player. Please refer to the notes on page 6 of this manual. You can reach the USB media
player by pressing the USB button on the remote control or by pressing the SOURCE button and
selecting "USB". You can access the MicroSD media player by pressing the SOURCE button and
selecting "MicroSD".
10
With the device you can only receive free-to-air DVB-T / T2 channels.

FIRST STEPS
Basic Functions
The basic functions of the remote control are described below:
Control Pad / OK Button
Use the / /▲/▼ buttons on the remote control to navigate the menus or the program guide or
station list. To confirm your selection press the OK button.
Number Buttons
You can directly select the desired station by entering the program slot using the number buttons 0-9.
Volume / Mute
Press the MUTE button on the remote control to turn off the sound. A crossed-out speaker symbol
appears. Pressing the key again activates the sound.
To adjust the volume, use the + / - or the / buttons on the remote control.
Changing Stations
To change the station, use the ▲ / ▼ buttons or the number buttons to directly enter the station number. With the OK key you reach the program list and with the FAV key you reach the favorite list of
the device.
TV / Radio Switching
The TV / RADIO button on the remote control switches between the radio and TV channel list. The
program list and functions are the same as the TV mode in radio mode.
Note:
The TV / RADIO button is only active if the device has also found radio stations during station search.
Currently no radio program is broadcast on DVB-T and DVB-T2! Therefore, the button may not have
any function for this reason!
English
Teletext
The TEXT button displays the teletext menu of the current station. Teletext pages are accessed by
entering the page number using the number buttons 0-9. Use the ▲ / ▼ buttons to scroll forwards
and backwards through the teletext. The color buttons also allow you to quickly jump to specific teletext pages depending on the sender. To exit teletext, press the TEXT button again.
Subtitle
While watching TV, press the SUB button to enter the subtitle menu. If the broadcaster offers subtitling, you can now activate the subtitles. Use the OK button to save your setting.
Audio Track
Press the AUDIO button to display the menu for the sound tracks of the active station. Depending on
the station, you can now choose between audio tracks. Use the OK button to save your setting.
11
INITIAL INSTALLATION
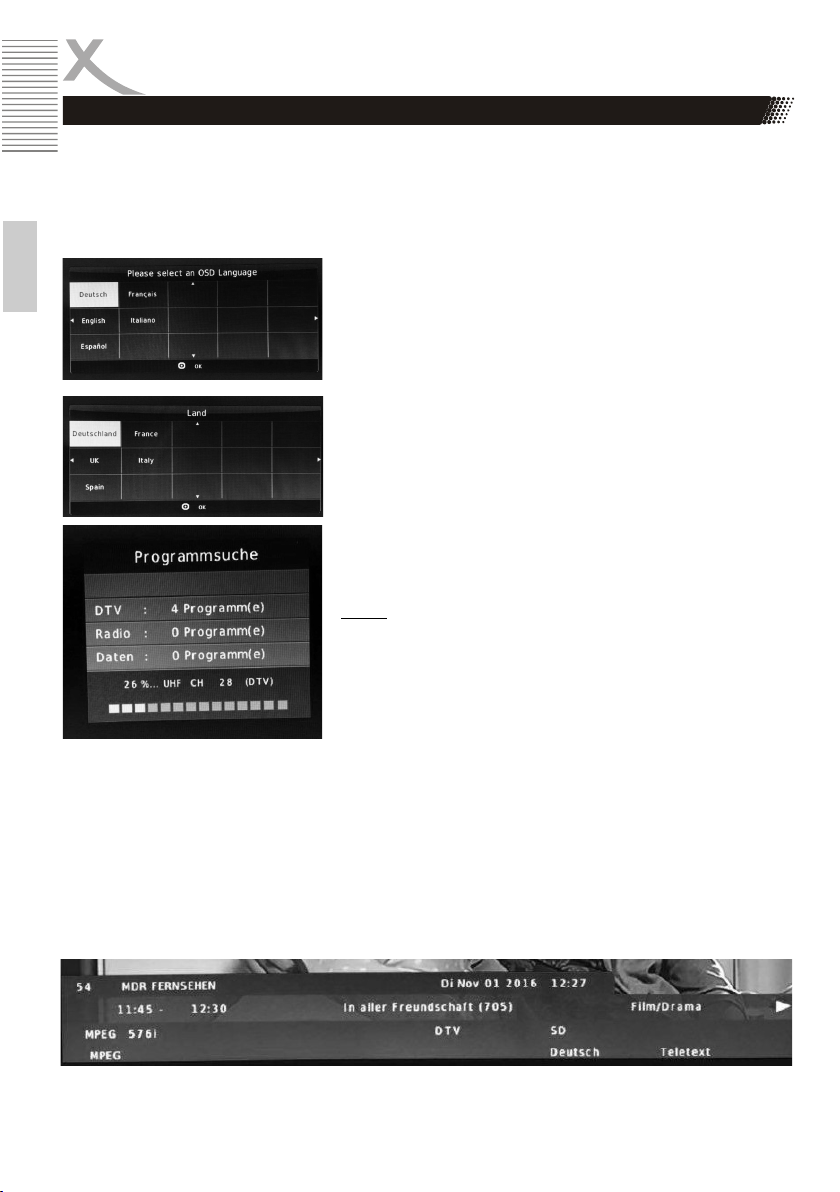
Initial Installation
When you start the device for the first time and/or restore the factory settings (Page 16), the device
offers a first-time installation. Make sure your device is connected to an antenna during initial installation and has sufficient reception.
In the first window, use the navigation buttons on the remote
English
control to select the desired language of the menu interface
and confirm your setting with the OK button.
In the next window, select the country where the device is
located. Confirm your selection with the OK button. The unit
then starts with the automatic digital station search. During the
search process, you can see how many channels the device
has already found.
DTV Digital TV channels
Radio Digital Radio stations
Data sender with data information When the scan is comple-
ted, the unit will start playing the first station found and
the initial installation will be complete.
You can cancel the initial installation at any time by pressing
the EXIT key.
Notes:
More extensive configuration options for station search
are provided by the manual station search TV settings
menu of the device (Page 17).
Since the TV providers occasionally change station
positions or new channels are switched on, it is advisable to perform a channel scan from time to time to be
able to receive all available TV channels.
As soon as you move the location of the device to
another region, for example while you are on vacation,
a new station search may be necessary.
Program Information
Information on the current program can be obtained by pressing the INFO button on the remote
control. In addition to information such as TV program title, date and time, current time, runtime of the
current program, resolution of the program (for example, 576i) and whether teletext is available, EPG
information about the current program is also displayed. More detailed EPG information on individual
programs can be found in the electronic program overview (page 13).
12
DAILY OPERATION
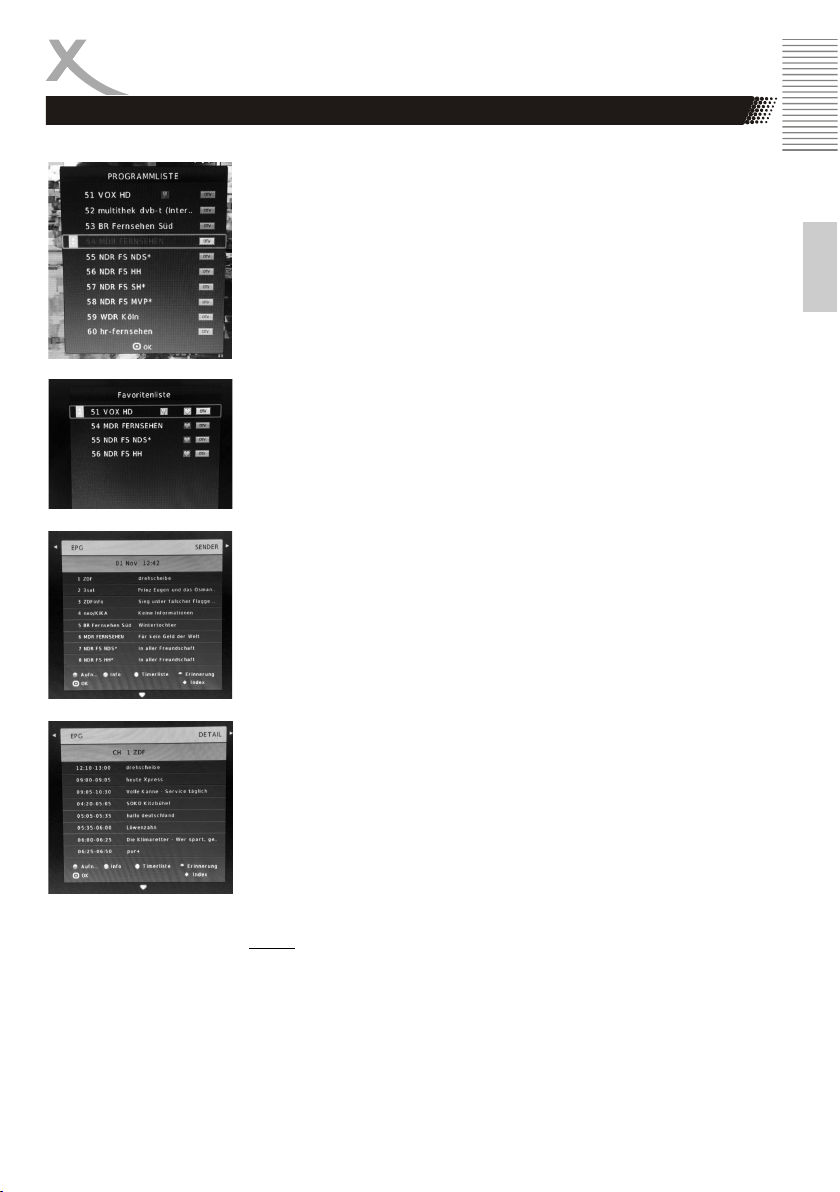
Program List
Press the OK button during the TV program list is displayed. With the
navigation buttons ▲ / ▼ you can select a station within the program list
and call it up with the OK button.
The program list can be edited with the program editor (page 17).
Favorites List
Press the FAV button while watching TV, the favorite list is displayed.
With the navigation buttons ▲ / ▼, you can select a station within the
favorites list and call it up with the OK button.
You can edit the favorites list with the program editor (Page 17).
EPG (Electronic Program Guide)
Press the EPG key to display the electronic program guide (EPG). You
can display the view in two variants with the INDEX button. Use the /
buttons to select between the station overview (SENDER) or the detail
view of the selected station (DETAIL) if the uppermost field is highlighted
in yellow after pressing the INDEX button.
English
You can now press the ▼ button in the box below, depending on the selection, set the day for the display (SENDER) or change the program for
the detail view (DETAIL).
By pressing the ▼ key, you will be taken to the respective overview. Use
the navigation buttons ▲ / ▼ to select an event within the view.
The following keys and functions are available:
Green button Shows information about the selected event
Yellow button Displays a list of all programmed timers (page 14)
Blue button Programs a reminder timer (page 14)
Index Changes the EPG view (see above)
OK Ends EPG and returns to the current program
Notes:
The extent to which program information is available in the EPG
depends on the particular TV station.
You may need to switch to a station first to see its program infor-
mation in the EPG views. Otherwise, you may see a "No Information" score.
Time and time zone must be set correctly.
EPG is not available for analog TV signals
13

DAILY OPERATION
The device offers a recording function on connected USB 2.0 data media or on a MicroSD memory
card (32 GB max.). Please read the notes on page 6 of this manual!
Finished recordings can be played in the media player of the respective recording medium (page 19).
Instant Recording
English
While watching TV, press the REC button and recording will start.
Stop recording by pressing the button. During recording, the time
left on the top left of the screen is shown for how long the recording
has been in progress. You can view finished recordings in the media
player of the recording medium (page 19).
Note:
Timed recordings are technically not possible with the device.
During an ongoing recording, it is technically not possible to
change the station or to watch another station.
Reminder
You can program a reminder timer. At the same time, the TV automatically switches on the TV set to the programmed event on time or to
the stored station.
In the detailed view of the desired station, select the program to be
recorded and press the blue button. In the now appearing window
"Reminder", the start time of the scheduled program is taken over
from the sender EPG. You can now optionally manually edit the start
time. In the last menu item you can set the frequency (once, daily or
weekly). With the OK key you save the reminder timer. The timer list
is displayed, with an overview of all the timers stored in the device.
Use EXIT to leave the timer list.
14
Timerlist
All memory timers stored in the device are listed in the timer list and
can be deleted there if necessary. To access the timer List, press the
EPG button while watching TV, followed by the yellow button. Use
the ▲ / ▼ buttons to scroll between the timers. With the red button
already stored timers can be deleted. Press the yellow button to
return to the EPG or EXIT to return to the current program.
Notes:
The device offers no possibility to edit already programmed timers
later. If you want changes, the timer must be deleted and reprogrammed with the new settings.

DAILY OPERATION
Main Menu
Press the MENU button to call up the main menu of the device. Here you can configure the device
according to your wishes. Use the navigation buttons ▲ ▼ to select and the OK button to confirm
entries. With the EXIT key you can leave the main menu at any time.
IMAGE
You can make the following settings:
Picture mode You can use the buttons
Color temperature With the buttons you can
Noise reduction You can use the buttons
VOLUME
You can make the following settings:
Audio mode You can use the buttons
Balance A balance controller serves this purpo
Auto volume When this feature is enabled, the unit
Surround sound You can use the buttons
choose between predefined settings.
Select the "User" option to set all the
underlying settings (contrast, bright
ness, ...) yourself.
choose between predefined settings.
Aspect ratio for the aspect ratio (16: 9,
4: 3, Automatic ...)
choose between predefined image
enhancement settings or disable the
feature.
choose between predefined settings.
Select the "User" option for all the
setting options below set.
se.Set the ratio of the volume levels of
the two audio channels (left / right).
will equalize volume differences bet
ween TV channels to a consistent level
choose between predefined surround
settings.
English
TIME
You can make the following settings:
Clock This shows the current time and date
Off / On Timer In this menu, you can define a time
that the device has read from the sen
derstream.
when the device will turn off automati
cally switched on or off. This allows
you to program the device like an
alarm clock.
15

DAILY OPERATION
Sleeptimer Here you can set a time slot in define
Save energy According to EU directives, electrical
English
Timezone Define zone if the device has not inhe-
rited the correct time zone from the
cally taken over by the device or the
FEATURES
You can make the following settings:
Menu language In this menu, you set the
Audio language In this menu, you specify the language
Subtitle language In this menu, you set the language
PVR file system In this menu, you can check connec ted USB data carriers and/or MicroSD
ry (only FAT32 is supported). The
Factory settings In this menu you can reset the device
ted (page 12).
minutes if the device is to be put into
standby mode automatically, if none
entries made.
devices must automatically switch to
standby mode after 3 hours, if no ent
ries have been made in the meantime
respectively. This should save energy.
In this menu you can deactivate this
function.
sender stream for your location. It may
also be necessary to adjust the time
zone manually if the change of the
summer / winter time is not automati-
transmitter stream.
Menu language fixed.
of the audio track.
subtitling.
cards for errors and format if necessa-
recording limit determines how long an
instant maximum reception is.
to factory settings. All settings will be
with it reset and initial installation star-
16
LOCK
If you change the default password of the device, lock individual programs, protect the device against modification or activate
the youth protection, activate this function by entering the
password.
The default password is 0000.
If the function is activated, the menu items below become
active and can be adjusted according to your wishes.

Sources
DAILY OPERATION
Lock system If the function is active, the system is
protected against modification with the
system password.
Set password In this menu you can change the default
password of the device according to your
wishes.
Prog. Block If you have this feature you can activate /
deactivate individual programs in the
program list with the system password.
Select the desired program and press the
green button to lock / unlock.
Protection of minors In this menu you can set the age for the
protection of minors. For the protection of
minors to be active, the TV station must
have a corresponding send signal to
activate the lock.
SENDER
You can make the following settings:
Automatic Search Starts an automatic station
search (page 12)
Manual Search Starts a manual transmitter retuning. This
is useful if you have only individual fre quencies to scan.
Program Editor Starts the channel list editor of the device.
With the red button you can delete indivi
dual stations of the program list, with the
blue button selected stations can be
skipped when zapping. With the FAV key
you add the selected station to the favori tes list or delete the station from the favo rites list by pressing the FAV key again.
Use the yellow button to highlight a stati on and use the ▲ / ▼ buttons to move it
within the channel list. Press the OK
button to save the station at the selected
position.
Signal Information Displays signal information about
the currently active channel.
5V Activ Antenna Activates the 5V supply voltage.
Activate the amplification of the
supplied antenna!
English
17

DAILY USE
English
LCN If you use the logical channel to use sor
ting by your provider, enable this feature.
Should you have problems with the sorter
sorting and change your station list inde-
pendently or the channel numbers are
not continuous displayed, check if the
LCN function is activated! Make sure that
this function has been deactivated before
the search, if you want to sort your stati-
on list manually!
Software Update Starts the software update via a connec-
ted USB data carrier.
Check regularly on the product page of
the device whether a software update in
the download area is available for your
device.
Sources
To change the source, press the SOURCE button on the remote
control, use the ▲ / ▼ buttons to select the desired source and
press the OK button to change.
DTV Opens the integrated DVB-T2 tuner for digital
terrestrial TV reception.
AV If you have connected external devices via the
AV-IN input of the device, select the AV signal
source to display audio / video signals from the
external source on the device.
USB Opens the media player of a USB 2.0 data carrier
connected to the device. Here you can also view
recordings made with the device.
MicroSD Opens the media player of a MicroSD memory
card connected to the device. You can also view
recordings made with the device.
18

MULTIMEDIA PLAYER
The device offers you a multimedia player. Connect a USB 2.0 mass storage or MicroSD memory
card to your digital media to the USB input of the device.
Press the SOURCE button on the remote control and select the signal source USB or MicroSD, depending on the medium you have connected to the device.
Now select the desired media type with the keys and confirm with the OK key. Now select the medium on which
your media are located (is the volume C) and press the
OK button again.
Note:
Recordings that you have created with the device are in
the "_MSTPVR" folder. This is automatically created by
the device during a recording.
All available media will now be previewed. Navigate to a
"Back" button to move to a higher directory level.
Use the navigation buttons to select a specific medium. If
you stop briefly on the media file, a preview is automatically displayed. With the OK button you can start the play-
back of the selected file directly. With the red button you
can delete individual files.
EXIT stops playback and returns to the media overview.
English
In full-screen mode of music playback, a toolbar is permanently displayed. When playing back pictures and videos, the function bar can be displayed with the OK button and hidden with the EXIT button.
With the ◄ / ► buttons you can select the individual functions and execute with the OK button. The
function of each key is displayed below it when you are on the key. Thus, the operation is selfexplanatory.
Pressing the EXIT button stops playback and returns to the Media Browser.
19

TROUBLE SHOOTING
Please read the following information to find out the possible cause of a problem before contacting
our customer service.
Problem Solution
Device does not turn on
English
No sound.
How can I decrypt PayTV
stations with the device,
or watch channels of the
multithek
Check whether the power adapter is properly connected to the
power outlet. Check if the cable of the power supply is properly
connected to the device.
Check whether the built-in battery of the device is charged and / or
charge the device before use.
Check if mute is activated in the volume control (mute).
Turn up the volume until you hear the sound.
Check the sound settings.
The device is only suitable for free-to-air DVB-T2 television. For
the decoding of the PayTV channels you need a certified receiver
with built-in cardless access system or a CI + slot.
The device is not HbbTV suitable and therefore can not receive
stations of the multithek.
When the USB data medium is inserted, the device
will restart occasionally
The device will restart
occasionally and then
display the initial installation
My station list changes
independently
No reception / bad reception
If the TV restarts unexpectedly with the USB storage device inser-
ted, the connected USB storage device requires too much inrush
current and does not comply with the USB 2.0 specifications. This
is a sign of incompatibility of the used disk.
Use a self-powered USB 2.0 mass storage device
In the event of overvoltages or voltage fluctuations at the antenna
input, the TV may respond with a restart and display the initial
installation.
Check your reception system for possible faults or short circuits.
If you have problems with the sorting of the station list and your
station list changes independently or the channel numbers are not
displayed continuously, check if the LCN function is activated!
Make sure that this function was deactivated before the search, if
you want to sort your station list independently!
Not all regions allow DVB-T / T2 reception with the included an-
tenna. Please get advice in the specialized trade. If necessary, the
device can be expanded with a commercially available (active)
DVB-T2 antenna with greater reception.
The TV can power DVB-T / T2 antennas if enabled in the device's
settings menu (page 17). Activate the integrated amplification of
the antenna!
For better reception, pull out the supplied telescopic antenna to its
full length or change the position.
20

WARRANTY
In case the products delivered are not free from defects in material or workmanship, MAS Elektronik
AG has the right to either repair or replace the defective product at its choice. MAS Elektronik AG
manufactures and repairs goods using components which are new or equivalent to new in accordance with industry standards and practice. The warranty for wearing parts (e.g. rechargeable batteries)
is limited to 6 months. In case the device is equipped with internal data storage (e.g. hard disc drive,
Flash drive), the customer is responsible to backup his data before sending the device. MAS Elektronik AG is not liable for any data loss on returned devices. MAS Elektronik AG reserves the right to
reset returned devices to factory defaults. Please note your personal settings for this reason.
MAS Elektronik AG is not liable for any accessories not belonging to original package content such as
DVDs, hard disc drives, Flash storage devices, batteries, etc. This limited warranty covers the warranty requirements set by authorities in your country. This limited warranty does not cover finishes,
accessories or batteries, nor does it cover damage resulting from accident, misuse, abuse, dirt, water,
battery leakage, tampering, servicing performed or attempted by unauthorized service agencies. This
limited warranty does not cover damages resulting from firmware upgrades. Only in case of firmware
upgrades needed to add functions promised at time of purchase, such damages are covered by this
limited warranty.
For a correct and frictionless completion of warranty or repairs you need a RMA No. You may obtain
a RMA on the internet at www.xoro.de/service or by telephone.
Please send the device in its original packing material, all standard accessories and a copy of the
invoice, a description of defect and the RMA No. to following address. Please note the RMA number
clear and in large numbers on the outer package.
Contact with Customer Service:
English
Phone: +49 4161 800 24 24 (Mon-Fri: from 11:00 to 17:00)
eMail: support@ersservice.de
ERS GmbH Elektronik Repair Service
Weidegrund 3
21614 Buxtehude / Niedersachsen
Germany
If you have questions or problems using your device, we are happy to help you.
21

 Loading...