


ELECTRIC COOKTOPS
USE & CARE INFORMATION
GUÍA DE USO Y MANTENIMIENTO
GUIDE D’UTILISATION ET D’ENTRETIEN
INFORMAZIONI SU USO E MANUTENZIONE
BEDIENUNGSUND PFLEGEANLEITUNG

E N G L I S H
Introducing Wolf Electric Cooktops |
5 |
|
Safety Instructions & Precautions |
6 |
|
Wolf Electric Cooktop Features |
8 |
|
Wolf Electric Cooktop Use & Care |
13 |
|
Wolf Troubleshooting Guide |
20 |
|
Wolf Service Information |
21 |
|
E S P Ã N O L |
|
|
Presentación de las placas |
|
|
vitrocerámicas de Wolf |
23 |
|
Precauciones e instrucciones de seguridad |
24 |
|
Características de las vitrocerámicas |
|
|
de Wolf |
26 |
|
Uso y mantenimiento de las |
|
|
vitrocerámicas de Wolf |
31 |
|
Guía de localización y solución |
|
|
de problemas de Wolf |
38 |
|
Información de mantenimiento de Wolf |
39 |
|
F R A N Ç A I S |
|
|
Présentation des plaques de cuisson |
|
|
électriques Wolf |
41 |
|
Instructions et mesures de sécurité |
42 |
|
Caractéristiques des plaques de cuisson |
|
|
électriques Wolf |
44 |
|
Utilisation et entretien de la plaque |
|
|
de cuisson électrique Wolf |
49 |
|
Guide de dépistage des pannes Wolf |
56 |
|
Service après-vente Wolf |
57 |
|
I TA L I A N O |
|
|
Piani di cottura elettrici Wolf |
59 |
|
Precauzioni e istruzioni di sicurezza |
60 |
|
Funzioni dei piani cottura elettrici Wolf |
62 |
|
Uso e manutenzione dei piani |
|
|
di cottura elettrici Wolf |
67 |
|
Guida alla soluzione dei problemi Wolf |
74 |
|
Informazioni sull’assistenza Wolf |
75 |
|
D E U T S C H |
|
|
Einführung der Elektrokochfelder von Wolf |
77 |
|
Sicherheitshinweise u. Vorsichtsmaßnahmen 78 |
|
|
Leistungsmerkmale der Elektrokochfelder |
|
|
von Wolf |
80 |
|
Bedienung und Pflege von |
|
|
Elektrokochfeldern von Wolf |
85 |
|
Anleitung zur Fehlersuche von Wolf |
92 |
|
Serviceinformationen von Wolf |
93 |
3 |
|
|
|
As you read this Use & Care Information, take particular note of the CAUTION and WARNING symbols when they appear.
This information is important for safe and efficient use of the Wolf equipment.
signals a situation where minor injury or product damage may occur if you do not follow instructions.
states a hazard that may cause serious injury or death if precautions are not followed.
In addition, this Use & Care Information may signal an IMPORTANT NOTE which highlights information that is especially important.
WOLF® is a registered trademark of Wolf Appliance, Inc.

WOLF E L E C T R I C CO O K TO P S
T H A N K YO U
Your purchase of a Wolf electric cooktop attests to the importance you place upon the quality and performance of your cooking equipment. We understand this importance and have designed and built your cooktop with quality materials and workmanship to give you years of dependable service.
We know you are eager to start cooking, but before you do, please take some time to read this Use & Care Information. Whether you are a beginning cook or an expert chef, it will be to your benefit to familiarize yourself with the safety practices, features, operation and care recommendations of the Wolf electric cooktop.
We appreciate your choice of a Wolf Appliance product and welcome any suggestions or comments you may have. Please visit our website at www.wolfappliance.com.
CONTACT INFORMATION
Website:
wolfappliance.com
5

S A F E T Y INSTRUCTIONS AND PRECAUTIONS
W H AT TO D O
IMPORTANT NOTE: Read all instructions before using this appliance.
Read this Use & Care Information carefully before using your new cooktop to reduce the risk of fire, electric shock or injury to persons.
Ensure proper installation and servicing. This appliance must be properly installed and grounded by a qualified technician. Have the installer show you where the fuse box is located so that you know where to turn off power.
Wear proper apparel. Never let loose clothing or other flammable materials come in contact with the elements while in operation. Fabric may ignite and result in personal injury.
Use only dry pot holders when removing pans from the cooktop.
Wet or damp pot holders on hot surfaces may result in burns from steam. Do not let pot holders touch hot heating elements.
Select cookware of the proper size, material and construction for the particular type of cooking being done. This unit is equipped with one or more surface units of different size.
Always turn pan handles inward so they do not extend over adjacent work areas, heating elements or edges of cooktop to reduce the risk of burns, ignition of flammable materials and spillage due to unintentional contact with pan. Do not turn handles toward the room, where they may be bumped or easily hit.
Always use a setting of eight bars or less on the bridge element when cooking on a griddle. Higher settings after a preheat of 5 minutes on
14 bars can damage the cooktop and cookware. Refer to Bridge-Zone Element on page 16.
6
W H AT N OT TO D O
Never use your cooktop to warm or heat a room.
When using the cooktop DO NOT TOUCH THE GLASS SURFACE directly above or adjacent to the heating elements. The glass surface may become hot enough to cause burns.
Do not leave children alone or unattended in the area where the cooktop is in use. Never allow children to sit or stand on the appliance. Do not let children play with the cooktop.
Do not repair or replace any part of the appliance unless it is specifically recommended in literature you received. All service should be referred to a Wolf authorized service center.
Do not use water on grease fires.
Smother the flame or use a dry chemical or foam-type extinguisher.
Never leave the cooktop unattended when using high heat settings.
Boilovers and greasy spillovers may smoke or ignite.
DO NOT store items of interest to children above or at the back of the cooktop, as they could climb on the appliance to reach items and be injured.
If the surface is cracked, switch off the appliance to avoid the possibility of electric shock. Call a Wolf authorized service center to repair the appliance.
Do not store flammable materials near hot components or let grease or other flammable substances accumulate on the cooktop.
Do not use a steam cleaner or clean the cooktop while it is still hot. If using a damp sponge or cloth, wait until the cooktop has cooled sufficiently to prevent steam burns. Also, some cleaners give off noxious fumes when applied to hot surfaces. Refer to Cooktop Cleaning on page 18 and Cooktop Care on page 19.
Do not use a griddle, open roaster or fish poacher across two heating elements unless the bridge element is turned on. This type of use without the bridge element turned on could damage or crack the glass. Refer to Bridge-Zone Element on page 16.
Do not block the cooling fan exhaust or intake vents. The cooling fan automatically turns on to cool internal parts. It may continue to run even after the cooktop has been turned off.
7

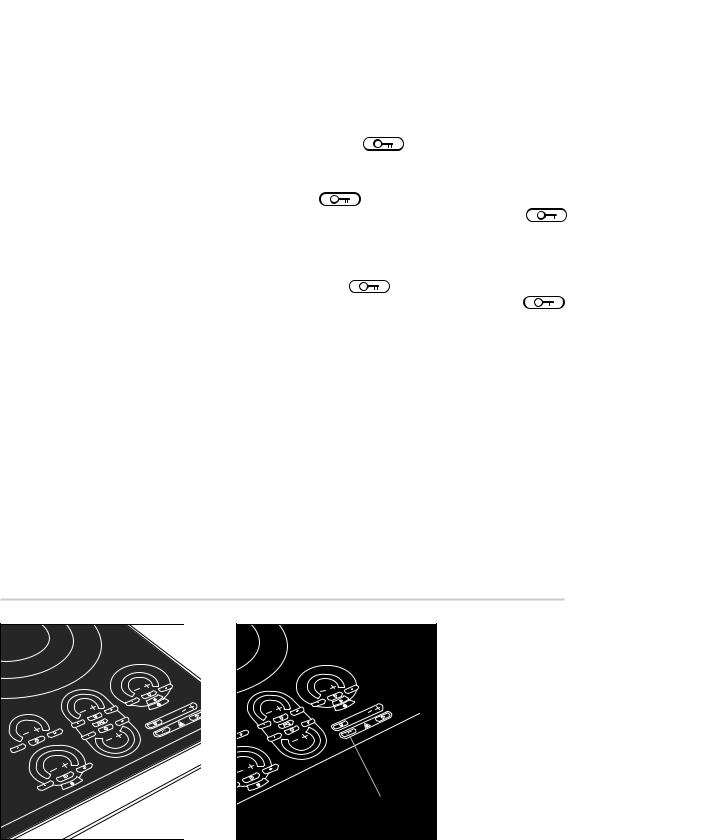
Model ICBCT15E
Model ICBCT30E
Model ICBCT36E
WOLF E L E C T R I C CO O K TO P FEATURES
F R A M E D E L E C T R I C C O O K TO P S
Classic stainless steel trim
Easy-to-clean black ceramic glass surface is resistant to scratching, staining, impact and heat—translucent surface allows you to see the glow of hot elements
High-frequency pulsation elements improve cooking performance and control
Temperature limiter to ensure that safe operating temperature of ceramic glass is never exceeded
Illuminated touch controls with graduated control lighting
True Simmer setting on all elements
Melt setting on one element
Hot-surface indicator light in control panel
Lock mode—cooktop can be locked so that no elements can be turned on
Universal OFF turns all elements off
Countdown timer with 1 to 99 minute range and adjustable sound frequency and volume
CE certified
These appliances are certified by Star-K to meet strict religious regulations in conjunction with specific instructions found on www.star-k.org.
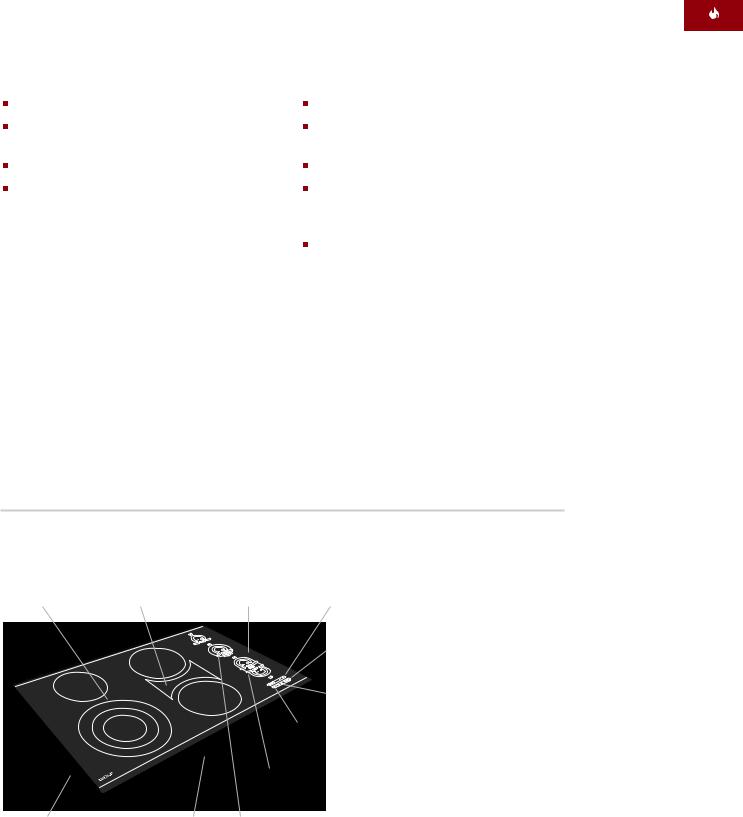
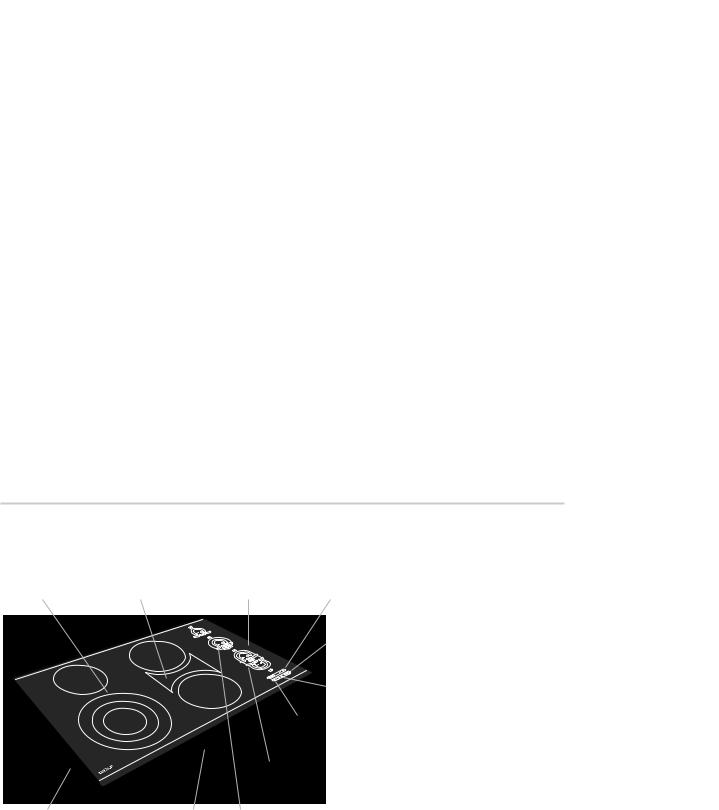
MODEL ICBCT15E
381 mm Framed Electric Cooktop
Triple-zone |
Electronic |
Melt setting |
element |
touch controls |
|
Countdown timer
Universal OFF key
 Hot-surface
indicator light
Lock key
Classic stainless |
Location of |
True Simmer |
steel trim finish |
rating plate |
|
8
WOLF E L E C T R I C CO O K TO P FEATURES
F R A M E D E L E C T R I C C O O K TO P S
381 mm FRAMED COOKTOP
Two heating elements with four zones
Triple-zone element power:
900 W/1800 W/2500 W (maximum)
Single element power: 1200 W (maximum)
Electric rating: 3.7 kW
762 mm FRAMED COOKTOP
Three heating elements with seven zones
Triple-zone element power:
900 W/1800 W/2500 W (maximum)
Single element power: 1200 W (maximum)
Bridge-zone element power—(2) 1800 W single elements with 800 W bridge: 4400 W (maximum)
Electric rating: 8.1 kW
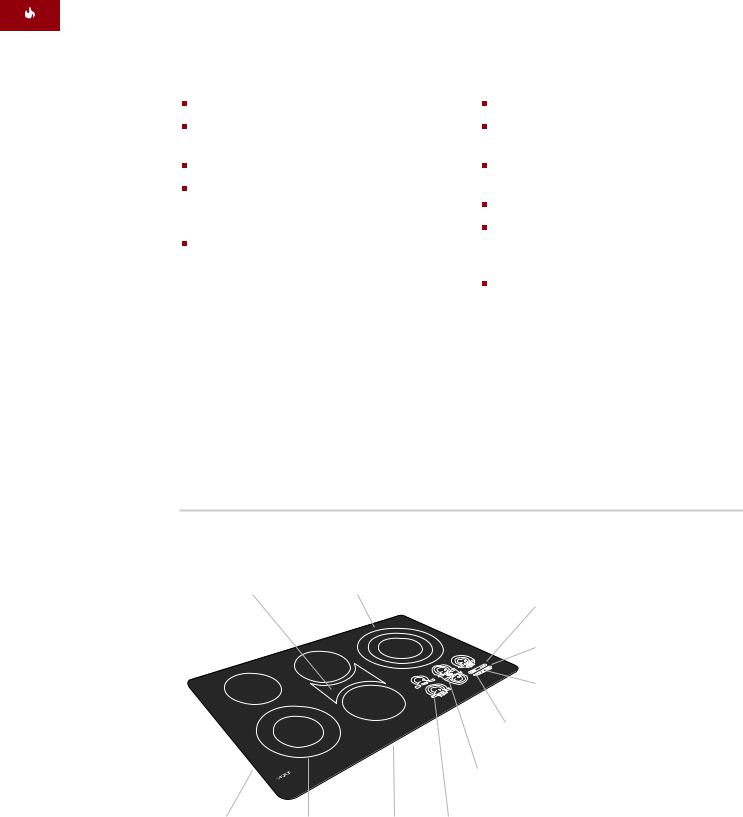
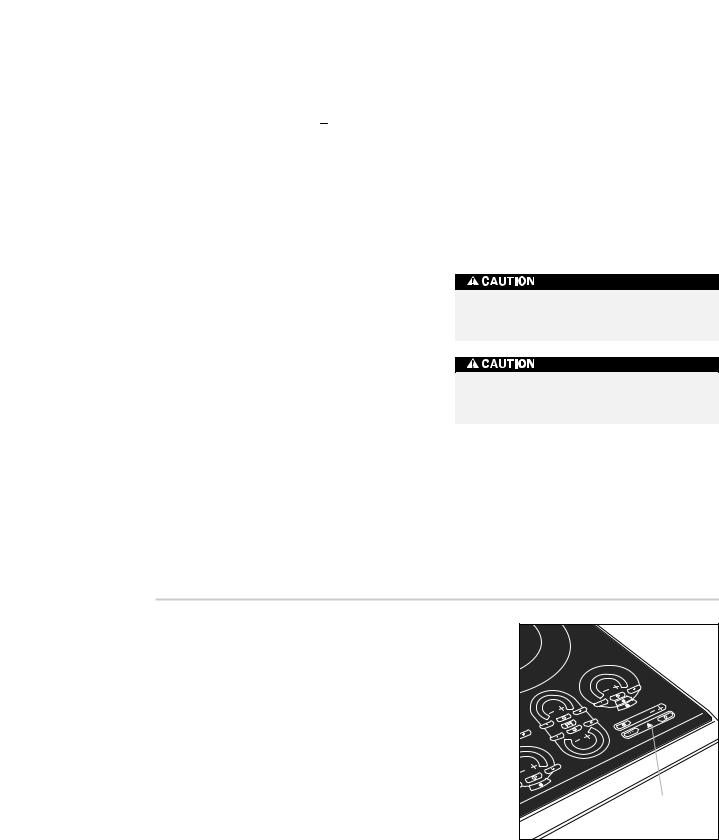
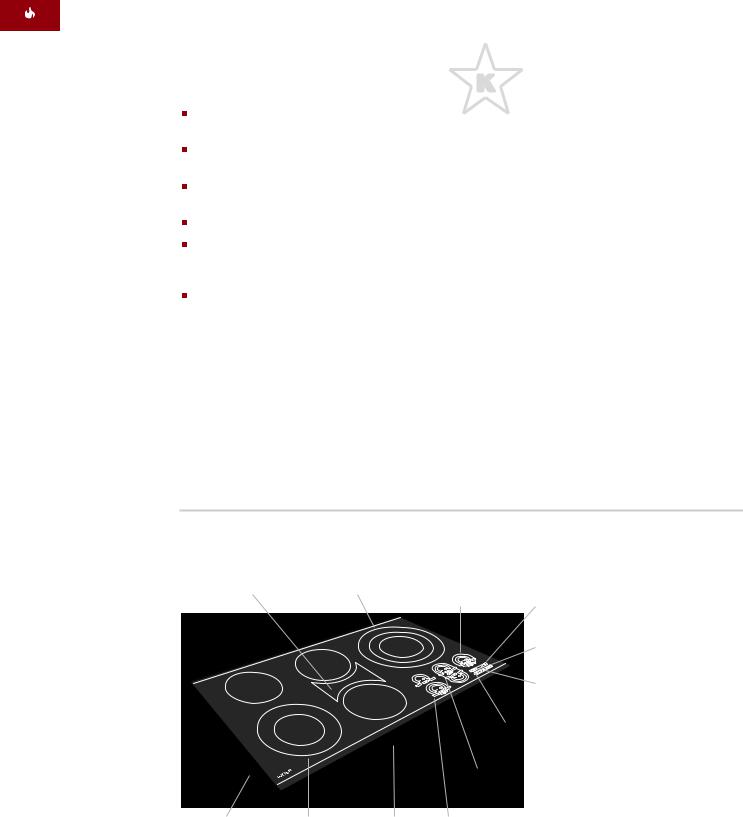
MODEL ICBCT30E
762 mm Framed Electric Cooktop
Triple-zone |
Bridge-zone |
Electronic touch |
Countdown |
element |
element |
controls |
timer |
|
|
|
Universal OFF |
|
|
|
key |
|
|
|
Hot-surface |
|
|
|
indicator light |
|
|
|
Lock key |
True Simmer on all elements
Stainless steel |
Location of |
Melt setting |
trim finish |
rating plate |
|
9

WOLF E L E C T R I C CO O K TO P FEATURES
F R A M E D E L E C T R I C C O O K TO P S
914 mm FRAMED COOKTOP
Four heating elements with nine zones
Triple-zone element power:
1050 W/2200 W/2700 W (maximum)
Dual-zone element power: 700 W/2200 W (maximum)
Single element power: 1200 W (maximum)
Bridge-zone element power—(2) 1800 W single elements with 800 W bridge: 4400 W (maximum)
Electric rating: 10.5 kW
These appliances are certified by Star-K to meet strict religious regulations in conjunction with specific instructions found on www.star-k.org.
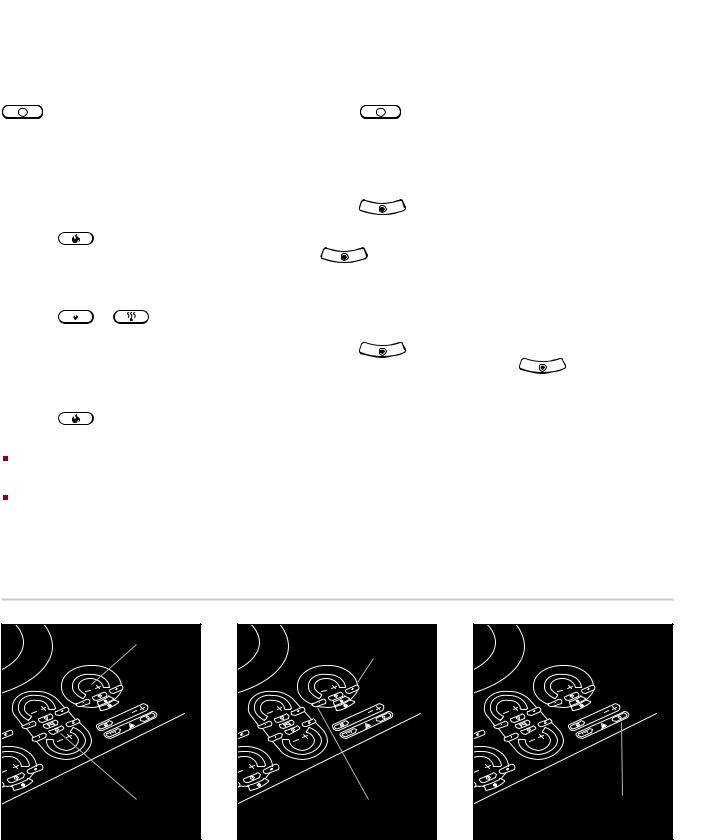
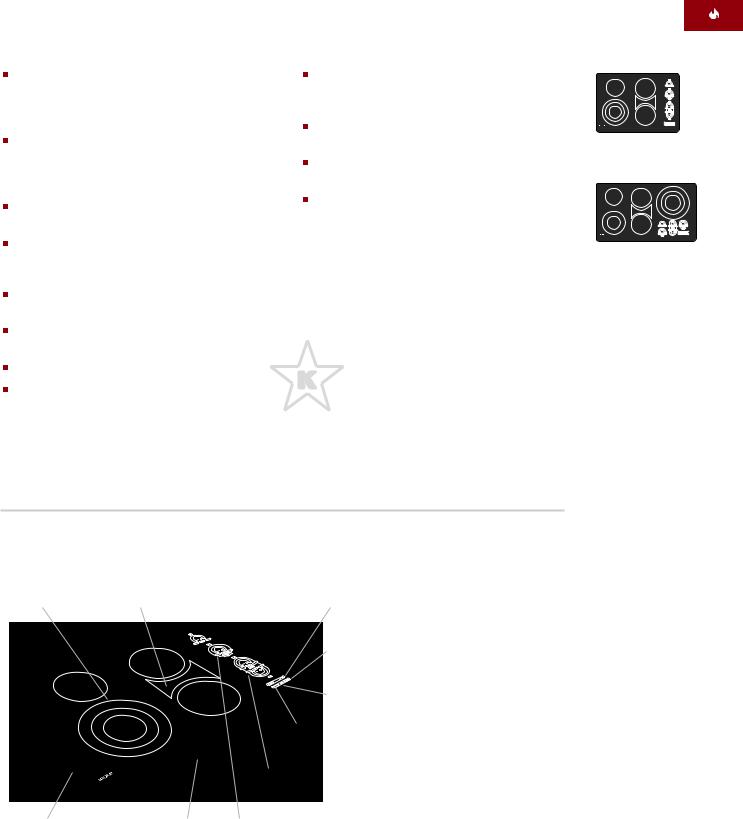
MODEL ICBCT36E
914 mm Framed Electric Cooktop
Bridge-zone |
Triple-zone |
Electronic touch |
Countdown |
element |
element |
||
|
|
controls |
timer |
|
|
|
Universal OFF |
|
|
|
key |
|
|
|
Hot-surface |
|
|
|
indicator light |
|
|
|
Lock key |
True Simmer on all elements
Stainless steel |
Dual-zone |
Location of |
Melt setting |
trim finish |
element |
rating plate |
|
10
WOLF E L E C T R I C CO O K TO P FEATURES
U N F R A M E D E L E C T R I C COOKTOPS
Can be mounted flush with top of countertop or as a frameless installation sitting on top of the countertop surface
Easy-to-clean black ceramic glass surface is resistant to scratching, staining, impact and heat—translucent surface allows you to see the glow of hot elements
High-frequency pulsation elements improve cooking performance and control
Lock mode—cooktop can be locked so that no elements can be turned on
Universal OFF turns all elements off
Countdown timer with 1 to 99 minute range and adjustable sound frequency and volume
CE certified
Temperature limiter to ensure that safe operating temperature of ceramic glass is never exceeded
Illuminated touch controls with graduated control lighting
True Simmer setting on all elements
Melt setting on one element
Hot-surface indicator light in control panel
These appliances are certified by Star-K to meet strict religious regulations in conjunction with specific instructions found on www.star-k.org.
MODEL ICBCT30EU
762 mm Unframed Electric Cooktop
Triple-zone |
Bridge-zone |
Electronic touch |
Countdown |
|
element |
element |
controls |
timer |
|
|
|
|
|
Universal OFF |
|
|
|
|
|
|
|
|
|
key |
|
|
|
|
Hot-surface |
|
|
|
|
indicator light |
|
|
|
|
Lock key |
True Simmer on all elements
Unframed edge |
Location of |
Melt setting |
|
rating plate |
|
Model ICBCT30EU
Model ICBCT36EU
11
WOLF E L E C T R I C CO O K TO P FEATURES
U N F R A M E D E L E C T R I C COOKTOPS
762 mm UNFRAMED COOKTOP
Three heating elements with seven zones
Triple-zone element power:
900 W/1800 W/2500 W (maximum)
Single element power: 1200 W (maximum)
Bridge-zone element power—(2) 1800 W single elements with 800 W bridge: 4400 W (maximum)
Electric rating: 8.1 kW
914 mm UNFRAMED COOKTOP
Four heating elements with nine zones
Triple-zone element power:
1050 W/2200 W/2700 W (maximum)
Dual-zone element power: 700 W/2200 W (maximum)
Single element power: 1200 W (maximum)
Bridge-zone element power—(2) 1800 W single elements with 800 W bridge: 4400 W (maximum)
Electric rating: 10.5 kW
MODEL ICBCT36EU
914 mm Unframed Electric Cooktop
Bridge-zone |
Triple-zone |
|
|
|
element |
element |
Electronic touch |
Countdown |
|
|
|
controls |
timer |
|
|
|
|
|
Universal OFF |
|
|
|
|
key |
|
|
|
|
Hot-surface |
|
|
|
|
indicator light |
|
|
|
|
Lock key |
True Simmer on all elements
Unframed edge |
Dual-zone |
Location of |
Melt setting |
|
element |
rating plate |
|
12
WOLF E L E C T R I C CO O K TO P USE & C ARE
CON T R O L OPERATION |
M O D E S OF OPERATION |
|
|||
|
|||||
The Wolf electric cooktop operates by using |
LOCK MODE |
|
|||
high-frequency pulsation, cycling the heating |
In Lock mode, all touch pad operations on |
|
|||
elements between zero power and full power. |
|
||||
the control panel are disabled and all heating |
|
||||
As the heat is increased on the control panel, |
|
||||
elements are turned off. A steady glowing light |
|
||||
the element will stay at full power for longer |
|
||||
within the |
symbol indicates that the |
|
|||
periods and have shorter periods of zero |
|
||||
unit is locked. Refer to the illustration below. |
|
||||
power. |
|
||||
|
|
|
|
|
|
When using the dual-zone or triple-zone |
|
|
To lock the control panel, touch and hold |
|
|
|
|
|
|||
|
|
|
for 3 seconds. The unit will beep |
|
|
elements, all sections of the element will cycle |
|
|
|
|
|
|
|
three times and the light within the |
|
||
at the same rate. For safety reasons, the outer |
|
|
|
||
|
|
symbol will illuminate. The control unit is |
|
||
elements cannot be turned on independently |
|
|
|
||
|
|
now in Lock mode. |
|
||
from the center section. |
|
|
|
||
|
|
|
|
|
|
|
|
|
To unlock the control panel, touch and |
|
|
|
|
|
|
||
TOUCH CON T R O L PA N E L |
|
|
hold |
for 3 seconds. The unit will |
|
|
|
beep twice and the light within the |
|
||
The control panel of your electric cooktop is |
|
|
symbol will go out. The control unit is now |
|
|
|
|
in Idle mode. |
|
||
illuminated for instant visual indication that |
|
|
|
||
|
|
|
|
|
|
one or more elements are in use. The control |
IMPORTANT NOTE: When the unit is powered |
|
|||
panel features touch controls with graduated |
up for the first time or if there has been a |
|
|||
control lighting. The illustrations below show |
power outage for longer than 5 seconds, the |
|
|||
the control panel of Model ICBCT36E. |
cooktop will default to Lock mode. |
|
|||
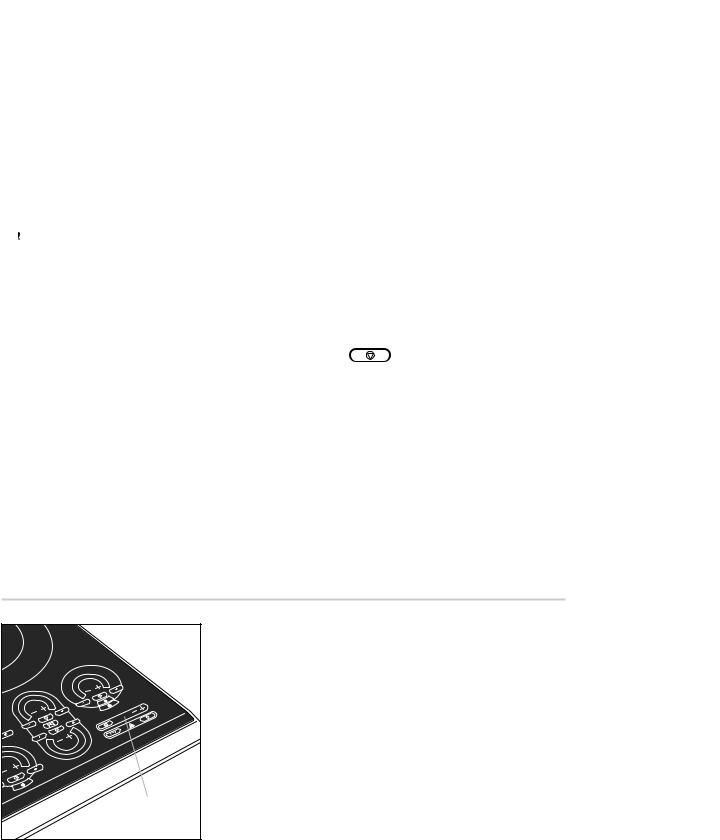
IDLE MODE
After unlocking the control panel as described in Lock Mode, the unit enters the Idle mode of operation. The only valid touch pad operations are  for each element, the
  and the timer functions.
Lock key |
touch pad |
Touch control panel |
Lock mode key touch pad |
13
WOLF E L E C T R I C CO O K TO P USE & C ARE
|
H OT- S U R FAC E INDIC ATOR |
INITIAL S TA RT- U P |
|
As a safety precaution, a hot-surface indicator light will illuminate when the surface temperature of any one of the heating elements rises above 65˚C.  will illuminate in the control panel. It will remain illuminated until the entire surface temperature has decreased to a safe level. Even if the cooktop controls are turned off, you are alerted that an area of the cooktop remains hot.
CO O L I N G FAN
The electric cooktop is equipped with a cooling fan that automatically turns on to cool internal parts. The fan will turn off once internal temperatures have been lowered. During extended use, the cooling fan may continue to run even after the cooktop has been turned off until internal temperatures have been lowered.
Before operating the cooktop for the first time, please read the entire Use & Care Information.
Clean the cooktop surface as outlined in the Ceramic Glass Top cleaning section on page 18. The cooktop surface must be free of any foreign substances, especially those that could melt and permanently adhere to the glass.
During the first uses of your new electric cooktop, you may smell a slight burning odor or see light smoke. Both of these conditions are normal in new ceramic glass cooktops.
Make sure that the cooktop surface is clean and dry before operating.
Do not place hot cooking utensils directly over the control panel.
Hot-surface |
indicator light |
Hot-surface indicator light
14
WOLF E L E C T R I C CO O K TO P USE & C ARE
CO O K TO P OPERATION |
|
|
|
|
|
|
|
|||||
|
|
|
|
|
|
|
||||||
SINGLE ELEMENT AND INNER ZONE |
DUAL - ZONE ELEMENT |
|
||||||||||
To turn on a heating element, touch the |
To turn on a dual-zone heating element, |
|
||||||||||
|
|
|
touch pad that corresponds to the |
touch the |
|
|
touch pad of the control that |
|
||||
|
|
|
|
|
||||||||
|
|
|
|
|
||||||||
element you wish to use. The power bar |
corresponds with the dual-zone element. Refer |
|
||||||||||
indicator graph will begin to blink and show |
to the illustration on the following page. |
|
||||||||||
a half-power status. |
|
|
|
Set the heat setting for the inner element |
|
|||||||
Touch one of the following symbols or touch |
|
|
|
|||||||||
|
|
zone as described previously. |
|
|||||||||
pads of the element control while the power |
|
|
Touch |
|
|
and the outer element zone |
|
|||||
bar indicator graph is still blinking: |
|
|
|
|
|
|||||||
|
|
will be set to the same heat setting as the |
|
|||||||||
|
|
|
|
|
|
|
|
|
||||
|
|
Touch |
to set the element at the |
|
|
inner zone. A light will remain on under the |
|
|||||
|
|
|
||||||||||
|
|
highest heat setting. |
|
|
|
|
touch pad to indicate the outer |
|
||||
|
|
Touch the ”+” or ”–” symbol to set the heat |
|
|
element zone has been turned on. |
|
||||||
|
|
|
|
Changing the heat setting to the entire |
|
|||||||
|
|
setting at half-power output. |
|
|
|
|||||||
|
|
|
|
|
||||||||
|
|
Touch |
or |
to set the element at |
|
|
dual-zone element is the same as for a |
|
||||
|
|
|
|
single element. |
|
|||||||
|
|
the lowest heat setting. |
|
|
|
|||||||
|
|
|
|
|
|
|
|
|
||||
To change the heat setting: |
|
|
Touch |
|
|
again to turn off the outer |
|
|||||
|
|
|
|
|
||||||||
|
|
element zone. The light under the |
|
|||||||||
|
|
|
|
|
|
|
|
|
||||
|
|
Touch the ”+” or ”–” symbol to change the |
|
|
touch pad will go out. |
|
||||||
|
|
|
||||||||||
|
|
heat setting incrementally up or down. |
The illustrations below show the control panel |
|
||||||||
|
|
|
|
|
|
|
||||||
|
|
Touch |
to set the element at the |
of Model ICBCT36E. |
|
|||||||
|
|
|
||||||||||
|
|
highest heat setting. |
|
|
|
|
|
|
|
|
||
Touch  or
or  to set the element at the lowest heat setting.
Touch  to turn the element off.
IMPORTANT NOTE: To quickly turn off all heating elements, use the universal  touch pad located in the lower right area of the control panel. Refer to the illustration below.
”+” and ”–” |
symbols |
OFF ON |
touch pad |
Heating element activation
HIGH |
touch pad |
SIM touch |
pad |
Heat settings
Universal OFF |
touch pad |
Universal OFF touch pad
15

WOLF E L E C T R I C CO O K TO P USE & C ARE
|
CO O K TO P OPERATION |
|
|
|
|
|
|
|||||
|
|
|
|
|
|
|
||||||
|
TRIPLE - ZONE ELEMENT |
|
BRIDGE - ZONE ELEMENT |
|||||||||
|
To turn on a triple-zone heating element, |
When activated, the bridge-zone element |
||||||||||
|
touch the |
|
|
touch pad of the control that |
creates an oblong heating area for use with a |
|||||||
|
|
|||||||||||
|
|
|||||||||||
|
corresponds with the triple-zone element. |
griddle, open roaster or fish poacher. |
||||||||||
|
Refer to the illustration below. |
|
To turn on the bridge-zone heating element, |
|||||||||
|
|
|
|
|
|
|
|
|||||
|
|
|
Set the heat setting for the inner element |
touch the |
|
touch pad of either control |
||||||
|
|
|
|
|||||||||
|
|
|
|
|||||||||
|
|
|
zone as described on page 15. |
|
that corresponds with the bridge zone element. |
|||||||
|
|
|
Touch |
and the middle element |
Refer to illustration below. |
|||||||
|
|
|
|
|
|
|
|
|||||
|
|
|
zone will be turned on to the same heat |
|
|
Set the heat setting for either the front or |
||||||
|
|
|
|
|
||||||||
|
|
|
setting as the inner zone. A light will remain |
|
|
rear element as described on page 15. |
||||||
|
|
|
on under the |
touch pad to indicate |
|
|
Touch |
|
. The bridge element and the |
|||
|
|
|
the middle element zone is on. |
|
|
|
|
|||||
|
|
|
|
|
|
element that is not turned on will both be |
||||||
|
|
|
|
|
|
|
|
|
|
|||
|
|
|
Touch |
and the outer element |
|
|
set to the same heat setting as the first |
|||||
|
|
|
|
|
||||||||
|
|
|
zone will be turned on to the same heat |
|
|
element. Lights will remain on under the |
||||||
|
|
|
setting as the inner and middle element |
|
|
front, rear and bridge element touch pads |
||||||
|
|
|
zones. |
|
|
|
|
to indicate the bridge-zone elements are on. |
||||
|
|
|
A light will remain on under the |
|
|
|
Changing the heat setting of the entire |
|||||
|
|
|
touch pad to indicate the outer element |
|
|
|||||||
|
|
|
|
|
bridge-zone element is done the same as |
|||||||
|
|
|
zone is on. |
|
|
|
|
|||||
|
|
|
|
|
|
|
for a single element. All three elements |
|||||
|
|
|
|
|
|
|
|
|
|
|||
|
|
|
Changing the heat setting to the entire |
|
|
maintain the same heat setting. |
||||||
|
|
|
|
|
||||||||
|
|
|
triple-zone element is the same as for a |
|
|
Touch |
|
again to turn off the bridge |
||||
|
|
|
single element. |
|
|
|
|
|||||
|
|
|
|
|
|
element. The light under the bridge element |
||||||
|
|
|
|
|
|
|
|
|
|
|||
|
If |
is turned on directly, |
will |
|
|
touch pad will go out. The front and rear |
||||||
|
automatically be turned on. Similarly, if all |
|
|
elements will remain at the current heat |
||||||||
|
three zones are turned on, turning off |
|
|
setting and will become independent of one |
||||||||
|
will automatically turn off |
. |
|
|
another. |
|
|
|||||
|
When |
is turned on, lights under the |
The illustrations below show the control panel |
|||||||||
|
other two zones will dim. This is normal. |
of Model ICBCT36E. |
||||||||||
Dual-zone |
element control |
Triple-zone |
element control |
Dual-zone element |
Triple-zone element |
Bridge-zone |
element control |
Bridge-zone element
16
WOLF E L E C T R I C CO O K TO P USE & C ARE
CO O K TO P OPERATION |
T I M E R OPERATION |
|
|||||
|
|||||||
BRIDGE-ZONE ELEMENT GRIDDLE USE |
The electric cooktop features a countdown |
|
|||||
Always use a setting of 8 bars or less on the |
timer located in the control panel. Refer to the |
|
|||||
illustration below. |
|
||||||
bridge-zone element when cooking on a |
|
||||||
The timer may be set to any one-minute |
|
||||||
griddle. Higher settings are not needed and |
|
||||||
can damage the cooktop and cookware. |
increment from 1 to 99. Once set, the |
|
|||||
To preheat the griddle, set the bridge |
remaining time will be illuminated in the |
|
|||||
control panel as it counts down. The timer is |
|
||||||
element at 14 bars for 5 minutes, then turn the |
|
||||||
available for use in any mode except Lock |
|
||||||
heat down to 8 bars for cooking. |
|
||||||
mode. |
|
|
|||||
|
|
|
|
|
|
||
|
|
|
|
|
To turn on the timer, touch ”+” on the |
|
|
|
|
|
|
|
|
||
|
|
|
|
|
timer control. |
|
|
A griddle, open roaster, or fish poacher |
|
|
|
||||
|
|
Touch and hold ”+” or ”–” until the desired |
|
||||
should not be used when the bridge-zone |
|
|
|
||||
|
|
|
|||||
|
|
time is reached. The timer will start 3 |
|
||||
is off or on any of the other combination |
|
|
|
||||
|
|
seconds after the last change in value. |
|
||||
of circular heating elements. |
|
|
|
||||
|
|
|
|
|
When the timer reaches 0, the unit will |
|
|
|
|
|
|
|
|
||
|
|
|
|
|
sound. The reminder will continue to sound |
|
|
|
|
|
|
|
until |
is pressed. |
|
The illustration below shows the control panel of Model ICBCT36E.
Timer display |
area |
Countdown timer
17
WOLF E L E C T R I C CO O K TO P USE & C ARE
|
S O U N D CONTROL |
|
CO O K TO P CLEANING |
||||||
|
|
||||||||
|
The electric cooktop is equipped with the |
CERAMIC GLASS TOP |
|||||||
|
ability to change the volume and frequency, or |
Lock the cooktop before cleaning by touching |
|||||||
|
tone, of the touch controls through the user |
||||||||
|
and holding the |
symbol for 3 seconds. |
|||||||
|
option, activated through the timer controls. |
||||||||
|
|
|
|
|
|
||||
|
|
|
To turn on user option, the cooktop must |
Clean the top surface thoroughly before |
|||||
|
|
|
operating the cooktop for the first time. Apply |
||||||
|
|
|
be in Idle mode. |
|
|||||
|
|
|
|
approximately 5 ml of nonabrasive cleaner to |
|||||
|
|
|
Touch and hold |
for 3 seconds to |
|||||
|
|
|
the surface of the ceramic glass with a lightly |
||||||
|
|
|
|||||||
|
|
|
turn on the volume adjustment option. The |
dampened clean cloth. Use a second clean |
|||||
|
|
|
three-digit display will show ”Uol.” |
cloth to remove any remaining cleaner residue. |
|||||
|
|
|
Touch and hold |
for more than 5 |
Wipe the cooktop surface with a dry cloth to |
||||
|
|
|
completely eliminate any remaining moisture. |
||||||
|
|
|
seconds to turn on the frequency adjust- |
||||||
|
|
|
|
|
|
|
|
||
|
|
|
ment option. The three-digit display will |
The cooktop should be cleaned after each use. |
|||||
|
|
|
show ”FRE.” |
|
To avoid personal injury, be careful not to wipe |
||||
|
Both the volume and frequency are adjusted |
or clean any hot areas. It will be safe to clean |
|||||||
|
each element area whenever the hot-surface |
||||||||
|
using the ”+” and ”–” touch pads. One touch |
||||||||
|
indicator light has gone out. |
||||||||
|
equals one step up or down in volume or |
||||||||
|
|
|
|
|
|
||||
|
frequency. The triple-zone element power bar |
To remove heavy or burned-on spills, allow the |
|||||||
|
indicator graph will show the current status of |
cooktop to cool. Use the razor blade scraper |
|||||||
|
the volume or frequency and will change with |
provided with the cooktop to scrape off any |
|||||||
|
the user’s input. (1 bar = low, 8 bars = medium |
burned-on substances. Remove any remaining |
|||||||
|
and 16 bars = high.) |
|
residue using the cleaning method described |
||||||
|
As the volume/frequency is adjusted, the |
above. |
|
|
|||||
|
|
|
|
|
|
||||
|
cooktop will beep with each change. The beep |
|
|
|
|
|
|||
|
|
|
|
|
|
|
|||
|
will represent the volume/frequency level that |
|
|
|
|
|
|||
|
is currently displayed by the power bar graph. |
Pitting of the ceramic glass is possible if |
|||||||
|
|
|
|
|
|||||
|
|
|
To exit the user option and return the |
spills with a high sugar content are left in |
|||||
|
|
|
|||||||
|
|
|
cooktop to Idle mode, touch and hold |
the hot zone. Use the razor blade |
|||||
|
for more than 7 seconds. |
provided to move the spill to a cool area |
|
for cleaning after the cooktop cools. |
|
|
Or, if no touch pad is touched for 10 |
|
|
|
|
|
|
|
|
seconds, the level is then stored and the |
|
|
cooktop returns to Idle mode. |
|
|
|
COOKTOP FRAME (FRAMED MODELS) |
|
|
For general cleaning after each use, apply a |
|
|
nonabrasive cleaner to the stainless steel |
|
|
cooktop frame and gently wipe with a clean |
|
|
towel or cloth. Be sure to remove any cleaner |
|
|
residue from the frame and ceramic glass |
|
|
surface before using the cooktop. |
18
WOLF E L E C T R I C CO O K TO P USE & C ARE
CO O K TO P C ARE |
|
|
||
|
|
|||
CERAMIC GLASS TOP C ARE |
MAINTENANCE |
|
||
|
|
|
The electric cooktop is a sealed system that |
|
|
|
|
|
|
Follow these guidelines to avoid injury |
does not require internal maintenance. The |
|
||
cleaning and care information outlines the |
|
|||
and prevent permanent damage to the |
|
|||
necessary maintenance for the ceramic glass |
|
|||
cooktop. |
|
|||
surface. A Wolf authorized service center must |
|
|||
|
|
|
|
|
|
|
|
perform all other maintenance. |
|
|
|
|
|
|
Do not use the cooktop as a cutting board.
Do not slide rough-bottom cookware, such as cast iron, across the glass surface. Remove any resulting marks immediately using the razor blade scraper and cleaning cream as mentioned in Cooktop Cleaning on page 18.
Do not allow any item that could melt to come in contact with the hot ceramic glass surface. If such a condition occurs, remove it immediately from the hot element with a razor blade.
Do not place food directly on cooktop surface when it is warm or hot.
Do not operate the cooktop if the ceramic glass surface is broken. Contact a Wolf authorized service center.
Do not place a trivet, wok support ring or other metal stand directly onto the cooktop surface.
Do not apply chlorine bleach, ammonia or other strong chemicals or cleaners to the cooktop surface.
Do not use abrasive cleaners or applicators.
Do not wipe the cooktop surface with a sponge or dish cloth that may leave a film of detergent; it will cause the cooktop to discolor during the next heating cycle.
Do not set hot cooking utensils near the sealed outer edges of flush-mounted Models ICBCT30EU or ICBCT36EU. This will cause damage to the silicone seal.
19
WOLF T R O U B L E S H O OT I N G GUIDE
T R O U B L E S H O OT I N G GUIDE
PROBLEM |
PROBABLE C AUSE |
CORRECTION |
|
|
|
|
|
Cooktop does not |
Cooktop is in Lock mode. |
Touch and hold the |
|
function at all |
|
symbol for 3 seconds to unlock |
|
|
|
the control panel. |
|
|
|
|
|
|
Cooktop is in Lock mode |
Errors may be cleared by |
|
|
and the timer display shows |
pressing the |
button. |
|
an error code. |
|
|
|
|
|
|
|
No electricity is being |
Have an electrician check the |
|
|
supplied to the cooktop. |
house power supply. |
|
|
|
|
|
|
Fuse is blown or circuit |
Have an electrician replace the |
|
|
breaker is tripped. |
fuse or reset the circuit breaker. |
|
|
|
|
|
|
Cooktop is not connected to |
Have an electrician verify that |
|
|
a proper electrical circuit. |
the proper voltage is being |
|
|
|
applied to the cooktop. |
|
|
|
|
|
Heating elements do not |
Power supply connection |
Have an electrician tighten |
|
heat properly |
is loose. |
connections at the electrical |
|
|
|
box. |
|
|
|
|
|
|
Cooktop is not connected to |
Have an electrician verify that |
|
|
a proper electrical circuit. |
the proper voltage is being |
|
|
|
applied to the cooktop. |
|
|
|
|
|
Heating elements cycle |
Heating element temperature |
This is a normal function of the |
|
off when unit is set for |
limiters are temporarily |
cooktop. The elements will turn |
|
full power |
shutting off element due to |
on when the temperatures have |
|
|
temperatures approaching |
cooled sufficiently. |
|
|
the maximum allowable limit |
|
|
|
of the ceramic glass. |
|
|
|
|
|
|
20
WOLF S E R V I C E INFORMATION
S E R V I C E INFORMATION
When requesting information, literature, replacement parts or service, always refer to the model and serial number of your cooktop. This information is found on the rating plate located on the underside of the cooktop. For location of the rating plate, refer to the illustration for your specific model on pages 8–12. Record the rating plate information below for future reference.
Model Number
Serial Number
Installation Date
Wolf Dealer and Phone
BEFORE C ALLING FOR SERVICE
Before calling your Wolf authorized service center, refer to the Troubleshooting Guide on page 20. Check the household fuse or circuit breaker to see if it has been blown or tripped and that the electrical connection to the appliance has not been disconnected. A power outage may also have caused a disruption in service.
The information and images in this book are the copyright property of Wolf Appliance, Inc., an affiliate of Sub-Zero, Inc. Neither this book nor any information or images contained herein may be copied or used in whole or in part without the express written permission of Wolf Appliance, Inc., an affiliate of Sub-Zero, Inc.
©Wolf Appliance, Inc. all rights reserved.
CONTACT INFORMATION
Website:
wolfappliance.com
21
Cuando lea esta guía de uso y mantenimiento, deberá prestar especial atención cuando aparezcan los símbolos de PRECAUCIÓN y ADVERTENCIA. Esta información es importante para utilizar de forma segura y eficaz el equipo de Wolf.
indica una situación en la que se pueden sufrir heridas leves o provocar daños secundarios al producto si no se siguen las instrucciones.
indica peligro de que se produzcan heridas personales graves o incluso puede provocar la muerte si no se siguen las precauciones especificadas.
Además, esta guía de uso y mantenimiento puede incluir una NOTA IMPORTANTE para resaltar información especialmente importante.
WOLF® es una marca comercial registrada de Wolf Appliance, Inc.

P LAC A S V I T R O C E R Á M I C A S DE WOLF
G R A C I A S
La compra de una placa vitrocerámica de Wolf confirma la importancia que usted da a la calidad y al rendimiento de su equipo de cocina. Entendemos esta importancia y hemos diseñado y creado la placa con materiales y mano de obra de primera calidad para proporcionarle un servicio seguro y eficaz durante muchos años.
Sabemos que está deseando empezar a cocinar pero, antes de hacerlo, debe leer esta guía de uso y mantenimiento. Tanto si es un cocinero novato como si es un chef experto, le resultará útil familiarizarse con las prácticas de seguridad, las características, el funcionamiento y las recomendaciones de mantenimiento de la placa vitrocerámica
de Wolf.
Apreciamos que haya decidido comprar un producto de Wolf Appliance y agradecemos cualquier sugerencia o comentario que desee realizar. Le invitamos a visitar nuestra página web wolfappliance.com.
INFORMACIÓN
DE CONTACTO
Página Web: wolfappliance.com
23

PRECAUCIONES E INSTRUCCIONES DE S E G U R I D A D
QUÉ D E B E H AC E R
NOTA IMPORTANTE: Lea las instrucciones antes de utilizar este aparato.
Lea con detenimiento esta guía de uso y mantenimiento antes de utilizar la nueva placa para reducir el riesgo de que se produzca un incendio, una descarga eléctrica o de sufrir lesiones personales.
Asegúrese de que la instalación y el mantenimiento se llevan a cabo de manera correcta. Este aparato debe ser instalado y conectado a tierra de manera correcta por un técnico cualificado. Solicite al instalador que le muestre en qué lugar de la casa está la caja de fusibles para que sepa cómo desconectar el suministro eléctrico.
Lleve ropa adecuada. No deje nunca que las prendas sueltas y holgadas u otros materiales inflamables entren en contacto con los elementos mientras está en funcionamiento. El tejido puede incendiarse y provocar lesiones personales.
Utilice solamente elementos aislantes secos para retirar las cazuelas de la placa. Si los elementos aislantes están húmedos o mojados y se apoyan en superficies calientes pueden producirle quemaduras. Los elementos aislantes no deben tocar los elementos caloríficos calientes.
El tamaño, los materiales y la fabricación de los recipientes de cocina que utilice deben ser los adecuados y adaptarse al tipo de cocción que vaya a realizar. Esta unidad incluye una o varias superficies de diferente tamaño.
Gire siempre hacia adentro las asas de las cacerolas de manera que no salgan por las áreas de trabajo próximas ni sobresalgan de los elementos calefactores ni de los bordes de la placa para reducir el riesgo de sufrir quemaduras, de que ardan los materiales inflamables o de que los alimentos se derramen al tocar sin querer la cazuela. No gire las asas hacia la habitación ya que se podría chocar con ellas o podría golpearlas.
Utilice siempre una posición de ocho barras de temperatura o menos en la zona puente para asados cuando cocine en una plancha. Si utiliza posiciones mas altas después de precalentar la placa durante 5 minutos en 14 barras, la placa y los utensilios de cocina se pueden dañar. Consulte la sección Zona puente para asados en la página 34.
24

QUÉ N O D E B E H AC E R
No utilice la placa para calentar la habitación.
Cuando esté utilizando la placa NO TOQUE LA SUPERFICIE DE CRISTAL que está encima o al lado de los elementos calefactores. La superficie de cristal puede estar caliente y causarle quemaduras.
No debe dejar a los niños solos o desatendidos en el área en la que se esté utilizando la placa. No permita que los niños se sienten o estén de pie sobre el aparato. No permita que los niños jueguen con la placa.
No repare ni cambie ninguna pieza del aparato a menos que se recomiende específicamente en los documentos que se proporcionan con este aparato. Todas las tareas de mantenimiento deben ser realizadas por un centro de asistencia técnica autorizado de Wolf.
No utilice agua para apagar los incendios producidos por grasa. Baje la llama o utilice un agente químico seco o un extintor de espuma.
No deje nunca la placa desatendida cuando esté utilizando las posiciones de temperatura alta. Los derrames y las salpicaduras de grasa pueden producir humo o pueden incendiarse.
NO almacene artículos que puedan gustar a los niños encima o detrás de la placa ya que pueden saltar sobre ella para alcanzarlos y podrían resultar heridos.
Si la superficie está agrietada, apague el aparato para evitar que se pueda producir una descarga eléctrica. Llame a un centro de asistencia técnica autorizado de Wolf para reparar el aparato.
No almacene materiales inflamables cerca de los componentes calientes ni deje que la grasa u otras sustancias inflamables se acumulen en la placa.
No utilice un limpiador de vapor ni limpie la placa mientras está caliente.
Si utiliza una esponja o un paño empapado, espere hasta que la placa se haya enfriado lo suficiente para evitar sufrir quemaduras por vapor. Algunos limpiadores desprenden vapores nocivos cuando se aplican sobre superficies calientes. Consulte la sección Limpieza de la placa en la página 36 y Mantenimiento de la placa en la página 37.
No utilice una plancha, un asador o una besuguera que ocupe dos elementos caloríficos a menos que la zona puente para asados esté encendida. Si los utiliza sin que la zona puente para asados esté encendida, el cristal podría dañarse o agrietarse. Consulte la sección Zona puente para asados en
la página 34.
No bloquee el extractor de ventilación ni las rejillas de ventilación de entrada de aire. El ventilador se enciende automáticamente para enfriar las piezas internas. Es posible que siga funcionando incluso después de que la vitrocerámica se haya apagado.
25

Modelo ICBCT15E
Modelo ICBCT30E
Modelo ICBCT36E
C ARACTERÍSTIC AS DE LAS P LAC A S V I T R O C E R Á M I C A S DE WOLF
PLAC AS VITROCERÁMIC AS CON M A R CO |
|
|
||
|
|
Marco en acero inoxidable clásico |
|
Bloqueo de seguridad—la placa se puede |
|
|
|
||
|
|
Superficie de cristal cerámico de color negro fácil |
|
bloquear de manera que no se pueda encender |
|
|
|
ninguna zona |
|
|
|
de limpiar y resistente a los rayones, manchas, |
|
|
|
|
|
|
|
|
|
golpes y calor —superficie traslúcida que permite |
|
Apagado universal que apaga todos los |
|
|
|
||
|
|
ver el resplandor de los elementos calefactores |
|
elementos de las zonas de cocción |
|
|
Elementos con pulso de alta frecuencia que |
|
Temporizador de cuenta atrás de 1 a 99 minutos |
|
|
|
||
|
|
mejoran el control y rendimiento de la cocción |
|
y volumen y frecuencia ajustables |
|
|
Limitador de temperatura para asegurar que no |
|
Certificado CE |
|
|
|
||
|
|
se supera la temperatura de funcionamiento del |
|
|
|
|
cristal cerámico |
|
|
|
|
Mandos digitales iluminados con graduación del |
|
|
|
|
|
|
|
|
|
calor con iluminación |
|
|
|
|
Posición para hervir a fuego lento en todos los |
|
|
|
|
|
|
|
|
|
elementos |
|
|
|
|
Posición para fundir en un elemento |
|
|
|
|
|
|
|
|
|
Luz indicadora de superficie caliente en |
|
Estos aparatos llevan el certificado Star-K |
|
|
|
||
|
|
la zona de mandos |
|
|
|
|
|
|
que indica que cumple rigurosas normas |
|
|
|
|
religiosas junto con instrucciones específicas |
|
|
|
|
que aparecen en la página www.star-k.org. |
MODELO ICBCT15E
Vitrocerámica de 381 mm con marco
Elemento con |
Mandos digitales |
Posición para derretir |
zona triple |
electrónicos |
|
|
|
Temporizador |
|
|
de cuenta atrás |
|
|
Apagado universal |
|
|
Luz indicadora |
|
|
de superficie |
|
|
caliente |
|
|
Bloqueo |
Marco con acabado |
Ubicación de la |
Posición para |
en acero inoxidable |
placa de datos |
hervir a fuego |
clásico |
|
lento |
26
C ARACTERÍSTIC AS DE LAS P LAC A S V I T R O C E R Á M I C A S DE WOLF
PLAC AS VITROCERÁMIC AS CON M A R CO |
|
|
|
|
||
|
|
|
|
|||
VITROCERÁMIC A CON MARCO DE |
VITROCERÁMIC A CON MARCO DE |
|
||||
381 mm |
762 mm |
|
||||
|
|
Dos elementos caloríficos con cuatro zonas |
|
|
Tres elementos caloríficos con siete zonas |
|
|
|
|
|
|||
|
|
Potencia del elemento de zona triple: |
|
|
Potencia del elemento de zona triple: |
|
|
|
|
|
|||
|
|
900 W/1800 W/2500 W (máximo) |
|
|
900 W/1800 W/2500 W (máximo) |
|
|
|
Potencia del elemento sencillo: 1200 W (máximo) |
|
|
Potencia del elemento sencillo: 1200 W (máximo) |
|
|
|
|
|
|||
|
|
Potencia: 3,7 kW |
|
|
Potencia de la zona puente para asados— |
|
|
|
|
|
|||
|
|
|
|
|
(2) 1800 W en elementos sencillos con zona |
|
|
|
|
|
|
puente de 800 W: 4400 W (máximo) |
|
|
|
|
|
|
Potencia: 8,1 kW |
|
|
|
|
|
|
|
|
MODELO ICBCT30E
Vitrocerámica de 762 mm con marco
Elemento con |
Elemento con zona |
Mandos digitales |
Temporizador |
zona triple |
puente para asados |
electrónicos |
de cuenta atrás |
Apagado universal
Luz indicadora de superficie caliente
Bloqueo
Posición para hervir a fuego lento en todos los elementos
Marco con acabado |
Ubicación de la |
Posición para derretir |
en acero inoxidable |
placa de datos |
|
27
C ARACTERÍSTIC AS DE LAS P LAC A S V I T R O C E R Á M I C A S DE WOLF
PLAC AS VITROCERÁMIC AS CON M A R CO
VITROCERÁMIC A CON MARCO DE 914 mm
Cuatro elementos calefactores con nueve zonas de cocción
Potencia del elemento con zona triple: 1050 W/2200 W/2700 W (máximo)
Potencia del elemento con zona doble: 700 W/2200 W (máximo)
Potencia del elemento sencillo: 1200 W (máximo)
Potencia de la zona puente para asados—
(2) 1800 W en elementos sencillos con puente de 800 W: 4400 W (máximo)
Potencia: 10,5 kW
Estos aparatos llevan el certificado Star-K que indica que cumple rigurosas normas religiosas junto con instrucciones específicas que aparecen en la página www.star-k.org.
MODELO ICBCT36E
Vitrocerámica de 914 mm con marco
Elemento con zona |
Elemento con zona |
puente para asados |
triple de cocción |
Mandos digitales |
Temporizador |
electrónicos |
de cuenta atrás |
|
Apagado universal |
|
Luz indicadora |
|
de superficie |
|
caliente |
|
Bloqueo |
Posición para hervir a fuego lento en todos los elementos
Marco con acabado |
Elemento con |
Ubicación de la |
Posición para derretir |
en acero inoxidable |
zonas doble |
placa de datos |
|
|
de cocción |
|
|
28
C ARACTERÍSTIC AS DE LAS P L A C A S V I T R O C E R Á M I C A S DE WOLF
PLAC AS VITROCERÁMIC AS S I N M A R CO
Se pueden instalar encastradas y niveladas con la parte superior de la encimera o se pueden instalar sin marco sobre la superficie de la encimera
Superficie de cristal cerámico de color negro fácil de limpiar y resistente a los rayones, manchas, golpes y calor—superficie traslúcida que permite ver el resplandor de los elementos calefactores
Elementos con pulso de alta frecuencia que mejoran el control y rendimiento de la cocción
Limitador de temperatura para asegurar que no se supera la temperatura de funcionamiento seguro del cristal cerámico
Mandos digitales iluminados con graduación del calor con iluminación
Posición para hervir a fuego lento en todos los elementos
Posición para fundir en un elemento
Luz indicadora de superficie caliente en la zona de mandos
Bloqueo de seguridad—la placa se puede bloquear de manera que no se pueda encender ningún elemento
Apagado universal que apaga todos los elementos de las zonas de cocción
Temporizador de cuenta atrás de 1 a 99 minutos y volumen y frecuencia ajustable
Certificado CE
Estos aparatos llevan el certificado Star-K que indica que cumple rigurosas normas religiosas junto con instrucciones específicas que aparecen en la página www.star-k.org.
MODELO ICBCT30EU
Vitrocerámica de 762 mm sin marco
Elemento con |
Elemento con zona |
|
zona triple |
||
puente para asados |
||
|
Mandos digitales |
Temporizador |
|
electrónicos |
de cuenta atrás |
|
|
|
Apagado universal |
|
|
|
|
|
Luz indicadora |
|
|
de superficie |
|
|
caliente |
|
|
Bloqueo |
Posición para hervir a fuego lento en todos los elementos
Perfil sin marco |
Ubicación de la |
Posición para derretir |
|
placa de datos |
|
Modelo ICBCT30EU
Modelo ICBCT36EU
29
 Loading...