Wolf 808528, 808526, 808525, 808524, 808523 Installation
...
W O L F S E A L E D B U R N E R R A N G E T O P R I S E R K I T I N S T A L L A T I O N I N S T R U C T I O N S
Riser Kit Model Numbers:
30'' Sealed Burner Rangetop Riser:
808520 - 5'' Stainless Steel Riser Kit
808521 - 10'' Stainless Steel Riser Kit
808522 - 20'' Stainless Steel Riser with Shelf Kit
36'' Sealed Burner Rangetop Rise:
808523 - 5'' Stainless Steel Riser Kit
808524 - 10'' Stainless Steel Riser Kit
808525 - 20'' Stainless Steel Riser with Shelf Kit
48'' Sealed Burner Rangetop Riser:
808526 - 5'' Stainless Steel Riser Kit
808527 - 10'' Stainless Steel Riser Kit
808528 - 20'' Stainless Steel Riser with Shelf Kit
Riser Kit Contents:
QTY PART NO./DESCRIPTION
1Center Support Bracket
1Riser Front Panel
1Riser Back Panel
2Riser Supports
25(730239) Finishing screws (#8
x3/8'' Modified Truss Screws) 4 (801099) 10-16 x 1/2'' Screws 4 (802332) Shoulder Screws
20'' Shelf only
NOTE: Depending on which kit is being installed, some screws may not be used and may be discarded.
PROCEDURE
Assembling Riser:
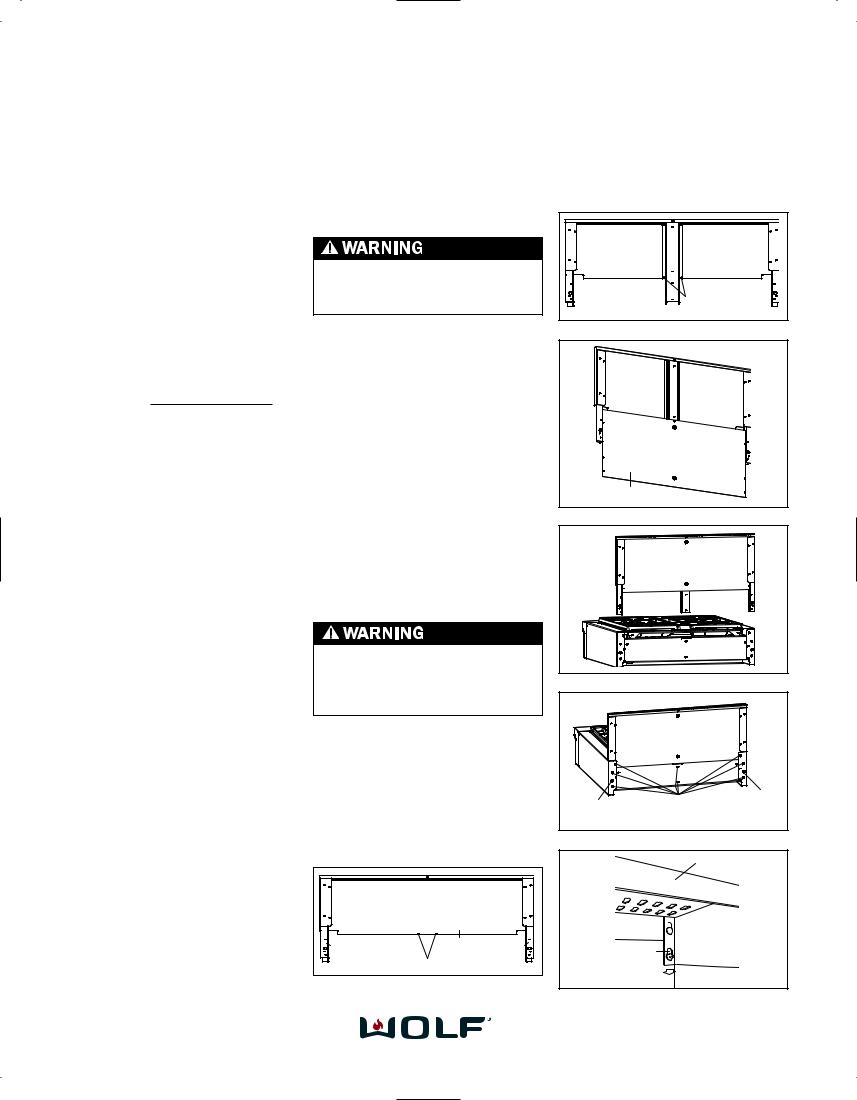
1.Lay front panel on work surface cosmetic side down. Remove protective covering from back side of riser front panel.
2.Attach side support legs inside of riser front panel, using supplied finishing screws (See Fig. 1 & 2).
3.Remove backing from double sided tape on center support bracket flanges (See Fig. 3).
4.Align center support bracket with alignment holes on bottom of front panel. Verify that center support bracket aligns vertically prior to adhering VHB tape to rear of
front panel.
NOTE: Proper alignment is important prior to securing tape. Firmly press tape to back side of
front panel.
5.Slide back panel inside of front panel mounting flanges (See Fig. 3). Align back panel mounting
holes with center support bracket mounting hole.
6. Continue installing finishing screws along center support bracket and front panel mounting flanges.
Attaching Riser Assembly to Sealed Burner Rangetop:
Be sure to disconnect power to sealed burner rangetop before, installing riser assembly.
1.Verify all packing material has been removed from riser assembly and all packaging residues has been cleaned from stainless
steel surface.
2.Remove island trim from sealed burner rangetop by removing the top screw on each side panel.
3.Slide riser side support legs inside rangetop outer side panels until bottom of riser assembly is flush with side panel (See Fig. 4). Verify that center support legs align with mounting holes.
4.Attach riser support legs and
center support to rangetop (See Fig. 5).
20'' Riser Shelf Installation:
right side of front panel and two shoulder screws on left side of front panel assembly.
3.Slide shelf assembly into place and tighten shoulder screws if necessary (See Fig. 6).
Center Support |
Alignment Holes |
Figure 2
Back Panel
Figure 3
Riser component parts may have sharp edges which could inflict serious personal injury. Use care when handling.
1.Once riser assembly is installed onto rangetop, attach 4 (2 on each side) shoulder screws in front panel assembly.
2.Remove protective packaging material from shelf. Align keyhole slots on back side of shelf assembly with two shoulder screws on
|
Front panel |
Side Support |
Side Support |
|
Center Support Alignment Holes |
Figure 1
Figure 4
|
|
|
7 |
|
8 |
|
801099 |
|
1 |
6 x 1/2” |
|
|
F |
shed Screws |
|
Scr |
|
1 |
6 x 1/2” |
|
|||
|
|
|
|
||
|
Scr |
|
|
|
|
Figure 5
SHELF ASSEMBLY
 SHOULDER
SCREWS
KEYHOLE
SLOTS
Figure 6
808992 / Rev A / May 2006
 Loading...